
WII MUSIC - Video game NINTENDO - Free user manual and instructions
Find the device manual for free WII MUSIC NINTENDO in PDF.
| Product type | Video game |
| Brand | Nintendo |
| Model | Wii Music |
| Platform | Wii |
| Genre | Music |
| Number of players | 1 to 4 |
| Game modes | Concert, Improvisation, Lessons, Mini-games, Drums |
| Compatible controllers | Wii Remote, Nunchuk, Wii Balance Board |
| Number of songs | 50 (some unlockable) |
| Number of instruments | Over 60 |
| Save | Automatic, requires 53 free blocks |
| Video clips | Up to 100 saves |
| Available languages | French, English, Spanish (FR, EN, ES) |
| Internet connection | WiiConnect24 to share video clips |
| Recommended age | All ages (with epilepsy precautions) |
| Safety | Precaution against epileptic seizures, repetitive movements, nausea |
| Warranty | 12 months for console, 3 months for game/accessories |
| Customer service | 1-800-255-3700, support.nintendo.com |
Frequently Asked Questions - WII MUSIC NINTENDO
User questions about WII MUSIC NINTENDO
0 question about this device. Answer the ones you know or ask your own.
Ask a new question about this device
Download the instructions for your Video game in PDF format for free! Find your manual WII MUSIC - NINTENDO and take your electronic device back in hand. On this page are published all the documents necessary for the use of your device. WII MUSIC by NINTENDO.
USER MANUAL WII MUSIC NINTENDO
NEED HELP WITH INSTALLATION, MAINTENANCE OR SERVICE?
Nintendo Customer Service
SUPPORT.NINTENDO.COM
or call 1-800-255-3700
Recorded tips for many titles are available on Nintendo's Power Line at (425) 885-7529.
This may be a long-distance call, so please ask permission from whoever pays the phone bill. If the information you need is not on the Power Line, you may want to try using your favorite Internet search engine to find tips for the game you are playing. Some helpful words to include in the search, along with the game's title, are: "walk through," "FAO," "codes," and "tips."
BESOIN D'AIDE POUR L'INSTALLATION L'ENTRETIEN OU LA RÉPARATION?
The official seal is your assurance that this product is licensed or manufactured by Nintendo. Always look for this seal when buying video game systems, accessories, games and related products.
- Some people (about 1 in 4000) may have seizures or blackouts triggered by light flashes or patterns, and this may occur while they are watching TV or playing video games, even if they have never had a seizure before.
- Anyone who has had a seizure, loss of awareness, or other symptom linked to an epileptic condition should consult a doctor before playing a video game.
- Parents should watch their children play video games. Stop playing and consult a doctor if you or your child has any of the following symptoms:
Convulsions
Loss of awareness
Eye or muscle twitching
Involuntary movements
Altered vision
Disorientation
- To reduce the likelihood of a seizure when playing video games:
- Sit or stand as far from the screen as possible.
- Play video games on the smallest available television screen.
- Do not play if you are tired or need sleep.
- Play in a well-lit room.
- Take a 10 to 15 minute break every hour.
WARNING - Repetitive Motion Injuries and Eyestrain
Playing video games can make your muscles, joints, skin or eyes hurt. Follow these instructions to avoid problems such as tendinitis, carpal tunnel syndrome, skin irritation or eyestrain:
- Avoid excessive play. Parents should monitor their children for appropriate play.
Take a 10 to 15 minute break every hour, even if you don't think you need it. - If your hands, wrists, arms or eyes become tired or sore while playing, or if you feel symptoms such as tingling, numbness, burning or stiffness, stop and rest for several hours before playing again.
- If you continue to have any of the above symptoms or other discomfort during or after play, stop playing and see a doctor.
CAUTION - Motion Sickness
Playing video games can cause motion sickness in some players. If you or your child feel dizzy or nauseous when playing video games, stop playing and rest. Do not drive or engage in other demanding activity until you feel better.
IMPORTANT LEGAL INFORMATION
This Nintendo game is not designed for use with
any unauthorized device. Use of any such device will invalidate your Nintendo product warranty. Copying of any Nintendo game is illegal and is strictly prohibited by domestic and international intellectual property laws. "Back-up" or "archival" copies are not authorized and are not necessary to protect your software. Violators will be prosecuted.
WARRANTY & SERVICE INFORMATION
You may need only simple instructions to correct a problem with your product. Try our website at support.nintendo.com or call our Consumer Assistance Hotline at 1-800-255-3700, rather than going to your retailer. Hours of operation are 6 a.m. to 7 p.m., Pacific Time, Monday - Sunday (times subject to change). If the problem cannot be solved with the troubleshooting information available online or over the telephone, you will be offered express factory service through Nintendo. Please do not send any products to Nintendo without contacting us first.
HARDWARE WARRANTY
Nintendo of America Inc. ("Nintendo") warrants to the original purchaser that the hardware product shall be free from defects in material and workmanship for twelve (12) months from the date of purchase. If a defect covered by this warranty occurs during this warranty period, Nintendo will repair or replace the defective hardware product or component, free of charge.* The original purchaser is entitled to this warranty only if the date of purchase is registered at point of sale or the consumer can demonstrate, to Nintendo's satisfaction, that the product was purchased within the last 12 months.
GAME & ACCESSORY WARRANTY
Nintendo warrants to the original purchaser that the product (games and accessories) shall be free from defects in material and workmanship for a period of three (3) months from the date of purchase. If a defect covered by this warranty occurs during this three (3) month warranty period, Nintendo will repair or replace the defective product, free of charge.*
SERVICE AFTER EXPIRATION OF WARRANTY
Please try our website at support.nintendo.com or call the Consumer Assistance Hotline at 1-800-255-3700 for troubleshooting information and repair or replacement options and pricing.*
*In some instances, it may be necessary for you to ship the complete product, FREIGHT PREPAID AND INSURED FOR LOSS OR DAMAGE, to Nintendo. Please do not send any products to Nintendo without contacting us first.
WARRANTY LIMITATIONS
THIS WARRANTY SHALL NOT APPLY IF THIS PRODUCT: (a) IS USED WITH PRODUCTS NOT SOLD OR LICENSED BY NINTENDO (INCLUDING, BUT NOT LIMITED TO, NON-Licensed GAME ENHANCEMENT AND COPIER DEVICES, ADAPTERS, AND POWER SUPPLIES); (b) IS USED FOR COMMERCIAL PURPOSES (INCLUDING RENTAL); (c) IS MODIFIED OR TAMPERED WITH; (d) IS DAMAGED BY NEGLIGENCE, ACCIDENT, UNREASONABLE USE, OR BY OTHER CAUSES UNRELATED TO DEFECTIVE MATERIALS OR WORKMANSHIP; OR (e) HAS HAD THE SERIAL NUMBER ALTERED, DEFACED OR REMOVED.
ANY APPLICABLE IMPLIED WARRANTYES, INCLUDING WARRANTYES OF MERCHANTABILITY AND FITNESS FOR A PARTICULAR PURPOSE, ARE HEREBY LIMITED IN DURATION TO THE WARRANTY PERIODS DESCRIBED ABOVE (12 MONTHS OR 3 MONTHS, AS APPLICABLE). IN NO EVENT SHALL NINTENDO BE LIABLE FOR CONSEQUENTIAL OR INCIDENTIAL DAMAGES RESULTING FROM THE BREACH OF ANY IMPLIED OR EXPRESS WARRANTYES. SOME STATES DO NOT ALLOW LIMITATIONS ON HOW LONG AN IMPLIED WARRANTY LASTS OR EXCLUSION OF CONSEQUENTIAL OR INCIDENTIAL DAMAGES, SO THE ABOVE LIMITATIONS MAY NOT APPLY TO YOU.
This warranty gives you specific legal rights. You may also have other rights which vary from state to state or province to province.
Nintendo's address is: Nintendo of America Inc., P.O. Box 957, Redmond, WA 98073-0957 U.S.A.
This warranty is only valid in the United States and Canada.

© 2008 Nintendo. TM, © and the Wii logo are trademarks of Nintendo. © 2008 Nintendo.
How to Play Wii Music

Play Instruments
First, try out playing instruments in Instrument Improv. Here you can play instruments in whatever way moves you!
Learn New Music Styles
Once you've recorded enough performances, you'll open up Lessons 13 , where you can learn to arrange music in new ways.
Play in Jam Session
In "jam session" p.9 you can perform together with up to three other players and save your recorded performance.
Save Your Favorite Performances
You can save all your performances as "videos" p.14 and view them later.
WiiMusic Contents
Controls 5
Jam Modes 7
Jam Session 9
Lessons 13
Videos 14
Games 17
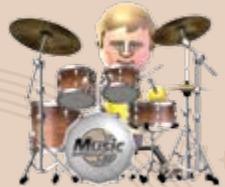
Drum Mode 19
Song Credits 20
Staff Credits 20
Wii Music lets you make music easily by playing instruments using
the Wii Remote, Nunchuk, and Wii Balance Board.

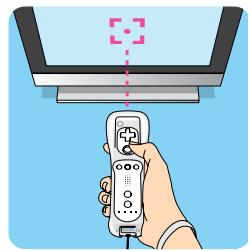
Main Menu
The main menu is displayed upon starting up the game. Point at the image for the section you want to play (or select it with or and press A). Select to play drums using the Wii Balance Board or
select to return to the Wii Menu.
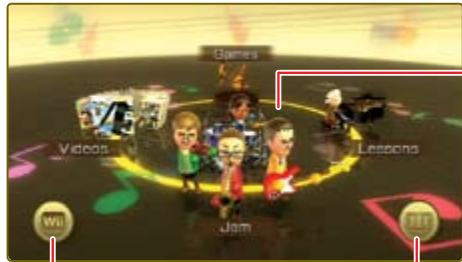
Return to Wii Menu
Main Menu
Jam p.7-9
Lessons 13
Videos (p.14-16)
Games p.17-18
Drum Mode p.19
Saving Your Game
Any progress you make in the Jam and Games sections will automatically be saved to a save file. Creating a new save file requires 53 blocks of empty storage space on the Wii console. In addition, you can save your jam sessions as "videos" after every song performance. See page 14 for more information on videos.
System Menu Update
Please note that when first loading the Game Disc into the Wii console, the Wii will check if you have the latest system menu, and if necessary a Wii system update screen will appear. Press OK to proceed.

CAUTION: Wrist Strap Use
Please use the wrist strap to help prevent injury to other people or damage to surrounding objects or the Wii Remote in case you accidentally let go of the Wii Remote during game play.
Also remember the following:
- Make sure all players put on the wrist strap properly when it is their turn.
- Do not let go of the Wii Remote during game play.
- Dry your hands if they become moist.
- Allow adequate room around you during game play and make sure that all areas you might move into are clear of other people and objects.
- Stay at least three feet from the television.
- Use the Wii Remote Jacket.
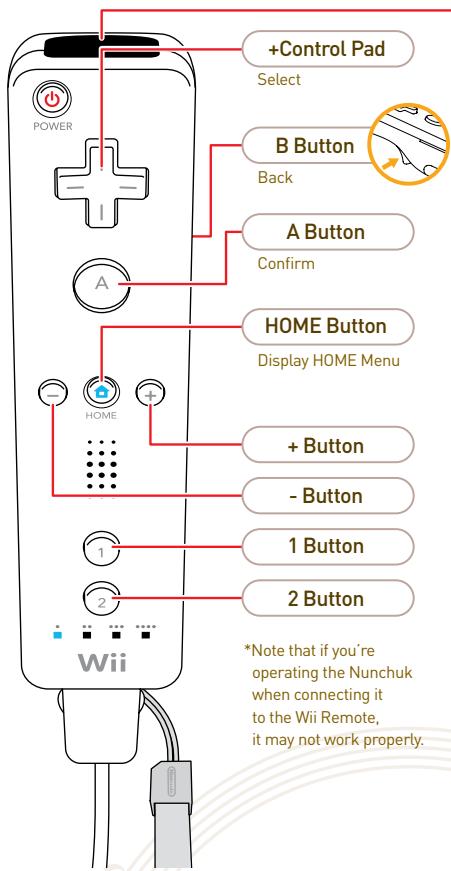
Controls
Wii Music mainly uses the Wii Remote™ and Nunchuk™ controllers. In Drum mode, you can also use the Wii Balance Board™ accessory.
Wii Remote and Nunchuk
On menu screens, point with the Wii Remote (or use or ⑤ ), then press A to confirm. To return to the previous screen, press B or point at the on-screen, then press A.
- If you have a Wii Remote and Nunchuk connection issue during play, a will appear, which indicates a Nunchuk connection error. Reconnecting the Nunchuk will usually resolve the issue. (Please consult the Wii Operations Manual if it does not.)
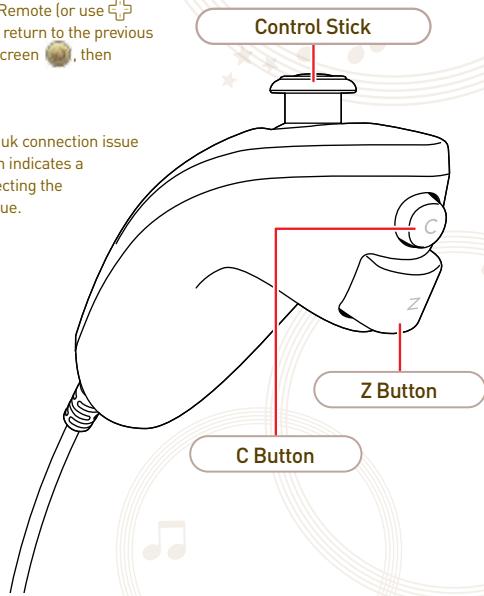
Pointer
"Pointing" refers to aiming the pointer at specific points on the screen.
Wii Balance Board
In addition to the Wii Remote and Nunchuk, you can also perform using the Wii Balance Board in Drum mode [19]. You can also learn about various drumming methods with the Drum Lessons mode.
Instrument Controls
Controls for instruments played in a jam session [9-12] vary by instrument, generally falling into the control methods shown below. For control details about an instrument, select How to Play in Instrument Improv [7].
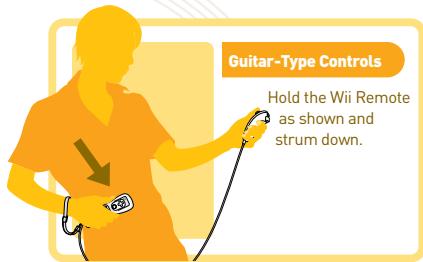
Trumpet-Type Controls
Hold the Wii Remote lengthwise with facing upward and press ① and/or ②.
While playing in jam sessions, press to perform various poses and actions.
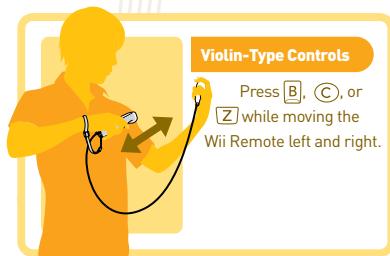

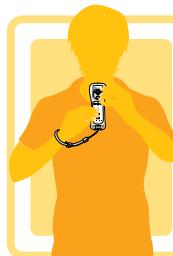
Drum-Type Controls
Hold the Wii Remote and Nunchuk in front of your body, swinging them firmly up and down.
Jam Modes
After you select Jam on the main menu, you can try out instruments in Instrument Impro or perform jam sessions with a Quick Jam or Custom Jam.
- In modes that involve selecting an instrument before you perform a song, you can try out the instruments during selection. You can ultimately select from over 60 instruments and play a total of 50 songs, but many selectable options (songs, instruments, stages, and music stylizations) will be locked when you first start Wii Music and will unlock as you create videos. Some songs, instruments and stages are unlocked by playing Games mode.

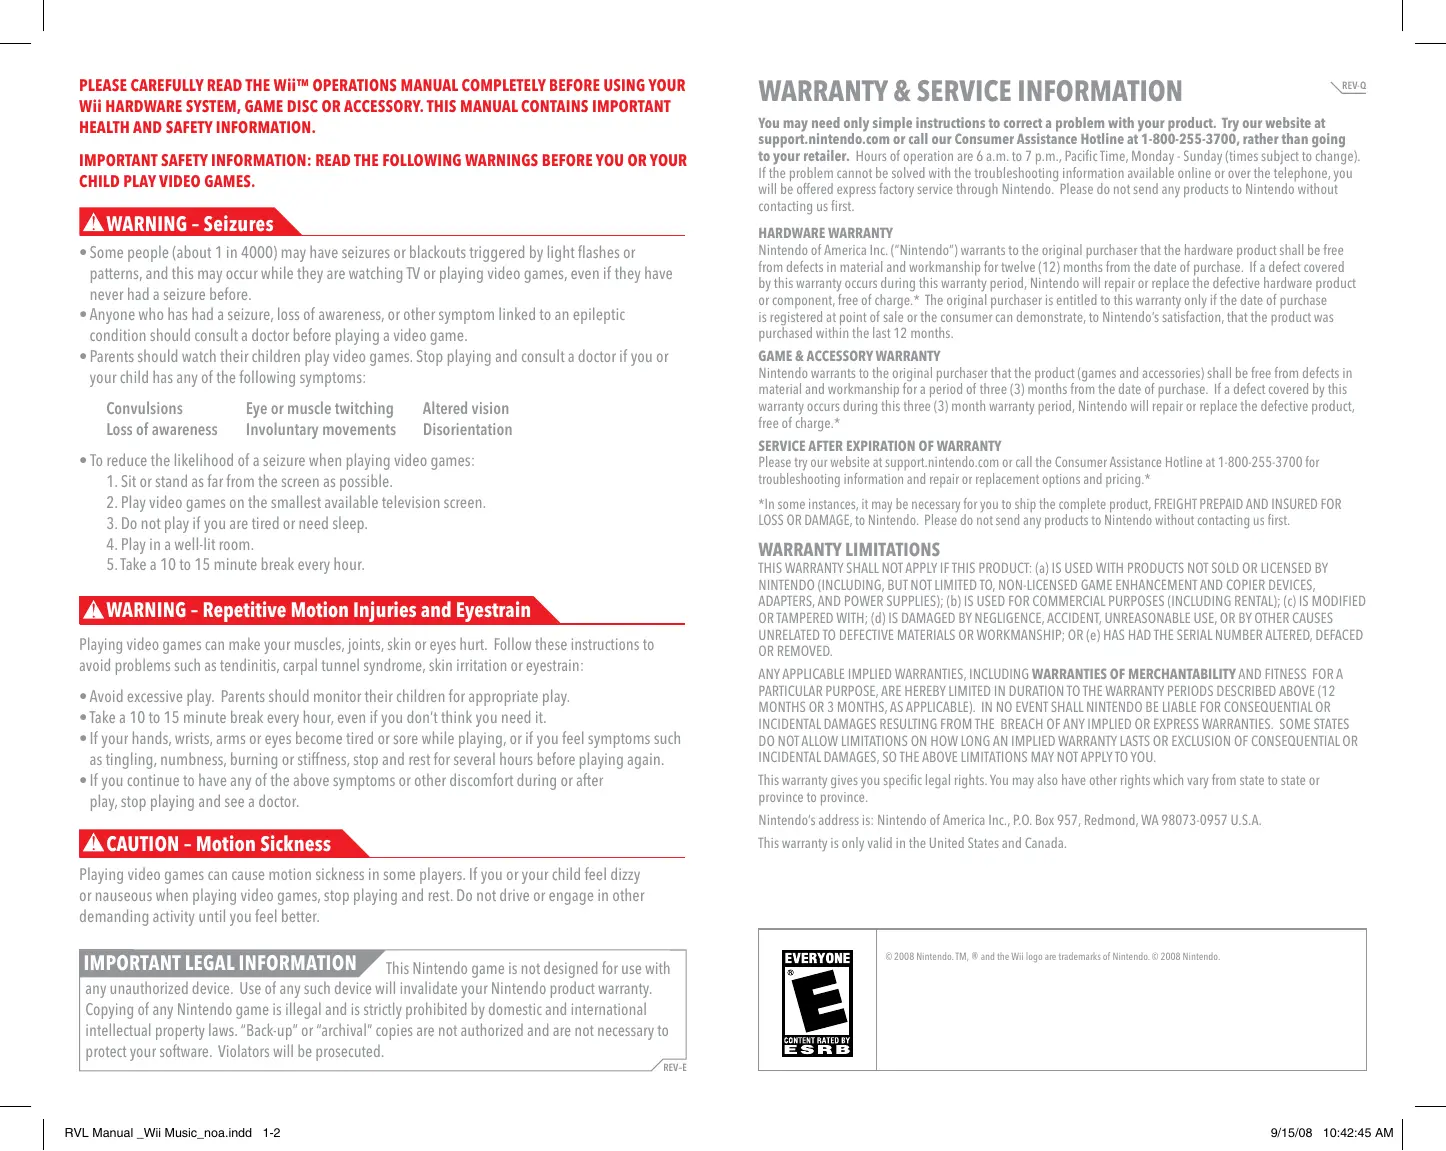
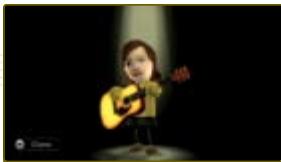
Instrument Improv
You can freely select and play instruments in Instrument Improv mode. Once you select your Mii™, point at an instrument panel and press (A) or switch between instruments using () and (-) . You can then play the instrument, or you can select more options. Select to quit Instrument Improv and return to the Jam menu. Also, if you hold down (A), () , or (-) , you can skip quickly between instrument categories.

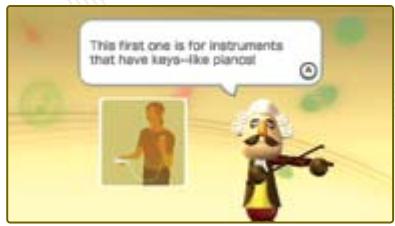
Learning Instrument Controls
On the Instrument Improv screen, select How to Play to view controls for the current instrument. Press A to turn pages.
Instrument Details
Using the More Details option, you can view interesting trivia about the selected instrument.
- On instrument-selection screens, if you play instruments, you'll see a appear next to the Mii. This indicates that you are currently using the controls to play the instrument and you cannot use pointer control or activate screen buttons. This state will end a few moments after you finish playing with a selected instrument, and then you can point and select.
Play with Tutes
Select the Play with Tutes option to practice with other instruments being played in the background. As you play, more and more instrument parts will join in to play with you. (The combination of instruments changes randomly.) To stop playing with Tutes, press ④ and select Change Instruments.
Play the instrument in whatever way you want. As you continue...

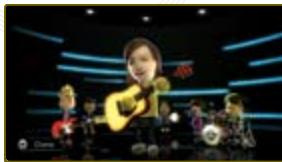
...Tutes will appear and play along with your performance.
The Tutes are musical helpers who play their instruments automatically. Since they'll adjust their play to what the player is doing, you can thoroughly enjoy the improvisational nature of a jam session even in Instrument Improv mode.

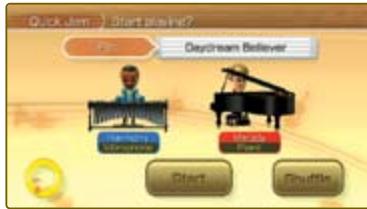
Jam Session: Quick Jam
For a quick, easy way to jump into a jam session, choose a Quick Jam to have the song, stage, instruments, and band parts all selected for you. After you select the number of players and choose your Mis, the random jam-session settings will be displayed. (At this time, you can practice playing the selected instrument.) Select the Start option to begin with those random settings, or select Shuffle to change to new random settings.

Jam Session: Custom Jam
In a Custom Jam, you'll select the song, stage, instruments, and band parts, then perform in a jam session.
First, you'll select the number of players and Miis, then the song and stage.
Song and Stage Selection
Select the jam-session song and stage, then select OK.
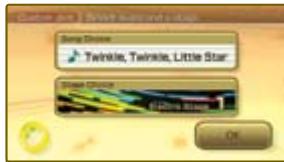
Point to the song or stage, then press A to bring up the related list of options to select from.
(You'll unlock some more songs and stages as you make more videos.)

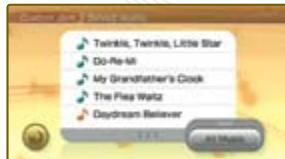
The New! icon marks newly unlocked songs, and appears for the five most recently played songs. You can also filter the song list by Not Played or Recently Played songs.
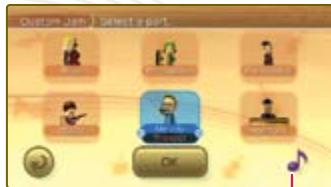
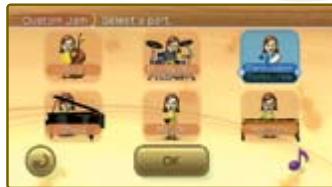
Instrument and Part Selection
Point at the band part you want to play, then press A to select it. Press (+) or - to scroll through all the instruments available for that band part, then A to confirm. To turn off any band parts from your performance, point at the part, then press B. Select OK, then Start to begin the jam session.
Options
Point at and press A to display the Options menu below, where you can change jam-session options.

Add/Remove Parts
For parts not controlled by players, you can select between a Tute helper who plays his or her part automatically, or the Mii who played that part previously, or removing the part altogether. (Mii performance data will be saved for only the last five performed songs.)

Stylize Parts
You can change the combination of instruments based on music style.

Change Tempo
You can change the song tempo. Point at the tempo slider and press (A) to grab it, then move it left or right.

Change Miis
You can access the Mii selection screen to change Miis used to perform with.

Load Video Data
If you have a video for the same song, you can load it into your jam session to use its selections and recorded music in all parts, or even to change it!
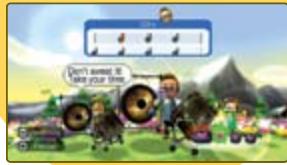
Jam Session
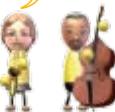
In jam sessions, players perform songs together using the Wii Remote and Nunchuk to play instruments. When your performance is finished, you can save your jam session.
What's a Jam Session?
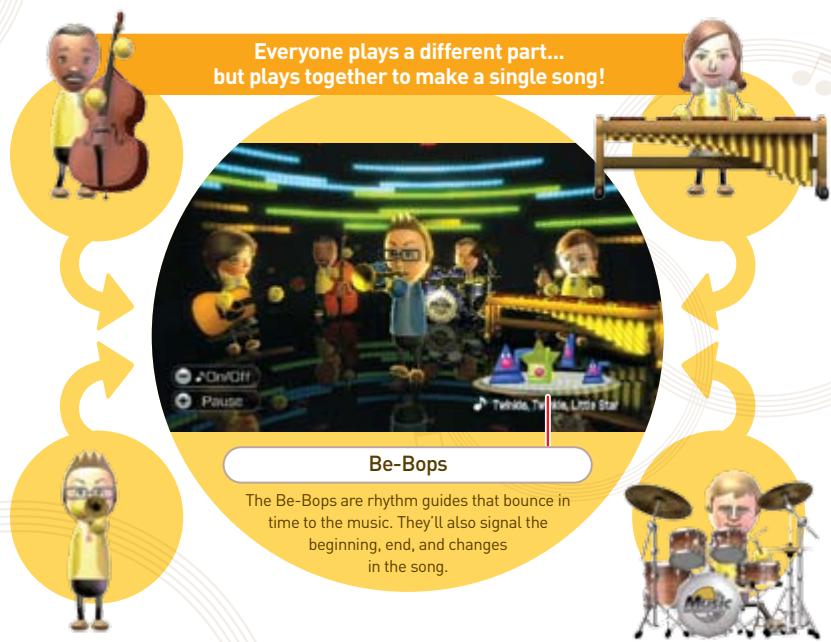
Each player plays his or her own part and instrument, then combines with other players in a band to perform music. In Wii Music, that's called a "jam session." Up to four players can enjoy "jamming" together. With six parts in each song, parts not played by players are performed automatically by a Tube helper.
(Note: you can also remove parts or replace Tutes with Mii performance data from a previous Custom Jam.)
In jam sessions, you can turn on a music-flow guide (see next page) to get a sense of how to play your instrument, especially for songs or instruments that you're unfamiliar with.
But even if a music-flow guide is turned on, you do not need to play along with it.
Feel free to change how you play to create a unique jam with your style!
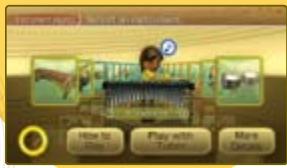
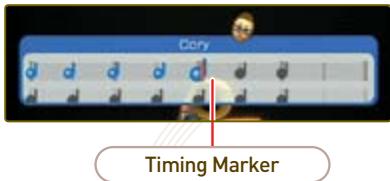
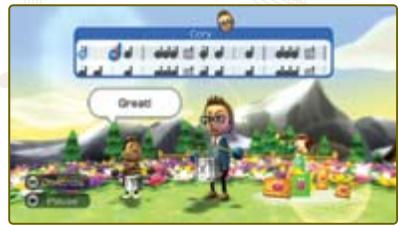
Music-Flow Guide
If you press during a jam session, you can display a music-flow guide for your instrument. The guide gives you suggestions about when to play that are shown as notes in gray. Notes indicating what you have already played are shown in blue for Player 1. Press again to hide the music-flow guide.
Notes for Players 2, 3, and 4 are shown in red, green, and yellow, respectively.
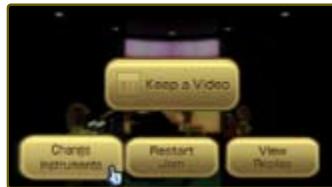
After Performing
When you are finished performing, the following menu is displayed.
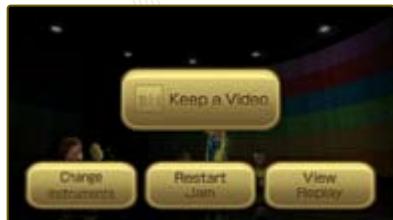
Keep a Video Save your jam session performance as a video.
End the jam session and return to the part- and instrument-selection screen. Change Instruments If you choose a different part in the same song, you can use overdubbing to perform with the previously recorded parts p.12
Restart Jam Start a performance over again from the beginning.
View Replay Watch your performance. To quit, press ① to pause, then select Quit.
Pause Menu
Press ① during a jam session to pause the performance and access the pause menu. Press ④ or select Continue to return to your performance.
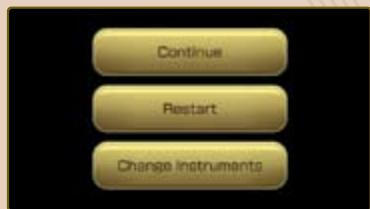
Continue Return to the performance.
Restart Start again from the beginning.
Change Instruments End jam session, then reselect parts and/or instruments.

Keeping a Video
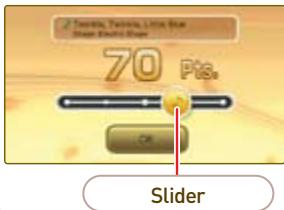
If you select Keep a Video after your performance, you can save a video 14 of your jam session. First, you must assign points to your performance showing how much you liked it. Point at the slider, press () to grab it, then move the slider left or right (or press 15 ) to assign a point ranking to your jam session. Select OK to proceed to jacket creation.
Jacket Creation
You can design your own video jacket. Use "Mii stickers" and select from different backgrounds and frames to customize the jacket. Press to see control details. Select Done when your design is finished.
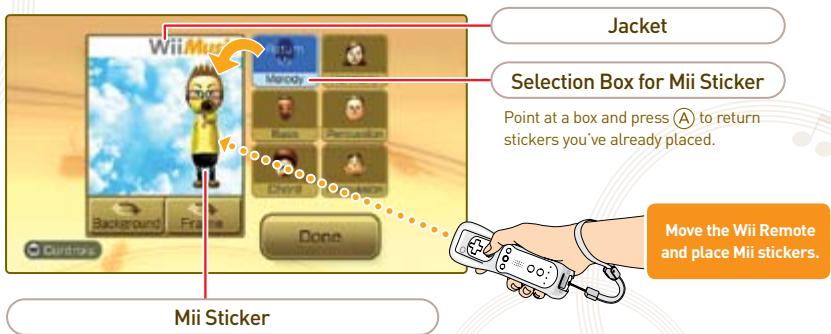
Point at a Mii head and press (A) to select it. Then you can move the Mii sticker around the jacket. Press (A) again to place it. Before placing it, you can use ① and ② to change the sticker's pose, or move the Wii Remote toward and away from the TV screen to change its size.
Finishing up Your Video Creation
Once your finalized jacket is displayed, press A to watch your video. To skip past the video, point at the screen, press , then select X . Finally, select Done to finish your video creation.
- Up to 100 videos can be saved. Upon exceeding 100, videos will automatically be deleted, starting with those with the lowest point values.

Solo Videos
Wii Music saves your previous performances for up to the last five songs. This feature allows one person to record all parts of a song so you can make videos all by yourself.
How to Make Solo Videos
After finishing your jam session, select Change Instruments. You will notice that your Mii and the part you just performed will automatically be left in that part. Then, if you pick another part and begin a jam session, you can perform an "overhub session" along with the previously recorded part.
Select Change Instruments after performing to add on a new part to a song.

If you repeat this process, you can perform all parts by yourself and create a solo video.
- It's recommended that you let a Tute take the Melody part while you perform your first part.

Overdubbing
Select Load Video Data from the Custom Jam instrument- and part-selection screen to record your own parts over a video. You can use this technique to add your own performances to videos sent from friends to virtually jam with friends and make new videos.
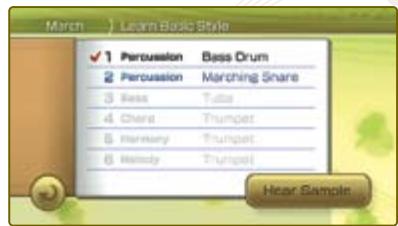
Lessons
The Lessons mode shows players the basics of Wii Music, plus many ways to further enjoy Wii Music, including using special performance techniques for specific music styles and unique song arrangements.
Jam Basics
Learn how to go hands-on with Wii Music instruments and how to perform in a basic jam session.
Jam Mastery
Learn tips for making your own unique song arrangements in a variety of different musical styles. Select your Mii, then select a lesson. For each music style, you'll put together arrangements by playing through each band part in order. (Note: Jam Mastery lessons are unlocked as you create more videos.)


Videos
In the Videos mode, you can view all the videos you've saved, and also exchange videos with friends who own Wii Music through WiiConnect24.
What's a "Video"?
A Wii Music video is a recording of your jam session that you can save, then replay and watch as a music video. After finishing a jam session, simply save it as a video by selecting Keep a Video.
- Up to 100 videos can be saved.
- Upon exceeding 100 videos, videos will automatically be deleted, starting with those with the lowest point values.
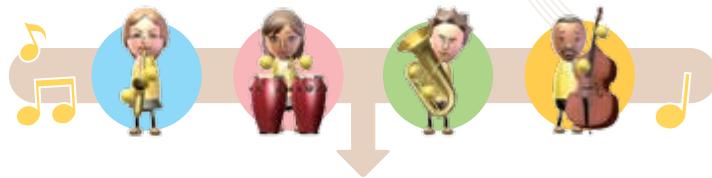
Save your favorite jam sessions as videos!
Your friends can add to jam sessions that you send to them!
Friends can watch your special creations!
Methods for Viewing Videos
Select the Videos mode from the main menu,
then select a method for viewing videos.
Video Library
Select individual videos to view or send to friends.
Top-10Playback
Play back the top-10 ranked videos.
Random Playback
Play back random videos from among all saved videos.
Video Library
All saved videos are displayed, 10 per page, in order of popularity-point value. When displaying in order of point value, videos sent from friends will come first. [Note: Unranked videos are displayed with a yellow frame. Rank them to place them in the list.]
Sharing Settings
Turn video sharing on or off, plus change Mii display settings.
OK
Select video and proceed to the Videos menu.
Sort By
Switch between different sort methods.
Sharting Settings
Setting video sharing to "ON" sends information to your Wii Friends that tells them you have Wii Music, which can lead to sharing videos between friends who own Wii Music. Also, setting the Mii display for videos received to "OFF" will result in friends' Mis being replaced with Wii Music Guest Miis during playback.
(Note: Updates to your Wii Friend Roster after changing video sharing settings, and the ability to send and receive videos between friends, could take several days or more.)
Videos Menu
Select a video and then choose OK to display the video menu.

Play
Play back video.

Send to Friend
Send the video to Wii Friends.16

Change Points
Reassign a popularity-point score to the Videos.

Delete
Delete the video. Caution: Deleted videos cannot be restored.
Video Playback
Press ① during video playback to display a control menu.
You can pause, skip ahead, and more by pointing at the control icons, then pressing
Control Menu
| Single-Video Playback | Random/Top-10 Playback | |
| ○ | Repeat video | Loop all videos |
| | | | Return to beginning | First to beginning of video, then previous song |
| | | ▷ | Pause/play | Pause/play |
| ▶ | Return to beginning | To next video |
| × | End video | End video |
Send to Friend
Select the Send to Friend option from the Videos menu to send a video to Wii Friends via WiiConnect24. Choose which Wii Friends to send to, then select OK. You can send a video to up to eight friends at once. (Note: You can only share videos with Wii Friends who own Wii Music. Turn on video-sharing settings using Sharing Settings if you want to share videos [p.15].)
Wii Friend Roster
This is a list of friends registered on your Wii console. The names of the Wii Friends who own Wii Music will be displayed in black.

What is WiiConnect24?
24…
Using your home's Internet connection, WiiConnect24 connects the Wii console to the Internet 24 hours a day, even when the console is turned off, which enables a variety of data transmissions and message sharing between friends and family.

Video Sharing Warning
- To share videos with a friend using the Send to Friend option, you and the friend must both satisfy the following conditions.
-Wii system is connected to the Internet via broadband connection and has WiiConnect24 enabled.
-WiiConnect24 is not restricted by the Wii system's Parental Controls.
-Wii Music video-sharing settings are set to "ON."
For details on Internet and WiiConnect24 settings, consult the Wii Operations Manual.
To share videos, you and the other party must be registered as Wii Friends on each other's systems.
For more details, consult the Wii Operations Manual.
Data for videos sent during operation of Wii Music is limited to 10 blocks.
*Note: Wii Friends who receive your Wii Music videos can send your videos to their Wii Friends. Your videos can also be modified by anyone who receives the videos. You cannot retract a video once you have sent it.
Games
The Games mode features Mii Maestro, Handbell Harmony, and Pitch Perfect, three minigames for one to four players.
- In each minigame, participants play at the same time. A Wii Remote is required for each player when playing with multiple participants. (A Nunchuk for each player is required only for Handbell Harmony.)

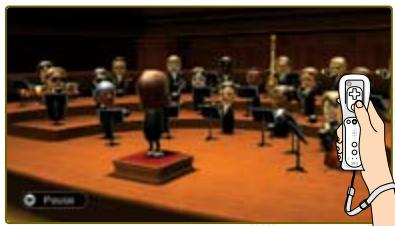
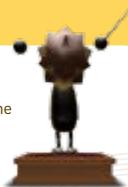
Mii Maestro
Conduct an orchestra by waving a baton.
Raise the Wii Remote to get the attention of your musicians. Wave the Wii Remote to start, then begin conducting after the countdown.
1
2
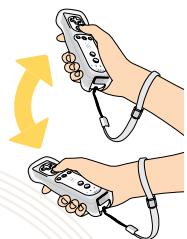
Wave the Wii Remote like a real conductor. You can alter the performance by changing the tempo and force of your waving.

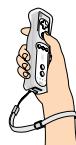

Hold A or B while waving to add powerful impact to the performance with a "mega hit." (Overusing the "mega hit," however, will tire out your musicians and result in lost points.)

Handbell Harmony

Ring your handbells in time with the music-flow guide.
1

The Wii Remote and Nunchuk correspond to the Mii's two bells.
2

When your own bell color reaches the yellow bar, wave the Wii Remote [or Nunchuk].
Bells with require you to press A or B on the Wii Remote or C or Z on the Nunchuk while waving.


Pitch Perfect

Take on tone-recognition challenges.
1
2
Read the question, then point at the on-screen speaker or Miis and press A to hear their tones.


Point at Miis and hold down B to grab them. Place the correct Mii on the platform, then let go of the button to drop the Mii.
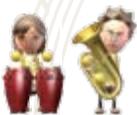
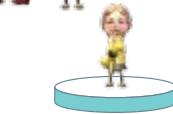
Select from the main menu to access Drum mode, which uses the Wii Balance Board in addition to the Wii Remote and Nunchuk.
- To play this mode, you will need the Wii Balance Board that is sold with the Wii software "Wii Fit" (sold separately). This mode is unavailable for users without a Wii Balance Board.
-Select
from the Drum mode menu to perform a Wii Balance Board operational check. - The Wii Balance Board must be synchronized with your Wii console before use. Do not synchronize the board with the console until instructed to do so by the Wii Music game program. See pages 7-8 in the Wii Balance Board Operations Manual for synchronization instructions.

Lessons
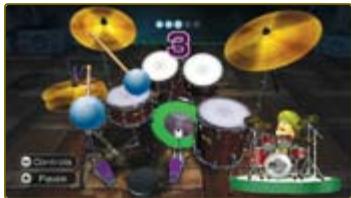
Drum Lessons
Take lessons to learn how to play real-life drums by using the Wii Remote, Nunchuk, and Wii Balance Board, and following the on-screen instructions.

Jam
Free Play
Freely play the drums.
Jam Session
Use the "Wii Balance Board Drums" to perform in a jam session with other instruments. As in a usual jam session, select a song and stage. You can also load videos created in Jam mode's Quick Jam and Custom Jam, and videos made in this mode can be loaded into Custom Jam.
Caution for Playing Drums with the Wii Balance Board
For this mode, sit on a chair or sofa, place both feet on the Wii Balance Board, and keep your heels down as you tap your feet up and down to control the drum pedals. While playing the "Wii Balance Board Drums," do not sit on anything but furniture designed to support a seated person.
- Note: If you are having trouble controlling the hi-hat with your left foot, try shifting your weight or adjusting your posture.
- Also, if you are playing on an upper floor, be aware that playing Drum mode may result in noise being heard on the floor below you.
SONG CREDITS
EMI:
CHARIOTS OF FIRE
By Vangelis
Published by EMI APRIL MUSIC INC. (ASCAP)
All Rights Reserved. Used by Permission.
DAYDREAM BELIEVER
By John Stewart
Published by EMI BLACKWOOD MUSIC INC. (BMI)
All Rights Reserved. Used by Permission.
Published by EMI BLACKWOOD MUSIC INC. (BMI)
All Rights Reserved. Used by Permission.
I'll BE THERE
By Hal Davis, Berry Gordy, Jr., Willie Hutch and Bob West
Published by JOBETEMUSIC CO.,INC. ASCAP)
All Rights Reserved. Used by Permission.
I'VE NEVER BEEN TO ME
By Ronald Miller and Kenneth Hirsch
Published by STONE DIAMOND MUSIC CORP. (BMI)
All Rights Reserved. Used by Permission.
MATERIAL GIRL
By Peter Brown and Robert Rans
Published by EMI BLACKWOOD MUSIC INC. (BMI)
All Rights Reserved. Used by Permission.
PLEASE MR. POSTMAN
By Brian Holland, Georgia Dobbins, William Garrett, Robert
Bateman and Freddie Gorman
Published by EMI BLACKWOOD MUSIC INC. (BMI).
JOBETEMUSICCO.INC.(ASCAP)andSTONEAGATE
MUSIC (A Division of Jobete Music Co., Inc.) (BMI)
All Rights Reserved. Used by Permission.
SEPTEMBER
By Maurice White, Al McKay and Allee Willis
Published by EMI APRIL MUSIC INC. (ASCAP) and EMI
All Rights Reserved. Used by Permission.
SUKIYAKI
By Rokusuke Ei and Hachidai Nakamura
Published by BEECHWOOD MUSIC CORP. (BMI)
All Rights Reserved. Used by Permission.
THE LOCO-MOTION
By Carole King and Gerry Goffin
Published by SCREEN GEMS-EMI MUSIC INC. (BMI)
All Rights Reserved. Used by Permission.
WOMAN
By John Lennon
Published by EMI BLACKWOOD MUSIC INC. (BMI)
All Rights Reserved. Used by Permission.
Warner/Chappell:
"Wake Me Up Before You Go-Go"
[George Michael]
© 1984 Wham Music LTD. (PRS)
All Rights On Behalf of Wham Music LTD. (PRS)
Administered by Chappell & CO. [ASCAP]
All Rights Reserved. Used By Permission.
"Jingle Bell Rock"
(Joe Beal and Jim Boothe)
© 1957 (Renewed) Chappell & CO., Inc (ASCAP)
All Rights Reserved. Used by Permission.
Williamson Music:
DO-RE-MI
Written by Richard Rodgers & Oscar Hammerstein II
Williamson Music (ASCAP)
It is a violation of Federal Copyright Law to copy, duplicate or reproduce this Product or any portions of this Product without the express written permission of the copyright owner.
STAFF CREDITS
GENERAL PRODUCER
Shigeru Miyamoto
PRODUCER
Takashi Tezuka
CO-PRODUCER
Katsuya Eguch
DIRECTOR
Kazumi Totaka
SUBDIRECTORS
Junji Morii
Makoto Wada
Mitsuhiro Hikino
PROGRAMMING DIRECTOR
Yusuke Shibata
PROGRAMMING
Yuichiro Okamura
Kazuya Sumak
Shinji Okane
Wataru Tanaka
Shoichi Obayashi
Jun Ito
Shintaro Satoh
DESIGN DIRECTOR
Koji Takahash
CHARACTER DESIGN
Takafumi Kiuchi
Hirohito Shinoda
STAGE DESIGN
Jun Takamura
Takuro Shimizu
EFFECT DESIGN
Kazumi Yamaguchi
UI DESIGN
Ryo Tanaka
Akiko Hirono
Michiko Iwasawa
2-D DESIGN
Satoko Okada
Chiharu Takabayashi
DESIGN SL
Takahiro Hamaguchi
Keijiro Inoue
SOUND DIRECTOR
Hajime Waka
MUSIC
Kenta Nagata
Toru Minegishi
Mahito Yokota
SOUND PROGRAMMING
Junya Osada
SOUND EFFECT
Takahiro Watanabe
VOICE
Sanae Uchida
PROGRESS MANAGEMENT
Keizo Kato
TECHNICAL SUPPORT
Hironobu Kakui
Masahiro Takeguchi
PROGRAMMING SUPPORT
Tsutomu Kaneshige
Keizo Ohta
Katsuhito Nishimura
Takuhiro Dohta
Network Development Group
MUSIC SUPPORT
Koji Kanda
SOUND PROGRAMMING SUPPORT
Yoji Inagaki
DEBUG
Naofumi Terazono
Takaomi Ueno
Super Mario Club
ARTWORK
Daiki Nishioka
Keisuke Okubo
Keizu Takagi
NCL COORDINATION
Emi Haga
Keiyu Kondo
Mina Miyanaga
NOA COORDINATION
Marc Doyal
Tim Bechtel
Ruthe Yamasaki
Sally Miyagi
NOE COORDINATION
Masako Meineke
Stefan Werning
Chaz Seydoux
SPECIAL THANKS
Masafumi Kawamura
Tadashi Sugiyama
Takaya Imamura
Hisashi Nogami
Ryuji Kobayashi
Tomohiro Kawase
Yukihiko Ito
EXECUTIVE PRODUCER
Satoru Iwata
NOA LOCALIZATION MANAGEMENT:
Nate Bihldorff
Jeff Miller
Leslie Swan
NOA LOCALIZATION
Gema Almoguera
Joanie Grenader
Steven Grimm
Kevin Sullivan
Jonathan Yeckley
NOA DESIGN
Mark Goetz
Ross Hirai
NOA PRODUCT TESTING
Masayasu Nakata
Kyle Hudson
Eric Bush
Sean Egan
Tomoko Mikami
Makiko Szolas
Zac Evans
Israel Cruz-Morales
NOA Product Testing
VEUILLEZ LIRE ATTENTIVEMENT L'INTÉGRAlité DU MODE D'EMPLOI DE LA Wii™ AVANT D'UTILISER VOTRE SYSTème, VOTRE DISQUE DE JEU, OU VOS ACCESSOIRS Wii. CE MODE D'EMPLOI COMPEND D'IMPORTANTES INFORMATIONS SUR VOTRE SANTÉ ET VOTRE SECURITÉ.
INFORMATIONS IMPORTANTES CONCERNANT VOTRE SECURITE: VEUILLEZ LIRE LES PRECAUTIONS SUIVANTES AVANT QUE VOUS OU VOTRE ENFANT NE JOUIEZ À VOS JEUX VIDÉO.
Continuer Retournez la performance.