DS LITE - Portable video game console NINTENDO - Free user manual and instructions
Find the device manual for free DS LITE NINTENDO in PDF.


User questions about DS LITE NINTENDO
0 question about this device. Answer the ones you know or ask your own.
Ask a new question about this device
Download the instructions for your Portable video game console in PDF format for free! Find your manual DS LITE - NINTENDO and take your electronic device back in hand. On this page are published all the documents necessary for the use of your device. DS LITE by NINTENDO.
USER MANUAL DS LITE NINTENDO
NEED HELP WITH INSTALLATION, MAINTENANCE OR SERVICE?
NINTENDO CUSTOMER SERVICE: WWW.NINTENDO.COM
or call 1-800-255-3700, MON.-SUN., 6:00 a.m. to 7:00 p.m, Pacific Time (Times subject to change)
TTY Hearing Impaired: 800-422-4281
BESOIN D'AIDE AVEC L'INSTALLATION, L'ENTRETIEN OU LE SERVICE ?
SERVICE à LA CLIENTÉLE DE NINTENDO: www.nintendo.ca
If you would like to order Nintendo parts, please visit our online store at www.nintendo.com or call 1-800-255-3700. This Nintendo product is not designed for use with any unauthorized accessories.
Nintendo of America Inc.
P.O.Box 957,Redmond,WA 98073-0957 U.S.A.
PRINTED IN CHINA IMPRIMÉ EN CHINE IMPRESO EN CHINA
SCBnNIN
INSTRUCTION BOOKLET
MODE D'EMPLOI (Pages 28-55)
The official seal is your assurance that this product is licensed or manufactured by Nintendo. Always look for this seal when buying video game systems, accessories, games and related products.
Nintendo does not license the sale or use of products without the Official Nintendo Seal.
This product is a precision electronic device that can be damaged by direct physical impact or contact with dust or other foreign material. A protective carrying case (sold separately) may help prevent damage to your Nintendo DS. Please carefully read the following instructions and the separate Health and Safety Precautions booklet before setup or use of the Nintendo DS. If, after reading all of the instructions, you still have questions, please visit our customer service area at www.nintendocom or call 1-800-255-3700.
Compatibility with Game Boy® Games & Accessories
The Nintendo DS Lite is compatible with Game Boy Advance Game Paks in single player mode.
The Nintendo DS will NOT work with the following games or accessories:
- Original Game Boy Game Paks
Game Boy Color Game Paks
Game Boy or Game Boy Advance Game Link® cables
Game Boy Advance Wireless Adapter
Game Boy Advance e-Reader - Nintendo GameCube™ Game Boy Advance cable
Game Boy Printer
Game Boy Camera

Nintendo DS Lite includes RSA BSAFE Cryptographic software from RSA Security Inc. RSA is a registered trademark of RSA Security Inc. BSAFE is a registered trademark of RSA Security Inc. in the United States and/or other countries. ©2005 RSA Security Inc. All Rights Reserved.

This product uses the LC Font by Sharp Corporation, except some characters. LCFONT, LC Font and the LC logo mark are trademarks of Sharp Corporation.
WARNING: PLEASE CAREFULLY READ THE SEPARATE HEALTH AND SAFETY PRECAUTIONS BOOKLET INCLUDED WITH THIS PRODUCT BEFORE USING YOUR NINTENDO® HARDWARE SYSTEM, GAMES OR ACCESSORIES. THIS BOOKLET CONTAINS IMPORTANT HEALTH AND SAFETY INFORMATION.
Table of Contents
1 Health & Safety Information 2-3
2 Nintendo DS Lite Components 4-5
3 Charging the Nintendo DS Lite Battery 6-7
4 Using the Nintendo DS Stylus & Touch Screen 8
5 Privacy Information 9
6 System Setup 10
7 Nintendo DS Menu Screen 10-11
8 Using Nintendo DS Game Cards 12-13
9 Using Game Boy Advance Game Paks 12-13
10 Wireless Communication & Game Play Modes 14-15
11 PictoChatTM 16
12 Nintendo Wi-Fi Connection 17
13 Using the On-Screen Keyboard 18
14 Settings Menu - Changing System Settings 19-23
15 Troubleshooting 24-25
16 Warranty & Service Information 26
17 Entertainment Software Rating Information 27
Health and Safety Information
IMPORTANT SAFETY INFORMATION - READ THE FOLLOWING WARNINGS BEFORE YOU OR YOUR CHILD PLAY VIDEO GAMES. IF THIS PRODUCT WILL BE USED BY YOUNG CHILDREN, THIS MANUAL SHOULD BE READ AND EXPLAINED TO THEM BY AN ADULT. FAILING TO DO SO MAY CAUSE INJURY.
WARNING - Seizures
- Some people (about 1 in 4000) may have seizures or blackouts triggered by light flashes or patterns, such as while watching TV or playing video games, even if they have never had a seizure before.
- Anyone who has had a seizure, loss of awareness, or other symptom linked to an epileptic condition should consult a doctor before playing a video game.
- Parents should watch when their children play video games. Stop playing and consult a doctor if you or your child have any of the following symptoms:
Convulsions Altered vision
Eye or muscle twitching Involuntary movements
Loss of awareness Disorientation
-
To reduce the likelihood of a seizure when playing video games:
-
Sit or stand as far from the screen as possible.
- Play video games on the smallest available television screen.
- Do not play if you are tired or need sleep.
- Play in a well-lit room.
- Take a 10 to 15 minute break every hour.
WARNING - Repetitive Motion Injuries and Eyestrain
Playing video games can make your muscles, joints, skin or eyes hurt after a few hours. Follow these instructions to avoid problems such as tendinitis, carpal tunnel syndrome, skin irritation or eyestrain:
- Avoid excessive play. It is recommended that parents monitor their children for appropriate play.
Take a 10 to 15 minute break every hour, even if you don't think you need it. - When using the stylus, you do not need to grip it tightly or press it hard against the screen. Doing so may cause fatigue or discomfort.
- If your hands, wrists, arms or eyes become tired or sore while playing, stop and rest them for several hours before playing again.
- If you continue to have sore hands, wrists, arms or eyes during or after play, stop playing and see a doctor.
Health and Safety Information
WARNING - Battery Leakage
Nintendo portable video game systems contain a rechargeable lithium ion battery pack. Leakage of ingredients contained within the battery pack, or the combustion products of the ingredients, can cause personal injury as well as damage to your Nintendo DS. If battery leakage occurs, avoid contact with skin. If contact occurs, immediately wash thoroughly with soap and water. If liquid leaking from a battery pack comes into contact with your eyes, immediately flush thoroughly with water and see a doctor.
To avoid battery leakage:
- Do not expose battery to excessive physical shock, vibration, or liquids.
- Do not disassemble, attempt to repair or deform the battery.
- Do not dispose of battery pack in a fire.
- Do not touch the terminals of the battery, or cause a short between the terminals with a metal object.
- Do not peel or damage the battery label.
WARNING - Radio Frequency Interference
The Nintendo DS can emit radio waves that can affect the operation of nearby electronics, including cardiac pacemakers.
- Do not operate the Nintendo DS within 9 inches of a pacemaker while using the wireless feature.
- If you have a pacemaker or other implanted medical device, do not use the wireless feature of the Nintendo DS without first consulting your doctor or the manufacturer of your medical device.
- Observe and follow all regulations and rules regarding use of wireless devices in locations such as hospitals, airports, and on board aircraft. Operation in those locations may interfere with or cause malfunctions of equipment, with resulting injuries to persons or damage to property.
Refer to the separate Nintendo DS Health and Safety Precautions booklet for additional information on hardware and software precautions and maintenance.
NOTE: This product does not contain latex, lead, mercury, cadmium, hexavalent chromium, PBB or PBDE.
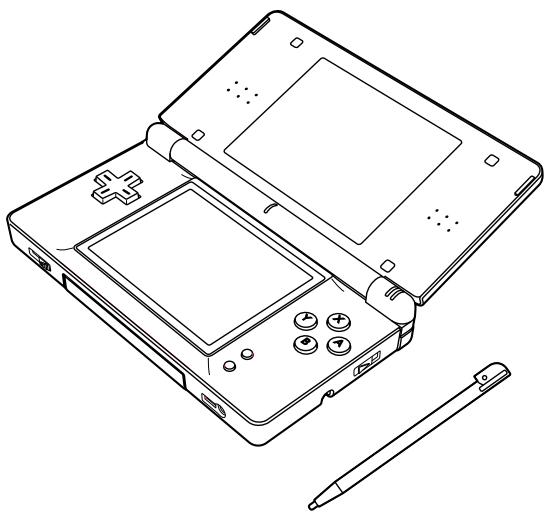
Nintendo DS Lite Components
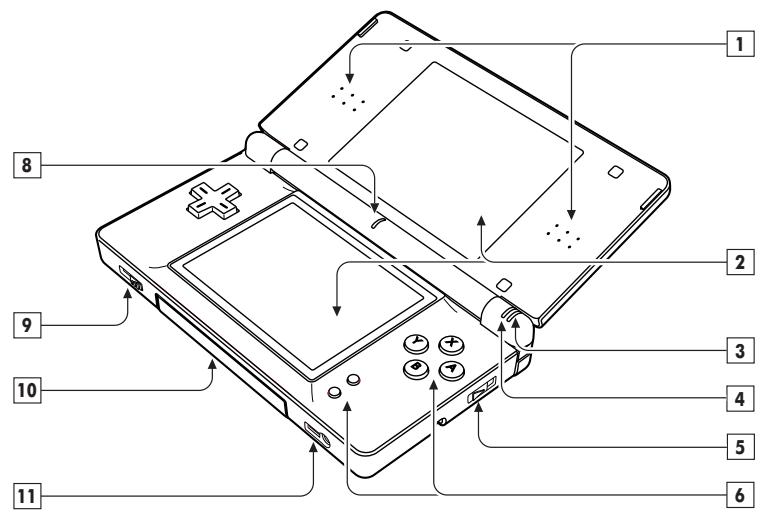
-
Stereo Speakers
-
LCD Screens - Twin backlit color liquid crystal displays. The lower display (the Touch Screen) is touch sensitive and should only be operated with a Nintendo-licensed stylus.
CAUTION: When opening the DS Lite, keep your fingers away from the hinge to avoid pinching them.
- Power Indicator LED - Indicates power is on or off and battery life. Green color will change to red when battery charge becomes low. When LED turns red, save your game and recharge the battery to prevent loss of game data.
Rapid blinking shows that wireless communication is in progress.
- Slow blinking shows that the Nintendo DS is in Sleep Mode. NOTE: If you close the DS while the power is on, it will automatically switch to power-saving Sleep Mode. It will resume normal mode when opened again.
4. Recharge Indicator LED - Lights orange while the battery is being recharged and turns off when charging is complete.
5. Power Button (POWER) - Turns system on or off. To prevent turning the system off accidentally during game play, you must hold the Power Button in the UP position for a moment before it will turn off.
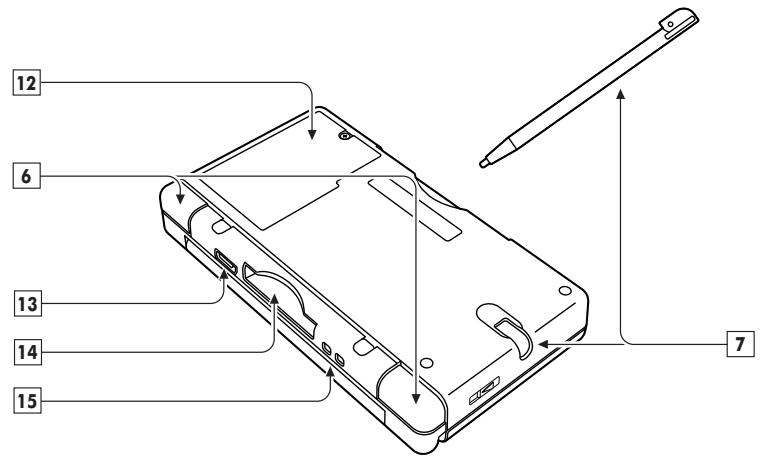
6. Control Buttons – The +Control Pad, A, B, X, and Y Buttons, L and R Buttons, and START and SELECT. Used for game play control. See the instruction booklet for the game you are playing for specific game control information.
7. Stylus and Stylus Holder - Always replace the stylus into the stylus holder after use.
8. Microphone (MIC.) - Used with specially designed games that include the microphone feature.
9. Volume Control (VOL.) - Slide to the right to increase volume.
10. Game Pak Slot Cover and Game Pak Slot (SLOT-2) – Remove cover when using Game Boy Advance Game Paks or Nintendo DS accessories (sold separately). Keep cover in place when not using Slot-2 to prevent contamination from dust or other foreign material.
11. Headphone/Microphone Connectors - For connection of stereo headphones, external microphone or headset (sold separately).
12. Battery Cover - Can be removed to replace the rechargeable battery pack. See page 7, Important Battery Guidelines, for more information on battery replacement.
13. External Extension Connector (5.2V IN) - Allows connection of Nintendo DS Lite AC Adapter, Model Number USG-002 (included) for recharging the battery or operation of the DS using household power.
14. DS Game Card Slot (SLOT-1) - For loading a Nintendo DS Game Card (sold separately).
15. Wrist Strap Attachment - For attachment of wrist strap (sold separately).
Charging the Nintendo DS Lite Battery
Do not use the Nintendo DS Lite AC Adapter during a lightning storm. There may be a risk of electric shock from lightning.
Before you use the DS for the first time, or after you have not used it for a long time, you must charge the battery. (If the DS will not be used for long periods of time, the battery should be recharged at least once every six months.)
When fully charged, the battery will last from 15-19 hours on the lowest screen brightness setting, depending on the type of game activity. (See page 11, #7, for information on adjusting the screen brightness.) On the brightest setting, the battery life is 5-8 hours.
The battery can be recharged approximately 500 times, but performance may decrease after repeated recharges, depending on usage conditions such as temperature. (Optimal charging temperature is between 50 and 104 degrees Fahrenheit.) Battery life may also decrease over time. After 500 recharges, battery life may be only 70% of the battery life when new.
It takes approximately three hours to recharge the battery. (The actual time varies depending on how much battery life you have left.) When the power indicator LED turns red, save your game and recharge the battery to prevent loss of game data. You can play games while recharging the battery, but the recharge time will be longer.
IMPORTANT: The DS Lite AC Adapter (Model No. USG-002 JPN/USA) is only for use with the DS Lite portable video game system. It is not compatible with any other Nintendo system.
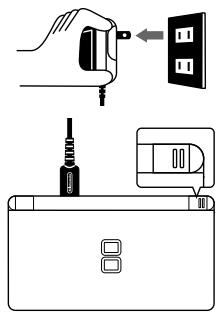
- Insert the DC Connector Plug from the AC Adapter into the External Extension Connector on the back of the DS. (Illustration 1)
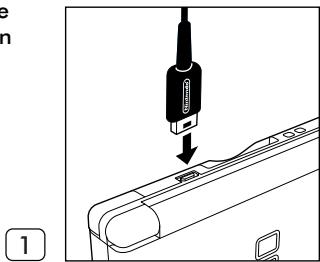
IMPORTANT: Be sure the DC Connector Plug is facing in the correct direction before inserting into the connector to avoid damaging either the plug or connector.
-
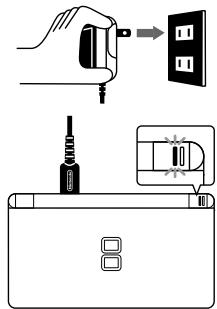
Swing the prongs out of the AC Adapter and insert into a standard 120-volt AC wall outlet. Be sure that the prongs are fully inserted into the outlet. The recharge indicator LED will light orange until the battery is fully charged (Illustration 2). You can use the DS while recharging; however it will take longer to recharge the battery. The AC Adapter should be correctly oriented in a vertical or floor mounted position.
-
When fully charged, the recharge indicator LED will go out (Illustration 3). Remove the AC Adapter from the wall outlet and fold the prongs back into the housing. Remove the DC Connector Plug from the EXT Connector.
When disconnecting any plugs from the DS or wall outlet, carefully pull by the plug itself rather than by the cord.
2
3
IMPORTANT BATTERY GUIDELINES:
- Do not remove the battery from the DS unless it needs to be replaced.
- Do not use any battery other than the Nintendo DS Lite rechargeable battery, Model No. USG-003. A replacement battery may be ordered through Nintendo's web site at www.nintendo.com (USA/Canada only) or by calling Customer Service at 1-800 255-3700.
- When recharging the battery, use ONLY the included AC Adapter, Model No. USG-002 JPN/USA.
- When disposing of the battery, follow appropriate local guidelines and regulations. For information on battery disposal contact your local solid waste authority.
- If liquid comes into contact with the battery, do not reuse it. Call Nintendo Customer Service at 1-800-255-3700 for further instructions on battery replacement and possible service to your Nintendo DS Lite.
Using the Nintendo DS Stylus and Touch Screen
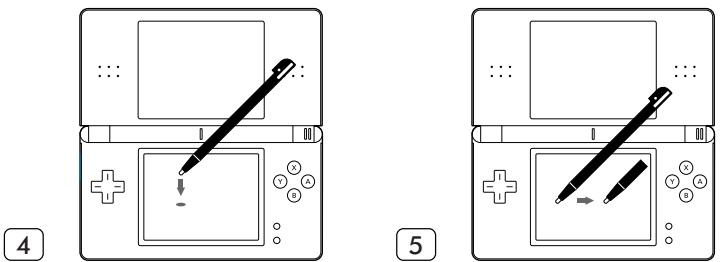
The lower LCD screen, or Touch Screen, is touch sensitive. For DS games that include this game control feature, operate the screen by using the included stylus. Lightly touch or slide the stylus across the Touch Screen. (Illustrations 4 and 5)
IMPORTANT STYLUS AND SCREEN GUIDELINES:
- Use the stylus ONLY on the LOWER Touch Screen.
- Use only enough pressure to operate the game. Excessive pressure may damage the Touch Screen.
- Do not use the stylus if it is broken.
- Use only a Nintendo-licensed stylus on the Touch Screen.
- Replace the stylus in the stylus holder when not in use.
- If you use a screen protector on your Nintendo DS, use only a Nintendo-licensed screen protector, and use it only on the Touch Screen.
NOTE: If the touch screen becomes dirty or contaminated with foreign material, do not continue to use your Nintendo DS. It may not work properly and can become more damaged. Follow the cleaning procedures below. If it still does not work after cleaning, visit www.nintendo.com for information on repair service.
SCREEN CLEANING PROCEDURE
If the screens on your Nintendo DS have visible smudges, fingerprints, or other foreign material on them, you can clean them by using a soft clean cloth such as a lens or eyeglass cleaning cloth.
- Slightly dampen the cloth with water ONLY and wipe off the screens to loosen any dirt or foreign material.
- Using a dry cloth, wipe the screens to dry them and finish the cleaning process. If needed, repeat the process.
Privacy Information
PictoChat (see page 16) is not an internet application. However, when using PictoChat, you can communicate with up to 15 other Nintendo DS users within range of your DS (approximately 65 feet). Such users will be able to see your nickname and messages. To protect your privacy, do not give out personal information such as last name, phone number, age, e-mail or home address when communicating with others.
An adult should assist children with system setup and instruct them not to use personal information. Children should be warned about communicating with or meeting strangers.
During system setup (see page 10), whatever date you choose to enter as your month/day of birth (year is not asked for), an "It's your birthday" message will be communicated in the chat room on that date.
For more information on wireless communication and privacy, visit our web site at http://www.nintendo.com/consumer/dsprivacy.
System Setup
The first time the Nintendo DS is turned on, you will be asked to select the screen language. Use the +Control Pad or stylus to select a language, then touch "Yes" or press the A Button.
Follow the on-screen instructions to input your nickname, screen color, date, time, and month and day of birth (not the year). Press the B Button to step backward through this process if you would like to change the settings. You will be able to change these settings later from the Settings Menu on pages 19-23. For help using the on-screen keyboard, see page 18. At the end of this process, the DS will save your settings and turn off.
Turn the power on to go to the Nintendo DS Menu Screen shown below.
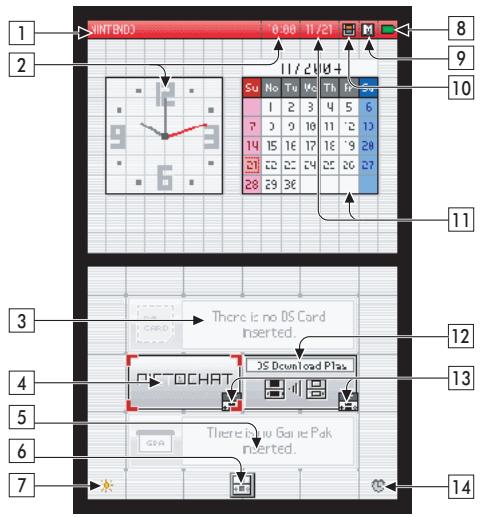
Nintendo DS Menu Screen
Nintendo DS Menu Screen
- User Name - Can be adjusted from the Settings Menu. (Page 22)
- Clock/Alarm and Current Time - Can be adjusted from the Settings Menu. (Page 21)
- DS Game Selection Panel - Select to play a DS Game Card inserted into Slot 1. (See Using Nintendo DS Game Cards on page 12.)
- PictoChat Selection Panel - Select to begin a PictoChat session. (See PictoChat on page 16.)
- Game Boy Advance Game Pak Selection Panel - Select to play a Game Boy Advance Game Pak inserted into Slot 2. (See Using Game Boy Advance Game Paks on page 12.)
- Settings Menu Panel - Select this panel to go to the Settings Menu to change initial setup information and other settings. (See Settings Menu on pages 19-23.)
- Display Brightness - Touch to select from four levels of screen brightness. (Note: Battery will discharge faster on brighter settings.)
- Power Indicator Icon - Shows battery charge. This is green while the battery has a normal charge and will change to red when the battery charge gets low.
- Screen Startup Mode Icon - This icon shows which startup mode the DS will use when turned on.
- In A (AUTO) mode, the DS will automatically load a game if there is one in Slot 1 or Slot 2. The DS will load a DS Game Card automatically if both slots have games loaded.
- In M (MANUAL) mode, the DS Menu Screen screen will appear. Can be adjusted from the Settings Menu. (Page 20)
- Game Boy Advance Display Screen Icon - This icon indicates which screen will display Game Boy Advance games. Can be adjusted from the Settings Menu. (Page 20)
- Calendar and Current Date - Can be adjusted from the Settings Menu. (Page 21)
- DS Download Play Selection Panel - Select to use Single-Card Download Play mode. See Wireless Communication & Game Play Modes. (Pages 14-15)
- Wireless Communication Icon - Indicates that wireless communication will begin if this panel is selected. NOTE: Use of wireless devices are prohibited in some locations. See page 3, Radio Frequency Interference.
- Alarm ON/OFF Panel - Touch to turn the alarm on. Can be adjusted from the Settings Menu. (Page 21)
Using Nintendo DS Game Cards
- Make sure that the Nintendo DS is turned off.
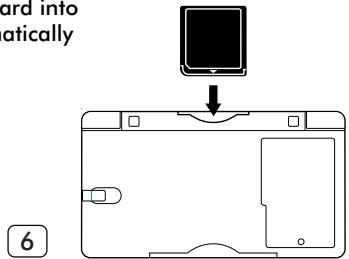
- Insert the DS Game Card into Slot 1 on the back of the system and push it until it clicks into place. The label should face towards the bottom of the DS. (Illustration 6)
- Turn the power on. After the safety information screen, the game title will appear. Touch the game title with the stylus to start the game. Refer to the instruction manual for the game you are playing for game instructions.
- To remove your game, first turn the power off. Push the DS Game Card into Slot 1 until it clicks. It will automatically eject partway out of the slot.
Using Game Boy Advance Game Paks
- Make sure that the Nintendo DS is turned off.
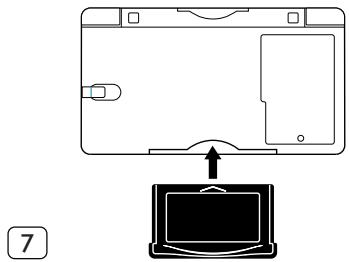
- Insert the Game Boy Advance Game Pak into Slot 2 on the front of the DS. Make sure it is fully inserted into Slot 2. The label should face towards the bottom of the DS. (Illustration 7)
- Turn the power ON. The game title will appear. Touch the game title with the stylus to start the game. Refer to the instruction manual for the game you are playing for game instructions.
- To remove a Game Pak, first turn the power off. Push the cartridge out of Slot 2 with your thumb.
When you are finished playing, always turn your system off and unplug the AC Adapter (if you are using it) from both the wall socket and the Nintendo DS.
Do not wrap the AC Adapter cord around the DS.
When not in use, close the DS to protect the screens from dust or damage.
NOTE: The power will NOT automatically turn off when the system is closed. If you close the DS while the power is ON, it will automatically switch to power-saving Sleep Mode. It will resume normal mode when opened again.
IMPORTANT GAME CARD/GAME PAK GUIDELINES:
- Always check the Game Card or Game Pak edge connector for foreign material before inserting it into the DS.
- Be sure to orient the Game Card or Game Pak correctly before inserting into the DS.
- Do not turn the power off or remove the Game Card or Game Pak while saving game data, or saved data may be destroyed.
Wireless Communication and Game Play Modes
NOTE: Use of wireless devices are prohibited in some locations. (See page 3, Radio Frequency Interference.)
You will know when your DS is in wireless mode when the Power Indicator LED (green or red) rapidly blinks. This indicates that wireless communication is in progress. The Power Indicator LED will blink rapidly when using PictoChat, playing any game in multiplayer mode, or downloading a game to another DS unit.
The Nintendo DS wireless feature allows you to communicate or play games with other people without the use of cables. There are two types of wireless compatible DS games.

Wireless DS Multi-Card Play requires one Game Card for each DS system used. The number of players that can participate will be indicated under the icon.

Wireless DS Single-Card Download Play requires only one Game Card for one system (host system). The other players download the game information into their systems (client systems) using the wireless feature. The number of players that can participate will be indicated under the icon.
Look for these icons on Nintendo DS game packaging for the type of wireless game play used on specific games and how many players can play simultaneously.
DS Multi-Card Play
- Make sure that all DS systems are turned off, then insert a Game Card into each system. Turn all DS systems on.
- Use the stylus to touch the game title on the display to start the game. Refer to the instruction booklet for the game you are playing for game play information.
DS Single-Card Download Play
- Make sure that all DS systems are turned off, then insert a Game Card into the system that will be the host system. Turn all DS systems on.
- Use the stylus to touch the game title on the display of the host system to start the game.
-
On the client systems, touch the DS Download Play panel on the DS Menu Screen.
-
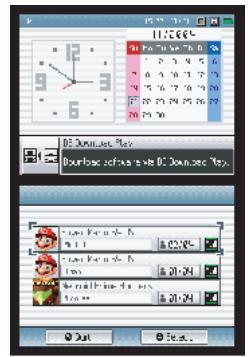
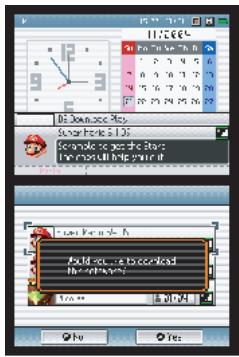
On the Game Selection Screen, touch the game title you wish to download (Illustration 8). You will be asked to confirm your choice (Illustration 9). Touch YES to download game information from the host system. Refer to the instruction booklet for the game you are playing for game play information.
9
Wireless Signal Strength
During wireless game play, an icon will appear on either the upper or lower displays showing the signal strength of the wireless signal. The icon has four modes depending on the signal strength, as shown below.

IMPORTANT WIRELESS COMMUNICATION GUIDELINES:
- Begin with the distance between systems at about 30 feet (10 meters) or less and move closer or farther apart as desired, keeping the signal strength at two or more bars for best results.
- Keep the maximum distance between systems at 65 feet (20 meters) or less.
- The systems should face each other as directly as possible.
- Avoid having people or other obstructions between the DS systems.
- Avoid interference from other devices. If communication seems to be affected by other devices (wireless LAN, microwave ovens, cordless devices, computers), move to another location or turn off the interfering device.
PicoChatTM
PictoChat allows you to use the Nintendo DS to send and receive wireless messages and pictures from other DS users. PictoChat is not an internet application. You can communicate with up to 15 other DS users within range of your DS. See PRIVACY INFORMATION on page 9.
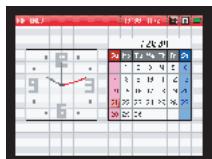
- Turn the power on. Select the PictoChat panel from the DS Menu Screen. (Illustration 10)
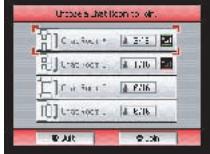
- The chat room selection screen will appear. Select one of the chat rooms to join. (Illustration 11)
The number in each panel indicates how many people are in that chat room. If the total number of participants is already at maximum (16/16), you cannot join that chat room.
The icon on the right side of the box indicates the signal strength for communicating with that chat room. See Wireless Signal Strength on page15 for information about this icon.
NOTE: If you have problems communicating with other members of a chat room, have everyone switch to a different chat room. Also, review the communication guidelines on page 15 and check for interference.
- The PictoChat screen will appear for the chat room you have selected.
10
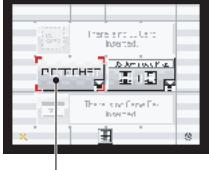
PictoChat panel
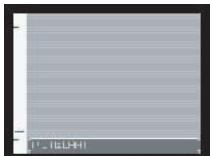
For a complete description of how to use PictoChat, see the separate PictoChat instruction booklet included with your Nintendo DS hardware system.
Nintendo Wi-Fi Connection
Nintendo Wi-Fi Connection (Nintendo WFC) allows you to play games over the internet, either at home or at select internet hotspots, using a Nintendo DS and a Nintendo WFC compatible Nintendo DS game.
Look for this icon on Nintendo DS game packaging for games that include the Nintendo WFC feature.
In addition, to play games over the internet at home, you will need:
An active broadband internet account.
- A wireless access point, such as a wireless router or the Nintendo Wi-Fi USB Connector.
Please see the separate Nintendo Wi-Fi Connection instruction booklet included with all Nintendo Wi-Fi Connection compatible games for more information on playing Nintendo DS games over the internet, and visit www.nintendowifi.com.
Using the On-Screen Keyboard
The on-screen keyboard functions like a simple computer keyboard. The keyboard style can be selected from the menu on the left side of the keyboard. There are five styles of keyboards, as listed below. (Illustration 12) Two styles are shown; however, they all work the same way.
Select letters by using either the stylus or the +Control Pad and A/B Buttons.
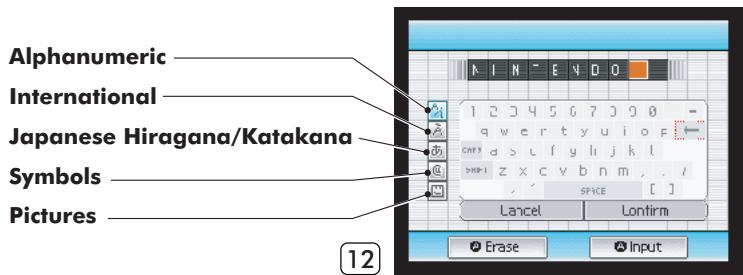
Alphanumeric
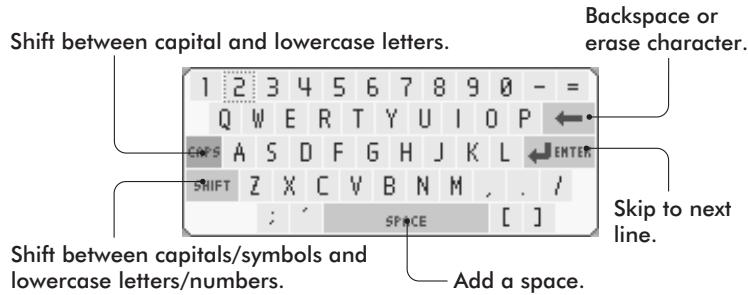
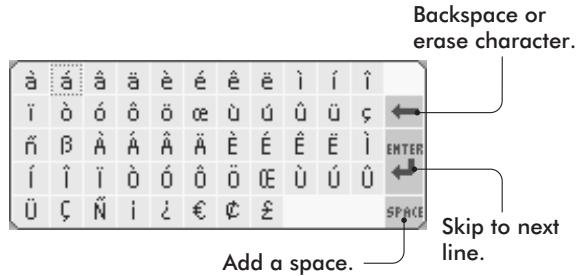
International
Settings Menu - Changing System Settings
Various items can be adjusted from the Settings Menu. To access the Settings Menu, touch the Settings Panel on the DS Menu Screen. (Illustration 13)
13
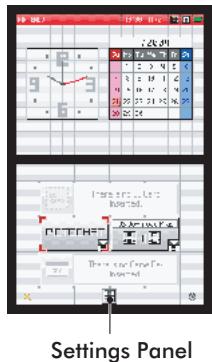
The Setting Menu will appear. Each of the four menu panels will open a different set of options you can adjust. (Illustration 14)
Select the menu panel for the options you would like to adjust.
(1) Options: · Startup Mode
- Screen Language
Game Boy Advance Screen
(2)Clock: Date
- Date
- Alarm
Time
(3)User: ·Color
Birthday
- User Name
- Message
14
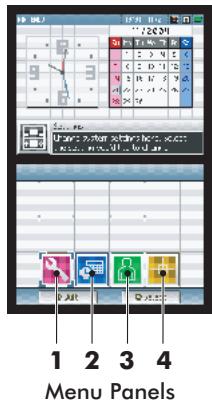
(4) Touch Screen
See pages 20-23 for a description and instructions for each option.
NOTE: After changing any system settings, the DS will save the new settings and shut itself off. Turn the power on to see the new settings and resume using the DS.
(1) Options
(Illustration 15)

Game Boy Advance
Screen
15
- Start-up Mode
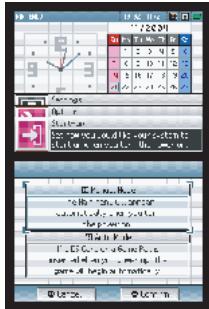
This option sets the mode the DS will start in when the power is turned on. Select from Manual or Auto mode.
In A (AUTO) mode, the DS will load a game if there is a Game Card or Game Pak in either slot. The DS will load the Game Card first if both slots have games in them. If no game is loaded, the DS Menu Screen will appear.
In M (MANUAL) mode, the DS Menu Screen will appear. (Illustration 16)
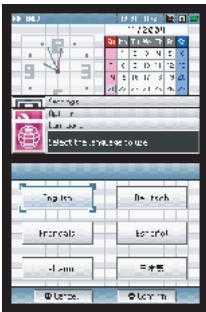
- Screen Language
This option sets the language used for non-game functions like menus. (Illustration 17)
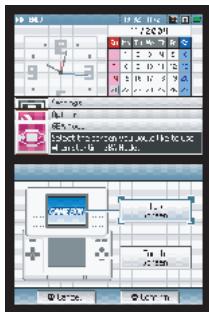
Game Boy Advance Screen
This option allows you to set which screen (upper or lower) you would like to use as the game screen when a Game Boy Advance game is played on the DS. (Illustration 18)
16
17
18
(2)Clock
(Illustration 19)
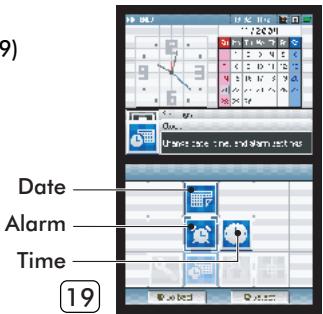
- Date
This option sets the month, day, and year for the system calendar. Touch the up/down arrows to adjust the numbers. Select "Confirm" when you are finished setting the date. (Illustration 20)
- Alarm
This option allows you to use the DS as an alarm. When the alarm is turned on, you will not be able to use the DS in any other mode until the alarm is turned off. The alarm can be turned off by touching any button or the Touch Screen (except the L or R Button).
Touch the up/down arrows to adjust the numerals. Select "Confirm" when you are finished setting the time. (Illustration 21)
Time
This option sets the time for the system clock. Touch the up/down arrows to adjust the numbers. Select "Confirm" when you are finished setting the date. (Illustration 22)
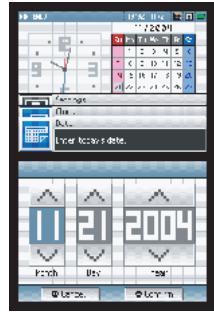
20
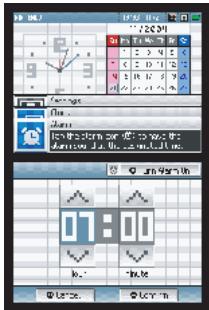
21
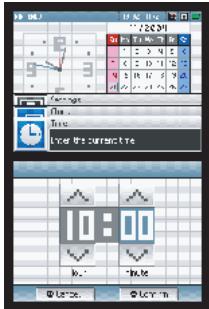
22
(3)User
(Illustration 23)
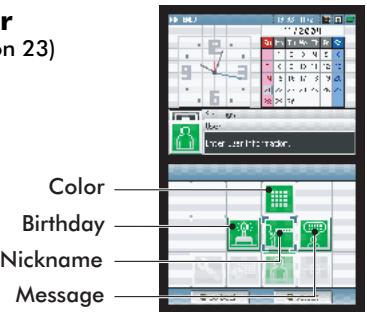
23
Color
Touch the color sample to set the background screen color. Select "Confirm" when you are finished selecting your color. (Illustration 24)
Birthday
Touch the up/down arrows to adjust the numbers. Select "Confirm" when you are finished setting the date. (Illustration 25)
- User Name
This options allows you to enter your nickname. Your nickname may appear during PictoChat on other participants screens. We recommend selecting a gender neutral nickname. (See the separate PictoChat instruction booklet included with the Nintendo DS.)
Use the on-screen keyboard to enter up to ten characters. (Illustration 26) See page 18 for information on how to use the on-screen keyboard.
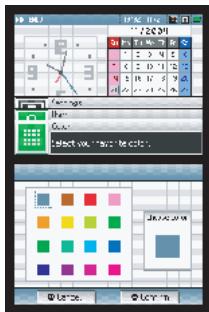
24
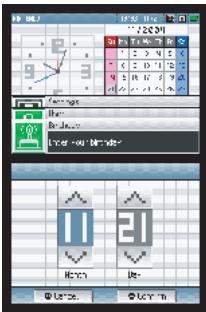
25
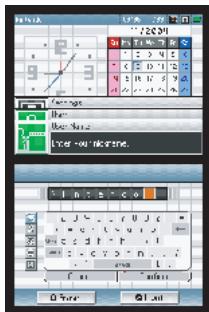
(3)User(cont.)
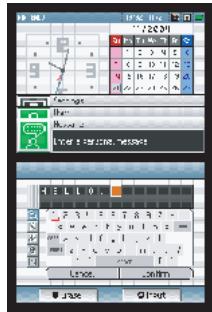
- Message
This options allows you to enter a message. Your message may appear during PictoChat on other participants screens. (See the separate PictoChat instruction booklet included with the Nintendo DS.)
Use the on-screen keyboard to enter up to 18 characters. See page 18 for more information on how to use the on-screen keyboard. (Illustration 27)
27
(4) Touch Screen
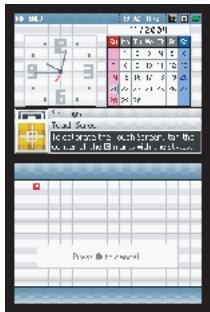
- Touch Screen
Select this option to realign the stylus with the Touch Screen. Follow the on-screen instructions and carefully touch the indicated marks on the Touch Screen. (Illustration 28)
Troubleshooting
Before seeking assistance, check the following information.
The screen stays blank even though the power is on.
- Make sure the battery pack is charged. The power indicator LED should light red or green depending on how much charge is in the battery.
- Turn the power off. Wait a few moments, then turn the power on.
- Turn the power off. Remove game and reinsert it, then turn the power on.
- If you are using the AC Adapter, make sure it is securely connected to both the Nintendo DS and the wall outlet.
Image appears but there is no sound.
Try adjusting the volume control.
- If headphones are attached to the Nintendo DS, sound will not come through the speakers.
- If you are using headphones, make sure they are securely plugged into the headphone jack.
Some games may have no sound during parts of the game.
Image appears but system is locked up.
- Make sure the game is inserted completely into the appropriate slot.
- Turn the power off. Remove game and reinsert it, then turn the power on.
- Make sure the game connector and game slots are clean and free of foreign material.
Battery life seems short and charging takes a long time.
- Make sure the surrounding temperature is above 50 degrees. Low temperatures will adversely affect battery performance.
- Battery life may also decrease over time. After 500 recharges, battery life may be only 70% of the battery life when new.
Game Boy Game Pak does not fit into the Nintendo DS.
- Make sure you are using a Game Boy Advance Game Pak. Slot 2 on the Nintendo DS will only work with DS accessories and Game Boy Advance Game Paks.
Wireless game play or communication does not work.
- Make sure the game supports wireless game play.
- For Multi-Card play, each DS system must have a Game Card inserted.
- Make sure all DS systems are within 30 feet (10 m) or less of each other to begin with. The signal strength should be at least two bars.
- Review the instruction booklet for the game you are playing for correct setup instructions.
Wireless game play or communication seems interrupted or unstable.
- Make sure all DS systems are within 30 feet (10 m) or less of each other to begin with. The signal strength should be at least two bars.
- Make sure there are no obstructions between the systems.
- Make sure the systems are facing each other.
- Make sure the batteries are charged.
- Check for interference from other devices (wireless LAN, microwave ovens, cordless devices, computers), and move to another location or turn off the interfering device if necessary.
PicoChat doesn't work.
Make sure there are no more than 16 participants in one chat room.
Try switching all participants to a different chat room.
Review the Wireless Signal Strength and PictoChat sections, pages 15-16.
The Touch Screen doesn't work.
- Make sure you are using the stylus on the correct area of the Touch Screen.
- Check the alignment of the stylus contact point using the Touch Screen adjustment (see page 23).
- Review the instruction booklet for the game you are playing for correct operation of the stylus.
- If the Touch Screen is scratched, dirty or contaminated with foreign material, follow the cleaning procedures on page 8.
The microphone doesn't work.
- Only games designed to use the microphone feature will work with the microphone. Make sure the game you are playing includes this feature.
- If using an external microphone, make sure it is plugged securely into the microphone jack.
When the power is turned OFF there is an after-image left on the screen.
- An after-image may appear on the screen after turning the power off. This after-image will not damage the DS and will disappear after a short time.
When playing Game Boy Advance games, the Multi-player features don't work.
- Multi-player features on Game Boy Advance games don't work on the Nintendo DS.
If your Nintendo DS still does not operate correctly after trying the above remedies, please visit the customer service area of our web site at www.nintendo.com or call 1-800-255-3700.
Warranty & Service Information
Rev. P
You may need only simple instructions to correct a problem with your product. Try our website at www.nintendo.com or call our Consumer Assistance Hotline at 1-800-255-3700, rather than going to your retailer. Hours of operation are 6 a.m. to 7 p.m., Pacific Time, Monday - Sunday (times subject to change). If the problem cannot be solved with the troubleshooting information available online or over the telephone, you will be offered express factory service through Nintendo. Please do not send any products to Nintendo without contacting us first.
HARDWARE WARRANTY
Nintendo of America Inc. ("Nintendo") warrants to the original purchaser that the hardware product shall be free from defects in material and workmanship for twelve (12) months from the date of purchase. If a defect covered by this warranty occurs during this warranty period, Nintendo will repair or replace the defective hardware product or component, free of charge. The original purchaser is entitled to this warranty only if the date of purchase is registered at point of sale or the consumer can demonstrate, to Nintendo's satisfaction, that the product was purchased within the last 12 months.
GAME & ACCESSORY WARRANTY
Nintendo warrants to the original purchaser that the product (games and accessories) shall be free from defects in material and workmanship for a period of three (3) months from the date of purchase. If a defect covered by this warranty occurs during this three (3) month warranty period, Nintendo will repair or replace the defective product, free of charge.
SERVICE AFTER EXPIRATION OF WARRANTY
Please try our website at www.nintendo.com or call the Consumer Assistance Hotline at 1-800-255-3700 for troubleshooting information and repair or replacement options and pricing. In some instances, it may be necessary for you to ship the complete product, FREIGHT PREPAID AND INSURED FOR LOSS OR DAMAGE, to Nintendo. Please do not send any products to Nintendo without contacting us first.
WARRANTY LIMITATIONS
THIS WARRANTY SHALL NOT APPLY IF THIS PRODUCT: (a) IS USED WITH PRODUCTS NOT SOLD OR LICENSED BY NINTENDO (INCLUDING, BUT NOT LIMITED TO, NON-Licensed GAME ENHANCEMENT AND COPIER DEVICES, ADAPTERS, AND POWER SUPPLIES); (b) IS USED FOR COMMERCIAL PURPOSES (INCLUDING RENTAL); (c) IS MODIFIED OR TAMPERED WITH; (d) IS DAMAGED BY NEGLIGENCE, ACCIDENT, UNREASONABLE USE, OR BY OTHER CAUSES UNRELATED TO DEFECTIVE MATERIALS OR WORKMANSHIP; OR (e) HAS HAD THE SERIAL NUMBER ALTERED, DEFACED OR REMOVED.
ANY APPLICABLE IMPLIED WARRANTYES, INCLUDING WARRANTYES OF MERCHANTABILITY AND FITNESS FOR A PARTICULAR PURPOSE, ARE HEREBY LIMITED IN DURATION TO THE WARRANTY PERIODS DESCRIBED ABOVE (12 MONTHS OR 3 MONTHS, AS APPLICABLE). IN NO EVENT SHALL NINTENDO BE LIABLE FOR CONSEQUENTIAL OR INCIDENTAL DAMAGES RESULTING FROM THE BREACH OF ANY IMPLIED OR EXPRESS WARRANTYES. SOME STATES DO NOT ALLOW LIMITATIONS ON HOW LONG AN IMPLIED WARRANTY LASTS OR EXCLUSION OF CONSEQUENTIAL OR INCIDENTAL DAMAGES, SO THE ABOVE LIMITATIONS MAY NOT APPLY TO YOU.
This warranty gives you specific legal rights. You may also have other rights which vary from state to state or province to province.
Nintendo's address is: Nintendo of America Inc., P.O. Box 957, Redmond, WA 98073-0957 U.S.A.
This warranty is only valid in the United States and Canada.
Entertainment Software Rating Board (ESRB) Video and Computer Game Software Rating Information
The Entertainment Software Rating Board (ESRB) ratings are designed to provide information about video and computer game content, so you can make informed purchasing decisions. ESRB ratings have two parts: rating symbols suggest age appropriateness for the game, and content descriptors indicate elements in a game that may have triggered a particular rating and/or may be of interest or concern.
To take full advantage of the ESRB rating system, it's important to check both the rating symbol (found on the front of the game box) and the content descriptor (found on the back of the game box). Go to www.esrb.org for a complete list of these content descriptors.
ESRB RATING SYMBOLS FOR VIDEO GAMES & PC SOFTWARE

EARLY CHILDHOOD
Contents may be suitable for ages 3 and older. Contains no material that parents would find inappropriate.

EVERYONE
Content may be suitable for persons ages 6 and older. May contain minimal violence and some comic mischief or crude language.

EVERYONE 10 AND OLDER
Content may be suitable for persons ages 10 and older. May contain cartoon, fantasy or mild violence, mild language and/or minimal suggestive themes.

TEEN
Content may be suitable for persons ages 13 and older. May contain violent content, mild or strong language, and/or suggestive themes.
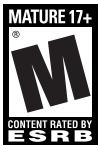
MATURE
Content may be suitable for persons ages 17 and older. May contain mature sexual themes, more intense violence and/or strong language.
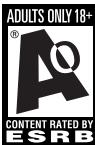
ADULTS ONLY
Content suitable only for adults. May include graphic depictions of sex and/or violence. Not intended for persons under the age of 18.

RATING PENDING
Titles have been submitted to the ESRB and are awaiting final rating.
The ESRB rating system is designed to provide information about a computer or video game. The ratings are not meant to recommend which games consumers should buy or rent or to serve as the only basis for choosing a product. Rather, individuals should use the ESRB ratings together with personal tastes and standards when deciding what is best to purchase.
For more information on the ESRB and video game ratings, go to the ESRB web site at www.esrb.org.