
C310 - Digital Camera KODAK - Free user manual and instructions
Find the device manual for free C310 KODAK in PDF.


| Product type | Compact digital camera |
| Brand | Kodak |
| Model | C310 |
| Sensor resolution | 10 megapixels |
| Optical zoom | 3x |
| Digital zoom | 5x |
| LCD screen | 2.4 inches (6.1 cm) |
| Power supply | 2 AA batteries (alkaline recommended) |
| Storage | SD/SDHC memory card (up to 32 GB) |
| Connectivity | USB 2.0 |
| Built-in flash | Yes (auto, red-eye reduction, fill, off) |
| Shooting modes | Auto, Portrait, Landscape, Sport, Night scene |
| Self-timer | 2 s, 10 s |
| Dimensions (W x H x D) | approx. 90 x 60 x 25 mm |
| Weight (without batteries) | approx. 120 g |
| Care and cleaning | Clean the lens with a soft, dry cloth; avoid solvents. Turn off the camera before cleaning. |
| Safety | Do not expose to moisture or extreme temperatures. Use only recommended batteries. |
| Spare parts and repairability | Spare parts available through Kodak after-sales service. Repairs by a qualified technician recommended. |
| General information | Class B digital device in compliance with Canadian ICES-003. |
Frequently Asked Questions - C310 KODAK
User questions about C310 KODAK
0 question about this device. Answer the ones you know or ask your own.
Ask a new question about this device
Download the instructions for your Digital Camera in PDF format for free! Find your manual C310 - KODAK and take your electronic device back in hand. On this page are published all the documents necessary for the use of your device. C310 by KODAK.
USER MANUAL C310 KODAK
Kodak EasyShare C310/CD40 digital camera
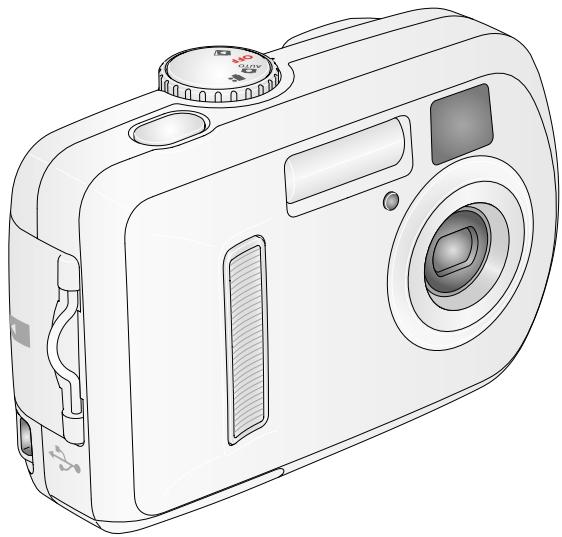
User's guide
www.kodak.com
For interactive tutorials, www.kodak.com/go/howto
For help with your camera, www.kodak.com/go/c310support or
www.kodak.com/go/cd40support

Eastman Kodak Company
Rochester, New York 14650
© Eastman Kodak Company, 2005
All screen images are simulated.
Kodak, EasyShare, and Retinar are trademarks of Eastman Kodak Company.
P/N 4J4295_en
Front view
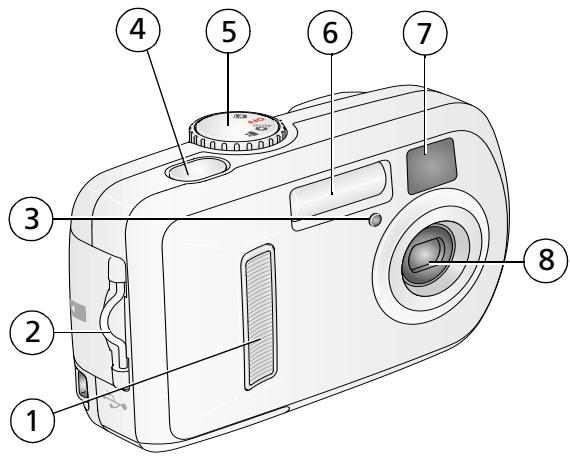
1 Grip
2 Strap post
3 Self Timer/Video light
4 Shutter button
5 Mode dial/Power
6 Flash unit
7 Viewfinder lens
8 Lens
Back view

1 Tripod socket
2 Dock connector
3 Share button
4 Controller buttons (4)
5 OK button
6 Delete button
7 Viewfinder
8 Ready light
9 Camera screen (LCD: liquid crystal display)
10 Flash/Status button
11 Grip
12 Slot for optional SD/MMC card
13 Menu button
14 Review button
15 USB (Universal Serial Bus) port
16 Battery compartment
Table of contents
1 Setting up your camera 1
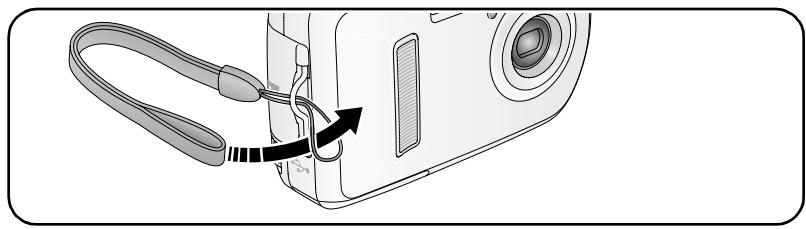
Attaching the wrist strap 1
Loading the batteries 1
Turning on the camera 2
Setting the date/time, first time 2
Setting the language and date/time, other times 3
Storing pictures on an SD or MMC card 3
2 Taking pictures and videos 4
Taking a picture 4
Using digital zoom 6
Using the flash. 7
Reviewing pictures and videos 7
Protecting pictures and videos from deletion 10
3 Transferring and printing pictures 12
Installing the software 12
Transferring pictures with the USB cable 13
Printing pictures 14
Dock compatibility for your camera 17
4 Doing more with your camera 18
Putting yourself in the picture or video 18
Running a slide show 19
Copying pictures and videos 20
Choosing a flash setting 22
Changing picture-taking settings 23
Customizing your camera 25
Viewing picture/video information 28
Pre-tagging for album names 28
Sharing your pictures 31
5 Troubleshooting 36
Camera problems 36
Camera/computer communications. 40
LCD screen messages 41
Camera ready light status 44
6 Getting help 46
Helpful Web links 46
Software help. 46
Telephone customer support 46
7 Appendix 49
Camera specifications 49
Storage capacities 52
Power-saving features 53
Important safety instructions 53
Battery information 55
Upgrading your software and firmware 56
Additional care and maintenance 56
Warranty. 57
Regulatory compliance 59
1 Setting up your camera
Attaching the wrist strap
Loading the batteries
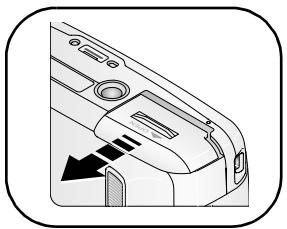
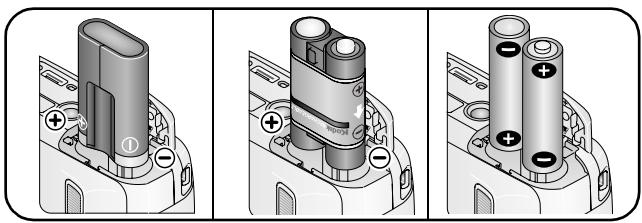
CRV3 lithium (non-rechargeable)
Ni-MH KAA2HR (rechargeable)
2-AA lithium, Ni-MH, or oxy-alkaline AA
For information on replacing batteries and extending battery life, see page 55.
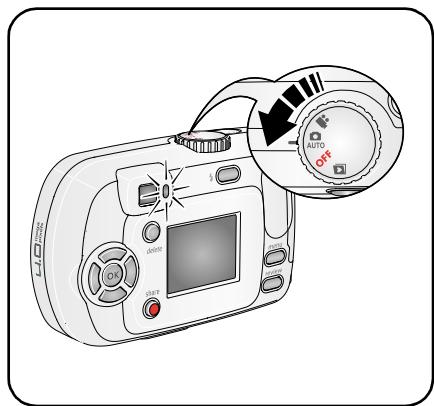
Turning on the camera
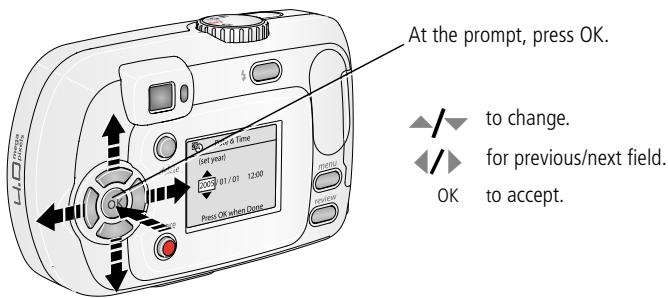
Setting the date/time, first time
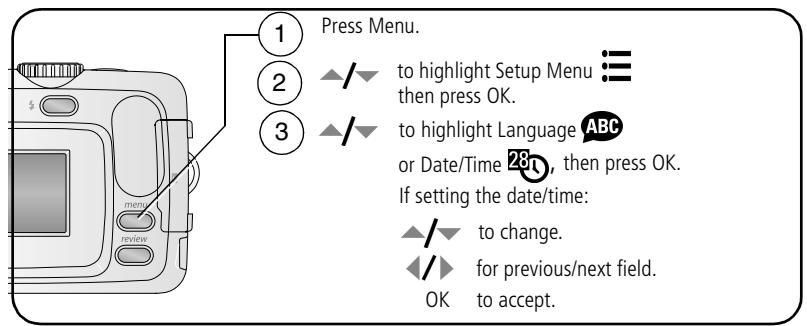
Setting the language and date/time, other times
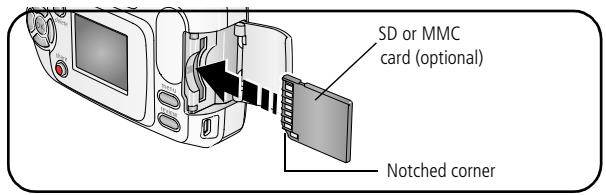
Storing pictures on an SD or MMC card
Your camera has 16 MB of internal memory. You can purchase an SD or MMC card to conveniently store more pictures and videos.
NOTE: We recommend Kodak SD and MMC cards. When using the card for the first time, format it in this camera before taking pictures (see page 27).

CAUTION:
A card can only be inserted one way; forcing it may cause damage. Inserting or removing a card when the Ready light is blinking may damage pictures, card, or camera.
See page 52 for storage capacities. Purchase SD or MMC cards at a dealer of Kodak products or www.kodak.com/go/c310accessories or www.kodak.com/go/cd40accessories
2 Taking pictures and videos
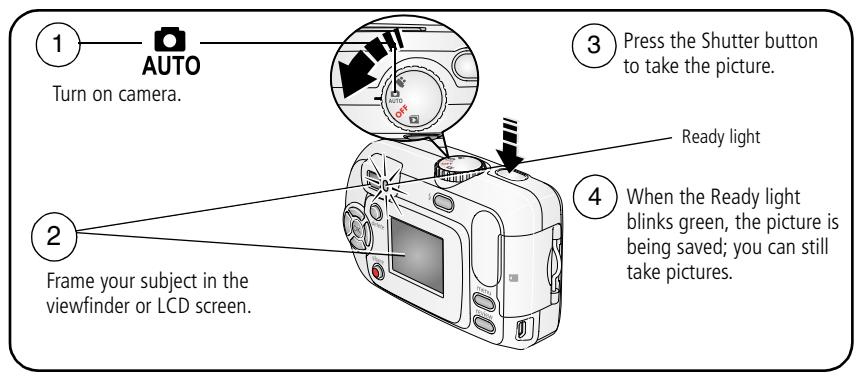
Taking a picture
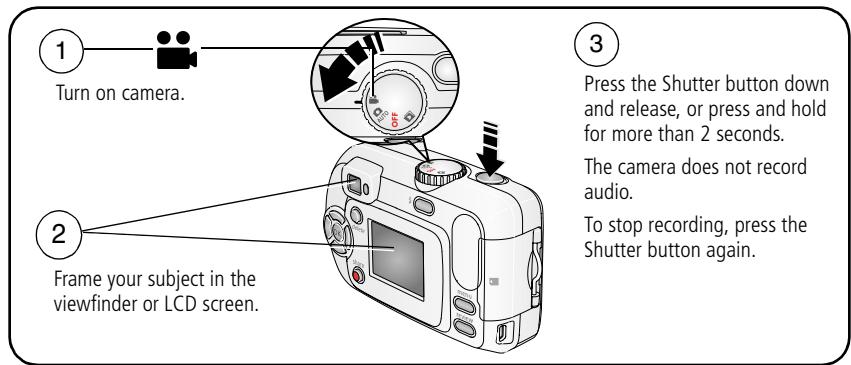
Taking a video
Reviewing the picture or video just taken
After you take a picture or video, the camera LCD screen displays a Quickview for approximately 5 seconds.
While the picture or video and are displayed:
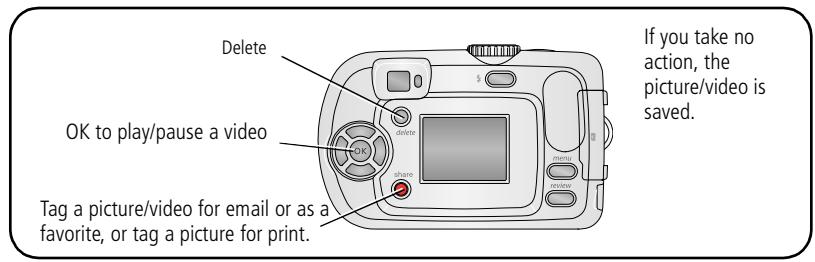
To view pictures and videos anytime, see page 7.
Using the camera LCD screen as a viewfinder
IMPORTANT: The Liveview feature significantly depletes battery power; use it sparingly.
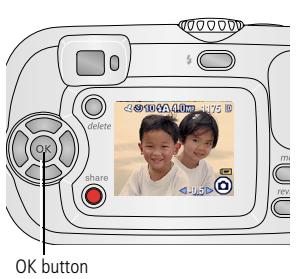
1 Turn the Mode dial to any Still mode.
2 Press the OK button to turn on the camera screen.
3 Frame your subject in the camera screen.
4 Press the Shutter button to take the picture.
5 To turn off the LCD screen, press the OK button.
To make the LCD screen turn on whenever the camera is on, see Liveview, page 25
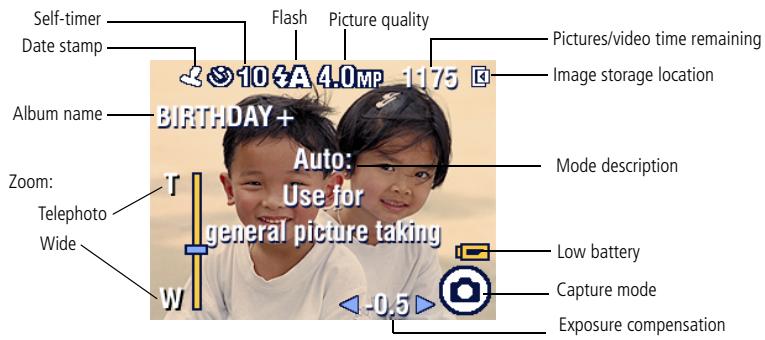
Picture/video capture screens
Using digital zoom
Use digital zoom in any Still mode to get up to 5X closer to your subject.
IMPORTANT: You may notice a decrease in printed image quality when using digital zoom. The blue slider on the zoom indicator pauses and turns red when the picture quality reaches the limit for an acceptable 4 × 6 in. (10 x 15 cm) print.
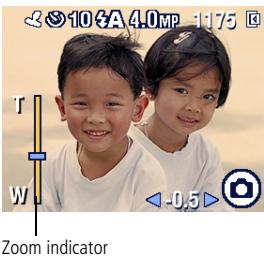
1 Press the OK button to turn on the LCD screen, then press to zoom in.
The LCD screen displays the zoomed image and the zoom indicator.
2 Press to zoom in and out.
3 Press the Shutter button to take the picture. To turn off digital zoom, from the lowest setting, press .
NOTE: You cannot use digital zoom for video recording.
Digital zoom is available only when Liveview is turned on. (See page 25.)
Using the flash
Use the flash when you take pictures at night, indoors, or outdoors in heavy shadows. Flash is effective between 2.6 - 7.9 ft (0.8 - 2.4 m). You can only change the flash setting in Still modes.
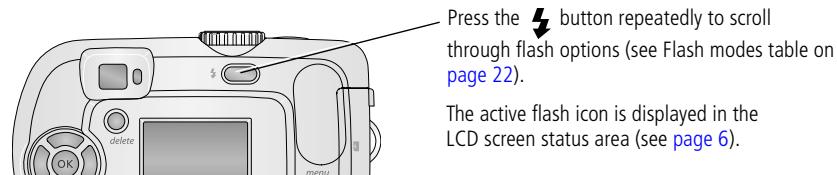
To change the flash settings, see page 22.
Reviewing pictures and videos
Press the Review button to view and work with your pictures and videos.
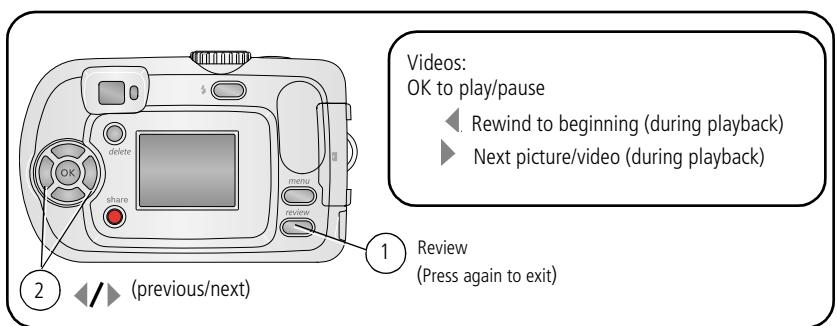
To save battery power, use the optional Kodak EasyShare camera or printer dock. (See www.kodak.com/go/c310accessories or www.kodak.com/go/cd40accessories.)
NOTE: Pictures taken at 3.5 MP (3:2) quality setting are displayed at a 3:2 aspect ratio with a black bar at the top of the screen.
What the review icons mean
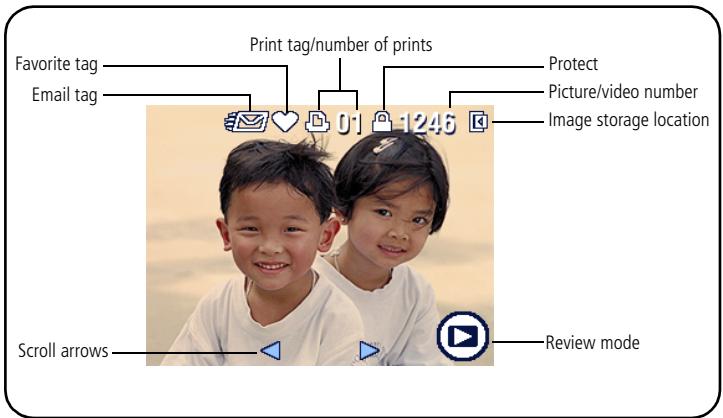
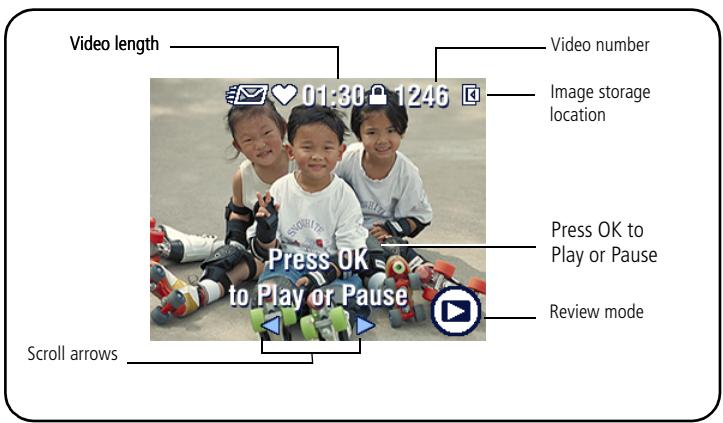
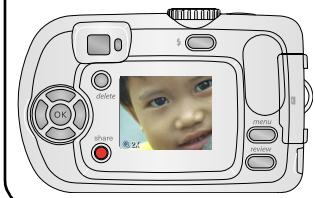
Magnifying a picture during review

OK

OK
magnify at 2X. Press again for 4X.
view other parts of the picture.
return to 1X.
Viewing multi-up (photbnails) during review
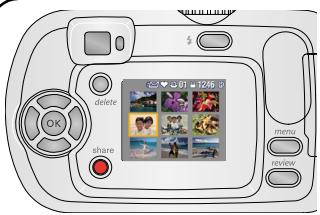

view multi-up thumbnails.

view previous/next row of thumbnails.

view previous/next thumbnail.
OK view single picture.
Protecting pictures and videos from deletion
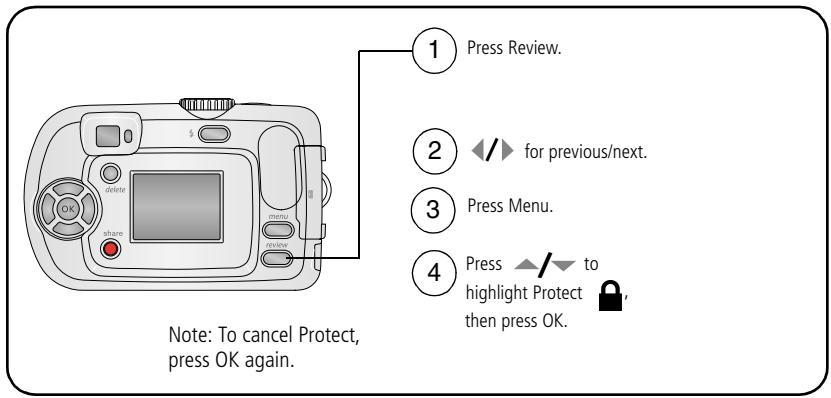
The picture or video is protected and cannot be deleted. The Protect icon appears with the protected picture or video.
Press the Menu button to exit.

CAUTION:
Formatting internal memory or an SD or MMC card deletes all (including protected) pictures, videos. ( Formatting internal memory also deletes email addresses, album names, and favorites. To restore them, see EasyShare software Help.)
Deleting pictures and videos
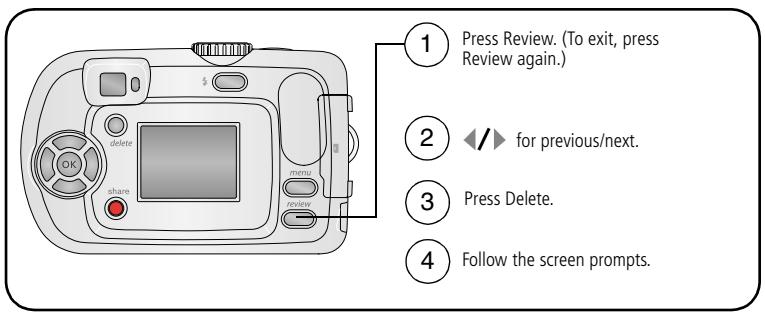
PICTURE or VIDEO—deletes the displayed picture or video.
EXIT—exits the Delete screen.
ALL—deletes all pictures and videos from your current storage location.
NOTE: To delete protected pictures and videos, remove protection before deleting.
3 Transferring and printing pictures
Installing the software

CAUTION:
Install Kodak EasyShare software before connecting the camera or optional dock to the computer. Failure to do so may cause the software to load incorrectly.
1 Close all software applications that are open on your computer (including anti-virus software).
2 Place the Kodak EasyShare software CD into the CD-ROM drive.
3 Load the software:
Windows OS—if the install window does not appear, choose Run from the Start menu and type d:\setup.exe where d is the drive letter that contains the CD.
Mac OS X—double-click the CD icon on the desktop, then click the Install icon.
4 Follow the on-screen instructions to install the software.
Windows OS—select Complete to automatically install the most commonly used applications. Select Custom to choose the applications you wish to install.
Mac OS X—follow the on-screen instructions.
NOTE: When prompted, register your camera and software. Registering lets you sign up for information that keeps your system up-to-date. To register later, visit www.kodak.com/go/register.
5 If prompted, restart the computer. If you turned off anti-virus software, turn it back on. See the anti-virus software manual for details.
For information on the software applications included on the Kodak EasyShare software CD, click the Help button in the Kodak EasyShare software.
Transferring pictures with the USB cable
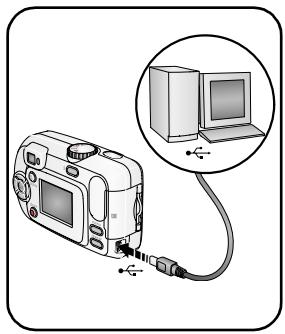
1 Turn off the camera.
2 Plug the labeled end of the USB cable (model U-8) into the labeled USB port on your computer. See your computer user's guide for details.
3 Plug the other end of the USB cable into the labeled USB port on the camera.
4 Turn on the camera. Kodak EasyShare software opens on your computer. The software prompts you through the transfer process.
NOTE: Visit www.kodak.com/go/howto for an online tutorial on connecting.
Also available for transferring
You can also use these Kodak products to transfer your pictures and videos.
Kodak EasyShare camera dock, Kodak EasyShare printer dock (see page 17)
Kodak multi-card reader, Kodak SD multimedia card reader-writer
Purchase these and other accessories at a dealer of Kodak products or www.kodak.com/go/c310accessories or www.kodak.com/go/cd40accessories
Printing pictures
Printing with a Kodak EasyShare printer dock
Dock your camera to the Kodak EasyShare printer dock and print directly—with or without a computer. Purchase this and other accessories at a dealer of Kodak products or www.kodak.com/go/c310accessories or www.kodak.com/go/cd40accessories
Direct printing with a PictBridge enabled printer
Your camera is compatible with PictBridge technology, so you can print directly to PictBridge enabled printers. You need:
Camera with fully charged batteries, or with optional Kodak 3-volt AC adapter
PictBridge enabled printer
USB cable (may be sold separately)
Connecting the camera to a PictBridge enabled printer
1 Turn off the camera and printer.
2 Optional: If you have a Kodak 3-volt AC adapter (optional accessory), plug it into the camera and into an electrical outlet.
IMPORTANT: Do not use the AC adapter included with the EasyShare camera dock or printer dock to power your camera.
3 Connect the appropriate USB cable from the camera to the printer. (See your printer user guide or www.kodak.com/go/c310accessories or www.kodak.com/go/cd40accessories for details.)
Printing from a PictBridge enabled printer
1 Turn on the printer. Turn on the camera.
The PictBridge logo is displayed, followed by the current picture and menu. (If no pictures are found, a message is displayed.) If the menu interface turns off, press any button to redisplay it.
2 Press to choose a printing option, then press the OK button.
| Current Picture | Press ↗ to choose a picture. Choose the number of copies. |
| Tagged Pictures | If your printer is capable, print pictures that you tagged for printing and choose a print size. |
| Index Print | Print thumbnails of all pictures. This option requires one or more sheets of paper. If the printer is capable, choose a print size. |
| All Pictures | Print all pictures in internal memory, on a card, or in Favorites. Choose the number of copies. |
| Image Storage | Access internal memory, a card, or Favorites. |
NOTE: During direct printing, pictures are not permanently transferred or saved to the computer or printer. To transfer pictures to your computer, see page 12. In Favorites mode, the current favorite picture is displayed.
Disconnecting the camera from a PictBridge enabled printer
1 Turn off the camera and printer.
2 Disconnect the USB cable from the camera and the printer.
Using a printer that is not PictBridge enabled
For details on printing pictures from your computer, click the Help button in the Kodak EasyShare software.
Ordering prints online
Kodak EasyShare Gallery (www.kodakgallery.com) is one of the many online print services offered in the Kodak EasyShare software. You can easily:
- Upload your pictures.
Edit, enhance, and add borders to your pictures.
Store pictures, and share them with family and friends. - Order high-quality prints, photo greeting cards, frames, and albums—and have them delivered to your door.
Printing from an optional SD or MMC card
- Automatically print tagged pictures when you insert your card into a printer with an SD/MMC card slot. See your printer user's guide for details.
Make prints at an SD/MMC card-capable Kodak picture maker. (Contact a location prior to visiting. See www.kodak.com/go/picturemaker.)
Take the card to your local photo retailer for professional printing.
Dock compatibility for your camera
| Kodak EasyShare dock | Docking configuration |
| ■ printer dock ■ printer dock plus ■ printer dock 6000 ■ camera dock 6000 | Custom dock insert Kodak dock adapter kit D-22 Dock |
| ■ others, including series 3 printer docks and camera docks | Custom dock insert Dock |
| ■ printer dock 4000 ■ camera dock II ■ LS420, LS443 camera dock | Not compatible |
Purchase camera docks, printer docks, and other accessories at a dealer of Kodak products or www.kodak.com/go/c310accessories or www.kodak.com/go/cd40accessories
4 Doing more with your camera
Putting yourself in the picture or video
The Self Timer creates a 10- or 2-second delay between the time you press the Shutter button and the time the picture or video is taken.
1 Turn the Mode dial to any Still mode for pictures, or to for videos, then press the Menu button.
2 Press to highlight Self Timer, then press the OK button.
3 Highlight 10 or 2 seconds, then press the OK button.
4 Press the Menu button to turn off the menu screen.
The Self Timer icon and delay time appear in the status area.
5 Place the camera on a flat surface or use a tripod.
6 Compose the scene.
Press the Shutter button, then move so that you are in the scene.
If the Self Timer is set at 10 seconds, the Self Timer light blinks slowly for 8 seconds (then quickly for 2 seconds) before the picture or video is taken.
If the Self Timer is set at 2 seconds, the light blinks for 2 seconds before the picture or video is taken.
The Self Timer cancels after you take the picture, record the video, or turn off the camera.
NOTE: The video stops when you press the Shutter button or when no storage space remains.
Running a slide show
Use the Slide Show to display your pictures and videos on the LCD screen. To run a slide show on a television or on any external device, see page 20.
Starting the slide show
1 Press the Review button, then press the Menu button.
2 Press to highlight Slide Show, then press the OK button.
3 Press to highlight Begin Show, then press the OK button. Each picture and video is displayed once, in the order in which you took them.
4 To cancel the Slide Show, press the OK button.
Changing the slide show display interval
The default interval setting displays each picture for 5 seconds. You can set the display interval from 3 to 60 seconds.
1 On the Slide Show menu, press to highlight Interval, then press the OK button.
2 Select a display interval. To scroll through the seconds quickly, press and hold
3 Press the OK button. The interval setting remains until you change it.
Running a continuous slide show loop
When you turn on Loop, the slide show is continuously repeated.
1 On the Slide Show menu, press to highlight Loop, then press the OK button.
2 Press to highlight On, then press the OK button.
The slide show repeats until you press the OK button or until battery power is exhausted. This setting remains until you change it.
Displaying pictures and videos on a television
You can display pictures and videos on a television, computer monitor, or any device equipped with a video input using a compatible Kodak EasyShare printer dock and an optional audio/video cable (see the printer dock user's guide).
Purchase these and other accessories at a dealer of Kodak products or at www.kodak.com/go/c310accessories or www.kodak.com/go/cd40accessories
Copying pictures and videos
You can copy pictures and videos from a card to internal memory or from internal memory to a card.
Before you copy, make sure that:
A card is inserted in the camera.
The camera's picture storage location is set to the location from which you are copying. See Image Storage, page 24.
Copy pictures or videos:
1 Press the Review button, then press the Menu button.
2 Press to highlight Copy , then press the OK button.
3 Press to highlight an option.
4 Press the OK button.
NOTE: Pictures and videos are copied, not moved. To remove pictures and videos from the original location after copying, delete them (see page 10).
Tags that you applied for print, email, and favorites are not copied. Protection settings are not copied. To apply protection to a picture or video, see page 10.
Choosing a flash setting
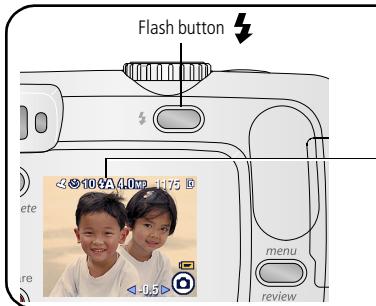
Press the button repeatedly to scroll through flash options (see Flash modes table).
The current flash mode is shown in the LCD status area.
NOTE:
Off and Fill flash options revert to Auto when the camera is turned off.
- When the picture is taken with Auto or Fill flash selected, the camera flashes twice: once to set the exposure and once to take the picture.
| Flash modes | Flash fires |
| Auto Flash | When the lighting conditions require it. |
| Fill | Every time you take a picture, regardless of the lighting conditions. Use when the subject is in shadow or is "backlit" (when the sun is behind the subject). |
| Red-eye | Three times: once to set the exposure, once to reduce red-eye, and once to take the picture. |
| Off | Flash never fires. |
Changing picture-taking settings
You can change settings to get the best results from your camera:
1 In any mode, press the Menu button.
2 Press to highlight the setting you wish to change, then press the OK button.
3 Choose an option, then press the OK button.
4 Press the Menu button to exit.
| Setting | Icon | Options |
| Self Timer Put yourself in the picture or video. | 10, 2 seconds, Off. See page 18. | |
| Exposure Compensation (Still modes) Choose how much light enters the camera. This setting remains until you turn the Mode dial. | -2.0 to +2.0. If pictures are too dark, increase the value. If pictures are too light, decrease the value. | |
| Picture Size (Still modes) Set picture resolution. This setting remains until you change it. | ★ | 4.0 MP (default)—for printing up to 20 x 30 in. (51 x 76 cm); pictures are highest resolution and largest file size. 3.5 MP (3:2 Best)—ideal for printing 4 x 6 in. (10 x 15 cm) prints without cropping. Also for printing up to 20 x 30 in. (51 x 76 cm); some cropping may result due to the 3:2 aspect ratio. 3.1 MP (Better)—for printing up to 11 x 14 in. (28 x 36 cm); pictures are medium resolution with smaller file size. 2.1 MP—for printing up to 8 x 10 in. (20 x 25 cm); pictures are medium resolution with smaller file size. 1.1 MP—for printing up to 5 x 7 in. (13 x 18 cm); for emailing, Internet, or screen display; pictures are lowest resolution and smallest file size. |
| Color Mode (Still modes) Choose color tones. This setting remains until you turn the Mode dial. | BW | Color (default)—for color pictures. Black & White—for black-and-white pictures. Sepia—for pictures with a reddish-brown, antique look. |
| Image Storage Choose an image storage location. This setting remains until you change it. | ○ | Auto (default)—the camera uses the card if one is in the camera. If not, the camera uses internal memory. Internal Memory—the camera always uses internal memory, even if a card is installed. |
| Set Album Choose Album names. | On or Off. Pre-select album names before you take pictures or videos. Then, all the pictures or videos you take are tagged with those album names. See page 28. | |
| Video Length (Video mode) Choose the amount of recording time for videos. This setting remains until you change it. | Continuous (default)—as long as there is room on the card or internal memory, or until the Shutter button is pressed. 5, 15, or 30—seconds NOTE: If the current image storage location does not have adequate space, some video length options are not displayed. See page 52 for storage capacities. | |
| Setup Menu Choose additional settings. | See Customizing your camera, page 25. |
Customizing your camera
Use Setup to customize your camera settings.
1 In any mode, press the Menu button.
2 Press to highlight Setup, then press the OK button.
3 Press to highlight the setting you wish to change, then press the OK button.
4 Choose an option, then press the OK button.
5 Press the Menu button to exit.
| Setting | Icon | Options |
| Return Return to previous menu. | ←↑ | |
| Liveview Change the LCD screen setting so that it is always on or always off (see page 26). This setting remains until you change it. | ◎ | On or Off. |
| Auto Power Off Select when you would like the camera to turn off. | ◎ | 3 minutes (default) 1, 3, 5, or 10 minutes |
| Date & Time Set the date and time. This setting remains until you change it. | 28° | See page 3. |
| Video Out Choose the regional setting that lets you connect the camera to a television or other external device (see page 20). This setting remains until you change it. | ◎ | NTSC (default)—used in most countries except those in Europe and China. North America and Japan use NTSC. PAL—used in Europe and China. |
| Date Stamp (Still modes) Imprint the date on pictures. This setting remains until you change it. | ◎ | Turn the Date Stamp on or off, or change the date stamp format. |
| Video Date Display (Video mode) Display capture date and time before the video starts. This setting remains until you change it. | 000 | Choose None, or choose a date and time format. |
| Language Display the camera screen text in different languages. This setting remains until you change it. | ABC | See page 3. |
| Format Format camera memory. CAUTION: Formatting deletes all pictures and videos, including those that are protected. Removing a card during formatting may damage the card. | Memory Card—moves everything on the card; formats the card. Cancel—exits without making a change. Internal Memory—moves everything in internal memory including email addresses, album names, and Favorites: formats the internal memory. | |
| About View camera and firmware information. | i |
Viewing picture/video information
1 Press the Review button, then press the Menu button.
2 Press to highlight Picture or Video Info, then press the OK button.
3 To view information on the next or previous picture or video, press / .
4 Press the Menu button to exit.
Changing optional review settings
In Review mode, press the Menu button to access optional review settings.
| + | Magnify (pictures) (page 10) | Protect (page 11) | |
| Album (page 28) | Image Storage (page 24) | ||
| Slide Show (page 19) | Picture/Video Information (page 28) | ||
| Multi-up (page 10) | Setup Menu (page 25) | ||
| Copy (page 20) | |||
Pre-tagging for album names
Use the Set Album (Still or Video) feature to pre-select album names before you take pictures or videos. Then, all the pictures or videos you take are tagged with those album names.
First-on your computer
Use Kodak EasyShare software to create album names on your computer. Then copy up to 32 album names to the album name list on your camera the next time you connect the camera to the computer. See Kodak EasyShare software Help for details.
Second-on your camera
1 In any mode, press the Menu button.
2 Press to highlight Set Album, then press the OK button.
3 Press to highlight an album name, then press the OK button. Repeat to mark pictures or videos for albums.
Selected albums are noted with a check mark.
4 To remove a selection, highlight an album name and press the OK button. To remove all album selections, select Clear All.
5 Highlight Exit, then press the OK button.
Your selections are saved. If you turn on the LCD screen, your album selection is displayed on the screen. A plus (+) after the album name means more than one album is selected.
6 Press the Menu button to exit.
This setting remains until you change it.
Third—transfer to your computer
When you transfer the tagged pictures and videos to your computer, Kodak EasyShare software opens and categorizes your pictures and videos in the appropriate album. See the Kodak EasyShare software Help for details.
Tagging pictures/videos for albums
Use the Album feature in Review mode to tag the pictures and videos in your camera with album names.
First-on your computer
Use Kodak EasyShare software to create album names on your computer, then copy up to 32 album names to the camera's internal memory. See Kodak EasyShare software Help for details.
Second-on your camera
1 Press the Review button.
2 Press / to locate a picture, then press the Menu button.
3 Press to highlight Album, then press the OK button.
4 Highlight an album, then press the OK button.
The album name appears with the picture. A plus (+) after the album name means the picture was added to more than one album.
To add other pictures to the same album, press / to scroll through the pictures. When the picture you want is displayed, press the OK button.
To add the pictures to more than one album, repeat step 4 for each album.
5 To remove a selection, highlight an album name, then press the OK button. To remove all album selections, select Clear All.
6 Highlight Exit, then press the OK button.
Your selections are saved.
1 Press the Menu button to return to Review mode.
Third—transfer to your computer
When you transfer the tagged pictures and videos to your computer, Kodak EasyShare software opens and categorizes your pictures and videos in the appropriate album. See Kodak EasyShare software Help for details.
Sharing your pictures
Press the Share button to tag your pictures and videos. When they are transferred to your computer, you can share using:
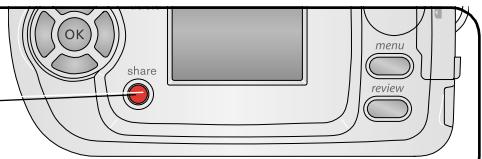
| Pictures | Videos | |
| Print (page 16) | ✔ | |
| Email (page 33) | ✔ | ✔ |
| Favors (page 33), for easy organization on your computer and for sharing on your camera | ✔ | ✔ |
NOTE: Tags remain until removed. If a tagged picture or video is copied, the tag is not copied.
Tagging pictures for printing
1 Press the Share button.
2 Press to locate a picture.
3 Press to highlight Print , then press the OK button.
4 Press to select the number of copies (0 - 99). The default is one. Zero removes the tag for that picture.**
The Print icon appears in the status area.
5 Press the OK button.
6 Press the Share button to exit.
- To tag all pictures in the image storage location, highlight Print All , press the OK button, then select the number of copies as described above. Print All is not available in Quickview.
**To remove the print tagging for all pictures in the image storage location, highlight Cancel Prts , then press the OK button. You cannot cancel prints in Quickview.
Printing tagged pictures
When you transfer the tagged pictures to your computer, the Kodak EasyShare software print screen opens. For details, click the Help button in the Kodak EasyShare software.
For more information on printing from your computer or card, see page 32.
NOTE: For the best 4 × 6 in. (10 x 15 cm) prints, set the camera to 3.5MP (3:2) print quality setting.
See page 24.
Tagging pictures and videos for emailing
First-on your computer
Use Kodak EasyShare software to create an email address book on your computer. Then, copy up to 32 email addresses to the camera's internal memory.
Second—tag pictures/videos on your camera
1 Press the Share button. Press / to locate a picture/video.
2 Highlight Email , then press the OK button.
3 Highlight an email address, then press the OK button.
To tag other pictures/videos with the same address, press / to scroll through the pictures. When the picture or video you want is displayed, press the OK button.
To send the pictures/videos to more than one address, repeat step 2 for each address.
Selected addresses are checked.
4 To remove a selection, highlight a checked address and press the OK button. To remove all email selections, highlight Clear All.
5 Highlight Exit, then press the OK button. Your selections are saved. The Email icon appears in the status area.
6 Press the Share button to exit.
Third—transfer and email
When you transfer the tagged pictures/videos to your computer, the Email screen opens and lets you send them to the addresses you specified. For details, click the Help button in the Kodak EasyShare software.
Tagging pictures as favorites
You can preserve your favorite pictures in the Favorites section of your camera's internal memory, then share them with friends and family.
NOTE: When you transfer pictures from your camera to your computer, all pictures (including favorites) are stored on your computer at full size. Favorite pictures—smaller copies of your originals—are loaded back to your camera, so you can share and enjoy more.
Share your favorite pictures in 4 easy steps:
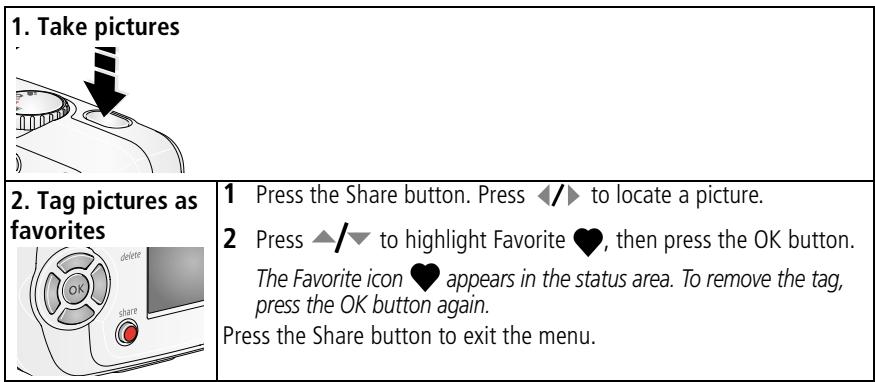
| 3. Transfer pictures to your computer | 1 To enjoy full functionality, install and use the EasyShare software that was packaged with this camera. (See page 12.) |
| 2 Connect the camera to the computer using the USB cable (see page 13) or an EasyShare dock. The first time you transfer pictures, the software helps you make choices about your favorite pictures. Then, your pictures are transferred to the computer. Favorite pictures (smaller versions of the originals) are loaded to the Favorites section of your camera's internal memory. | |
| 4. View favorites on your camera | 1 Turn the Mode dial to Favorites . |
| 2 Press ←/▶ to scroll through favorites. To exit Favorites mode, turn the Mode dial to any other position. |
NOTE: The camera holds a limited number of favorites. Use Camera Favorites in the EasyShare software to customize the size of your camera Favorites section. Videos tagged as favorites remain in the Favorites folder in the EasyShare software. For more details, click the Help button in the Kodak EasyShare software.
Optional settings
In Favorites mode, press the Menu button to access optional settings.
| Slide Show (page 19) | 图 | Picture Information (page 28) |
| Multi-up (page 9) | 图 | Remove all favorites (page 35) |
| 图 | Setup Menu (page 25) |
NOTE: Pictures taken at the 3.5 MP (3:2) quality setting are displayed at a 3:2 aspect ratio with a black bar at the top of the screen. (See Picture Size (Still modes), page 24.)
Removing all favorites from your camera
1 Turn the Mode dial to Favorites
2 Press the Menu button.
3 Highlight, then press the OK button.
All pictures stored in the Favorites section of internal memory are removed. Favorites are restored the next time you transfer pictures to the computer.
4 Press the Menu button to exit the menu.
Preventing favorites from transferring to the camera
1 Open the Kodak EasyShare software. Click the My Collection tab.
2 Go to the Albums view.
3 Click the Camera Favorites Album for your camera.
4 Click Remove Album.
The next time you transfer pictures from your camera to the computer, use the Camera Favorites Wizard/Assistant in the Kodak EasyShare software to either recreate your Camera Favorites Album or to turn off the Camera Favorites feature.
Printing and emailing favorites
1 Turn the Mode dial to Favorites. Press / to locate a picture.
2 Press the Share button.
3 Highlight Print or Email , then press the OK button.
NOTE: Favorites that were taken on this camera (not imported from another source) are good for prints up to 4 × 6 in. (10 × 15 ~cm) .
5 Troubleshooting
For step-by-step product support, visit www.kodak.com/go/c310support or www.kodak.com/go/cd40support and select Interactive Troubleshooting & Repairs.
Camera problems
| Problem | Cause | Solution |
| Camera does not turn on. | Batteries are not installed correctly. | Install new batteries (page 1) or charge rechargeable batteries. |
| Camera does not turn off. | Camera has locked up. | Remove the battery, then reinsert or replace it. If the camera still does not function, contact Customer Support (page 46). |
| Pictures remaining number does not decrease after taking a picture. | Picture does not take up enough space to decrease the number. | The camera is operating normally. Continue taking pictures. |
| Short battery life with Kodak Ni-MH rechargeable digital camera batteries. | Dirt or oxidation on the battery contacts. | Wipe the contacts with a clean, dry cloth (page 55) before loading batteries in the camera. |
| Stored pictures are corrupted. | Card was removed or the batteries expired while the ready light was blinking. | Retake picture. Do not remove card while the ready light is blinking. Keep rechargeable batteries charged. |
| In Review mode, you do not see a picture (or the expected picture) on the LCD screen. | Camera may not be accessing the correct image storage location. | Check the image storage location setting (page 24). |
| In Review mode, a blue or black screen is displayed instead of a picture. | File format is unrecognized. | Transfer the picture to the computer (page 13). |
| Shutter button does not work. | Camera is not turned on. | Turn on the camera (page 2). |
| Camera is processing a picture; the ready light (near the viewfinder) is blinking red. | Wait until the ready light stops blinking red before attempting to take another picture. | |
| Card or internal memory is full. | Transfer pictures to the computer (page 13), delete pictures from the camera (page 11), switch image storage locations (page 24), or insert a card with available memory (page 3). | |
| Shutter button was not pressed. | For best pictures, see page 4. | |
| Slide show does not run on external video device. | Video Out setting is incorrect. | Adjust the camera Video Out setting (NTSC or PAL, page 26). |
| External device is set incorrectly. | See the external device's user's guide. | |
| Picture is too light. | Subject was too close for flash. | Move so there is at least 2.6 ft (0.8 m) between camera and subject. |
| Too much light. | Decrease Exposure Compensation (page 23). | |
| Picture is not clear. | Lens is dirty. | Clean the lens (page 56). |
| Subject too close when taking picture. | Move so there is at least 2.6 ft (0.8 m) between the camera and the subject. | |
| Subject or the camera moved while the picture was taken. | Place the camera on a flat, steady surface or use a tripod. | |
| Picture is too dark. | Flash is not on. | Turn on the flash (page 7). |
| Subject is too far away for the flash to be effective. | Move so there is no more than 7.9 ft (2.4 m) between the camera and the subject. | |
| Subject is in front of a bright light (backlit). | Use Fill flash (page 22) or change your position so light is not behind the subject. | |
| Not enough light. | Increase Exposure Compensation (page 23). | |
| Camera does not recognize SD/MMC card. | Card may not be SD/MMC certified. | Purchase a certified SD/MMC card. |
| Card may be corrupt. | Reformat the card (page 27). Caution: Formatting a card deletes all pictures and videos, including protected files. | |
| Card is not properly inserted in camera. | Insert a card into the slot, then push to seat (page 3). | |
| Camera freezes up when a card is inserted or removed. | Camera detected an error when the card was inserted or removed. | Turn the camera off, then back on. Make sure the camera is turned off before inserting or removing a card. |
| Memory card full. | Storage is full. | Insert a new card (page 3), transfer pictures to the computer (page 13), or delete pictures (page 11). |
| Maximum number of files or folders is reached (or other directory concern). | Transfer pictures to the computer (page 13), then format the card or internal memory (page 27).Caution: Formatting a card deletes all pictures and videos, including protected files. |
Camera/computer communications
| Problem | Cause | Solution |
| The computer does not communicate with the camera. | There is a problem with the configuration of the USB port on the computer. | See this file on the EasyShare software CD: USB.html Or, visit www.kodak.com/go/camerasupport |
| Camera power is off. | Turn on the camera (page 2). | |
| Batteries are exhausted or are not charged. | Install new batteries (page 1) or charge rechargeable batteries. | |
| Some Advanced Power Management utilities on laptops turn off ports to save battery life. | See the Power Management section of the laptop user's guide to disable this feature. | |
| USB cable is not securely connected. | Connect cable to camera and computer port (page 13). | |
| Software is not installed. | Install the software (page 12). | |
| Software is installed incorrectly. | Disconnect the USB cable. Close all open applications. Re-install the software (page 12). | |
| Too many applications are running on the computer. | Disconnect camera from the computer. Close all software applications, reconnect camera. | |
| The Battery Monitor or similar software runs constantly. | Close that software before starting the Kodak software. | |
| Cannot transfer pictures. (The Add New Hardware Wizard cannot locate drivers.) | Software is not installed. | Disconnect USB cable. (If using camera dock or printer dock, disconnect cable and remove camera from dock). Close all open applications. Re-install the software (page 12). |
| Software is installed incorrectly. | Disconnect the USB cable. Close all open applications. Re-install the software (page 12). |
LCD screen messages
| Message | Cause | Solution |
| No images to display | There are no pictures in the current image storage location. | Change image storage location setting (page 24). |
| Memory card requires formatting | Card is corrupted or formatted for another digital camera. | Insert a new card (page 3) or format the card (page 27).Caution: Formatting a card deletes all pictures and videos, including protected files. |
| Memory card cannot be read (Please format memory card or insert another card) | ||
| Only one USB connection allowed. Disconnect cable or rem. (remove) camera from dock. | USB cable is connected to camera while docked. | Unplug the USB cable from the camera. |
| Internal memory requires formatting | Camera internal memory is corrupted. | Format the internal memory (page 27). Caution: Formatting deletes all pictures and videos, including protected files. (Formating internal memory also deletes email addresses, album names, and Favorites. To restore them, see the Kodak EasyShare software Help.) |
| Internal memory cannot be read (Please format internal memory) | ||
| No memory card (Files not copied) | There is no card in the camera. Pictures were not copied. | Insert a card (page 3). |
| Not enough space to copy files (Files not copied) | There is not enough space in the image storage location you are copying to (internal memory or the card). | Delete pictures from the image storage location you are copying to (page 11), or insert a new card (page 3). |
| Memory card is locked (Insert new memory card) | Card is write-protected. | Insert a new card (page 3), move the switch on the card to unlock the card, or change the image storage location to internal memory (page 24). |
| Read-only memory card. Remove write protection to capture or write to card. | ||
| Memory card is unusable (Insert new memory card) | Card is slow, corrupted, or unreadable. | Insert a new card (page 3) or format the card (page 27).Caution: Formatting a card deletes all pictures and videos, including protected files. |
| Date and time have been reset | This is the first time you turned on the camera; or the batteries have been removed for an extended period of time; or the batteries are exhausted. | Reset the clock (page 3). |
| No address book on camera (Connect with computer to import address book) | No Email addresses appear because there is no address book. | Create and copy address book from computer. See the Kodak EasyShare software Help. |
| No album names on camera (Connect with computer to import album names) | Album names have not been copied to the camera from the computer. | Create and copy album names from computer. See the Kodak EasyShare software Help. |
| Can only mark image with 32 album names. Only the first 32 album names will be saved | The maximum number of album names (32) have been associated with an image.NOTE: Albums previously associated with an image persist even though they may not be contained in current album file on camera. | Delete one or more album names associated with the image (page 29). |
| High camera temperature. (Camera will be turned off.) | Internal temperature of the camera is too high for the camera to operate. The viewfinder light glows red and the camera turns off. | Leave the camera off until it's cool to the touch, then turn it back on. If the message reappears, contact Customer Support (page 46). |
| Unrecognized file format | Camera cannot read the picture format. | Transfer the picture to the computer (page 13), or delete it (page 11). |
| Camera error #XXXX. See user's guide. | An error is detected. | Turn the Mode dial off, then back on. If the message reappears, contact Customer Support (page 46). |
Camera ready light status
| Status | Cause | Solution |
| Ready light does not turn on and the camera does not work. | Camera is not turned on. | Turn on the camera (page 2). |
| Batteries are exhausted or are not charged. | Install new batteries (page 1) or charge rechargeable batteries. | |
| Mode dial was on when batteries were reloaded. | Turn Mode dial off, then back on. | |
| Ready light blinks green. | Picture is being processed and saved to the camera. | Camera is operating normally. |
| Ready light blinks amber. | Flash is not charged. | Wait. Resume picture taking when the light stops blinking and turns green. |
| Camera is initializing. | ||
| Ready light blinks red and camera turns off. | Batteries are low or exhausted. | Install new batteries (page 1) or charge rechargeable batteries. |
| Ready light glows steady red. | Camera's internal memory or card is full. | Transfer pictures to the computer (page 13), delete pictures from the camera (page 11), switch image storage locations (page 24), or insert a card with available memory (page 3). |
| Camera processing memory is full. | Wait. Resume picture taking when the light turns green. | |
| Card is read-only. | Change the image storage location to internal memory (page 24), or use a different card. | |
| Ready light glows steady green. | Camera is on; ready to take a picture or video. | Camera is operating normally. |
6 Getting help
Helpful Web links
| Help with your camera | www.kodak.com/go/c310support www.kodak.com/go/cd40support |
| Help with Windows operating system and working with digital pictures | www.kodak.com/go/pcbasics |
| Download the latest camera software and firmware | www.kodak.com/go/c310downloads www.kodak.com/go/cd40downloads |
| Optimize your printer for truer, more vibrant colors | www.kodak.com/go/onetouch |
| Get support for cameras, software, accessories, more | www.kodak.com/go/support |
| Purchase camera accessories | www.kodak.com/go/c310accessories www.kodak.com/go/cd40accessories |
| Register your camera | www.kodak.com/go/register |
| View online tutorials | www.kodak.com/go/howto |
Software help
Click the Help button in the Kodak EasyShare software. Also, see the tutorial on the CD for help with connecting your camera to a computer.
Telephone customer support
If you have questions concerning the operation of the software or camera, you may speak with a customer support representative.
Before you call
Have the camera, camera dock, or printer dock connected to your computer. Be at your computer, and have the following information available:
Operating system
Exact error message you received
Processor speed (MHz)
Version of Kodak EasyShare software CD
Computer model
Camera serial number
Amount of memory (MB)
NOTE: See next page for customer support numbers.
| Australia | 1800 147 701 |
| Austria | 0179 567 357 |
| Belgium | 02 713 14 45 |
| Brazil | 0800 150000 |
| Canada | 1 800 465 6325 |
| China | 800 820 6027 |
| Denmark | 3 848 71 30 |
| Ireland | 01 407 3054 |
| Finland | 0800 1 17056 |
| France | 01 55 1740 77 |
| Germany | 069 5007 0035 |
| Greece | 00800 44140775 |
| Hong Kong | 800 901 514 |
| India | 91 22 617 5823 |
| Italy | 02 696 33452 |
| Japan | 03 5540 9002 |
| Korea | 00798 631 0024 |
| Netherlands | 020 346 9372 |
| New Zealand | 0800 440 786 |
| Norway | 23 16 21 33 |
| Philippines | 1 800 1 888 9600 |
| Poland | 00800 4411625 |
| Portugal | 021 415 4125 |
| Singapore | 800 6363 036 |
| Spain | 91 749 76 53 |
| Sweden | 08 587 704 21 |
| Switzerland | 01 838 53 51 |
| Taiwan | 0800 096 868 |
| Thailand | 001 800 631 0017 |
| Turkey | 00800 448827073 |
| United Kingdom | 0870 243 0270 |
| United States | 1 800 235 6325 |
| 585 781 6231 (toll) | |
| International Toll Line | +44 131 458 6714 |
| International Toll Fax | +44 131 458 6962 |
For the most up-to-date listings, visit: http://www.kodak.com/go/dfiswwcontacts
7 Appendix
Camera specifications
For more specifications, visit www.kodak.com/go/c310support or www.kodak.com/go/cd40support.
| Kodak EasyShare C310/CD40 digital camera | |
| CCD (charge-coupled device) | |
| CCD | 1/2.5 in. CCD, 4:3 aspect ratio |
| Output image size | 2304 x 1728 (4.0 M) pixels 2304 x 1536 (3.5 M) pixels 2048 x 1536 (3.1 M) pixels 1664 x 1248 (2.1 M) pixels 1216 x 912 (1.1 M) pixels |
| Displays | |
| Color display | 1.6 in. (4 cm) color hybrid LCD, 220 x 279 (61K) pixels |
| Preview | Frame rate: 20 fps; Field-of-view: 99%. |
| Lens | |
| Taking lens | Aspheric all-glass Kodak Retinar lens, f/4.5 35 mm (35 mm equivalent) |
| Focus system | Fixed focus. Working range: 0.85 m to infinity |
| Digital zoom | 1.0X–5X with 0.2X step Not supported for movie capture |
| Lens barrier | Integrated in lens barrel |
| Exposure | |
| Exposure metering | TTL-AE, Center-weighted |
| Exposure compensation | +/-2.0 EV with 0.5 EV step |
| Shutter speed | Mechanical with CCD electrical Auto: 1/2 - 1/2000 sec. |
| ISO speed | Auto: 100 to 400 |
| Flash | |
| Electronic flash | Guide no. 9 (@ ISO 100) Auto flash by pre-flash Working range @ ISO 140: 0.8 - 2.4 m |
| Flash modes | Auto, Fill, Red-eye, Off |
| Capture | |
| Capture modes | Auto, Video |
| Video capture | QVGA (320 x 240) @ 20 fps |
| Image file format | Still: EXIF 2.2 (JPEG compression) |
| Image storage | Optional MMC or SD Card SD . (The SD logo is a trademark of the SD Card Association.) |
| Internal storage capacity | 16 MB internal memory/13 MB available for image storage (1 MB equals one million bytes) |
| Review | |
| Quickview | Yes |
| Video output | NTSC or PAL, selectable via dock connector |
| Power | |
| 2 Kodak oxy-alkaline digital camera batteries AA ZR6 (non-rechargeable); 2-AA lithium digital camera batteries; 2 Kodak Ni-MH rechargeable digital camera batteries AA; 1 Kodak lithium digital camera battery CRV3 (non-rechargeable); 1 Kodak Ni-MH rechargeable digital camera battery KAA2HR | |
| Communication with computer | |
| USB 2.0 (PIMA 15740 protocol), via USB cable Model U-8, EasyShare camera dock or printer dock | |
| Other features | |
| PictBridge support | Yes |
| Self-timer | 10 seconds, 2 seconds selectable |
| Auto power off | Selectable 1, 3, 5, 10 minutes |
| Color modes | Color, Black & White, Sepia |
| Date stamp | None, YYYYY/MM/DD, MM/DD/YYYY, DD/MM/YYYY |
| Tripod mount | 1/4 inch |
| Operating temperature | 32-104°F (0-40°C) |
| Size | 4.1 in. (103.5 mm) x 2.6 in. (65 mm) x 1.4 in. (35 mm) @ power off |
| Weight | 4.7 oz (134 g) without battery or card |
Storage capacities
Actual storage capacity varies depending on subject composition, card brand, and other factors. You may be able to store more or fewer pictures and videos. Favorites take up additional space in internal memory.
Picture storage capacity
| Number of pictures | |||||
| 4.0 MP | 3.5 MP (3:2) | 3.1 MP | 2.1 MP | 1.1 MP | |
| 16 MB internal memory | 16 | 18 | 20 | 29 | 48 |
| 16 MB SD or MMC | 19 | 21 | 24 | 34 | 56 |
| 32 MB SD or MMC | 38 | 43 | 47 | 68 | 112 |
| 64 MB SD or MMC | 77 | 85 | 95 | 136 | 223 |
| 128 MB SD or MMC | 153 | 171 | 190 | 272 | 447 |
| 256 MB SD or MMC | 307 | 341 | 379 | 543 | 893 |
Video storage capacity
| Minutes/seconds of video | |
| QVGA (320 x 240) | |
| 16 MB internal memory | 35 sec. |
| 16 MB SD or MMC | 40 sec. |
| 32 MB SD or MMC | 1 min. 21 sec. |
| 64 MB SD or MMC | 2 min. 42 sec. |
| 128 MB SD or MMC | 5 min. 25 sec. |
| 256 MB SD or MMC | 10 min. 50 sec. |
Power-saving features
| If no action for | The camera | To turn it back on |
| 1 minute | Screen turns off. | Press any button. |
| 3 minutes or select 1, 5, or 10 minutes | Enters auto power off. | Turn the Mode dial off and on again. |
Important safety instructions
Using this product
- Read and follow these instructions before using Kodak products. Always follow basic safety procedures.
Use only a USB 2.0 certified computer equipped with a current-limiting motherboard. Contact your computer manufacturer if you have questions.
The use of an accessory attachment that is not recommended by Kodak, such as an AC adapter, may cause fire, electric shock, or injury.
If using this product in an airplane, observe all instructions of the airline.

CAUTION:
Do not disassemble this product; there are no user-serviceable parts inside. Refer servicing to qualified service personnel. Do not expose this product to liquid, moisture, or extreme temperatures. Kodak AC adapters and battery chargers are intended for indoor use only. The use of controls, adjustments, or procedures other than those specified herein may result in exposure to shock and/or electrical or mechanical hazards. If the LCD breaks, do not touch the glass or liquid. Contact Kodak Support.
Battery safety and handling

CAUTION:
When removing batteries, allow them to cool first; batteries may be hot.
- Read and follow all warnings and instructions supplied by the battery manufacturer.
Use only batteries that are approved for this product. - Keep batteries out of the reach of children.
- Do not allow batteries to touch metal objects, including coins. Otherwise, a battery may short circuit, discharge energy, become hot, or leak.
- Do not disassemble, install backward, or expose batteries to liquid, moisture, fire, or extreme temperature.
- Replace all batteries of a set at the same time. Do not mix new batteries with used ones. Do not mix rechargeable and non-rechargeable batteries. Do not mix lithium, Ni-MH, and Ni-Cd batteries together. Do not mix batteries of different chemistry types, grades, or brands. Failure to observe this precaution may cause leakage.
- Remove batteries when the product is stored for an extended period of time. In the unlikely event that battery fluid leaks inside the product, contact your local Kodak Customer Service representative.
In the unlikely event that battery fluid leaks onto your skin, wash immediately with water and contact your local health provider. For additional health-related information, contact your local Kodak Customer Service representative.
Dispose of batteries according to local and national regulations.
Do not charge non-rechargeable batteries.
For more information on batteries, see www.kodak.com/global/en/service/batteries/batteryUsage.jhtml
Battery information
Battery life for Kodak C-series digital cameras
Use the following batteries. Actual battery life may vary based on usage.
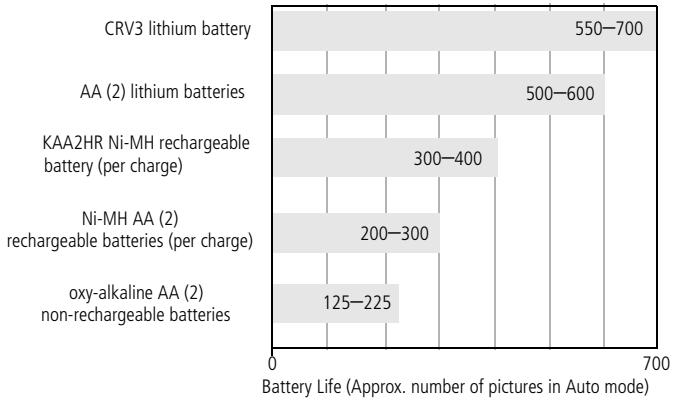
Battery life test method: CIPA
Memory card used in test: Kodak SD 128 MB memory card
We do not recommend or support alkaline batteries. For acceptable battery life, and to make sure your camera operates dependably, use the replacement batteries listed above.
Extending battery life
Limit the following activities that quickly deplete battery power:
- Reviewing your pictures on the camera screen (see page 7)
Using the camera LCD screen as a viewfinder (see page 5)
- Excessive use of the flash (see page 22)
- Dirt on the battery contacts can affect battery life. Wipe the contacts with a clean,
dry cloth before loading batteries in the camera.
- Battery performance is reduced at temperatures below 41^ ( 5^ ). When using your camera in cold weather, carry spare batteries and keep them warm. Do not discard cold batteries that do not work; when they return to room temperature, they may be usable.
Visit www.kodak.com/go/c310accessories or www.kodak.com/go/cd40accessories for:
Kodak EasyShare camera dock—powers your camera, transfers pictures to your computer, and charges the available Kodak Ni-MH rechargeable digital camera battery KAA2HR.
Kodak EasyShare printer dock—powers your camera, makes 4 x 6 in. (10 x 15 cm) prints with or without a computer, transfers pictures, and charges the available Kodak Ni-MH rechargeable digital camera battery KAA2HR.
Upgrading your software and firmware
Download the latest versions of the software included on the Kodak EasyShare software CD and the camera firmware (the software that runs on the camera). Visit www.kodak.com/go/c310downloads or www.kodak.com/go/cd40downloads.
Additional care and maintenance
If the camera has been subjected to inclement weather or you suspect water has gotten inside the camera, turn off the camera and remove the batteries and card. Allow all components to air-dry for at least 24 hours before using the camera again.
- Blow gently on the lens or camera screen to remove dust and dirt. Wipe gently with a soft, lint-free cloth or an untreated lens-cleaning tissue. Do not use cleaning solutions unless designed specifically for camera lenses. Do not allow chemicals, such as suntan lotion, to contact painted surfaces.
Service agreements are available in some countries. Contact a dealer of Kodak products for more information.
For digital camera disposal or recycling information, contact your local authorities. In the US, visit the Electronics Industry Alliance Web site at www.eiae.org or the Kodak Web site at www.kodak.com/go/c310support or www.kodak.com/go/cd40support
Warranty
Limited warranty
Kodak warrants Kodak EasyShare digital cameras and accessories (excluding batteries) to be free from malfunctions and defects in both materials and workmanship for one year from the date of purchase.
Retain the original dated sales receipt. Proof of the date of purchase will be required with any request for warranty repair.
Limited warranty coverage
This limited warranty will be honored only in the geographical location that Kodak digital cameras and accessories were purchased.
Kodak will REPAIR or REPLACE Kodak EasyShare digital cameras and accessories if they fail to function properly during the warranty period, subject to any conditions and/or limitations stated herein. Such repair service will include all labor as well as any necessary adjustments and/or replacement parts. Such repair or replacement is the sole remedy under this warranty.
If replacement parts are used in making repairs, these parts may be remanufactured, or may contain remanufactured materials. If it is necessary to replace the entire product, it may be replaced with a remanufactured product.
Limitations
Request for Warranty service will not be accepted without proof of date of purchase, such as a copy of the original dated Kodak EasyShare digital camera or accessory sales receipt. (Always keep the original for your records.)
This warranty does not apply to the battery(s) used in digital cameras or accessories.
This warranty does not cover circumstances beyond Kodak's control, nor problems caused by failure to follow the operating instructions in the Kodak EasyShare digital cameras and accessories User's Guides.
This warranty does not apply when failure is due to shipping damage, accident, alteration, modification, unauthorized service, misuse, abuse, use with incompatible accessories or attachments, failure to follow Kodak's operation, maintenance or repacking instructions, failure to use items supplied by Kodak (such as adapters and cables), or claims made after the duration of this warranty.
Kodak makes no other express or implied warranty for this product. In the event that the exclusion of any implied warranty is ineffective under the law, the duration of the implied warranty will be one year from the purchase date.
The option of replacement is Kodak's only obligation. Kodak will not be responsible for any special, consequential or incidental damages resulting from the sale, purchase, or use of this product, regardless of the cause. Liability for any special, consequential or incidental damages (including but not limited to loss of revenue or profit, downtime costs, loss of the use of the equipment, cost of substitute equipment, facilities or services, or claims of your customers for such damages resulting from the purchase, use or failure of the product), regardless of cause or for breach of any written or implied warranty is expressly disclaimed and excluded here from.
Your rights
Some states or jurisdictions do not allow exclusion or limitation of incidental or consequential damages, so the above limitation or exclusion may not apply to you. Some states or jurisdictions do not allow limitations on how long an implied warranty lasts, so the above limitation may not apply to you.
This warranty gives you specific rights, and you may have other rights which vary from state to state or by jurisdiction.
Outside the United States and Canada
In countries other than the United States and Canada, the terms and conditions of this warranty may be different. Unless specific Kodak warranty is communicated to the
purchaser in writing by a Kodak company, no warranty or liability exists beyond any minimum requirements imposed by law, even though defect, damage, or loss may be by negligence or other act.
Regulatory compliance
FCC compliance and advisory

Kodak EasyShare C310/CD40 digital camera
This equipment has been tested and found to comply with the limits for a Class B digital device, pursuant to Part 15 of the FCC Rules. These limits are designed to provide reasonable protection against harmful interference in a residential installation.
This equipment generates, uses, and can radiate radio frequency energy and, if not installed or used in accordance with the instructions, may cause harmful interference to radio communications. However, there is no guarantee that interference will not occur in a particular installation.
If this equipment does cause harmful interference to radio or television reception, which can be determined by turning the equipment off and on, the user is encouraged to try to correct the interference by one or more of the following measures: 1) reorient or relocate the receiving antenna; 2) increase the separation between the equipment and the receiver; 3) connect the equipment to an outlet on a circuit different from that to which the receiver is connected; 4) consult the dealer or an experienced radio/TV technician for additional suggestions.
Any changes or modifications not expressly approved by the party responsible for compliance could void the user's authority to operate the equipment. Where shielded interface cables have been provided with the product or specified additional components or accessories elsewhere defined to be used with the installation of the product, they must be used in order to ensure compliance with FCC regulation.
Canadian DOC statement
DOC Class B Compliance—This Class B digital apparatus complies with Canadian ICES-003.
Waste Electrical and Electronic Equipment labeling

In the European Union, do not discard this product as unsorted municipal waste. Contact your local authorities or go to www.kodak.com/go/recycle for recycling program information.
Korean Class B ITE
English translation:
This is a Class B product based on the standard of the Voluntary Control Council for Interference from Information Technology Equipment (VCCI). If this is used near a radio or television receiver in a domestic environment, it may cause radio interference. Install and use the equipment according to the instruction manual.
Australian C-Tick

N137
Index
A
AA battery, installing, 1
About, 27
accessories, 13
battery, 55
buying, 46
camera dock, 56
primer dock, 14, 56
SD/MMC card, 3
albums, tagging pictures for, 28, 29
alkaline batteries, warning, 1
Australian C-Tick regulatory information, 60
auto
flash, 7
power-down, 53
B
batteries
expected life, 55
extending life, 55
loading, 1
types, 1, 51, 55
battery
safety, 54
battery compartment, ii
button
controller, ii
Delete, ii
delete, 5
Flash/Status, ii
flash/status, 7
Menu, ii
Review, ii
review, 7
Share, ii
shutter, i
zoom, 6
C
cable
audio/video, 20
USB, 13
camera dock, 56
camera screen, ii
error messages, 41
reviewing pictures, 7
reviewing videos, 7
turningLiveviewdefaulton/off,26
Canadian compliance, 60
caring for your camera, 56
Class B ITE, 60
clock, setting, 2, 3, 26
Color Mode, 24
computer
connecting camera, 12, 13
transfer to, 12
controller buttons, ii
copy pictures
card to memory, 20
memory to card, 20
to computer via USB cable, 13
CRV3 battery
loading, 1
customer support, 46
customizing camera settings, 25
D
date displaying on video, 27 imprinting on pictures, 26 setting, 26
Date and Time, 26
date setting, 2, 3
Date Stamp, 26
Delete button, ii
deleting during quickview, 5 formatting precaution, 27 from internal memory, 11 from SD/MMC card, 11 protecting pictures, videos, 10 digital zoom, 6
displaying slide show, 19
disposal, recycling, 57, 60
dock camera, 56 printer, 14, 56
dock connector, ii
downloading pictures, 12
E
EasyShare software, 12
emailing pictures, videos, 32
error messages, 41
expected life, 55
Exposure Compensation, 23
external video device
setting video out, 26 viewing pictures, videos, 20
F
favorsites
removing, 35
settings, 34
tagging, 33
FCC compliance, 59
firmware
finding version on camera, 27
firmware, upgrading, 56
flash, i
settings, 7
Flash/Status button, ii
Format, 27
formatting internal memory/card, 27
G
grip, i, ii
guidelines, battery, 55
H
help camera,36 EasyShare software,46 support,46 web links,46
Image Storage, 24 setting storage location, 24 information about camera, 27 installing
batteries, 1
SD/MMC card, 3
software, 12
internal memory
formatting, 27
setting image storage location, 24
storage capacity, 52
K
Kodak digital camera batteries, 1
Kodak EasyShare software
getting help, 46
installing, 12
upgrading, 56
Kodak web sites, 46
Korean Class B ITE, 60
L
Language, 27
LCD (liquid crystal display), ii
lens, i
cleaning lens, 56
light
ready, ii, 44
Self Timer, i
video, i
Liveview, 26
turning default on/off, 26
loading
batteries, 1
SD/MMC card, 3
software, 12
M
Macintosh OS, installing software on, 12
maintenance, camera, 56
memory
inserting card, 3
internal, 24
removable card, 24
setting image storage location, 24
storage capacities, 52
Menu
button, ii
MMC card
formatting, 27
setting image storage location, 24
mode dial, i
movies. See videos
N
NTSC, video out setting, 26
0
OK button, ii
online prints, ordering, 16
P
PAL, video out setting, 26
PictBridge enabled printer, 14
Picture Quality, 24
pictures
checking settings, 8
copying, 20
deleting, 11
emailing tagged, 32
printing, 16
printing tagged, 31
protecting, 10
reviewing, 7
storage capacity, 52
tagging, 28, 29
transfer via USB cable, 13
power
auto off, 53
camera, 2
switch, i
primer dock, 14, 56
printing
from a card, 16
from computer, 16
optimizing printer, 46
order online, 16
PictBridge enabled, 14
tagged pictures, 16
withEasyShare printer dock,14
protecting pictures, videos, 10
Q
quickview
using, 5
R
ready light, ii, 44
recycling, disposal, 57, 60
red-eye, flash, 7
regulatory information, 59, 60
Class B ITE, 60
removing favorites, 35
Return, 26
Review button, ii
review button, 7
reviewing pictures
as you take them, 5
cameracreen,7
deleting, 11
protecting, 10
slide show, 19
reviewing videos
cameracreen,7
deleting, 11
protecting, 10
slide show, 19
running slide show, 19
S
safety
battery, 54
SD/MMC card
formatting, 27
inserting, 3
printing from, 16
setting image storage location, 24
storage capacities, 52
Self Timer, 23
light, i
self timer
with pictures, 18
service and support, telephone
numbers, 46
SetAlbum,25
setting
album, 25
color mode, 24
date and time, 2, 3
date stamp, 26
date/time,26
exposure compensation, 23
flash, 7
image storage location, 24
language, 27
Liveview, 26
picture quality, 24
self timer, 18
video length, 25
video out, 26
setup mode, using, 25
Share button, ii
shutoff,auto,53
shutter
self timer delay, 18
shutter button, i
shutter, problems, 37
sleep mode, 53
Slide Show
problems, 37
slide show
continuous loop, 20
running, 19
software
getting help, 46
installing, 12
upgrading, 56
specifications, camera, 49
status
camera ready light, 44
storage capacity, 52
support,technical,46
T
tagging
favors, 33
for email, 32
for print, 32
tagging pictures
for albums, 28, 29
television, slide show, 20
time, setting, 2, 3, 26
timer, shutter delay, 18
tips
battery guidelines, 55
care & maintenance, 56
transfer, via USB cable, 13
trash can, deleting, 5
tripod socket, ii
troubleshooting
camera, 36
camera/computer
communications, 40
error messages, 41
ready light status, 44
turning camera on and off, 2
U
upgrading software, firmware, 56
URLs, Kodak web sites, 46
USB (universal serial bus)
transferring pictures, 13
USB cable
camera port, ii
V
VCCI compliance, 60
Video Date Display, 27
Video Length, 25
Video Out, 26
videos checking settings, 8 copying, 20 deleting, 11 display date on, 27 emailing tagged, 32 protecting, 10 record light, i reviewing, 7 setting recording time, 25 storage capacities, 52 transfer to computer, 12 viewing, 7 viewfinder, ii lens, i viewing camera information, 27 viewing picture after taking, 5, 7
W
warranty, 57
WEEE Waste Electrical and Electronic Equipment,60
Windows OS-based computers installing software,12
wrist strap post, i