
ESA3085 - Air-conditioner HAIER - Free user manual and instructions
Find the device manual for free ESA3085 HAIER in PDF.
User questions about ESA3085 HAIER
0 question about this device. Answer the ones you know or ask your own.
Ask a new question about this device
Download the instructions for your Air-conditioner in PDF format for free! Find your manual ESA3085 - HAIER and take your electronic device back in hand. On this page are published all the documents necessary for the use of your device. ESA3085 by HAIER.
USER MANUAL ESA3085 HAIER
What The World Comes Home To
Room Air Conditioner
(ESA3065/ESA3085 0nly)
User Manual
Read instructions before installing.
Call 1-877-337-3639 for questions on parts and services
Thank You for buying a dependable, energy saving and easy to operate HAIER room air conditioner. This manual contains useful information for you to maintain, operate, install and safely use your room air conditioner. Your air conditioner cleans, cools and dehumidifies the air in your room to provide you with the ultimate level of comfort.
Please read instructions carefully before using the product. Also, do not forget to fill out and mail the Product Registration Card.
Product Registration
Record Your Model and Serial Number.
For all your service calls during the warranty period the following information will be needed. Attach the sales receipt to this guide and keep for future reference. This information can be obtained from the serial plate, which is on your air conditioner. This is either on the cabinet (side or back) or you may have to remove the front grille to locate it.
Model Number:
Serial Number:
Date of Purchase:
Dealer's Name:
Dealer's Address:
Dealer's Phone Number:
| TABLE | |||||
| RECEPTACLE AND FUSE TYPES | |||||
| RATED VOLTS | 125/60 | 250/60 | |||
| AMPS | 15 | 20 | 15 | 20 | 30 |
| WALL OUTLET | |||||
| FUSE SIZE | 15 | 20* | 15 | 20* | 30 |
| TIME DELAY FUSE (or circuit braker) | Plug | Plug | Plug | ||
SAFETY PRECAUTIONS
WARNING: Following these basic precautions will reduce the

risk of fire, electrical shock, injury or death when using your air conditioner.
1) Air conditioner must be connected to proper electrical outlet with the correct electrical supply. (see table)

2) Proper grounding must be ensured to reduce the risk of shock and fire. DO NOT CUT OR REMOVE THE GROUNDING PRONG. If you do not have a three-prong electric receptacle outlet in the wall, have a certified electrician install the proper receptacle. The wall receptacle MUST be properly grounded.

3) Do not use if power cord is frayed or otherwise damaged. Also avoid using it if there are cracks or abrasion damage along the length, plug or connector.

4) DO NOT USE AN ADAPTER OR AN EXTENSION CORD.

5) When installing your air conditioner in a window, make sure the window is strong enough to hold the weight of the air conditioner. You also want to secure and correctly install your air conditioner properly to prevent it from falling. Extra brackets and or support may be required depending on your window.
6) Do not block airflow inside or outside the air conditioner with blinds, drapes, protective covers, shrubs or bushes.
7) Be careful of sharp edges on the front and rear fins of the unit that could cut and cause serious injury.
8) Be careful when lifting the air conditioner to install or remove the unit. Always use two or more people for this.
9) Always unplug the air conditioner before servicing it or moving it.
Table Of Contents
PAGE
A Word From Haier 1
Product Registration 1
Safety Precautions 2
Warnings 4
Electrical Safety 4
Tips 5
Energy Saving Guide 5
Features 6-7
Operating Guide 8-13
Normal Operating Sounds 8
Operating Instructions 8-13
Installations 14-18
Parts Supplied 15
Tools 15
Steps for Installation 16-18
Clean and Care Guide 19-20
Troubleshooting 20-21
Warranty Information 22
WARNING

Following the safety messages is very important.
These messages can save you from being injured or killed.
Warning symbols alert you to be careful and means Danger. Always follow instructions to be safe and reduce chances of injury or death.
Warning and Danger signs will precede safety messages.
Electrical Safety

Grounding: This room air conditioner must be grounded.
Grounding reduces the risk of electric shock by providing an escape wire for the electric current.
The power cord has a grounding wire with a grounding plug. Plug it into an outlet that is properly installed and grounded.
WARNING: Improper use of the grounding
plug can result in a risk of electric shock.
Call a qualified electrician if you don't understand
the grounding instructions or if you are not sure if the air conditioner is properly grounded.
If the wall outlet is not grounded, please contact an electrician to have it replaced with a properly grounded outlet.
Do not, under any circumstances, cut or remove the third (ground) prong from the power cord.
Adapter Plug: We strongly advise against using an adapter plug.
Important: Test power plug before each use:
- Press i reset i button.
- Press i test i button, unit should trip.
- Press i reseti button again for use .
Do not use if above test fail.
In the event this device trips, the cause of the malfunction can be corrected before further use of the device.
Tips
- Air Conditioners are designed for use in a double hung window or through the wall installation only. (As applicable in your model)
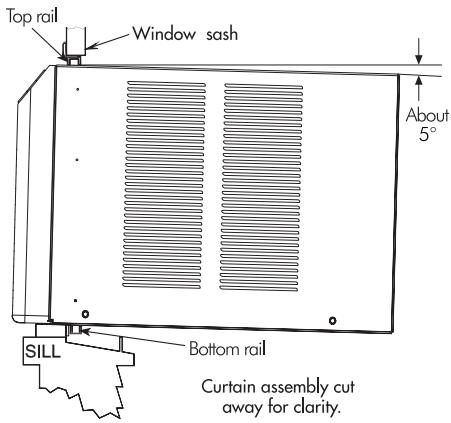
- While installing unit be sure to tilt air conditioner 5 degree outward to have the water drip outside the house.
- Install the unit on the north side as normally that is the shaded side. This will enhance the operation of your unit.

- Window has to be strong for installation. Extra brackets and or support may be required depending on your window. (Brackets and Supports not included in all models)
- Measure the window before installing, if the window is too big for the unit you may require professional installation.

- Use correct electric voltage and proper ampere for the unit to run effectively.

- Only let a certified electrician do any modifications to your electrical outlet.
- Use a dedicated line for the operation of your air conditioner to avoid the possibility of an electrical surge.
Energy Saving Guide
- When installing your air conditioner make sure to seal all areas where there is a possibility of air leakage.
- Airflow should not be blocked inside either by curtains, drapes or furniture or outside by shrubs or bushes.
- Do not needlessly use an electrical light or other appliances that produce heat.
- Keep the vent closed on the air conditioner when in the cooling function.
- Keep the blinds and the drapes drawn on all the other windows.
- While cooking use an exhaust fan in the kitchen to remove the excess heat produced.
- Always use the correct BTU size air conditioner to cool the room to attain optimum efficiency.
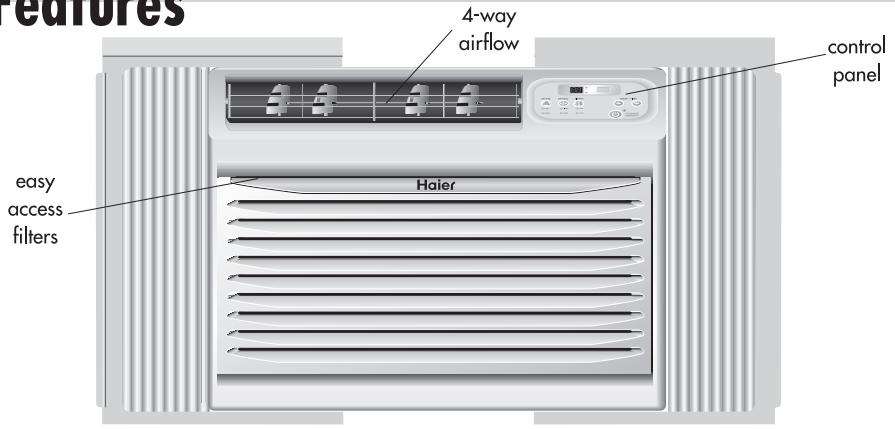
Features
MODEL: HWR08XC5
ESA3065, ESA3085
1. Thermostat
This allows you to adjust the temperature of the air. The lower the setting the cooler the air temperature With this you can set the temperature to your desired comfort level You can set the temperature between 61^ and 86^ .
2. fan Speed
You have 2 levels of Fan speed to set at your desired comfort level.
3. Function.
Your air conditioner has 2 Functions.
a) COOL
Here the air conditioner will operate the compressor and the desired fan speed set to give you chilled cold air for your comfort.
b) Fan
You can run the fan only on not so hot days. The fan can be set to run at 2 speeds as desired by you.
4. Timer
Your air conditioner can be set to go on or off at your desire. This can be done up to 24 hours in advance.
5. 4 Way Air Flow
These air directional louvers let you control the direction of the airflow in your required direction.
The airflow can be directed
up - down - right side -left side.
6. Window Install Kit
Enables you to install the air conditioner in a double hung window. Extra brackets or support may be needed depending on your window.
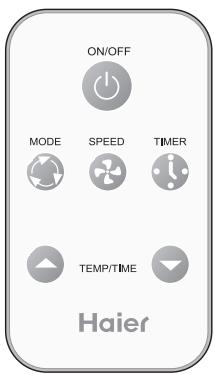
7. Remote Control
This full functional wireless remote allows you to operate your air conditioner from a distance. You need not have to get up to change the settings, the functions or to turn the unit on or off.
8. LED Display Electronic Control Panel
The 4 function LED displays Room Temperature, Temperature Setting, Timer Setting and Time Remaining to Stop / Start the unit. Electronic Control Panel lets you set the temperature to the Exact Temperature you desire.
9. Electrostatic Filter (not all models)
Being constructed of high efficiency purifying substance, active carbon fabric, electrostatic fabric, electrostatic active carbon net and other materials it purifies the air effectively. Its wavy structure increases the capability to filter dust and smoke effectively. Due to the retention of the active carbon it has a high purifying speed capable of strong airflow.
10. How The Unit Drains
On humid days with the air conditioner in use, moisture may collect on the pan or bottom of the air conditioner. If the unit is position properly the moisture will gather towards the back of the unit. This will not effect the operation of the unit and the moisture will evaporate in time. Occasional the moisture will flow over the back of the pan but this will not effect the operation of the unit. Never drill holes in the pan under any condition.
Features
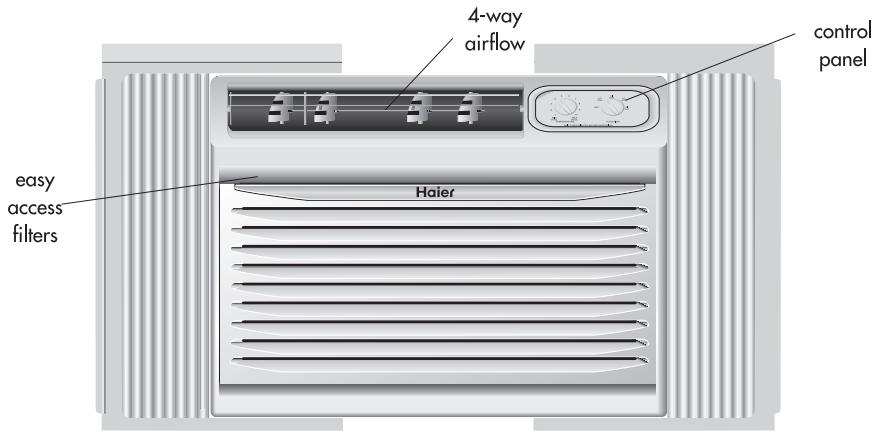
MODEL: HWF08XC5
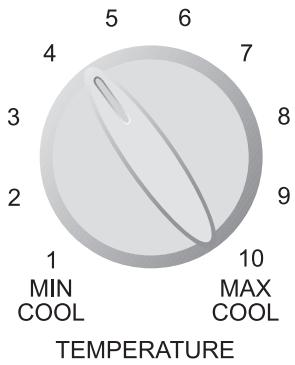
1. Temperature Set Knob
This knob adjusts the temperature of the air.
Higher the setting the cooler the air temperature.
With this knob you can set the temperature to your desired comfort level. Min. Cool being the warmest and Max. Cool being the coldest.
2. Function Set Knob
With this knob you can control the fan speed as well as the cooling speed. There are 2 knob
positions on the A/C for you to select from HI and LO.
You have 2 Fan Only speeds to choose from HI and LO.
3.4 Way Air Flow
These air directional louvers let you control the direction of the airflow in your required directi
The airflow can be directed
up-down-rightside-leftside.
4. Window Install Kit.
Enables you to install the air conditioner in a
double hung window. Extra brackets or support
may be needed depending on your window.
10. How The Unit Drains
On humid days with the air conditioner in use, moisture may collect on the pan or bottom of the air conditioner. If the unit is position properly the moisture will gather towards the back of the unit. This will not effect the operation of the unit and the moisture will evaporate in time. Occasional the moisture will flow over the back of the pan but this will not effect the operation of the unit. Never drill holes in the pan under any condition.
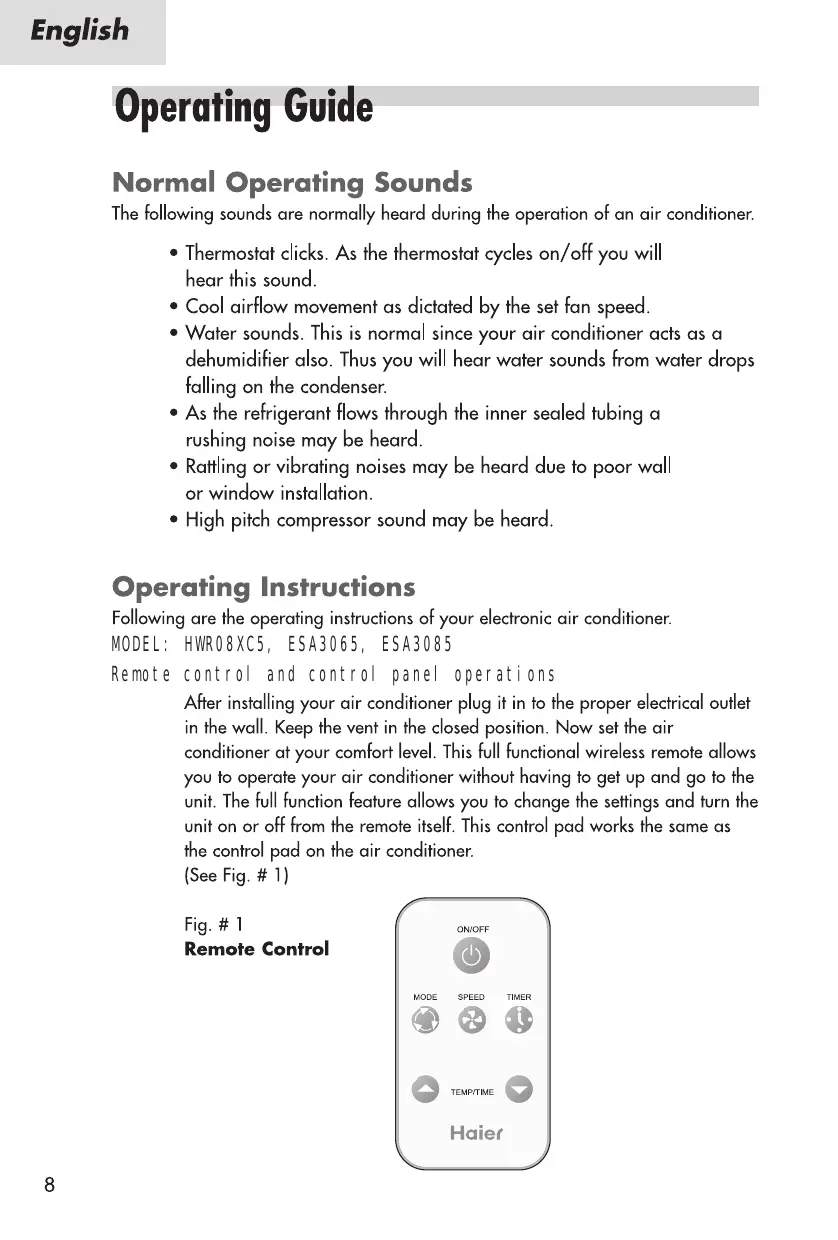
Operating Guide
Normal Operating Sounds
The following sounds are normally heard during the operation of an air conditioner.
- Thermostat clicks. As the thermostat cycles on/off you will hear this sound.
Cool airflow movement as dictated by the set fan speed. - Water sounds. This is normal since your air conditioner acts as a dehumidifier also. Thus you will hear water sounds from water drops falling on the condenser.
- As the refrigerant flows through the inner sealed tubing a rushing noise may be heard.
- Rattling or vibrating noises may be heard due to poor wall or window installation.
- High pitch compressor sound may be heard.
Operating Instructions
Following are the operating instructions of your electronic air conditioner.
MODEL: HWR08XC5, ESA3065, ESA3085
Remote control and control panel operations
After installing your air conditioner plug it in to the proper electrical outlet in the wall. Keep the vent in the closed position. Now set the air conditioner at your comfort level. This full functional wireless remote allows you to operate your air conditioner without having to get up and go to the unit. The full function feature allows you to change the settings and turn the unit on or off from the remote itself. This control pad works the same as the control pad on the air conditioner.
(See Fig. # 1)
Fig. # 1
Remote Control
After you plug in the unit it will perform a self test. All the display lights will turn on for 3 seconds. The LED display will read "88". If any display light fails to turn on you may need service on the unit. After the 3 seconds self test the unit will automatically go to the stand by mode. Now all lights will be off and you will have to turn "ON" by pressing the On/Off key.
After pressing "On/Off", the unit starts to work and enters the status of "Fan" with low setting. You will have to press the (▲) or (▼) key on the
Temp/Time to set the temperature at your desired comfort. You can choose
between 61^ and 86^ . Once the temperature is set you can raise or lower it by pressing the () or () keys. (Only when the unit is cooling,
can the temperature setting be adjusted.) (See Fig. # 2)
Having set the temperature you will set the function of the air conditioner.
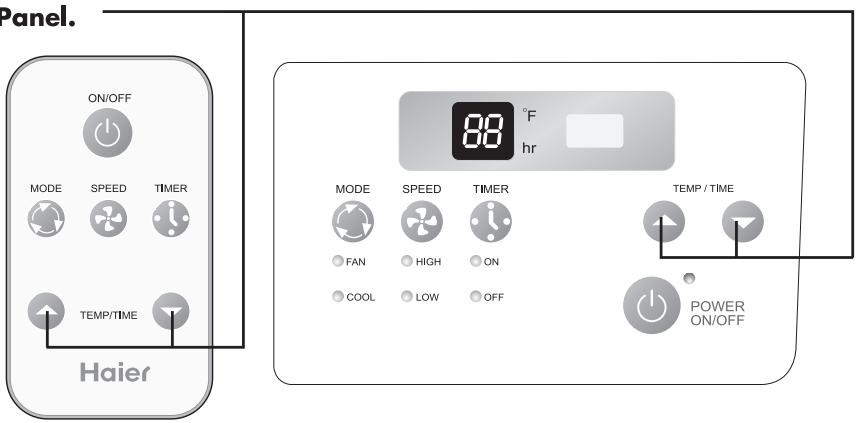
Fig. # 2
Control Panel.
Every time you press the MODE button, it will change between FAN, COOL. (See Fig. # 3)
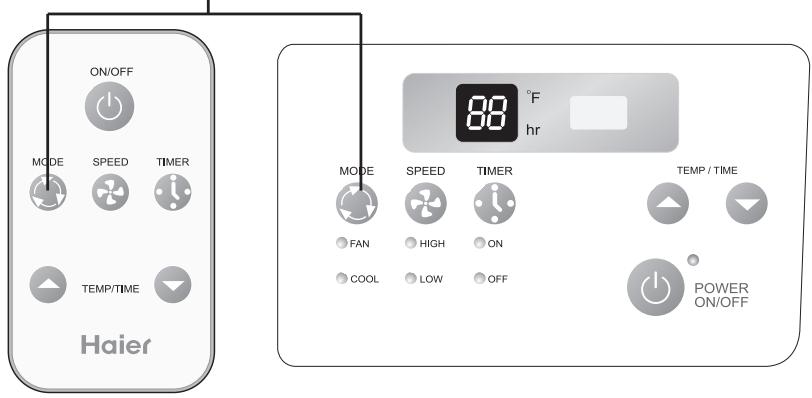
Fig. # 3
Control Panel.
Once the function mode is decided you will have to set the fan speed. (See fig. Every time you press the SPEED button, fan speed will change between LOW HIGH.
1) If you choose the COOL mode you can run the fan in one of the 2 speeds HIGH, LOW
2) For cool days you may want to run the "FAN" function. Here the fan runs at one of 2 speeds, HIGH or LOW
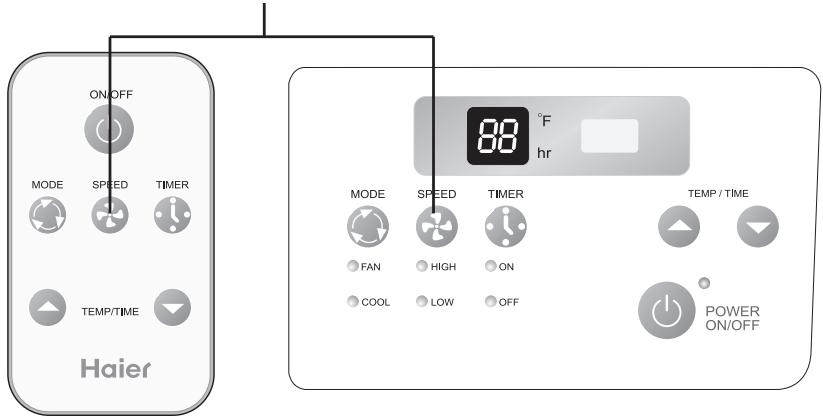
Fig. # 4
Control Panel.

Fig. # 5
Control Panel.
Operating Instructions
MODEL: HWF08XC5
(See fig.#1)
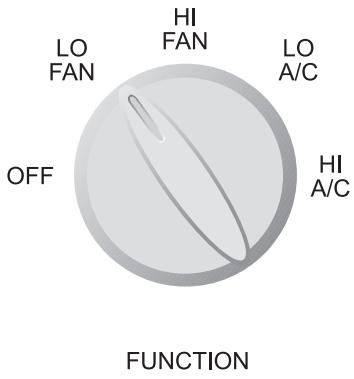
fig.#1
After installing your air conditioner, plug it into the proper electrical outlet in the wall.
1) Select Med. A/C on the Function Set knob.
2) Set the Temperature Set knob at the mid level setting. This will turn on your air conditioner.
3) You can set the thermostat from Min Cool to Max Cool. Min Cool being the warmest setting Max Cool being the coldest setting.
4) Your air conditioner has 1 or 2 Fan speeds depending on your model purchased and 2 A/C settings.
5) If your air conditioner has a Vent control make sure that it is on close. Leave it open only if you need to recycle the stale room air. By leaving it closed you will retain the cool air in the room.
6) Let your air conditioner run for a few hours before adjusting to the desired settings.
7) Remember the compressor of your air conditioner will not work when the temperature goes below 65^ .
8) Also when you shut off the air conditioner wait for 3 minutes before turning it on again. This is the compressor cycle time.
9) If you have any trouble in operating your air conditioner please refer to the Trouble Shooting section.
Installations
Before you install your air conditioner check the following:
1) The unit is free of all obstructions inside and outside the room e.g. drapes, curtains, furniture, plants, shrubs, bushes, trees, other structures like building, garage etc. Air conditioner must have clear unobstructed airflow through the condenser to remove the heat.
2) The window is strong enough to hold the weight of the air conditioner. Extra brackets or supports may be needed depending on your windows. (Brackets or Supports not provided in all models)
3) The window sill and track are strong enough to hold the weight of the air conditioner.
4) The wall is strong enough to hold the unit. Extra brackets or supports may be needed depending on the wall. (Brackets or Supports not provided in all models).
5) There is adequate and proper power supply near the air conditioner.
6) DO NOT use adapter plugs.
7) DO NOT use extension cords.
8) DO NOT cut or remove the ground prong.
9) DO NOT modify the plug or the electrical wall outlet in any way. If plug does not fit the electrical outlet have a certified electrician do the necessary change.
10) DO NOT connect electrical power to the unit before installation.
11) DO NOT use if power cord is worn out, frayed or otherwise damaged. Avoid using if there are cracks or abrasion damage along the length, plug or connection.
12) DO NOT install into any existing cabinet or sleeve which does not have side and top air vents.
13) Be careful of exposed sharp edges of the cabinet and sharp coils (finish back of the unit that could cut and cause serious injury.
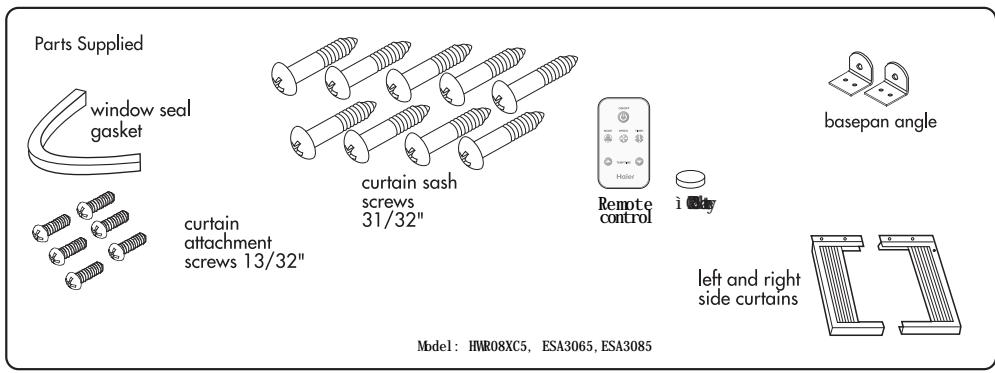
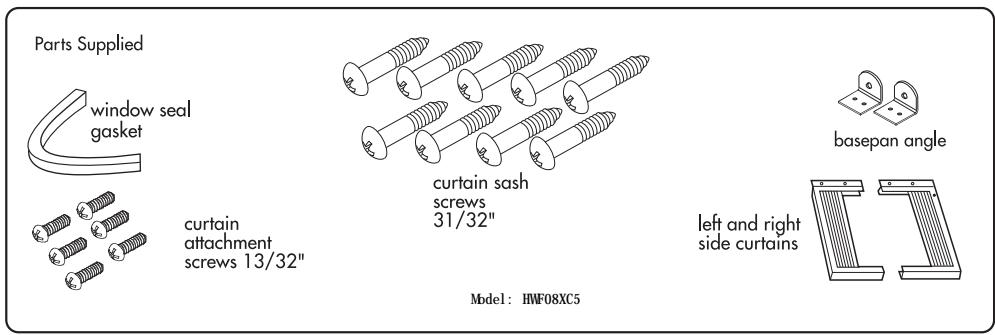
Parts
Tools
You will need to have the following tools to help you in the installation of your air conditioner.
Scissors
Phillips Screwdriver
Standard Screwdriver
- Pliers
Wrench
- Drill and Drill Bits
Tape Measure
Gloves
- Level
- Sockets
Installing Unit into A Window
Window Opening Requirements
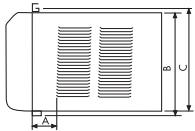
The air conditioner is designed to fit into double or single hung sash type windows. Each of the units comes with an installation kit that provides adjustable mounting louvers, to fill the gaps between the sides of the unit, and the window frame. The chart below reflects the dimensions of the units with, and without installation kits. Measure your window opening width and compare it to the chart below to ensure that it meets the minimum and maximum window width requirements.
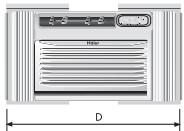
HWF08XC5, HWR08XC5, ESA3065, ESA3085
| Model Dimension | HWF08XC5, HWR08XC5, ESA3065, ESA3085 |
| A(inch) | 2 9/16" |
| B(inch) | 14 3/8" |
| C(inch) | 14 9/32" |
| D(inch) Max | 34 1/4" |
| D(inch) Min | 23 5/8" |
| Case High | 13 13/16" |
| Case Width | 20 1/4" |
| Case Depth | 12 5/8" |
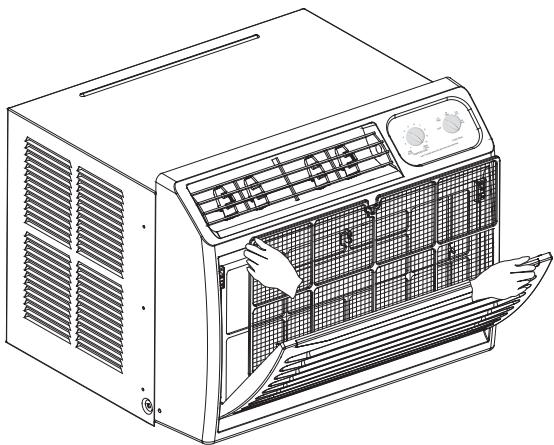
ASSEMBLE CURTAINS
Unpack unit on floor next to installation location.
Slide left-hand curtain assembly into left ends of top and bottom rails.
Repeat for right-hand curtain assembly. Fasten curtain retainer strips to sides of outer case with six 13/32^th screws.
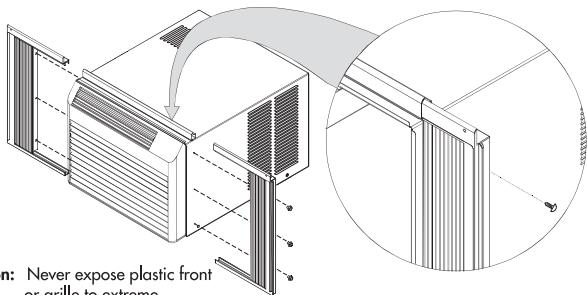
Caution: Never expose plastic front or grille to extreme temperatures.
2 PREPARE WINDOW FOR INSTALLATION
Inspect window track, sash, and sill for its ability to support the weight of air conditioner.
Measure width between window moldings to ensure Instant Mount will fit window frame. Instant Mount models are designed for windows (the detail see page 16)
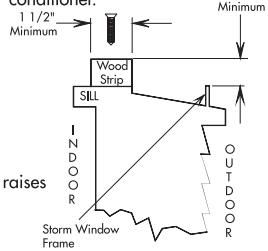
Instant Mount kit supplied with unit is designed for mounting in most double-hung windows without storm windows. For installation in window frame with storm window, modify sill by adding wood strips (not included) to inner and outer sills. This raises unit and eliminates interference of storm window frame.
Storm window installation
If storm window frame does not allow adequate clearance below sill (1 / 2^ required), remove storm window frame or create clearance by adding a wood strip (at least 1 / 2^ wide) along entire width of sill. Fasten wood strip to sill with at least three countersunk wood screws (not supplied with kit). This provides a smooth surface for mounting air conditioner.
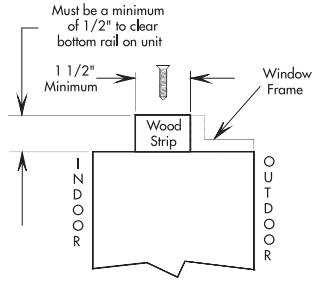
Mobile home window installation
Add wood strip (at least 1/2'' wide) along entire width of window sill. Thickness of wood strip should match height of front lip on window frame. Fasten wood strip to sill with a minimum of three countersunk wood screws (not supplied with kit). This provides a smooth surface for mounting air conditioner.
3 INSTALL UNIT IN WINDOW
Place unit in window. Lower sash until it rests behind front flange of top rail. Bottom rail must rest behind window sill.
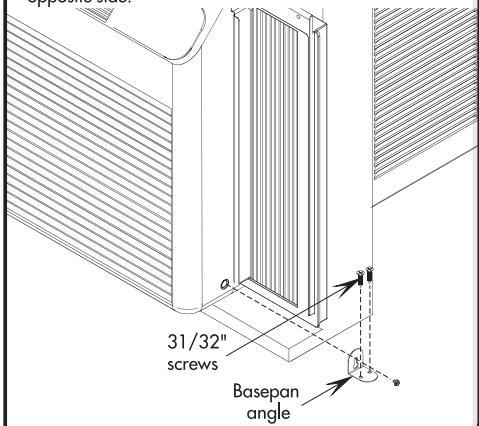
4 INSTALL BASEPAN ANGLE
Back front attachment screw out several turns and slip Basepan Angle over screw head. Snug screw with angle resting on window ledge. Install Two 31/32" screws through angle into window ledge. Repeat for opposite side.
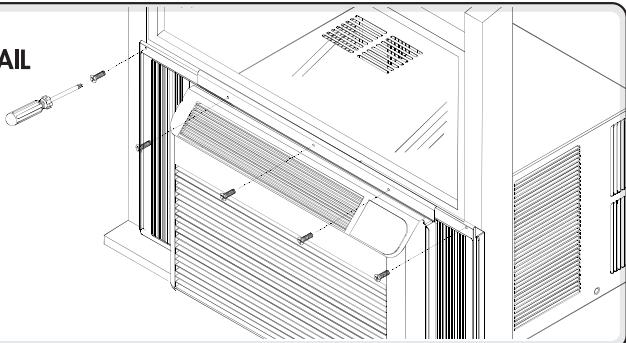
5 SECURE SIDE CURTAINS AND TOP MOUNTING RAIL
Expand curtains as far as possible. Install (2) 31 / 32'' curtain sash screws. Install (3) 25-mm top mounting rail For hard wood or metal window frames, drill a pilot hole to start screw.
IMPORTANT: Be careful not to drill pilot hole too deep. Add a piece of tape to the drill bit as a depth gauge. Also stay clear of glass. Be careful not to damage the function of the window.
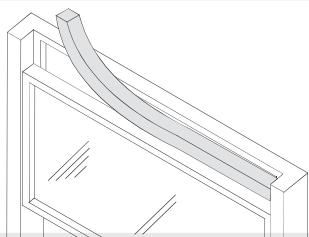
Cut window seal gasket to width of window. Stuff window seal gasket between outdoor window glass and top of indoor sash. This will stop air leakage which reduces efficiency.
Care and Cleaning Guide
- Always unplug your air conditioner before cleaning.
- The air filter behind the front grille should be checked and cleaned at least once every 2 weeks or more often if necessary.
To remove:
- Open the inlet grille downward by pulling out the top of the inlet grille.
- Remove the air filter from the front grille assembly by pulling the air filter up slightly.
- Clean the filter with warm, soapy water below 40^(104^) .
- Rinse and gently shake the water from the filter and let it dry before replacing it.
DO NOT use your air conditioner without the air filter in place.
- To clean the front panels or the cabinet DO NOT use harsh chemicals, abrasives, ammonia, chlorine, bleach, concentrated detergents, solvents or metal scouring pads. Some of these chemicals may dissolve, damage and/or discolor your air conditioner.
- Always use a soft cloth dampened with water or mild soap and water solution to wipe the front of the cabinet.
Wipe dry with a soft cloth.
- To store your air conditioner, after the season, remove the unit from the window as per the installation guide. Repack the unit in its original box and store away. If your unit is installed in a wall or you do not intend to remove it from the window then cover the outside with a winter cover. This can be purchased from the retailer where you purchased your air conditioner or from your local hardware store.
- Before putting away your unit make sure any water left in the pan is removed and drained away. Water left in the pan could lead to Rusting or damage to the electrical connections.
Trouble-Shooting
If air conditioner does not operate:
- Check if unit is plugged in. The plug may have come loose.
- Check if the unit is in "Off" mode.
- The fan control may be in "Off" position.
Air from air conditioner is warm:
- The A/C setting may need to be raised.
- The temperature outside the room is below 65^ . The compressor will not cycle on if the temperature outside is below 65^ .
Ice formation on cooling coils:
- Outside temperature too cold. Set the unit on fan only setting to defrost ice.
- Lower temperature setting. Temperature setting may be too cold.
- Unit BTU may be too high for the room.
Air conditioner working but room not cooling:
- Room may have appliances that produce heat. Use an exhaust fan to remove excess heat.
- Vent may be in the open position. Vent has to be closed for optimum cooling.
- Redirect the airflow. Remove any obstacles.
- All doors and windows need to be closed so cool air does not escape the room.
Air filter may need cleaning. - Unit BTU may be too low for the required cooling area.
- On extreme hot & humid days air conditioners may take a little longer to cool.
Air conditioner is making noise when cooling:
You may hear sounds of air movement, water, compressor clicking on and off or window vibrations. Please read Operating Guide - Normal Operating Sounds. (See page 8)
Water in the air conditioner cabinet:
This is normal as your air conditioner not only cools but also dehumidifies the air. If there is water dripping inside the room, check the installation of the unit. The unit may need to be reinstalled. (See page 17)
Limited Warranty
What is covered and for how long?
This warranty covers all defects in workmanship or materials for a period of:
12 months for labor
12 months for parts (Functional Parts Only)
5 years for sealed system
The warranty commences on the date of item purchase. Customer shall provide Haier with proof of the date of purchase, brand, model and serial number for verification prior to any warranty service being provided.
EXCEPTIONS: Commercial or Rental Use
warranty
90 days for labor
90 days for parts
No other warranty applies
What is covered/Not covered?
- The mechanical and electrical parts of the appliance which serve the functional purpose of this appliance are covered for a period of
12 months. This includes all parts except finish and trim. - Manufacturing defects to the components of the sealed system (e.g. hermetic compressor, condenser and evaporator) are covered for a period of 5 years from the date of purchase.
Any damages to such components caused by mechanical abuse, improper handling or shipping will not be covered. - The limited warranty does not cover any credit or refund for any loss or injury caused by the product or defects to the product including but not limited to incidental or consequential damages.
What will be done?
- Any mechanical or electrical part that proves to be defective in normal usage during the specified warranty period will be repaired or replaced at Haier's discretion.
A&E factory service is the authorized service provider for Haier.
If it is determined that repair is not appropriate or replacement part is unavailable for repair, Haier will exchange the product with a refurbished or new product the same or similar to the original at its discretion. - There will be no charge to the purchaser for functional replacement parts and labor on any covered items during the initial 12- month period. Beyond this period, only the components of the sealed system are covered, labor is not provided and must be paid for by the customer.
- To have your product serviced, please contact Haier customer service 1-877-337-3639.
THIS WARRANTY COVERS APPLIANCES WITHIN THE CONTINENTAL UNITED STATES, PUERTO RICO AND CANADA. IT DOES NOT COVER
THE FOLLOWING:
Damages from improper installation. Damages incurred during shipping.
Defects other than manufacturing.
Damage from misuse, abuse, accident, alteration, lack of proper care and maintenance or incorrect current or voltage.
Damage from other than household use.
Damage from service by other than an authorized dealer or service center.
Decorative trims or replaceable light bulbs.
Transportation and shipping.
Labor (after the initial 12 months).
Credit or Refund for products over 30 days past date of purchase
Food loss for food spoiled as a direct result of mechanical failure of the product or of any delay in providing service, repair, replacement.
This limited warranty doesn't apply to refurbished product or unit purchased as/like new or second-hand.
THIS LIMITED WARRANTY IS GIVEN IN LIEU OF ALL OTHER WARRANTYES, EXPRESSED OR INCLUDING THE WARRANTYES OF MERCHANTABILITY AND FITNESS FOR A PARTICULAR PURPOSE
The remedy provided in this warranty is exclusive and is granted in lieu of all other remedies.
This warranty does not cover incidental or consequential damages, so the above limitations may not apply to you. Some states do not allow limitations on how long an implied warranty lasts, so the above limitations may not apply to you.
This warranty gives you specific legal rights, and you may have other rights, which vary from state to state.
Haier America Trading L.L.C.
New York, NY 10018.
1-877-337-3639