
OPC A01 120WIFI - Portable air conditioner OPTIMEA - Free user manual and instructions
Find the device manual for free OPC A01 120WIFI OPTIMEA in PDF.


| Product type | Reversible portable air conditioner (cooling and heating) |
| Brand | Optimea |
| Model | OPC-A01-120WIFI |
| Cooling capacity | 3.53 kW |
| Heating capacity | 2.49 kW |
| Power consumption (cooling) | 1350 W |
| Power consumption (heating) | 1020 W |
| EER (cooling) | 2.60 |
| COP (heating) | 2.50 |
| Noise level (indoor) | 65 dB(A) |
| Refrigerant | R290 (flammable gas) |
| Functions | Cooling, dehumidification, ventilation, heating |
| Control | LCD touch panel, remote control, WiFi |
| Timer | 1 to 24 hours |
| Sleep mode | Yes (cooling only) |
| Automatic oscillation | Yes |
| Air filter | Washable, clean every 2 weeks |
| Drainage | Manual and continuous |
| Exhaust hose length | 28 to 150 cm (do not extend) |
| Power supply | 220-240 V / 50 Hz |
| Energy efficiency class | A (cooling and heating) |
| Standby power | < 1 W (0.42 W measured) |
Frequently Asked Questions - OPC A01 120WIFI OPTIMEA
User questions about OPC A01 120WIFI OPTIMEA
0 question about this device. Answer the ones you know or ask your own.
Ask a new question about this device
Download the instructions for your Portable air conditioner in PDF format for free! Find your manual OPC A01 120WIFI - OPTIMEA and take your electronic device back in hand. On this page are published all the documents necessary for the use of your device. OPC A01 120WIFI by OPTIMEA.
USER MANUAL OPC A01 120WIFI OPTIMEA

Plus d'infos


Plus d'infos
1. Notes
Figure 1

Figure 2

Figure 3
Figure 5

Figure 6
Avis important :
6. Maintenance
Plus d'infos
Portable Air Conditioning
3530W
User manual
Item : OPC-A01-120WIFI


More info

Thank you for choosing the luxurious and elegant mobile air conditioning. Please keep the manual for later review, and read the manual carefully before use.
If you lose this User Guide, please contact your reseller, or send an e-mail to info@optimea.fr to obtain the electronic version.
Content
- Notes ____ 1
- Features and Components ____ 2
2.1 Features 2
2.2 Components 3
- Installation and adjustment ____ 4
- Control setting ____ 6
4.1 Operating instructions ____ 6
4.2 Operating Instructions of the Remote Control ____ 7
4.3 A variety of protection functions ____ 8
- Drainage instructions ____ 9
5.1 Manual drainage ____ 9
5.2 Continuous drainage ____ 10
- Maintenance 10
- Troubleshooting 12
- Appendix ____ 13
- Technical data ____ 14


More info
1. Notes
- The air conditioning is only suitable for indoor use, and is not suitable for other applications.
- Follow local grid interconnection rules while installing the air conditioning and ensure that it is properly grounded. If you have any question on electrical installation, follow the instructions of the manufacturer, and if necessary, ask a professional electrician to install it.
- Place the machine in a flat and dry place and keep a distance of above 50cm between the machine and the surrounding objects or walls.
- After the air conditioning is installed, ensure that the power plug is intact and firmly plugged into the power outlet, and place the power cord orderly to prevent someone from being tripped or pulling out the plug.
- Do not put any object into the air inlet and outlet of the air conditioning. Keep the air inlet and outlet free from obstructions.
- When drainage pipes are installed, ensure that the drainage pipes are properly connected, and are not distorted or bended.
- While adjusting the upper and lower wind-guide strips of the air outlet, pluck it with hands gently to avoid damaging wind-guide strips.
- When moving the machine, make sure that it is in an upright position.
- The machine should stay away from gasoline, flammable gas, stoves and other heat sources.
- Don't disassemble, overhaul and modify the machine arbitrarily, otherwise it will cause a machine malfunction or even bring harm to persons and properties. To avoid danger, if a machine failure occurs, ask the manufacturer or professionals to repair it.
- Do not install and use the air conditioning in the bathroom or other humid environments.
- Do not pull the plug to turn off the machine.
- Do not place cups or other objects on the body to prevent water or other liquids from spilling into the air conditioning.
- Do not use insecticide sprays or other flammable substances near the air conditioning.
- Do not wipe or wash the air conditioning with chemical solvents such as gasoline and alcohol. When you need to clean the air conditioning, you must disconnect the power supply, and clean it with a half-wet soft cloth. If the machine is really dirty, scrub with a mild detergent.
- The appliance can be used by children aged from 8 years and above and persons with reduced physical, sensory or mental capabilities if they have been given supervision or instruction concerning use of the appliance in a safe way and understand the hazards involved. Children shall not play with the appliance. Cleaning and maintenance shall not be made by children without supervision.
2. Features and components
2.1 Features :
- New look, compact structure, streamlined machine, aristocratic atmosphere.
- With cooling, heating (single cold with no such function), dehumidification and fan function, Continuous Water Drainage Functions.
- Automatic swing leaf in the outlet has automatic air swing function, and the outlet can be covered when the machine is turned off to prevent dust from entering the body.
- LCD displays the control panel. The machine is beautiful and elegant. High-quality LCD remote control is equipped to facilitate operation.
- Handles on both sides adopt dividing point design, so that it is easier to carry it and the body design is more humane.
- The structure of wrapping the power cord on the back facilitates users to hang the power cord without hanging it down to the ground and staining and damaging the power cord.
- Outdoor interface is set high to facility assembly and keep the smooth flow of the heat pipe.
• Air filtration capability. - Timing switch function,
- Protection function of automatically restarting the compressor after three minutes, a variety of other protection functions.
2.2 Components :
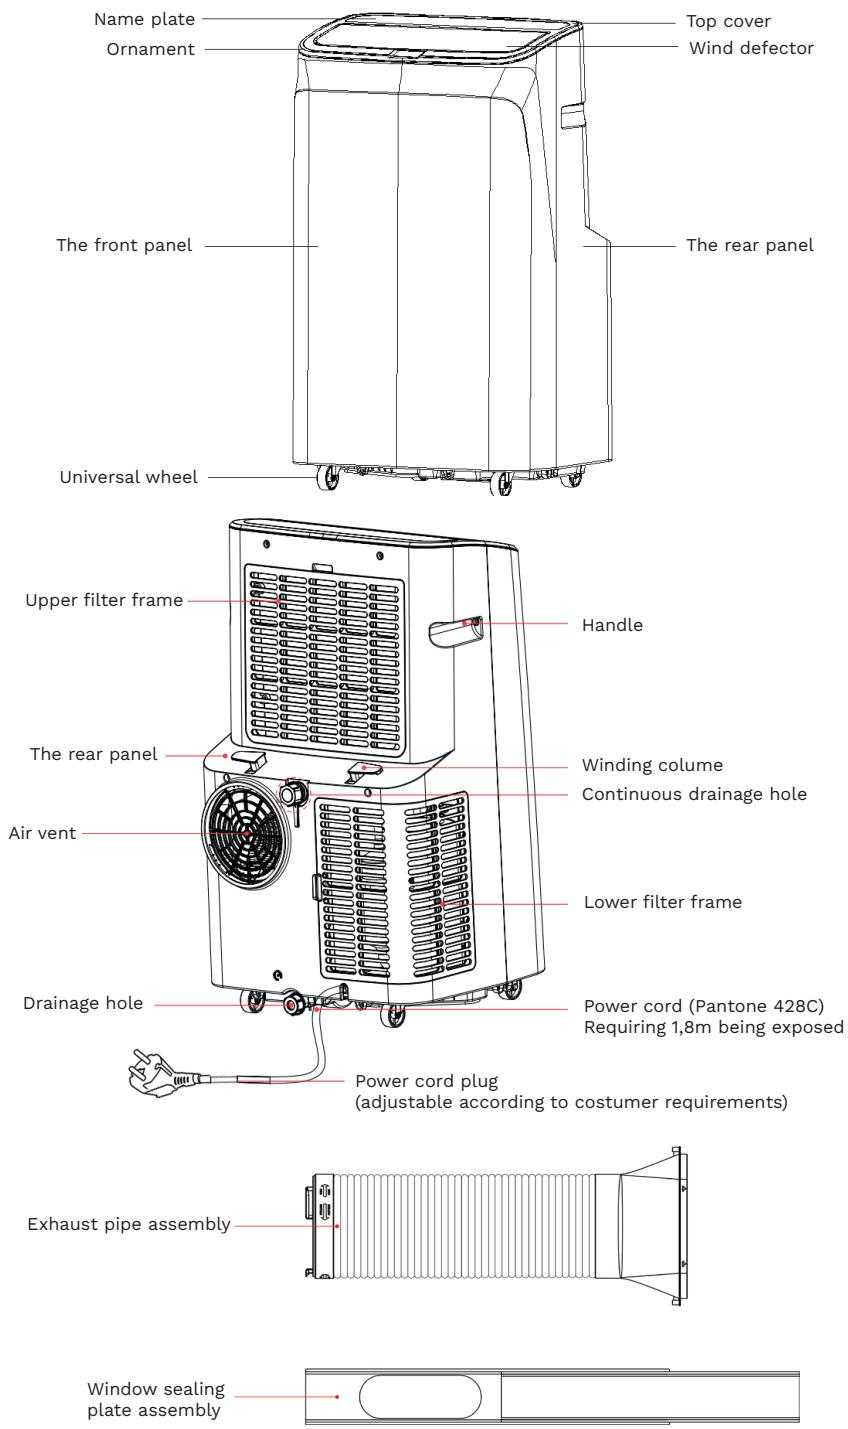
3. Installation and adjustment
Installation :
Warning :
before using the mobile air conditioning, keep it upright for at least two hours.
The air conditioning can be easily moved in the room. In the moving process, ensure that the air conditioning is in the upright position and the air conditioning should be placed on a flat surface. Do not install and use the air conditioning in the bathroom or other humid environments.
- Install the heat pipe assembly (as shown in Figure 1): screw the heat pipe assembly (exhaust fitting end) into the exhaust port on the rear panel (counterclockwise).

Figure 1
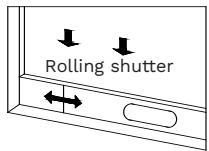
Figure 2

Figure 3
• Install the window sealing plate assembly
1) Half open the window, and mount the window sealing plate assembly to the window (as shown in Figure 2 and Figure 3); the assembly can be placed in horizontal and vertical direction.
2) Pull various components of the window sealing plate assembly open, adjust their opening distance to bring both ends of the assembly into contact with the window frame, and fix various components of the assembly.
- Install the body
1) Move the machine with installed heat pipe and fittings before the window, and the distance between the body and walls or other objects shall be least 50 cm (as shown in Figure 4).
2) Elongate the heat pipe and snap the flat end of the heat pipe joints into the elliptical hole of the window sealing plate assembly (as shown in Figure 5 and Figure 6).

Figure 4
Notes :
- the flat end of the heat pipe joints must be snapped into place.
- The pipe cannot be distorted nor has substantial turning (greater than 45irc ). Keep the ventilation of the heat pipe unobstructed.

Figure 5

Figure 6
Important Notice :
The length of the exhaust hose shall be 280\~1,500mm, and this length is based on the specifications of the air conditioning. Do not use extension tubes or replace it with other different hoses, or this may cause a malfunction. Exhaust must be unobstructed; otherwise it may cause overheating.
4. Control setting
4.1 Operating instructions

Power on : when the machine is powered on for the first time, the buzzer will play power-on music, and then the machine will get into standby status.
- Power Key: press the key to turn on and turn off the machine. In the case of power on, press the key to turn off the machine; in the case of power off, press the key to turn on the machine.
- Mode Selection Key : In the case of power on, press the key to switch between cooling → dehumidification → fan → cooling → ... mode.
- Fan Key: In cooling and air supply mode, press the key to select high, medium or low wind speed operation. In dehumidification mode, pressing the key is invalid, and the fan will forcibly choose low wind speed operation.
- and 6. Down and Up Key: Up Key and Down Key: press the two keys to change the set temperature or timing sett value, operate as follows: While setting temperature, press up key or down key to select the required temperature (not available in air supply or dehumidification mode).
While setting timing value, press up key or down key to select the required timing value. Simultaneously press both keys to switch between Celsius (°C) and Fahrenheit (°F).
- Display Window Key : The display shows the operating status of the unit: selected mode, set temperature, fan speed, active timer, oscillation, as well as the icons corresponding to the current functions.
- WIFI Key : Press and hold the Timer button for 3 seconds until the Wi-Fi indicator flashes. At this point, you can connect your device to the machine.
-
Timer Key : In the case of power on, press the key to close timing; in the case of power off, press the key to open timing. Press the key, when the timing symbol flashes, press up and down key to select the required timing value. Timing values can be set within 1-24 hours and the timing value is adjusted upwards or downwards by one hour.
-
Sleep Mode : In the cooling, press the sleep Key to turn on the sleep mode, then the unit will work on Energy-Saving and quiet type.
-
Auto Swing Key : Press this button to turn the automatic swing of the louvers on or off. When oscillation is enabled, the airflow is distributed more evenly throughout the room. When the function is disabled, the airflow remains fixed in a single direction.
Note :
Can not turn on the sleep mode in the dehumidifying or Fan mode! Please use the remote control to set the sleep mode only, can not set on the LCD Type Soft-Touch Control Panel.
4.2 Operating Instructions of the Remote Control
Operation interface of the remote control is as follows

Instructions of key operation of the high-quality remote control are as follows:
- Power : Press ⏻ the key to turn on or turn off the machine.
- Mode : Press ⚙ the key to switch between cooling, de-humidification, fan and heating (single cold without such function) mode.
- Up : Press + the key to increase temperature and timing set value.
- Down : Press ■ the key to reduce temperature and timing set value.
- Fan : Press 📋 the key to select high, medium and low wind speed output circularly.
- Timer : Press Ⓤ the key to set timing value. Timing value can be set with 1-24 hours and the timing value is adjusted upwards or downwards by one hour.
- swing : Press Ⓞ the louver will swing up and down.
- Temperature : Press Ⓗ←T the key to switch between Celsius and Fahrenheit.
- Sleep Mode : Press 🎨 the key to turn on the sleep mode.
4.3 A variety of protection functions
1. Frost Protection Function :
In cooling, dehumidification or economic power saving mode, if the temperature of the exhaust pipe is too low, the machine will automatically enter protection status; if the temperature of the exhaust pipe rises to a certain temperature, it can automatically revert to normal operation.
- When water in the water pan exceeds the warning level, the machine will automatically sound an alarm, and the LDC temperature display area will show "FL". At this point, you need to move the drainage pipe connecting the machine or the water outlet to sewer or other drainage area to empty the water (details see Drainage Instructions at the end of this chapter). After the water is emptied, the machine will automatically return to the original state.
3. Automatic Defrosting (heating and cooling models have this function):
The machine has automatic defrosting function: during defrosting, heating symbol on the display screen will flash.
4. Automatic Thermal Protection :
To protect the service life of the machine, the machine has automatic thermal protection in heating mode. During the protection period, the compressor and the lower motor will stop operation and will automatically return to normal heating state after the temperature of the machine recovers.
5. Protection Function of the Compressor :
To increase the service life of the compressor, it has a 3-minute delay booting protection function after the compressor is turned off.
5. Drainage instructions
1) When the machine stops after the water is full, turn off the machine power and unplug the power plug.
Notes : Please move the machine carefully, so as not to spill the water in the water pan at the bottom of the body.
2) Place the water container below the side water outlet behind the body.
3) Unscrew the rotary knob and unplug rubber stopper, the water will automatically flow into the water container.
Note :
- Keep the rotary knob and rubber stopper properly.
- During drainage, the body can be tilted slightly backwards.
- If the water container cannot hold all the water, before the water container is full, stuff the water outlet with rubber stopper as soon as possible to prevent water from flowing to the floor or the carpet.
4) When the water is discharged, stuff rubber stopper, and tighten the rotary knob.
note : Restart the machine after rubber stopper and rotary knob are installed, otherwise condensate water of the machine will flow to the floor or the carpet.
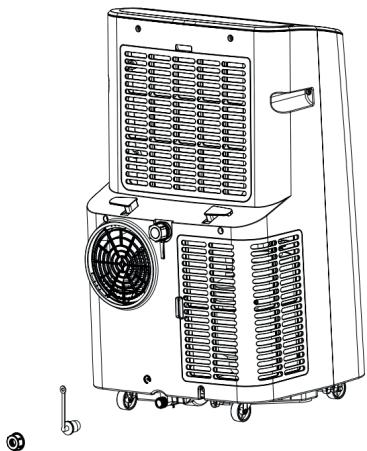
5.2 Continuous drainage
(only applicable to cooling and dehumidification mode), as shown in figure:
1) Unscrew the rotary knob, and unplug rubber stopper.
2) Set the drainage pipe into the water outlet.
3) Connect the drainage pipe to the bucket.

6. Maintenance
Cleaning : before cleaning and maintenance, turn off the machine and unplug the plug.
1. Clean the surface
Clean with surface of machine with a wet soft cloth. Don't use chemicals, such as benzene, alcohol, gasoline, etc.; otherwise, the surface of the air conditioning will be damaged or even the whole machine will be damaged.
2. Clean the filter screen
- 1) If the filter screen is clogged with dust, and the effectiveness of the air conditioning is reduced, be sure to clean the filter screen once every two weeks.
• 2) Clean the upper filter screen frame
Clasp the wedging block of the filter screen frame with hands. Force down from the outside to remove the filter screen frame. Unscrew four screws fixing the filter screen and the rear housing to remove the EVA filter screen (as shown in the above figure).

Put the filter screen into warm water with neutral detergent (about 40irc C/ 104irc F) and dry it in the shade after rinsing clean.

Postseason Storage :
- Unscrew the rotary knob, unplug rubber stopper, and discharge the water in the water pan into other water containers or directly tilt the body to discharge the water into other containers.
- Turn on the machine, adjust it to low-wind ventilation mode, and maintain this state until the drainage pipe becomes dry, so as to keep the inside of the body in a dry state and prevent it from mildewing.
- Turn off the machine, unplug the power plug, and wrap the power cord around the wrapping post; install rubber stopper and the rotary knob.
- Remove the exhaust pipe and keep it properly.
- Cover the air conditioning with a plastic bag. Put the air conditioning in a dry place, keep it out of the reach of children, and take dust control measures.
- Remove batteries of the remote control and keep them properly.
note :
Ensure that the body is placed in a dry place and keep all machine components properly.
7. Troubleshooting
Do not repair or disassemble the air conditioning by yourself. Unqualified repair will lead to failure of the warranty card, and may cause damage to users or their properties.
| Problems | Reasons | Solutions |
| The air conditioning does not work. | There is no electricity. | Turn it on after connecting it to a socket with electricity. |
| The overflow indicator displays "FL". | Discharge the water inside. | |
| The ambient temperature is too low or too high | Recommend to use the machine in at the temperature of 7-35 °C (44-95 °F). | |
| In cooling mode, the room temperature is lower than the set temperature; in heating mode, the room temperature is higher than the set temperature. | Change the set temperature. | |
| In dehumidification mode, the ambient temperature is low. | The machine is placed in a room with an ambient temperature of greater than 17 °C (62 °F). | |
| The cooling or heating effect is not good. | There is direct sunlight. | Pull the Curtain. |
| Doors or windows are open; there are a lot of people; or in cooling mode, there are other sources of heat. | Close doors and windows, and add new air conditioning. | |
| The filter screen is dirty. | Clean or replace the filter screen. | |
| The air inlet or outlet is blocked. | Clear obstructions. | |
| Big Noise. | The air conditioning is not placed on a flat surface. | Put the air conditioning on a flat and hard place (to reduce noise). |
| compressor does not work. | Overheat protection starts. | Wait for 3 minutes until the temperature is lowered, and then restart the machine. |
| The remote control does not work. | The distance between the machine and the remote control is too far. | Let the remote control get close to the air conditioning, and make sure that the remote control directly faces to the direction of the remote control receiver. |
| The remote control is not aligned with the direction of the remote control receiver. | ||
| Batteries are dead. | Replace batteries. | |
| Displays 'E1'. | The pipe temperature sensor is abnormal. | Check the pipe temperature sensor and related circuitry. |
| Displays 'E2' | The room temperature sensor is abnormal. | Check the room temperature sensor and related circuitry. |
If problems not listed in the table occur or recommended solutions do not work, please contact the professional service organization: sav@optimea.fr
8. Appendix
Schematic Diagram

All the technical and specific parameters, please refer to product nameplate. Due to continuous improvement, we reserve the right to change some design without any notice.

Treatment: Don't put the abandoned machine with other unsorted waste together. Such waste shall be placed separately for other special use.


Appliance containing flammable gas R290.
- Technical data
| Item | Rated value | Measured value | Requirements for minimum energy efficiency | Energy Efficiency Class (According to table 2 of EU 626/2011) | Verdict |
| Rated capacity for cooling (kW) | 3.53 | 3.532 | - | - | Pass |
| Power input for cooling (kW) | 1.350 | 1.349 | - | - | Pass |
| EERrated | 2.60 | 2.62 | ≥ 2.34 | A | Pass |
| Rated capacity for heating (kW) | 2.49 | 2.512 | - | - | Pass |
| Power input for heating (kW) | 1.020 | 0.986 | - | - | Pass |
| COPrated | 2.50 | 2.55 | ≥ 1.84 | A | Pass |
| Standby Mode Power (W) (According to (UE) n° 206/2012) | 1.00 | 0.42 | ≤ 1.00 | - | Pass |
| Networked Standby Mode Power (W) (According to (CE) n° 1275/2008 & (UE) n° 801/2013) | 2.00 | 0.92 | ≤ 2.00 | - | Pass |
| Off Mode Power (W) | N/A | N/A | ≤ - | - | N/A |
| Sound Power, indoor (dB(A)) | 65 | 64.22 | ≤65 | - | Pass |
| Sound Power, outdoor (dB(A)) | N/A | N/A | ≤ | - | N/A |
Optimea
Please find our product range on our website www.optimea.fr :

More info
DECLARATION DE CONFORMITE EU DECLARATION OF CONFORMITY Directive 2014/53/UE (RED)
| Type of equipment : | Portable Air Conditioner / Mobile Air Conditioner |
| Model Ref : | OPC-A01-120WIFIOPC-A01-120HPWIFI |
| Trade mark : | OPTIMEA |
| Certificate No.: | Compliance Document No. D10 087671 0276 Rev. 00 |
| Report No.: | 6818925040401 |
Tested according to: EN 18031-1:2024
Parameters :
Communication module model: WBR3
Communication module firmware version: 3.1.23
Device firmware version: refer to Table 1
Main control board PCB version: refer to Table 1
Operating System version: refer to Table 1
Android app version: Tuya Smart 6.6.1
iOS app versions: Tuya Smart 6.6.1
more information refers to Table 1
This Compliance document confirms the compliance with the listed standards in the area of cybersecurity on a voluntary basis. It refers only to the sample submitted for testing and certification and does not certify the quality, safety or cybersecurity of the serial products. All applicable requirements of the Testing, Certification, Validation and Verification Regulations of TÜV SÜD Group have to be complied. For details see: www.tuvsud.com/ps-cert
Rodolphe PILETTE / Optimea Courbevoie, 17/02/2026


- Notes
- Avis important :
- Maintenance
- Portable Air Conditioning
- Content
- Features and components
- Features :
- Components :
- Installation and adjustment
- Installation :
- Warning :
- - Install the body
- Notes :
- Important Notice :
- Control setting
- Operating instructions
- Note :
- Operating Instructions of the Remote Control
- Instructions of key operation of the high-quality remote control are as follows:
- A variety of protection functions
- Frost Protection Function :
- Automatic Defrosting (heating and cooling models have this function):
- Automatic Thermal Protection :
- Protection Function of the Compressor :
- Drainage instructions
- Continuous drainage
- Clean the surface
- Clean the filter screen
- Postseason Storage :
- Troubleshooting
- Appendix
- Optimea
- DECLARATION DE CONFORMITE EU DECLARATION OF CONFORMITY Directive 2014/53/UE (RED)
Brand : OPTIMEA
Model : OPC A01 120WIFI
Category : Portable air conditioner