
M2 - Sports Watch SUUNTO - Free user manual and instructions
Find the device manual for free M2 SUUNTO in PDF.

| Product type | Sports watch with heart rate monitor |
| Brand | SUUNTO |
| Model | M2 |
| Case weight | Max. 36 g |
| HR belt weight (M2) | Max. 42 g |
| Water resistance of case | 30 m (ISO 2281) |
| Water resistance of HR belt | 20 m (ISO 2281) |
| Transmission frequency | 5.3 kHz inductive and 2.465 GHz ANT |
| Battery life (case) | Approx. 1 year (2.5 h exercise with HR/week) |
| Battery life (HR belt) | Approx. 1 year |
| Case battery | 3V CR2032, user-replaceable |
| HR belt battery | 3V CR2032, user-replaceable |
| Operating temperature | -10°C to +50°C |
| Storage temperature | -30°C to +60°C |
| Main functions | Heart rate monitor with 3 HR zones, stopwatch, calorie calculation, history and trends, alarm, button lock, sleep mode |
| Available languages | English, German, French, Spanish, Portuguese, Italian, Dutch, Swedish, Finnish |
| Maintenance and cleaning | Clean the case with a soft damp cloth; hand wash the HR belt after use |
| Safety | Use not recommended for pacemaker wearers without medical advice; consult a doctor before starting an exercise program |
| Spare parts and repairability | Repair only by an authorized Suunto service center; use original accessories |
| Warranty | 2 years for the device, 1 year for consumables and accessories |
Frequently Asked Questions - M2 SUUNTO
User questions about M2 SUUNTO
0 question about this device. Answer the ones you know or ask your own.
Ask a new question about this device
Download the instructions for your Sports Watch in PDF format for free! Find your manual M2 - SUUNTO and take your electronic device back in hand. On this page are published all the documents necessary for the use of your device. M2 by SUUNTO.
USER MANUAL M2 SUUNTO
1 Welcome 4
2 Display icons and segments 5
3 Using buttons 6
4 Getting started 7
4.1 Estimating your fitness level 8
5 Using button lock 10
6 Putting on HR belt 11
7 Starting exercise 13
7.1 Troubleshooting 14
8 During exercise 15
8.1 Heart rate zones 15
9 Weekly exercise program example: from poor to excellent level 17
10 After exercise 18
11 Reviewing history 20
11.1 History & trend 20
11.2 Previous exercise 21
12 Adjusting settings 22
Example: adjusting alarm settings 23
12.1 Sleep mode and initial settings 24
12.2 Changing language 24
13 Care and maintenance 25
13.1 Replacing battery 25
13.2 Replacing HR belt battery 27
14 Specifications 28
14.1 Technical specifications 28
14.2 Trademark 29
14.3 CE 29
14.4ICES 29
14.5 Copyright 29
14.6 FCC compliance 30
14.7 Patent notice 30
14.8 Disposal of device 31
15 Warranty 32
Warranty Period 32
Exclusions and Limitations 32
Access to Suunto warranty service 33
Limitation of Liability 34
1 WELCOME
Thank you for choosing Suunto M1/M2 heart rate monitor!
Suunto M1/M2 heart rate monitor is equipped with the essential tools you need to reach your fitness goals. Suunto M1/M2 makes heart rate monitoring simple and comfortable, it shows in real time your heart rate and calories burnt, and monitors you while you work out to ensure you stay within your ideal heart rate zone.
Suunto M1/M2 key features are designed to make your exercise as efficient as possible:
- easy to use with three buttons, large display, and nine language options
real time exercise guidance showing heart rate and calories burnt - automatic switch between three different heart rate zones
- exercise summaries
- comfortable heart rate belt that is compatible with most gym cardio equipment
This User Guide is here to help you get the most out of your exercise with Suunto M1/M2. Read it through to make using your new Suunto M1/M2 even more enjoyable.
Your exercise does not need to stop when your workout ends. Continue your fitness experience online and get even more out of every move at Movescount.com. Check out Movescount.com today and sign up. Get motivated and start having fun. Because that's what fitness is all about.

NOTE: Be sure to register your device at www.suunto.com/register to get the
full range of Suunto support.
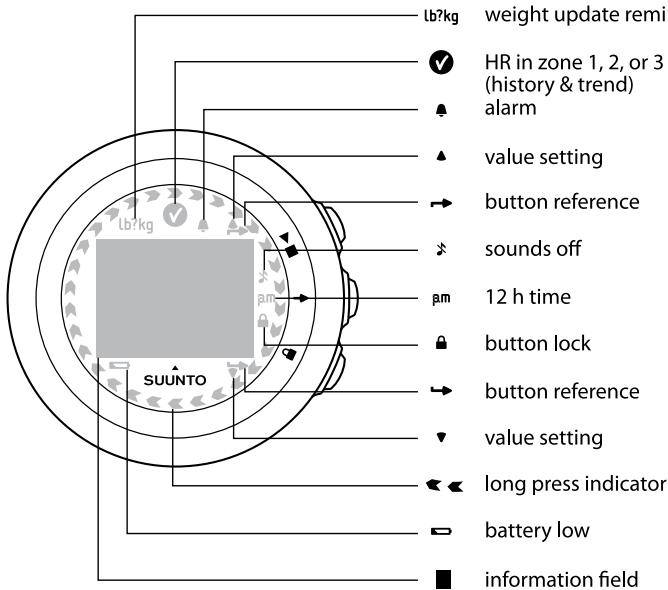
2 DISPLAY ICONS AND SEGMENTS
3 USING BUTTONS
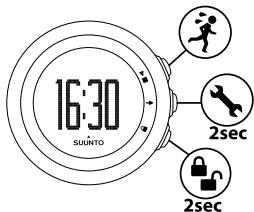
By pressing the following buttons, you can access the following features:
▶(PLAY/STOP):
- select exercise, history & trend, prev. exercise
- start/stop exercise
- increase/move up
(NEXT):
- switch views
enter/exit settings by keeping pressed - accept/move to the next step
(LOCK):
- lock▶ button by keeping pressed
- decrease/move down
4 GETTING STARTED
Start by personalizing Suunto M1/M2 to get reliable and easy monitoring.
Through the personal settings, you tune your Suunto M1/M2 according to your physical traits and activity. Many of the calculations use these settings, so it is important that you are as accurate as possible when defining the values.

NOTE: Take time to carefully adjust the initial settings. Some settings can only changed later by resetting the device.
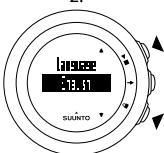
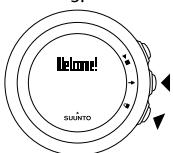
To set the initial settings:
- Press any button to activate the device. Wait until the unit wakes up and says hold 2 sec. Keep pressed to enter the first setting.
- Press or to change values.
- Press to accept a value and to move to the next setting. Press to return to the previous setting.
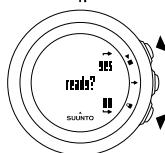
- When you are ready, select yes (▶■) to confirm all settings. If you want to modify the settings, select no (▲) to return to the first setting.

1.
2.
3.
4.
You can set the following initial settings:
-
language: English, Deutsch, français, español, portugués, italiano, Nederlands, svenska, suomi
-
units: metric / imperial
time: 12 / 24h hours and minutes - date
personal settings: year of birth, sex, weight

NOTE: Maximum HR is the absolute maximum number of times a person's
heart can beat in one minute at the highest intensity. Once you have entered your year of birth, your device automatically sets the maximum heart rate (max. HR) using the formula 207 - (0.7 × AGE) published by the American College of Sports Medicine. If you know your real max. HR, you should adjust the automatically given value to the known value.
For information about adjusting the settings at a later time, see Chapter 12. Adjusting settings on page 22.

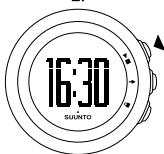
TIP: See the date and seconds with the time by pressing in the time view.
The display returns to show only the time to save battery life, if you do not press
again after 2 minutes.
4.1 Estimating your fitness level
To get guidance during exercise, you need to estimate your current fitness level in the initial settings.
Select one of the following options:
-
very poor: you prefer using the elevator or driving to walking, or sometimes walk for pleasure, and occasionally exercise sufficiently to cause heavy breathing or perspiration.
-
poor: you exercise regularly 10 to 60 minutes per week in recreation or work requiring modest physical activity, such as golf, horseback riding, calisthenics, gymnastics, table tennis, bowling, weight lifting, or yard work.
- fair: you run less than one mile (1.6 km) per week or spend less than 30 min per week in comparable physical activity.
- good: you run 1 to 5 miles (1.6 - 8 km) per week or spend 30 to 60 min per week in comparable physical activity.
- very good: you run 5 to 10 miles (8 - 16 km) per week or spend 1 to 3 hours per week in comparable physical activity.
excellent: you run over 10 miles (16 km) per week or spend over 3 hours per week in comparable physical activity.
5 USING BUTTON LOCK
Keep pressed to lock or unlock the button. When the button is locked, is shown on the display.

TIP: Lock the button to avoid accidentally starting or stopping your
stopwatch.

NOTE: When the button is locked during the exercise, you can still change
the views by pressing
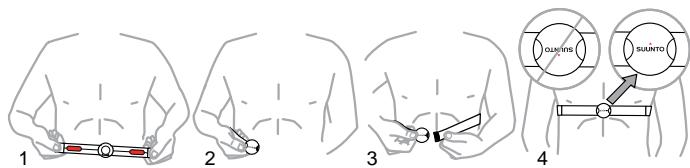
6 PUTTING ON HR BELT
Adjust the strap length so that the heart rate (HR) belt is tight but still comfortable. Moisten the contact areas with water or gel and put on the HR belt. Ensure the HR belt is centered on your chest and the red arrow is pointing up.
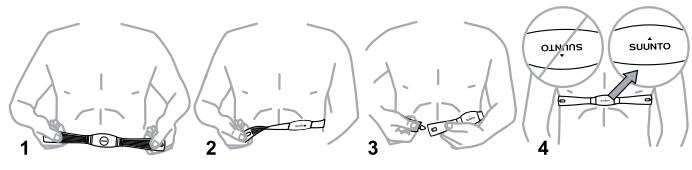
M1 heart rate belt
M2 heart rate belt
WARNING: People who have a pacemaker, defibrillator, or other implanted electronic device use the HR belt at their own risk. Before starting the initial use of the HR belt, we recommend an exercise test under a doctor's supervision. This will ensure the safety and reliability of the pacemaker and HR belt when being used simultaneously. Exercise may include some risk, especially for those who have been
inactive. We strongly advise you to consult your doctor prior to beginning a regular exercise program.

NOTE: HR belts with IND icon are compatible with most exercise equipment
with inductive heart rate reception. Suunto M1/M2 is compatible with Suunto Dual
Comfort Belt (IND and ANT icons
7 STARTING EXERCISE
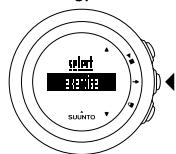
To start exercising:
- Moisten the contact areas and put on the HR belt.
- In the time view, press to select exercise.
- Confirm exercise with
- Press to start recording your exercise.
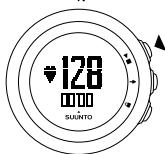
While you are wearing the HR belt properly, the HR values are shown.

NOTE: If the HR belt signal is not found after trying to connect, you are only
shown the duration. In order to use heart rate information during exercise, HR value needs to be shown.

TIP: During recording, press to glance the heart rate and time.

1.
2.
3.
4.

TIP: You can use Suunto M1/M2 as a stopwatch without the HR belt. During
exercise, press to view the duration without HR.
TIP: Warm up before and cool down after exercices. These should be done with low intensity (zone 1 or below).
Read more about using HR zones in Section 8.1 Heart rate zones on page 15.
7.1 Troubleshooting
Suunto M1/M2 uses coded transmission to prevent reading disturbances. However, exercising near overhead power lines, magnetic or electronic devices may cause interference with the HR signal.
If you lose the HR signal, try the following:
- Check that you are wearing the HR belt correctly.
- Check that the electrode areas of the HR belt are moist.
- Move away from any potential sources of interference.
- Replace the battery of the HR belt and/or the device, if problems persist.
8 DURING EXERCISE
Suunto M1/M2 gives you additional information to help guide you during your exercise. This information can be both helpful and rewarding.
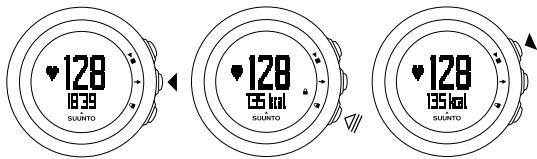
Here are some ideas on how to use the device during exercise:
- Press to see in real time the duration, your HR and additionally your average HR, kcal consumption, the heart rate zone you are in and the time. Adjust the intensity of the exercise to reach the desired heart rate zone.
- Keep pressed to lock the button to avoid accidentally stopping your stopwatch.
- Press to stop the exercise.

TIP: Switch the sounds on or off () during exercise by keeping pressed. You
cannot switch the sounds on, if you have set sounds to all off in general settings, see Chapter 12 Adjusting settings on page 22.
8.1 Heart rate zones
For information on maximum HR, see Chapter 4 Getting started on page 7.
Heart rate zones are percentages of your maximum heart rate. The intensity of your exercise is determined by the time you spend in each of the three zones.
Zone training is an established training method, and the pre-set defaults are as follows:
- Zone 1 (60-70%): fitness zone; improves basic fitness and is suitable for weight control.
- Zone 2 (70-80%): aerobic zone; improves aerobic fitness and is suitable for endurance training.
- Zone 3 (80-90%): threshold zone; improves aerobic and anaerobic capacity and is suitable for improving peak performance.

TIP: Use zones 2 and 3 to reach a good fitness level. Avoid exercising in zone
3 too often to avoid overtraining or injury.

TIP: If you press to see the heart rate zone you are in during exercise, you
will also hear a sound when your HR zone changes.

NOTE: The zone defaults follow the guidelines of the American College for
Sports Medicine for exercise prescription.
9 WEEKLY EXERCISE PROGRAM EXAMPLE: FROM POOR TO EXCELLENT LEVEL
The following table shows a suggestion for a good exercise program, and illustrates how you could take full advantage of the zone exercise to improve your fitness level.
| Level | <Zone 1 | Zone 1 | Zone 2 | Zone 3 | >Zone 3 | Weeks |
| very poor | 1x25 min | 2x25 min | 3x15 min | x2 | ||
| below average | 2x30 min | 2x20 min | x2 | |||
| fair | 1x35 min | 2x30 min | 3x25 min | x6 | ||
| good | 3x40 min | 2x30 min | x6 | |||
| very good | 2x35 min | 2x40 min | 1x30 min | x8 | ||
| excellent | 1x60 min | 1x50 min | 2x40 min | 2x20 min |
10 AFTER EXERCISE
After exercising, you can view the summary of your exercise.
- Press to stop the exercise.
- Select yes (▶) to confirm stopping the exercise and to view the summary, or select no (▲) to continue the exercise.
- Press to browse through the different views of the summary.
- Keep pressed to return to the time view.
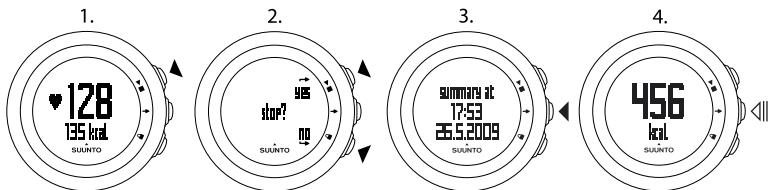
You can view the following information in the summary:
- starting time and date of the exercise
duration of the exercise - percentage of time spent below, within and above each zone
amount of calories burned
average HR
peak HR
NOTE: If you exercised without HR, the summary shows only the starting time, date, and duration of the exercise.

TIP: You can skip the summary by keeping pressed in the first summary
view. To view the previous exercise summary later, press▶■ in the time view and select prev.exercise.

TIP: During exercises using a heart rate belt, you can pause the stopwatch by
pressing▶ The device saves the exercise log automatically if you do not continue
the exercise by pressing within one hour. To continue recording, select no (A).

TIP: Hand-wash the heart rate belt regularly after use to avoid unpleasant
odor.
11 REVIEWING HISTORY
You can review the cumulative information of your saved exercise sessions and the information of your previous exercise.
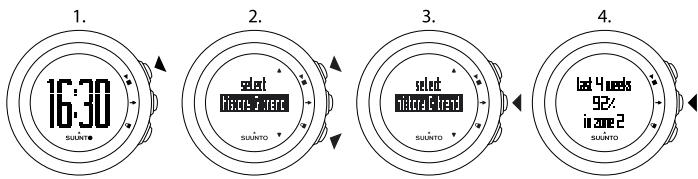
To review history & trend or prev. exercise:
- In the time view, press
- Select history & trend or prev. exercise with or .
- Confirm your selection with
- Press to browse through the views. After you have browsed through the views, the device returns to the time view.

TIP: Keep pressed at any time to return to the time view.
11.1 History & trend
History & trend shows you the cumulative information of your saved exercise sessions.
You can view the following information:
number and duration of all saved exercises
number and duration of the saved exercises during the last 4 weeks
calories burned during the last 4 weeks
- percentage of time spent in each heart rate zone during the last 4 weeks
() is shown when HR is in zone 1, 2, or 3
11.2 Previous exercise
In prev. exercise you can view the information of your previous exercise. For more information about views, see Chapter 10 After exercise on page 18.
12 ADJUSTING SETTINGS
You can adjust the settings in the time view. During exercise, you can only set the sounds on or off by keeping pressed.
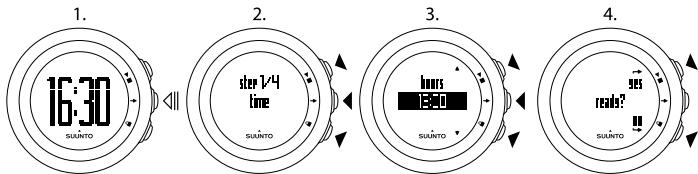
To adjust the settings:
- In the time view, keep pressed to enter the settings.
- Press to enter the first setting. You can browse through the setting steps with and .
- Press or to change the values. Press to confirm and to move to the next setting.
- When you are ready, select yes (▶) to confirm all settings. If you still want to modify the settings, select no (A) to return to the first setting.
You can adjust the following settings:
time: hours and minutes
- alarm: on/off, hours and minutes
- date: year, month, weekday
- personal settings: weight, maximum HR (max. HR)
- sounds:
all on: all sounds are on
- buttons off: you will hear all other sounds, except button presses
all off: all sounds are off (when the sounds are off, is shown on the display during exercise)

TIP: Switch the sounds on or off (S) during exercise by keeping pressed. You
cannot switch the sounds on, if you have set sounds to all off.
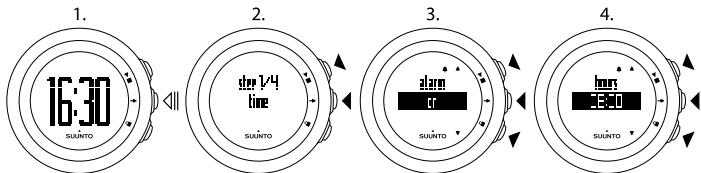
Example: adjusting alarm settings
When the alarm is on, A is shown on the display.
To set the alarm on/off:
- In the time view, keep pressed to enter the settings.
- Browse to alarm with and confirm with .
- Set the alarm on or off with and . Confirm with .
- Set the alarm time with and . Confirm with .
When the alarm sounds, press stop (A) to turn it off.
After you have stopped the alarm, it sounds the same time the following day. Remove the alarm in the settings.
12.1 Sleep mode and initial settings
To change the initial settings, you have to put the device into sleep mode.
To put the device into sleep mode:
- After the last step of general settings, when the device asks you to confirm that the setting changes are done, keep pressed until the device goes into sleep mode.
- Press any button to activate the device again.
- Set the initial settings, see Chapter 4 Getting started on page 7.
NOTE: When replacing the battery, only the time and date change. The device remembers your previous initial settings and recorded exercises.
12.2 Changing language
If you want to change the device's language or you have chosen the wrong language when setting up the device, the device needs to be put to sleep. For information on how to put the device to sleep, see Section 12.1 Sleep mode and initial settings on page 24
NOTE: The device remembers your previous initial settings and recorded exercises.
13 CARE AND MAINTENANCE
Handle the unit with care - do not knock or drop it.
Under normal circumstances the device will not require servicing. After use, rinse it with fresh water, mild soap, and carefully clean the housing with a moist soft cloth or chamois.

NOTE: Do not expose the device to any detergents, solvents, or insect repellents, they might damage it.
Do not try to repair the unit yourself. Contact an authorized Suunto service, distributor or retailer for any repair. Use only original Suunto accessories - damage caused by non-original accessories is not covered by warranty.

NOTE: Never push the buttons while swimming or in contact with water.
Pressing the buttons while the unit is submerged could cause the unit to malfunction.
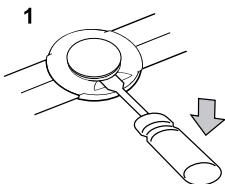
13.1 Replacing battery
If is displayed, a battery replacement is recommended.
Replace the battery with extreme care to ensure your Suunto M1/M2 remains water resistant. Careless replacement may void the warranty.
Replace the battery as illustrated here:
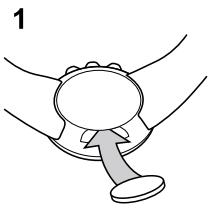
NOTE: Carefully ensure that the plastic O ring is properly placed so that the wriststop computer remains water-resistant. Careless battery replacement may void the warranty.
NOTE: Be careful with the spring in the battery compartment (see illustration). If the spring is damaged, please send your device to an authorized Suunto representative for service.
NOTE: When replacing the battery, only the time and date change. Previous initial settings and recorded exercises are restored.
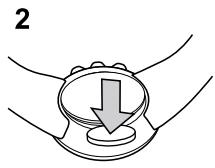
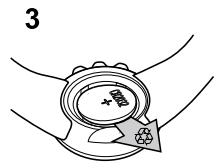
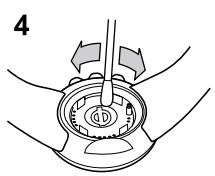
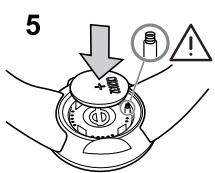
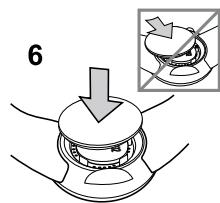
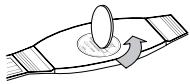
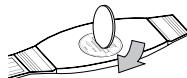
13.2 Replacing HR belt battery
Replace the battery as illustrated here:
M1 heart rate belt
1
2


3

4
5
M2 heart rate belt
1

2

3
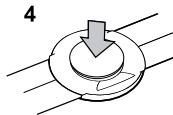
4

NOTE: Suunto recommends that the battery cover and the O ring are changed
simultaneously with the battery to ensure that the HR belt remains clean and water resistant. Replacement covers are available with replacement batteries from your authorized Suunto dealer or web shop.
14 SPECIFICATIONS
14.1 Technical specifications
General
- Operating temperature: -10^ to +50^ / +14^ to +122^
Storage temperature: -30^ to +60^ / -22^ to +140^
Weight (device): max. 36 g / 1.27 oz
Weight (Suunto Basic HR belt): max. 55 g / 1.95 oz
Weight (Suunto Dual Comfort belt): max. 42g / 1.48 oz
Water resistance (device): 30m / 100 ft (ISO 2281)
Water resistance (HR belt): 20m / 66 ft (ISO 2281)
Transmission frequency (belt): 5.3 kHz inductive, gym equipment and 2.465 GHz Suunto-ANT compatible
Transmission range: 2m / 6 ft - User-replaceable battery (device / HR belt): 3V CR2032
- Battery life (device / HR belt): approximately 1 year in normal use (2.5 h exercise with HR / week)
Log recorder/stopwatch
Maximum log time: 9 hours 59 minutes and 59 seconds
- Resolution: The first 9.9 seconds are shown with 0.1 second accuracy. After 10 seconds the duration is shown with 1 second accuracy.
Totals
Previous exercise summary: 1
Total exercise time: 0 - 9999 h (After 9999 h back to 0 h)
- Last 4 weeks kcal and duration: 0-99999 kcal and 00:01 - 99:59 h
en
Heart rate
- Display: 30 to 240
Personal settings
Birth year: 1910 - 2009
Weight: 30 - 200 kg or 66 - 400 lb
14.2 Trademark
Suunto M1/M2, its logos, and other Suunto brand trademarks and made names are registered or unregistered trademarks of Suunto Oy. All rights are reserved.
14.3 CE
The CE mark is used to mark conformity with the European Union EMC directives 89/336/EEC and 99/5/EEC.
14.4 ICES
This Class [B] digital apparatus complies with Canadian ICES-003.
14.5 Copyright
Copyright © Suunto Oy 2009. All rights reserved. Suunto, Suunto product names, their logos and other Suunto brand trademarks and names are registered or unregistered trademarks of Suunto Oy. This document and its
contents are proprietary to Suunto Oy and are intended solely for the use of clients to obtain knowledge and information regarding the operation of Suunto products. Its contents shall not be used or distributed for any other purpose and/or otherwise communicated, disclosed or reproduced without the prior written consent of Suunto Oy. While we have taken great care to ensure that information contained in this documentation is both comprehensive and accurate, no warranty of accuracy is expressed or implied. This document content is subject to change at any time without notice. The latest version of this documentation can be downloaded at www.suunto.com.
14.6 FCC compliance
This device complies with Part 15 of the FCC Rules. Operation is subject to the following two conditions: (1) this device may not cause harmful interference, and (2) this device must accept any interference received, including interference that may cause undesired operation. Repairs should be made by authorized Suunto service personnel. Unauthorized repairs will void warranty. This product has been tested to comply with FCC standards and is intended for home or office use.
14.7 Patent notice
This product is protected by pending patent applications and their corresponding national rights. US 11/432,380 US 7129835, US 7,526,840, US 11/808,391, USD 603,521, USD 29/313,029. Additional patent applications have been filed.
14.8 Disposal of device
Please dispose of the device in an appropriate way, treating it as electronic waste. Do not throw it in the garbage. If you wish, you may return the device to your nearest Suunto representative.

15 WARRANTY
SUUNTO LIMITED WARRANTY FOR Suunto M1/M2
This Limited Warranty is valid as of January 1st, 2008.
Suunto warrants that during the Warranty Period Suunto or a Suunto Authorized Service Center (hereinafter referred to as Service Center) will, at its sole discretion, remedy defects in materials or workmanship free of charge either by a) repairing the Product or the parts, or b) replacing the Product or the parts, or c) refunding the purchase price of the Product, subject to the terms and conditions of this Limited Warranty.
This Limited Warranty is only valid and enforceable in the country in which the Product was purchased, provided that Suunto has intended the Product for sale in that country.
Warranty Period
The Warranty Period starts at the date of retail purchase by the original end-user purchaser. The Warranty Period is two (2) years for the Product.
The Warranty Period for the consumable parts and accessories for all products including (but not limited to) PODs, heart rate transmitters, chargeable batteries, chargers, docking stations, straps, cables and hoses (whether included in the sales package or sold separately) is one (1) year.
Exclusions and Limitations
This Limited Warranty does not cover:
-
- a) normal wear and tear, b) defects caused by rough handling (defects caused by sharp items, by bending, compressing or dropping, etc.), or c)
defects or damage caused by misuse of the Product or contrary to the instructions.
- user manuals or any third-party software;
- defects or alleged defects caused by the fact that the Product was used with, or connected to, any product, accessory, software and/or service not manufactured or supplied by Suunto, or was used otherwise than for its intended use;
- replaceable batteries.
This Limited Warranty is not enforceable if:
- the Product has been opened, modified or repaired by anyone other than Suunto or Service Center;
- the Product has been repaired using unauthorized spare parts;
- the Product's serial number has been removed, erased, defaced, altered or made illegible in any way - and this shall be determined at the sole discretion of Suunto;
- the Product has been exposed to influence from chemical products including (but not limited to) mosquito repellents.
Suunto does not warrant that the operation of the Product will be uninterrupted or error free, or that the Product will work in combination with any hardware or software provided by a third party.
Access to Suunto warranty service
Please remember to register your Product at www.suunto.com/register. Save also the purchase receipt and/or registration card.
For Products covered by this Limited Warranty, contact your local authorized Suunto retailer – for contact information please visit the Suunto website www.suunto.com or call the Suunto Help Desk +358 2 284 1160. (national or
premium rates may apply) for further details and instructions on how to bring your Product for Warranty Service. Please, use prepaid freight when shipping your Product to your local authorized Suunto retailer.
Limitation of Liability
To the maximum extent permitted by applicable mandatory laws, this Limited Warranty is your sole and exclusive remedy and is in lieu of all other warranties, expressed or implied. Suunto shall not be liable for special, incidental, punitive or consequential damages, including but not limited to loss of anticipated benefits or profits, loss of savings or revenue, loss of data, punitive damages, loss of use of the Product or any associated equipment, cost of capital, cost of any substitute equipment or facilities, downtime, the claims of any third parties, including customers, and damage to property, resulting from the purchase or use of the Product or arising from breach of the warranty, breach of contract, negligence, strict tort, or any legal or equitable theory, even if Suunto knew of the likelihood of such damages. Suunto shall not be liable for delay in rendering service under the Limited Warranty, or loss of use during the time the Product is being repaired.
SUUNTO HELP DESK
Global +358 2 284 1160
USA (toll free) 1-800-543-9124
Canada (toll free) 1-800-267-7506
www.suunto.com
SUUNTO
© Suunto Oy 6/2010
Suunto is a registered trademark of Suunto Oy.
All Rights reserved.
- WELCOME
- DISPLAY ICONS AND SEGMENTS
- USING BUTTONS
- GETTING STARTED
- Estimating your fitness level
- USING BUTTON LOCK
- PUTTING ON HR BELT
- STARTING EXERCISE
- To start exercising:
- Troubleshooting
- DURING EXERCISE
- Heart rate zones
- WEEKLY EXERCISE PROGRAM EXAMPLE: FROM POOR TO EXCELLENT LEVEL
- AFTER EXERCISE
- REVIEWING HISTORY
- History & trend
- Previous exercise
- ADJUSTING SETTINGS
- Example: adjusting alarm settings
- Sleep mode and initial settings
- Changing language
- CARE AND MAINTENANCE
- Replacing battery
- Replacing HR belt battery
- M1 heart rate belt
- M2 heart rate belt
- SPECIFICATIONS
- Technical specifications
- General
- Log recorder/stopwatch
- Totals
- Heart rate
- Personal settings
- Trademark
- CE
- ICES
- Copyright
- FCC compliance
- Patent notice
- Disposal of device
- WARRANTY
- Warranty Period
- Exclusions and Limitations
- Access to Suunto warranty service
- Limitation of Liability
- SUUNTO HELP DESK
- SUUNTO
Brand : SUUNTO
Model : M2
Category : Sports Watch