
OPC A01 090HP - Portable air conditioner OPTIMEA - Free user manual and instructions
Find the device manual for free OPC A01 090HP OPTIMEA in PDF.


| Product type | Portable monoblock air conditioner |
| Brand | Optimea |
| Model | OPC A01 090HP |
| Cooling capacity | 9000 BTU/h (approx. 2.6 kW) |
| Recommended area | Up to 25 m² |
| Power supply | 230 V ~ 50 Hz |
| Power consumption | Approx. 950 W |
| Dimensions (W × D × H) | 33 × 30 × 68 cm |
| Net weight | 22 kg |
| Noise level | ≤ 65 dB(A) |
| Airflow | 300 m³/h |
| Dehumidification capacity | 1.2 L/h |
| Water tank | 1 L (continuous drainage possible) |
| Refrigerant | R290 (propane) – eco-friendly |
| Main functions | Cooling, dehumidification, fan, timer |
| Remote control | Yes, included |
| Maintenance and cleaning | Clean filter every 2 weeks with warm water |
| Safety | Auto shut-off on overheat, compressor protection |
| Spare parts and repairability | Available on manufacturer website – repairability score: 7.5/10 |
| Warranty | 2 years (parts and labor) |
Frequently Asked Questions - OPC A01 090HP OPTIMEA
User questions about OPC A01 090HP OPTIMEA
0 question about this device. Answer the ones you know or ask your own.
Ask a new question about this device
Download the instructions for your Portable air conditioner in PDF format for free! Find your manual OPC A01 090HP - OPTIMEA and take your electronic device back in hand. On this page are published all the documents necessary for the use of your device. OPC A01 090HP by OPTIMEA.
USER MANUAL OPC A01 090HP OPTIMEA

Plus d'infos




Notes :
- Méthode 2 :

Plus d'infos
Portable air conditioner (reversible)
User manual
Item : OPC-A01-090HP


More info

This product is only suitable for well insulated spaces or occasional use.
Thank you for choosing our product.
For proper operation of the device, please Read this manual carefully before installing or operating your new air conditioning unit. Make sure to save this manual for future reference.
If you lose this User Guide, please contact your reseller, or send an e-mail to info@optimea.fr to obtain the electronic version.
Table of Contents
- Important safety instructions ____ 1
- Features and components ____ 4
- Compliance 5
- Control settings ____ 6
- Safety devices 8
- Installation and adjustment ____ 9
- Drainage instructions ____ 11
- Maintenance ____ 13
- Storage of the unit ____ 13
- Troubleshooting ____ 14
- Technical data 16
The refrigerant used in mobile air conditioners is the environmentally friendly hydrocarbon R290. This refrigerant is odorless, and compared to the alternative refrigerant, the R290 is an ozone-free refrigerant, and its effect is very low.
Please read the instructions before use and repair. The drawings provided in this manual may not be the same as the physical objects. Please refer to the physical objects.
1. Important safety instructions
Avertissement
- Do not use products other than those recommended by the manufacturer to accelerate defrosting or for cleaning the air conditioner.
- The appliance must be placed in an area free from continuous sources of ignition (e.g., open flames, gas, or operating electrical devices).
- Do not pierce or burn.
- Be aware that refrigerant gases may be odorless.
- The appliance must be installed, used, and stored in a room larger than 11 m 2 .
- Ensure that ventilation outlets and inlets are not obstructed.
- Follow the manufacturer's maintenance instructions.
- Use the unit in a well-ventilated room corresponding to its cooling/ventilation capacity.
- Any person working on the refrigerant circuit must hold proper certification issued by an accredited organization that guarantees competence in handling refrigerants.
- Maintenance and repairs requiring assistance must be carried out under the supervision of a qualified professional experienced in the use of flammable refrigerants.
- Any operation that may affect safety must be carried out by competent persons.




Warning: Fire hazard.
Notes
The air conditioner is intended for domestic use and is not suitable for any other potential applications.
-
During installation, please follow the rules for connecting to the power supply and ensure that it is properly grounded. If you have any questions regarding the electrical installation, follow the manufacturer's instructions and, if necessary, seek professional assistance for the installation.
-
Place the air conditioner on a flat, dry surface, at least 50 cm away from other objects or walls.
-
After installation, make sure the plug is intact and securely connected, and ensure that the power cord is positioned so that no one can trip over it or pull the plug out accidentally.
-
Never block the air inlets or outlets with objects.
-
Check that the drainage hoses are not twisted or kinked.
-
Be careful not to damage any parts when attaching accessories to the hot air exhaust hose.
-
If you move the air conditioner, it must always remain in a horizontal position.
-
Keep away from any type of fuel, flammable gas, stoves, or other sources of heat.
-
Do not attempt to disassemble, repair, or modify the air conditioner yourself, as this could cause malfunction, personal injury, or property damage. To avoid any risk, please contact the manufacturer or qualified professionals in case of malfunction.
-
Do not install the air conditioner in a bathroom or any other damp location.
-
Do not switch off the air conditioner by unplugging it from the socket.
-
Do not place glasses or other objects on the unit to avoid liquids spilling into the air conditioner.
-
Do not use insecticides or flammable substances near the air conditioner.
-
Do not use chemical products or detergents for cleaning. Clean the air conditioner with a slightly damp cloth and dry it. If the air conditioner is very dirty, use a mild detergent (such as dishwashing liquid).
-
This appliance can be used by persons aged 16 years and above, and by persons with reduced physical, sensory, or mental capabilities, or lack of experience and knowledge, if they are properly supervised or have been given instructions on the safe use of the appliance and understand the hazards involved. Children must not play with the appliance. Cleaning and maintenance must not be carried out by children without supervision. If the power cord is damaged, it must be replaced by the manufacturer, its service agent, or a similarly qualified person to avoid hazards. The air conditioner
must be installed in accordance with applicable wiring regulations. Do not operate in a bathroom or damp room such as a laundry room.
Transport, Marking and Storage of Air Conditioners
- Transport of the Equipment Contains flammable refrigerants / Must comply with transport regulations.
- Marking of the Equipment Use of symbols / Must comply with applicable regulations.
- Handling of the Equipment Use of flammable refrigerants / Must comply with applicable regulations.
- Storage of the Equipment The equipment must be stored in accordance with the manufacturer's instructions.
- Storage of Unopened (Unsold) Equipment The protective packaging must be designed in such a way that any mechanical damage inside the packaging cannot cause leakage of the refrigerant charge. The maximum number of units that can be stored together is defined by local standards.
2. Features and components
1. Specifications
- Functions: Cooling, heating, dehumidification, and ventilation.
- The connector support is designed in height to facilitate assembly and ensure airflow through the duct.
- The control panel has an LED display and a remote control allows easy adjustment of the unit settings.
- Timer function: 24 hours.
- Safety anti-restart function preventing the automatic start of the compressor for 3 minutes.
- An alert indicates that the unit must be drained when the water tank is full.
- Operating range: 7°C to 35°C (indoor).
• Temperature setting range: 16°C to 31°C.
2. Component
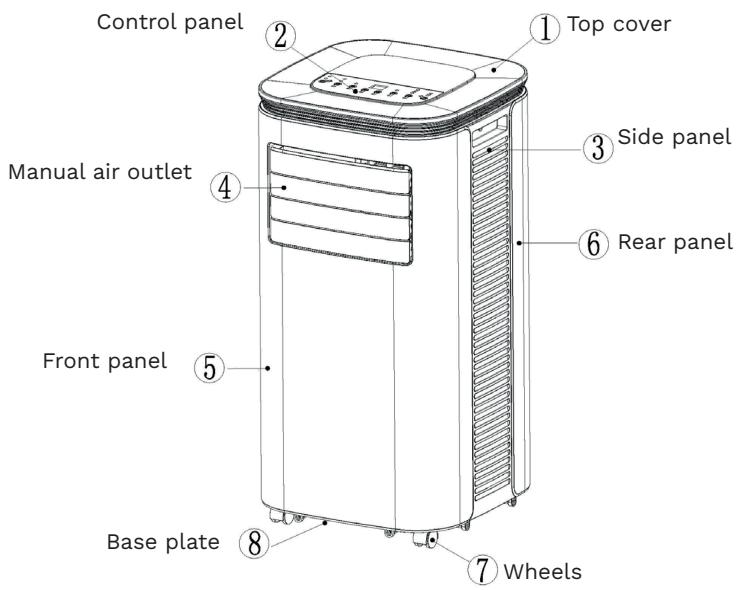


3. Compliance
OPTIMEA OPC-A01-090HP complies with European directives:
• 2014/35/EU - Low Voltage Directive (LVD)
• 2014/30/EU - Electromagnetic Compatibility (EMC)

Electrical waste must not be disposed of with household waste. Please check recycling facilities near you. Contact local authorities or your dealer for recycling advice. Remote control batteries contain materials that are hazardous to the environment and must be disposed of responsibly.
4. Control settings
1. Control Panel Operating Instructions
1) Operating Interface
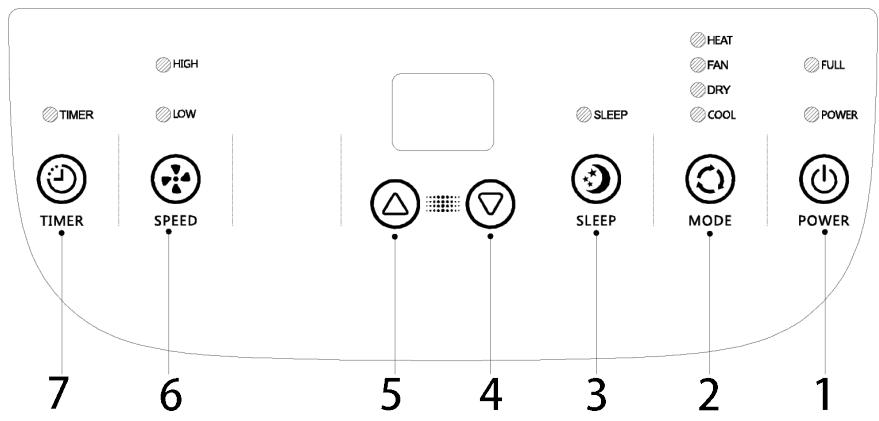
① Power ON/OFF ② Mode ③ Sleep ④ “Down” ⑤ “Up” ⑥ Speed ⑦ Timer
When the unit is powered on for the first time, the buzzer sounds and the unit enters standby mode.
① Power ON/OFF :
Turn the air conditioner on or off. If the unit is off, press the button to switch it on. If it is on, press the button to switch it off.
② Mode Selection :
When the unit is powered on, press this button to switch between the modes: Cooling → Dehumidification → Fan → Heating → Cooling → ...
③ Sleep Mode :
Sleep mode ensures continuous operation adapted to rest periods and environments where comfort and energy efficiency are a priority. In this mode, the fan operates at low speed and the compressor is activated only when the room temperature exceeds the set temperature, then stops as soon as the setpoint is reached. This automatic regulation maintains stable conditions while limiting energy consumption, thus ensuring optimal comfort with economical use of the unit.
④ ⑤ Down and Up Buttons :
Press these buttons to adjust the temperature or the timer setting:
- For temperature adjustment, press UP or DOWN to set the desired temperature (not available in Fan or Dehumidification mode).
- For timer adjustment, press UP or DOWN to set the desired number of hours.
⑥ Fan Speed Selection :
- Cooling: when the unit is on, press this button to activate cooling mode.
- Fan: when the unit is on, press this button to activate fan mode.
- Heating: when the unit is on, press this button to activate heating mode.
- Dehumidification: this button is not functional; the fan will automatically run at low speed.
⑦ Timer :
If the timer is off, press this button to activate it. If it is on, press again to deactivate it. When the timer indicator flashes, use the UP and DOWN buttons to set the desired time. The setting range is from 1 to 24 hours, adjustable in 1-hour increments.
2. remote control operating instructions
The remote control is as follows :
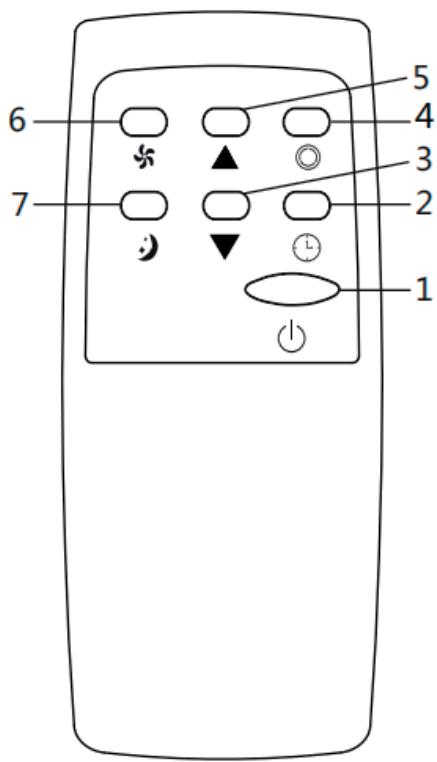
- "Power On/Off"
- "Timer"
- "Down" to lower the temperature or set the timer
- "Mode" to select cooling, dehumidification, ventilation or heat
- "Up" to increase the temperature or set the timer
- "Speed" to select low or high fan speed
- "Sleep" to activate the sleep function
5. Safety devices
1. Anti-freeze protection
In cooling or energy-saving mode, if the exhaust pipe temperature becomes too low, the air conditioner will automatically switch to safety mode. Once the exhaust pipe temperature rises again, the unit will automatically resume operation.
2. Overflow protection
When the water level in the tank exceeds the alert threshold, the air conditioner will automatically emit an audible alarm, and the “FULL” indicator will flash. You must then move the drainage hose and connect the unit to a drain or another suitable drainage area to empty the water (for more details, refer to the Drainage Instructions section at the end of this chapter). Once the water has been drained, the air conditioner will automatically resume operation.
WARNING : When using the cooling mode under very high temperatures combined with particularly high humidity, we recommend using the continuous drainage function (see Chapter VI: Drainage Instructions, Section 2: Continuous Drainage) to prevent possible tank overflows.
3. Automatic Defrost
In heating mode, the unit features an automatic defrost function. After defrosting, the unit will automatically return to its previous state.
4. Overheating Protection
To extend the service life of the unit, it is equipped with overheating protection in heating mode. During the protection period, the compressor and lower motor stop operating and will automatically return to normal heating mode once the unit's temperature has stabilized.
6. Installation and adjustments
1. Installation
Caution : The air conditioner must remain in a vertical position for at least two hours before use. The unit can be easily moved to the desired location. During transportation, always keep it upright and place it on a flat surface. Do not install the unit in a bathroom or any other humid environment.
1.1 Installing the Assembled Exhaust Hose (see Fig. 1)

Figure1
- Remove the external connector and the exhaust hose from their plastic packaging.
- Insert the exhaust hose (hose joint end) into the air outlet slot on the rear panel (turn counterclockwise to tighten) and complete the assembly (see Figure 1).
1.2. Installing the Window Sealing Panels
- Open the window halfway, then install the sealing system on the window (see Figures 2 and 3).
- The panels can be installed either horizontally or vertically.
- Extend the adjustable parts of the sealing system to match the window frame so that both ends of the device are in contact with the frame. Make the necessary adjustments on the different sections of the sealing kit.
Notes :
- The flat end of the exhaust hose joint must be securely locked in place.
- The hose must not be twisted or bent. The ventilation of the exhaust hose must not be obstructed.
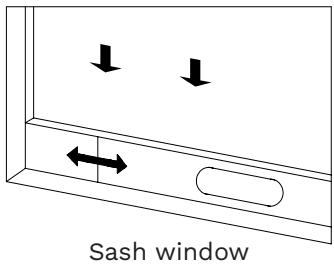
Figure 2
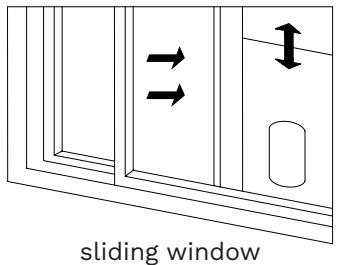
Figure 3
1.3. Installing the Main Unit
- Move the air conditioner with the exhaust hose and connected accessories to the window, keeping a distance of at least 50 cm between the unit and walls or other objects (see Figure 4).
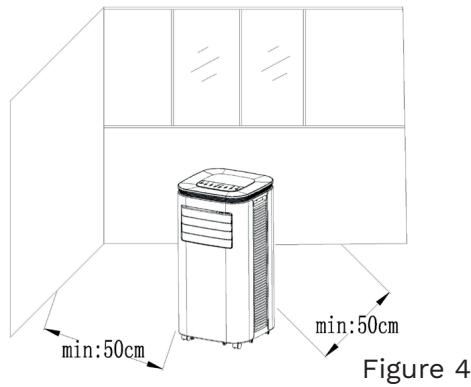
- Extend the exhaust hose and insert its flat end into the opening of the window sealing system (see Figures 5 and 6).
Notes :
- The flat end of the exhaust hose must be firmly locked into place.
- The hose must not be twisted or bent. Make sure the exhaust hose ventilation is not obstructed.

installation of a sash window Figure 5

sliding window installation Figure 6
Important Notes :
The exhaust hose length must be between 280 and 1500 mm, depending on the air conditioner specifications. Do not use extensions and do not replace with different hoses, as this may cause malfunction. The exhaust hose inlet must not be blocked to avoid overheating.
7. Drainage Instructions
This unit has two drainage methods: manual drainage or continuous drainage.
1. Manual Drainage
- When the unit stops due to excess water, press the OFF button and unplug the unit.
Note: Move the unit carefully to prevent water from spilling inside the base of the unit. - Place a container under the drain outlet at the back of the unit.
- Unscrew the drain cap and remove the rubber stopper. The water will flow automatically into the container below.

Notes :
- Keep the drain cap and rubber stopper.
- During drainage, you may tilt the unit slightly backwards.
- If the container cannot hold all the water, close the drain outlet before it overflows to prevent water from spilling on the floor or carpet.
- Once the water has been drained, replace the rubber stopper and screw the drain cap back in place.
2. Continuous Drainage
There are two methods for continuous drainage:
- Method 1:
- Unscrew the drain cap and remove the rubber stopper.
- Connect the supplied drainage hose to the drain outlet.
- Place the other end into a bucket.
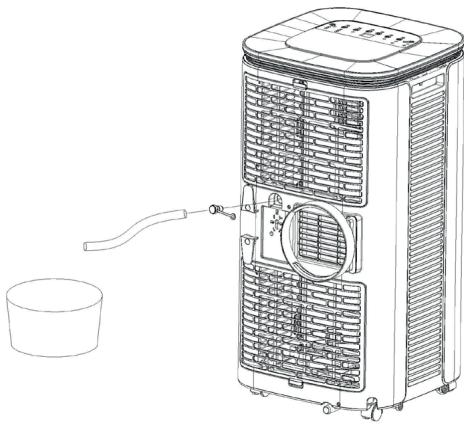
- Method 2:
- Unscrew the drain cap and remove the rubber stopper.
- Connect the supplied drainage hose to the drain outlet.
- Unscrew the drain cap and remove the rubber stopper from the bottom drainage hole.
- Connect the other end of the hose to the bottom drainage hole.

8. Maintenance
Cleaning : Always turn off and unplug the unit before performing any cleaning or maintenance..
1. Cleaning the Housing :
Clean the housing with a soft damp cloth. Do not use chemicals such as benzene, alcohol, or detergents, as they may damage the surface and the entire unit.
2. Cleaning the Filter Screen :
To prevent dust from clogging the filter and reducing the efficiency of the air conditioner, clean the filter every two weeks.

3. Cleaning the Upper Filter Frame :
-
Using a screwdriver, remove one of the screws holding the EVA filter on the rear housing. Remove the filter.
-
Soak the filter in warm water mixed with a neutral detergent (approx. 40 °C / 104 °F). Rinse thoroughly and let it dry in the shade before reinstalling.
9. Storage of the Unit
- Unscrew the drain cap and remove the rubber stopper, then drain the water into a container (you may slightly tilt the unit).
- Switch the unit on in low fan mode and let it run until the drain hose is completely dry. This will prevent moisture and mold from developing inside.
- Turn off and unplug the unit, wrap the power cord around the designated holder, and install the water inlet connector and drain cap.
- Remove the exhaust hose and store it carefully.
- Cover the unit with a plastic bag and store it in a dry place, away from children, and protected from dust.
- Remove the batteries from the remote control and store them safely.
Note : Always store the unit in a dry place and keep all accessories carefully.
10. Troubleshooting
Do not repair or disassemble the air conditioning by yourself. Unqualified repair will lead to failure of the warranty card, and may cause damage to users or their properties.
| Problems | Reasons | Solutions |
| The air conditioning does not work. | ·There is no electricity. | ·Turn it on after connecting it to a socket with electricity. |
| ·The overflow indicator displays "FL". | ·Discharge the water inside. | |
| ·The ambient temperature is too low or too high. | ·Recommend to use the machine in at the temperature of 7-35 °C (44-95 °F). | |
| ·In cooling mode, the room temperature is lower than the set temperature; in heating mode, the room temperature is higher than the set temperature. | ·Change the set temperature. | |
| ·In dehumidification mode, the ambient temperature is low. | ·The machine is placed in a room with an ambient temperature of greater than 17 °C (62 °F). | |
| The cooling effect is not good. | ·There is direct sunlight. | ·Pull the Curtain. |
| ·Doors or windows are open; there are a lot of people; or in cooling mode, there are other sources of heat. | ·Close doors and windows, and add new air conditioning. | |
| ·The filter screen is dirty. | ·Clean or replace the filter screen. | |
| ·The air inlet or outlet is blocked. | ·Clear obstructions. | |
| Big Noise. | ·The air conditioning is not placed on a flat surface. | ·Put the air conditioning on a flat and hard place (to reduce noise). |
| compressor does not work. | ·Overheat protection starts. | ·Wait for 3 minutes until the temperature is lowered, and then restart the machine. |
| The remote control does not work. | ·The distance between the machine and the remote control is too far. | ·Let the remote control get close to the air conditioning, and make sure that the remote control directly faces to the direction of the remote control receiver. |
| ·The remote control is not aligned with the direction of the remote control receiver. | ||
| ·Batteries are dead. | ·Replace batteries. | |
| Displays 'E1'. | ·The pipe temperature sensor is abnormal. | ·Contact after-sales service |
| Displays 'E2'. | ·The room temperature sensor is abnormal. |
Note :
If problems not listed in the table occur or recommended solutions do not work, please contact the professional service organization : sav@optimea.fr
Environment

Meaning of the crossed-out wheeled dustbin :
Do not dispose of electrical appliances as unsorted municipal waste, use separate collection facilities. Contact your local council for information regarding the collection systems available.
If electrical appliances are disposed of in landfills or dumps, hazardous substances can leak into the groundwater and get into the food chain, damaging your health and well-being.
- Technical data
| Item | Rated value | Measured value | Requirements for minimum energy efficiency | Energy Efficiency Class (According to table 2 of EU 626/2011) | Verdict |
| Rated capacity for cooling (kW) | 2.64 | 2.644 | - | - | Pass |
| Power input for cooling (kW) | 1.010 | 1.009 | - | - | Pass |
| EERrated | 2.60 | 2.62 | ≥ 2.34 | A | Pass |
| Rated capacity for heating (kW) | 2.05 | 2.065 | - | - | Pass |
| Power input for heating (kW) | 0.850 | 0.845 | - | - | Pass |
| COPrated | 2.30 | 2.44 | ≥ 1.84 | A | Pass |
| Standby Mode Power (W) (According to (UE) n° 206/2012) | 1.00 | 0.36 | ≤ 1.00 | - | Pass |
| Networked Standby Mode Power (W) (According to (CE) n° 1275/2008 & (UE) n° 801/2013) | 2.00 | 0.74 | ≤ 2.00 | - | Pass |
| Off Mode Power (W) | N/A | N/A | ≤ - | - | N/A |
| Sound Power, indoor (dB(A)) | 65 | 64.75 | ≤65 | - | Pass |
| Sound Power, outdoor (dB(A)) | N/A | N/A | ≤ | - | N/A |
Optimea
Please find our product range on our website www.optimea.fr :


More info


- NOTES
- MÉTHODE 2
- PORTABLE AIR CONDITIONER (REVERSIBLE)
- TABLE OF CONTENTS
- IMPORTANT SAFETY INSTRUCTIONS
- AVERTISSEMENT
- TRANSPORT, MARKING AND STORAGE OF AIR CONDITIONERS
- FEATURES AND COMPONENTS
- SPECIFICATIONS
- COMPONENT
- COMPLIANCE
- CONTROL SETTINGS
- CONTROL PANEL OPERATING INSTRUCTIONS
- ④ ⑤ DOWN AND UP BUTTONS
- ⑥ FAN SPEED SELECTION
- ⑦ TIMER
- REMOTE CONTROL OPERATING INSTRUCTIONS
- SAFETY DEVICES
- ANTI-FREEZE PROTECTION
- OVERFLOW PROTECTION
- AUTOMATIC DEFROST
- OVERHEATING PROTECTION
- INSTALLATION AND ADJUSTMENTS
- INSTALLATION
- 1.1 INSTALLING THE ASSEMBLED EXHAUST HOSE (SEE FIG. 1)
- INSTALLING THE WINDOW SEALING PANELS
- INSTALLING THE MAIN UNIT
- IMPORTANT NOTES
- DRAINAGE INSTRUCTIONS
- MANUAL DRAINAGE
- CONTINUOUS DRAINAGE
- THERE ARE TWO METHODS FOR CONTINUOUS DRAINAGE
- METHOD 1
- METHOD 2
- MAINTENANCE
- CLEANING THE HOUSING
- CLEANING THE FILTER SCREEN
- CLEANING THE UPPER FILTER FRAME
- STORAGE OF THE UNIT
- TROUBLESHOOTING
- NOTE
- ENVIRONMENT
- OPTIMEA
Brand : OPTIMEA
Model : OPC A01 090HP
Category : Portable air conditioner