Mon Soleil Verre - Electric heater Eurom - Free user manual and instructions
Find the device manual for free Mon Soleil Verre Eurom in PDF.


| Brand | Eurom |
| Model | Mon Soleil Verre |
| Product type | Electric inertia radiator |
| Dimensions (W x H x D) | 60 x 45 x 12 cm |
| Weight | 8 kg |
| Power supply | 230 V ~ 50 Hz |
| Power | 1500 W |
| Built-in thermostat | Yes, adjustable |
| Programmer | Built-in, 24h/7 days |
| Heating mode | Radiation and convection |
| Material | Tempered glass and aluminum |
| Mounting type | Wall mounting or included feet |
| Anti-freeze function | Yes |
| Protection rating | IP24 (splash-proof) |
| Safety shutdown | In case of overheating |
| Remote control | Not supplied |
| Maintenance and cleaning | Dust with a soft cloth, do not use abrasive products |
| Spare parts | Available on request from the manufacturer |
| Repairability | Repairability index: 7.5/10 |
| Warranty | 2 years |
Frequently Asked Questions - Mon Soleil Verre Eurom
User questions about Mon Soleil Verre Eurom
0 question about this device. Answer the ones you know or ask your own.
Ask a new question about this device
Download the instructions for your Electric heater in PDF format for free! Find your manual Mon Soleil Verre - Eurom and take your electronic device back in hand. On this page are published all the documents necessary for the use of your device. Mon Soleil Verre by Eurom.
USER MANUAL Mon Soleil Verre Eurom
natural_image
Blank white rectangular panel with four corner markers (no text or symbols)Mon Soleil 300 & 450 & 720 Verre (Glass)
Art. nr. 361698 & 361711 & 361735
Art. nr. 361704 & 361728 & 361742 (Swiss plug)
| formatie eisen voor elektrische toestellen voor lokale ruimteverwarming | |||||
| Model: Mon Soleil 300 WiFi | |||||
| Item | Symbool | Waarde | Eenheid | Item | Eenheid |
| Warmteafgifte | Type warmte-input, uitsluitend voor elektrische warmte opslagtoestellen (selecteer één) | ||||
| Nominale warmteafgifte | Pnom | 0,3 | kW | Handmatige sturing van de warmteopslag met geïntegreerde thermostaat | N/A |
| Minimale warmteafgifte (indicatief | Pmin | N/A | kW | Handmatige sturing van de warmteopslag met kamer- en/of buitentemperatuur feedback | N/A |
| Maximale continue warmteafgifte | Pmax,c | 0,3 | kW | Elektrische sturing van de warmteopslag met kamer- en/of buitentemperatuur feedback | N/A |
| Aanvullend elektriciteitsverbruik | Door een ventilator bijgestane warmteafgifte | N/A | |||
| Bij nominale warmteafgifte | elmax | 0,281 | kW | Type warmteafgifte/sturing kamertemperatuur (selecteer één) | |
| Bij minimale warmteafgifte | elmin | N/A | kW | Eentrapswarmteafgifte, geen sturing van de kamertemperatuur | Neen |
| In stand-by modus | eISB | 0,000774 | kW | Twee of meer handmatig in te stellen trappen, geen sturing van de kamertemperatuur | Neen |
| Mechanische sturing van de kamertemperatuur door thermostaat | Neen | ||||
| Elektronische sturing van de kamertemperatuur | Neen | ||||
| Elektronische sturing van de kamertemperatuur plus dag-tijdschakelaar | Neen | ||||
| Elektronische sturing van de kamertemperatuur plus week-tijdschakelaar | Ja | ||||
| Andere sturingsopties (meerdere selecties mogelijk) | |||||
| Sturing van de kamertemperatuur, met aanwezigheidsdetectie | Neen | ||||
| Sturing van de kamertemperatuur, met openraamdetectie | Neen | ||||
| Met de optie van afstandsbediening | Ja | ||||
| Met adaptieve sturing van de start | Neen | ||||
| Met beperking van de werkingstijd | Neen | ||||
| Met black-bultsensor | Neen | ||||
| Contactgegevens | Eurom - Kokosstraat 20 - 8281JC - Genemuiden - The Netherlands | ||||
| Erforderliche Angaben zu elektrischen Einzelraumheizgeräten | |||||
| Modell: Mon Soleil 300 WiFi | |||||
| Angabe | Symbol | Wert | Einheit | Angabe | Einheit |
| Wärmeleistung | Nur bei elektrischen Speicher-Einzelraumheizgeräten: Art der Regelung der Wärmezufuhr (bitte eine Möglichkeit auswählen) | ||||
| Nennwärmeleistung | Pnom | 0,3 | kW | Manuelle Regelung der Wärme-zufuhr mit integriertem Thermostat | N/A |
| Mindestwärme-leistung (Richtwert) | Pmin | N/A | kW | Manuelle Regelung der Wärme-zufuhr mit Rückmeldung der Raum- und/oder Außertemperatur | N/A |
| Maximale kontinuierliche Wärmeleistung | Pmax,c | 0,3 | kW | Elektronisch Regelung der Wärmezufuhr mit Rückmeldung der Raum- und/oder Außertemperatur | N/A |
| Hilfsstromverbrauch | Wärmeabgabe mit Gebläse-unterstützung | N/A | |||
| Bei Nennwärmeleistung | elmax | 0,281 | kW | Art der Wärmeleistung / Raumtemperaturkontrolle (bitte eine Möglichkeit auswählen) | |
| Bei Mindestwärme-Leistung | elmin | N/A | kW | Einstufige Wärmeleistung, keine Raumtemperaturkontrolle | Nein |
| Im Bereitschafts-zustand | eISB | 0,000774 | kW | Zwei oder mehr manuell einstellbare Stufen, keine Raum-Temperatur Kontrolle | Nein |
| Raumtemperaturkontrolle mit mechanischem Thermostat | Nein | ||||
| Mit Elektronische Raum-Temperatur Kontrolle | Nein | ||||
| Elektronische Raumtemperatur-kontrolle und Tageszeitregelung | Nein | ||||
| Elektronische Raumtemperatur-kontrolle und Wochentags Regelung | Ja | ||||
| Sonstige Regelungsoptionen (Mehrfach-nennungen möglich) | |||||
| Raumtemperaturkontrolle mit Präsenzerkennung | Nein | ||||
| Raumtemperaturkontrolle mit Erkennung offener Fenster | Nein | ||||
| Mit Fernbedienungsoption | Ja | ||||
| Mit adaptiver Regelung des Heizbeginns | Nein | ||||
| Mit Betriebzeitbegrenzung | Nein | ||||
| Mit Schwarzkugelsensor | Nein | ||||
| Kontaktangaben | Eurom - Kokosstraat 20 - 8281 JC - Genemuiden - The Netherlands | ||||
| Information requirement for the electric local space heaters | |||||
| Model identifier(s): Mon Soleil 300 WiFi | |||||
| Item | Symbol | Value | Unit | Item | Unit |
| Heat output | Type of heat input, for electric storage local space heaters only (select one) | ||||
| Nominal heat output | Pnom | 0,3 | kW | manual heat charge control, with integrated thermostat | No |
| Minimum heat output (indicative) | Pmin | N/A | kW | manual heat charge control with room and/or outdoor temperature feedback | No |
| Maximum continuous heat output | Pmax,c | 0,3 | kW | electronic heat charge control with room and/or outdoor temperature feedback | No |
| Auxiliary electricity consumption | fan assisted heat output | No | |||
| At nominal heat output | elmax | 0,281 | kW | Type of heat output/room temperature control (select one) | |
| At minimum heat output | elmin | N/A | kW | single stage heat output and no room temperature control | No |
| In standby mode | eISB | 0,000774 | kW | Two or more manual stages, no room temperature control | No |
| with mechanic thermostat room temperature control | No | ||||
| with electronic room temperature control | No | ||||
| electronic room temperature control plus day timer | No | ||||
| electronic room temperature control plus week timer | Yes | ||||
| Other control options (multiple selections possible) | |||||
| room temperature control, with presence detection | No | ||||
| room temperature control, with open window detection | No | ||||
| with distance control option | Yes | ||||
| with adaptive start control | No | ||||
| with working time limitation | No | ||||
| with black bulb sensor | No | ||||
| Contact details | Eurom - Kokosstraat 20 - 8281 JC - Genemuiden - The Netherlands | ||||
| Exigences d'information applicables aux dispositifs de chauffage décentralisés électriques | |||||
| Modèle: Mon Soleil 300 WiFi | |||||
| Caractéristique | Symbole | Valeur | Unité | Caractéristique | Unité |
| Puissance thermique | Type d'apport de chaleur, pour les dispositifs de chauffage décentralisés électriques à accumulation uniquement (sélectionner un seul type | ||||
| Puissance thermique nominale | Pnom | 0,3 | kW | Contrôle thermique manuel de la charge avec thermostat intégré | Non |
| Puissance thermique minimale (indicative) | Pmin | N/A | kW | Contrôle thermique manuel de la charge avec réception d'informations sur la température de la pièce et/ou extérieure | Non |
| Puissance thermique maximale continue | Pmax,c | 0,3 | kW | contrôle thermique électronique de la charge avec réception d'informations sur la température de la pièce et/ou extérieure | Non |
| Consommation d'électricité auxiliaire | Puissance thermique réglable par ventilateur | Non | |||
| À la puissance thermique nominale | elmax | 0,281 | kW | Type de contrôle de la puissance thermique/de la température de la pièce (sélectionner un seul type) | |
| À la puissance thermique minimale | elmin | N/A | kW | Contrôle de la puissance thermique à un palier, pas de contrôle de la température de la pièce | Non |
| En mode veille | eISB | 0,000774 | kW | Contrôle à deux ou plusieurs paliers manuels, pas de contrôle de la température de la pièce | Non |
| Contrôle de la température de la pièce avec thermostat mécanique | Non | ||||
| Contrôle électronique de la température de la pièce | Non | ||||
| Contrôle électronique de la température et programmateur journalier | Non | ||||
| Contrôle électronique de la température et programmateur hebdomadaire | Oui | ||||
| Autres options de contrôle (sélectionner une ou plusieurs options) | |||||
| Contrôle de la température de la pièce, avec détecteur de présence | Non | ||||
| Contrôle de la température de la pièce, avec détecteur de fenêtre ouverts | Non | ||||
| Option contrôle à distance | Oui | ||||
| Contrôle adaptatif de l'activation | Non | ||||
| Limitation de la durée d'activation | Non | ||||
| Capteur à globe noir | Non | ||||
| Coordonnées de contact | Eurom - Kokosstraat 20 - 8281 JC - Genemuiden - The Netherlands | ||||
| Informatie eisen voor elektrische toestellen voor lokale ruimteverwarming | |||||
| Model: Mon Soleil 450 WiFi | |||||
| Item | Symbool | Waarde | Eenheid | Item | Eenheid |
| Warmteafgifte | Type warmte-input, uitsluitend voor elektrische warmte opslagtoestellen (selecteer één) | ||||
| Nominale warmteafgifte | Pnom | 0,45 | kW | Handmatige sturing van de warmteopslag met geïntegreerde thermostaat | N/A |
| Minimale warmteafgifte (indicatief | Pmin | N/A | kW | Handmatige sturing van de warmteopslag met kamer- en/of buitentemperatuur feedback | N/A |
| Maximale continue warmteafgifte | Pmax,c | 0,45 | kW | Elektrische sturing van de warmteopslag met kamer- en/of buitentemperatuur feedback | N/A |
| Aanvullend elektriciteitsverbruik | Door een ventilator bijgestane warmteafgifte | N/A | |||
| Bij nominale warmteafgifte | elmax | 0,432 | kW | Type warmteafgifte/sturing kamertemperatuur (selecteer één) | |
| Bij minimale warmteafgifte | elmin | N/A | kW | Eentrapswarmteafgifte, geen sturing van de kamertemperatuur | Neen |
| In stand-by modus | eISB | 0,000774 | kW | Twee of meer handmatig in te stellen trappen, geen sturing van de kamertemperatuur | Neen |
| Mechanische sturing van de kamertemperatuur door thermostaat | Neen | ||||
| Elektronische sturing van de kamertemperatuur | Neen | ||||
| Elektronische sturing van de kamertemperatuur plus dag-tijdschakelaar | Neen | ||||
| Elektronische sturing van de kamertemperatuur plus week-tijdschakelaar | Ja | ||||
| Andere sturingsopties (meerdere selecties mogelijk) | |||||
| Sturing van de kamertemperatuur, met aanwezigheidsdetectie | Neen | ||||
| Sturing van de kamertemperatuur, met openraamdetectie | Neen | ||||
| Met de optie van afstandsbediening | Ja | ||||
| Met adaptieve sturing van de start | Neen | ||||
| Met beperking van de werkingstijd | Neen | ||||
| Met black-bultsensor | Neen | ||||
| Contactgegevens | Eurom - Kokosstraat 20 - 8281JC - Genemuiden - The Netherlands | ||||
| Erforderliche Angaben zu elektrischen Einzelraumheizgeräten | |||||
| Modell: Mon Soleil 450 WiFi | |||||
| Angabe | Symbol | Wert | Einheit | Angabe | Einheit |
| Wärmeleistung | Nur bei elektrischen Speicher-Einzelraumheizgeräten: Art der Regelung der Wärmezufuhr (bitte eine Möglichkeit auswählen) | ||||
| Nennwärmeleistung | Pnom | 0,45 | kW | Manuelle Regelung der Wärme-zufuhr mit integriertem Thermostat | Nein |
| Mindestwärme-leistung (Richtwert) | Pmin | N/A | kW | Manuelle Regelung der Wärme-zufuhr mit Rückmeldung der Raum- und/oder Außertemperatur | Nein |
| Maximale kontinuierliche Wärmeleistung | Pmax,c | 0,45 | kW | Elektronisch Regelung der Wärmezufuhr mit Rückmeldung der Raum- und/oder Außertemperatur | Nein |
| Hilfsstromverbrauch | Wärmeabgabe mit Gebläse-unterstützung | Nein | |||
| Bei Nennwärmeleistung | elmax | 0,432 | kW | Art der Wärmeleistung / Raumtemperaturkontrolle (bitte eine Möglichkeit auswählen) | |
| Bei Mindestwärme-Leistung | elmin | N/A | kW | Einstufige Wärmeleistung, keine Raumtemperaturkontrolle | Nein |
| Im Bereitschafts-zustand | eISB | 0,000774 | kW | Zwei oder mehr manuell einstellbare Stufen, keine Raum-Temperatur Kontrolle | Nein |
| Raumtemperaturkontrolle mit mechanischem Thermostat | Nein | ||||
| Mit Elektronische Raum-Temperatur Kontrolle | Nein | ||||
| Elektronische Raumtemperatur-kontrolle und Tageszeitregelung | Nein | ||||
| Elektronische Raumtemperatur-kontrolle und Wochentags Regelung | Ja | ||||
| Sonstige Regelungsoptionen (Mehrfach-nennungen möglich) | |||||
| Raumtemperaturkontrolle mit Präsenzerkennung | Nein | ||||
| Raumtemperaturkontrolle mit Erkennung offener Fenster | Nein | ||||
| Mit Fernbedienungsoption | Ja | ||||
| Mit adaptiver Regelung des Heizbeginns | Nein | ||||
| Mit Betriebzeitbegrenzung | Nein | ||||
| Mit Schwarzkugelsensor | Nein | ||||
| Kontaktangaben | Eurom - Kokosstraat 20 - 8281 JC - Genemuiden - The Netherlands | ||||
| Information requirement for the electric local space heaters | |||||
| Model identifier(s): Mon Soleil 450 WiFi | |||||
| Item | Symbol | Value | Unit | Item | Unit |
| Heat output | Type of heat input, for electric storage local space heaters only (select one) | ||||
| Nominal heat output | Pnom | 0,45 | kW | manual heat charge control, with integrated thermostat | No |
| Minimum heat output (indicative) | Pmin | N/A | kW | manual heat charge control with room and/or outdoor temperature feedback | No |
| Maximum continuous heat output | Pmax,c | 0,45 | kW | electronic heat charge control with room and/or outdoor temperature feedback | No |
| Auxiliary electricity consumption | fan assisted heat output | No | |||
| At nominal heat output | elmax | 0,432 | kW | Type of heat output/room temperature control (select one) | |
| At minimum heat output | elmin | N/A | kW | single stage heat output and no room temperature control | No |
| In standby mode | eISB | 0,000774 | kW | Two or more manual stages, no room temperature control | No |
| with mechanic thermostat room temperature control | No | ||||
| with electronic room temperature control | No | ||||
| electronic room temperature control plus day timer | No | ||||
| electronic room temperature control plus week timer | Yes | ||||
| Other control options (multiple selections possible) | |||||
| room temperature control, with presence detection | No | ||||
| room temperature control, with open window detection | No | ||||
| with distance control option | Yes | ||||
| with adaptive start control | No | ||||
| with working time limitation | No | ||||
| with black bulb sensor | No | ||||
| Contact details | Eurom - Kokosstraat 20 - 8281 JC - Genemuiden - The Netherlands | ||||
| Exigences d'information applicables aux dispositifs de chauffage décentralisés électriques | |||||
| Modèle: Mon Soleil 450 WiFi | |||||
| Caractéristique | Symbole | Valeur | Unité | Caractéristique | Unité |
| Puissance thermique | Type d'apport de chaleur, pour les dispositifs de chauffage décentralisés électriques à accumulation uniquement (sélectionner un seul type | ||||
| Puissance thermique nominale | Pnom | 0,45 | kW | Contrôle thermique manuel de la charge avec thermostat intégré | Non |
| Puissance thermique minimale (indicative) | Pmin | N/A | kW | Contrôle thermique manuel de la charge avec réception d'informations sur la température de la pièce et/ou extérieure | Non |
| Puissance thermique maximale continue | Pmax,c | 0,45 | kW | contrôle thermique électronique de la charge avec réception d'informations sur la température de la pièce et/ou extérieure | Non |
| Consommation d'électricité auxiliaire | Puissance thermique réglable par ventilateur | Non | |||
| À la puissance thermique nominale | elmax | 0,432 | kW | Type de contrôle de la puissance thermique/de la température de la pièce (sélectionner un seul type) | |
| À la puissance thermique minimale | elmin | N/A | kW | Contrôle de la puissance thermique à un palier, pas de contrôle de la température de la pièce | Non |
| En mode veille | eISB | 0,000774 | kW | Contrôle à deux ou plusieurs paliers manuels, pas de contrôle de la température de la pièce | Non |
| Contrôle de la température de la pièce avec thermostat mécanique | Non | ||||
| Contrôle électronique de la température de la pièce | Non | ||||
| Contrôle électronique de la température et programmateur journalier | Non | ||||
| Contrôle électronique de la température et programmateur hebdomadaire | Oui | ||||
| Autres options de contrôle (sélectionner une ou plusieurs options) | |||||
| Contrôle de la température de la pièce, avec détecteur de présence | Non | ||||
| Contrôle de la température de la pièce, avec détecteur de fenêtre ouverts | Non | ||||
| Option contrôle à distance | Oui | ||||
| Contrôle adaptatif de l'activation | Non | ||||
| Limitation de la durée d'activation | Non | ||||
| Capteur à globe noir | Non | ||||
| Coordonnées de contact | Eurom - Kokosstraat 20 - 8281 JC - Genemuiden - The Netherlands | ||||
| Informatie eisen voor elektrische toestellen voor lokale ruimteverwarming | |||||
| Model: Mon Soleil 720 WiFi | |||||
| Item | Symbool | Waarde | Eenheid | Item | Eenheid |
| Warmteafgifte | Type warmte-input, uitsluitend voor elektrische warmte opslagtoestellen (selecteer één) | ||||
| Nominale warmteafgifte | Pnom | 0,72 | kW | Handmatige sturing van de warmteopslag met geïntegreerde thermostaat | Neen |
| Minimale warmteafgifte (indicatief | Pmin | N/A | kW | Handmatige sturing van de warmteopslag met kamer- en/of buitentemperatuur feedback | Neen |
| Maximale continue warmteafgifte | Pmax,c | 0,72 | kW | Elektrische sturing van de warmteopslag met kamer- en/of buitentemperatuur feedback | Neen |
| Aanvullend elektriciteitsverbruik | Door een ventilator bijgestane warmteafgifte | Neen | |||
| Bij nominale warmteafgifte | elmax | 0,666 | kW | Type warmteafgifte/sturing kamertemperatuur (selecteer één) | |
| Bij minimale warmteafgifte | elmin | N/A | kW | Eentrapswarmteafgifte, geen sturing van de kamertemperatuur | Neen |
| In stand-by modus | eISB | 0,000774 | kW | Twee of meer handmatig in te stellen trappen, geen sturing van de kamertemperatuur | Neen |
| Mechanische sturing van de kamertemperatuur door thermostaat | Neen | ||||
| Elektronische sturing van de kamertemperatuur | Neen | ||||
| Elektronische sturing van de kamertemperatuur plus dag-tijdschakelaar | Neen | ||||
| Elektronische sturing van de kamertemperatuur plus week-tijdschakelaar | Ja | ||||
| Andere sturingsopties (meerdere selecties mogelijk) | |||||
| Sturing van de kamertemperatuur, met aanwezigheidsdetectie | Neen | ||||
| Sturing van de kamertemperatuur, met openraamdetectie | Neen | ||||
| Met de optie van afstandsbediening | Ja | ||||
| Met adaptieve sturing van de start | Neen | ||||
| Met beperking van de werkingstijd | Neen | ||||
| Met black-bultsensor | Neen | ||||
| Contactgegevens | Eurom - Kokosstraat 20 - 8281JC - Genemuiden - The Netherlands | ||||
| Erforderliche Angaben zu elektrischen Einzelraumheizgeräten | |||||
| Modell: Mon Soleil 720 WiFi | |||||
| Angabe | Symbol | Wert | Einheit | Angabe | Einheit |
| Wärmeleistung | Nur bei elektrischen Speicher-Einzelraumheizgeräten: Art der Regelung der Wärmezufuhr (bitte eine Möglichkeit auswählen) | ||||
| Nennwärmeleistung | Pnom | 0,72 | kW | Manuelle Regelung der Wärme-zufuhr mit integriertem Thermostat | Nein |
| Mindestwärme-leistung (Richtwert) | Pmin | N/A | kW | Manuelle Regelung der Wärme-zufuhr mit Rückmeldung der Raum- und/oder Außertemperatur | Nein |
| Maximale kontinuierliche Wärmeleistung | Pmax,c | 0,72 | kW | Elektronisch Regelung der Wärmezufuhr mit Rückmeldung der Raum- und/oder Außertemperatur | Nein |
| Hilfsstromverbrauch | Wärmeabgabe mit Gebläse-unterstützung | Nein | |||
| Bei Nennwärmeleistung | elmax | 0,666 | kW | Art der Wärmeleistung / Raumtemperaturkontrolle (bitte eine Möglichkeit auswählen) | |
| Bei Mindestwärme-Leistung | elmin | N/A | kW | Einstufige Wärmeleistung, keine Raumtemperaturkontrolle | Nein |
| Im Bereitschafts-zustand | eISB | 0,000774 | kW | Zwei oder mehr manuell einstellbare Stufen, keine Raum-Temperatur Kontrolle | Nein |
| Raumtemperaturkontrolle mit mechanischem Thermostat | Nein | ||||
| Mit Elektronische Raum-Temperatur Kontrolle | Nein | ||||
| Elektronische Raumtemperatur-kontrolle und Tageszeitregelung | Nein | ||||
| Elektronische Raumtemperatur-kontrolle und Wochentags Regelung | Ja | ||||
| Sonstige Regelungsoptionen (Mehrfach-nennungen möglich) | |||||
| Raumtemperaturkontrolle mit Präsenzerkennung | Nein | ||||
| Raumtemperaturkontrolle mit Erkennung offener Fenster | Nein | ||||
| Mit Fernbedienungsoption | Ja | ||||
| Mit adaptiver Regelung des Heizbeginns | Nein | ||||
| Mit Betriebzeitbegrenzung | Nein | ||||
| Mit Schwarzkugelsensor | Nein | ||||
| Kontaktangaben | Eurom - Kokosstraat 20 - 8281 JC - Genemuiden - The Netherlands | ||||
| Information requirement for the electric local space heaters | |||||
| Model identifier(s): Mon Soleil 720 WiFi | |||||
| Item | Symbol | Value | Unit | Item | Unit |
| Heat output | Type of heat input, for electric storage local space heaters only (select one) | ||||
| Nominal heat output | Pnom | 0,72 | kW | manual heat charge control, with integrated thermostat | No |
| Minimum heat output (indicative) | Pmin | N/A | kW | manual heat charge control with room and/or outdoor temperature feedback | No |
| Maximum continuous heat output | Pmax,c | 0,72 | kW | electronic heat charge control with room and/or outdoor temperature feedback | No |
| Auxiliary electricity consumption | fan assisted heat output | No | |||
| At nominal heat output | elmax | 0,666 | kW | Type of heat output/room temperature control (select one) | |
| At minimum heat output | elmin | N/A | kW | single stage heat output and no room temperature control | No |
| In standby mode | eISB | 0,000774 | kW | Two or more manual stages, no room temperature control | No |
| with mechanic thermostat room temperature control | No | ||||
| with electronic room temperature control | No | ||||
| electronic room temperature control plus day timer | No | ||||
| electronic room temperature control plus week timer | Yes | ||||
| Other control options (multiple selections possible) | |||||
| room temperature control, with presence detection | No | ||||
| room temperature control, with open window detection | No | ||||
| with distance control option | Yes | ||||
| with adaptive start control | No | ||||
| with working time limitation | No | ||||
| with black bulb sensor | No | ||||
| Contact details | Eurom - Kokosstraat 20 - 8281 JC - Genemuiden - The Netherlands | ||||
| Exigences d'information applicables aux dispositifs de chauffage décentralisés électriques | |||||
| Modèle: Mon Soleil 720 WiFi | |||||
| Caractéristique | Symbole | Valeur | Unité | Caractéristique | Unité |
| Puissance thermique | Type d'apport de chaleur, pour les dispositifs de chauffage décentralisés électriques à accumulation uniquement (sélectionner un seul type | ||||
| Puissance thermique nominale | Pnom | 0,72 | kW | Contrôle thermique manuel de la charge avec thermostat intégré | Non |
| Puissance thermique minimale (indicative) | Pmin | N/A | kW | Contrôle thermique manuel de la charge avec réception d'informations sur la température de la pièce et/ou extérieure | Non |
| Puissance thermique maximale continue | Pmax,c | 0,72 | kW | contrôle thermique électronique de la charge avec réception d'informations sur la température de la pièce et/ou extérieure | Non |
| Consommation d'électricité auxiliaire | Puissance thermique réglable par ventilateur | Non | |||
| À la puissance thermique nominale | elmax | 0,666 | kW | Type de contrôle de la puissance thermique/de la température de la pièce (sélectionner un seul type) | |
| À la puissance thermique minimale | elmin | N/A | kW | Contrôle de la puissance thermique à un palier, pas de contrôle de la température de la pièce | Non |
| En mode veille | eISB | 0,000774 | kW | Contrôle à deux ou plusieurs paliers manuels, pas de contrôle de la température de la pièce | Non |
| Contrôle de la température de la pièce avec thermostat mécanique | Non | ||||
| Contrôle électronique de la température de la pièce | Non | ||||
| Contrôle électronique de la température et programmateur journalier | Non | ||||
| Contrôle électronique de la température et programmateur hebdomadaire | Oui | ||||
| Autres options de contrôle (sélectionner une ou plusieurs options) | |||||
| Contrôle de la température de la pièce, avec détecteur de présence | Non | ||||
| Contrôle de la température de la pièce, avec détecteur de fenêtre ouverts | Oui | ||||
| Option contrôle à distance | Oui | ||||
| Contrôle adaptatif de l'activation | Non | ||||
| Limitation de la durée d'activation | Non | ||||
| Capteur à globe noir | Non | ||||
| Coordonnées de contact | Eurom - Kokosstraat 20 - 8281 JC - Genemuiden - The Netherlands | ||||
Dank
natural_image
Technical diagram of a device rear panel with labeled components (A and B), showing internal components and mounting points (no text or symbols beyond labels)natural_image
Close-up of a hand holding a white electronic device with wires and a small black connector (no visible text or symbols)Display (3)


of website: http://www.eurom.nl/nl/manuals
natural_image
Technical diagram of a two-panel electronic device with labeled components (A and B), showing front, side, and top views without any readable text or symbols.natural_image
Close-up of a hand holding a white electronic device with wires, no visible text or symbolsThank you very much for choosing for a EUROM device. You have made a good choice! We hope you will be satisfied about its functioning.
To get maximum profit from your product, it is important to read this manual attentive and totally before use, and to understand what is written. Read especially the safety instructions: they are there to protect you and your environment.
Keep the manual in a safe place for future reference. Store also the package: that is the best protection for your product in times of no-use. And if you at any time pass the appliance on, pass on the manual and package too.
We wish you a lot of fun with the Mon Soleil!
Eurom
Kokosstraat 20
8281 JC Genemuiden (NL)
info@eurom.nl
www.eurom.nl
This manual has been complied with the utmost care. Nevertheless, we reserve the right to optimize this manual at any time and to adjust it technically. The image used may differ.
Symbol Explanation

This symbol on your device means: do not cover!
Technical data
| Type | MS300 Verre wifi | MS450 Verre wifi | MS720 Verre wifi | |
| Supply voltage | V/Hz | 220-240 / 50-60 | ||
| Maximale Leistung | W | 300 | 450 | 720 |
| Thermostat | + | + | + | |
| Protection class | IP24 | IP24 | IP24 | |
| Dimensions | cm | 60x70 | 60x100 | 70x130 |
| Weight | kg | 10,8 | 14,7 | 22,1 |
General safety instructions
-
Before using the machine, carefully read this entire instruction manual.
-
Before using your new heater, check it, including cord and plug, for any visible damage. Do not use a damaged heater, but send it back to your dealer for replacement.
-
Do not use the heater until it is been fully installed in accordance with the instructions under the heading 'Description, Composition and Installation'.
-
This heater is strictly intended for normal domestic use. Only use it for the (additional) heating of your home.
-
This heater is in principle suitable for use in wet or damp rooms such as bathrooms, washrooms, etc. (IP24). Keep it at least 60 cm. away from water points and make sure that it can never fall into water and that no water can enter the stove. Should this ever happen, take out the plug from the socket first! Do not use an internally wet stove again but offer it for repair. Never immerse the heater, cord or plug in water or other liquids and never touch the heater with wet hands.
-
The supply voltage and utility frequency, specified on the machine, need to match those of the socket that is used. Only use an undamaged, earthed socket that is secured with a 30 mA earth leakage circuit breaker. The electrical socket that you are using must be to hand at all times in order to be able to remove the plug from the socket in the event of an emergency
-
Fully extend the cord before plugging in the heater. Make sure it does not come into contact with any part of the heater and prevent it from heating up any other way. Do not run the cord underneath carpeting; do not cover it with mats, carpet strips or similar and make sure it is not placed in any passageways. Make sure the cord cannot be stepped on and that no furniture is placed on top of it. Do not lead the cord around sharp corners and do not roll it up too tightly after use!
-
If possible, do not use an extension cord, as this poses the risk of overheating and fire. If the use of an extension cord is unavoidable, then make sure it is an undamaged, approved extension cord with a minimum diameter of 2 × 1.5 mm^2 and a minimum permissible power of 1000 Watt. To prevent overheating, always fully extend the cord!
-
During use the plug can feel a little warm, that's normal. Is it really warm, then there is probably something wrong with the socket. Contact your electrician.
-
Do not use the heater outdoors and do not use it in spaces, smaller than 7 m^3 .
-
A heater contains hot and/or glowing and sparking components. Do not, therefore, use it in areas where fuels, paint, flammable liquids and/or gasses etc. are stored.
-
Do not place the heater near, under, or directly opposite a socket and do not place it near an open fire or other heat source.
-
Do not use the heater near or directly opposite furniture, animals, curtains, paper, clothes, bedding or other inflammable objects. Keep them at least 1 metre away from the heater!
-
Never cover a heater! Never use the heater to dry clothes and do not place anything on top of the heater. Do not let anything lean against the heater.
-
Make sure that the air around the heater can circulate freely. Do not place the heater too close to walls or large objects and do not place it under shelves, cupboards or similar: take at all sides at least 30 cm free space and at least 20 cm from the floor. For hanging installation: don’t block the space between stove and wall.
-
Always switch the heater off, unplug it and leave to cool down before:
-
cleaning the heater
- carrying out maintenance on the heater
-
touching or moving the heater.
-
This machine gets hot when in use ( ± 95^ C). To prevent burns, do not let bare skin come into contact with hot surfaces.
-
Close supervision is necessary if the product is used near children or incapacitated persons. Children of less than 3 years should be kept away unless continuously supervised. Children aged from 3 years and less than 8 years shall only switch on/off the appliance provided that it has been placed or installed in its intended normal operating position and they have been given supervision or instruction concerning use of the appliance in a safe way and understand the hazards involved. Children aged from 3 years and less than 8 years shall not plug in, regulate and clean the appliance or perform user maintenance.
-
This appliance can be used by children aged from 8 years and above and persons with reduced physical, sensory or mental capabilities or lack of experience and knowledge if they have been given supervision or instruction concerning use of the appliance in a safe way and understand the hazards involved. Children shall not play with the appliance. Cleaning and user maintenance shall not be made by children without supervision.
-
Carefully supervise when this appliance is used in the presence of children, incapacitated persons or pets. Let persons who are not able to leave the room independently, leave behind a working stove. The surface becomes hot (up to 95°C), so keep children and people with disabilities out of the neighborhood. Keep the packaging material away from children.
-
This heater can also be controlled with a timer or an app as well as manually. However you operate it, always ensure that all safety regulations have been observed!
-
Keep the heater clean. Dust, dirt and/or a build up of deposits in or behind the heater are a common cause of overheating. Make sure these deposits are removed regularly.
-
Do not turn on the appliance if you have discovered damage to the appliance itself, the cord or the plug, if the appliance is malfunctioning, if it has been dropped or if there are any other signs of a defect. Return the complete product to the vendor or to a certified electrician for inspection and/or repair. Always ask for the original parts.
-
Types Mon Soleil 300, 450 and 720 Verre: If the heater's glass is damaged in any way, dismantle the heater immediately, to prevent damage and/or injury from falling/fallen glass. Submit your device to your supplier for repairs.
-
Do not use attachments and/or accessories that have not been recommended or supplied by the manufacturer.
- The appliance (incl. cord and plug) may only be opened and/or repaired by properly authorised and qualified persons.
- Only use this heater for its intended purpose and as described in this instruction manual.
Not abiding by the instructions may lead to damage, fire and/or personal injuries. A failure to adhere to these rules also immediately nullifies the guarantee and vendor, importer and/or manufacturer do not take responsibility for any of the consequences!
Description, composition and installation

- Heating panel
- Control switch
- Main switch
- Electra cable with plug
- Permanent temperature sensor
- Connection external temperature sensor
- Suspension frame
- Suspension knobs 2
- Display

Attention! The above images may differ in appearance and size from the different types, but the parts described are the same.
Remove all packaging material and keep out of reach of children.
After removing packaging, check the appliance for damage or other signs that could indicate a fault/defect/malfunction. In case of doubt, do not use the appliance, but contact your vendor for inspection or replacement.
The fixing materials supplied are intended for a brick wall. If you are using a different type of surface, you should supply appropriate fixing materials yourself.
This heater has been designed to hang securely from the wall.
Do not use it until it has been properly installed, as described in these instructions for use and never, for example, in a standing position or when leaning against something!
Wall mounting
The heater must be at least 30 cm removed from all objects, walls, etc.; the distance to the floor must be at least 20 cm and there must be at least 30 cm above the heater.

Pay attention: The wall-suspension system on the rear side of the heating panel is pre-mounted in order to hang the heating panel vertically. Viewed from the front, the main switch is at the bottom side and the control panel is at the right-hand side. If you want to hang the heating panel horizontally, you first have to mount the suspension frame, the suspension knobs and the wall spacer on the rear side of the heating panel in a different manner. Using a Phillips screwdriver, you can detach the suspension knobs and the wall spacer and then mount them in another position (see illustration). In case of horizontal mounting, it is sensible to use an external temperature sensor. This is because – when mounting the panel horizontally – the fixed temperature sensor is positioned at the top right-hand side of the panel and therefore, it measures a higher temperature. For measuring the room temperature correctly, it is better to use an external temperature sensor and to move the sensor downwards to below the heating panel.
A. Suspension frame including suspension knobs
B. Wall spacer

natural_image
Technical drawings of a two-panel electronic device with labeled components (A, B) and mounting holes, shown from different angles (no text or symbols beyond labels)- Choose a firm, even, vertical wall made of heat-resistant material on which to hang the heater.
- Define the position of the suspension frame: the frame should be mounted horizontal to the wall. Position the suspension frame in such a manner that the minimum distances stated in the drawing above are guaranteed when installing the heating panel in the suspension frame. Mount the suspension frame with the correct side upwards (see the 'This side up' label on the suspension frame).
- Mark where the 4 holes need to be drilled: do this at the correct distance and perfectly level with respect to each other.

- Drill 10mm holes in the marked places and insert the cotter bolts into the holes.
- Screw the suspension frame immovably against the wall.
- Hang the heating panel in the suspension frame: the panel's suspension knobs through the eyes in the suspension frame.
- Slide the panel as far as possible to the right side and lower it as far as possible. Now the panel is suspended securely.
To remove the panel from the wall, you must slide in the opposite direction and lift, until the knobs are in front of the eyes again. Now you can take the panel off.
Note: Guide the electric cable and the thermostat cable (if applicable) immediately downwards and make sure that they do not come into contact with the panel. Do not conceal any surplus cable behind the heater!

Use and working
Control panel
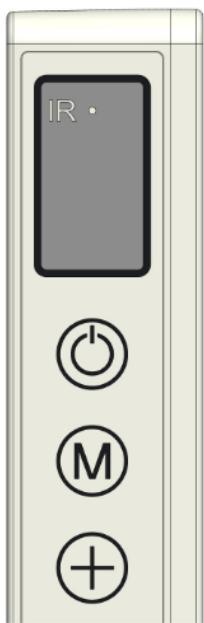
- Main switch & pilot light
- Temperature sensor
- Display
- Up/down key
- ON/OFF switch
- button M
- Connection external temperature sensor

External temperature sensor (7)
Because the temperature sensor is located on the heater, it does not measure the external temperature very accurately. If you want accurate measuring, connect the separate thermostat (included in the delivery) by inserting the small plug into the control panel and placing the sensor approx. 2 metres away from the heater (see illustration). For this purpose, you should remove the heater from the wall and subsequently, place it back. When you have connected the separate thermostat, it automatically takes over the thermostat operation.

natural_image
Close-up of a hand holding a white electronic device with wires, no visible text or symbolsDisplay (3)
a. Temperature / Data
b. Heating symbol
c. Open-window detection symbol
d. WiFi symbol
e. Capacity indication symbol

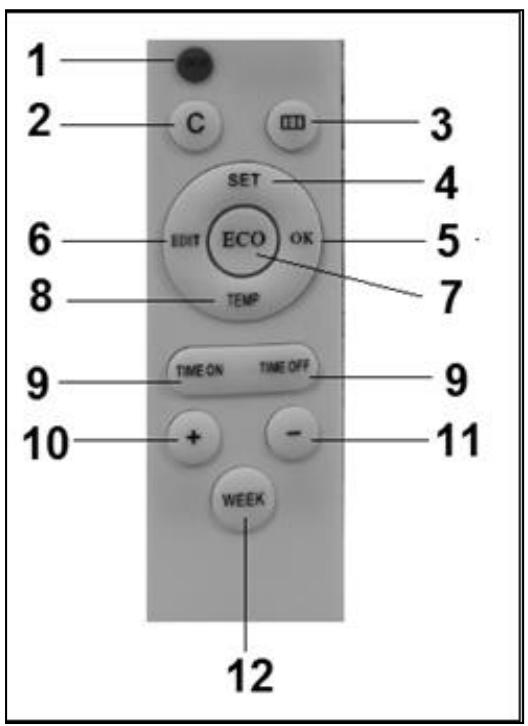
Remote control
- ON/OFF button
- C (Cancel) button
- Open-window detection button
- SET button
- OK button
- EDIT button
- ECO button
- TEMP (temperature) button
- Time on / Time off button
- Higher (+)button
- Lower (−)button
- WEEK button
Operation with control panel
Operation using the control panel on the heater
Make sure the heater is firmly attached to the wall. Turn the main switch ON.
The symbol indicating the capacity lights up and the WiFi symbol flashes on the display of the heater. When the WiFi symbol flashes, you can make a connection.
- Press the ON/OFF button on the control panel.
First the heater's display shows the set temperature for 3 seconds and subsequently, the ambient temperature. (The set temperature is the most recently set temperature or 20^ in case of first use.)
If the set temperature is higher than the ambient temperature, the heater will start to heat and the heating symbol will appear.
- Using the + and – buttons, the set temperature can be adjusted from 0 °C to 37 °C). If the set temperature is higher than the ambient temperature, the heater will start to heat and the heating symbol will appear.
When the set temperature is reached, the heater will automatically switch OFF and will switch ON again when the room cools down.
The heating symbol will disappear and re-appear accordingly.
If no button is pressed during two (2) minutes, the ambient temperature will disappear from the display. Pressing any button will make the ambient temperature re-appear.
Setting the time and day on the heater using the control panel
Using the M button, the time and day of the week can be entered so that you can use the timer function.
The heating panel should be ON, but should NOT heat and therefore, there is no heating symbol visible on the display. (Do this by setting the temperature lower than the ambient temperature, for example.)
| Step | Press button: | The display shows: | Explanation: |
| 1 | M | HH flashes | |
| 2 | + or – | 1 to 7 | Select day of the: 1 = Monday, 2 = Tuesday, etc. |
| 3 | M | H1 flashes | |
| 4 | + or – | 1 to 24 | Select the correct hour |
| 5 | M | H2 flashes | |
| 6 | + or – | 1 to 60 | Select the correct minute |
| 7 | M | Ambient temperature | |
| 8 | Day and time are set. | ||
Checking the day / time data on the heater using the control panel
The heating panel should be ON and should heat. Therefore, the heating symbol is visible on the heater's display. (Do this by setting the temperature higher than the ambient temperature, for example.)
Briefly and consecutively press the M button on the heater's control panel in order to check the day and time: HH = day of the week, H1 = hour and H2 = minute
Attention: If the infrared panel is switched OFF using the main switch or by removing the plug from the socket, the day will be set to 1 and the time to 00.00 the next time you switch the heater ON again.
Operation with remote control
Operation using the remote control
The remote control should be directed towards the display in order to operate the heating panel using the remote control. The illustration shows the position (IR) of the reception point of the remote control.
- Turn the main switch on the heater ON.
The symbol indicating the capacity lights up and the WiFi symbol flashes on the heater's display. When the WiFi symbol flashes, you can make a connection (please refer to the end of this instruction booklet).
- Press the red ON/OFF button on the remote control.
First the heater's display shows the set temperature for 3 seconds and subsequently, the ambient temperature. (The set temperature is the most recently set temperature or 20^ in case of first use.) If the set temperature is higher than the ambient temperature, the heater will start to heat and the heating symbol will appear.
- Using the + and – buttons, the set temperature can be adjusted from 0^ C to 37^ C). If the set temperature is higher than the ambient temperature, the heater will start to heat and the heating symbol will appear.
When the set temperature is reached, the heater will automatically switch OFF and will switch ON again when the room cools down.
The heating symbol will disappear and re-appear accordingly.
If no button is pressed during two (2) minutes, the ambient temperature will disappear from the display. Pressing any button will make the ambient temperature re-appear.
Setting the time and day on the heater using the remote control
First, the day of the week and time should be entered in order to be able to use the timer function.
The heating panel should be ON, but should NOT heat and therefore, there is no heating symbol visible on the heater's display. (Do this by setting the temperature lower than the ambient temperature, for example.)
| Step | Press button: | The display shows: | Explanation: |
| 1 | SET (3 sec.) | HH flashes | |
| 2 | + or – | 1 to 7 | Select day of the: 1 = Monday, 2 = Tuesday, etc. |
| 3 | SET | H1 flashes | |
| 4 | + or – | 1 to 24 | Select the correct hour |
| 5 | SET | H2 flashes | |
| 6 | + or – | 1 to 60 | Select the correct minute |
| 7 | SET | Ambient temperature | |
| 8 | Day and time are set. | ||
Checking the day of the week and time using the remote control
The heater should be ON and should heat. Therefore, the heating symbol is visible on the heater's display. (Do this by setting the temperature higher than the ambient temperature, for example.)
Briefly and consecutively press the SET button on the remote control in order to check the day and time: HH = day of the week, H1 = hour and H2 = minute
Setting the week timer using the remote control
In advance: Setting the week timer can be done using remote the control, but it is easier using the APP. As soon as the heater has a WiFi connection, you can no longer use the timer function on the remote control. The function buttons concerned will automatically switch off.
Attention: Timer setting made with the remote control are not visible in the APP and timer settings made with the APP are not visible on the heater's display. As soon as there is a WiFi connection, you can no longer make a new timer setting using the remote control.
Therefore, never mix the two methods for setting the times!
Attention: If the infrared panel is switched OFF using the main switch or by removing the plug from the socket, the day will be set to 1 and the time to 00.00 the next time you switch the heater ON again.
However, the timer data that were entered previously (ON and OFF times of the week timer) are stored. To avoid misunderstandings, the week timer is automatically set to OFF in case of turning the heater off using the main switch or removing the plug from the socket. Otherwise, the panel would switch on and off at the wrong times.
Switching the week times on again is described below.
Please note that the abovementioned does not apply when using the Eurom Smart APP. The APP updates the time automatically and therefore, you do not have to enter the time manually.
Attention: If in the time setting mode no button is pressed for five (5) seconds, the timer-setting mode will stop and you will have to start all over again.
Attention: All timer settings – maximum 28 settings: seven (7) days multiplied by maximum four (4) settings per day – are processed consecutively. therefore, make sure that they do NOT contain contradictions.
| Step | Press button: | The display shows: | Explanation: |
| 1 | WEEK (3 sec.) | UU flashes | |
| 2 | SET | ON/OFF flashes | |
| 3 | + or - | Select: + = ON: Timer on (on the set times, the heater will automatically switch on/off) - = OFF: Timer off (on the set times, the heater will not automatically switch on/off) | |
| 4 | OK | UU | |
| 5 | SET | 01 or 99 flashes | Select: + = 01: All timer settings are executed only once- = 99: All timer settings are executed endlessly [see Attention (1)]. |
| 6 | OK | UU | |
| 7 | SET | U1 flashes | |
| 8 | + or - | U1 to U7 flashes | Select the day of the week (1 = Monday, 2 = Tuesday, etc.) for which you want to make a timer setting. |
| 9 | OK | The selected day | |
| 10 | EDIT | 01 flashes | |
| 11 | + or - | You should give a number (1 to 4) to this day, because you can only make four (4) timer settings per day. The sequence of the numbering is not important [see Attention (2)]. | |
| 12 | OK | The selected number | |
| 13 | TEMP | HP flashes | |
| 14 | + or - | Set the desired temperature (0 °C to 37 °C). The default setting is 20 °C. | |
| 15 | OK | The selected temperature | |
| 16 | TIME ON | HE flashes | |
| 17 | + or - | Set the desired start time from 00.00 to 23.00 [see Attention (3)]. | |
| 18 | OK | The selected start time | |
| 19 | TIME OFF | HF flashes | |
| 20 | + or - | Set the desired stop time from 00.00 to 23.00 [see Attention (3)]. | |
| 21 | OK | The selected stop time | |
| Timer setting(s) is/are entered; the ambient temperature will appear on the display after three (3) seconds. | |||
Attention (1): The timer setting(s), which you make under ‘once only (01)’, should be made for the current week. On Sunday (day 7) at 24.00, all ‘once only’ setting(s) are set to ‘non-active’. Therefore, a timer setting for Saturday that you made on Tuesday will work, but a timer setting for Tuesday that you make on Saturday will not work!
Attention (2): If a timer setting with number 01 was made for this day, you must manually set the next timer setting for this day to 02 using the + button, otherwise the timer setting 01 will be overwritten.
Attention (3): Start & stop times can only be entered in whole hours (not in minutes).
Removal of timer settings using the remote control
Removing all timer settings
- Press the WEEK button for three (3) seconds, until the display shows the flashing UU.
- Pressing the C (Cancel) button will erase all timer settings.
Removing all timer settings of a specific day
- Press the WEEK button for three (3) seconds, until the display shows the flashing UU.
- Press the SET button and the display will show your flashing selection of ON/OFF (timer on or off).
- Press the SET button again and the display will show your flashing selection of 01/99 (only once or endlessly).
- Press the SET button again and the display will show the flashing U1 (day 1).
- Using the + and/or – buttons, select the day for which you want to remove the timer settings.
- Pressing the C (Cancel) button will erase all timer settings of the day concerned.
Removing a specific timer setting
- Press the WEEK button for three (3) seconds, until the display shows the flashing UU.
- Press the SET button and the display will show your flashing selection of ON/OFF (timer on or off).
- Press the SET button again and the display will show your flashing selection of 01/99 (only once or endlessly).
- Press the SET button again and the display will show the flashing U1 (day 1).
- Using the + and/or – buttons, select the day for which you want to remove a specific timer setting.
- Press the EDIT button.
- Using the + and/or - buttons, select the number of the timer setting that you want to remove.
- Pressing the C (Cancel) button will erase the timer setting concerned.
Checking the timer settings using the remote control
Press the WEEK button a few times briefly. You will see the following settings in sequence:
- Timer ON or Timer OFF
-
Once only (01) or endlessly (99)
-
U1-U7, day of the week
- Timer setting number of the day concerned (1, 2, 3 or 4)
- The set temperature of the thermostat
- Start time in hours
- Stop time in hours
This is repeated for the next timer settings.
All 28 timer settings are shown, also the timer settings that have not been filled. The temperature of the non-filled timer settings is 20 °C .
Open-window detection system (not applicable for Wifi control)
Press the button on the remote control. The symbol will appear on the heater's display. If the ambient temperature decreases 8°C or more within 15 minutes, the heater will turn off and the related symbol will flash.
If this is the case and you press this button again, the heater will resume its normal operation.
ECO button
If the ECO button on the remote control is pressed, the display will show EC. The heater will start to heat if the ambient temperature drops to below 16 °C and will turn off if the ambient temperature increases to above 16 °C. Pressing the ECO button again will switch off the ECO mode.
Wifi and app operation
The heater can also be controlled with an app on your smartphone. To do this, the heater must be connected to a Wifi modem.
Download the Eurom Smart App
- Scan the QR code below or search for ‘Eurom Smart’ in the App store or Google Play and follow the download instructions.


- The Eurom Smart App will be added.
- For more information about the App see: www.eurom.nl/nl/manuals.
Safety precautions App
Safety and remote operation
Your Eurom heater can be easily operated, via the same WLAN, via a different WLAN, or via a 3G or 4G mobile network. This makes it possible to operate your heater remotely, without your direct supervision. Beware that even when operating the heater remotely, all safety precautions stated in the user manual
supplied must be observed. Read and understand these safety precautions and make sure that all safety precautions are taken also with remote operation.
Safety and setting the timer
The Eurom Smart App has a ‘Smart Timer’ with which you can create a schedule yourself with days and times on which the heater is to automatically switch itself on and off. Any timer data entered into the Eurom Smart App will be stored in the heater. This means that, once you have entered the timer data and the heater loses the connection with the Wifi modem, the heater will still be able to switch itself on and off on your specified times. Storing the timer data in the heater is a safety precaution. Your set on and off times schedule will also work without a Wifi connection. So the heater will not unexpectedly continue heating up if the Wifi connection (temporarily) fails.
The Smart timer data will be stored, even if the heater is switched off or the plug is removed from the socket. The set Smart timer data can only be checked via the App and also only be removed via the App. Bear this in mind when entering the data into the Smart Timer. The Smart Timer data is not visible on the heater. Regularly check in the App whether the entered Smart Timer data are still correct.
You can consult an elaborate Eurom Smart App user manual with the QR code below:

or on the website: http://www.eurom.nl/nl/manuals
Turning the WiFi connection on and off
- The heater should be ON, but should NOT heat and therefore, there is no heating symbol visible on the heater's display. (Do this by setting the temperature lower than the ambient temperature using the – button, for example.)
- Press the ON/OFF button for three (3) seconds to toggle between WiFi ON and OFF. WiFi symbol flashes on the display: WiFi connection is ON.
No WiFi symbol on the display: WiFi connection is OFF.
Attention: As soon as there is a WiFi connection, you can no longer use the timer function on the remote control, which prevents contradictions.
As soon as there is a WiFi connection, the APP updates the time automatically and therefore, you do not have to enter the time manually.
Safety feature
Anti-tip protection
If the heater is horizontal for more than 20 seconds, the stove switches off automatically. Put the stove upright again, switch it off and on again and the stove will resume operation.
Overheating safeguard
In case of internal overheating, the overheating safeguard will switch the heater off. This may occur if the heater cannot give off enough heat or if it cannot draw in enough fresh air. As mentioned above, this is generally caused by (partially) covering the heater, or installing the heater too close to a wall or something similar. In case of overheating, switch off the heater and unplug. Give the heater time to cool down, remove the source of the overheating and use as normal. If the problem persists or if you have not been able to trace the source of the overheating, turn the heater off immediately and unplug. Contact a servicing point to have the heater repaired.
Cleaning and maintenance
Keep the heater clean. Switch off the heater, remove the plug from the socket and allow the heater to cool down before cleaning or carrying out maintenance work.
- Wipe the outside of the heater regularly with a dry or slightly damp cloth. Do not use aggressive soaps, sprays, cleaners or abrasives, waxes, polishes or chemical solutions; This can cause irreparable scratches and damage! You can use a glass cleaner for the 'Verre' models. Never use cloths that are too wet, dry the appliance properly and ensure that the entire unit is dry before taking it back into use.
- You can keep the back of the heater free of dust with a feather duster. For thorough cleaning of the back, you can take the heater from the wall.
- If you want to store the Mon Soleil at the end of the season, remove it from the wall, unscrew the suspension frame (if applicable) and store the entire unit (in the original packaging) upright in a cool, dry and frost-free place.
Disposal

At its end of life, discard the device according to the local laws and regulations, or deliver the device to your supplier.
Remerciements
natural_image
Technical diagram of a two-panel electronic device with labeled components (A and B), showing front, side, and top views without any readable text or symbols.natural_image
Close-up of a hand holding a white electronic device with wires, no visible text or symbolsProtection anti-surchauffe
natural_image
Prohibition symbol of a document with a diagonal line crossing it, enclosed in a circle (no text or numbers present)natural_image
Technical diagram of a device rear panel with labeled components (A and B), showing internal components and mounting holes (no text or symbols beyond labels)natural_image
Close-up of a hand holding a white electronic device with wires, no visible text or symbolsDrift med kontrollpanelen

natural_image
Technical diagram of a two-panel electronic device with labeled components (A and B), showing front, side, and top views without any readable text or symbols.natural_image
Close-up of a hand holding a white mechanical component with wires, no visible text or symbolsBetjening via betjeningspanelet
Betjening via betjeningspanelet på varmeapparatet
natural_image
Technical diagram of a device rear panel with labeled components (A and B), showing internal components and mounting holes (no text or symbols beyond labels)natural_image
Close-up of a hand holding a white electronic device with wires and connectors (no visible text or symbols)sau website: http://www.eurom.nl/nl/manuals
- Mon Soleil 300 & 450 & 720 Verre (Glass)
- Dank
- Display (3)
- Symbol Explanation
- General safety instructions
- Description, composition and installation
- This heater has been designed to hang securely from the wall.
- Do not use it until it has been properly installed, as described in these instructions for use and never, for example, in a standing position or when leaning against something!
- Wall mounting
- Use and working
- Control panel
- External temperature sensor (7)
- Remote control
- Operation with control panel
- Operation with remote control
- Setting the week timer using the remote control
- Therefore, never mix the two methods for setting the times!
- Removal of timer settings using the remote control
- Removing all timer settings
- Removing all timer settings of a specific day
- Removing a specific timer setting
- Checking the timer settings using the remote control
- Open-window detection system (not applicable for Wifi control)
- ECO button
- Wifi and app operation
- Safety and remote operation
- Safety and setting the timer
- Turning the WiFi connection on and off
- Safety feature
- Anti-tip protection
- Overheating safeguard
- Cleaning and maintenance
- Disposal
- Remerciements
- Protection anti-surchauffe
- Drift med kontrollpanelen
- Betjening via betjeningspanelet
Brand : Eurom
Model : Mon Soleil Verre
Category : Electric heater