
ErgoMaster Serie 6 MSM6M621 - Blender BOSCH - Free user manual and instructions
Find the device manual for free ErgoMaster Serie 6 MSM6M621 BOSCH in PDF.
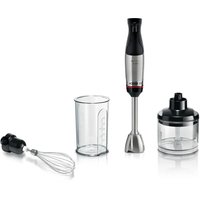


| Product Type | Immersion Blender |
| Brand | Bosch |
| Model | ErgoMaster Series 6 MSM6M621 |
| Dimensions (L x W x H) | 43 x 7 x 7 cm |
| Weight | 0.8 kg |
| Power Supply | 220-240 V, 50/60 Hz |
| Power | 600 W |
| Speeds | 2 speeds + turbo |
| Shaft Material | Stainless Steel |
| Bowl Capacity (accessory) | 0.6 L |
| Main Functions | Blend, chop, emulsify, crush |
| Included Accessories | Whisk, chopper, measuring cup |
| Care and Cleaning | Blade and accessories dishwasher safe |
| Safety | Automatic shut-off in case of overload |
| Spare parts and repairability | Shaft, whisk, chopper available from after-sales service |
| Warranty | 2 years |
| Color | Black and stainless steel |
| Cable Length | 1.2 m |
| Repairability Index | 8.4/10 |
Frequently Asked Questions - ErgoMaster Serie 6 MSM6M621 BOSCH
User questions about ErgoMaster Serie 6 MSM6M621 BOSCH
0 question about this device. Answer the ones you know or ask your own.
Ask a new question about this device
Download the instructions for your Blender in PDF format for free! Find your manual ErgoMaster Serie 6 MSM6M621 - BOSCH and take your electronic device back in hand. On this page are published all the documents necessary for the use of your device. ErgoMaster Serie 6 MSM6M621 by BOSCH.
USER MANUAL ErgoMaster Serie 6 MSM6M621 BOSCH

| [de] | Scannen Sie den QR-Code oder besuchen Sie die Webseite, um die erweiterten Hinweise zur Benutzung zu öffnen. Dort finden Sie zusätzliche Informationen zu Ihrem Gerät oder Zubehör. |
| [en] | Scan the QR code or visit the website to open the Further Notices for Use. You can find additional information about your appliance or accessory here. |
| [fr] | Scanner le code QR ou visiter le site Web pour ouvrir les informations d'utilisation complémentaires. Vous y trouverez des informations supplémentaires concernant votre appareil ou accessoire. |
| [it] | Scansionare il codice QR oppure visitare il sito Web per indicazioni dettagliate sull'uso. Si trovano informazioni aggiuntive sull'apparecchio o gli accessori. |
| [nl] | Scan de QR-code of bezoek de website om de uitgebreide gebruiksinstructies te openen. Hierin vindt u meer informatie over het apparaat of toebehoren. |
| [da] | Scan QR-koden, eller besøg hjemmesiden, for at åbne de udvidede anvisninger om anvendelse. Der kan der findes yderligere oplysninger om apparatet eller tilbehøret. |
| [no] | Skann QR-koden eller besøk nettstedet for å åpne mer informasjon om bruken. Der finner du mer informasjon om apparatet eller tilbehøret. |
| [sv] | Scanna QR-koden eller gå till webbplatsen och öppna de utökade användningsanvisningarna. Där finns mer information om din apparat eller dina tillbehör. |
| [fi] | Skannaa QR-koodi tai vieraile internet-sivustollamme, jotta voit avata laajennetut käyttötiedot. Sieltä löydät laitetta tai varustetta koskevia lisätietoja. |
| [es] | Para abrir las indicaciones ampliadas sobre el uso, visite la página web o escanee el código QR. Allí encontrará más información sobre el aparato o los accesorios. |
| [pt] | Leia o código QR ou visite a página web para abrir as indicações avançadas relativas à utilização. Aí encontra informações adicionais sobre o seu aparelho ou acessório. |
| [el] | Σαρώστε τον κωδικό QR ή επισκεφτείτε την ιστοσελίδα, για να ανοίξετε τις διευρυμένες υποδείξεις για τη χρήση. Εκεί θα βρείτε πρόσθετες πληροφορίες για τη συσκευή σας ή τα εξαρτήματα. |
| [tr] | Ayrıntılı kullanım bilgilerine ulaşmak için QR kodu taratin veya web sayfasını ziyaret ediniz. Cihaz ve aksesuarlar ile ilgili ayrıntılı bilgileri bu şekilde edinebilirsiniz. |
| [pl] | Aby uzyskać rozszerzone informacje na temat zastosowań urządzenia, należy zeskanować kod QR albo wejść na stronę internetową. Można tam znaleźć dodatkowe informacje na temat posiadanego urządzenia i akcesoriów. |
| [uk] | Щоб отримати докладніші вказівки з користування, зіскануйте QR-код або відвідайте сайт. Там ви знайдете додаткові відомості про прилад або приладдя. |
| [ru] | Чтобы узнать больше о пользовании, отсканируйте QR-код или зайдите на сайт. Там вы найдете более подробные сведения о приборе и принадлежностях. |
| [ar] | امسع رمز الاستجابة السليغوة ضوئيا ت tightّ بزيارة الموقع الإلكتروني لفتح الإرشادات الموسègeة حول الاستخدام. تجد هناك |
2

3

4

5

6


7 8


9 10

11

13


15


17


19


21


23


25


27
 |  |  |  |  |  |  |  | |
 | 00:00 | |||||||
| CNHR34, CNHR36 | 80 g | 20 g | 2 s | |||||
| CNHR33, CNHR34C CNHR36C | 100 g | 20 g | 2 s | |||||
| CNHR37 | 120 g | 20 g | 3 s | |||||

30


32


34


36


38


40


42


44


46
 |  |  |  |  | |
 |  |  | 200-600 g | 40-90 s | |
 |  | 200-500 g | 60-90 s | ||
 |  |  | 200-500 g | 60-90 s | |
 |  | 200-600 g | 60-90 s | ||
 |  |  | 1 x O | 60-90 s | |
 |  |  | 200-600 g | 40-60 s | |
 |  | 200-600 g | 60-90 s | ||
 |  |  |  |  _ _  | |
 |  |  | 50-100 g | 10-20 s | |
 |  | 50-100 g | 20-40 s | ||
 |  | 5-20 x 📋 | 3-15 s | ||
 |  | 50-100 g | (3-8) x 1 s | ||
 |  | 5-15 g | (7-10) x 1 s | ||
 |  | 50-150 g | 5-30 s | ||
 | 150 g | ● L 7 - 10 s | |||
| ● M 16 - 20 s | |||||
| ● S 20 - 30 s | |||||
 |  |  | 100 g | 5 s | |
 |  |  | 100-300 g | 20-180 s | |
 |  |  | 1-3 x ⭕ | 40-120 s | |
 |  | 50-150 g | 60-120 s | ||
 | |||||
 | √ | × |  | × | × |
 | × | × |  | √ | √ |
 | √ | √ |  | √ | √ |
 | √ | √ |  √ √ | √ |  |
49

50


52


Safety
- Read this instruction manual carefully.
- Keep the instruction manual and the product information safe for future reference or for the next owner.
Only use this appliance:
■ With genuine parts and accessories. ■ For cutting up, chopping, mixing, puréeing and emulsifying liquid or semi-solid food. ■ In private households and in enclosed spaces in a domestic environment at room temperature. ■ For normal processing quantities and for normal processing times for domestic use. ■ Up to an altitude of max. 2000 m above sea level.
After each use, whenever the appliance is unsupervised, prior to assembly, disassembly or cleaning and in the event of an error, it must always be disconnected from the mains.
This appliance can be used by persons with reduced physical, sensory or mental capabilities or a lack of experience and/or knowledge if they have been given supervision or instruction concerning use of the appliance in a safe way and if they understand the hazards involved.
Do not let children play with the appliance.
Cleaning and user maintenance must not be performed by children.
The appliance must not be used by children. Keep children away from the appliance and power cable.
- Connect and operate the appliance only in accordance with the specifications on the rating plate. If the power cord of this appliance is damaged, it must be replaced by the manufacturer, the manufacturer's Customer Service or a similarly qualified person in order to prevent any risk. ▶ Never immerse the appliance or the power cord in water or clean in the dishwasher.
- Only immerse the blender foot into the ingredients as far as the "max" marking.
- Never use the appliance further if it has fallen into water or any other liquid.
▶ Do not use the appliance with damp hands. ▶ Never operate a damaged appliance. ▶ Never let the power cord come into contact with hot parts or be dragged over sharp edges. ▶ Never place the appliance on or near hot surfaces. ▶ After switching off, wait until the drive has come to a complete standstill. - Keep hands, hair, clothing and utensils away from rotating parts. ▶ Only attach and remove accessories once the drive has stopped and the appliance has been unplugged. ▶ Only use the accessories once fully assembled. ▶ Never touch the edges of the blades with bare hands. - Care should be taken when handling sharp blades, emptying the container and during cleaning. ▶ Be careful when processing hot food. Leave boiling food to cool down to at least 70 °C before processing. ▶ Follow the cleaning instructions. - Clean surfaces which come in contact with food before each use.
Avoiding material damage
▶ Do not operate the appliance at no-load. ▶ Never use the blender jug in the microwave or oven. ▶ Never immerse the gear attachments in liquids and do not clean under running water or in the dishwasher. ▶ Never use the universal cutter container in the microwave or oven. ▶ Never use the blender foot or the whisk in the universal cutter container. - Place the main unit fully on the blender foot or accessory and lock into position with a click.
Overview
→ Fig. 1
| A | Whisk 1 |
| B | "ProPuree" masher attachment 1 |
1 Depending on the model
| C | Universal cutter 1 |
| 1 | Switch-on lock |
| 2 | Control lever |
| 3 | Release buttons |
| 4 | Blender foot 1 |
| 5 | Plastic blender jug 1 |
| 6 | Gear attachment for the whisk |
| 7 | Gear attachment for the masher attachment |
| 8 | Masher paddle (detachable) |
| 9 | Gear attachment for the universal cutter |
| 10 | Ice crusher blade 1 |
| 11 | Universal blade |
| 12 | Container |
1 Depending on the model
en Controls
Notes
■ If an accessory is not included in the scope of supply, it can be ordered from customer service. ■ Only CNHR37: The universal cutter can be ordered from Customer Service quoting order no. 0012042772. With the universal cutter use the appliance at full power when making the honey and apple mixture and follow the recipe in the instruction manual for the universal cutter.
Controls
Control lever with switch-on lock
You can use the control lever for stepless control of the speed of your appliance. To switch on the appliance, first press the switch-on lock and then the control lever. The more firmly the control lever is pressed, the higher the speed of the motor.
Note: The appliance remains switched on as long as the control lever is pressed.
→ Fig. 2
Blender feet
Note: The blender feet are not suitable for preparing purées consisting only of potatoes or foods with a similar consistency.
The blender feet are suitable for the following purposes:
■ Mixing drinks ■ Making pancake batter, mayonnaise, sauces and baby food ■ Puréeing cooked food, e.g. fruit, vegetables, soup
Processing food with the blender foot Notes
■ Solid foods should always be cut up and cooked until soft before processing, e.g. apples, potatoes or meat. ■ Use the universal cutter for cutting up raw food without adding liquid, e.g. onions, garlic or herbs. ■ Before processing the food in a pan, take the pan off the heat.
→ Fig. 3 - 11
Sample recipe Mayonnaise
■ 1 egg (egg yolk and egg white) ■ 1 tbsp mustard ■ 1 tbsp lemon juice or vinegar ■ 200-250 ml oil ■ Salt and pepper to taste
Making mayonnaise
Notes
- When using the blender foot, mayonnaise can only be made with whole eggs (egg white and egg yolk).
- When making mayonnaise, air underneath the blender foot prevents the ingredients blending together well. For optimum results, let the air escape before mixing.
→ Fig. 12 - 16
Universal cutter
The universal cutter is suitable for cutting up food, e.g. meat, hard cheese, onions, garlic, fruit, vegetables, herbs, nuts or almonds.
Notes
■ Remove hard pieces of food before processing, e.g. gristle, bones, sinews or stones from stone fruit. ■ The universal cutter is not suitable for cutting up very hard ingredients, e.g. coffee beans, nutmegs, radishes or frozen food. ■ Only process ice cubes with the ice crusher blade.
Using the universal cutter
→ Fig. 17 - 28
Honey cake with apples
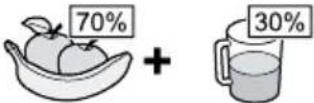
Honey-apple mixture
→ Fig. 29
Cakes
Ingredients
■ 3 eggs ■ 60 g butter ■ 100 g plain white flour ■ 60 g ground walnuts ■ 1 tsp cinnamon
■ 2 tbsp vanilla sugar ■ 1 tsp baking powder ■ 1 apple - Separate the eggs and whisk the egg whites until stiff. - Beat the egg yolk with the sugar until light and fluffy. Add the soft butter and the prepared honey-apple mixture. - Mix the rest of the ingredients in a separate bowl, add to the moist ingredients and stir in. ■ Carefully fold in the beaten egg whites with a spatula. ■ Line a rectangular loaf tin (35 x 11 cm) with greaseproof paper and add the prepared cake mixture. - Peel the apple, cut into slices and arrange on the cake. ■ Preheat the oven to 180 °C and bake the cake for 30 minutes.
Preparation
Whisk
The whisk is suitable for whipping cream, beating egg whites or milk froth and for making sauces or desserts.
Recommendations for optimum results:
■ Use cream with a minimum fat content of 30% and a temperature of 4-8 °C ■ Use milk with a high protein content and a temperature of max. 8 °C ■ Whip cream or beat egg whites in a wide jug
Note: To prevent splashing, use deep containers with the whisk.
Using the whisk
→ Fig. 30 - 39
"ProPuree" masher attachment
The masher attachment is suitable for preparing purées from boiled potatoes, peas, fruit or foods with a similar consistency.
Notes
■ Do not process hard ingredients. ■ Before processing the food in a pan, take the pan off the heat. ■ Do not strike the masher attachment against hard edges (e.g. pots, bowls).
Using the masher attachment
→ Fig. 40 - 46
Mashed potatoes
■ 1 kg boiled potatoes ■ 0.15 I warm milk ■ 50 g soft butter ■ Salt, pepper and nutmeg Preparation - Add the ingredients to a suitable jug and process with the masher attachment for approx. 1 minute. ■ Lastly, season to taste with salt, pepper and nutmeg.
Application examples
Always observe the maximum quantities and processing times in the tables.
Examples for the blender foot
After each operating cycle let the appliance cool down to room temperature.
→ Fig. 47
Examples for the universal cutter and whisk
→ Fig. 48
Overview of cleaning
Clean the individual parts as indicated in the table.
→ Fig. 49
Cleaning the masher attachment
Remove the masher paddle to ensure especially thorough cleaning.
→ Fig. 50 - 53
Troubleshooting
Appliance switches off during processing (800 W – 1200 W models only).
The overload protection feature has been activated.
- Remove the mains plug and leave the appliance to cool down for approx. 1 hour to deactivate the overload protection device.
Note: If the fault cannot be eliminated, please contact customer service.
Disposing of old appliance
- Dispose of the appliance in an environmentally friendly manner. Information about current disposal methods are available from your specialist dealer or local authority.

This appliance is labelled in accordance with European Directive 2012/19/EU concerning used electrical and electronic appliances (waste electrical and electronic equipment - WEEE). The guideline determines the framework for the return and recycling of used appliances as applicable throughout the EU.
Customer Service
Detailed information on the warranty period and terms of warranty in your country is available from our after-sales service, your retailer or on our website.
The contact details for Customer Service can be found in the enclosed Customer Service directory or on our website.

Safety
electrical and electronic
(equipment - WEEE)


- SAFETY
- AVOIDING MATERIAL DAMAGE
- OVERVIEW
- EN CONTROLS
- NOTES
- CONTROLS
- CONTROL LEVER WITH SWITCH-ON LOCK
- BLENDER FEET
- PROCESSING FOOD WITH THE BLENDER FOOT NOTES
- SAMPLE RECIPE MAYONNAISE
- MAKING MAYONNAISE
- UNIVERSAL CUTTER
- USING THE UNIVERSAL CUTTER
- HONEY CAKE WITH APPLES
- HONEY-APPLE MIXTURE
- CAKES
- PREPARATION
- WHISK
- USING THE WHISK
- PROPUREE" MASHER ATTACHMENT
- USING THE MASHER ATTACHMENT
- MASHED POTATOES
- APPLICATION EXAMPLES
- EXAMPLES FOR THE BLENDER FOOT
- EXAMPLES FOR THE UNIVERSAL CUTTER AND WHISK
- OVERVIEW OF CLEANING
- CLEANING THE MASHER ATTACHMENT
- TROUBLESHOOTING
- APPLIANCE SWITCHES OFF DURING PROCESSING (800 W – 1200 W MODELS ONLY)
- DISPOSING OF OLD APPLIANCE
- CUSTOMER SERVICE
Brand : BOSCH
Model : ErgoMaster Serie 6 MSM6M621
Category : Blender