
MAP - GPS Navigation System MIO - Free user manual and instructions
Find the device manual for free MAP MIO in PDF.
| Product type | GPS / Navigation system |
| Brand | MIO |
| Model | MAP |
| Dimensions (approx.) | 12 x 8 x 2 cm |
| Weight (approx.) | 150 g |
| Screen | Color touchscreen, 4.3 inches |
| Power supply | Rechargeable internal battery, 12V adapter |
| Battery life | Approximately 2 to 3 hours |
| Maps | Preloaded, multi-country coverage |
| GPS receiver | Built-in, 12 channels |
| Navigation functions | Address search, POI, multi-stop, demo |
| Additional functions | NavPix, photo albums, Bluetooth, volume and brightness settings |
| Available languages | Multiple, including French |
| External connection | USB, optional external antenna jack |
| Included accessories | Suction cup mount, USB cable, cigarette lighter adapter |
| Maintenance | Clean with a soft, dry cloth, avoid moisture |
| Safety | Do not use while driving, mount securely |
Frequently Asked Questions - MAP MIO
User questions about MAP MIO
0 question about this device. Answer the ones you know or ask your own.
Ask a new question about this device
Download the instructions for your GPS Navigation System in PDF format for free! Find your manual MAP - MIO and take your electronic device back in hand. On this page are published all the documents necessary for the use of your device. MAP by MIO.
USER MANUAL MAP MIO
What are the main screens I will use? 5
Main Map screen 5
Main Menu screen 5
How do I navigate with GPS? 6
How do I go from A to B? 7
What if I miss a turn? 7
How do I search for an address? 8
Case Study: How do I search for an address? 8
Using the Keyboard screen 10
How do I create a trip with multiple stops? 11
Case Study: How do I navigate to multiple addresses? 11
How do I skip a waypoint during a multi-stop trip? 12
How do I search for a Point of Interest (POI)? 13
Case Study: How do I search for a Point of Interest? 13
How do I save Favourites and My Home? 15
How do I save a Favourite or My Home? 15
How do I navigate to a Favourite? 16
How do I navigate to My Home? 16
How do I edit the name of a Favourite? 17
How do I delete a Favourite? 17
How do I navigate to a recent location? 18
How do I view my route? 19
Navigation screen 19
How do I use the Route Menu? 21
How do I use the Trip Menu? 22
How do I use the Map Menu? 23
How do I demonstrate a trip? 24
How do I use saved trip? 25
How do I view my NavPix albums? 26
NavPix Albums 26
How do I view a NavPix in full-screen? 27
How do I navigate to a NavPix? 28
GPS Status 29
What can I customize? 30
Route Options 31
Route Calculation 1/4 31
Road Types 2/4 & 3/4 31
Driving Alerts 4/4 32
Map Display 33
Map Display 1/2 33
Select Map 2/2. 33
Map POIs 34
Volume 35
Screen 36
POI Alerts 37
Language 38
Time settings 39
Power 40
Keyboard 41
Units 42
Restore defaults 43
Welcome
Thank you for purchasing this Mio. This manual has been prepared to guide you through the operation of your Mio from first set-up through to continuous use. Please read this manual carefully before using your Mio for the first time. Keep this manual in a safe place and use as your first point of reference.
Important information for using the manual
It is important to understand the terms and typographical conventions used in this manual.
Formatting
The following formatting in the text identifies special information:
| Convention | Type of Information |
| Bold | Mio components or items displayed on screen, including buttons, headings, field names and options. |
| Italics | Indicates the name of a screen. |
Icons
The following icons are used throughout this manual:
| Icon | Description |
| Case study |
Terms
The following terms are used throughout this manual to describe user actions.
| Term | Description |
| Press | Press and release a button quickly. |
| Press and hold | Press and hold a button for 2-3 seconds. |
| Tap | Press and release an item displayed on the touch screen. |
| Tap and hold | Tap and hold an item displayed on the touch screen for 2-3 seconds. |
| Select | Tap an item in a list or tap a command from a menu. |
What are the main screens I will use?
Main Map screen
Then Main Map screen is the application starting point and its main view. You can browse map, plan a journey or just track your vehicle on the map.
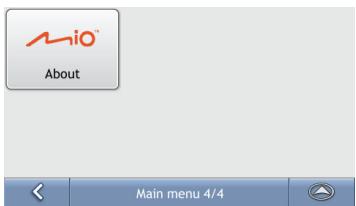
Main Menu screen
The Main Menu screen is your starting point for searching for a destination. The Main Menu screens also allow you to customize preferences, make and receive phone calls, browse images or play music.
The Main Menu can be accessed from the map screen by tapping at the bottom left corner of main map screen.
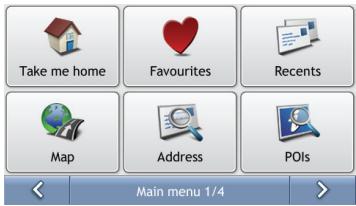
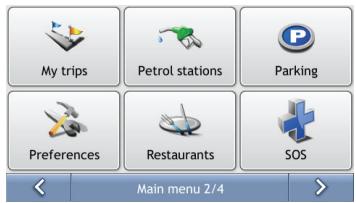
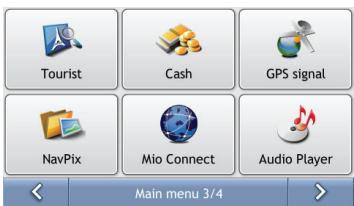
Note: The Main Menu screens may differ from those displayed above, depending on your Mio model.
How do I navigate with GPS?
The Global Positioning System (GPS) is available at any time, free of charge, and is accurate to within 5m (15ft). GPS navigation is made possible by a network of satellites that orbit the Earth at around 20,200km (12,552mi). Each satellite transmits a range of signals which are utilized by GPS receivers, such as your Mio, to determine an exact location. Although a GPS receiver can detect signals from up to 12 satellites at any time, only four signals are required to provide a position or "GPS fix" (latitude and longitude), for vehicle navigation systems.
How does my Mio receive GPS signals?
Your Mio receives GPS signals via the internal GPS antenna. To guarantee the optimum GPS signal strength, ensure your Mio is outdoors, or in a vehicle outdoors, and has an unobstructed view of the sky. GPS reception is not usually affected by weather, however, very heavy rain or snow may have a negative effect on your reception.
How do I view my GPS status?
You can view your GPS status at any time from the map screens or the GPS status screen. displays green when a GPS fix is established and red when a GPS fix is unavailable. To indicate the reception strength of a GPS fix, displays between one and four green vertical bars.
Note: Before you begin, check if your vehicle is fitted with a heat-reflective or heated windscreen. If so, you may need to purchase an external antenna for your Mio to receive GPS signals. The first time you use your Mio, it may take up to 15 minutes to establish a GPS connection.
To view your GPS status in more detail, see "GPS Status".
How do I go from A to B?
Your Mio is equipped with maps that provide street-level detail for door-to-door navigation, including Points of Interest such as accommodation, parking areas, petrol stations, railway stations and airports.
| When you ... | Then ... |
| know the address of your destination | use the Find address menu command to enter the address • see "How do I search for an address?". |
| want to make multiple stops | use the Add a destination or Add a via point concepts to enter multiple waypoints • see "How do I create a trip with multiple stops?". |
| need to find a named site, feature, landmark or public venue | search for a Point of Interest • see "How do I search for a Point of Interest (POI)?". |
| want to navigate to a NavPixTM location | use the Go To NavPix screen to navigate to a preinstalled NavPix • see "How do I navigate to a NavPix?". |
WARNING For your safety, enter destination information before you start a journey. Do not enter a destination while driving.
What if I miss a turn?
You will be automatically redirected if you make a wrong turn. In most cases you will not even notice that Mio has just recalculated your route.
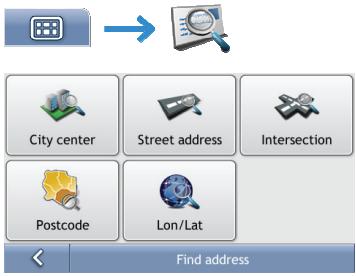
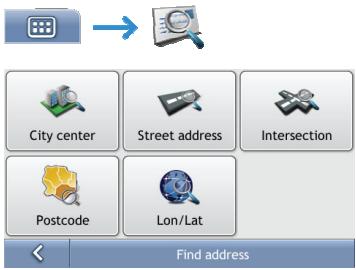
How do I search for an address?
Enter a destination using the Find address screen. There are five ways to enter an address, depending on the data about destination you may have. These five ways are:
- Find city centre, which you will use if your destination is centre of some city or settlement
- Find address, which you will use if you have complete address information including city, street and house number
- Find intersection, which you will use if your destination is intersection of two streets within some city
- Postcode, if you are looking for destination described as postcode
- Longitude/Latitude, which you will use if you have exact GPS location of your destination
Note: When specifying Longitude/Latitude as the destination, use period to separate the values of degree, minute, and second. For example, if the latitude is 50^08'45'' , please input 50.145833.
This section provides a case study to help guide you through setting your destination. You are going to enter destination which has complete city, street and house number information.
Quick Steps
- Open the Find address screen
- Select Street address
- Type City, Street and House number and press Find
-
Select your address from the list of found matches
-
Tap from the Destination Preview screen.

Case Study: How do I search for an address?
This case study will show you how to enter an address and how to navigate to it.
The address we will be using in this example is:
Ilica 13
10000 Zagreb
Croatia
Tip: Before you enter your destination address, ensure that you have set your route preferences. For more information, see "Route Options".
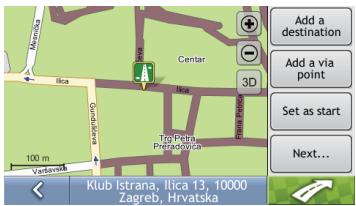
1. Open the Find address screen
The Find address screen will display.
2. Search for the Street address
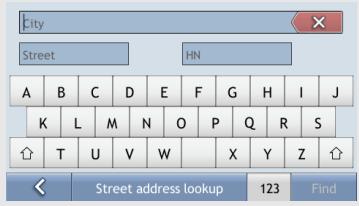
a) From the Find address screen, tap Street address. The Street address lookup screen will display.
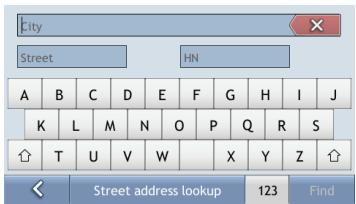
Note: although you may have installed maps covering several countries, you do not need to enter country name to find address. Your Mio will search all your maps to find the best possible address match.
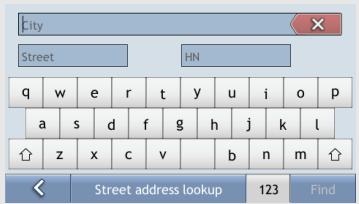
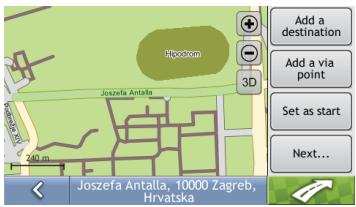
b) Use the Street address lookup screen to type Zagreb in the city field, type Ilica in the street field and finally 13 in the house number field. Press Find. The Search results screen will display.
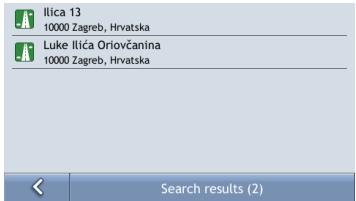
c) Tap the list item with Ilica 13, Zagreb. The Location Preview screen will display.
Note: If required house number is not available, the list with search results will display only the street name.

d) Complete one of the following:
| If you want to ... | Then ... |
| navigate to your selected destination | tap Your route is calculated; the 3D Map screen will display. |
| add the destination to a multi-stop trip | tap Add a destination or Add a via point. For detailed explanation of these actions see “How do I create a trip with multiple stops?” |
| set this location as start of a planned trip | tap Set as start |
| save the destination as My Home | tap Next... then Set as home. Destination will become your new home location. |
| save the destination as a favourite | tap Next... then Add to favorites. The Edit Favourite Name screen will display. Type the name of newly created favourite location and press OK. |
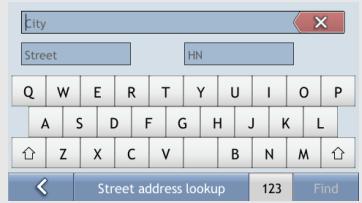
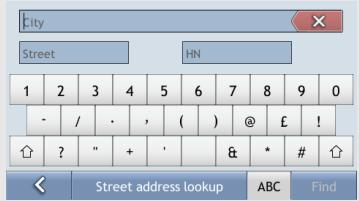
Using the Keyboard screen
The Keyboard screen will display when you are required to enter text, such as when searching for a street name. Search results will be listed in matching order, with the closest matches appearing at the top of the list. A maximum of 100 results will display.
The Keyboard screen can display with various layouts depending on the information you need to enter, including alphabet, number, alternate characters and combinations of these.
You can also choose the type of keyboard you prefer from alphabetic, QWERTY and keypad. For more information, see "Keyboard".
To delete a character, tap
To display more characters, tap 123, ABC or abc, if available.
Depending on your language, a different character set may be displayed on keyboard. For example, Hebrew keyboard layout will be:
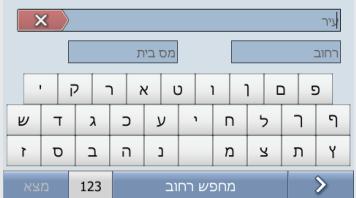
For all non-Latin keyboards there is a button to which switches between native language keyboard and the Latin keyboard.
How do I create a trip with multiple stops?
You can use the Add a destination or Add a via point screen to set multiple stops or waypoints for your trip. Your route will be calculated to go via each of these points in the specified order.
If you use Add a destination your location will be added as the last destination of you trip. However, if you use Add a via point then destination will be added as the first next stop.
Quick Steps
- Open the Find address screen
- Select Street address
- Type City, Street and House number and press Find
- Select your address from the list of found matches
- Tap Add a destination or Add a via point

Case Study: How do I navigate to multiple addresses?
This case study will show you how to set a multi-stop trip by entering multiple waypoints.
The address we will be using in this example is:
Dicmo Croatia
Tip: Before you enter your destination address, ensure that you have set your route preferences. For more information, see "Route Options".
1. Open the Find address screen
The Find address screen will display.
2. Search for the City centre
a) From the Find address screen, tap City center. The City centre lookup screen will display.
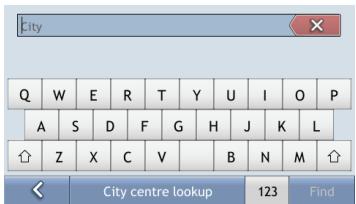
b) Use the City centre lookup screen to type Dicmo in the city field. Press Find. The Search results screen will display.
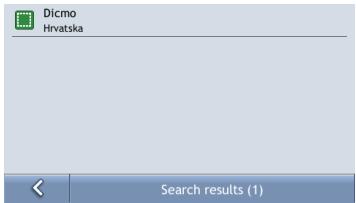
c) Tap the (only) list item containing Dicmo, Hrvatska. The Location Preview screen will display.
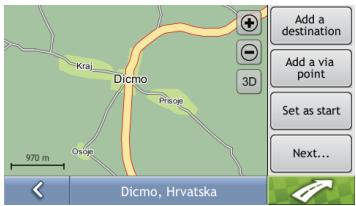
d) Complete one of the following:
| If you want to ... | Then ... |
| add this destination as the last destination of your trip | tap Add a destination. Your route is calculated; the 3D Map screen will display. |
| add this destination as the first next destination | tap Add a via point. Destination will be added to your route as the first next destination; the 3D Map screen will display. |
| set this location as start of a planned trip | tap Set as start Location will be set as your starting location instead of your GPS location. |
How do I skip a waypoint during a multi-stop trip?
To skip a waypoint during a multi-stop trip, complete the following:
- Tap the Route options button.
The Route options context menu will display.
- Tap Drop next via point
The next waypoint will be skipped and the route recalculated to the following waypoint.
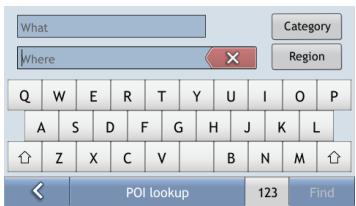
How do I search for a Point of Interest (POI)?
A POI is a named site, feature, landmark or public venue which can be displayed as an icon on the map. POIs are grouped by type, such as petrol stations, parks, beaches and museums.
Tip: You can also quickly search for certain POIs based upon your current location via the Main Menu screen.
This section provides a case study to help guide you through finding or setting your POI as a destination.
Quick Steps
- Open the POI Lookup screen
- Type what and where you are looking for POI
-
Select POI from the search results window
-
Tap

Case Study: How do I search for a Point of Interest?
This case study will show you how to find POI and navigate to it.
The address used in this example is:
Koncertna dvorana Vatoslav Lisinski
Trg Stjepana Radica 4
Zagreb
Croatia.
1. Select the POIs command from the Main Menu


The POI lookup screen will display.
2. Search for a POI
a) Type Lisinski in What field and type Zagreb in Where field.
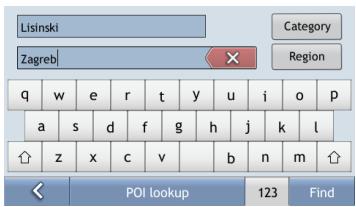
b) Select Koncertna dvorana Vatroslav Lisinski from the search results window. The Preview screen will display.
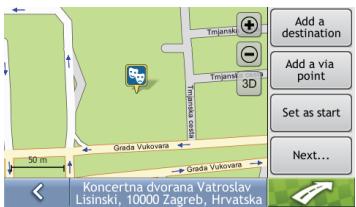
c) Complete one of the following:
| If you want to ... | Then ... |
| navigate to your selected destination | tap Your route is calculated and displayed on the 3D Map screen. |
| add this destination as the last destination of your trip | tap Add a destination. Your route is calculated; the 3D Map screen will display. |
| add this destination as the first next destination | tap Add a via point. Destination will be added to your route as the first next destination; the 3D Map screen will display. |
| set this location as start of a planned trip | tap Set as start |
| save the destination as My Home | tap Next... then Set as home. The New Favourite screen will display.. |
| save the destination as a favourite | tap Next... then Add to favorites. The New Favourite screen will display. |
| make a phone call to the POI | tap Next... then tap Dial. |
How do I save Favourites and My Home?
You can save up to 256 destinations as favourites, one of which can be saved as My Home.
You can save a favourite from the Preview screen after searching for an address, or from the Map Menu. For more information, see "How do I use the Map Menu?"
How do I save a Favourite or My Home?
- Search for an address until the Preview screen is displayed.
- Tap Add to favourites or Set as home.
The Edit Favourite screen will display if you selected Add to favourites.
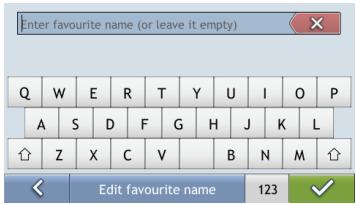
- After you have entered a name for the favourite, tap A message box saying that location was saved to favourites will display.
- Complete one of the following:
| If you want to ... | Then ... |
| save as a Favourite | tap Add to favourites. The Edit Favourite screen will display . Type the name of your favourite and press √ The favourite is saved. |
| save as My Home | tap Set as home. The favourite is saved as My Home. |
How do I navigate to a Favourite?


- Tap the Favourite destination you want to travel to.
The Preview screen will display.
- Tap

Your Mio will calculate the route from your current location. The 3D Map screen will display.
How do I navigate to My Home?
If you have not set an address as My Home, option Take me home will be disabled.
Option 1 - Via the Main Menu


Your Mio will calculate the route from your current location. The 3D Map screen will display.
Option 2 - Via the Favourite Destinations screen


- From the Favourite Destinations screen, select My Home. The Preview screen will display.
- Tap

Your Mio will calculate the route from your current location. The 3D Map screen will display.
How do I edit the name of a Favourite?


- From the Favourite Destinations screen, select a favourite to edit. The Favourite Preview screen will display.

- Tap Change name.
The Edit Name screen will display.
- After you have edited the favourite name, tap
- Complete one of the following:
| If you want to … | Then … |
| rename the Favourite | tap Change name. The Edit favourite name displays. Change favourite name and tap |
How do I delete a Favourite?


- From the Favourite Destinations screen, select a favourite to delete. The Preview screen will display.
- Tap Delete.
A warning message will display prompting you to confirm action. The favourite will be deleted if you press Yes.
How do I navigate to a recent location?
To make navigating to an address easier, your Mio will automatically save all your destinations in a list of recent locations.

1. Tap a recent location.
The Preview screen will display.
2. Complete one of the following:
| If you want to ... | Then ... |
| calculate the route and open the 3D Map screen | tap The 3D Map screen will display. |
| save the recent location as My Home | tap Set as home. Location will be set as new home location |
| save the recent location as a favourite | tap Add to favourites. The Edit favourite name screen displays. Type new favourite name and tap |
How do I view my route?
When a route has been calculated, the 3D Map screen will display. You will be directed to your destination by spoken and visual instructions.
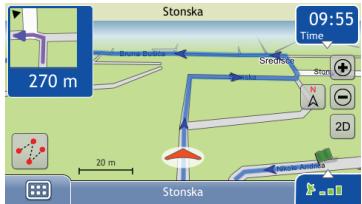
Navigation screen
The Navigation screen displays your current position and follows your direction of travel.
- Tap and drag the screen, to move across the map.
- Tap the map to view the Route Menu (see "How do I use the Route Menu?").
- Tap the map to view the Map Menu (see "How do I use the Map Menu?").
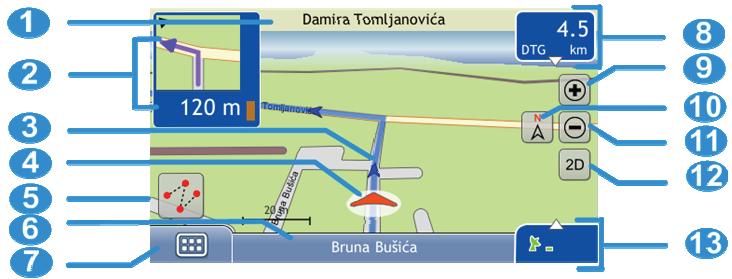
Note: Depending on the country you are travelling in, the colour of the direction and distance buttons may differ from the above example.
| Item | Description | |
| 1 | Next street | The name of the street to turn in to. |
| 2 | Direction and distance of next turn | The direction and distance of your next turn. Note: To repeat the spoken prompt of your next turn, tap the turn arrow. |
| 3 | Route | Your current route is highlighted. |
| 4 | Current position | Your current position is marked with ↘. |
| 5 | Route menu | Route Menu button allows you search for POIs on the route, to avoid roads on the route, to see route summary information etc. |
| 6 | Status bar | Displays one of the following: • The name of the street you are located on • Selected POI or street name.. |
| 7 | Main Menu | The Main Menu button allows you to enter an address for your destination and customize preferences. |
| 8 | Distance and Time Information | Tap to expand and see the following options: • Time • km/h or mph (Speed) • TTG (Time to Go) • DTG (Distance to Go) • ETA (Estimated Time of Arrival). Tap to cycle through the options. Note: During a trip with multiple via points, Time to Go, Distance to Go and ETA will display as: Time to via point, Distance to via point and ETA at via point. |
| 911 | Zoom | To view zoom options, tap To zoom out, tap To zoom in, tap |
| 10 | North up | Tap to change tracking mode from heads-up to north-up. |
| 12 | 2D/3D switch | Tap to change map view between 2D and 3D. |
| 13 | Mute/unmute volume, Bluetooth™, phone, battery and GPS information. | Tap to expand and see the following options: Mute/unmute volumeBluetooth and phone connection indicator.The icon is grey when Bluetooth is on, but a phone has not been paired.Battery charge indicatorGPS status indicatorThe icon displays green when a GPS fix is established and red when a GPS fix is unavailable. To indicate the reception strength of a GPS fix between one and four green vertical bars are displayed. |
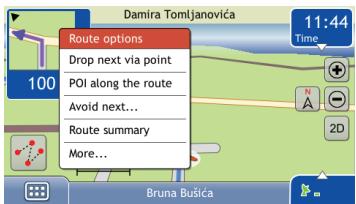
How do I use the Route Menu?
The Route Menu allows you to access navigational functions from the 3D Map and 2D Map screens.

Route Menu options
The following options are available via the Route Menu:
| Menu Option | Description |
| Drop next via point | Cancels your next destination. If next destination was also the last destination this option also stops navigation. |
| POI along the route | Displays POI along the route screen. This option allows you to quickly find POIs along your route. |
| Petrol stations Parking Restaurants | |
| Tourist Cash More | |
| POI along the route | |
| Avoid next... | Displays the Avoid next sub-menu from where you select how many kilometres (or miles) of the calculated route Mio should avoid:1 km, 2 km, 5 km, 10 km, 20 km..This option is useful when, for example, you know that in front of you there is traffic jam you would like to avoid. |
| Route summary | Displays Route summary window:From: Bruna Bulicca10000 Zagreb, HrvatskaTo: Selska10434 Svetna Nedelj, HrvatskaEstimated time: 00:23 hDistance: 22 km |
| Route summary | |
| More... | Displays the Route sub-menu from where you can:Manoeuvres list- the list of all manoeuvres on your route.Via points list - the list of all your via points on your route. You can also rearrange order of via points as well as or delete them from the route.Save this route. Saves this route to My TripsDelete this route. Cancels this route and stops navigation. |
How do I use the Trip Menu?
If you have calculated your route using Set as start options instead of using your GPS position as start location then you have a trip. Trips are useful when you want to plan and view a route without a GPS fix, such as when you are inside a building
The Trip Menu allows you to access trip specific functions from the 3D Map and 2D Map screens.
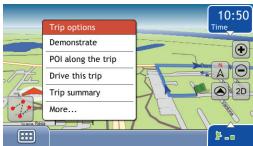
Trip Menu options
The following options are available via the Route Menu:
| Menu Option | Description |
| Demonstrate | Once the route has been determined, you can demonstrate the route using this option. |
| POI along the trip | Displays POI along the trip screen. This option allows you to quickly find POIs along your trip. |
| Petrol stations Parking Restaurants | |
| Tourist Cash More | |
| POI along the route | |
| Drive this trip | Changes trip to navigation route, effectively replacing trip start point with your GPS position. |
| Trip summary | Displays Trip summary window:From: Bruna Bulica10000 Zagreb, HrvatskaTo: Selska10434 Sveta Nedelj, HrvatskaEstimated time: 00:23 hDistance: 22 km |
| Route summary | |
| More... | Displays the Trip sub-menu from where you can:Manoeuvres list- the list of all manoeuvres on your trip.Via points list - the list of all your via points on your trip. You can also rearrange order of via points as well as or delete them from the trip.Save this trip. Saves this trip to My Trips/Delete this trip. Removes this trip and all trip via point from the map. |
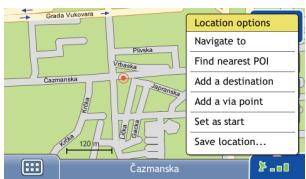
How do I use the Map Menu?
The Map Menu allows you to access location specific and navigational functions from the 3D Map and 2D Map screens.

Displaying the Map Menu
- Tap and drag to move around the map to your selected location.
- Tap the map. The Map Menu will display.
Map Menu options
The following options are available via the Map Menu:
| Menu Option | Description |
| Navigate To | Calculates a route from your current location, if your Mio has a GPS fix. |
| Find nearest POI | Displays the Find nearest POI screen from where you can browse for POIs in vicinity of selected location: Petrol stations Parking Tourist Cash Find nearest POI 1/2 > |
| Add a destination | Adds selected location as last destination of your route or planned trip. |
| Add a via point | Adds selected location as the first next destination of your route or planned trip. |
| Set as start | Sets selected location as starting point of planned trip. |
| Save location | Saves selected location to Favourites. |
How do I demonstrate a trip?
Route demonstration allows you to:
Preview a route.
Plan and view a route without a GPS fix, such as when you are inside a building.
The following steps will show you how to preview one route.
1. Select a departure point
a) Tap the 3D Map or 2D Map screen at your departure point. The Map Menu will display.
b) Tap Set As Start.
The Map Menu will close, and the selected point is set as your departure point.
2. Select a destination point
Set a destination either by using the address entry wizard or by using the Map Menu:
a) Locate your destination.
b) Tap your destination to display the Map Menu.
c) Tap Add a destination.
The Map Menu will close and the map screen will display the calculated route.
3. Demonstrate the route
Once the route has been determined, you can demonstrate the route by completing the following:
a) Tap the trip menu button to display the Trip Menu.
b) Tap Demonstrate.
The 3D Map screen will display the calculated route in Route Demonstration mode.
How do I use saved trip?
If you saved your route or planned trip using Route Menu or Trip Menu, it will be stored under My Trips. You may quickly reload your saved trip from the Main Menu:


Trips are saved with start and end location together will all intermediate via locations. The list with all your saved trips will display.
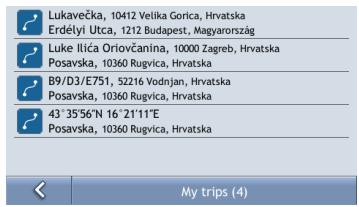
The following steps will show you what you can do with saved trip:
- Tap a saved trip from the list. The Preview screen will display.
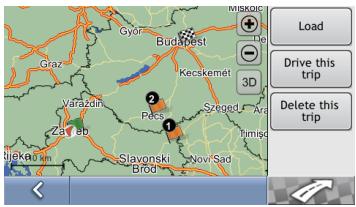
- Complete one of the following:
| If you want to ... | Then ... |
| load this saved trip to main map | Tap Load. The 3D Map screen will display. This saved trip will become current planned trip. You may now use all Trip Menu options. |
| navigate this trip | Tap Drive this trip. The 3D Map screen will display and navigation will start. |
| remove this trip from the list | tap Delete this trip. |
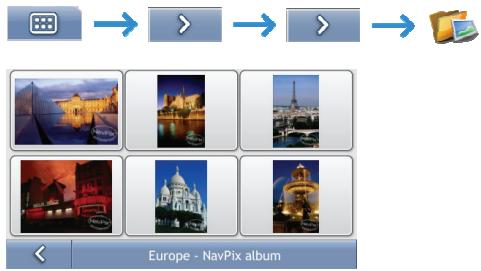
How do I view my NavPix albums?
NavPix Albums
Your NavPix images are stored in device internal memory. All images within each subfolder in NavPix folder represent one NavPix album. You should use MioMore desktop tool to add organize your NavPix images.
To display list of your NavPix albums use Main Menu:

Your collection of NavPix albums will display:
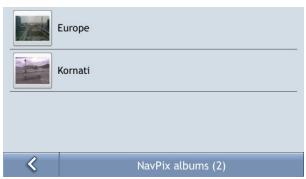
- The albums contain all your NavPix and display them as thumbnails. You can scroll the list to see all images by simple dragging:
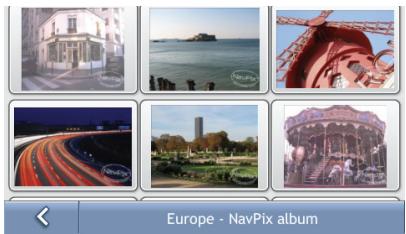
- The NavPix Details screen displays information about your NavPix. Tap a NavPix to display the Photo Details screen.

How do I view a NavPix in full-screen?
- From the NavPix Details screen, tap the thumbnail of the NavPix. The NavPix will appear in full-screen.
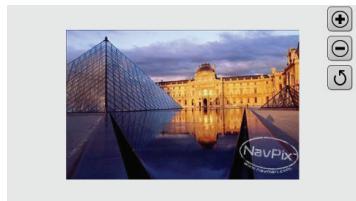
- Complete the following:
| If you want to ... | Then ... |
| zoom into the NavPix | tap |
| zoom out of the NavPix | tap |
| rotate the NavPix | tap |
| The NavPix will rotate 90 degrees anticlockwise each time is tapped; the NavPix is saved at the new angle. | |
| view parts of the NavPix not displayed on-screen | tap and hold the NavPix, then drag across the screen. |
| return to the NavPix Details screen | Tap NavPix and then tap |
How do I navigate to a NavPix?
Your Mio contains preinstalled NavPix that you can navigate to.
Note: To navigate to a NavPix location, either a GPS fix must have been available when the NavPix was taken, or GPS coordinates have been added using MioMore.
How do I navigate to a NavPix from my albums?
- Tap the NavPix you want to navigate to. The Photo Details screen displays. Tap Map. The Preview screen will display.
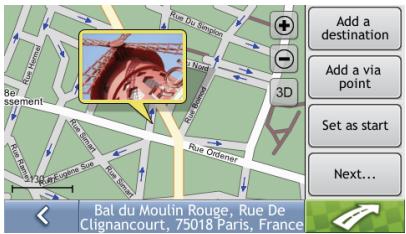
- Complete one of the following:
| If you want to ... | Then ... |
| navigate to NavPix | tapYour route is calculated and displayed on the 3D Map screen. |
| add this NavPix as the last destination of your trip | tap Add a destination.Your route is calculated; the 3D Map screen will display. |
| add this NavPix as the first next destination | tap Add a via point.NavPix will be added to your route as the first next destination; the 3D Map screen will display. |
| set this NavPix as start of a planned trip | tap Set as start |
| save the NavPix as My Home | tap Next... then Set as home.The New Favourite screen will display.. |
| save the NavPix as a favourite | tap Next... then Add to favorites.The New Favourite screen will display. |
GPS Status
Signals are transmitted by Global Positioning System (GPS) satellites orbiting the Earth. The GPS Status screen provides a visual representation of the information being received.
Latitude and longitude are displayed, along with ground speed and the heading in degrees. The strength of each satellite is displayed on a bar chart.
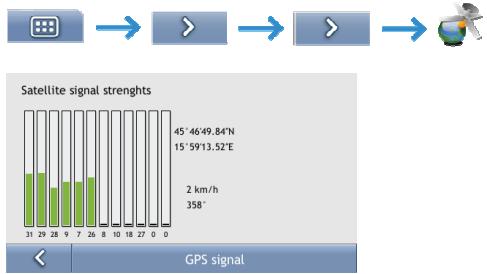
The satellites available from your current position are shown as grey, red and green coloured bars:
| Bar colour | Description |
| Grey | No signal. |
| Red | A valid signal, but not being used to fix your position. |
| Green | A valid signal being used to fix your position. |
What can I customize?
There are various customization options available to enhance your navigation experience.
The Preferences menu screens are accessed by pressing

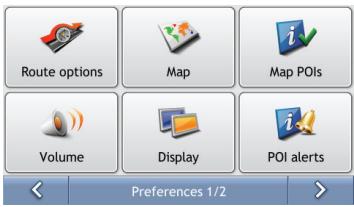
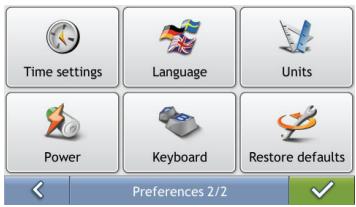
To move forward through the Preferences screens, tap
To revisit the previous screen, tap
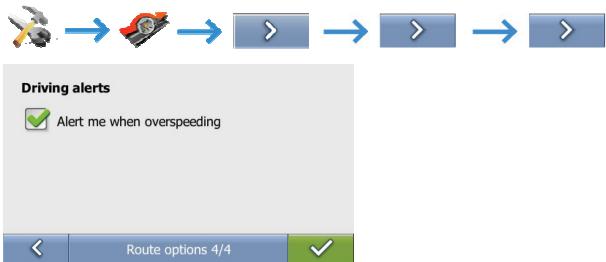
Route Options
You can enhance your navigation experience by modifying aspects of your route and route calculation.
Route Calculation 1/4
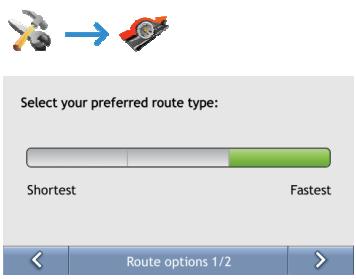
Complete the following:

- Your preferences are automatically saved.
Road Types 2/4 & 3/4

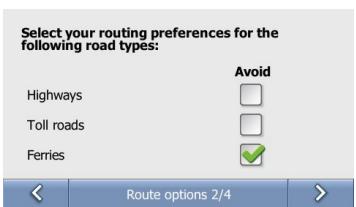
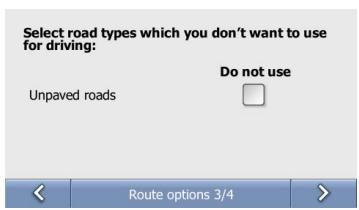
Complete the following:
| If you want to... | Then... |
| avoid highways roads | select theHighway check box in the Avoid column. |
| avoid toll roads | select the Toll roads check box in the Avoid column. |
| avoid ferry routes | select the Ferries check box in the Avoid column. |
- Your preferences are automatically saved.
Driving Alerts 4/4
Map Display
You can change the look and behaviour of the Map screens by customizing the Map Display preferences.
Map Display 1/2


Complete the following:
| If you want to... | Then... |
| set the screen contrast to automatically adjust | select the Auto day/night option. |
| improve screen contrast in light or dark conditions | select either the Day or the Night option to manually adjust the contrast. |
- Your preferences are automatically saved.
Select Map 2/2

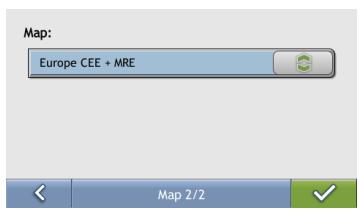
Complete the following:
| If you want to... | Then... |
| use maps from a different continent | select a different map data from the maps you are currently using. |
- Your preferences are automatically saved.
Map POIs
Points of Interest (POIs) are grouped into categories. You may choose to either display (or hide) icons of all POI categories on the map screens, or only display the icons from selected categories.
For example, you may only be interested in entertainment venues and want to disable other categories such as schools.

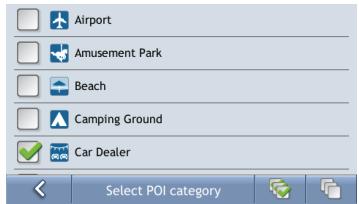
Complete the following:
| If you want to... | Then... |
| display all POI icons (ie, icons from all categories) | Tap |
| display no POI icons | Tap |
| select a specific POI category icon for display on the map screens | select the required POI category checkbox; repeat until all required categories are selected. |
- Your preferences are automatically saved.
Volume

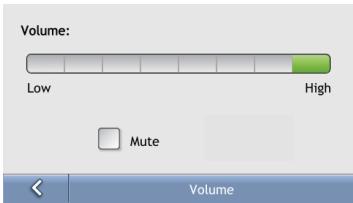
Complete the following:
| If you want to... | Then... |
| increase or decrease the volume | move the Volume slider towards High to increase the volume. move the Volume slider towards Low to decrease the volume. |
| completely mute sounds | select the Mute check box. |
- Your preferences are automatically saved.
Screen


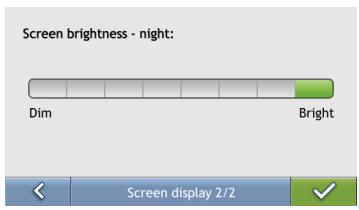
Complete the following:
| If you want to... | Then... |
| change the screen brightness for day display scheme | move the Screen Brightness slider towards Bright to increase screen brightness. move the Screen Brightness slider towards Dim to decrease screen brightness. Warning: Your Mio can heat up when the Brightness scale is set above 70% - i.e., when more than seven rectangles are coloured - therefore, use lower brightness whenever acceptable. |
| change the screen brightness for night display scheme | move the Screen Brightness slider towards Bright to increase screen brightness. move the Screen Brightness slider towards Dim to decrease screen brightness. Warning: Your Mio can heat up when the Brightness scale is set above 70% - i.e., when more than seven rectangles are coloured - therefore, use lower brightness whenever acceptable. |
- Your preferences are automatically saved.
POI Alerts
The POI Alert preferences allow you to set a warning chime and/or visual warning to Point of Interest categories that you have installed via MioMore (Custom POIs). You may also be able to set warnings to certain POI categories that were preinstalled on your Mio or available by subscription, such as Safety Cameras.
If you have a route set, the warnings will occur when you are a certain distance (set by the Warning Distance preference) from the POI on your route.
If you do not have a route set, the warnings will occur when you are in the vicinity of the POI.

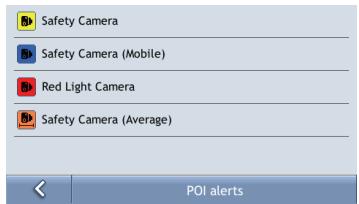
1. Tap a custom POI category.
The activation preferences for the selected category will display.
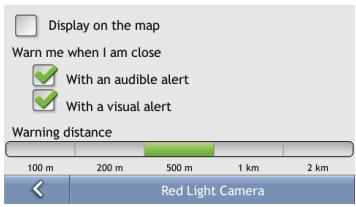
2. Complete the following:
| If you want to... | Then... |
| display locations in this category on the map | select the Display on the map check box. |
| enable a warning chime when locations in this category are in close proximity | select the With an audible alert check box. |
| enable a visual warning when locations in this category are in close proximity | select the With a visual alert check box. |
| select the distance at which the warnings will activate | move the Warning distance slider to select the distance at which the warnings will activate. |
- Your preferences are automatically saved.
Language

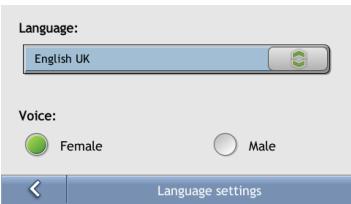
Complete the following:
| If you want to... | Then... |
| change the on-screen language | select your preferred language from the Language box and tap Yes. Your language preference is saved and the map screen is displayed. |
| change the voice guidance between male and female voice | select your preferred voice gender from the Voice box. |
- Your preferences are automatically saved.
Time settings
You can set Mio time zone settings to match your current location.


From the Time settings screen:
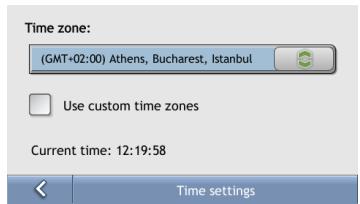
Complete the following:
| If you want to... | Then... |
| change Mio time zone | select your preferred time zone from Time zones . |
- Your preferences are automatically saved.
Power


The Battery Status bar shows the percentage of power left in the Mio battery; the words External Power will display when the battery is charging from an external power source. To charge the battery, see "Internal battery".
Keyboard


Keyboard type:

Alphabetic (abc)

QWERTY
Behaviour:

Change upper/lower case

Keyboard
Complete the following:
| If you want to... | Then... |
| use an alphabetic keyboard for entering information | select the Use alphabetic type (a, b, c...) option. |
| use a QWERTY keyboard for entering information | select the Use QWERTY type option. |
| allow Mio to automatically capitalize first letters of words | select the Change upper/ lower case check box. |
- Your preferences are automatically saved.
Units
You can change the units used by your Mio by customizing the measurements preferences.
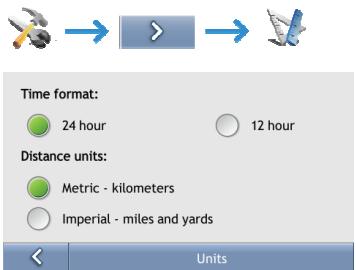
Complete the following:
| If you want to... | Then... |
| change the time format | select either the 12 hour or 24 hour option |
| change the distance units1 | select your preferred distance unit type from the Distance Units options. |
- Your preferences are automatically saved.
Restore defaults

This option will restore all factory default settings.
Note: The Restore Factory Defaults option does not delete recent locations or saved favourite destinations.
- Welcome
- Important information for using the manual
- Formatting
- Icons
- Terms
- What are the main screens I will use?
- Main Map screen
- Main Menu screen
- How do I navigate with GPS?
- How does my Mio receive GPS signals?
- How do I view my GPS status?
- How do I go from A to B?
- What if I miss a turn?
- How do I search for an address?
- Quick Steps
- Case Study: How do I search for an address?
- Open the Find address screen
- Search for the Street address
- Using the Keyboard screen
- How do I create a trip with multiple stops?
- Case Study: How do I navigate to multiple addresses?
- Dicmo Croatia
- Search for the City centre
- How do I skip a waypoint during a multi-stop trip?
- How do I search for a Point of Interest (POI)?
- Case Study: How do I search for a Point of Interest?
- Select the POIs command from the Main Menu
- Search for a POI
- How do I save Favourites and My Home?
- How do I save a Favourite or My Home?
- How do I navigate to a Favourite?
- How do I navigate to My Home?
- Option 1 - Via the Main Menu
- Option 2 - Via the Favourite Destinations screen
- How do I edit the name of a Favourite?
- How do I delete a Favourite?
- How do I navigate to a recent location?
- Tap a recent location.
- Complete one of the following:
- How do I view my route?
- Navigation screen
- How do I use the Route Menu?
- Route Menu options
- How do I use the Trip Menu?
- Trip Menu options
- How do I use the Map Menu?
- Displaying the Map Menu
- Map Menu options
- How do I demonstrate a trip?
- Select a departure point
- Select a destination point
- Demonstrate the route
- How do I use saved trip?
- How do I view my NavPix albums?
- NavPix Albums
- How do I view a NavPix in full-screen?
- How do I navigate to a NavPix?
- GPS Status
- What can I customize?
- Route Options
- Route Calculation 1/4
- Road Types 2/4 & 3/4
- Driving Alerts 4/4
- Map Display
- Map Display 1/2
- Select Map 2/2
- Map POIs
- Volume
- Screen
- POI Alerts
- Tap a custom POI category.
- Complete the following:
- Language
- Time settings
- Power
- Keyboard
- Units
- Restore defaults
Brand : MIO
Model : MAP
Category : GPS Navigation System