V.SMILE CYBER POCKET - Video game console VTECH - Free user manual and instructions
Find the device manual for free V.SMILE CYBER POCKET VTECH in PDF.

| Product type | Educational portable video game console |
| Brand | VTECH |
| Model | V.SMILE CYBER POCKET |
| Category | Video game console |
| Power supply | 4 AA batteries (alkaline recommended) or 9V AC adapter (not included) |
| Screen | Integrated color LCD screen |
| TV connection | AV cable included for TV display |
| Main functions | Educational games with Smartridge cartridges, stylus for writing area, built-in microphone, V.Link for online score transfer |
| Box contents | V.SMILE Cyber Pocket console, V.Link, one Smartridge cartridge, AV cable, wrist strap, user manual, 4 AA batteries |
| Manual languages | French, English (downloadable manual) |
| Care and cleaning | Wipe with a slightly damp cloth; do not use solvents |
| Safety | Parental supervision recommended; epilepsy risk for people sensitive to flashing lights |
| Recommended age | Over 5 years |
| Spare parts and repairability | Batteries and adapter replaceable; stylus included; no specific spare parts provided by manufacturer |
| Dimensions (estimated) | Approximately 15 x 8 x 3 cm |
| Weight (estimated) | Approximately 300 g (without batteries) |
Frequently Asked Questions - V.SMILE CYBER POCKET VTECH
User questions about V.SMILE CYBER POCKET VTECH
0 question about this device. Answer the ones you know or ask your own.
Ask a new question about this device
Download the instructions for your Video game console in PDF format for free! Find your manual V.SMILE CYBER POCKET - VTECH and take your electronic device back in hand. On this page are published all the documents necessary for the use of your device. V.SMILE CYBER POCKET by VTECH.
USER MANUAL V.SMILE CYBER POCKET VTECH
L E A R N I N G S Y S T E M
Dear Parent,
VTech, with the introduction of our V.SMILE Gabor PocketTM, offers parents a fun, healthy alternative to the world of hand-held video games. We know that children enjoy the "big kid" feeling that comes with owning one's very own hand-held system, and we also understand parents' reluctance to put these toys into their children's hands. Children want more independent play as they get older, and parents want to feel comfortable that this play is providing healthy, fun and educational benefits to their children.
With V.SMILE Gvor Pocket - an educational hand-held video game system designed for kids over 5-years-old - VTech continues its tradition of providing unique and fun alternatives to the existing video game systems. The V.SMILE Gvor Pocket combines age-appropriate educational content with high-tech graphics and fun game play to provide a state-of-the-art experience that kids and parents will both love. Also, V.SMILE Gvor Pocket can be played both on-the-go as a hand-held unit, or plugged directly into your TV for a shared, at-home game play experience.
Both the V.SAILE Opher Pocket and the V.SAILE TV Learning System work with the full library of VTech™ Smartridges™, each based on popular children's characters that engage and encourage your child to play while learning. The library continues to grow, as VTech™ seeks to provide parents with an almost endless selection of wholesome video games that meet the individual needs and likes of their children.
At VTech we are proud to provide you with a much-needed solution to the video game dilemma, as well as another innovative way for your child to learn while having fun. We thank you for trusting VTech, with the important job of helping your child explore a new world of learning!
sincerely,

Julia Fitzgerald
Vice President, Marketing
Vtech Electronics, NA
Your Friends at VTech
To learn more about the V.SMILE Cyber Pocket™ and other VTech® toys, visit www.vtechkids.com
TABLE OF CONTENTS
Introduction 1
Included in this package. 1
Product Features 2
V.SMILE Cyber Pocket™ Features 2
- Direction and enter button left / right reverse switch. 3
Wearing the Wrist Strap 4
Getting Started 4
- Battery installation 4
- Battery notice 4
ACAdaptor 5
Standard guidelines for adaptor toys 6
To Begin Play 6
- Connecting to a TV 6
Care & Maintenance 7
Troubleshooting 8
Technical support 9
Other info. 1
Disclaimer and limitation of liability. 1
Thank you for purchasing the VTech® V.SMILE Cyber Pocket™!
This unique handheld video game device was created especially for young players. With the VTech® V.SMILE Cyber Pocket™, children can play exciting, educational games on the go, or plug the V.SMILE Cyber Pocket™ directly into a TV for great at-home play. They can also use the included V.Link to upload their scores to a secure web site and unlock additional fun bonus games online!
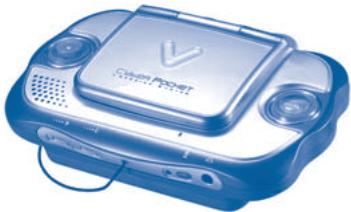
V.SMILE Cyber PocketTM
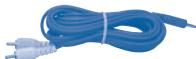
AV Cable

Wrist Strap

4AA batteries

User's Manual
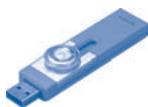
V.LINK

V.LINKTM Manual

SmartridgeTM

Smartridge™ Manual


Included in this package
#
One VTech® V.SMILE Cyber Pocket™
One V.LINK™
- One Smartridge™ and Smartridge™ Manual
One AV Cable
One Wrist Strap
- One V.SMILE Cyber Pocket™ and one V.Link™ User's Manual.
- 4 "AA" heavy duty batteries included. Alkaline batteries are recommended for longer life and optimum performance.
WARNING: All packing materials such as tape, plastic sheets, wire ties, vacuum form and tags are not part of this toy and should be discarded for your child's safety.
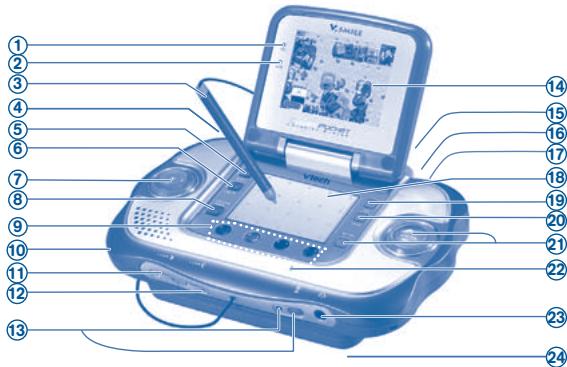
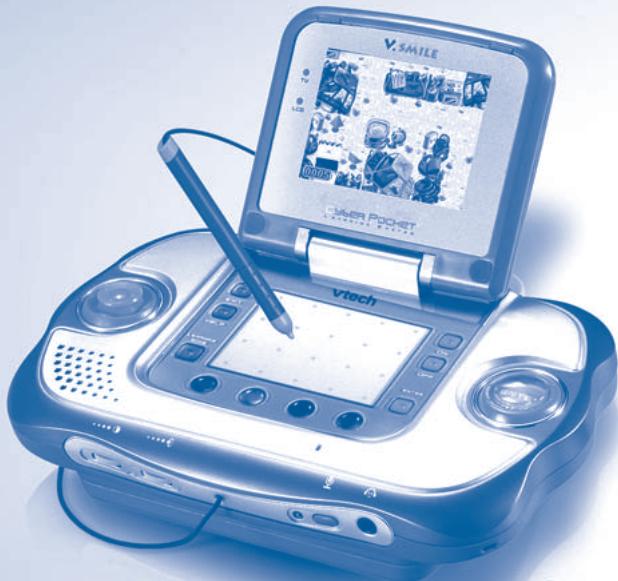
| 1 | TV indicator | Light appears when the unit is connected to the TV screen and the unit is turned ON. |
| 2 | LCD indicator | Light turns on when the unit is turned on while it is not connected to TV. |
| 3 | Stylus | For use with some specially designed games. Use the stylus on the writing pad area to play these games. |
| 4 | V.LinkTM port | Insert V.LinkTM with the sliding button side facing front, as shown in the diagram. Indicator light will let you know that the V.LinkTM is transferring information. For detailed operation instructions, please refer to V.LinkTM User's Manual. |
| 5 | Exit button | Press this button to exit or pause a game. |
| 6 | Help button | Press this button to hear helpful hints in certain games. |
| 7 | DIRECTION button | Press left, right, up, or down to direct the onscreen cursor, or game character, to the location you wish. |
| 8 | LEARNING ZONE button | Push this button to enter the Learning Zone play mode. |
| 9 | 4 Color Buttons | Use these buttons to choose answers in certain activities, or to perform certain game actions. |
| 10 | Wrist Strap fastener | Use to attach wrist strap. |
| 11 | Contrast button | Adjust the screen brightness. |
| 12 | Volume button | Adjust the volume. |
| 13 | Microphone indicator & button | Press the microphone button to turn the mic on. The mic Indicator lights up to indicate that you can now use the built-in microphone for any sing along or microphone-related activities. Only activated when unit connected to TV. If you connect the unit to a TV and hear feedback when using the microphone, try lowering the volume setting on the TV. |
| 14 | LCD screen | Viewing area for game play. CAUTION: When opening the Cyber Pocket, keep your fingers away from the hinge to avoid pinching them. |
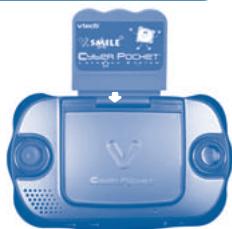
| 15 | Smartridge slot | Insert V.Smile Smartridge™ here. |
| 16 | AV output jack | Use this to connect the unit to a TV. |
| 17 | DC Power jack | Use this to connect to an AC/DC adaptor. Recommend to use VTech® 9V AC/DC adaptor. |
| 18 | Writing Pad | Operate the game by using the included stylus. Lightly touch or slide the stylus across the Writing Pad. Note: • Use the stylus ONLY on the Writing Pad. • Use only enough pressure to operate the game. Excessive pressure may damage the Writing Pad. • Use only the included stylus on the Writing Pad. |
| 19 | "ON" button | Press this button to turn the unit On. |
| 20 | "OFF" button | Press this button to turn the unit OFF. Always do this before removing a Smartridge™. |
| 21 | ENTER button | Press this button to make a choice or to perform certain game actions. Some of the games advise to press the Pen button. You can press the Enter button to take action. |
| 22 | Microphone | Use with specially designed games that include the microphone feature. |
| 23 | Headphone jack | Use this to connect to headphones (sold separately). |
| 24 | Battery compartment | Please refer to Page 4. "Battery Installation." |

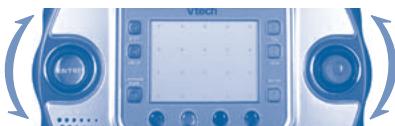
Direction and enter button left/right reverse switch
The V.SMILE Cyber PocketTM accommodates both right and left-handed players. To switch the ENTER and DIRECTION buttons from one side to the other:
- Slide up the switch on the back of the unit as shown in the diagram.
- Roll the DIRECTION and ENTER buttons from up to down until you hear and feel a locking sound. The DIRECTION and ENTER buttons will now appear on opposite sides from where you started.
- To return the buttons to their original positions, perform this same maneuver again.

back of the unit
WEARING THE WRIST STRAP
Attach the wrist strap to the V.SMILE Cyber Pocket™ and then use the strap to secure the V.SMILE Cyber Pocket™ to your wrist when playing.


GETTING STARTED

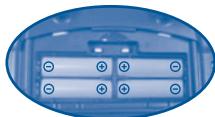
Battery Installation


Make sure the unit is turned OFF.
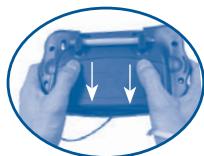
- Locate the battery cover on the back of the unit.
- Locate and remove the battery cover on the back of the unit as indicated in the diagram.
- Insert 4 X1.5v SIZE AA UM-3 OR LR6 batteries as indicated in the diagram.
- Make sure to replace the battery cover.

Battery Notice


- Install batteries correctly observing the polarity (+, -) signs to avoid leakage.
- Do not mix old and new batteries.
-
Do not mix batteries of different types: alkaline, standard (carbon-zinc) or rechargeable (nickel-cadmium).
-
Remove the batteries from the equipment when the unit will not be used for an extended period of time.
- Always remove exhausted batteries from the equipment.
- Do not dispose of batteries in fire.
- Do not attempt to recharge ordinary batteries.
- The supply terminals are not to be short-circuited.
- Only batteries of the same and equivalent type as recommended are to be used.
WE DO NOT RECOMMEND THE USE OF RECHARGEABLE BATTERIES.
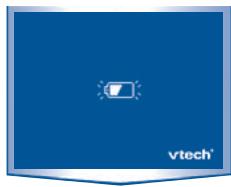
NOTE: When the V.SMILE Cyber Pocket™ is running on batteries, you may see this icon appear on the screen. This indicates that battery power is low, and you should replace the batteries soon. Battery time remaining once the icon first appears is approximately 10-30 minutes, depending on the type of batteries in use. After that, the handheld will show the screen on the right for 5 seconds, and then will turn OFF automatically.

AC adaptor


#
- Use a standard 9V--- 300mA +--- -AC/DC adaptor. We recommend the use of a VTech® 9V AC/DC adaptor.
- Make sure the unit is turned OFF.
- Plug the power jack into the 9V socket at the lower part of the handheld.
- Plug the AC adaptor into a wall socket.
NOTE: The use of an adaptor will override the batteries. When the toy is not going to be in use for an extended period of time, unplug the adaptor.

Standard guidelines for adaptor toys
#
- The toy is not intended for use by children under 3 years old.
- Only use the recommended adaptor with the toy.
The transformer is not a toy. - Never clean a plugged-in toy with liquid.
- Never use more than one adaptor.
- Do not leave the toy plugged-in for extended periods of time.

TO BEGIN PLAY
Make sure the V.SMILE Cyber PocketTM is turned OFF and TV cable is disconnected.
- Insert the Smartridge™ with the label side facing front, to assure that it is inserted correctly as shown in the diagram.
- Press the ON button to begin.

Connecting to a TV
#
- Make sure the handheld and TV are turned OFF.
- Insert the Smartridge™ with the label side facing front.
- Connect the AV cable plug to the TV jack on the handheld.
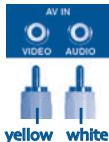
- Connect the yellow plug on the V.SMILE Cyber Pocket™ cable to the yellow video input terminal on your TV.
-
Connect the white plug on the V.SMILE Cyber Pocket™ cable to the white audio input terminal on your TV.
-
Turn on the TV.
-
Set your TV mode to accept input from the port in which your V.SMILE Cyber Pocket™ is connected. In some cases this will involve setting the TV to "video" mode. However, since all TVs vary, please refer to your TV manual for further details.
- Turn the V.SMILE Cyber Pocket™ on by pressing the ON button.
-
When the handheld is properly connected, the TV indicator light will come on.
-
Keep your V.SMILE Cyber Pocket™ clean by wiping it with a slightly damp cloth. Never use solvents or abrasives.
- Keep it out of direct sunlight and away from direct sources of heat.
- Remove the batteries when not using it for an extended period of time.
- Avoid dropping it. Never try to dismantle it.
- Always keep the V.SMILE Cyber Pocket™ away from water.
- Please examine the toy transformer periodically for conditions that may result in the risk of fire, electric shock, or injury to persons (such as damage to the output cord, blades, housing, or other parts) and that, in an event of such conditions, the transformer should not be used until properly repaired.
WARNING
A very small percentage of the public, due to an existing condition, may experience epileptic seizures or momentary loss of consciousness when viewing certain types of flashing colors or patterns, especially on television. While the V.SMILE Cyber PocketTM does not contribute to any additional risks, we do recommend that parents supervise their children while they play video games. If your child experiences dizziness, altered vision, disorientation, or convulsions, discontinue use immediately and consult your physician.
Please note that focusing on a television and LCD screen at close range and handling joystick controls for a prolonged period of time may cause fatigue or discomfort. We recommend that children take a 15 minute break for every hour of play.
| Problem | Possible Reason | Solution |
| No LCD display but can hear sound | After some time, the LCD will turn off | Press any key and the LCD should display again. |
| LCD display but with no sound | Volume is turned down | Adjust the volume control. |
| The Headphone is connected | Unplug headphones from the headphone jack. | |
| No LCD or sound but TV indicator light is ON | Cable is plugged into AV jack | Unplug the AV cable from the AV output jack. |
| TV indicator ON but no picture on TV | Incorrect TV connection | Make sure that the yellow plug of the AV cable is connected to the Video IN terminal (Usually yellow) of the TV. |
| Incorrect TV mode selected | Make sure that the TV is set to "Video" mode. Some TVs have several video inputs – please make sure you selected the video input that matches the video port connected to the V.SMILE Cyber PocketTM unit. | |
| TV or LCD display turns ON and OFF immediately | Battery power low | Replace battery. |
| The LCD or TV light on the unit is ON, but there is no picture (or incorrect picture) on the TV or LCD, and pressing the OFF button has no effect. | Program needs to be reset | Disconnect all power supplies (batteries and adaptor), then reconnect all power supplies. |
| Press the ON Button. | ||
| If the problem persists, remove the Smartridge. Inspect the inside of the Smartridge by pushing up the protective sleeve on the bottom of the Smartridge. Clean the inside piece with a dry, soft cloth. Then, re-insert the Smartridge and press the ON Button. | ||
| The picture on LCD is correct but the picture on TV is black and white | Non-matching color system | Make sure that the TV is set to the correct TV system (e.g. NTSC or Auto). |
| Cable connection problem | Make sure that the video cable is firmly connected to the video input of the TV and video setup of V.SMILE Cyber PocketTM. | |
| Program says to press pen button but there is no pen button | Using older V.SMILE controller | Can use the Enter button to replace pen button. |
| Does not recognize V.LinkTM | Some Smartridges do not support V.LinkTM | Please refer to Smartridge user manual to see if it supports V.LinkTM. |
| V.LinkTM connection problem | Turn off V.SMILE Cyber PocketTM, unplug V.LinkTM, then re-insert V.LinkTM to V.LinkTM port in the V.SMILE Cyber PocketTM. | |
| There is a picture on the TV, but no sound | TV setting | Raise the volume of the TV, and make sure it is not set to "Mute." |
| Cable connection problem | Make sure that the white and/or red plug is firmly connected to the audio input of the TV. | |
| Volume is turned down | Adjust volume control in the front of V.SMILE Cyber PocketTM. | |
| Program needs to be reset | Disconnect all power supplies (batteries and adaptor), then reconnect all power supplies. | |
| Press theON Button. | ||
| If the problem persists, remove the Smartridge. Inspect the inside of the Smartridge by pushing up the protective sleeve on the bottom of the Smartridge. Clean the inside piece with a dry, soft cloth. Then, re-insert the Smartridge and press the ON Button. | ||
| No sound coming through Microphone | The microphone is turned OFF | Press the microphone ON/OFF Button to turn the microphone ON. The sound from the microphone can only be heard when the V.SMILE Cyber PocketTM is connected to TV. The microphone sound will not be heard through the either A. speaker or B. earphone of the V.SMILE Cyber PocketTM. |

TECHNICAL SUPPORT
- If you have a problem that cannot be solved by using this manual, we encourage you to visit us online or contact our Consumer Services Department with any problems and/or suggestions that you might have. A support representative will be happy to assist you. Before requesting support, please be ready to provide or include the information below:
- The name of your product or model number (the model number is typically located on the back or bottom of your product).
- The actual problem you are experiencing.
- The actions you took right before the problem occurred.
Internet: www.vtechkids.com
Phone: 1-800-521-2010 in the U.S. or 1-877-352-8697 in Canada

Disclaimer and limitation of liability

#
VTech® Electronics North America, L.L.C. and its suppliers assume no responsibility for any damage or loss resulting from the use of this handbook. VTech® Electronics North America, L.L.C. and its suppliers assume no responsibility for any loss or claims by third parties that may arise through the use of this software. VTech® Electronics North America, L.L.C. and its suppliers assume no responsibility for any damage or loss caused by deletion of data as a result of malfunction, dead battery, or repairs. Be sure to make backup copies of important data on other media to protect against data loss.
Company: VTech® Electronics North America, L.L.C.
Address: 1155 West Dundee Rd, Suite 130, Arlington Heights, IL 60004 USA
Phone: 1-800-521-2010 in the U.S. or 1-877-352-8697 in Canada
Notice: This equipment has been tested and found to comply with the limits for a Class B digital device, pursuant to Part 15 of the FCC Rules.
These limits are designed to provide reasonable protection against harmful interference in a residential installation. This equipment generates, uses and can radiate radio frequency energy and, if not installed and used in accordance with the instructions, may cause harmful interference to radio communications. However, there is no guarantee that interference will not occur in a particular installation. If this equipment does cause harmful interference to radio or television reception, which can be determined by turning the equipment off and on, the user is encouraged to try to correct the interference by one or more of the following measures:
- Reorient or relocate the receiving antenna.
- Increase the separation between the equipment and receiver.
- Connect the equipment into an outlet on a circuit different from that to which the receiver is connected.
- Consult the dealer or an experienced radio/TV technician for help.
Caution : Changes or modifications not expressly approved by the party responsible for compliance could void the user's authority to operate the equipment.