
RC5400 - Universal remote MARANTZ - Free user manual and instructions
Find the device manual for free RC5400 MARANTZ in PDF.


| Product Type | Touchscreen Universal Remote |
| Brand | MARANTZ |
| Model | RC5400 |
| Dimensions (approx.) | 200 x 60 x 25 mm |
| Weight (approx.) | 300 g (with batteries) |
| Power Supply | 2 AA batteries (not included) |
| Screen | Backlit color touchscreen |
| Main Functions | Control multiple devices (TV, amp, player, etc.), signal learning, customizable macros, PC programming |
| Infrared Range | Up to 10 meters |
| Memory | Storage capacity for numerous codes and macros |
| Care and Cleaning | Clean with a soft, dry cloth. Do not use solvents or liquids. |
| Safety | Do not expose to moisture, extreme temperatures, or shocks. Remove batteries if not used for a long time. |
| Spare Parts and Repairability | Parts not available retail. Repair by an authorized Marantz center. |
| General Information | User manual available for download on Marantz website. Compatible with most devices on the market. |
Frequently Asked Questions - RC5400 MARANTZ
User questions about RC5400 MARANTZ
0 question about this device. Answer the ones you know or ask your own.
Ask a new question about this device
Download the instructions for your Universal remote in PDF format for free! Find your manual RC5400 - MARANTZ and take your electronic device back in hand. On this page are published all the documents necessary for the use of your device. RC5400 by MARANTZ.
USER MANUAL RC5400 MARANTZ
This equipment has been tested and found to comply with the limits for a Class B digital device, pursuant to part 15 of the FCC rule. These limits are designed to provide reasonable protection against harmful interference in residential installation. This equipment generates, uses, and can radiate radio frequency energy and, if not installed and used in accordance with the instructions, may cause harmful interference to radio communications. However, there is not guarantee that interference will not occur in a particular installation. If this equipment does cause harmful interference to radio or television reception, which can be determined by turning the equipment off and on, the user is encouraged to try to correct the interference by one or more of the following measures:
Reorient or relocate the receiving antenna.
n Increase the separation between the equipment and receiver.
n Connect the equipment into an outlet on a different circuit from the receiver.
Consult the dealer or an experienced radio/TV technician for help.
CAUTION:
The user changes or modifications not expressly approved by the party responsible for compliance could void the user's authority to operate the equipment.
For Europe
Declaration of Conformity N V03ECRC5400:
We, Marantz Europe B.V., PO Box 8744, 5605 LS Eindhoven, The Netherlands declare under our responsibility that the Marantz product described in this user guide is in compliance with the corresponding technical standards such as EN301 489-1 of 2002-08, EN301 489-3 of 2002-08, EN300 220-1 of 2002-09 and IEC60950 of Edition 2001.
Eihdhoven, The Netherland
Bert Kiggen

Marketing manager of Marantz Europe B.V.
This device is approved according to applicable safety regulations for the following countries:
| BE √ | DK √ | GR √ | ES √ | FR √ |
| IRE √ | IT √ | LU √ | NL √ | AT √ |
| PT √ | FI √ | SE √ | UK √ | DE √ |
Dear customer,
Please be informed that this carton only contains a copy of the user manual in English. For German, French, Dutch, Spanish and Italian please visit our website www.marantz.com and check the download section (touch screen remotes).
The information in this manual is copyright-protected. No part of this user guide may be copied or reproduced in any form without prior written consent from Marantz.
MARANTZ SHALL NOT BE LIABLE FOR OMISSIONS OR FOR TECHNICAL OR EDITORIAL ERRORS CONTAINED IN THIS USER GUIDE. MARANTZ SHALL NOT BE HELD LIABLE FOR INCIDENTAL OR CONSEQUENTIAL DAMAGES RESULTING FROM THE SUPPLYING OR USE OF THIS INFORMATION. MARANTZ SHALL NOT BE HELD LIABLE FOR INCIDENTAL OR CONSEQUENTIAL DAMAGES RESULTING FROM THE PERFORMANCE OR USE OF THE MATERIALS DESCRIBED IN THIS USER GUIDE.
The information in this user guide may be subject to change without prior notice. All other brand or product names are trademarks or registered trademarks of their respective companies or organizations.
Introduction 2
- The Marantz RC5400 2
- The Battery 3
Getting Started 6
- Activating the RC5400 6
- Navigating the RC5400 7
- Operating a Device 11
- Check Battery Life - The Information Page 12
5 The Setup Pages 12 - The Mode Menus 14
- Adjusting the Touch Screen Contrast 14
Customizing Your RC5400 16
- Introduction 16
- Cloning All Your Existing Remotes 16
3 Complex Operation? Macros or Help... 18 - Programming Help Lists 20
- Macro Capabilities 21
- Programming Macros 23
Reference 26
1.Learning IR Commands 26
2.Labeling Buttons,Pages and Devices 30
3.Adding Devices 33
4. Deleting Buttons and Devices 37
5. Moving Devices 39
6. Programming Macros 40
7. Using the Remote Control with RF (Radio Frequency) 44
8. Wizz.it Software 46
Maintaining the RC5400 48
Troubleshooting 49
Frequently Asked Questions 52
Overview of Symbols 54
Specifications 56
Index 57
Service and Support 62
1. The Marantz Wlzz.5 RC5400
The RC5400 is designed to control most devices that understand infrared (IR) remote control signals. Its easy-to-use Touch Screen and its intuitive interface make it a perfect remote control for every user. The RC5400 is completely customizable and programmable. You can add devices and functions, re-label buttons, record macros and animate your macros. Although the RC5400 is pre-programmed for Marantz components, a vast collection of built-in tab guided panels with prearranged button art enables you to easily choose the perfect interface for any non-Marantz component. The RC5400 easily “learns” commands from the vast majority of manufacturers’ remote controls.
The Touch Screen
2. The Battery
When you use the RC5400 for the first time, you will have to:
Install the battery pack.
- Place the RC5400 in the docking station (DS5400) and charge the RC5400.
- Tap the INFO button on the UPPER TOOL BAR to check battery life.
Warning: Use the docking station only with supplied NiMH rechargeable battery pack.
We strongly advise you NOT to plug other appliances (like mobile phones, PDA's) into the docking station. This will damage both the connector and the appliance.
Installing the Battery Pack
1 Press the latch on the battery cover and remove the battery cover from the RC5400.
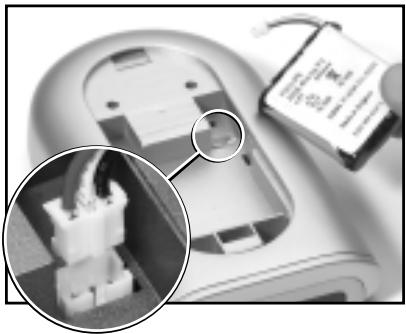
2 Plug the cable of the battery pack in the connector as illustrated.
3 Place the battery pack in the battery compartment.
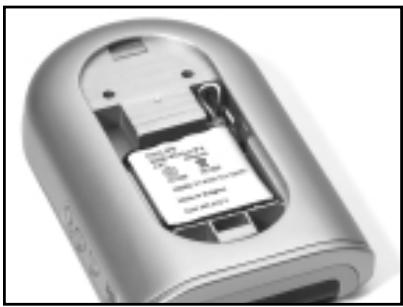
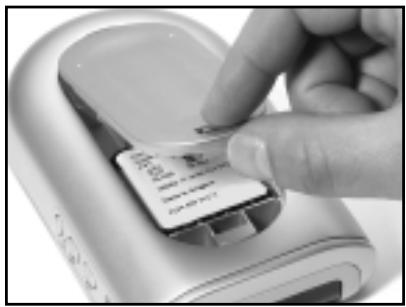
4 Place the battery cover back on.
Note Make sure the cable of the battery pack does not get stuck between the molded interior and the battery cover.
After a few seconds, the RC5400 starts up automatically and an Introduction screen appears. The RC5400 beeps twice to indicate that it has finished starting up.
Because the battery pack of the RC5400 is not fully pre-charged, you will have to charge it as described in the next page.
Charging the RC5400
For charging the RC5400, you use the docking station DS5400.
1 Connect the power adapter to the docking station and plug it into a wall outlet.
2 Slide the RC5400 into the docking station. Charging starts immediately. The blue charging LED on the front of the docking station indicates charging takes place.
When the RC5400 is fully charged, the LED goes off.
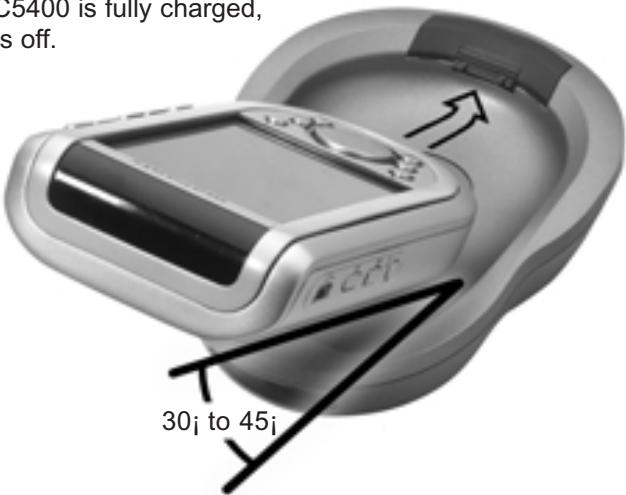
Make sure you lift the RC5400 up at an angle of 30^ to 45^ when you take the RC5400 out from the docking station.
Note Normal charging time is 2 to 3 hours, depending on the condition of the battery pack.
You can operate the RC5400 while it is being charged.
The battery pack does not have to be entirely empty before recharging.
You can place the RC5400 in the docking station at any time.
When the battery is running low, the Low Battery icon appears in the UPPER TOOL BAR. Recharge the RC5400 as soon as possible to ensure perfect performance.

Low Battery icon
Note The RC5400 retains all settings when the battery is completely dead. You will only have to reset the clock.
1. Activating the RC5400
Turning on the Touch Screen
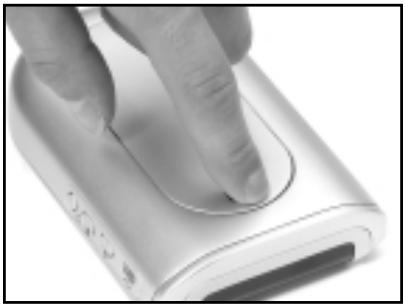
Tap the Touch Screen gently with your finger or a blunt, soft object like a pencil eraser.
The display is activated and you see the Home page.
Notes If the display stays blank or becomes black, adjust the contrast
using the buttons on the left side (see page 15).
- If another panel is displayed, press the HOME button.
- The RC5400 shuts down automatically after being left alone for a few seconds (you can adjust the time out period in the Setup pages).

HOME button
Using the Backlight
RC5400 s backlight can be activated in three different ways,
Pressing the BACKLIGHT button
By pressing the BACKLIGHT button on the left side of the RC5400, the backlight is turned on.
Picking up the RC5400
The RC5400 has the Pickup sensor in it. By picking your RC5400 from the docking station and tilting more than 50_i the backlight is turned on.
Note To enable this function, the pickup sensor setting in the Setup has to be set to Active (see page 13).
Tapping the Touch Screen
By tapping the Touch Screen, the backlight is turned on.
Note To enable this function, the Auto backlight setting in the Setup has to be set to Active (see page 13).
The backlight shuts off after a few seconds to save power.
Modes
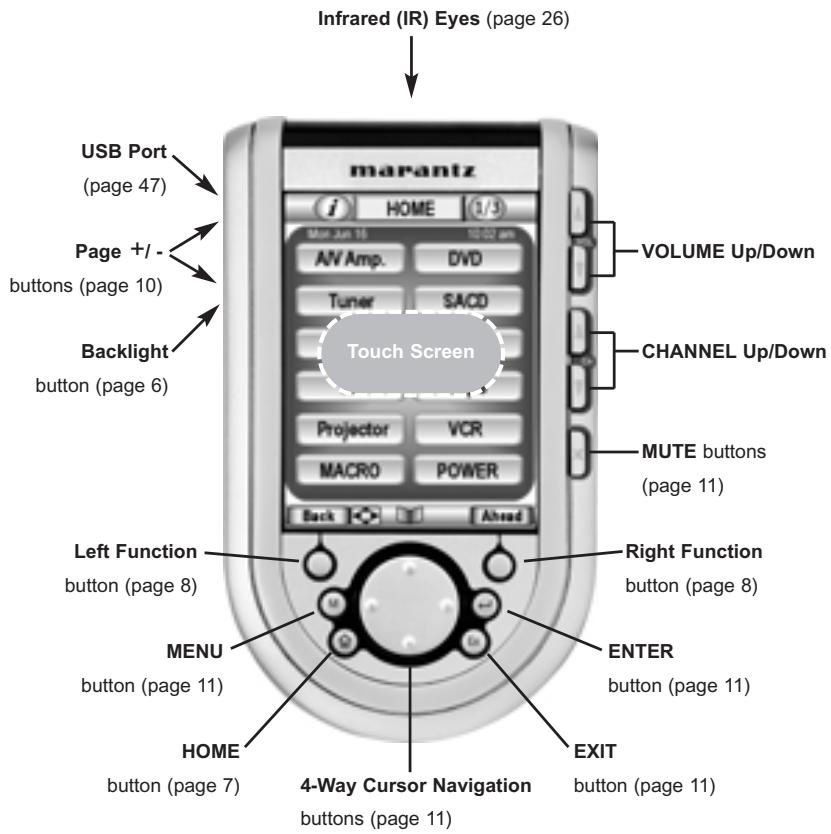
The RC5400 has different "Modes". When you activate the RC5400 for the first time, it starts up in USE mode allowing you to immediately operate your devices. In USE mode, the center of LOWER TOOL BAR displays the MODE icon .Tap and hold the MODE icon more than 3 seconds. The Mode Menu page will appear. If the center of LOWER TOOL BAR shows another icon, like LEARN, tap it to reveal the Mode Menu and press the Left Function button labeled Exit to return to USE mode.
Note If you do not see the Mode icon; it has been deactivated via the Setup. To enable this function, the Mode Menu setting in the Setup has to be set to Active (see page 13).
2.
Navigating the RC5400
Your RC5400 is capable of displaying hundreds of different control pages. RC5400 presents you various ways to navigate to the specific device and page easily.
Navigating the Devices
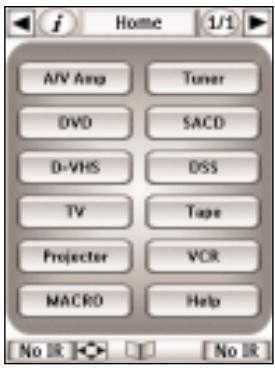
Home — The Home Page displays convenient jump buttons to the main control page of your system devices (your Amp., TV, DVD player etc.). These buttons also select the Input of your Home Theater Receiver or Preamp.
Access Home page bypressing the HOME buttonat the bottom left of the r

-
Device buttons in the Home page perform two actions when pressed;
-
Jumps to the main page of the Device.
- Changes your home theater receiver/preamp to the appropriate input. To program for a non-Marantz receiver/preamp, see page 28.
The commands assigned to the device button called the Device Action.
Device Overview
The Device Overview page also displays a list of all the devices you can control. You can jump to the main page of your device by tapping the device button in the list.
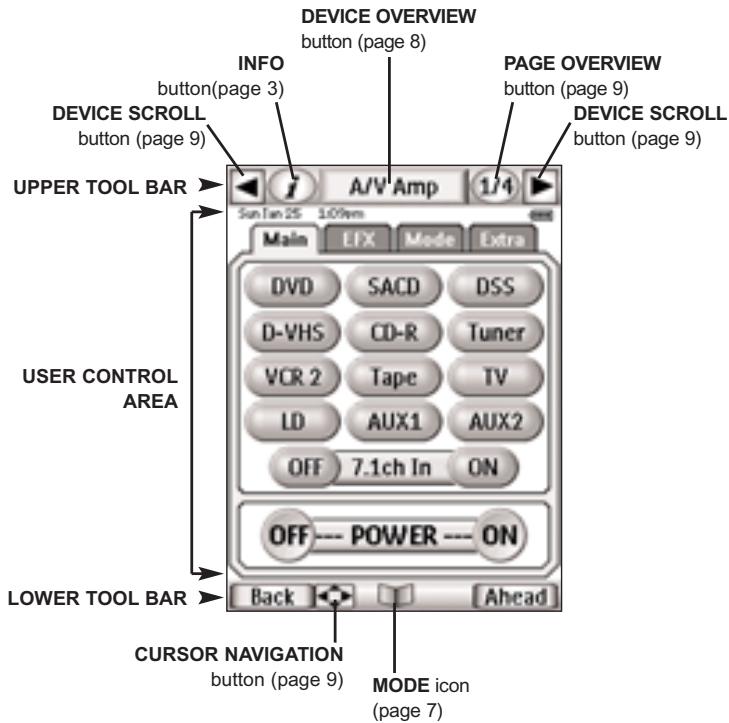
Access Device Overview page by tapping the DEVICE OVERVIEW button at the middle of UPPER TOOL BAR.
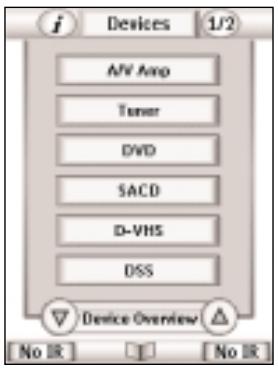

If you have more than seven devices, scroll arrows enable you to navigate to the next Device Overview page.
Note When you jump to a Device by tapping the device button in the Device Overview pages, the RC5400 will change the input of your home theater receiver/preamp. Using the buttons in the Home page is exactly the same thing as pressing a button in the Device Overview page.
-
Using Device Overview without Changing Input (No IR) If you don't want to change the input for your receiver/preamp, you can only jump to a Device without changing the input by the following steps;
-
Display the Device Overview page, by tapping the DEVICE OVERVIEW button.
- Look at the label for the Left and Right Function buttons. Now, they are labeled No IR.
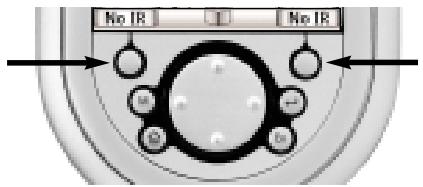
3. Press and hold either of the two Left and Right
Function buttons, then tap the device you would like to jump to. No input select commands will be sent to your receiver/preamp.
Device Scroll — You can also navigate the devices by tapping the DEVICE SCROLL buttons on the left and right side of the UPPER TOOL BAR. Tap the Left arrow button to navigate to the previous device. Tap the Right arrow button to navigate to the next
device.

Cursor Navigation — This function enables you to navigate to the devices by pressing the Left and Right direction of the 4-way Navigation button.
Note This function is deactivated by the factory setting.
You can activate it in the Setup pages (see page 13).
To switch this function on, tap the button in the LOWER TOOL BAR. When this function was activated, the button is changed to the button and icon is displayed in the UPPER TOOL BAR where the left device scroll arrow button was. To switch this function off, tap the button in the LOWER TOOL BAR
again.

Navigating the Pages
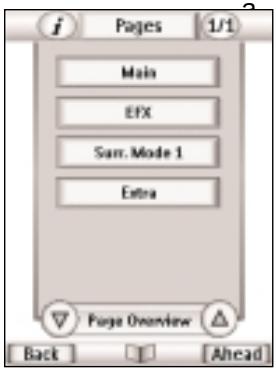
Page Overview
The Page Overview page displays list of all the pages for one device.
You can jump immediately to another control page in one device by tapping the page buttons in the list.
Access Page Overview page by tapping the PAGE OVERVIEW button (Page number) in the UPPER TOOL BAR.

Page Scroll — you can navigate the pages by pressing the Page + and Page - buttons on the left side of RC5400.
Cursor Navigation — This function enables you to navigate to the different pages as well as the device by pressing the Up and Down direction of the 4-way Navigation button.
Note This function is deactivated by the factory setting. You can activate it in the Setup pages (see page 13).
To switch this function on, tap the button in the LOWER TOOL BAR. When this function is activated, the button is changed to the button and icon is displayed in the UPPER TOOL BAR where the left arrow button was. To switch this function off, tap the button in the LOWER TOOL BAR again.
Tab Buttons— All of your devices have been programmed with one-touch jump buttons called Tab button. By tapping the Tab button, you can jump to the appropriate page in your operation device.
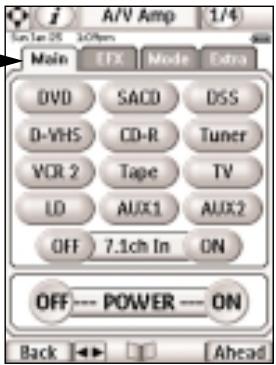
Other Navigation
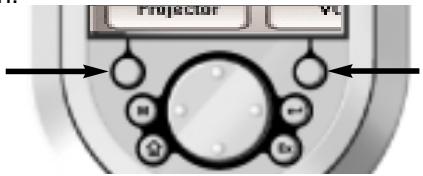
Ahead and Back Function buttons — Press the Left Function buttons labeled Back to navigate to last ten pages you've viewed. Use the Right Function button labeled Ahead to navigate in the other direction.
3. Operating a Device
You can operate the devices using two kinds of buttons;
Soft buttons - Virtual buttons on the Touch Screen.
Hard buttons - Seven buttons below the screen (HOME, Left and Right Function buttons are not included) and five to the right of the screen (Vol +/-, Ch Up/Down & Mute)
Using the Soft Buttons
By tapping the Soft buttons on the Touch Screen you send Infrared (IR) commands to the device you have selected.
The name of the device you are controlling is always displayed on the DEVICE OVERVIEW button.
Sending commands
IR commands are invisible. However, when you send a command, an animated icon appears in the INFO button at the UPPER TOOL
BAR to show that a command is being sent.
Using the Hard Buttons
Hard buttons can be operated at any time, even without turning on the Touch Screen. They can change their function depending on which device is active (teach commands to the specific device).
For example:
Since VOLUME Up, VOLUME Down and MUTE are typically receiver/preamp commands in most home theaters, these direct access buttons have been pre-programmed to always operate a Marantz receiver/preamp as the default. Should you own another brand, see the programming instructions on page 28-29.
MENU, ENTER, EXIT, 4-Way Cursor Navigation, CHANNEL Up and CHANNEL Down are typically programmed to change with the device selected. So when you are operating your DVD player, you use them to navigate DVD menus and change chapters. While you are watching TV, the MENU buttons operate the TV menus and the CHANNEL buttons change channels.
4. Check Battery Life- The Information Page
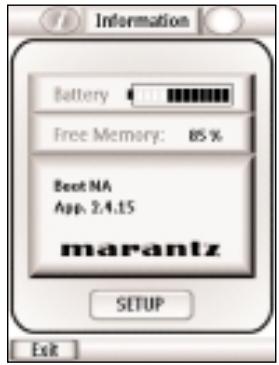
Access the Information page by tapping the INFO button in the UPPER TOOL BAR.
You can check;
The percentage of the battery life.
The percentage of the free memory available for new programming.
Software version information installed on to your RC5400.
To exit the Information page, Tap the INFO button again or press the Left Function button labeled Exit.
5. The Setup Pages
Most of the RC5400's features can be set to your own wishes.
1 Tap the INFO button in the UPPER TOOL BAR. The Information page appears.
2 Tap the SETUP button in the Information page. The first Setup page appears. You can display the second and third Setup page by using the Page + and Page - buttons.
3 Tap the button of the setting you want to adjust. The color of the button will be changed.
4 Tap the button again or and buttons to to adjust the setting.
User Guide
First Setup page
| Setting | Function | Adjusting |
| Time Mode | Sets the time display mode. (AM/PM, 24H, No Time) | Tap the “Time Mode” button Repeatedly. |
| Time, Day, Month and Year | Sets the time, Day, Month and Year individually | Tap the each label, and then adjust by tapping + and - buttons. |
| Animation | Selects the Animation mode (Full, Page, Mode, None). | Tap the “Animation” button. repeatedly. |
| Cursor Navigation | Turns the Cursor Navigation mode On/Off. | Tap the “Cursor navigation” button repeatedly. |
Second Setup page
| Setting | Function | Adjusting |
| LCD Sleep | Sets the timeout of the Touchscreen. | Tap the + and - buttons both side of the “Screen” label. |
| Backlight | Sets the timeout of the backlight | Tap the + and - buttons both side of the “Backlight” label. |
| Auto Backlight | Turn the Auto backlight On/Off. | Tap the “Auto backlight” button |
| Pickup Sensor | Turn the Pickup Sensor On/Off. | Tap the “Pickup sensor” button |
| Screen (beep) | Selects the beep volume (Off, 1,2,3) for Touchscreen | Tap the “Screen” button repeatedly. |
| Button (beep) | Selects the beep volume (Off, 1,2,3) for Hard buttons. | Tap the “Button” button repeatedly. |
Third Setup page
| Setting | Function | Adjusting |
| Mode Menu | Active - Normal. Anyone can access. | Tap the “Mode Menu” button repeatedly |
| Deactive - Hide the Mode icon. | ||
| SPECIAL NOTE | Good when children are tech-savvy. | |
| Device Menu | Active- Turns On the Device Overview. | Tap the “Device Menu” |
| Deactive - Turns Off the Device Overview. repeatedly. | ||
| Page Menu | Active- Turns on Page Overview. | Tap the “Page Menu” |
| DeActive - Turns off Page Overview. | repeatedly. | |
| Calibration | Calibrates the Touchscreen. | Tap the “Calibration” buttonSee page 53 for more detail. |
| Revert* | Reverts the RC5400 to the default configuration. | Tap the “Revert” button and follow the on-screen instruction* When you revert the RC5400, all customization items (macros, learned IR commands,...)are lost permanently. only the settings are remained. |
6. The Mode Menu
RC5400 provides different modes. For customizing your RC5400 you have to switch to the appropriate mode via the Mode Menu page.
The mode menus are utilized like this:
1 Tap and hold the MODE icon more than 3 seconds in the LOWER TOOL BAR. The Mode Menu page will appear.
2 Select the mode you wish to use to customize your RC5400 by tapping the appropriate button on the Mode Menu.
When you operate your devices, RC5400 is in USE mode.
For actions other than operating (like
learning IR commands, recording macros, adding devices, and so on), you have to switch to the appropriate mode:
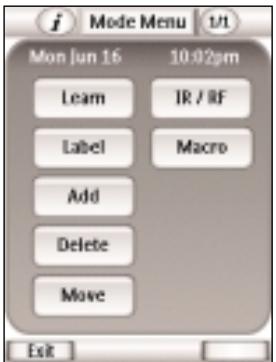
Learn For learning IR commands from other remotes. (Page 26)
Label For labeling buttons, pages and devices. (Page 30)
Add For adding new devices and copying existing devices. (Page 33)
Delete For deleting buttons and devices. (Page 37)
For changing the order of devices in the device overview. (Page 39)
For selecting the commands sending mode IR or RF. (Page 40)
For recording and editing macros. (page 44)
To switch to another mode
1 Tap the label of the mode (i.e LARN) you are using in the LOWER TOOL BAR. The Mode Menu page appears.
2 Tap the appropriate mode button you want to use. The label of the active mode appears in the LOWER TOOL BAR. You can now work in the selected mode.
Note RC5400 will not return automatically to the USE mode. To return to the USE mode, you have to go back to the Mode Menu page and press "EXIT" (Left Function button) or press "CANCEL" (Right Function button).
7. Adjusting the Touch Screen Contrast
You can adjust the contrast level of the Touch Screen using the buttons on the left side of the RC5400.
The adjust the Touch Screen contrast;
1 Press and hold the BACKLIGHT button on the left side of the RC5400.
2 While still holding the BACKLIGHT button, press Page + button once to increase the contrast one level up (getting darker). Or, press Page - button once to decrease the contrast one level down (getting lighter).
3 Release the BACKLIGHT button when the contrast is satisfactory. The contrast can be adjusted 16 levels.
Note To adjust the contrast multiple levels, you have to press the Page + or - button multiple times. When you press and hold the Page + or - button, the contrast will only change one level.
1. Introduction
It is best to proceed with customizing in several stages.
The first stage is to teach all of your existing remote codes to the RC5400. The second stage is to practice using your home theater system with the RC5400. As you gain familiarity with your system, you'll notice that many operations in a home theater require several steps. In the third stage of customization, you will record multiple step operations as either a "Macro" that you can play back with one button push or as a list of numbered steps recorded in a "Help List" device group.
In the next few pages you'll find step by step guidelines on each of the three stages. When a more detailed explanation can be found in the Reference section, we've noted the page.
2. Cloning All Your Existing Remotes
1 Gather all of your remote controls in front of you.
2 Play with all of the example devices. Compare the devices with your existing remote controls. Can you use any as templates for non-Marantz components?
3 Use DELETE mode to delete all of the devices that you don't use (see page 37).
4 Use ADD mode to add the devices for each Marantz component (see page 35-36).
When you are prompted to add with or without RC codes, choose Create with RC codes.
5 Use ADD mode to add a devices for each non-Marantz component (see page 36). Choose Create without RC codes.
6 Switch to LEARN Mode to evaluate the page layouts of the new devices.
User Guide
7 Switch back to DELETE mode and delete the device if it is not a good match to your component. Repeat steps 4 through 7 until all of your remote controls have matching devices.
8 Switch to LABEL mode to relabel each device (see page 30-32).
9 Switch to MOVE mode to re-order your devices, so that your Device Overview page is arranged the way you want (see page 39).
10 Switch to LABEL mode to relabel any buttons as needed to match your existing remote controls. Check all of your devices.
12 Switch to LEARN mode and teach the RC5400 all of your non-Marantz components' RC Codes (see page 26-30).
13 Switching back and forth between USE and LEARN modes, test all codes and reteach as necessary.
Note Be very careful to NEVER delete the jump tabs; they can only be restored with a Editor software using PC. (see page 46-47).
14 Switch back to LEARN mode. Teach each Device the appropriate Preamp/Receiver Input (source switching) IR command (see page 28) as the Device Action.
Congratulations!
You have completed the first stage of customization. Take a well deserved break.
3. Complex Operation? Macro or Help...
If your entire system is new to you, practice using the RC5400 manually for a few days before programming any macros. You'll find that your home theater requires many operations that require multiple steps to do. You have to decide whether to use a:
Macro - The entire operation happens in an automated sequence when you touch one button.
Help List - The operation happens manually but is prompted by large sequentially numbered buttons with friendly labels on one sequence of pages linked together.
Some multiple step operations require you to make decisions before you proceed. An example is turning on a non-Marantz home theater system. Many components turn on and off with a single "Power" button. Before you press a "Power" button, the manufacturer expects you to look at the component to see whether it is on or off. If you want it on and it's off, you press the "Power" button. If you forget to look, and it is already on, you will turn it off when you press the "Power" button. The Remote cannot "look" at your components to see if they are on or off. So, if you recorded a macro intended to power up a non-Marantz home theater, it wouldn't be very reliable.
Here's an example:
Your spouse goes out to the local video store and rents a video tape. When he/she gets home, they pop the tape in the VCR (most VCR's automatically turn on when a tape is inserted). Your spouse touches the macro button you programmed to power up the system. The recorded sequence of "power" buttons is played back. Unfortunately, since the VCR was already on, it is now off and everything else is on. Your spouse sees no picture, assumes the macro didn't work, so he/she touches the button again. This time, the macro tums the VCR on and every thing else off. Frustrating!
Marantz builds components that are "macro-friendly". Instead of a single "power" button, the remote controls have a discrete "On" and a discrete "Off" button. With a Marantz system, you can record a Macro that is very reliable from a series of "On" commands. Take a look at the example ALL ON and ALL OFF macros preprogrammed in the default configuration.
User Guide
The problems don't stop with powering up a system. Often, you will want to construct a macro to watch or listen to a specific source. This may require that both the Television and the Surround Receiver be set to new inputs. Some components have "discrete" commands to select sources (meaning the command will only have one effect on the components, like the CD input on most receivers). Other components have "toggle" commands (these are commands that require you to look at the component, evaluate its state and sometimes issue the command over and over again). An example of a "toggle" command is the Input or TV/VCR button found on many television remote controls. You have to look at the TV, decide that it is on the wrong input, then toggle or scroll through the inputs to select the one you want.
Evaluate each of the multiple step operations you would like to record as macros. If all of the commands in the process are "discrete," the macro will work reliably. If even one command is a "toggle" command, you should program a help list for the operation instead of a macro.
Tip
Sometimes there is a reliable way to use toggle type commands in macros.
Unfortunately, it will not be written down in your component's instruction manual. You will have to find it through experimentation and imagination
What you are looking for is an "anchor" command that will put your component in a known state. Once it is in a known state, you can use toggle commands in your macro.
An example for Powering Up DVD Players:
Most DVD players will turn on when off when they receive a Play command.
Thus a discrete On command is two steps,
A discrete off command is constructed by:
An example for Selecting Source on a TV:
Many televisions will return to a particular input with either a channel up or down command or by selecting a particular channel.
Thus, to construct a macro that selects the EXT1 input:
1) Channel Up (selects the Antenna A input)
2) Input ( toggles to the Antenna B input)
3) Input ( toggles to the EXT 1 input)
4.
Programming Help List
1 Write a list of all of the actions in the operation you want to record.
2 Gather all of the remote controls you will need for the operation.
3 Select ADD from the Mode menu. Choose "Copy Existing DEVICE" when prompted (see page 33-36). In the device list, there is a device labeled "Help . Tap it to add the Help device.
4 Switch to LABEL mode. Relabel the new device currently labeled Help 1 (for details on relabeling devices, see page 30-32). Try to use a descriptive title like POWER, RECORD, etc.
5 Stay in LABEL mode. Relabel as many of the buttons on the five pages as you need.
Tip Do not relabel the buttons labeled "Press for More ..." unless the button is the last step in the operation.
6 Switch to LEARN mode. Teach each button the appropriate command.
7 Switch to MOVE mode. Move the new device to the appropriate position in the device list (remember, this determines the button position on Device Overview page).
8 Return to USE mode and test out your new list.
9 You can make as many Help lists as you like. Simply repeat steps 1 through 8 for each operation you would like to program a help list.
5. Macro/Page Jump Capability
Macros allow you to send a sequence of commands, jumps, delays and beeps with up to 250 steps using one single touch.
Basically, you can assign any button as a macro button. However, it is recommended that you use the macro buttons in the reserved macro device since they are conveniently labeled with popular Macro titles. However any button can be reprogrammed to be a Macro.
In order to plan your macros, you should understand the capabilities as follows,
Any Button Perform Macros/Jumps
You can program a macro to be played back when a button is selected by pressing a button on a device page or Home page (see page 41).
You can program a macro to be played back when a device is selected by selecting the device via the Device Overview page (see page 42).
Macros Perform Jumps to Any Device
The RC5400 has the unique capability of jumping to any device panel during a macro.
You can make any or all of the 250 steps a jump to any devices. This provides you with the opportunity to give some feedback to the end user while a macro is being played back. For example: you can reveal the CD device panel to show the user that commands are being sent to the CD player, then jump to an A/V Amp panel to show the user that commands are being sent to the amp. (see page 41-42)
You can Add/Create a Status device (located in new devices in the division named OTHER) and custom label each panel to give the end user more specific feedback as to what the macro is doing. You can then program jumps to each Status panel to occur during the macro. (see page 33-34)
You cannot jump to any Home page, Device Overview and Page Overview page. You are only allowed to jump to first page of each devices when programming with the RC5400 stand alone.
Macros Send Commands To Your System
You can make any or all of the 250 steps send a remote control command to your system. The step is actually just a recording of the location of any button on any device page. To record an RC command, you simply navigate to the panel and button you want, then touch it. Thus, all RC commands in a Macro must first be taught to a button location first (see page 40-42).
You can record a "Device Action" which is what the device button on the Device Overview page really does (see page 42).
Macros Can Contain Delay and Beep Between Steps
You can program a Delay/Beep as any or all of the 250 steps of a macro (see page 41).
You can adjust that delay in 1/10th of a second intervals between 0.1 and 10.0 seconds (see page 41).
6. Programming Macros & Page Jumps
You will do all of your Macro/Jump programming within a screen that will appear after you press the Macro button on the Mode menopause. Before proceeding with programming, make sure that you understand how to move around in the MACRO mode and how to read the RC5400's shorthand notation for each macro step (see page 40).
1 Write a list of all of the actions in the operation you want to record.
2 Play with all of the example Macro buttons in MACRO device. Are any of these examples adaptable to your purposes?
3 Use DELETE mode to delete all of the macro devices that you don't like (see page 38).
4 Use ADD mode to add a new macro device empty of any programming from the device list (see page 35-36).
5 Switch to LABEL mode to re-label your macro devices. (see page 32).
6 Switch to MOVE mode to re-order your macro devices, so that the most commonly used Macro devices are near the top (see page 39).
7 Switch to LABEL mode and navigate to the your new macro device. Relabel the macro buttons with an appropriate name. The buttons are large so try to imagine a descriptive name even if it requires a few words.
8 Switch to MACRO mode. Tap the Macro to button to proceed.
Note If you like to create a macro to the Device button, tap the Macro to device button instead of the Macro to button button.
9 Navigate to your new macro device and press your newly named macro button to enter the MACRO edit page.
The MACRO edit page will appear. If you had any previously programmed commands in this button, they will appear for you to edit.
10 Working from your written list, navigate to the desired device and page to program all of the steps in the Macro (see page 41).
Commands - When you touch a button, you will record an RC command step (see page 41).
Jumps - When you select a device from the Device Overview while holding down the Left Function button (now labeled Jump), you will record a page jump to the first page of that device (see page 42).
Device Action - When you select a device from the Device Overview while holding down the Right Function button (now labeled Action), you will record a Device Action of that device (see page 42).
Delays - When you select a Delay, use the + and - buttons to set the amount of delay (see page 41).
Beeps - When you select a Beep, you will record a beep (see page 41).
Note Use the Page + / - buttons, Device Overview or Page Overview to navigate pages; the Tab buttons will work as a Jump. If you accidentally record a Tab button as a macro step, it is better to delete it.
11 Once all steps have been programmed, test your macro by tapping the Test button on the page.
12 Typically you will need to adjust the timing of the macro. Simply putting in lots of delays will make the macro work, but may make the macro unnecessarily long.
Try moving commands, so that a TV command alternates with another component command before another TV command is issued. To move a command, simply select it and use the and [] buttons to reposition it within the Macro page.
When a delay is added to the macro, the default timing is 0.5 seconds. If the macro works with a 0.5 second delay, try a smaller delay to shorten the macro.
When programming Channel number macros, use 0.1 second delays between different digits and 0.5 second delays between identical digits.
13 Once you are happy with the macro, press the Done button on the screen to save it.
14 Continue to program macros until you have recorded all that you plan.
Congratulations!
You are now a Home Theater Automator!
1. Learning IR command
You program the RC (Remote Control)
commands by transmitting IR (infrared) signals from your existing remote controls to the RC5400's learning eye.
To do this, place the RC5400 and the device's remote control on a flat surface, 1 to 10cm (0.5 to 3.6 inches) apart. With each new remote control, you have to find the correct learning distance.
It is best to be systematic and teach all of the buttons from one remote control before proceeding to the next. Start with the remotes close together; if you receive a Failed message, move them farther apart in one inch increments. Although rare, some component remotes require a very large distance between the sending LED and the RC5400's learning eye.
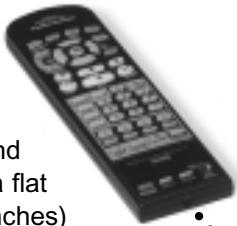
1 to 10 cm apart (0.5 to 3.6 inches)
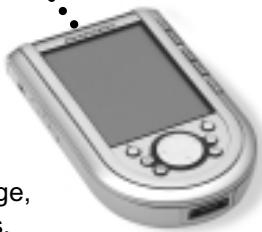
Test the first command from any new remote control to find the correct learning distance.
Once you have found the correct learning distance, do not change it for any other button on that particular remote control.
Most commands learn correctly when you press and hold them until the OK indicator appears. However, sometimes the RC5400 will say OK, yet the command will not operate the component properly. If this occurs, try re-teaching the command with a brief tap. After a short delay the OK indicator will appear. Test the code. If this improves operation, continue to use the tap technique for all other buttons on the remote. The only buttons that you MUST use the press and hold technique for are buttons that you will press and hold when you are operating the component (i.e. Volume Up/Down, Scan, etc.).
The following buttons can be programmed: Soft buttons (operation page buttons, device buttons) and Hard buttons.
You cannot program the buttons in the Devece Overview page directly. You have to program them using Learn device action function (see page 28).
The RC5400 also offers empty control panel buttons which you can program and label as existing buttons. They are visible in USE mode as grayed-out.
Programming Touch Screen Buttons
1 Tap and hold the MODE icon in the LOWER TOOL BAR more than 3 seconds. Mode Menu page will appear.
2 Tap the LEARN button to switch to the LEARN mode.
3 Select the Learn button button navigate to the device page which contains the button you want to program.
4 Point the device's original remote control to the RC5400's learning eye as shown on page 26.
5 Tap the button you want to program on the RC5400.
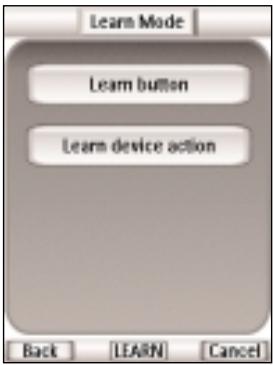
Learning will be displayed on the DEVICE OVERVIEW button and the button s color is reversed.
6 Press and hold the corresponding button on your device's original remote control. If the RC5400 has learned the command successfully, OK appears on the Device Overview button. You can let go of the button you're holding. If the RC5400 has not learned successfully, you hear a short buzz and Failed appears.
7 Program all other buttons you want and relabel them if necessary (see page 30-31).
8 Return to the Mode Menu page by tapping LEARN label in the LOWER TOOL BAR.
9 Return to USE mode by pressing the Left Function button labeled Exit via the Mode Menu page.
Programming The Device Buttons to Switch Sources
Note When you teach a command as a Device Action, this command will be sent when you select the Device from the Device Overview page. Remember, the only way to NOT issue this command is to reveal the Device Overview page, press and hold the Left or Right Function buttons (now labeled No IR) and select the device.
1 Tap and hold the MODE icon in the LOWER TOOL BAR more than 3 seconds. Mode Menu page will appear.
2 Tap the LEARN button to switch to the LEARN mode.
3 Select the Learn device action button. The Device Overview page appears.
4 Complete steps 4 to 9 in "Programming Touch Screen buttons" on page 27. Instead of tapping a button on the Touch Screen, press the Device button you want to program.
Programming Hard Buttons Globally And/Or Locally Per Device
The Hard buttons are defined as the five hard buttons on the right side of the Touch Screen (Channel Up/Down, Volume Up/Down, Mute) and the seven buttons below the Touch Screen (except the HOME, Left and Right Function buttons, since you cannot program them).
Note It is not possible to teach commands to the HOME, LEFT and RIGHT Function buttons on the remote. Only via a PC, you can re-program them.
User Guide
Hard buttons can be programmed for a device specific command for a particular device on the remote (Programming locally).
Only via PC, hard buttons can be programmed with a global function for all devices.
When a command is taught to a hard button from a device page, it will only be issued when that device is active, even if a command has been programmed globally. Local learning overrides global programming.
For example: One could program the CH+ & CH- buttons as the Chapter +/- command when the DVD is active. Now, if you program the TV channel +/- globally (and any device other than the DVD is selected) the TV channel +/- commands will be issued.
Programming a Hard Button Locally
1 Switch to the device for which you want to program the button.
2 Complete steps 1 to 9 in the programming Touch Screen buttons on page 27 to 28. Instead of tapping a button on the Touch Screen, press the button you want to program.
2. Labeling Buttons, Pages and Devices
The following elements can be labeled: Buttons on a device page and Home page, Page (the name that appears on the Page Overview page), and Device (the name that appears on the Device Overview button and Device Overview page).
Labeling a Button
1 Tap and hold the MODE icon in the LOWER TOOL BAR more than 3 seconds. Mode Menu page will appear.
2 Tap the LABEL button to switch to the LABEL mode.
3 Tap the Label button button on page. The last visited page in USE mode appears.
4 Navigate to the page contains the button you want to label.
5 Tap the button you want to label. The virtual auto-zooming" mini-keyboard shows up. The button/frame you want to label is displayed above the keyboard.
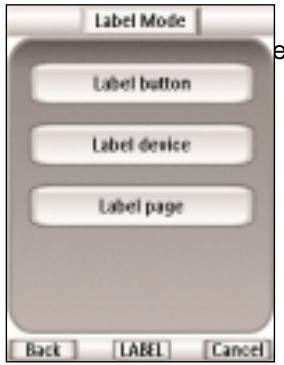
6 Edit the label.
To delete a character, press the Right Function button labeled Delete.
To change the font size, Tap the + or - buttons beside the Font label on the page.
To enter a character, tap the keyboard near the character you want to use. The keyboard is zoomed in, allowing you to tap exactly the character you need. After you have tapped the character, the keyboard is zoomed out. Repeat this action for every character.
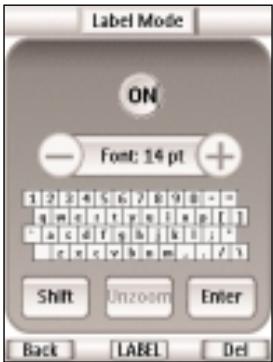
Note You can zoom out again without tapping a character by tapping the Unzoom button.
n For capital characters and symbols, tap the Shift button repeatedly to display the keyboard you want.
7 Tap Enter button to save the changes and return to the page you were at.
-or-
Press the Left Function button labeled Back to return to the page you were at without saving changes.
-or-
Press the Right Function button labeled Cancel to return to the USE mode without saving changes.
8 Label all other items you want and return to the Mode Menu page by tapping label in the LOWER TOOL BAR.
9 Return to USE mode by pressing the Left Function button labeled Exit.
Note You cannot label buttons on the Device Overview page directly. You have to label them using Label device function in the LABEL mode (see page 32).
Labeling a Device
You can label all devices which are displayed in the Device Overview page.
1 Tap and hold the MODE icon in the LOWER TOOL BAR more than 3 seconds. Mode Menu page will appear.
2 Tap the LABEL button to switch to the LABEL mode.
3 Tap the Label device button on the page. The Device Overview page appears.
4 Tap the device button which you want to label.
5 Complete steps 6 to 9 in "Labeling a Button" on page 30-31.
Labeling a Page
You can label all pages which are displayed in the Page Overview page.
1 Tap and hold the MODE icon in the LOWER TOOL BAR more than 3 seconds. Mode Menu page will appear.
2 Tap the LABEL button to switch to the LABEL mode.
3 Tap the Label page button on the page. The Page Overview page appears. You can navigate to other device by tapping the DEVICE SCROLL buttons.
4 Tap the page button which you want to label.
5 Complete steps 6 to 9 in "Labeling a Button" on page 30-31.
3. Adding Devices
If you have a device that is not provided in the Device Overview page, you can add it to the RC5400.
There are two possible ways to add a device:
n Create New Device
n Copy Existing Device
In the following sections we'll discuss what these options offer you.
Description for the Template Device
You will be able to choose from a list of preprogrammed templates with or without Marantz RC codes.
The Device list box will appear. As you scroll down the list using the Down arrow button, you will notice Device Type Dividers and Devices you can add. Only select the Device to ADD. Although it is possible to ADD the Device Type Divider as a Device, it is not useful. Should you accidentally Add a divider to your device list, delete it.
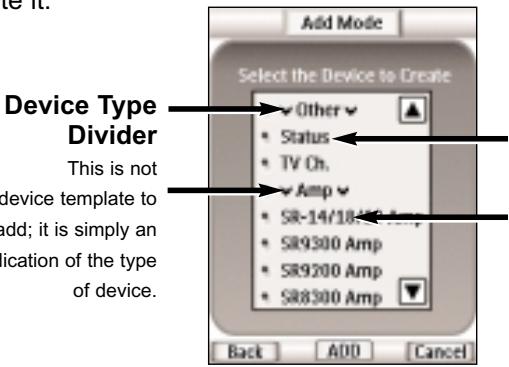
Device Template
When you add this for a Marantz component, you should add with RC codes . When you plan to teach codes from an existing remote control, add without RC codes .
With the and arrows, you can scroll through the complete device list.
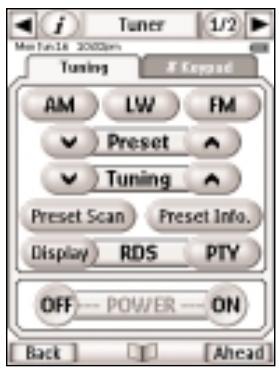
Receivers are both A/V Amps and Tuners - Since you typically use the two sections of your Marantz receiver at different times, we have separated them into two devices. You will find the amp section in Amp and the Tuner section in Tuner.
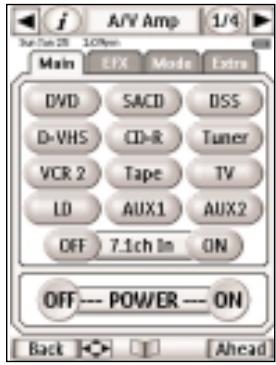
The Marantz SR9300 Receiver is actually two templates: The SR9300 AMP template for all Preamp/Surround functions and the SR9300 Tuner template for all Radio functions.
All of the devices shown are Marantz model s # with the exception of the first division, called "Other." Below the "Other" division are three device templates that are meant for other purposes.
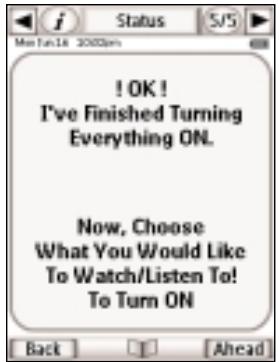
STATUS - This template is used to provide status screens you can jump to during a macro. Five pages are created with the device name "Status." If you add additional Status devices, they will be named Status2, Status3, Status4 and so on. Each page is named according to its numbered position (1/5, etc.), so that if you are editing a macro, you will know which panel you have jumped to.
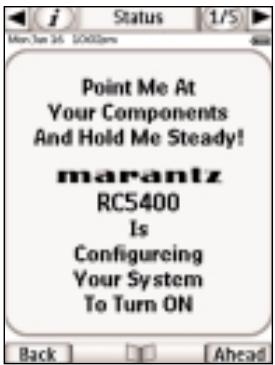
Status panels help your family hold the remote steady during long complex macros.
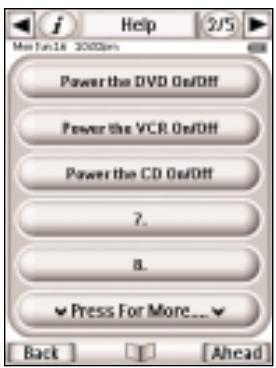
HELP - This template is used to create a Help List that will help users through a multiple step process that cannot be reliably programmed as a macro. See page 18-20 for more information about help lists.
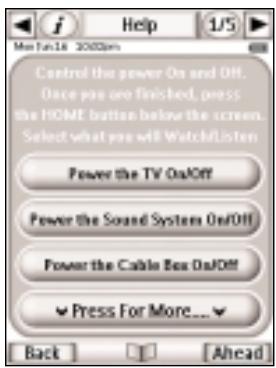
Help List panels are a good way to help casual users through a long operation with lots of steps.
DSS - Since Marantz does not make a DSS receiver, we included a template. Simply teach the RC5400 from your original remote.
Creating a New Device Step by Step
1 Tap and hold the MODE icon in the LOWER TOOL BAR more than 3 seconds. Mode Menu page will appear.
2 Tap the ADD button to switch to ADD mode. The RC5400 displays the following choices:
n Create New DEVICE n Copy Existing DEVICE
2 Tap the Create new device button on the screen.
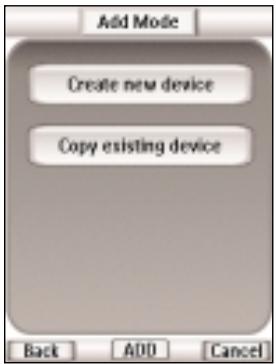
3 Tap the device you want to add from the device list box.
4 You can add the device with or without RC codes.
n Create with RC codes: Choose this option if you have the exact Marantz component listed. The new device is added with operational buttons.
n Create without RC codes: If you choose this option, the new device is added with greyed-out buttons. Program them using LEARN and LABEL mode.
Note When you add a device without RC codes, all buttons are visible as grayed-out.
By experimentally adding devices and inspecting them in USE mode, you can decide which is the best match to your component and delete the ones not used.
Tap the button of your choice.
The new device will be automatically displayed once you return to USE mode.
5 Add all other devices you want and return to the Mode Menu page by tapping label in the LOWER TOOL BAR.
6 Return to USE mode by pressing the Left Function button labeled Exit.
Copy Existing Device
Tap the Copy existing device button in the ADD mode page to copy a device that is already active.
TIP
It is often useful to have two almost identical devices for your Television. The only difference between the two is one would have the Vol+ and Vol- Direct Access buttons programmed locally with the televisions internal volume + and - commands. Label this device TV Only (for use late at night without Surround Sound). The other TV device has no programming in its Direct Access buttons; as a result, the surround receiver's Vol+ and Vol- (programmed globally on the Home panel) is issued when the TV device is selected.
User Guide
4. Deleting Buttons and Devices
You can delete the Buttons in device pages and the Device itself.
Note Left, Right Function, Home buttons, Pages and Frames (texts with non-button function) can not be deleted.
Deleting a Button
1 Tap and hold the MODE icon in the LOWER TOOL BAR more than 3 seconds. Mode Menu page will appear.
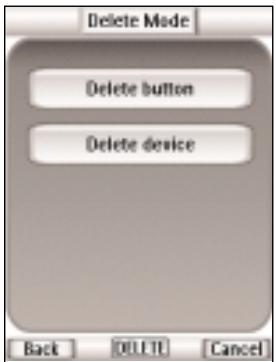
2 Tap the DELETE button to switch to the DELETE mode.
3 Tap the Delete button button.
4 Navigate to the page that contains the button you want to delete.
5 Tap the button you want to delete.
6 Tap Yes to delete or No to cancel. The label Undo appears above the Right Function button when you
Note By pressing the Undo function button, the button you just deleted is restored.
The result depends on the element you are deleting:
n Soft buttons (Touch Screen button): The button disappears from the display.
n Hard buttons: The button becomes inactive.
7 Delete all the buttons you want and return to the Mode Menu page by tapping Cancel label in the LOWER TOOL BAR.
8 Return to USE mode by pressing the Left Function button labeled Exit.
Deleting a Device
1 Tap and hold the MODE icon in the LOWER TOOL BAR more than 3 seconds. Mode Menu page will appear.
2 Tap the DELETE button to switch to DELETE mode.
3 Tap the Delete device button. The Device Overview page appears.
4 Tap the device name you want to delete.
5 Tap Yes to delete or No to cancel. The label Undo appears above the Right Function button when you have deleted the device.
Note By pressing the Undo function button, the device you just deleted is restored.
6 Delete all the devices you want and return to the Mode Menu page by tapping Cancel label in the LOWER TOOL BAR.
7 Return to USE mode by pressing the Left Function button labeled Exit.
5. Moving Devices
You can change the order of device buttons in the Device Overview pages.
1 Tap and hold the MODE icon in the LOWER TOOL BAR more than 3 seconds. Mode Menu page will appear.
2 Tap the MOVE button to switch to the MOVE mode. The RC5400 displays the Device list box.
3 Tap the device name of your choice. The point next to the selected device name is highlighted.
4 Tap the Move and buttons below the Device list box to move the device up or down.
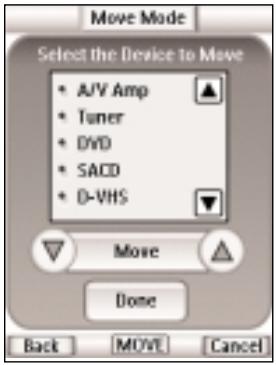
5 Tap the Done button to save the changes. You return to Mode Menu page.
6. Programming Macros
Macro Page Notation
Before you begin to program a Macro, study the notation used in the MACRO mode. Each type of action has its own notation.
DVD
- When only a device name is listed, the macro step will be a Device Action (the action that occurs when the Device is selected, which is typically the receiver/preamp's source selection or input command).
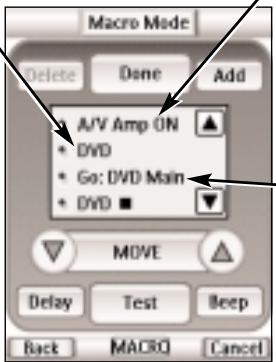
AMP - ON - When a device name and a button name are listed, that particular button s IR command will be issued.
GO: DVD Main
- A Go command indicates a panel jump. In this case, "TV" means a jump to the TV device and Main is the name for the particular panel (sometimes panels just have numbers, not names).
DVD-n
- A device name and the Stop symbol means that this particular button's IR command will be issued. The symbol list can be found on page 54.
Delay
- A delay counts as one of the 250 macro steps. Delays can be adjusted in 0.1 second intervals to be any value between 0.1 second to 10.0 seconds.
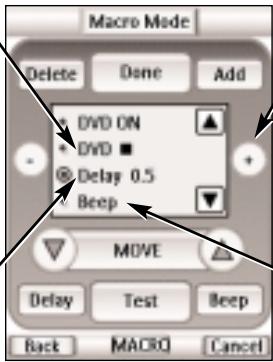
Adjusting Delays
- When a delay is "Selected," you can adjust the delay with the + and - buttons.
Beep - A beep counts as one of the 250 macro steps. Useful to notify when the macro execution is finished
User Guide
Recording a Macro to a Operation Button Step By Step
1 Tap and hold the MODE icon in the LOWER TOOL BAR more than 3 seconds. Mode Menu page will appear.
2 Tap the MACRO button to switch to MACRO mode. The RC5400 displays first Macro mode page.
3 Tap the Macro to BUTTON button to proceed to the next step.
4 Navigate to the device and the page that contains the button for which you want to create a macro.
5 Tap the button you want to create a macro. If the selected button cannot be used for a macro, you hear a beep which signifies a failure.
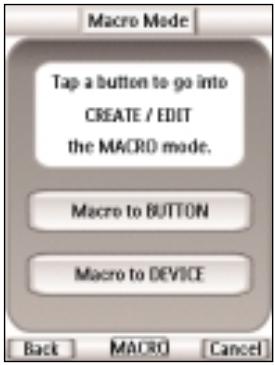
6 Tap the Add button to enter the sequence of commands in a macro. You can navigate to whatever control page you want, just as you do in USE mode except using Tab buttons. When you have selected the sequence, the RC5400 back to the Macro edit page.
7 Tap the Delay button to enter the delay in a macro. The delay is added in the macro list. You can adjust the delay time by pressing + and - buttons beside the list box.
8 Tap the Beep to enter the beep in a macro. The Beep is added in the macro list.
9 Tap the Test button to try if the macro performs properly.
10 Tap the Done button to finish the macro if it performed properly. By pressing the Right Function button labeled Cancel, you can cancel creating a macro.
There are two extra commands you can record as any step in a macro;
Recording a Device Action (Source or Input Switching)
To record a Device Action containing a source switching command, open the Device Overview page, hold down the Right Function button (labeled Action) and tap the device you want to record the device action. This action places the entire Device Action in the Macro.
Note
If a macro has been recorded as a Device Action, you can include all of it as a single step in another Macro, effectively nesting one macro inside another.
Recording a Jump to a Device page
To jump to any device, open the Device Overview page, hold down the Left Function button (labeled Jump) and tap the device you want to jump to. This action places the jump to the selected device's main page in the Macro.
Recording a Macro to a Device Button Step By Step
1 Tap and hold the MODE icon in the LOWER TOOL BAR more than 3 seconds. Mode Menu page will appear.
2 Tap the MACRO button to switch to MACRO mode. The RC5400 displays first Macro mode page.
2 Tap the Macro to DEVICE button to proceed to the next step. The Device Overview page appears.
3 Tap the device you want to program a macro.
4 Complete steps 6 to 10 in "Recording a Macro to an Operation Button" on page 41.
User Guide
Editing Macros
You can edit any macro you have recorded.
1 Tap and hold the MODE icon in the LOWER TOOL BAR more than 3 seconds. Mode Menu page will appear.
2 Tap the MACRO button to switch to MACRO mode. The RC5400 displays first Macro mode page.
3 Tap the Macro to button button if you want to edit the macro for the operation button, or Macro to device button for the device to proceed to the next step.
4 Navigate to the device and the page that contains the button you want to edit a macro.
5 Tap the button which holds the macro you want to edit. The Macro mode page appears.
6 You can move or delete the listed commands, or you can add new commands.
n Tap Add
n Browse to the page,choose button
n Use the arrow buttons and to move the command to the right place
7 You can also add delays and beeps to the macro (for example, to insert a short pause between turning on a device and sending commands to it, allowing the device to warm up).
Delay timing can be adjusted:
n Tap a delay.
n Tap or buttons beside the list box to decrease or increase the length of the delay.
8 Press the Test button to check if edited macro performs properly.
9 Tap Done to store and finish editing.
7.
Using the RC5400 with Radio Frequency
Warning To use the Remote Control with Radio Frequency (RF) you need an Marantz RX-77 RF Extender.
This is an optional accessory for the RC5400.
By default, the RC5400 uses infrared (IR) signals to operate devices. This means that you have to point the RC5400 s IR sending eye towards the devices you re operating. IR signals have an operating distance of approximately 10 meters (33 feet).
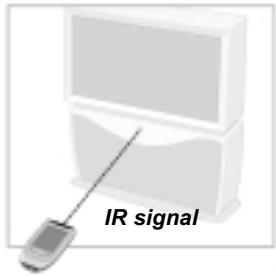
You can choose to operate devices using Radio Frequency (RF) signals instead of IR signals. RF signals can, unlike IR signals, go through obstacles like furniture or walls.
The RF signals sent out by the RC5400 are picked up by the RX-77 RF Extender. The RX-77 translates the RF signals in IR signals and sends the IR signals to the appropriate devices. Therefore, the RX-77 has to be placed near the devices you re operating with the RX-77 s sending eye pointed to the
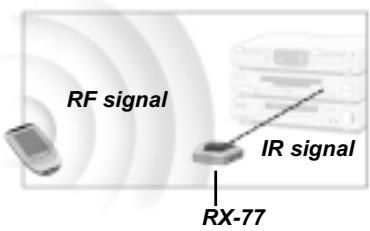
Your devices will always receive IR signals either directly from the RC5400 or from the RX-77.
Changing the IR / RF Settings
All devices are set up by default to work with IR signals. To be able to operate one or more devices with RF signals, you have to change the RC5400 s IR/RF settings for those devices.
1 Tap and hold the MODE icon in the LOWER TOOL BAR more than 3 seconds. Mode Menu page will appear.
2 Tap the IR / RF button to switch to IR/RF Setting mode. The RC5400 displays the device list box.
3 Select the device for which you want to change the IR / RF settings. The IR / RF setting page appears. The reversed color button labeled IR indicates that the selected device is currently operated with IR signals.
4 Tap RF button. The IR/RF settings for the selected device are changed from IR to RF.
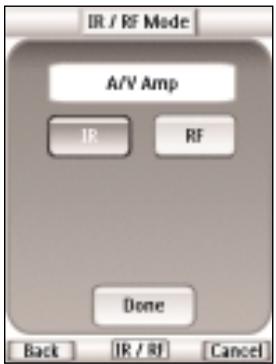
When you have several RX-77s to operate Back IR/RI CaneI devices, you have to assign the correct Extender ID to the selected device. Continue with Step 5.
- or- When you have only one RX-77, you can accept the default settings for the Extender ID and the Channel. Skip to step 6.
Note The ID on the RF Extender has to match the Extender ID on the Remote Control.
5 Press + and + buttons beside the Extender ID label to change the Extender ID number. The RC5400 offers 16 Extender IDs.
6 Tap Done to save the IR/RF settings for the selected device or Press the Right Function button labeled Cancel to return without changing the IR/RF settings for the selected device.
7 Repeat instructions 1 to 3 for all devices Back for which you want to change the IR/RF settings.
8 Tap IR/RF label to return to the Mode Menu page. The RC5400 is configured to operate the devices you have set with RF signals.
9 Return to USE mode by pressing the Left Function button labeled Exit and try out the devices for which you just changed the IR/RF settings.
Note It is possible that a device does not respond properly when operated with RF signals. In that case, you have to reconfigure the Remote Control to operate the device with IR signals again.
Choosing Another Channel
When you notice RF interference or unreliable operation you should try choosing another channel to operate your devices.
Note All devices you want to operate with RF signals use the same channel. If you choose another channel for one device, the Remote Control will automatically change the channel for all devices that work with RF signals.
1 Switch back to IR / RF mode. The Device list box will appear.
2 Select a device that is set with RF signals. The IR / RF setting page appears.
3 Tap the + and - buttons beside the Channel label to change the Channel number. The RC5400 offers 4 RF Channels.
Note The Channel (CH) on the RF Extender has to match the Channel on the Remote Control.
4 Tap the Done button to finish.
8.

Software
If you want to personalize your RC5400 even more, beyond its standard programming features, Wizz.it is the tool for you to use. Wizz.it is the RC5400's companion software that you can download from the following internet address; http://www.marantz.com
With Wizz.it, you can;
Add, delete, move and modify control pages, devices and commands anywhere on the touch screen.
Save, duplicate and share configuration files, codes or devices with other RC5400.
Preview new configuration files on Wizz.it Simulator. In this way you can check how the RC5400's interface will look like.
Upload and download new configurations to and from your RC5400. You do this with the USB cable supplied with your RC5400 connected to the USB port on the left side of the remote.
Connect the USB cable to the port above the Page + button
Convert the RC5200/5000 s configuration files (.ccf) for your RC5400.
Import new graphics to create new buttons and designs.
Personalize configuration files to optimize the use of your RC5400.
Programming the macro easily.
Customize the system area and make the whole Touch Screen to your operation area.
Share your work with other enthusiasts on the internet.
Create animated slide shows using your own photos or art.
Internet Fun
A community of enthusiasts helping each other to learn how to use PC's to configure their remote controls exists at; www.remotecentral.com
System requirements
Windows 98SE/ME/2000/XP
16 MB of RAM
25 MB of free hard disk space
n Free USB port
User Guide
Important notice
Take care not to scratch the Touch Screen
Use your finger to tap the Touch Screen or use plastic-tipped pens intended for use with other touch screen products. Never use an actual pen, pencil or other sharp object on the Touch Screen.
Protect the RC5400 from extreme temperatures
Keep the RC5400 away from heaters and other heat sources.
RC5400 is NOT waterproof
RC5400 should not be exposed to rain or moisture. Do not store or use the RC5400 in any location that is extremely damp or wet. When you have spilled water on the RC5400, you have to take out the batteries and let the RC5400 dry for 48 hours before you place the batteries back. When you have spilled other liquids like coffee on the RC5400, you can clean it with distilled water.
IMPORTANT: Make sure no water gets into the housing.
The Touch Screen of the RC5400 contains a glass element
Do not drop the RC5400 or subject it to any strong impact.
Cleaning the RC5400
Use a clean, soft and damp cloth to clean the RC5400.
If the Touch Screen is soiled, clean it with soft cloth moistened with diluted window-cleaning solution. Do not use a corrosive detergent or an abrasive sponge. Avoid the use of abundant water.
General Problems
The display is blank
Tap the screen to make sure the RC5400 is turned on.
Adjust the screen contrast using the buttons on the left side (page 15).
Make sure the batteries are properly installed (page 4).
Recharge the battery pack using the docking station (page 5).
The display is too light or too dark
Adjust the screen contrast using the buttons on the left side (page 15).
The RC5400 shuts itself off
This is a feature of the RC5400 to save power. You can change the length the RC5400 stays on in the Setup (page 13).
Devices do not respond to commands from the RC5400
Make sure the RC5400 is in USE mode (page 7).
Make sure the RC5400's IR sending eye is pointed towards the device you're operating.
- Check if the Low Battery icon appears. If so, recharge the battery pack using the docking station.
- Check if the button you are trying to use is programmed properly (page 18).
- Check if your device understands these particular Marantz infrared codes. Re-add the device with the correct model number (page 33).
The RC5400 beeps 4 times after inserting the batteries
Use the Firmware Updater to update the RC5400's software. The Firmware Updater file will be provided from our website.
Programming Problems
Hard buttons are not sending the correct commands
- Check whether the button is programmed per device or globally (page 28). The MACRO mode is useful to confirm the programmed commands for buttons (page 43).
Macros or Tab Style Jump buttons do not work
Make sure the RC5400's IR sending eye is pointed towards the device the entire time the macro is being executed.
Insert delays to allow devices to start up properly (page 41).
Check that you have included greyed-out buttons in your macro.
- Check that you haven't reprogrammed the buttons. Macros do not store commands, they store button locations. If you reteach a button, the macro will execute the newly learned code, not the code that you taught to the original button.
The RC5400 won't learn, edit, label or delete commands
Make sure your devices are positioned as shown on page 26. Avoid programming the RC5400 under bright fluorescent light, it might affect the infrared signals.
If the buttons in the Mode menu page do not respond, the configuration file might be protected to prevent unwanted changes. You cannot modify or delete commands for on the RC5400. the protection for the configuration file has to be released by using Wizz.it.
Make sure the button you want to edit has a border. Text frames cannot be programmed with commands.
The RC5400 won't switch the modes
- When the batteries are low, the RC5400 prevents you from switching to customizing modes so that no customization can get lost. Recharge the battery pack (page 5).
The RC5400 is low on memory
The RC5400 displays a message to clean up the memory. Please delete unneccessary devices, macros and learned commands as many as possible manually.
Warning DO NOT REVERT the RC5400. When you revert the RC5400, all customization which you made is lost permanently and the RC5400 goes back to the default configuration.
The TV goes blank or the input source changes
The Device Overview page item might be programmed to switch the input source. Select the device without issuing IR codes (page 8).
The configuration file is corrupted
- When this very unlikely event occurs, you can use Wizz.it to upload a new configuration file. Taken into account that all your customized commands, devices, and macros will be lost and you will have to reprogram your RC5400. The Rivert function on the third Setup page is also available to get the smaller size of the default configuration file.
Error messages
If one of the following error messages occurs, please contact your Marantz authorized dealer or Marantz customer service:
Can't open configuration file
Configuration file error
No configuration file found
Invalid configuration file version
Tip The bulletin boards and friendly users at www.remotecentral.com can often give you help with problems on weekends or in evenings when your Marantz authorized dealer or Marantz technical support may not be available.
Recharging Problems
The batteries won't recharge
Make sure you are using the rechargeable battery pack and the docking station (DS5400) supplied with your RC5400.
Make sure the battery pack is installed properly in your RC5400 (see page 4).
The indicator light on the docking station flashes
- Check if the contacts on the docking station are clean and free of obstructions.
Make sure the RC5400 lies properly on the docking station.
Make sure the battery pack is installed properly (see page 5).
Frequently Asked Questions
Can I program a device button to execute more than one command?
Yes, you can. You can program a macro to the device button in the MACRO mode. (see page 42).
How do I program source switching?
See "Programming The Device Buttons ..." on page 28.
How can I edit buttons which are programmed macro on Device overview pages?
You can do this using Macro to device function via the MACRO mode. (page 43).
How can I label buttons on Device overview pages?
You can do this using Label device function via the LABEL mode. All changes you make to these items are automatically updated in the Home page (page 32).
How can I delete buttons on Device overview pages?
You can do this using Delete device function via the DELETE mode. All changes you make to these items are automatically updated in the Home page (page 38).
How do I reset the RC5400?
Normally, you never have to reset the RC5400. However, if the RC5400's display freezes or if you notice unusual behavior, you might need to reset the RC5400. You will not lose any saved programmed commands or macros.
Carefully press the reset button near the battery connector inside the battery compartment of the RC5400 with a paperclip or sharp pencil. The RC5400 restarts and beeps to indicate it is ready for use.
Can I revert to the original configuration?
Yes, by using the Revert function on the third Setup page or Wizz.it with Windows PC. By using Wizz.it, once the program is installed, open a configuration file named RC5400_default in C:/Program Files/Wizzit/Samples. Downloading this configuration to your RC5400 will restore your RC5400 to its factory state except the setup items.
User Guide
How do I calibrate the Touch Screen?
The RC5400 is calibrated when it leaves the factory, so normally you do not have to calibrate it yourself. It is possible that the RC5400 displays a message to calibrate the Touch Screen. If this message appears do the following.
1 Tap the INFO button in the Upper Tool Bar. The information page will appear.
2 Tap the SETUP button in the Information page. The first Setup page appears. Navigate to third Setup page by using the Page + and Page - buttons.
3 Tap the Calibration button.
4 Tap as close as possible the marker in the upper left corner using a blunt tip of a pencil. You will see the instruction "Touch TOP LEFT corner".
5 Tap as close as possible the marker inthe upper left corner using a blunt tip of a pencil. You will see the instruction "Touch BOTTOM RIGHT corner".
6 Tap as close as possible the bottom right corner using a blunt tip of a pencil. You will see the message Calibration succeeded.
7 Return to USE mode by tapping the INFO button again or press the Left Function button labeled Exit.
Overview of Symbols
Pause
Stop
Play, Normal run, normal speed
Reverse Play, Normal run, normal speed
Fast Forward, Scan Forwards, Fast run, fast speed
Rewind, Scan Backwards, Fast run, fast speed
Slow Motion Forwards, Slow run, slow speed
Slow Motion Backwards, Slow run, slow speed
Eject, Open/Close
Record, general
Key, Lock
<>NAV Navigate in the direction of the arrow
Still mode, Freeze Frame
Autoreverse a tape, Tape running direction
Next track, Next chapter, Next song
Previous track, Previous chapter, Previous song
Fast forward to index
Rewind to index
Frame by frame, general
Frame by frame, general
Subtitle
区 Cancel picture
Picture-in-picture mode
Menu
Picture-in-picture shift
Picture-in-picture swap
Multi-picture display
Picture-in-picture select
Teletext mode
Page number up
Page number down
Page enlargement
TV and text mixed
1st or 2nd language
Piv Last view, previous program
Power, Stand-by
Zone focus: long distance
Zone focus: very short distance
Single or multi-digit selection
Brightness, brilliance
Contrast
Brightness/contrast
Color saturation
Lamp, lighting, illumination
Split screen freeze / double screen freeze
Split screen swap / double screen swap
13 Split screen / double screen
Movie expand
Personal preference
Picture-in-picture freeze
Main index page
Picture freeze
(4) Programmable timer, general
Tracking
Application assistance
Actual time on screen
EPG / Electronic Program Guide
Video output
| Hardware | High-resolution (320 x 240) monochrome LCD 16 grey scales with digital contrast control Blue EL backlighting for LCD and direct-access buttons Infrared sending and learning eyes USB port for PC connection |
| Software | Dynamic, animated interface Editable macros (up to 250 commands per macro) Built-in Marantz components codes Total number of devices and macros limited only by memory |
| Infrared (IR) | Operating distance of approximately 10m (33 ft) Learns from the vast majority of remotes with a carrier frequency of up to 78 KHz and 455 KHz (most Bang & Olufsen commands can be learned) |
| Radio frequency (RF) | Operating distance of approximately 20m (66ft) in open-air condition Carrier frequency: 418 MHz (for US), 434MHz (for Europe) *The distance may vary depending on the surrounding conditions. |
| Memory | 8MB non-volatile flash memory, 512 K SRAM |
| Batteries | NiMH rechargeable battery pack |
| Power management | Power On: By tapping the Touch Screen, by pressing buttons, by picking up the RC5400 Power Off: Auto shut off by adjustable timer |
| Dimensions | 153mm x 90mm x 33.5mm (6inch x 3.5inch x 1.2inch) |
| Operating temperature | 0°C to 50°C (32°F to 122°F) |
| Accessories | USB cable for PC connection NiMH 4.8V Rechargeable battery pack DS5400 Recharging docking station AC to DC power adapter for docking station |
| Option | RX-77 RF Extender |
| The specifications and design of this product are subject to change without notice. | |
A
Activating 6
Pickupsensor 6,14
ADD mode 33
Switch Modes 15
AMPS 34
Copy Existing Device 33
Create New Device 33
Device Template 33
Device Type Divide 33
DSS 35
Help 35
Receivers 34
Status 34
TUNERS 34
With RC Codes 36
Without RC Codes 36
Adjusting
Contrast 15
Delay 20,40
Animation 13
Auto Backlight 6,13
B
Backlight Button 2,3
Backlight Timeout 13
Battery 4
Battery Compartment 5
Battery Cover 5
Battery Pack 5
Charging 5
Docking Station 4
Low Battery Icon 5
Beep
Button 13
Macro 22,40
Screen 13
Button 2
4-Way Cursor 2,11
Backlight 2,6
CHANNEL 2,11
Cursor Navigation 3
Device Overview 3
Device Scroll 3
ENTER 2,11
EXIT 2,11
Function 2
Hard Buttons 11
HOME 2,11
INFO 3
MENU 2,7
Mode icon 3,7
MUTE 2,11
Page + 2, 10
Page - 2,10
Page Overview 3
Soft buttons 11
VOLUME 2,11
C
Calibrate 53
Calibration 13
CHANNEL Buttons 2,11
Charging 5
Choosing Channel 46
Cleaning 48
Cloning 16
Command 24, 41
Configuration File 46
Contrast 15
Copy Existing Device 33
Create New Device 33
Cursor Navigation 9,13
Cursor Navigation Button 3
D
Day 13
Delay 22,40
DELETE Mode 37
Button 37
Device 38
Undo 37
Device Action 8,24,42
Device Menu 13
Device Overview Button 3
Device Overview Page 8
Device Scroll Buttons 3
Device Scroll 9
Device Template 33
Device Type Divider 33
Discrete Command 19
Docking Station 4
Download 47
DSS 35
E
Edit Software 46
Editing 43
ENTER Button 2,11
Error Message 51
EXIT Button 2,11
Extender ID 45
F
FAQ
Calibrate 53
Original Configuration 52
Reset 52
Font Size 31
Free Memory 12
Function Buttons 2
G
General Problem 49
Globally 28
GO 40
H
Hard Button 11
Help 35
Help List 18,20
HOME Button 2,11
Home Page 7
1
Import Graphics 47
Important Notice 48
INFO Button 3
Information 12
Battery Life 12
Free Memory 12
Software Version 12
Infrared 2
Infrared Eyes 2
IR 2
Internet Address 46
Internet Fun 47
IR/RF Mode 44
Choosing Channel 46
Extender ID 45
Optional Accessory 44
Radio Frequency 44
RF 44
RF Extender 44
RX-77 44
Setting 44
IR 2
IR Command 11,26
J
Jump 42
LCD Sleep 13
Learning 26
Locally 28
Low Battery Icon 5
Lower System Area 3
L
LABEL Mode 30
Button 30
Device 32
Font Size 31
Page 32
Symbols 31
Text Frame 30
LEARN Mode 27
Button 27
Device 28
Globally 28
Locally 28
Learning 26
Tap Technique 26
Lower Tool Bar 3
M
Macro-Friendly 18
MACRO Mode 18
Add 41
Adjusting Delay 22,40
Anchor Command 19
Beep 22,40
Button 41
Command 24, 41
Delay 22,40
Delete 43
Device 42
Device Action 24, 42
Discrete Command 19
Editing 43
GO
Jump 42
Macro-Friendly 18
Move 43
Multiple Step 18
Page Jump 21
Page Notation 40
RC Command 22
Status Device 21
Test 24, 41
Toggle Command 19
Maintaining 48
Cleaning 48
Important Notice 48
Memory 56
MENUButton 2,7
ModeIcon 3,7
Mode Menu 14
Setup 13
Modes 7
ADD 14
DELETE 14
IR/RF 14
LABEL 14
LEARN 14
MACRO 14
MOVE 14
USE 7
Month 13
MOVE Mode 39
Device 39
Multiple Step Operation 18
MUTEButton 2,11
N
Navigating 7
Cursor Navigation 9
Device Action 8
Device Overview page 8
Device Scroll 9
Home Page 7
Devices 7
Pages 9
NO IR 8
Page Overview Page 9
Tab Button 10
NO IR 8
0
Operating 11
Device 11
Hard Button 11
IR Command 11
Soft Button 11
Operation Page Button 26
Optional Accessory 44
Original Configuration 52
P
Page ^+ , - Button 2, 10
Page Jump 21, 24
Page Menu 13
Page Notation 40
Page Overview Button 3
Page Overview Page 9
Pickup Sensor 6,13
Programming 20
Command 24
Device Action 24
Help List 20
Macro 24
Page Jump 24
Programming Problem 50
User Guide
R
Radio Frequency 44
RC Command 22
Receivers 34
Recharging Problem 51
Remote Central 47
Reset 52
Revert 13,51
RF 44
RF Extender 44
RX-77 44
s
Setting IR / RF 44
Service & Support 64
Updates 64
Setup Page 12
Setup 12
Animation 13
Auto Backlight 6,13
Backlight Timeout 13
Button (Beep) 13
Calibration 13
Cursor Navigation 13
Day 13
Device Menu 13
LCD Sleep 13
Mode Menu 13
Month 13
Page Menu 13
Pickup Sensor 13
Revert 13
Screen (Beep) 13
Setup Button 12
Setup Page 12
Time 13
Time Mode 13
Year 13
Simulator 46
Soft Button 11
Software 46
Software Version 12
Specification 56
Memory 56
Option 56
Symbols 31,54
System Requirement 47
T
Tab Button 10
Tap Technique 26
Teach 17
Test 24, 41
Text Frame 30
Time 13
Time Mode 13
Toggle Command 19
Touch Screen 2,3
Contrast 15
Lower Tool Bar 3
Upper Tool Bar 3
User Operation Area 3
Troubleshooting 49
Error Message 51
General Problem 49
Programming Problem 50
Recharging Problem 51
Revert 51
TUNERS 34
Turning On 6
U
Undo 37
Updates 64
Upload 47
Upper Tool Bar 3
USB Cable 47
USB Port 2,47
USEmode 7
User Operation Area 3
V
VOLUME Buttons 2
W
With RC Codes 16,36
Without RC Codes 16,36
Wizz.it 46
.ccf 47
Configuration file 46
Download 47
Import Graphics 47
Internet Address 46
Internet Fun 47
Remote Central 47
Simulator 46
Software 46
System Requirement 47
Upload 47
USB cable 47
Y
Year 13
Other
.ccf 47
4-Way Cursor Navigation 2
Service and Support
For service and support, please contact your Marantz authorized dealer or Marantz customer service.
On the Marantz internet site you can find more contact details.
When you contact Marantz customer service, you will be asked for the technical information listed on the Information page.
To view this information, follow these steps.
1 Tap the INFO icon to display the Information page.
2 When you wish to return to USE mode, tap the INFO icon again or press the Left function button labeled Exit.
Updates and New Products
For news about updates and new products, please visit us on the World Wide Web at;
http://www.marantz.com
User Guide
www.marantz.com
You can find your nearest Marantz authorized dealer or distributor on our website.
JAPAN
U.S.A
EUROPE
Marantz Japan, Inc.
Marantz America, Inc.
Marantz Europe B.V.
7-35-1 Sagami Ohno, Sagamihara-shi, Kanagawa 228-8505, Japan
1100 Maplewood Drive, Itasca, IL 60143, U.S.A
P.O. Box 8744, 5605 LS Eindhoven, The Netherlands
- CAUTION:
- Declaration of Conformity N V03ECRC5400:
- Dear customer,
- Introduction 2
- Getting Started 6
- Customizing Your RC5400 16
- Reference 26
- Maintaining the RC5400 48
- Troubleshooting 49
- Frequently Asked Questions 52
- Overview of Symbols 54
- Specifications 56
- Index 57
- Service and Support 62
- The Marantz Wlzz.5 RC5400
- The Touch Screen
- The Battery
- Installing the Battery Pack
- Charging the RC5400
- Activating the RC5400
- Turning on the Touch Screen
- Using the Backlight
- Modes
- 2.
- Navigating the RC5400
- Navigating the Devices
- Device Overview
- Press and hold either of the two Left and Right
- Navigating the Pages
- Page Overview
- Other Navigation
- Operating a Device
- Using the Soft Buttons
- Sending commands
- Using the Hard Buttons
- For example:
- Check Battery Life- The Information Page
- The Setup Pages
- The Mode Menu
- To switch to another mode
- Adjusting the Touch Screen Contrast
- Introduction
- Cloning All Your Existing Remotes
- Complex Operation? Macro or Help...
- Tip
- An example for Powering Up DVD Players:
- An example for Selecting Source on a TV:
- 4.
- Programming Help List
- Macro/Page Jump Capability
- Any Button Perform Macros/Jumps
- Macros Perform Jumps to Any Device
- Macros Send Commands To Your System
- Macros Can Contain Delay and Beep Between Steps
- Programming Macros & Page Jumps
- Learning IR command
- Programming Touch Screen Buttons
- Programming The Device Buttons to Switch Sources
- Programming Hard Buttons Globally And/Or Locally Per Device
- Programming a Hard Button Locally
- Labeling Buttons, Pages and Devices
- Labeling a Button
- Labeling a Device
- Labeling a Page
- Adding Devices
- Description for the Template Device
- Device Template
- Creating a New Device Step by Step
- Copy Existing Device
- Deleting Buttons and Devices
- Deleting a Button
- Deleting a Device
- Moving Devices
- Programming Macros
- Macro Page Notation
- DVD
- GO: DVD Main
- DVD-n
- Delay
- Adjusting Delays
- Recording a Macro to a Operation Button Step By Step
- Recording a Device Action (Source or Input Switching)
- Recording a Jump to a Device page
- Recording a Macro to a Device Button Step By Step
- Editing Macros
- 7.
- Using the RC5400 with Radio Frequency
- Changing the IR / RF Settings
- Choosing Another Channel
- 8.
- Software
- Internet Fun
- System requirements
- Important notice
- Take care not to scratch the Touch Screen
- Protect the RC5400 from extreme temperatures
- RC5400 is NOT waterproof
- The Touch Screen of the RC5400 contains a glass element
- Cleaning the RC5400
- General Problems
- The display is blank
- The display is too light or too dark
- The RC5400 shuts itself off
- Devices do not respond to commands from the RC5400
- The RC5400 beeps 4 times after inserting the batteries
- Programming Problems
- Hard buttons are not sending the correct commands
- Macros or Tab Style Jump buttons do not work
- The RC5400 won't learn, edit, label or delete commands
- The RC5400 won't switch the modes
- The RC5400 is low on memory
- The TV goes blank or the input source changes
- The configuration file is corrupted
- Error messages
- Recharging Problems
- The batteries won't recharge
- The indicator light on the docking station flashes
- Frequently Asked Questions
- How do I calibrate the Touch Screen?
- Overview of Symbols
- A
- B
- Beep
- C
- D
- E
- F
- G
- H
- 1
- J
- L
- M
- N
- 0
- P
- R
- s
- T
- U
- V
- W
- Y
- Other
- Service and Support
- Updates and New Products
- www.marantz.com
Brand : MARANTZ
Model : RC5400
Category : Universal remote