
24B2U4301 - Monitor PHILIPS - Free user manual and instructions
Find the device manual for free 24B2U4301 PHILIPS in PDF.

 FR
FR
 AR
AR
 BG
BG
 CS
CS
 DA
DA
 DE
DE
 EL
EL
 EN
EN
 ES
ES
 FI
FI
 HE
HE
 HR
HR
 HU
HU
 IT
IT
 JA
JA
 KO
KO
 NL
NL
 NO
NO
 PL
PL
 PT
PT
 RO
RO
 RU
RU
 SK
SK
 SL
SL
 SV
SV
 TR
TR
 UK
UK
 ZH
ZH
| Product Type | Monitor |
| Brand | Philips |
| Model | 24B2U4301 |
| Screen Size | 24 inches (diagonal) |
| Resolution | 1920 x 1080 (Full HD) |
| Panel Type | IPS |
| Aspect Ratio | 16:9 |
| Refresh Rate | 60 Hz |
| Response Time | 4 ms (typical) |
| Brightness | 250 cd/m² |
| Contrast Ratio | 1000:1 |
| Viewing Angles | 178° horizontal / 178° vertical |
| Connectivity | HDMI, VGA, DisplayPort, USB |
| Power Consumption (typical) | 25 W |
| Power Consumption (standby) | < 0.5 W |
| Weight (with stand) | Approx. 5.5 kg |
| Dimensions (with stand) | 540 x 410 x 200 mm |
| VESA Mount | 100 x 100 mm |
| Special Features | Low Blue Light, Flicker-Free, Adaptive Sync |
| Energy Class | A+ |
| Included Accessories | Power cable, HDMI cable, Quick start guide |
| Color | Black |
| Adjustability | Tilt, swivel, height adjustable |
Frequently Asked Questions - 24B2U4301 PHILIPS
User questions about 24B2U4301 PHILIPS
0 question about this device. Answer the ones you know or ask your own.
Ask a new question about this device
Download the instructions for your Monitor in PDF format for free! Find your manual 24B2U4301 - PHILIPS and take your electronic device back in hand. On this page are published all the documents necessary for the use of your device. 24B2U4301 by PHILIPS.
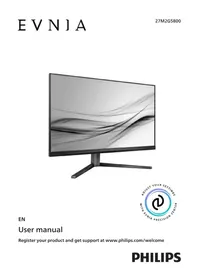
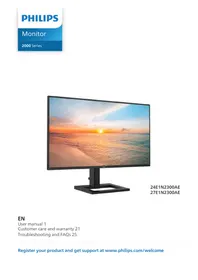
USER MANUAL 24B2U4301 PHILIPS
24B2U4301
EN
User manual
Register your product and get support at www.philips.com/welcome
Table of Contents
1. Important .... 1
1.1 Safety precautions and maintenance ....1
1.2 Notational Descriptions ......3
1.3 Disposal of product and packing material ....4
2. Setting up the monitor .....5
2.1 Installation 5
2.2 Operating the monitor .....8
2.3 Remove the Base Assembly for VESA Mounting 11
3. Image Optimization ......12
3.1 SmartImage 12
3.2 SmartContrast 13
3.3 LightSensor 14
4. Daisy-chain function ..... 15
-
Power Delivery and Smart Power 18
-
PowerSensor TM .....19
-
Designs to prevent computer vision syndrome (CVS) ...... 21
-
Adaptive Sync 22
9. Technical Specifications ..... 23
9.1 Resolution & Preset Modes ..... 26
- Power Management ...... 27
11. Customer care and warranty ...28
11.1 Philips' Flat Panel Displays Pixel Defect Policy 28
11.2 Customer Care & Warranty ....31
12. Troubleshooting & FAQs .....32
12.1 Troubleshooting 32
12.2 General FAQs ....33
1. Important
This electronic user's guide is intended for anyone who uses the Philips monitor. Take time to read this user manual before you use your monitor. It contains important information and notes regarding the operation of your monitor.
The Philips guarantee applies provided that the product is handled for its intended use, by its operating instructions, and accompanied by the presentation of the original invoice or cash receipt that indicates the date of purchase, dealer's name and model, and production number of the product.
1.1 Safety precautions and maintenance
Warnings
The use of controls, adjustments, or procedures other than those specified in this document may result in exposure to shock, electrical hazards, and/or mechanical hazards.
Read and follow these instructions when connecting and using your monitor.
Excessive sound pressure from earphones and headphones can cause hearing loss. Adjustment of the equalizer to maximum capacity increases the earphones and headphones output voltage; thereby increasing the sound pressure level.
Operation
- Please keep the monitor out of direct sunlight. Lengthy exposure to this type of environment may result in discoloration and damage to the monitor.
- Keep the display away from oil. Oil may damage the plastic cover of the display and void the warranty.
- Remove any object that could fall into ventilation holes or prevent proper cooling of the monitor's electronics.
- Do not block the ventilation holes in the cabinet.
- When positioning the monitor, make sure the power plug and outlet are easily accessible.
- If turning off the monitor by detaching the power cable or DC power cord, wait for 6 seconds before attaching the power cable or DC power cord before returning to normal operation.
- Please use the approved power cord provided by Philips all the times. If your power cord is missing, please contact your local service center. (Please refer to the Service contact information located in the Important information manual.)
- Operate under the specified power supply. Use of incorrect voltage will cause malfunction and may cause fire or electric shock.
- Protect the cable. Do not pull or bend the power cable and signal cable. Do not place the monitor or any other heavy objects on the cables. If damaged, the cables may cause fire or electric shock.
- Do not subject the monitor to severe vibration or high-impact conditions during operation.
- To avoid potential damage, like the panel peeling from the bezel, ensure that the monitor does not tilt downward by more than -5 degrees. If the -5 degree downward tilt angle
maximum is exceeded, the monitor damage will not be covered under warranty.
- Do not knock or drop the monitor during operation and/or transportation.
- The USB Type-C port could only be connected to specify equipment with fire enclosure in compliance with IEC 62368-1 or IEC 60950-1.
- Excessive usage of the monitor can cause eye discomfort. It's recommended to take shorter breaks more often at your workstation than longer breaks and less often. For example, a 5-10 minute break after 50-60-minute continuous screen use is likely to be better than a 15-minute break every two hours. Prevent eye strain while using the screen for a constant period by :
- Looking at something varying distances after a long period of focusing on the screen.
- Conscious Blinking while you work.
• Gently closing and rolling your eyes to relax.
- Reposition your screen to the appropriate height and angle.
- Adjust the brightness and contrast to an appropriate level.
- Adjust the environment lighting similar to that of your screen brightness. Avoid fluorescent lighting and surfaces that don't reflect too much light.
• Seeing a doctor if your symptoms worsen.
Maintenance
• To protect your monitor from possible damage, do not put excessive pressure on the LCD
panel. When moving your monitor, grasp the frame to lift; do not lift the monitor by placing your hand or fingers on the LCD panel.
- Oil-based cleaning solutions may damage the plastic parts and void the warranty.
- Unplug the monitor if you are not going to use it for an extensive period.
- Unplug the monitor if you need to clean it with a slightly damp cloth. The screen may be wiped with a dry cloth when the power is off. However, never use organic solvents, such as alcohol or ammonia-based liquids.
- To avoid the risk of shock or permanent damage to the set, do not expose the monitor to dust, rain, water, or excessive moisture.
- If your monitor gets wet, wipe it with a dry cloth as soon as possible.
- If a foreign substance or water gets in your monitor, please turn the power off immediately and disconnect the power cord. Then, if damaged, send it to the maintenance center.
- Do not store or use the monitor in locations exposed to heat, direct sunlight, or extreme cold.
- To maintain the best performance of your monitor and use it for a longer lifetime, please use the monitor in a location that falls within the following temperature and humidity ranges:
• Temperature: 0°C\~40°C 32°F\~104°F
• Humidity: 20%\~80% RH
Important information for Burn-in/Ghost image
- Always activate a moving screen saver program when you leave your monitor unattended. Always activate a periodic screen refresh application if your monitor will display unchanging static content. Uninterrupted display of still or static images over an extended period may cause "burn-in", also known as "after-imaging" or "ghost imaging", on your screen.
- "Burn-in", "after-imaging", or "ghost imaging" is a well-known phenomenon in LCD panel technology. In most cases, the "burn-in", "after-imaging" or "ghost imaging" will disappear gradually over some time after the power has been switched off.
Warning
Failure to activate a screen saver, or a periodic screen refresh application may result in severe "burn-in" or "after-image" or "ghost image" symptoms that will not disappear and cannot be repaired. The damage mentioned above is not covered under your warranty.
Service
- The casing cover should be opened only by qualified service personnel.
- If there is any need for any document for repair or integration, please contact your local service center. (You can refer to the service contact information listed in the important information manual.)
- For transportation information, please refer to "Technical Specifications".
- Do not leave your monitor in a car under direct sunlight.
Note
Consult a service technician if the monitor does not operate normally or you are not sure what procedure to take when the operating instructions given in this manual.
This equipment is not suitable for use in locations where children are likely to be present.
1.2 Notational Descriptions
The following subsections describe the notational conventions used in this document.
Notes, Cautions, and Warnings Throughout this guide, blocks of text may be accompanied by an icon and printed in bold or italic type. These blocks contain notes, cautions, and/or warnings.
They are used as follows:
Note
This icon indicates important information and tips that help you make better use of your computer system.
Caution
This icon indicates information that tells you how to avoid either potential damage to the hardware or loss of data.
Warning
This icon indicates the potential for bodily harm and tells you how to avoid the problem.
Some warnings may appear in alternate formats and may not be accompanied by an icon. In such cases, the specific presentation of the warning is mandated by the relevant regulatory mechanism.
1.3 Disposal of product and packing material
Waste Electrical and Electronic Equipment-WEEE

This marking on the product or its packaging illustrates that, under European Directive 2012/19/EU governing used electrical and electronic appliances, this product may not be disposed with normal household waste. You are responsible for the disposal of this equipment through a designated waste electrical and electronic equipment collection. To determine the locations for dropping off such waste, contact your local government office, the waste disposal organization that serves your household, or the store at which you purchased the product.
Your new monitor contains materials that can be recycled and reused. Specialized companies can recycle your product to increase the number of reusable materials and minimize the amount to be disposed of.
All redundant packing material has been omitted. We have done our utmost to make the packaging easily separable into mono materials.
Please find out about the local regulations on how to dispose of your old monitor and packing from your sales representative.
Taking back/Recycling Information for Customers
Philips establishes technically and economically viable objectives to optimize the environmental performance of the organization's products, services, and activities.
From the planning, design, and production stages, Philips emphasizes the importance of making products that can easily be recycled. At Philips, end-of-life management primarily entails participation in national take-back initiatives and recycling programs whenever possible, preferably in cooperation with competitors, which recycle all materials (products and related packaging material) following all Environmental Laws and taking back programs with the contractor company.
Your display is manufactured with high-quality materials and components which can be recycled and reused.
To learn more about our recycling program please visit:
http://www.philips.com/a-w/about/sustainability.html
2. Setting up the monitor
2.1 Installation
1 Package contents
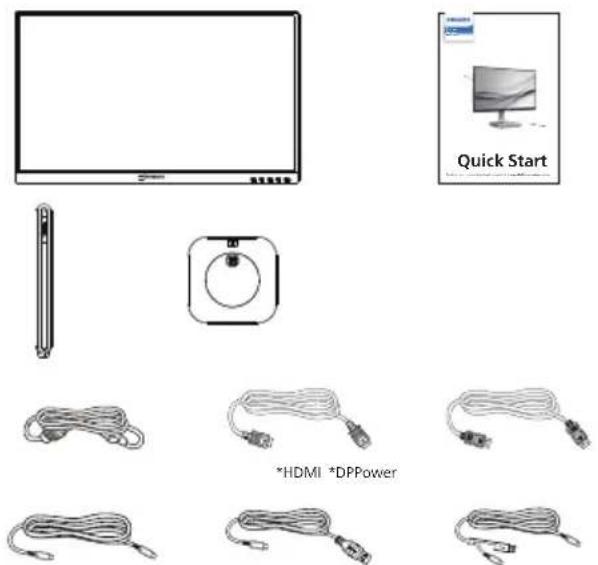
*USB C-C *USB C-A *USB C-C/A
* Different according to region.
2 Install the base
- To well protect this monitor and avoid scratching or damaging of the monitor, keep the monitor face down in the cushion for the base installation.
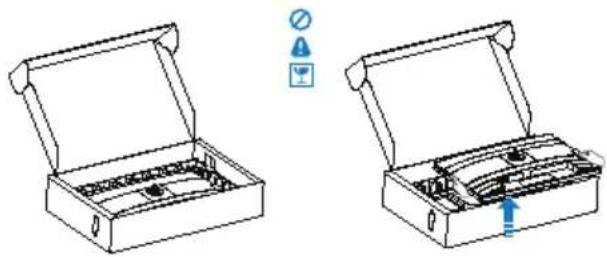
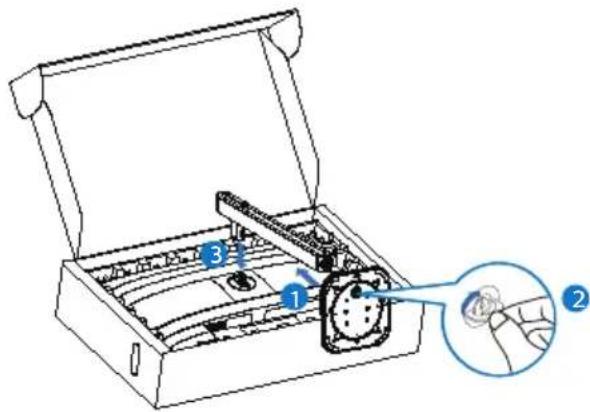
- Hold the stand with both hands.
(1) Gently attach the base to the stand.
(2) Use your fingers to tighten the screw located at the bottom of the base, and secure the base to the stand tightly.
(3) Gently attach the stand to the VESA mount area until the latch locks the stand.
3 Connecting to your PC
![graph TD A["Monitor"] -->|USB ports| B["Fast Charger"] B --> C["Mobile Device"] C --> D["RJ45 Sensor"] D --> E["Laptop"] style A fill:#f9f,stroke:#333 style B fill:#ccf,stroke:#333 style C fill:#cfc,stroke:#333 style D fill:#fcc,stroke:#333](/content/2026/07/1457292/images/da139617ce7f8b7934c746dbcdb8da3cc8584e341270346e9b9a31eb1d473026.jpg)
USB docking (USB C-C)
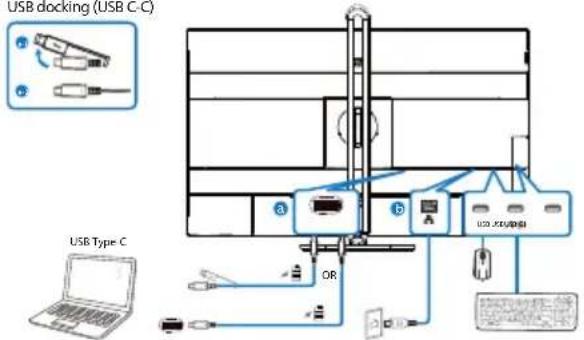
USB hub (USB A-C)
![graph TD A["USB Type A"] --> B["EN12* B"] B --> C["USB CI"] C --> D["USB CI"] D --> E["ICA-PR/ATM"] E --> F["OR"] F --> G["USB Type A"] H["USB Hub (USB/A-C)"] --> I["USB Type A"] style A fill:#f9f,stroke:#333 style H fill:#f9f,stroke:#333](/content/2026/07/1457292/images/5190db3e043163c262f7e3daaf879f7cd92a6cae6a4f8157e1f9afb40b0d0226.jpg)
Multi-stream transport
![graph TD A["Laptop"] --> B["Server Rack 1"] B --> C["Server Rack 2"] C --> D["Switch"] D --> E["Data Bus"] style A fill:#f9f,stroke:#333 style B fill:#ccf,stroke:#333 style C fill:#cfc,stroke:#333 style D fill:#fcc,stroke:#333 style E fill:#cff,stroke:#333](/content/2026/07/1457292/images/49c05857469f86dafd2def849ea9b57b9a0aa60c7c551174c4f569f9af39552e.jpg)
1 Power Switch
2 AC power input
③ HDMI input
4 DisplayPort input
5 USB C1
6 DisplayPort output
7 RJ45 input
8 USB downstream
9 USB downstream/USB fast charger
10 USB downstream
11 USB C2(Power supply up to 15W)
12 Audio out
13 Kensington anti-theft lock
Connect to PC
- Connect the power cord to the back of the display firmly.
- Turn off your computer and unplug its power cable.
- Connect the monitor signal cable to the video connector on the back of your computer.
- Plug the power cord of your computer and your monitor into a nearby outlet.
- Turn on your computer and monitor. If the monitor displays an image, installation is complete.
4 RJ45 driver installation
You can find the "LAN Drivers" from Philips website support page.
Please follow the steps for the installation:
- Install the LAN driver that matches your system.
- Double click driver to install, and follow Window's instructions to proceed with installation.
- It will show "success" when the installation is finished.
- You must reboot your computer after the installation has completed.
-
Now you will be able to see "Realtek USB Ethernet Network Adapter" from your program installed list.
-
We recommend to periodically visit the above web link to check for the availability of the most updated driver.

Note
Please contact Philips service hotline for Mac address clone tool as necessary.

USB hub
To comply with International energy standards, the USB hub/ports of this monitor are disabled during Standby and Off modes.
Connected USB devices will not work in this state.
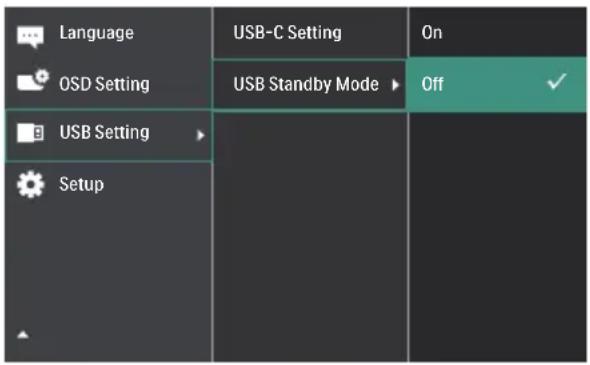
To permanently put the USB function in the "ON" state, please go to OSD Menu, then select "USB standby mode", and switch it to the "ON" state. Somehow if your monitor resets to the factory setting, ensure to select "USB standby mode" to "ON" state in the OSD menu.

USB charging
This display has USB ports capable of standard power output including some with USB charging functions (identifiable with power icon). You can use these ports to charge your Smartphone or power your external HDD, for example. The display must be powered ON at all times to be able to use this function.
Some selected Philips displays may not Power or Charge your device when it enters "Sleep/Standby" mode (White power LED blinking). In that case, please enter to OSD Menu and select "USB Standby Mode", then, turn the function to "ON" mode (default=OFF). This will then keep the USB power and charging functions active even when the monitor is in sleep/standby mode.

Note
If you Turn OFF your monitor via the power switch at any given time, all the USB ports will power OFF.

Warning
USB 2.4Ghz wireless devices, such as wireless mice, keyboards, and headphones, may result in decreased efficiency of radio transmission of USB 3.2 or higher version of devices. Should this happen, please try the following methods to help reduce the effects:
- Try to keep USB 2.0 receivers away from a USB 3.2 or higher version of connection port.
- Use a standard USB extension cable or USB hub to increase the space between your wireless receiver and the USB 3.2 or higher version of connection port.
2.2 Operating the monitor
1 Description of the control buttons
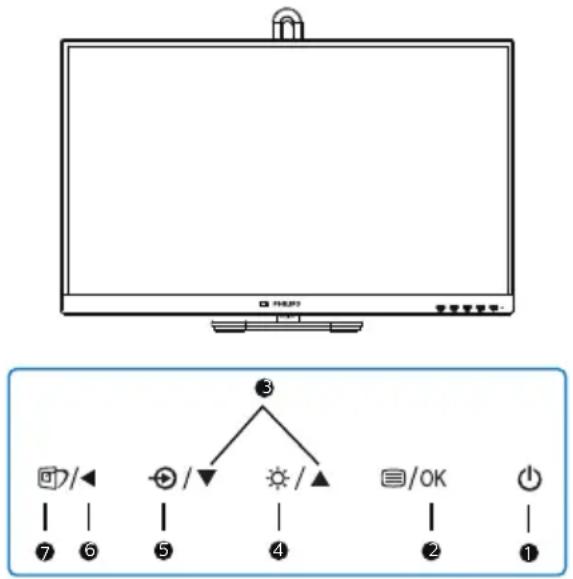
| 1 |  | Switch monitor's power ON or OFF. |
| 2 | [722T] /OK | Access the OSD menu. Confirm the OSD adjustment. |
| 3 |  ▼ ▼ | Adjust the OSD menu. |
| 4 |  | Adjust the brightness level. |
| 5 |  | Change the signal input source. |
| 6 |  | Return to previous OSD level. |
| 7 |  | SmartImage hot key. There are multiple modes to select: EasyRead, Office, Photo, Movie, Game, Economy, Off. |
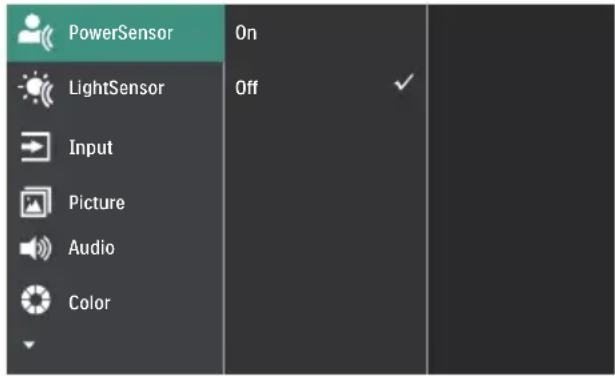
2 Description of the On-Screen Display What is On-Screen Display (OSD)?
On-Screen Display (OSD) is a feature in all Philips LCD monitors. It allows an end user to adjust screen performance or select functions of the monitors directly through an on-screen instruction window. A user-friendly OSD interface is shown below:
Basic and simple instructions on the control keys
In the OSD shown above, you can press
▼▲buttons at the front bezel of the monitor to move the cursor, and press OK button to confirm the choice or change.
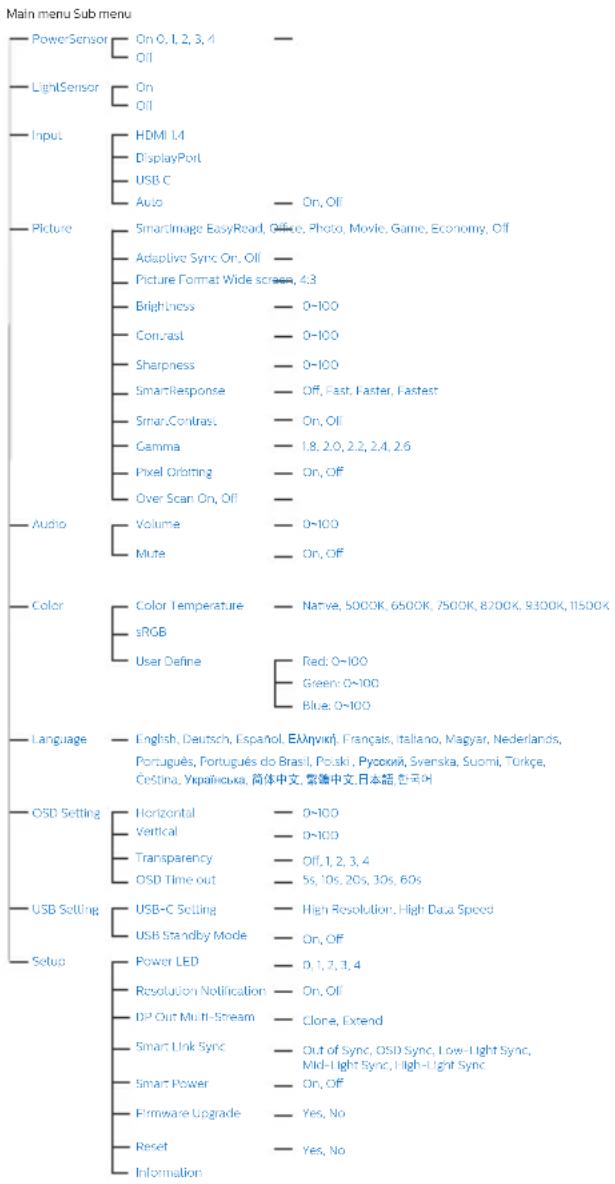
The OSD Menu
Below is an overall view of the structure of the On-Screen Display. You can use this as a reference when you want to work your way around the different adjustments later on.

Note
The Firmware Upgrade option in the OSD menu is only applicable when used with OTG.
3 Resolution notification
This monitor is designed for optimal performance at its native resolution: 1920 x 1080.
When the monitor is powered on at a different resolution, an alert is displayed on the screen as follows: Use 1920 x 1080 for best results.
Display of the native resolution alert can be switched off from Setup in the OSD (On Screen Display) menu.

Note
-
The USB hub default setting of USB C input for this monitor is "High Data Speed". The maximum resolution supported depends on your graphic card capability. If your PC doesn't support HBR 3, select High Resolution in USB Setting, then the maximum resolution supported will be 1920 x 1080 @120Hz. Press 📋 Button > USB Setting > USB > High Resolution
-
If your Ethernet connection seems slow, please enter OSD menu and select High Data Speed which supports the LAN speed to 1G.
4 Firmware
There are two ways to perform firmware updates.
1. Over-the-air (OTA)
The over-the-air (OTA) firmware update is through the SmartControl software and is easily downloadable through the Philips website. What does SmartControl do? It is an additional software that helps control the picture, audio, and the other on-screen graphic settings of the monitor. In the "Setup" section, you can check which firmware version you currently have and if you need to upgrade or not. In addition, it is important to note that the firmware upgrades must be done through the SmartControl software. It is necessary to be connected to a network when updating the firmware on SmartControl over-the-air (OTA).
2. On-the-go (OTG)
This monitor has an OTG function, allowing for direct firmware updates via USB stick. Please contact local customer service before proceeding to obtain relevant information and assistance with the update.
4 PhysicalFunction
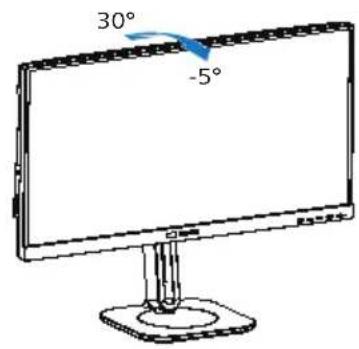
Tilt
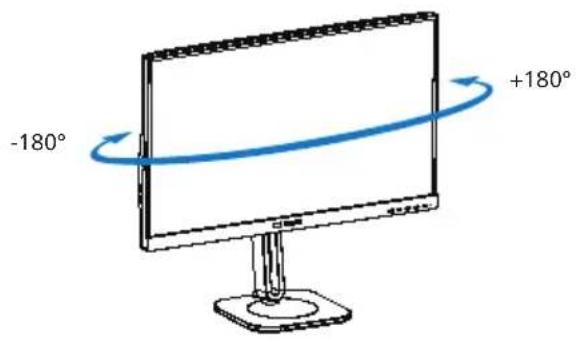
Swivel
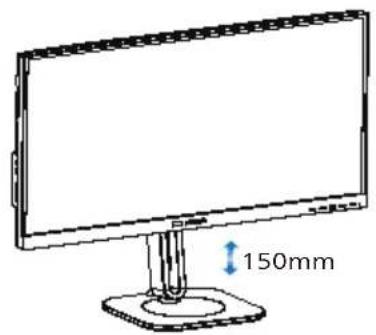
Height adjustment
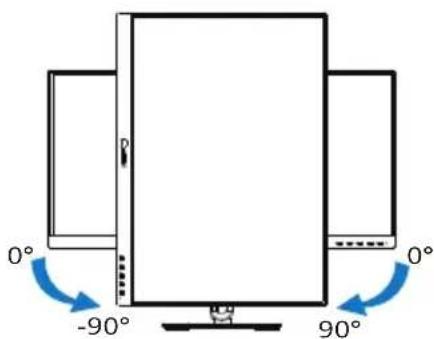
Pivot
Warning
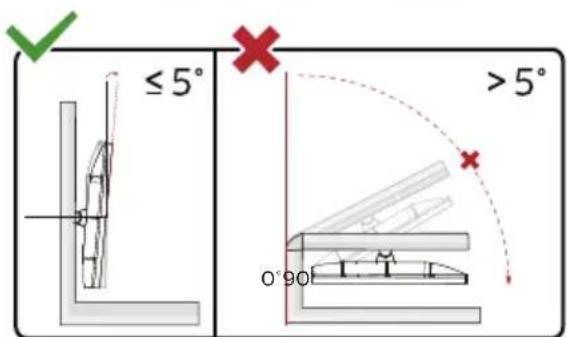
- To avoid potential screen damage, such as panel peeling, ensure that the monitor does not tilt downward by more than -5 degrees.
- Do not press the screen while adjusting the angle of the monitor. Grasp only the bezel.
2.3 Remove the Base Assembly for VESA Mounting
Before you start disassembling the display base, please follow the instructions below to avoid any possible damage or injury.
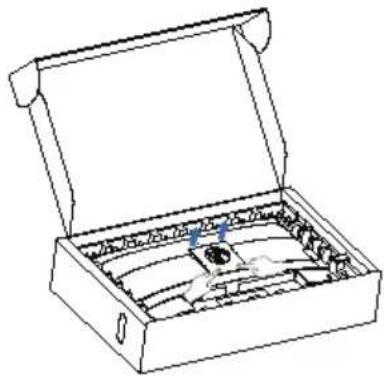
- Place the monitor face down on a smooth surface. Pay attention not to scratch or damage the screen. Then lift the monitor stand.

- While keeping the release button pressed, tilt the base and slide it out.

- Press both corners of the VESA Cover and the other side of the cover will pop out.
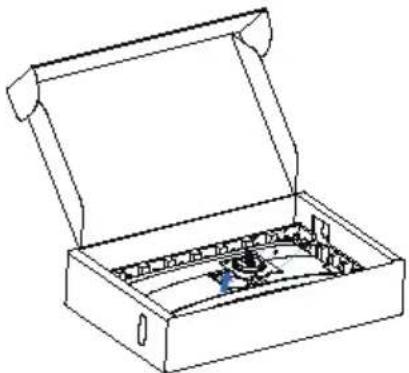
- Loosen the assembly screws, Remove the hinge.
Note
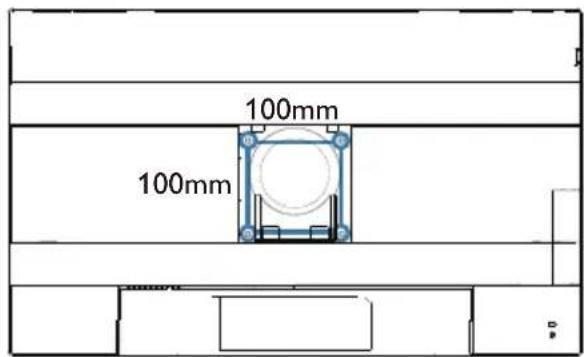
This monitor accepts a 100mm x 100mm VESA-Compliant mounting interface. VESA Mounting Screw M4. Always contact the manufacturer for wall-mount installation.
* Display design may differ from those illustrated in this manual.
Warning
- To avoid potential screen damage, such as panel peeling, ensure that the monitor does not tilt downward by more than -5 degrees.
- Do not press the screen while adjusting the angle of the monitor. Grasp only the bezel.
3. Image Optimization
3.1 SmartImage
1 What is it?
SmartImage provides presets that optimize display for different types of content, dynamically adjusting brightness, contrast, color, and sharpness in real-time. Whether you're working with text applications, displaying images, or watching a video, Philips SmartImage delivers great monitor performance.
2 Why do I need it?
It is ideal to have a monitor that delivers an optimized display of all your favorite types of content. Our SmartImage software dynamically adjusts brightness, contrast, color, and sharpness in real-time to enhance your monitor viewing experience.
3 How does it work?
SmartImage is an exclusive, leading-edge Philips technology that analyzes the content displayed on your screen. Based on the scenario you select, SmartImage dynamically enhances the contrast, color saturation, and sharpness of images to enhance the contents being displayed - all in real time by the press of a single button.
4 How to enable SmartImage?
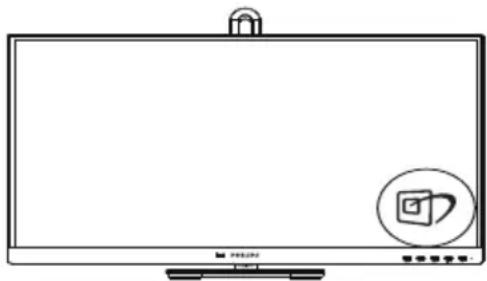
-
Press to launch the SmartImage on-screen display.
-
Keep pressing ▼ to toggle among
EasyRead, Office, Photo, Movie, Game, Economy and Off.
3. The SmartImage on-screen display will remain on screen for 5 seconds, or you can also press "OK" to make confirmation.
There are multiple modes to select: EasyRead, Office, Photo, Movie, Game, Economy and Off.
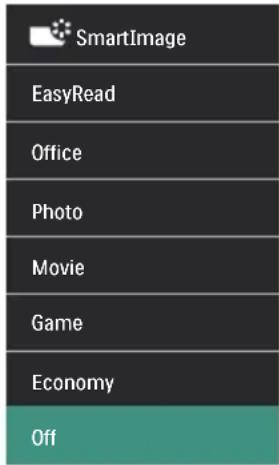
- EasyRead: Helps improve reading of text-based applications like PDF ebooks. By using a special algorithm that increases the contrast and boundary sharpness of text content. The display is optimized for a stress-free reading by adjusting the brightness, contrast, and color temperature of the monitor.
- Office: Enhances text and dampens brightness to increase readability and reduce eye strain. This mode significantly enhances readability and productivity when you're working with spreadsheets, PDF files, scanned articles or other general office applications.
- Photo: This profile combines color saturation, dynamic contrast and sharpness enhancement to display photos and other images with outstanding clarity in vibrant colors - all without artifacts and faded colors.
- Movie: Ramped up luminance, deepened color saturation, dynamic contrast, and razor sharpness displays every detail in darker areas of your videos without experiencing color washout.
- Game: Turn on over drive circuit for best response time, reduce jaggy edges for fast moving objects on screen, enhance contrast ratio for bright and dark scheme, this profile delivers the best gaming experience for gamers.
- Economy: Under this profile, brightness and contrast are adjusted and backlighting is fine-tuned to produce the right display for everyday office applications.
- Off: No optimization by SmartImage.
3.2 SmartContrast
1 What is it?
It is a unique technology that dynamically analyzes displayed content and automatically optimizes a monitor's contrast ratio for maximum visual clarity and viewing enjoyment.
2 Why do I need it?
Because SmartContrast offers the best visual clarity and viewing comfort for every type of content. It dynamically controls contrast and adjusts backlighting for bright gaming and video imagery. In addition, by reducing your monitor's power consumption, you save on energy costs and extend the lifetime of your monitor.
3 How does it work?
When you activate SmartContrast, it will analyze the content you are displaying in real time to adjust colors and control backlight intensity. This function will dynamically enhance contrast for a great entertainment experience when viewing videos or playing games.
3.3 LightSensor
1 What is it?
Light Sensor is a unique and intelligent way of optimizing picture quality by measuring and analyzing the incoming signal to automatically adjust picture quality settings. Light Sensor uses a sensor to adjust the picture brightness depending on the room light conditions.
2 How to enable LightSensor?
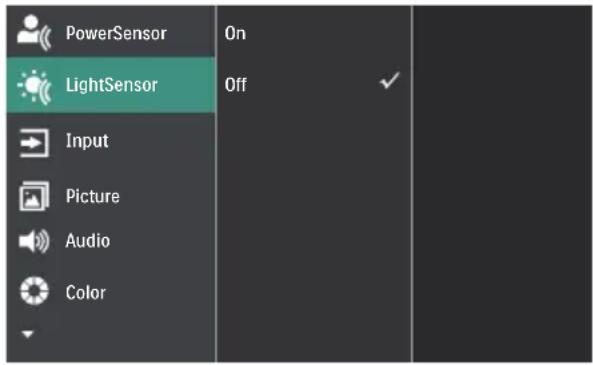
- Press button on the front bezel to enter OSD menu screen.
- Press ▲ or button to select main menu [LightSensor], then press button OK.
- Press ▲ or button to turn on or off the LightSensor.
4. Daisy-chain function
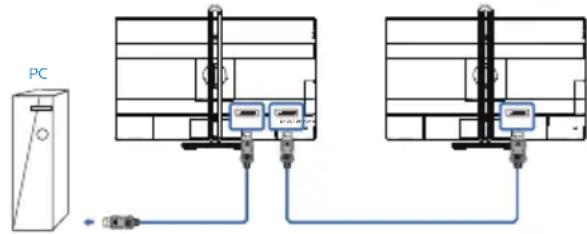
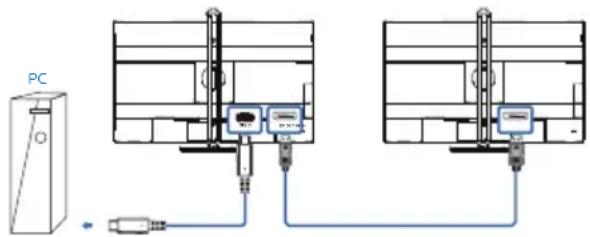
DisplayPort Multi-Stream feature enables multiple monitor connections.
This Philips display is equipped with DisplayPort interface and DisplayPort over USB C1 which enables daisy-chaining to multiple displays.
Now you can daisy chain and use multiple monitors via a single cable from one display to the next.
To daisy-chain monitors, first to check below:
Make sure the GPU on your PC support DisplayPort MST (Multi-stream transport).

Note
The maximum number of connectible monitors may vary depending on GPU performance.
Please check with your graphic card vendor and always update your graphic card driver.
1. DisplayPort multi-streaming over DisplayPort
| Display Resolution Maximum number of external monitors that can be supported |
| Extend mode (DisplayPort) |
| 1920 x 1080 @ 60Hz 2 |
2. DisplayPort multi-streaming over USB Type C1
| Display Resolution | Link Rate 1 | USB Settings 2 | Maximum number of external monitors that can be supported |
| 1920 x 1080 @ 60Hz | HBR2 High | Resolution 1 | 3 |
| High Data Speed 1 | 1920 x 1080 @60Hz) | ||
| HBR3 High | Resolution 2 | 3 | |
| High Data Speed 2 |

Note
-
To check link rate: press ☐ button, select Setup > information. The screen will show HBR3, otherwise, the link rate is HBR2.
-
We recommend to set USB Setting to USB 3.2, press button, select USB Settings >USB, then select USB 3.2 which supports the LAN speed to 1G.
- Depends on the graphic card capability, you may connect maximum 3 external monitors.
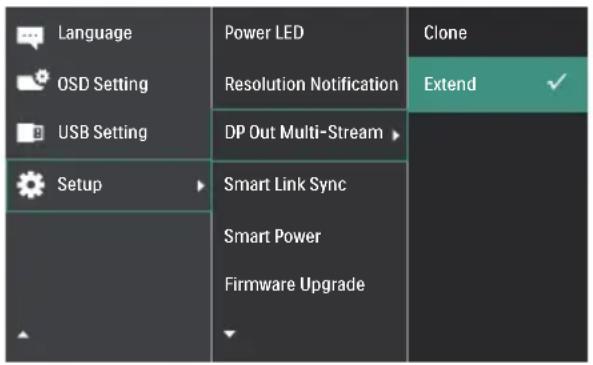
To select one of DP Out Multi-stream modes:
Press button, select Setup > DP Out Multi-stream > Extend.

Note
The secondary monitor in the chain must support DisplayPort multi-streaming, and the maximum resolution support is 1920 x 1080@60Hz.
3. Smart Link Sync
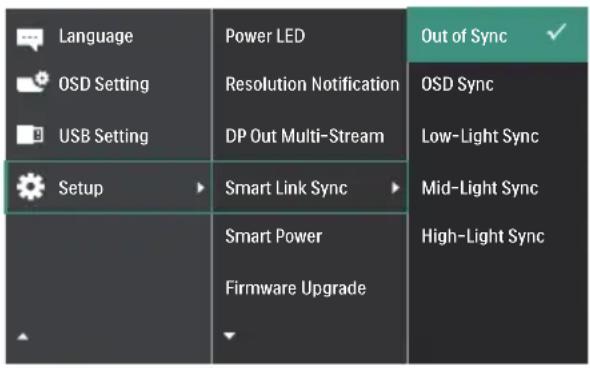
This device features a Smart Link Sync function that optimizes the daisy-chained monitors. This function makes it easy and convenient to synchronize the display settings of connected monitors. It effectively eliminates the need for traditional manual adjustments and ensures consistent visual and application settings between the monitors.
The OSD options include Out of Sync, OSD Sync, Low-Light Sync, Mid-Light Sync, and High-Light Sync (default: Out of Sync).
- The function of OSD Sync synchronizes some OSD settings of the monitors, including Light Sensor, Brightness, Contrast, Smart Contrast, SmartImage, Smart Response, Gamma, Color Temperature, User Defined RGB, Sharpness, and Language.
- The function of Low-Light Sync/Mid-Light Sync/High-Light Sync synchronizes the panel luminance and some OSD settings, including Luminance, Contrast, SmartImage, Smart Response, Gamma, Color Temperature, User Defined RGB, Sharpness, and Language. Low/Mid/High-Light Sync corresponds to different luminance levels.
For identical daisy-chained monitors, either OSD Sync or Low-Light Sync/Mid-Light Sync/High-Light Sync can ensure the monitors display identical effects, allowing users to choose according to their preference. However, for different models, since each device has different specifications, it is recommended to choose the Low/Mid/High-Light Sync option. The function of this option will detect the second monitor and automatically adjust it to match the panel luminance settings of the first
monitor, achieving a similar luminance between the monitors.
Note
The Smart Link Sync option will be grayed out and unavailable in the following cases: when HDR is enabled, DP Out Multi-Stream is configured in Clone mode, or the monitors do not support Smart Link Sync.
5. Power Delivery and Smart Power
You can power your compatible device with up to 96 Watts of power from this monitor.
1 What is it?
Smart Power is an exclusive Philips technology that provides flexible power delivery options for various devices.
This is useful for recharging high performance laptops with only one cable.
With Smart Power, the monitor makes it possible to deliver up to 96W of power through the USB C1 port, compared to the standard 65W.
To prevent damaging the device, Smart Power enables protections to limit current draw.
2 How to enable Smart Power?
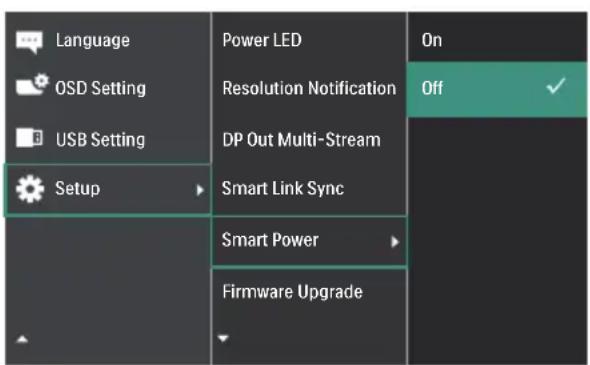
- Toggle to the ☐ to enter OSD Menu Screen.
- Toggle to the ▲ or ▼ to select main menu [Setup], then toggle to the right to confirm.
- Toggle to the ▲ or ▼ to turn on or off the [Smart Power].
3 Power through USB C1 port:
- Connect the device to the USB C1 port.
- Turn on [Smart Power].
- If [Smart Power] is on, and USB C1 is used for power, then maximum power delivery depends on the brightness value of the monitor. You may adjust the brightness value manually to increase power delivery from this monitor.
There are 3 power delivery levels:
| Brightness value | Power Delivery from USB C1 | |
| Level 1 0~2 | 0 96W | |
| Level 2 21~ | 60 85W | |
| Level 3 61~ | 100 80W |
Note
- If [Smart Power] is on, and DFP (Downstream Facing Port) is using more than 5W, then USB C1 can only deliver up to 65W.
- If [Smart Power] is off, then USB C1 can only deliver up to 65W.
6. PowerSensor™
1 How does it work?
- PowerSensor works on principle of transmission and reception of harmless "infrared" signals in order to detect user-presence.
- When the user is in front of the monitor, the monitor operates normally, at the predetermined settings that the user has set- i.e. brightness, contrast, color, etc
• Assuming that the monitor was set to 100% of brightness for example, when the user leaves his seat and is no longer in front of the monitor, the monitor automatically reduces the power consumption upto 80%.
User present in front User not present
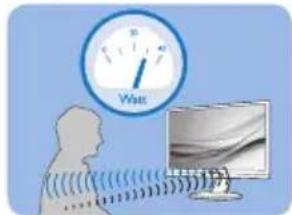
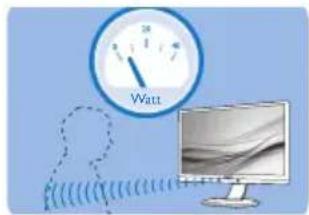
Power consumption as illustrated above is for reference purpose only
2 Setting
Default settings
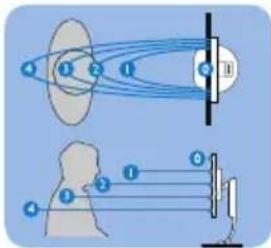
PowerSensor is designed to detect the presence of the user located between 30 and 100 cm (12 and 40 inches) from the display and within five degrees left or right of the monitor.
Custom settings
If you prefer to be in a position outside the perimeters listed above, choose a higher strength signal for optimal detection efficiency: The higher the setting, the stronger the detection signal. For maximum PowerSensor efficiency and proper detection, please position yourself directly in front of your monitor.
• If you choose to position yourself more than 100 cm or 40 inches
from the monitor use the maximum detection signal for distances up to 120 cm or 47 inches. (Setting 4)
- Since some dark colored clothing tends to absorb infrared signals even when the user is within 100 cm or 40 inches of the display, step up signal strength when wearing black or other dark clothes.
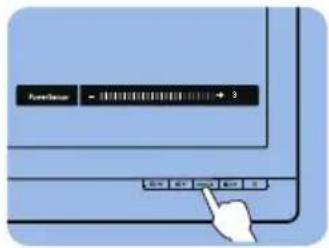
Hot key Sensor distance
Landscape/Portrait mode
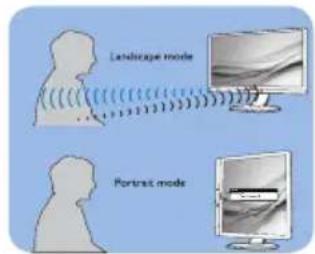
Above illustrations are for reference purpose only, may not reflect the exact display of this model.
3 How to adjust settings
If PowerSensor is not operating correctly inside or outside the default range, here's how to fine-tune detection:
- Press the PowerSensor hot key.
- You will find the adjustment bar.
- Adjust the PowerSensor detection adjustment to Setting 4 and press OK.
- Test the new setup to see if PowerSensor properly detects you in your current position.
- PowerSensor function is designed to work in Landscape mode (horizontal position) only. After PowerSensor turn on it, it will automatically turn Off if the monitor is used in Portrait mode (90 degree/vertical position); it will automatically turn ON if
monitor is returned to its default Landscape position.

Note
A manually selected PowerSensor mode will remain operational unless and until it is readjusted or the default mode is recalled. If you find that the PowerSensor is excessively sensitive to nearby motion for some reason, please adjust to a lower signal strength. Keep sensor lens clean, if the sensor lens is dirty, wipe it with alcohol to avoid reducing of distance detection.
7. Designs to prevent computer vision syndrome (CVS)
Philips monitor is designed to prevent eye strain caused by prolonged computer use.
Follow the below instructions and use a Philips monitor to efficiently reduce fatigue and maximize working productivity.
-
Appropriate environment lighting:
-
Adjust the environment lighting similar to that of your screen brightness, avoid fluorescent lighting, and surfaces that don't reflect too much light.
-
Adjust the brightness and contrast to the appropriate level.
-
Good working habits:
- Excessive usage of the monitor can cause eye discomfort, it's better to take shorter breaks more often at your workstation than longer breaks and less often; for example a 5-10 minute break after 50-60-minute continuous screen use is likely to be better than a 15-minute break every two hours.
- Looking at something varying distances after a long period of focusing on the screen.
• Gently closing and rolling your eyes to relax.
- Conscious blinking often while working.
- Gently stretch your neck, and slowly tilt your head forward, backward, and side for pain relief.
- Ideal working posture
- Reposition your screen to the appropriate measurement according to your own height.
- Choose a Philips monitor for viewing that is easy on the eyes.
- Anti-glare screen: This feature efficiently reduces annoying and distracting reflections that is associated with eye fatigue.
- Flicker-free technology is designed to regulate brightness and reduce flicker for more comfortable viewing.
- EasyRead mode for a paper-like reading experience, giving a more comfortable viewing experience while dealing with long documents on the screen.
8. Adaptive Sync

Adaptive Sync
PC gaming has long had an imperfect experience because GPUs and monitors update at different rates. Sometimes a GPU can render many new pictures during a single update of the monitor and the monitor will show pieces of each picture as a single image. This is called “tearing.” Gamers can fix tearing with a feature called “v-sync,” but the image can become jerky as the GPU waits on the monitor to call for an update before delivering new pictures.
The responsiveness of mouse input and overall frames per second is reduced with v-sync, too. AMD Adaptive Sync technology eliminates all of these problems by letting the GPU update the monitor the moment a new picture is ready. Therefore, this feature leaves gamers with unbelievably smooth, responsive, tearing-free gaming.
Followed by the graphic card that are compatible.
- Operating system
- Windows 11/10
- Graphic Card: R9 290/300 Series & R7 260 Series
• AMD Radeon R9 300 Series - AMD Radeon R9 Fury X
• AMD Radeon R9 360
• AMD Radeon R7 360
• AMD Radeon R9 295X2
• AMD Radeon R9 290X
• AMD Radeon R9 290
• AMD Radeon R9 285
• AMD Radeon R7 260X
• AMD Radeon R7 260
- Processor A-Series Desktop and Mobility APUs
- AMD A10-7890K
- AMD A10-7870K
- AMD A10-7850K
- AMD A10-7800
- AMD A10-7700K
- AMD A8-7670K
- AMD A8-7650K
- AMD A8-7600
- AMD A6-7400K
- AMD RX 6500 XT
- AMD RX 6600 XT
- AMD RX 6700 XT
- AMD RX 6750 XT
- AMD RX 6800
- AMD RX 6800 XT
-
AMD RX 6900 XT
-
Technical Specifications
| Picture/Display | |
| Display Panel Type IPS Technology | |
| Backlight W-LED | |
| Panel Size 23.8" W (60.5 cm) | |
| Aspect Ratio 16:9 | |
| Pixel Pitch 0.2745(W) x 0.2745(H) | |
| Contrast ratio(typical) 1500:1 | |
| Native Resolution 1920 x 1080 @ 60 Hz | |
| Maximum Resolution 1920 x 1080 @ 120 Hz | |
| Viewing Angle 178° (H) / 178° (V) @ C/R > 10 (Typ.) | |
| Picture Enhancement SmartImage | |
| Display Colors 16.7M (6Bits+A-FRC) | |
| Vertical Refresh Rate 48 Hz - 120 Hz | |
| Horizontal Frequency 30 kHz - 140 kHz | |
| sRGB | YES |
| EasyRead | YES |
| Flicker Free | YES |
| Adaptive Sync | YES |
| Over-the-air firmware update | YES |
| Connectivity | |
| Signal Input source | HDMI, DisplayPort, USB C1 (DP Alt mode) |
| Connectors | 1 x HDMI 1.4 (HDCP 1.4, HDCP 2.2)1 x DisplayPort 1.4 (HDCP 1.4, HDCP 2.2)1 x USB C1 (upstream, HDCP 1.4, HDCP 2.2)1 x USB C2 (downstream)3 x USB-A (downstream with x1 fast charge BC 1.2)1 x RJ45,Ethernet LAN (USB 2.0: 10M/100M; USB 3.0: 1000M)1 x DisplayPort Out1 x Audio Out |
| Sync input | Separate Sync |
| USB | |
| USB Ports | USB C1 x1 (upstream, typical PD 96W, DP Alt mode)USB C2 x1 (downstream, DATA, up to 15W)USB-A x3(downstream with x1 fast charge B.C 1.2) |
| Power Delivery | USB C1: USB PD version 3.0, typical 96W (5V/3A, 7V/3A, 9V/3A, 10V/3A, 12V/3A, 15V/3A, 20V/4.8A) 1 USB C2: Power supply up to 15W (5V/3A)USB-A: x1 fast charge B.C 1.2, up to 7.5W (5V/1.5A) |
| USB SuperSpeed | USB-C/USB-A: USB 3.2 Gen1, 5 Gbps |
| Convenience | |||
| USER convenience | ∅/◄ ⬤/▼ ⚙/▲ ⭕/OK ⏻ | ||
| Built-in speaker 2 W x 2 | |||
| OSD Languages | English, German, Spanish, Greek, French, Italian, Hungarian, Dutch, Portuguese, Brasil Portuguese, Polish, Russian, Swedish, Finnish, Turkish, Czech, Ukrainian, Simplified Chinese, Traditional Chinese, Japanese, Korean | ||
| Other Convenience VESA | mount(100x100mm), Kensington Lock | ||
| Plug & Play Compatibility | DDC/CI, Mac OS X, sRGB, Windows 11/10 | ||
| Stand | |||
| Tilt -5 / +30 degree | |||
| Swivel -180 / +180 degree | |||
| Height adjustment 150 mm | |||
| Pivot -90 / +90 degree | |||
| Power | |||
| Consumption | AC Input Voltage at 100VAC, 50Hz | AC Input Voltage at 115VAC, 60Hz | AC Input Voltage at 230VAC, 50Hz |
| Normal Operation 19.7 W (typ.) | 19.6 W (typ.) | 19.2 W (typ.) | |
| Sleep (Standby mode) 0.3 W(typ.) | 0.3 W(typ.) | 0.3 W(typ.) | |
| Off mode 0.3 W(typ.) | 0.3 W(typ.) | ||
| Off mode(AC switch) | 0 W(typ.) | 0 W(typ.) | 0 W(typ.) |
| Consumption | AC Input Voltage at 100VAC, 50Hz | AC Input Voltage at 115VAC, 60Hz | AC Input Voltage at 230VAC, 50Hz |
| Normal Operation | 67.24 BTU/hr (typ.) | 66.89 BTU/hr (typ.) | 65.53 BTU/hr (typ.) |
| Sleep (Standby mode) 1.02 BTU/hr(typ.) | 1.02 BTU/hr(typ.) | 1.02 BTU/hr(typ.) | |
| Off mode 1.02 BTU/hr(typ.) | 1.02 BTU/hr(typ.) | 1.02 BTU/hr(typ.) | |
| Off mode(AC switch) | 0 BTU/hr(typ.) | 0 BTU/hr(typ.) | 0 BTU/hr(typ.) |
| On Mode(ECO mode) | 10.1 W (typ.) | ||
| PowerSensor | 3.46 W (typ.) | ||
| Power LED indicator | On mode: White, Standby/Sleep mode: White (blinking) | ||
| Power Supply | Built-in, 100-240V AC, 50/60Hz | ||
| Dimensions | |||
| Product with stand (WxHxD) | 544 x 503 x 228 mm | ||
| Product without stand (WxHxD) | 544 x 326 x 56 mm | ||
| Product with packaging (WxHxD) | 650 x 400 x 139 mm | ||
| Weight | |
| Product with stand 5.74 kg | |
| Product without stand 4.00 kg | |
| Product with packaging 7.74 kg | |
| Operating Condition | |
| Temperature range (operation) | 0°C to 40 °C |
| Relative humidity (operation) | 20% to 80% |
| Atmospheric pressure (operation) | 700 to 1060hPa |
| Temperature range (Non-operation) | -20°C to 60°C |
| Relative humidity (Non-operation) | 10% to 90% |
| Atmospheric pressure (Non-operation) | 500 to 1060hPa |
| Environmental and energy | |
| ROHS YES | |
| Packaging 100% recyclable | |
| Specific Substances 100% PVC BFR free housing | |
| Cabinet | |
| Color Charcoal/Silver | |
| Finish Texture | |
1 The USB-C ports USBC1 provide data, video transfer, and power delivery from 96W and up to 100W depending on the device.

Note
- This data is subject to change without notice. Go to www.philips.com/support to download the latest version of leaflet.
- The Power delivery function is also based on the PCs capabilities.
9.1 Resolution & Preset Modes
| H. freq (kHz) | Resolution V. freq (Hz) |
| 31.47 720 | x 400 70.09 |
| 31.47 640 | x 480 59.94 |
| 35.00 640 | x 480 66.67 |
| 37.86 640 | x 480 72.81 |
| 37.50 640 | x 480 75.00 |
| 35.16 800 | x 600 56.25 |
| 37.88 800 | x 600 60.32 |
| 46.88 800 | x 600 75.00 |
| 48.08 800 | x 600 72.19 |
| 47.73 832 | x 624 74.55 |
| 48.36 1024 | x 768 60.00 |
| 56.48 1024 | x 768 70.07 |
| 60.02 1024 | x 768 75.03 |
| 63.89 1280 | x 1024 60.02 |
| 79.98 1280 | x 1024 75.03 |
| 67.50 1920 | x 1080 60.00 |
| 83.92 1920 | x 1080 75.00 |
| 110.00 | 1920 x 1080 100.00 |
| 137.28 | 1920 x 1080 120.00 |

Note
-
Please notice that your display works best at native resolution of 1920 x 1080 @ 60Hz. For best display quality, please follow this resolution recommendation. Recommended resolution HDMI 1.4/DP/USB C:1920 x 1080 @ 60Hz If your display is not on the native resolution when connecting to USB C or DP port, please adjust resolution to the optimal state: 1920 x 1080 @60 Hz from your PC.
-
The factory default setting HDMI supports to the resolution 1920 x 1080 @ 60Hz.
-
The USB hub default setting of USB C input for this monitor is "High Data Speed". The maximum resolution supported depends on your graphic card capability. If your PC doesn't support HBR 3, select "High Resolution" in USB Setting, then the maximum resolution supported will be 1920 x 1080 @120Hz. Press button >USB Setting >USB >High Resolution
10. Power Management
If you have a VESA DPM compliance display card or software installed on your PC, the monitor can automatically reduce its power consumption when not in use. If an input from a keyboard, mouse, or other input device is detected, the monitor will 'wake up' automatically. The following table shows the power consumption and signaling of this automatic power saving feature:
| Power Management Definition | |||||
| VESA Mode | Video | H-sync | V-sync | Power Used | LED Color |
| Active ON Yes Yes | 19.6 W (typ.)166.6 W (max.) | White | |||
| Sleep(Standby mode) | OFF No 0.3 | W (typ.) | White (blink) | ||
| Off mode(AC switch) | OFF - + | 0W(AC switch) | OFF | ||
The following setup is used to measure power consumption on this display.
• Native resolution: 1920 x 1080
- Contrast: 50%
- Brightness: 80%
• Color temperature: 6500k with full white pattern
• Audio and USB Inactive (Off)

Note
This data is subject to change without notice.
11. Customer care and warranty
11.1 Philips' Flat Panel Displays Pixel Defect Policy
Philips strives to deliver the highest quality products. We use some of the industry's most advanced manufacturing processes and practice stringent quality control. However, pixel or sub-pixel defects on the TFT Monitor panels used in flat panel monitors are sometimes unavoidable. No manufacturer can guarantee that all panels will be free from pixel defects, but Philips guarantees that any monitor with an unacceptable number of defects will be repaired and/or replaced under warranty. This notice explains the different types of pixel defects and defines acceptable defect levels for each type. To qualify for repair or replacement under warranty, the number of pixel defects on a TFT Monitor panel must exceed these acceptable levels. For example, no more than 0.0004% of the sub-pixels on a monitor may be defective. Furthermore, Philips sets even higher quality standards for certain types or combinations of pixel defects that are more noticeable than others. This policy is valid worldwide.
![graph TD A["subpixel"] --> B["R"] A --> C["G"] A --> D["B"] E["pixel"] --> F["R"] E --> G["G"] E --> H["B"]](/content/2026/07/1457292/images/dcd76db281b2df897ce547a65d7af39d9866fc3859b3227b42f274d4a1f8de1a.jpg)
Pixels and Sub pixels
A pixel, or picture element, is composed of three sub-pixels in the primary colors of red, green, and blue. Many pixels
together form an image. When all the sub-pixels of a pixel are lit, the three colored sub-pixels together appear as a single white pixel. When all are dark, the three colored sub-pixels together appear as a single black pixel. Other combinations of lit and dark sub-pixels appear as single pixels of other colors.
Types of Pixel Defects
Pixel and sub-pixel defects appear on the screen in different ways. There are two categories of pixel defects and several types of sub-pixel defects within each category.
Bright Dot Defects
Bright dot defects appear as pixels or sub-pixels that are always lit or 'on'. Meaning, a bright dot is a sub-pixel that stands out on the screen when the monitor displays a dark pattern. There are three types of bright dot defects: One lit red, green, or blue sub-pixel.
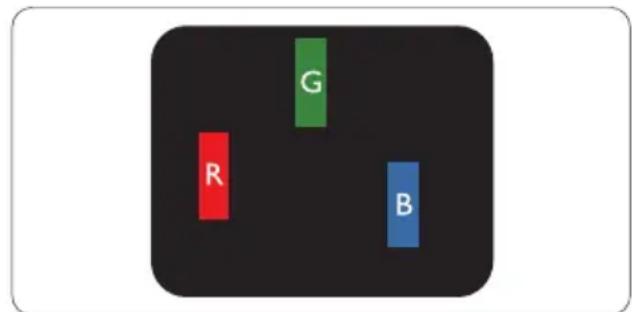
One lit red, green or blue sub pixel.
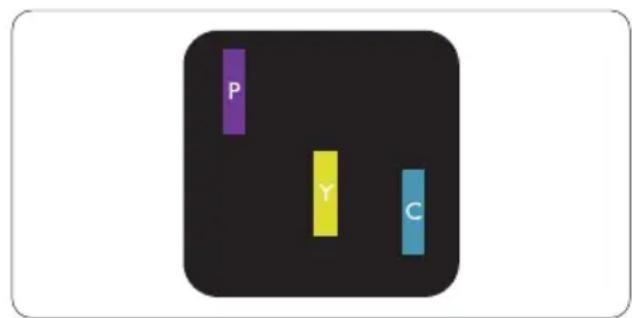
Two adjacent lit sub-pixels:
- Red + Blue = Purple
- Red + Green = Yellow
- Green + Blue = Cyan (Light Blue)
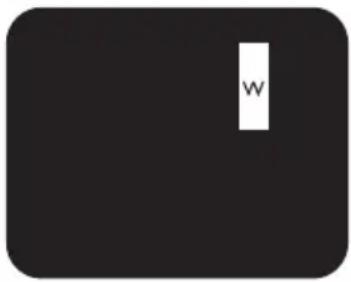
Three adjacent lit sub pixels (one white pixel).

Note
A red or bright blue dot must be more than 50 percent brighter than neighboring dots, while a bright green dot is 30 percent brighter than neighboring dots.
Black Dot Defects
Black dot defects appear as pixels or sub-pixels that are always dark or 'off'. Meaning, a dark dot is a sub-pixel that stands out on the screen when the monitor displays a light pattern. These are the types of black dot defects.
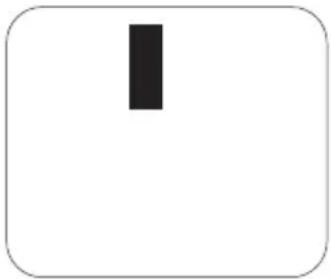
Proximity of Pixel Defects
Because pixel and sub pixels defects of the same type that are near to one another may be more noticeable, Philips also specifies tolerances for the proximity of pixel defects.
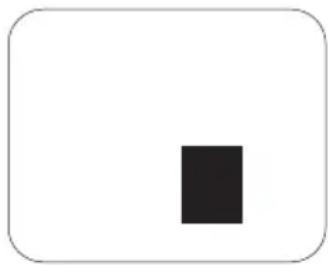
Pixel Defect Tolerances
To qualify for repair or replacement due to pixel defects during the warranty period, a TFT Monitor panel in a Philips flat panel monitor must have pixel or sub-pixel defects exceeding the tolerances listed in the following tables.
| BRIGHT DOT DEFECTS ACCEPTABLE LEVEL | |
| 1 lit subpixel 2 | |
| 2 adjacent lit subpixels 1 | |
| 3 adjacent lit subpixels (one white pixel) 0 | |
| Distance between two bright dot defects* >15mm | |
| Total bright dot defects of all types 2 | |
| BLACK DOT DEFECTS ACCEPTABLE LEVEL | |
| 1 dark subpixel 3 or fewer | |
| 2 adjacent dark subpixels 2 or fewer | |
| 3 adjacent dark subpixels 1 | |
| Distance between two black dot defects* >15mm | |
| Total black dot defects of all types 3 or fewer | |
| TOTAL DOT DEFECTS ACCEPTABLE LEVEL | |
| Total bright or black dot defects of all types 5 or fewer |

Note
1 or 2 adjacent sub pixel defects = 1 dot defect
11.2 Customer Care & Warranty
For warranty coverage information and additional support requirements valid for your region, please visit www.philips.com/support website for details or contact your local Philips Customer Care Center.
For the Warranty Period please refer to Warranty Statement in the Important information manual.
For an extended warranty, if you would like to extend your general warranty period, an Out of Warranty service package is offered via our Certified Service Center.
If you wish to make use of this service, please be sure to purchase the service within 30 calendar days of your original purchase date. During the extended warranty period, the service includes pickup, repair, and return service, however, the user will be responsible for all costs accrued.
If the Certified Service Partner cannot perform the required repairs under the offered extended warranty package, we will find alternative solutions for you, if possible, up to the extended warranty period you have purchased.
Please contact our Philips Customer Service Representative or local contact center (by Consumer care number) for more details.
Philips Customer Care Center number listed below.
| • Local Standard Warranty Period | • Extended Warranty Period | • Total Warranty Period |
| • Depend on different Regions | • + 1 Year • Local Standard warranty period +1 | +1 |
| • + 2 Years • Local Standard warranty period +2 | +2 | |
| • + 3 Years • Local Standard warranty period +3 | +3 |
**Proof of original purchase and extended warranty purchase required.

Note
Please refer to the Important information manual for the regional service hotline, which is available on the Philips website support page.
12. Troubleshooting & FAQs
12.1 Troubleshooting
This page deals with problems that can be corrected by a user. If the problem persists after you have tried these solutions, contact a Philips customer service representative.
1 Common Problems
No Picture (Power LED not lit)
- Make sure the power cord is plugged into the power outlet and the back of the monitor.
- First, ensure that the power button on the front of the display is in the OFF position, then press it to the ON position.
No Picture (Power LED is White)
- Make sure the computer is turned on.
- Make sure the signal cable is properly connected to your computer.
- Make sure the monitor cable has no bent pins on the connecting side. If yes, repair or replace the cable.
- The Energy Saving feature may be activated Screen says
Check cable connection
- Make sure the display cable is properly connected to your computer. (Also refer to the Quick Start Guide).
- Check to see if the display cable has bent pins.
- Make sure the computer is turned on.
Visible signs of smoke or sparks
- Do not perform any troubleshooting steps
- Disconnect the monitor from the mains power source immediately for safety
- Contact Philips customer service representative immediately.
2 Imaging Problems
The image appears blurred, indistinct, or too dark
- Adjust the contrast and brightness on On-Screen Display.
An "after-image", "burn-in" or "ghost image" remains after the power has been turned off.
- Uninterrupted display of still or static images over an extended period may cause "burn-in", also known as "after-imaging" or "ghost imaging", on your screen. "Burn-in", "after-imaging", or "ghost imaging" is a well-known phenomenon in LCD panel technology. In most cases, the "burn-in" "after-imaging" or "ghost imaging" will disappear gradually over some time after the power has been switched off.
- Always activate a moving screen saver program when you leave your display unattended.
- Always activate a periodic screen refresh application if your LCD display will display unchanging static content.
- Failure to activate a screen saver, or a periodic screen refresh application may result in severe "burn-in", "after-imaging" or "ghost imaging"
symptoms that will not disappear and cannot be repaired. The damage mentioned above is not covered under your warranty.
The image appears distorted or the text is fuzzy or blurred.
- Set the PC's display resolution to the same mode as the monitor's recommended screen native resolution.
Green, red, blue, dark, and white dots appear on the screen
- The remaining dots are a normal characteristic of the liquid crystal used in today's technology, Please refer to the pixel policy for more detail.
* The "power on" light is too strong and is disturbing
- You can adjust the "power on" light using the power LED Setup in OSD Main Controls.
For further assistance, refer to the Service contact information listed in the Important information manual and contact a Philips customer service representative.
* Functionality is different according to display.
12.2 General FAQs
Q1: When I install my display what should I do if the screen shows 'Cannot display this video mode'?
Ans.: Recommended resolution for this display: 1920 x 1080.
- Unplug all cables, then connect your PC to the display that you used previously.
- In the Windows Start Menu, select Settings/Control Panel. In the Control Panel Window, select the Display icon. Inside the Display Control Panel, select the 'Settings' tab. Under the setting tab, in the box labeled 'desktop area', move the sidebar to 1920 x 1080 pixels.
- Open 'Advanced Properties' and set the Refresh Rate to 60 Hz, then click OK.
- Restart your computer and repeat steps 2 and 3 to verify that your PC is set at 1920 x 1080.
- Shut down your computer, disconnect your old monitor, and reconnect your Philips LCD monitor.
- Turn on your display and then turn on your PC.
Q2: What is the recommended refresh rate for an LCD monitor?
Ans.: Recommended refresh rate in LCD monitors is 60 Hz, In case of any disturbance on the screen, you can set it up to 75 Hz to see if that removes the disturbance.
Q3: What are the .inf and .icm files? How do I install the drivers (.inf and .icm)?
Ans.: These are the driver files for your monitor. Your computer may ask you for monitor drivers (.inf and .icm files) when you first install your monitor. Follow the instructions in your user manual, and monitor drivers (.inf and .icm files) will be installed automatically.
Q4: How do I adjust the resolution?
Ans.: Your video card/graphic driver and display together determine the available resolutions. You can select the desired resolution under Windows® Control Panel with the "Display properties".
Q5: What if I get lost when I am making display adjustments via OSD?
Ans.: Simply press button, then select 'Setup' > 'Reset' to recall all the original factory settings.
Q6: Is the LCD screen resistant to scratches?
Ans.: In general it is recommended that the panel surface is not subjected to excessive shocks and is protected from sharp or blunt objects. When handling the display, make sure that there is no pressure or force applied to the panel surface side. This may affect your warranty conditions.
Q7: How should I clean the LCD surface?
Ans.: For normal cleaning, use a clean, soft cloth. For extensive cleaning, please use isopropyl alcohol. Do not use other solvents such as
ethyl alcohol, ethanol, acetone, hexane, etc.
Q8: Can I change the color setting of my display?
Ans.: Yes, you can change your color setting through OSD control as per the following procedures.
- Press "OK" to show the OSD (On Screen Display) menu
- Press "Down Arrow" to select the option "Color" then press "OK" to enter the color setting, there are three settings as below.
-
Color Temperature: The settings are as follows. Native, 5000K, 6500K, 7500K, 8200K, 9300K, and 11500K. With settings in the 5000K range the panel appears "warm, with a red-white color tone", while a 11500K temperature yields "cool, blue-white toning".
-
sRGB: This is a standard setting for ensuring the correct exchange of colors between different devices (e.g. digital cameras, monitors, printers, scanners, etc).
-
User Define: The user can choose his/her preferred color setting by adjusting red, green, and blue colors.
Note
A measurement of the color of light radiated by an object while it is being heated. This measurement is expressed in terms of absolute scale, (degrees Kelvin). Lower Kevin temperatures such as 2004K are red; higher temperatures such as 9300K are blue. The neutral temperature is white, at 6504K.
Q9: Can I connect my LCD monitor to any PC, workstation, or Mac?
Ans.: Yes. All Philips LCD monitors are fully compatible with standard PCs, Macs, and workstations. You may need a cable adapter to connect the monitor to your Mac system. Please contact your Philips sales representative for more information.
Q10: Are Philips LCD displays Plug-and-Play?
Ans.: Yes, the displays are Plug-and-Play compatible with Windows 11/10
Q11: What is Image Sticking, Image Burn-in, After Image, or Ghost Image in LCD panels?
Ans.: Uninterrupted display of still or static images over an extended period may cause "burn in", also known as "after-imaging" or "ghost imaging", on your screen. "Burn-in", "after-imaging", or "ghost imaging" is a well-known phenomenon in LCD panel technology. In most cases, the "Burn-in" or "after-imaging" or "ghost imaging" will disappear gradually over a period of time after the power has been switched off.
Always activate a moving screen saver program when you leave your display unattended.
Always activate a periodic screen refresh application if your LCD display will display unchanging static content.
Warning
Failure to activate a screen saver, or a periodic screen refresh application may result in severe "burn-in" "after-image" or "ghost image" symptoms that will not disappear and cannot be repaired. The
damage mentioned above is not covered under your warranty.
Q12: Why is my Display not showing sharp text, and is displaying jagged characters?
Ans.: Your LCD monitor works best at its native resolution of 1920 x 1080. For the best display, please use this resolution.
Q13: How to unlock/lock my hotkey?
Ans.: To lock the OSD, press and hold the button while the monitor is off and then press button to turn the monitor on. To un-lock the OSD, press and hold the button while the monitor is off and then press button to turn the monitor on.
Monitor controls unlocked
Monitor controls locked
Q14: Where can I find the Important information manual mentioned in EDFU?
Ans.: Important information manual can be downloaded on the Philips website support page.

2025 © TOP Victory Investments Ltd. All rights reserved.
This product has been manufactured by and is sold under the responsibility of Top Victory Investments Ltd., and Top Victory Investments Ltd. is the warrantor in relation to this product. Philips and the Philips Shield Emblem are registered trademarks of Koninklijke Philips N.V. and are used under license.
Specifications are subject to change without notice.
Version: 24B2U4301E1WWT

- EN
- USER MANUAL
- TABLE OF CONTENTS
- IMPORTANT .... 1
- SETTING UP THE MONITOR .....5
- IMAGE OPTIMIZATION ......12
- DAISY-CHAIN FUNCTION ..... 15
- TECHNICAL SPECIFICATIONS ..... 23
- CUSTOMER CARE AND WARRANTY ...28
- TROUBLESHOOTING & FAQS .....32
- IMPORTANT
- 1.1 SAFETY PRECAUTIONS AND MAINTENANCE
- WARNINGS
- OPERATION
- MAINTENANCE
- WARNING
- SERVICE
- NOTE
- 1.2 NOTATIONAL DESCRIPTIONS
- CAUTION
- 1.3 DISPOSAL OF PRODUCT AND PACKING MATERIAL
- SETTING UP THE MONITOR
- 2.1 INSTALLATION
- 2 INSTALL THE BASE
- CONNECT TO PC
- 4 RJ45 DRIVER INSTALLATION
- USB HUB
- USB CHARGING
- 2.2 OPERATING THE MONITOR
- 3 RESOLUTION NOTIFICATION
- 4 FIRMWARE
- OVER-THE-AIR (OTA)
- ON-THE-GO (OTG)
- 4 PHYSICALFUNCTION
- 2.3 REMOVE THE BASE ASSEMBLY FOR VESA MOUNTING
- IMAGE OPTIMIZATION
- 3.1 SMARTIMAGE
- 1 WHAT IS IT
- 2 WHY DO I NEED IT
- 3 HOW DOES IT WORK
- 4 HOW TO ENABLE SMARTIMAGE
- THE SMARTIMAGE ON-SCREEN DISPLAY WILL REMAIN ON SCREEN FOR 5 SECONDS, OR YOU CAN ALSO PRESS "OK" TO MAKE CONFIRMATION
- 3.2 SMARTCONTRAST
- 3.3 LIGHTSENSOR
- 2 HOW TO ENABLE LIGHTSENSOR
- DAISY-CHAIN FUNCTION
- DISPLAYPORT MULTI-STREAMING OVER DISPLAYPORT
- DISPLAYPORT MULTI-STREAMING OVER USB TYPE C1
- SMART LINK SYNC
- POWER DELIVERY AND SMART POWER
- 2 HOW TO ENABLE SMART POWER
- 3 POWER THROUGH USB C1 PORT
- POWERSENSOR™
- 1 HOW DOES IT WORK
- 2 SETTING
- DEFAULT SETTINGS
- CUSTOM SETTINGS
- 3 HOW TO ADJUST SETTINGS
- DESIGNS TO PREVENT COMPUTER VISION SYNDROME (CVS)
- ADAPTIVE SYNC
- 9.1 RESOLUTION & PRESET MODES
- POWER MANAGEMENT
- CUSTOMER CARE AND WARRANTY
- 11.1 PHILIPS' FLAT PANEL DISPLAYS PIXEL DEFECT POLICY
- PIXELS AND SUB PIXELS
- TYPES OF PIXEL DEFECTS
- BRIGHT DOT DEFECTS
- TWO ADJACENT LIT SUB-PIXELS
- BLACK DOT DEFECTS
- PROXIMITY OF PIXEL DEFECTS
- PIXEL DEFECT TOLERANCES
- 11.2 CUSTOMER CARE & WARRANTY
- TROUBLESHOOTING & FAQS
- 12.1 TROUBLESHOOTING
- 1 COMMON PROBLEMS
- 2 IMAGING PROBLEMS
- 12.2 GENERAL FAQS
Brand : PHILIPS
Model : 24B2U4301
Category : Monitor