
WAMBA HD - TV receiver ASTON - Free user manual and instructions
Find the device manual for free WAMBA HD ASTON in PDF.
User questions about WAMBA HD ASTON
0 question about this device. Answer the ones you know or ask your own.
Ask a new question about this device
Download the instructions for your TV receiver in PDF format for free! Find your manual WAMBA HD - ASTON and take your electronic device back in hand. On this page are published all the documents necessary for the use of your device. WAMBA HD by ASTON.
USER MANUAL WAMBA HD ASTON
Conformity with European legislation: CE
The WAMBA® HD receiver complies with the essential requirements of the European directives 89/336/CEE relative to electromagnetic compatibility (standards EN
55020, EN 55013 and EN 61000-3-2), 73/23/CEE relative to electrical safety (standard EN 600065), and 93/68/CEE relative to CE marking.
At ASTON, development is a continuous and constantly evolving process. Consequently, we reserve the right to make changes and improvements at any time and without notice.
WAMBA® HD is a trademark deposited and owned by ASTON®.
You have just purchased the ASTON® WAMBA® HD receiver.
Thank you for choosing ASTON® for your purchase of this product.
This user manual will give you explanations and practical advice for immediate familiarisation with your WAMBA® HD.
You can then benefit from the best in digital television and receive your preferred bouquets in HD and in standard definition.
WAMBA® HD is also a PVR-Ready receiver: you have the option of recording your programs onto an external hard drive
or a USB key via the USB port. Lastly, the WAMBA® HD receiver enables you to watch your satellite programs from anywhere
in the house, via its Ethernet port*.
RECOMMENDATIONS
Before connecting your WAMBA® HD, we recommend that you observe a few instructions for use and safety.
Never try to open the cover of the set when it is connected to the mains.
Never try to take the set apart.
Avoid putting your WAMBA® HD in a damp place.
As with any electrical equipment, your receiver gives off heat when in operation. This is absolutely normal.
Therefore avoid putting it in a closed unit or blocking the air vents.
We recommend that you don't put anything on the set (vase, tablecloth, etc.).
Place your WAMBA® HD receiver on a stable piece of furniture.
Check that the voltage of the mains corresponds to that recorded on the back of your receiver.
- Do not use several plug adaptors connected to each other.
Never clean your set when it is connected to the mains.
Never use detergents or wet cloths. Switch off at the mains and use a dry cloth.
If you are going to be away for a long period, we recommend disconnecting your receiver from the mains.
*Requires purchase of one BEE-PLAYER® for each additional television set. You can watch only the programs in MPEG2 standard definition and in unencrypted. This function applies equally to the encrypted programs in function with the agreements with the operators.
CONTENTS
DESCRIPTION OF YOUR RECEIVER 24
A Front 24
B Rear 24
C Remote Control 25
2 CONNECTIONS 26
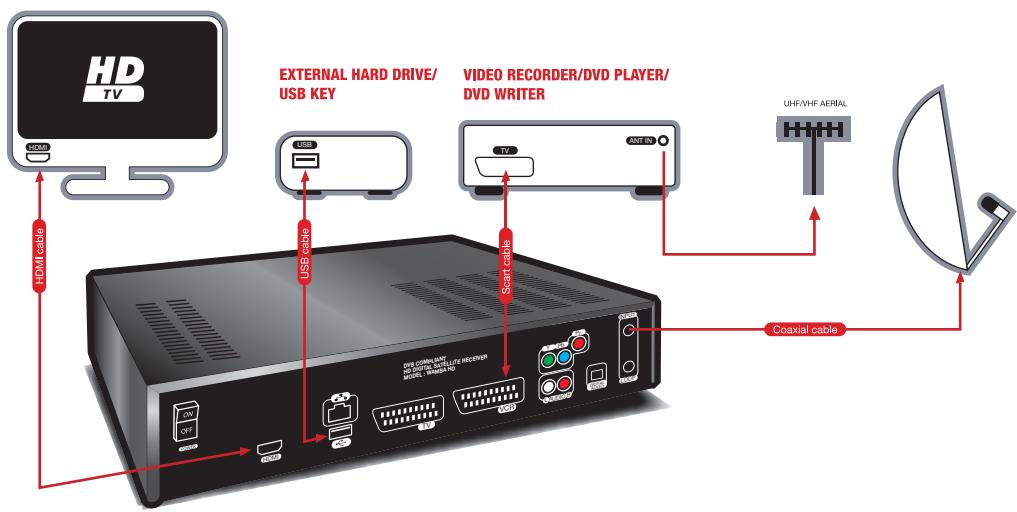
A Connect your WAMBA® HD to your HD TV + External Hard Drive/USB key + Video Recorder/DVD Player/DVD Writer 26
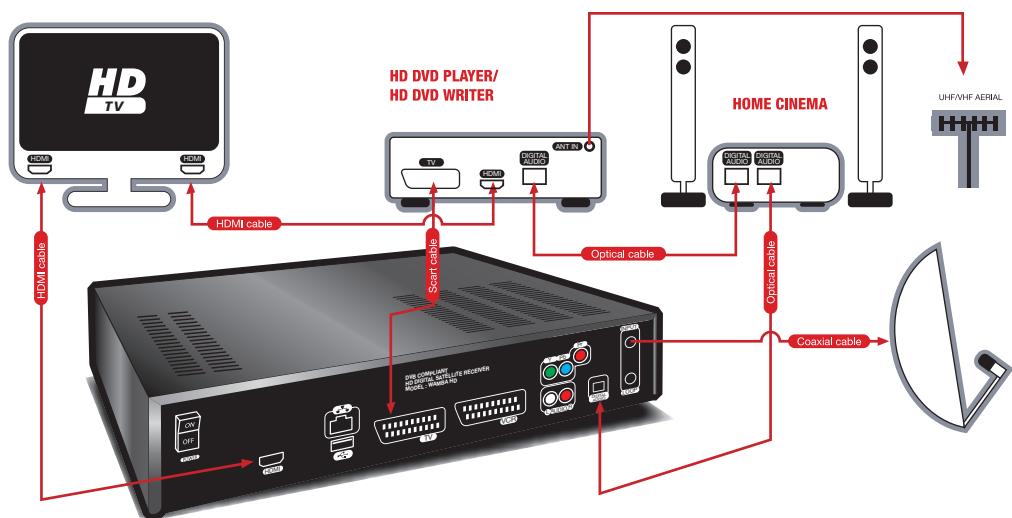
B Connect your WAMBA® HD to your HD TV + Home Cinema + HD DVD Player/HD DVD Writer 26
3 INSTALLATION OF YOUR RECEIVER 27
A Automatic Installation 27
B Manual Installation 28
1) Fixed mount 28
2)Motorised mount 29
4 PRINCIPLES OF NAVIGATION OF YOUR RECEIVER 30
A Navigation in Video Mode 30
B Navigation in the list of channels, bouquets and radio stations 30
C Navigation in the List of Recordings 31
D Navigation in the List of Favourites 31
E Focus on ... 32
5 THE MENU 35
A Navigation in the Menu 35
B "Configuration" Submenu 35
C "Program Search" Submenu 36
D "Supervisions" Submenu 36
E "Programming Recording" Submenu 36
F "Information, Update" Submenu 37
6 THE PVR-READY FUNCTION VIA THE USB PORT 38
A Principles of Operation 38
B Notes 38
7 THE MULTI-ROOM READY FUNCTION VIA THE ETHERNET PORT 39
APrinciples of Operation 39
B Notes 39
GENERAL CHARACTERISTICS 40
9 TECHNICAL CHARACTERISTICS 41

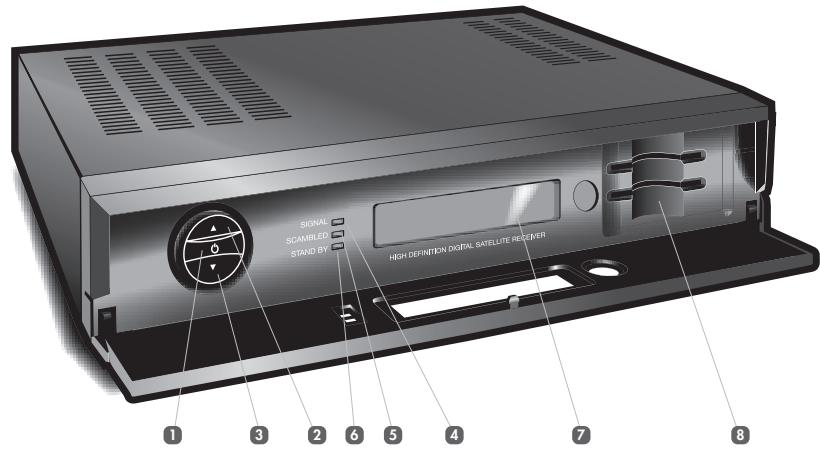
DESCRIPTION OF YOUR RECEIVER
A FRONT
On/Standby switch
2 Channel selection switch Access to next channel
3 Channel selection switch Access to previous channel
Signal presence indicator
3 Scrambled signal indicator
6 Standby indicator
7 Front display (name of channel, time, etc.)
Smart card readers (2 versions: 2 card readers or 1 card reader + 1 common PCMCIA interface)
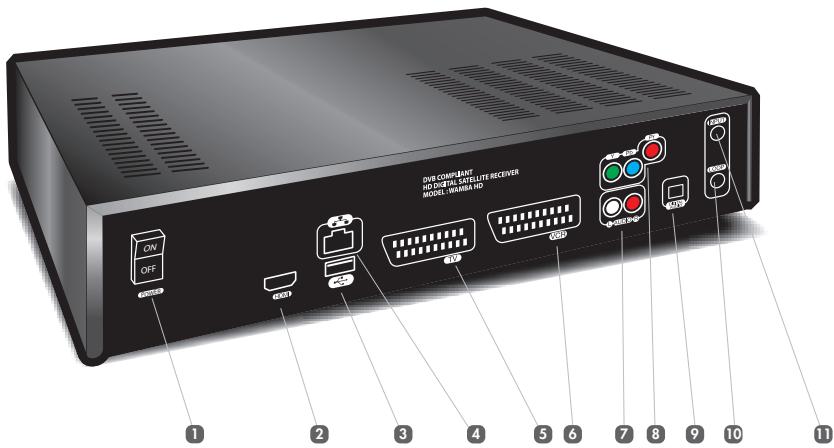
B REAR
1 Interruptor
2 HDMI socket
USB port
4 Ethernet socket
Scart TV socket
Scart video recorder, DVD reader/writer socket
7 RCA Audio L/R (Left, Right) output
8 RCAY-Pb-Pr output
Optical digital audio output
10 Loop through satellite output
1 Satellite aerial input
C REMOTE CONTROL
Switch on or standby.

Start fast rewind.
REC
- Start recording.

- Stop recording/playing.
Stop TImeshift.
Vol + / -
Increase or reduce volume.
GUIDE
Show the Electronic Program Guide.
FAV
Display list of Favourites.
REC LIST
Display list of recordings made and available.
ESC
-
In the "Auto-configuration and Supervision" screen and the Menu: return to video mode.
-
Return to previous screen.

- Switch from the list of channels/radio stations to the list of channel/radio station bouquets.
- Switch from one Favourite list to another.
- Switch from video recordings to audio recordings.
- Navigate from one window to another.
FCT
In a program: display the list of actions possible on the channel.
In a list: display the list of actions possible on the list.
- In the "Auto-configuration and Supervision" screen the Menu and the submenus: display help screen.
TIMER/DEL
Programstandby/Delete.
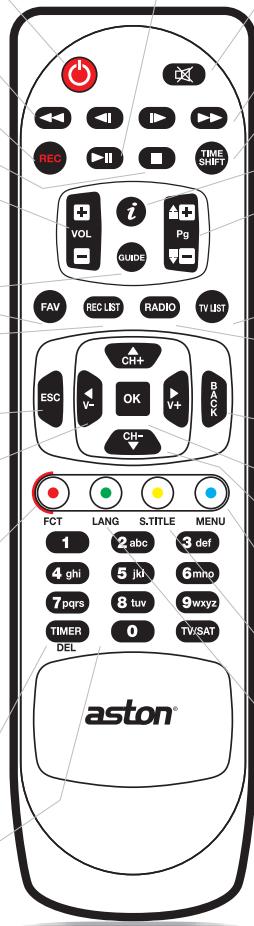
Alphanumeric keypad
Input letters and figures.
- Access a channel directly.

Start playing.
- Pause.
Launch Timeshift.
Resume Timeshift playing/
Pause Timeshift playing.
Mute
- Cancel/Resume sound.

- Start fast forward.
TIMESHIFT
- Start Timeshift

Display information about the
"Auto-configuration and Supervision" screen elements.
- Showing the program informations.
Pg ▲▼
Change channel.
- Navigate lists page by page.
TV LIST
Display list of channels and channel bouquets.
RADIO
Display list of radio stations and radio bouquets.
BACK
- Return to previous screen
OK
- Confirm or enter in submenus and categories.
In video mode: calls up the last list used.
#
Change channel.
Move from one item to another in a list.
MENU
S.TITLE
- Return to Menu.
Display subtitles available.
LANG
Change language of the program, according to availability.
2
CONNECTIONS
A CONNECT YOUR WAMBA® HD TO YOUR HD TV + EXTERNAL HARD DRIVE/USB KEY + VIDEO REORDER/DVD PLAYER/DVD WRITER
B CONNECT YOUR WAMBA® HD TO YOUR HD TV + HOME CINEMA + HD DVD PLAYER/HD DVD WRITER
3
INSTALLATION OF YOUR RECEIVER
A AUTOMATIC INSTALLATION
Once you have made the connections and your receiver is switched on, you will access the "Auto-configuration and Supervision" screen. A message will display asking you to choose your language and to launch, if you so desire, auto-detection:
Step 1: choose the language from the menus using the buttons on the remote control.
- Step 2: press OK to select your language and launch auto-detection. Your WAMBA® HD receiver automatically detects the different elements of your installation and their parameters (HD television, external hard drive, satellite dishes, cards, etc.). When the auto-detection is complete, a window will display summarising the elements detected. It will suggest you launch the automatic channel search (OK button) or return to the Menu in order to configure your receiver manually (ESC button).
- Step 3: launch the channel search by pressing OK. This search may take a few minutes. If you wish to interrupt the search, press BACK or ESC. Only the channels already identified by the receiver will be accessible.
Note: certain operators allow you to obtain the categorized list of channels. You can obtain this list from the WAMBA® HD channel research if the operator card is inserted in your receptor and if the satellite on which the bouquet is found is present in your kit. After the memorization of channels, WAMBA® HD offers you automatic installation of the operator channels. If you validate by pressing OK, these channels will appear at the top of your channels list.
This option will be offered to you at each new channel search at the time of auto-detection if the conditions outlined above are respected. It is equally accessible via the Menu in selecting the sub-menu "Program Search" then the category "Scan on a frequency".
- Step 4: once the search is completed, press OK to save it. You will then be automatically redirected to the first channel on the list and the list of channels available will display on the screen. You can also choose to access manual configurations via the Menu by pressing the ESC button.
B MANUAL INSTALLATION
You can manually configure your kit when you wish to modify your installation (addition of an LNB head, transfer from a Fixed mount to a Motorised mount...):
Press on blue button on your remote control to access the Menu.
Choose the submenu "Configuration", then the category Antennas".
A window called "Choice of installation type" opens. You have the choice between "Fixed mount" and "Motorised mount".
Warning: the modification of your kit can cause the loss of part or the totality of your previously installed channels.
1)FIXED MOUNT
When you choose "Fixed mount", a window called "Antenna Parameters" opens. This window allows you to configure your mount if you are using a stationary antenna.
- Select the type of mount used, (DiSEqC switch, monoblock head,...).
- Select the switch entry to configure.
Choose the LNB head type at the entry selected (universal or C band).
Choose the satellite that is pointed toward the LNB head.
The signal level will display at the bottom. If no level appears, help yourself from a recent frequency table in order to modify the channel changing parameters (polarization, frequency and symbol output). In case of failure, verify your mount.
Start from step 2 for each switch entry.
At the end of your configuration, press OK to have it memorized.
2) MOTORISED MOUNT
When you choose "Motorised mount", you access the main window, "Manual configuration".
Initially, you must select the satellites you wish to access with your antenna.
- Select "Satellite activation".
Using the buttons and OK, select (or unselect) the satellites in the list.
Once your choice is made, press BACK.
You can now verify that your antenna is pointed correctly.
Select "Satellite aiming".
- Choose the LNB type used and the satellite for which you want to verify the direction of your antenna. As needed, modify the channel changing parameters (polarization, frequency and symbol output).
Press OK.
In the new window that opens you can choose:
- "Aim the satellite": hit OK, the motorized antenna positions itself toward the selected satellite and to the previous memorized position. Use the EAST button (green button), WEST button (blue button), then when you have an output signal press AUTOFOCUS (yellow button) to refine the direction.
- "Memorise satellite position": memorize the actual position for the satellite selected.
- "Recalculate satellite positions": recalculate the position of all the satellites from the actual position of the satellite selected.
If you are using a new motor, all the satellite positions are found on the motor position 0^ . You should then manually find these positions using, via the window "Manual configuration", the EAST (green button), WEST (blue button) and AUTOFOCUS (yellow button) buttons in order to obtain a sufficient signal, memorize this position as previously indicated, then restart for each satellite.
The presence of various obstacles (trees, walls, ...) around your installation can require you to impose limits on the direction of your antenna:
In the window "Manual configuration", select "Memorise limits".
- Move the cursor onto "EAST LIMIT" then use the EAST button (green button)/ WEST (blue button) in order to define the position limit of the antenna movement toward the EAST horizon. This position is memorized automatically.
- Move the cursor onto "WEST LIMIT" then use the EAST button (green button)/ WEST (blue button) in order to define the position limit of the antenna movement toward the WEST horizon. This position is memorized automatically.
- Move the cursor to "ACTIVATE LIMITS", select "YES" then hit OK. Now the course of your motor will be reduced to the interval limit thus defined.
If you wish to deactivate these limits, call up the window "Memorise the limits", move the cursor on "ACTIVATE LIMITS", select "NO" then press OK.
Navigation in the WAMBA® HD receiver is simple and intuitive. You have access to a large number of functions by pressing the FCT* button on your remote control, whether you are watching a channel (video mode), on the list of channels and radio stations, on the list of recordings or on the list of Favourites.
A NAVIGATION IN VIDEO MODE
- When you are watching a TV channel, press the FCT button on your remote control to access a set of functions.
- By using the buttons then pressing OK you can add the channel you are watching to your list of Favourites, lock/unlock this channel, record it, launch Timeshift, access to the recording medium functions, display Teletext, change the parental code, access to information on the channel, access to the list of TVs, access to the list of radios, access to the list of Favourites and access to the list of recordings.
Functions are also accessible directly from your remote control:
- The GUIDE button allows you to access the Electronic Program Guide. You can see the programs for 2 weeks (under reserve of information availability) and directly program their recording thanks to the FCT button.
- The i button brings up the mini program guide. You access information on the program that you are watching and the following program: channel, name of program, synopsis, start time, end time. Pressing the buttons allow you to see the information relative to the next and preceding channels, without changing channels.
- The REC button allows you to begin recording the program that you are watching and to choose the length of the recording. The button enables you to stop it.
The TIMESHIFT button enables you to interrupt live playing and resume it later.
The OK button calls up the last list used.
Warning: in video mode as in the lists, the functions related to recording of one channel or of radio and the Timeshift appear only if a recording medium ( external hard disk or USB key) is connected to WAMBA® HD.
B NAVIGATION IN THE LIST OF CHANNELS, BOUQUETS AND RADIO STATIONS
To show the list of channels, press the TV LIST button on your remote control.
- Navigate in the list with the buttons and select a channel with OK. You can also enter a channel number using the alphanumeric keypad on your remote control.
Below the channels list, pictograms indicate to you the buttons on the remote control that you can use to take action on this list. You can, for example, directly type the channel number using the alphanumeric box or go from the list of channels to the bouquet list with the keys . You will find these buttons on the lists for radio, bouquet, favourites and recordings.
*The list of functions mentioned in the next few paragraphs may be enhanced by updating your receiver.
Using the FCT button in the list of channels
Using this button when you are in the list of channels enables you to sort the list alphabetically*, show unencrypted channels, show HD channels, add a channel to your Favourites, add several channels to your Favourites, lock/unlock a channel, delete a channel, reorganize the list, record a channel, access information on the channel, access radio stations and Favourites...
Press OK to confirm your choice.
The operation is the same for the list of radio stations. This list is accessible via the RADIO button on your remote control.
Using the FCT button in the list of bouquets
In the list of bouquets, the FCT button enables you to sort the bouquets in alphabetical order, delete a bouquet, add the bouquet to your Favourites, rename the bouquet, reorganize the list, access the Favourites list, access the radios list and access the recordings list.
C NAVIGATION IN THE LIST OF RECORDINGS
To access this list, your external hard drive/USB key must be connected to your WAMBA© HD receiver.
To access the list of video and audio recordings available on your external hard drive/USB key, press the REC LIST button on your remote control.
- To switch from your video recordings to your audio recordings, press the buttons on your remote control.
To move within the list, use the buttons on your remote control and confirm by pressing OK.
Using the FCT button in the list of recordings
The functions proposed when you press in the FCT key allow you to act on your recording: you can, among other things, launch the reader, delete it, rename it and lock it. You also have the possibility of acting on the list in sorting your recordings by alphabetical order or by date.
Using the FCT while playing
This button gives access to all play functions of a video: stop, pause, fast forward and rewind, slow rewind, etc. These functions are also available directly via the buttons on the upper keypad of your remote control.
D NAVIGATION IN THE LIST OF FAVOURITES
To access the Favourites lists, press the FAV button on your remote control.
To navigate between the different lists (FAV 1, FAV 2... ) use the buttons.
To navigate within a list (e.g.: FAV 1) use the buttons and confirm by pressing OK.
Using the FCT button in the list of Favourites
The FCT button gives access to various functions: sort alphabetically, lock this channel, delete this channel from this Favourite, reorganize the list, start recording, rename this Favourite, access channel information.
- If you have chosen to sort your list alphabetically, you can quickly access channels/radio stations beginning with a specific letter, for example "s", by pressing the corresponding button on the alphanumeric keypad (press 4 times to obtain the letter "s").
E FOCUS ON ...
Creation of Favourites lists
This function is accessible with the FCT button on your remote control from video mode, the list of channels, bouquets and radio stations, and Reorganization mode.
You can create up to 6 Favourites lists.
Add a channel or bouquet to a Favourites list
- Select the "Add to Favourite" or "Add this channel to Favourite" function (according to the wording in the lists) by pressing OK.
A window will open with the list of Favourites. Select the list in which you want to put the channel, using the buttons, and press OK.
Add several channels to your Favourites
Press the TV LIST button on your remote control.
Press the FCT button and select the "Add several channels to Favourite" function.
Choose the Favourites list in which you want to add the channels using the buttons, then press OK.
The list of Favourites will display alongside the list of channels. You can navigate from one window to another using the buttons on your remote control.
In the list of channels, select all the channels you want to put in your Favourites by pressing OK. They will then be automatically transferred to your chosen list.
- As you create your Favourites list, you can use the FCT key. If you press on FCT when you are on the channels list, you have access to the functions that can help you to create your Favourites: alphabetical sorting of the list, display of unencrypted channels only, display of HD channels only...If you press FCT while the Favourite is active, you will have access to the functions that allow you to act upon this Favourite: empty the Favourite, delete a channel from the Favourite...
Press BACK when you have finished.
Timeshift
You access Timeshift in video mode by bringing up the functions window via the FCT key or in pressing the TIMESHIFT or keys on your remote control.
- When you launch the Timeshift, the image on your screen will freeze.
A strip appears at the bottom of the page. In pressing OK you launch the Timeshift reader. The strip disappears. You can restore it at any time with the i button.
At the time that the Timeshift is read, you have access, via the FCT key, to the functions "Go to direct", "Pause" and "Speed up play".
These functions are equally available via the Timeshift strip: you navigate with the keys and validate with OK.
They are also available in direct access on your remote control: the button II takes over the
Timeshift reader or pauses it, the buttons allow a return or rapid advance and the button allows you to return directly.
Recording Programs
Recording a program
You can start recording a channel or radio station when you are in video mode, on the list of channels, on the list of radio stations and on the list of Favourites:
Press the FCT button on your remote control.
The list of available functions will appear.
- Choose the record function and confirm by pressing OK. The recording of a program is equally accessible via the REC button on the remote control.
- Length or recording is 4 hours by default. You can modify it by 30 minutes interval by pressing REC at the moment the recording is begun.
To stop the recording, press FCT and select the function "Stop recording".
You can record up to 3 programs simultaneously.
You can stop your recording from any channel with the button. A window will open showing the recordings in process. To interrupt a recording just press OK.
Programming your recordings
Press the blue button to access the Menu.
Choose the submenu "Programming Recording"
Press OK to enter the "Programming" section. The programming window will open.
Press OK to enter the programming window.
Use the buttons on your remote control to move within the window.
To program a recording, select a line and press OK.
- Use the buttons on your remote control and/or the alphanumeric keypad to define the recording parameters and confirm by pressing OK. You can also amend an existing recording.
Press TIMER/DEL to delete a recording.
You can program up to 8 recordings.
Parental Control
This function is accessible via the FCT button on your remote control from video mode, the list of channels or radio stations, and the list of Favourites.
- Select the "Lock this Channel" function by pressing OK.
- Your parental code is required. At its first use, enter the code 1234. You can then change this via the "Change the Parental Code" function, accessible in video mode with the FCT button.
- During one session, the parental code will only be requested once, when locking the first channel. You will then not have to re-enter it if you want to lock other channels. The parental code becomes active after the receiver has been put in standby or disconnected from the mains.
The reorganization of lists
You can reorganize a list by pressing on the FCT button on your remote control when you are on the list of channels, bouquets, radios and Favourites. In reorganization mode, the OK button enables you to select and move a channel in the list, without zapping.
- Select the function "Reorganise the list" by pressing OK. You will then go back to your list.
In the list, select the channel you want to move using the OK button.
Choose the new position for the channel using the or Pg buttons and confirm by pressing OK. You can also enter the number of the channel that you wish to change to. - By pressing the FCT button, you can switch back to zapping mode, among other options. You can equally hit BACK to exit the mode.
5
THE MENU
A NAVIGATION IN THE MENU
Press the blue button to access the Menu.
This menu comprises 5 submenus, each divided into sections.
- You can navigate in the submenus by using the button on your remote control.
Choose the sections using the buttons.
To access a section, press OK.
To move within a section, use the buttons on your remote control. - To change your parameters, use the buttons on your remote control and/or the alphanumeric keypad and confirm by pressing OK.
In the menu, the submenus and the sections, the FCT button will bring up help.
B "CONFIGURATION" SUBMENU
This is divided into 4 sections: "System", "Audiovisuals", "Antennas", and "Network".
"System" section
This section enables you to select the date, time and time zone, and also languages, latitude and longitude.
You can perform a RESET on your equipment by pressing the green button. Warning: all the parameters you have programmed, and all channels installed, will then be lost.
"Audiovisuals" section
This section enables you to configure your WAMBA® HD according to the specifications of your audiovisual installation (television set, audio output, video output, television format, HD format, auxiliary output, etc.).
"Antennas" section
This section enables you to modify the configuration of your satellite dish (LNB type, name of satellite, frequency, east limit, west limit, etc.). It is divided into two, according to your type of installation: fixed mount and motorised mount.
"Network" section
This section enables you to configure your WAMBA® HD according to the specifications of your personal network.
Warning: any incorrect handling may cause a malfunction in the WAMBA® HD. This part is for advanced users only.
THE MENU
"PROGRAM SEARCH" SUBMENU
This comprises 4 sections: "Scan on all satellites", "Scan on a single satellite", "Scan on a frequency", "Installation via USB".
"Scan on all satellites" section
Launch a new channel search over all satellites.
"Scan on a single satellite" section
You have the option of choosing the satellite over which you want to search for channels.
"Scan on a frequency" section
The search is limited to channels at a frequency you have chosen.
"Installation via USB" section
This section allows you to clone the complete configurations: antenna configurations, main lists and Favourites. You can:
Duplicate an existing configuration on a USB key in order to save and/or copy it on other WAMBA® HD.
- Recover the configuration types on the site www.aston-france.com, via your USB key, in order to recopy them on one or several WAMBA® HD.
D "SUPervisions" SUBMENU
"Supervision" section
This section allows you to access "Auto-configuration and Supervision" on the screen. You will find here the information relative to the elements of your installation (satellite, card, network,...).
- Select the element about which you want information using the buttons on your remote control.
Press the i or OK buttons to show the information.
Use the BACK button to exit or press OK or i a second time.
Use the ESC button if you wish to return to the video.
You can launch a new self-detection by pressing the yellow button on your remote control.
You can import or export an existing installation ("Installation via USB" function) with a USB key or an external hard disk then pressing on the green button on your remote control.
E "PROGRAMMING RECORDING" SUBMENU
"Programming" section
This section enables you to program your recordings on your external hard drive or your USB key, via the USB port on your WAMBA® HD (further information page 33).
F "INFORMATION, UPDATE" SUBMENU
This is divided into 3 sections: "Your Subscriptions", "Update", "About...".
"Your Subscriptions" section
Here you will have access to information about your subscription card(s): card n°, change of Pin code, etc.
"Update" section
This section gives you the option of updating your receiver via the satellite or the USB port*.
"About..." section
This section enables you to find out information relative to your WAMBA® HD. This information cannot be amended. If will be required if you contact customer services.
6
THE PVR-READY FUNCTION VIA THE USB PORT
A PRINCIPLES OF OPERATION
The WAMBA® HD receiver is PVR-Ready. This signifies that you can connect a recording medium onto the USB port of the receiver and record your satellite programs.
Recognition of the recording medium (external hard disk or USB key) by your WAMBA® HD is automatic in most cases. It may happen, however, that your WAMBA® HD does not recognize the format of the external hard drive/USB key you have connected. It will suggest to you to format your recording medium in order that you can use it with your WAMBA® HD. Warning: a hard disk which has never been formatted will not be used by WAMBA® HD.
Once the recording medium is connected and recognized you can, in total simplicity, record a program and/or program recordings (more information on page 33).
In video mode, you access several functions relative to your hard disk/USB key by pressing the FCT button and selecting "Go to recording medium functions". You can:
Show your support properties. You can also see the available space remaining on your disk/USB key.
Format your recording medium.
- Do a test of your recording medium. Essentially, certain mediums are not of sufficiently rapid access for allowing one or several simultaneous HD recordings. The diagnostic function allows you to evaluate the performance of your recording medium. 3 types of messages can appear:
- "USB medium not adapted for digital recording".
- "USB medium allowing a single HD recording", in other words a single HD recording at a time.
- "USB medium adapted to all recording types". This then concerns a medium allowing several simultaneous HD recordings.
B NOTES
Once you have started recording, your access to channels is limited. You can only watch programs received on the same frequency as that of the program you are recording. In the list of channels, radio stations or Fa-vourites, the icon will appear opposite programs you can no longer view.
Programs recorded on a storage device connected to the USB port of the WAMBA® HD receiver can only be read via this same receiver, except where this program is unencrypted.
7
THE MULTI-ROOM READY FUNCTION VIA THE ETHERNET PORT
A PRINCIPLES OF OPERATION
The WAMBA® HD receiver is Multi-Room Ready. It enables you to rebroadcast the programs it receives unencrypted on a domestic network. You can also enjoy your TV programs on all the televisions in the house.
This function requires purchase of a BEE-PLAYER® which enables the secondary television set to receive the programs broadcast on your domestic network via the WAMBA® HD*. You can also check the recordings made via WAMBA® HD, existing on the hard disk connected to your receiver. To do this, you must connect a BEE-PLAYER® to each additional television set on which you want to watch your programs.
BEE-PLAYER® automatically recognises the content broadcast by the WAMBA® HD receiver.
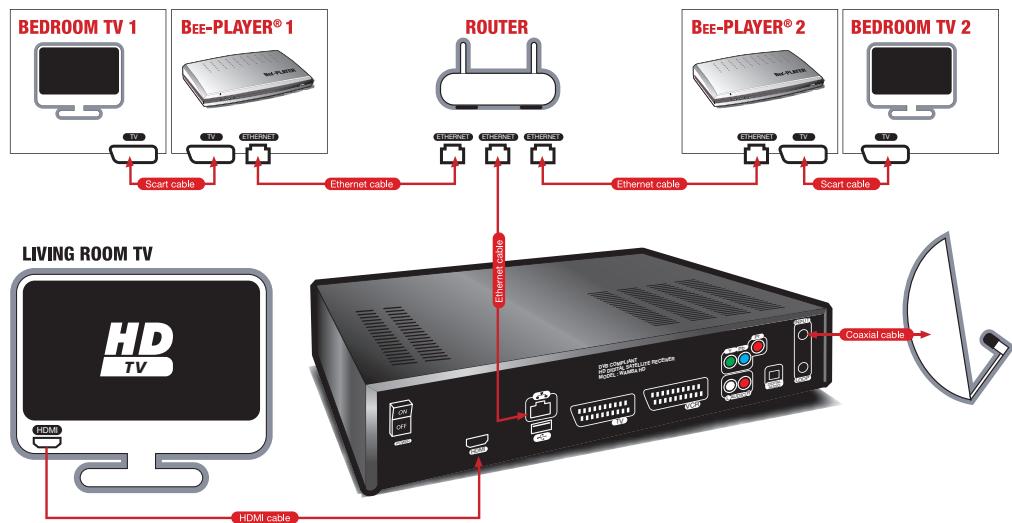
The above diagram presents the Ethernet configuration.
Your BEE-PLAYER® can also communicate with your router in CPL or in Wi-Fi.
B NOTES
Case n°1: your WAMBA® HD receiver is in use.
You can only view, on your secondary television set, the channels broadcast on the same frequency as that of the channel you are watching on the principal TV via the WAMBA® HD receiver.
Case n°2: your WAMBA® HD receiver is on standby.
The BEE-PLAYER® can remotely activate your WAMBA® HD on any of the channels received by your satellite installation. Thus, your BEE-PLAYER® can receive all the programs received by your WAMBA® HD.
If several BEE-PLAYER® are installed at your house, the first activated will condition the others' access, according to the frequency of the channel chosen by the first.
- Only the programs in MPEG2 standard definition and unencrypted. This function applies equally to the encrypted programs in function with the agreements with the operators.

Reception MPEG4/MPEG2, HD/SD.
- Reception of unencrypted channels.
Multi-controls of embedded access.
Labeled Viaccess 3.0.
2 card readers or card reader +1 common PCMCIA interface (according to the version).
Simple satellite tuner DVB-S2/HD/SD.
Dolby Digital Sound 5.1.
- Configuration of the receiver and bouquet and channels search entirely automatic.
PVR-Ready function via the USB port: possibility of external hard disk or a USB key connection.
Multi-Room Ready function via Ethernet port/possibility of streaming of received programs in order to watch your satellite programs** throughout the house (requires getting a dedicated kit per each additional television)
3 simultaneously recordable programs***.
8 programmable recordings.
Timeshift.
6 configurable Favourites lists.
Electronic Program Guide.
Parental control-Teletext-Sub-titles-Timer.
- Possibility to show just the HD channels in the lists.
- Possibility to show just the unencrypted channels/radio in the lists.
Downloadable upgrade by satellite and USB port****.
WAMBA
HD
High Definition
- On the satellites recognized at the time of auto-detection.
Only the programs in MPEG2 standard definition and unencrypted. This function applies equally to the encrypted programs in function with the agreements with the operators.
* Under the reserve of broadcast on the same frequency, the speed of the connected storage periphery and of the output of recorded channels.
*** Following availability of upgrade sheets.

TECHNICAL CHARACTERISTICS
Nr of channels
Input Frequency
Input Level
Bandwidth
Impedance
Tuner standard
Symbol rate
Band switching
LNB switching
LNB protection against short circuit
LNB type
LNB inputs
LNB loop-through gain
LNB switches
DVB compatibility
Video/audodecoding
Picture format on scart
HDMI version
HDMI picture formats
Dolby digital
Audio mode
Video memory
System memory
- Flash memory
EEProm
USB version
USB current limitation
- Ethernet version
Video RCA output
Audio RCA output
Digital audio optical output
TV SCART output
-
Video level
-
Audio level
VCR SCART
- Output:
Video level
Audio level
Loop trough
-Input:
Video format switching
Embedded conditional access
Number of smart card readers
Physical specifications
- Protocol
Front panel
Main voltage
Power consumption
Operating temperature
Dimensions
5500
950-2150MHz
-65dBm/-25dBm
10 to 34 MHz (-3dB)
75 Ohms
DVB-S:QPSK,
DVB-S2: QPSK, 8PSK
1 to 45 Mb/s
0/22 kHz (+4kHz) 0.65+ -0.25V
DC 0/14/18V (500mA Max)
Automatic
Universal type 1, C band
-5dB min, +5dB max over 950-2150MHz
DiSEqC 1.0, Tone burst, Option A/B
ISO/IEC 13818-1 & ETS 300 468
MPEG2, MPEG4
4:3, 16:9 pan scan / letter box
1.1
50Hz:1080i,720p,576p,576i
60Hz:1080i,720p,480p,480i
can be decoded on analog ports
Mono, Stereo
64 Mbytes DDR400
64 Mbytes DDR400
8 MBytes
4 KBytes
2.0
500mA
100Base1
Components Y, Pb, Pr
Stereo pair
SPDIF
CVBS (PAL/PAL-N/NTSC/PAL-M), RGB
CCIR 624-4 Standard
L + R (1Vrms max volume) controllable
CVBS (PAL/PAL-N/NTSC/PAL-M)
CCIR 624-4 Standard
L+R (1Vrms max vol) controllable
when STB d or VCR slow blanking high.
CVBS,RGB
16:9 (4.5V to 7.0V) 4:3 (9.5V to 12.0V)
VIACCESS 3.0 and/or CONAX
ISO 7816-1
T=0.T=1
Fluorescent vacuum display + 3 LEDs + 3 swt.
230 V AC (- + 10%) 50Hz (+2%)
32W (standby mode = 24W)
5^ to 50^122.5^
340 × 260 × 70 mm