
S-Play Mini - Controller Enttec - Free user manual and instructions
Find the device manual for free S-Play Mini Enttec in PDF.


| Product Type | DMX Lighting Controller |
| Model | S-Play Mini |
| Brand | Enttec |
| Dimensions (approx) | 100 x 60 x 25 mm |
| Weight (approx) | 150 g |
| Power Supply | 5V DC via Micro USB or USB port |
| Power Consumption | <2.5 W |
| DMX Output | 1 universe (512 channels) |
| Storage | MicroSD card (not included) |
| Playback Modes | Standalone, triggered, or manual |
| Maximum Cue List Length | Up to 99 cues per scene |
| Maximum Scenes | Depends on microSD capacity |
| Connection | 3-pin XLR male (DMX) |
| Control Input | Push button, optional remote trigger |
| LED Indicators | Power, status, DMX activity |
| Software Compatibility | Enttec S-Play Editor (free download) |
| Operating Temperature | 0 to 40 °C |
| Housing Material | ABS plastic |
| Cleaning | Wipe with dry cloth; do not use liquids |
| Safety | Keep away from water and moisture |
Frequently Asked Questions - S-Play Mini Enttec
User questions about S-Play Mini Enttec
0 question about this device. Answer the ones you know or ask your own.
Ask a new question about this device
Download the instructions for your Controller in PDF format for free! Find your manual S-Play Mini - Enttec and take your electronic device back in hand. On this page are published all the documents necessary for the use of your device. S-Play Mini by Enttec.
USER MANUAL S-Play Mini Enttec
Create, Record, Edit and Play up to 2 Universes light shows integrating with party hardware and systems in a compact 4 DIN module width form factor.
Contents
Safety 3
Electrical Safety 3
System Planning and Specification....3
Protection from Injury During Installation....4
Installation Safety Guidelines....4
Wiring Diagrams 5
Application Diagram....5
Playback to Pixel Systems....5
Distribute DMX Output 6
Connection to Relay 7
Connection to Digital Inputs....7
Using Motion Sensors with the S-PLAY MINI 8
Functional Features....9
Hardware Features....10
Overview 10
S-PLAY MINI Connectivity....10
LED Indicator 11
Reset Button....11
Trigger Playlists....11
Boot Loading....11
Reset Network Configuration....12
Resume Factory Default....12
Out of the Box 12
Network Discovery....12
Changing the Network Settings....14
Web interface....14
Top Menu....14
Home 14
Cue....16
Managing Cues 16
Static Scenes 17
Capture DMX Snapshot 17
Edit/Modify Static Cue 18
Dynamic Cue Creation 19
Effects....21
Events....22
UDP 22
OSC 23
Relay 23
Art-Net 23
sACN 24
DMX 24
Triggers....25
UDP 25
OSC 26
Digital Input 26
Art-Net 26
sACN 27
DMX....27
Playlists....28
Playlists Page Layout 29
Created Playlists....30
Global Playlist Control 30
Search and Filter Bar 30
Cues, Triggers & Events Library 30
Playlist Playback Configuration....31
Playlist Settings 32
Playlist Timeline and Media Tracks....32
Event and Trigger Tracks....33
Interfaces 34
Interface Editor 35
Widgets....35
Storage 37
Backup 37
Restore 38
Storage & Calculating Requirements....38
Settings....39
Device Info....40
Output settings 40
Art-Net and sACN settings....40
DMX Settings 41
Network Settings 41
Playback Configuration....42
Firmware Update....42
Factory Reset....43
User Management 44
Monitor DMX Current 44
Lock Feature 45
Default Login and Password 45
Servicing, Inspection & Maintenance 46
Cleaning 46
Package Contents 47
Ordering Information 47
Safety

Ensure you are familiarised with all key information within this guide and other relevant ENTTEC documentation before specifying, installing, or operating an ENTTEC device. If you are in any doubt about system safety, or you plan to install an ENTTEC device in a configuration that is not covered within this guide, contact ENTTEC or your ENTTEC supplier for assistance.
ENTTEC's return to base warranty for this product does not cover damage caused by inappropriate use, application, or modification to the product.
Electrical Safety

This product must be installed in accordance with applicable national and local electrical and construction codes by a person familiar with the construction and operation of the product and the hazards involved. Failure to comply with the following installation instructions may result in death or serious injury. Do not exceed the ratings and limitations defined in the product datasheet or this document. Exceeding can cause damage to the device, risk of fire and electrical faults. ■ Ensure that no part of the installation is or can be connected to power until all connections and work is complete. Before applying power to your installation, ensure your installation follows the guidance within this document. Including checking that all power distribution equipment and cables are in perfect condition and rated for the current requirements of all connected devices and factor in overhead and verify that it is appropriately fused and voltage is compatible. ■ Remove power from your installation immediately if any accessory power cable or connector is in any way damaged, defective, shows signs of overheating or is wet. ■ Provide a means of locking out power to your installation for system servicing, cleaning and maintenance. Remove power from this product when it is not in use. ■ Ensure your installation is protected from short circuits and overcurrent. Loose wires around this device whilst in operation, this could result in short circuiting. - Do not over stretch cabling to the device's connectors and ensure that cabling does not exert force on the PCB. - Do not 'hot swap' or 'hot plug' power to the device or its accessories. - Do not connect any of this device's V-(GND) connectors to earth. ■ Do not connect this device to a dimmer pack or mains electricity.
System Planning and Specification

■ To contribute to an optimal operating temperature, where possible keep this device out of direct sunlight. ■ Any twisted pair, 120ohm, shielded EIA-485 cable is suitable to transmit DMX512 data to or from the S-PLAY MINI. The DMX cable should be suitable for EIA-485 (RS-485) with one or more low capacitance twisted pairs, with overall braid and foil shielding. Conductors should be 24 AWG (7/0.2) or larger for mechanical strength and to minimise volt drop on long lines. A maximum of 32 devices should be used on a DMX line before re-generating the signal using a DMX buffer/repeater/splitter. ■ Always terminate DMX chains using a 120Ohm resistor to stop signal degradation or data bounce-back. The maximum recommended DMX cable run is 300m (984ft). ENTTEC advises against running data cabling close to sources of electromagnetic interference (EMF) i.e., mains power cabling / air conditioning units.
This device has an IP20 rating and is not designed to be exposed to moisture or condensing humidity. ■ Ensure this device is operated within the specified ranges within its product datasheet.
Protection from Injury During Installation

■ Installation of this product must be performed by qualified personnel. If ever unsure always consult a professional. ■ Always work with a plan of the installation that respects all system limitations as defined within this guide and product datasheet. - Keep the S-PLAY MINI and its accessories in its protective packaging until final installation. Note the serial number of each S-PLAY MINI and add it to your layout plan for future reference when servicing. All network cabling should be terminated with an RJ45 connector in accordance with the T-568B standard. ■ Always use suitable personal protective equipment when installing ENTTEC products. ■ Once installation is completed, check that all hardware and components are securely in place and fastened to supporting structures if applicable.
Installation Safety Guidelines

■ The device is convection cooled, ensure it receives sufficient airflow so heat can be dissipated. ■ Do not cover the device with insulating material of any kind. ■ Do not operate the device if the ambient temperature exceeds that stated in the device specifications. ■ Do not cover or enclose the device without a suitable and proven method of dissipating heat. ■ Do not install the device in damp or wet environments. ■ Do not modify the device hardware in any way. ■ Do not use the device if you see any signs of damage. ■ Do not handle the device in an energised state. ■ Do not crush or clamp the device during installation. ■ Do not pull power from the device whilst in operation. Do not sign off a system without ensuring all cabling to the device and accessories has been appropriately restrained, secured and is not under tension.
Wiring Diagrams
Application Diagram![graph TD A["Playlist Triggers"] --> B["Digital Input"] B --> C["Relay"] C --> D["Activate external equipment for Events"] D --> E["Control through Ethernet Art-Net, sACN, UDP, OSC"] E --> F["DMX Ethernet"] F --> G["Dual Direction DMX Control"] G --> H["DMX Lights"] G --> I["Lighting Console"] H -->…](/content/2026/07/1448122/images/623954fd8f39dce9cb622f3ad165c197173f1c3d816f441ed9039f760317f21e.jpg)
Playback to Pixel Systems![graph TD A["S-PLAY MINI<br>SKU:70093"] -->|Power 12-24V DC| B["ENTTEC<br>S-PLAY<br>MINI"] B --> C["eDMX"] C --> D["OCTO MK2<br>SKU:71521"] D --> E["DC PSU & Protection"] D --> F["DC PSU & Protection"] B --> G["DATA"] B --> H["DATA BACKUP"] D --> I["VCC"] D --> J["0V / DMX GND"] D --> K["Ethernet"]](/content/2026/07/1448122/images/1a0bbd1bc3d2fcba318b5a06ea460a493d0989c19dd4dfebc3f200c4f75f8fb5.jpg)
Distribute DMX Output
Legend
DMX Port - Max 1U DMX Output
Ethernet Port - Max 2U DMX Output![graph TD A["S-PLAY MINI\nSKU:70093"] -->|Power 12-24V DC| B["DIN ETHERGATE\nSKU:71030"] B -->|DMX| C["Output"] B -->|DMX| D["Output"] B -->|eDMX| E["Input"] style A fill:#f9f,stroke:#333 style B fill:#ccf,stroke:#333](/content/2026/07/1448122/images/56da61c0d5ef6c0330e9061af0286759cdf512a7c6b56f024e7e90b7d6d1bf00.jpg)
Connection to Relay
The S-PLAY MINI is equipped with a set of relays designed for use with low power devices and to provide switching logic for higher power contactors.
To ensure a safe installation it is imperative that the power connected to the S-PLAY MINI's relays is within their operating limits.
The S-PLAY MINI's relay specifications are as follows:
| Maximum Current Rating | 2A |
| Maximum Voltage Rating | 50V DC |
| Total switchable power of each S-PLAY MINI relay | 60W |
To calculate the total power your circuit will pass through the relay, multiply the circuit voltage by the current you intend to pass through it. This value must be lower than 60W. In other words, Voltage x Current ≤ 60W.
| Example 1 | Example 2 | Example 3 | |
| Current | 1.2A | 2A | 2A |
| Voltage | 50V | 30V | 50V |
| Maximum Power | 60W | 60W | 100W |
If your application requires main power switching or high current applications, ENTTEC recommends the use of a DMX switch pack controlled by the S-PLAY MINI's DMX output or wire the S-PLAY MINI's relay outputs to connect to the primary coil of a DIN mount high powered relay or contactor.
Connection to Digital Inputs
The S-PLAY MINI's digital inputs detect circuit completion to the S-PLAY MINI's 'GND' (V-terminal) to send triggers.
The maximum resistance of a cable that can be used to connect to a Digital Input to the S-PLAY MINI's GND is 20 Ohms. ■ ENTTEC recommends a total maximum wire length of 100m. (50m total distance from the S-PLAY MINI in a loop). The longer the cable, the higher its capacitance and likelihood of interference from EMF (Electro Magnetic Interference). ■ To ensure a reliable trigger when creating a system, contact should be made for 3 seconds when triggering a digital input.
Note: Always run digital input cabling away from main power or high sources of EMI (i.e. air conditioning units) to reduce interference.

If you require a remote input trigger further away from the S-PLAY MINI than 50m, ENTTEC recommend the use of a 3rd party GPIO interface that can communicate with the S-PLAY MINI's other triggering methods over a network.
Using Motion Sensors with the S-PLAY MINI

- Connect the sensor output to one of the Digital Input ports (IN1 to IN4) in S-PLAY MINI.
- Connect OV (GND) from sensor to GND of Digital Input connectors in S-PLAY MINI.
- Go to web interface:
■ Go to Triggers. ■ Create a new entry. ■ Select Digital Input from Type ■ Change to Port 3 in "Ports" (or to the corresponding port the OUT cable was connected to). ■ You can use the Test Trigger option to ensure functionality. - Click on Save Trigger for it to be saved ready for use on the Playlists page.
- Navigate to the Playlists Page.
- The Trigger can be selected as a 'Start Trigger' to commence playback of a certain playlist and/or dragged onto the timeline to act as a condition that must be met for playback to continue.


Functional Features
Overview
■ Supports protocols including DMX, Art-Net and sACN. ■ 1 Universe DMX output or input. ■ 2 Universe Art-Net and sACN input or output. ■ Max output refresh rate 40 FPS.
Record Cues or Create Effects
■ Record/edit up to 16 Static, Dynamic or Effect Cues. ■ Preview Cues being created. ■ Monitor the DMX values of Cues while recording. ■ On board gradient Effect Cue generator.
Create and playback Playlist Integrating External Hardware
■ Create up to 8 playlists using the intuitive timeline editor. ■ HTP merge between cues and playlists. ■ Fade out on Stop command. ■ Hold last value on pause. ■ Support up to 16 Events through options: UDP, OSC, Relay, Art-Net, sACN and DMX. ■ Create up to 16 remote Triggers through options: UDP, OSC, Digital Input (GPI), Art-Net, sACN and DMX. ■ Map different streams and protocols to different ports. ■ Enable a customised user interface that empowers end users to control the system while withholding complete system privileges. ■ Playback on power up with preferred loop times. ■ Support OSC API.
Management and Support
■ Easily accessible web interface for account management. ■ Lock out edit functionality using a password. ■ Allow backup and restore S-PLAY MINI state.
Hardware Features
Overview
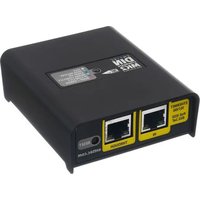
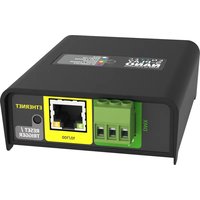
■ 4-DIN-module width unit form factor. ■ One bi-directional 3-Pin Phoenix DMX Port. ■ 12 to 24V DC Input. ■ 100 Mbps Ethernet RJ45 Port with built-in Link and Activity LED Indicator. ■ 4 Digital Inputs (GPI). ■ 1 Relay output (NC, NO, COM). ■ Full electrical isolation of up to 1500V. ■ Polarity protection.
S-PLAY MINI Connectivity
Fast reference for user to identify the device status. Using this button to resume device back to factory default or setup as a trigger for playlists. Bi-directional DMX port to record, playback or trigger playlist using DMX. Ethernet port capable of transmitting or receiving Art-Net, sACN, OSC, UDP. Use web interface to create playlists, record cues, apply updates and access the full functionality of the device. 12-24 DC Jack. 4 digital inputs to receive triggers from buttons, switches, sensors, etc. 1 relay output to activate 3rd party device for an event. Accessory coming along with the package for DIN rail mount.
LED Indicator
The LED status indicator is used to determine the S-PLAY MINI's current state.
Each state is as follows:
| LED Colour | S-PLAY MINI Status |
| White | Idle |
| Blue | Device starting up |
| Green | Play/Pause |
| Yellow | Record |
| Red | Boot/Error |
| Purple | IP Conflict |
| Flashing Yellow | Updating firmware |
| Flashing Red | On Reset/Trigger button press |

Reset Button
The reset button on the device providing multiple control options and ensuring the device's adaptability to various operational scenarios.
This reset button can access to below functionalities:
Trigger Playlists
The reset button can be configured as a trigger button for playlists. By selecting "Button" as the input type in Trigger page, users have the option to trigger a playlist either when the button is on release or on press.

Boot Loading
This function assists to restore or recover the device's firmware to a stable state. This can be performed by following steps:
Press and hold the reset button while powering up. Continue holding and release the button within 10 seconds. The unit will load the boot and the web interface will be prompted to the boot page. On this page, users have the option to upload a firmware file, perform factory reset at the current firmware version, or revert to the factory-state firmware.

Reset Network Configuration
In case of IP conflicts or network issues, follow these steps to reset the network configuration to default (DHCP enabled with fallback IP 192.168.0.10):
Press and hold the reset button while powering up. Continue holding for 10 seconds until the LED turns Green. The device will restart automatically. The network settings will be reset to default.
Resume Factory Default
In specific situations, a factory reset might be necessary. This action reverts the device to its initial manufacturer settings, erasing all data and custom configurations:
Press and hold the reset button while powering up. Continue holding for 20 seconds until the LED turns Yellow. The device will restart automatically. All settings will be reset to initial state.
Out of the Box
Out of the box, the S-PLAY MINI is factory configured to:
Output Settings: Art-Net DHCP - Enable. Allowing you to plug it directly into your existing router and it will receive a network address. If it does not receive a DHCP response it will fall back to IP: 192.168.0.10 until the network adaptor is reset or the device is power cycled.
To begin your installation please follow these steps:
Unpack the unit from the box. Inspect the S-PLAY MINI for any damage that might have occurred in shipping and verify that it looks to be in good condition before plugging it into power. Complimentary DIN clip and screws in the box for S-PLAY MINI DIN rail mount. Using a Cat5, Cat5e or Cat6 cable, connect the S-PLAY MINI to an ethernet network. Connect a DC power supply of 12-24v to power up the unit. The device is factory default to DHCP enabled. Plug it directly into your existing router and it will receive a network address once the unit is powered on. You will be able to find its IP address using ENTTEC EMU App. If it does not receive a DHCP response it will fall back to IP: 192.168.0.10 until the network adaptor is reset or the device is power cycled. More information can be found in the Network Discovery section in this document.
Network Discovery
To configure your S-PLAY MINI you will be required to use its web interface. S-PLAY MINI's IP address can easily be discovered from ENTTEC EMU software by following these steps:
- Download EMU from www.enttec.com/sku/70680. (Available for Windows and macOS)
- S-PLAY MINI should be connected physically by an ethernet cable either directly between the S-PLAY MINI and the computer or through the same physical network (or router) as the computer, on which you will run EMU.
- Open EMU. Access the Settings in the top right corner and go to the Output tab. Here you can 'Rescan for Devices' and wait until EMU finds the S-PLAY MINI and any other supported ENTTEC
device on the network.
- Once found, select 'S-PLAY MINI' and press the configuration cog to be directed to your S-PLAY MINI's Web interface.
Alternatively, you can also use the following methods to discover the IP address:
■ An IP scanning software application (i.e. Angry IP Scanner) can be run on the local network to return a list of active devices on a local network. ■ Devices can be discovered using Art Poll (i.e. DMX Workshop if set to use Art-Net). ■ The device default IP address 192.168.0.10 is printed on the physical label on the product when DHCP server is not available.

Note: When the S-PLAY MINI is set to a static IP, the default gateway MUST be the same for both the S-PLAY MINI and your computer for EMU to discover the S-PLAY MINI.
Changing the Network Settings
Change the Network settings between either Static or DHCP, Netmask and Gateway and input ports within settings page on S-PLAY MINI's web interface.
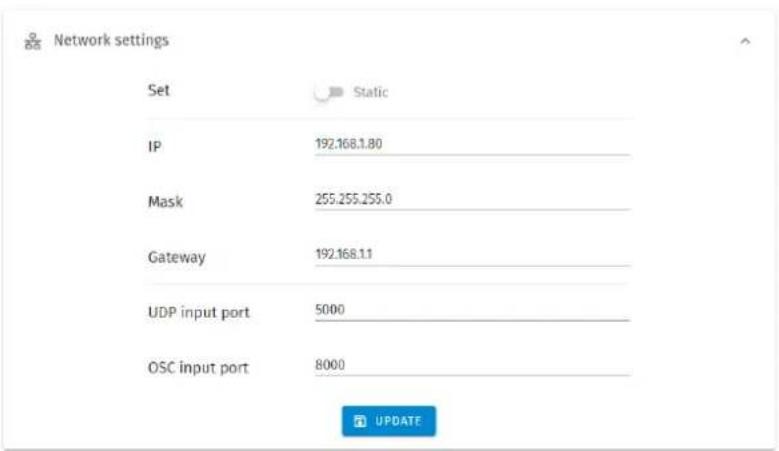
The S-PLAY MINI can either be configured to be a DHCP or Static IP address.
DHCP: When DHCP is enabled and the S-PLAY MINI is on a network with a device/router with a DHCP server, the S-PLAY MINI will request an IP address from the server on power up. If the DHCP server is slow to respond, or your network does not have a DHCP server, the S-PLAY MINI will fall back to the IP address 192.168.0.10 and netmask 255.255.255.0. If a DHCP address is provided, this can be used to communicate with the S-PLAY MINI.
Static IP: By default (out of the box) the Static IP address will be 192.168.0.10. If the S-PLAY MINI has DHCP disabled, the Static IP address given to the device will become the IP address to communicate with the S-PLAY MINI. The IP address will change from the default once it is modified in the web interface. Please note down the Static IP address after setting.
Web interface
The S-PLAY MINI can be configured and controlled through a web browser on a computer, located on the same Local Area Network (LAN) as the device. Either click on the cog within EMU following the guide in Network Discovery section or simply type the IP address directly into the web browsers URL field if you are aware of the S-PLAY MINI's IP address (either DHCP or Static).
Top Menu
The S-PLAY MINI's web interface consists of the following pages:
Home Cues Events Triggers Playlists Interfaces Storage Settings
Home
The Home page, which is the default landing page, presents an overview of all playback activities going on the S-PLAY MINI.
When used in combination with the lock function, the homepage can be used as a system page for the end users to view all custom interfaces and playlists:
Interfaces:
- Navigate to custom interface.
Playlists
■ View/Set intensity for all Playlists ■ Play/Pause all Playlists ■ Stop all Playlists ■ Play individual Playlist ■ Pause individual Playlist ■ Stop individual Playlist ■ View/Set intensity individual Playlist ■ View/Set progress individual Playlist
Note: Custom Interface and playlists can be hidden from the home page by selecting the 'Hide from Home' option on each of their configuration pages.

Hide from Home


Cue
S-PLAY MINI allows a maximum of 16 cues created from a combination of Static, Dynamic and Effect Cues. The Cue page allows cues to be created, configured, duplicated, edited and previewed before building into a playlist.
The S-PLAY MINI's Cue is based around three key types of cues that can be created by using the green + icon:
■ Static is a cue type consisting of one lighting state of up to 2 universes. The DMX data may be either user defined values or a snapshot of the incoming DMX frame. This can be built into a playlist with fade in / out times applied. ■ Dynamic is a recording of up to 2 universes of lighting control data. The S-PLAY MINI provides various methods to allow a perfect loop when recording over a user defined period. ■ Effect is a cue type capable of creating gradient effect from within the S-PLAY MINI without requiring a physical DMX source. Select the universe count, order and much more.

Managing Cues
All cues can be ordered by ID, Cue Name, Cue Type & Duration. Preview, Duplicate, Edit or Delete Static or Effect Cues from this view. Note that Dynamic recordings cannot be duplicated.

Quickly turn a Cue into a Playlist:
■ After a cue has been created, note that editing it in the Cue Library directly overwrites the full universe values received and extends the length of the cue if necessary. By clicking Edit, the user is allowed to modify the Cue name, active universes, and channels after the cue is created. ■ You can preview multiple cues simultaneously by pressing the PREVIEW button in the cue list. Actively playing cues will have green PREVIEW buttons. To stop previewing, simply click on the green PREVIEW button.

Note: Once a cue is selected to be edited, the S-PLAY MINI will internally trigger the Stop All command to stop all playback on the S-PLAY MINI to prevent overlapping.
Static Cue
The Static Cue can be generated by either capturing a DMX snapshot from external sources or using the built-in editor to define DMX values manually.
Follow the instructions below to create a static cue using your preferred method.
Capture DMX Snapshot for Static Cue
Follow these steps to use the DMX Snapshot feature that captures and records DMX values from external sources:
- Click the green icon + and choose "Static" as the cue type to open the Static cue editor window.
- Start by assigning a name to the cue for easy identification.
- Then, choose the source protocol and specify the desired channels to be used for the recording.
a. DMX (up to 1 Universe / 512 Channels) b. Art-Net (up to 2 Universes / 1,024 Channels) c. sACN (up to 2 Universes / 1,024 Channels)

- Select the S-PLAY MINI's Universe, which represents the internal universe designated for recording within the S-PLAY.
- Specify the External Universe, corresponding to the universe of the external source or the DMX port of the S-PLAY MINI.

Tip: You can also set all external universe numbers to be identical if you want to mirror the same external Art-Net / sACN source to all internal universes.
- Once the option for capturing is selected, press the 'DMX Snapshot' button to take a snapshot of your input. It will automatically populate the recorded DMX values to the selected universes.

- If you wish to view the output live, press the 'Preview' button at the top left of the interface to send the recorded data to your fixtures of your S-PLAY's outputs as defined on the Settings page.
- Save the cue once completed.
Edit/Modify Static Cue
The S-PLAY MINI's inbuilt editor can be utilised to either modify the DMX values grid after DMX Snapshot or create static scene by using the colour picker tool provided at the top of the interface. To edit the DMX value:
- Click the green icon + and choose "Static" to create a new static cue or select the existing Static Cue that you would like to modify.
- Select the universes you want to affect, then set a channel range you wish to set/modify.
- Next, either utilise the colour picker or define channel values manually.
Note: If setting single channel or dimmer fixtures, select "All/W" for single channel control.

- When the state you require has been created press 'SET DMX' for the values to be populated in the channel grid of each universe selected.

- Preview or save the cue created.

Note
You can also set all external universe numbers to be identical if you want to mirror the same external Art-Net / sACN source to all internal universes.
Dynamic Cue Creation
Dynamic Cues are recordings that allow DMX/Art-Net/sACN streams to be recorded and integrated into a show. When creating a Dynamic Cue, press the green icon and select Dynamic as the cue

type:
- Provide a cue name to aid identification.
- Select one of the following options for data capture:
a. DMX (up to 1 Universe / 512 Channels) b. Art-Net (up to 2 Universes / 1,024 Channels) c. sACN (up to 2 Universes / 1,024 Channels)
- Options for manual cue recording by clicking the red "Start Rec" button located at the top right corner, or configure a recording trigger to initiate and halt the recording with precision, allowing you to effortlessly capture a show using a remote trigger:

a. OSC, UDP triggers start on message received and stop when same message received again. b. Art-Net, sACN, DMX triggers start when a value is received that is equal or above the

'Trigger Level'. It will then stop when the value drops below.
c. Digital Input: when configured as 'Activate on Break' - Recording starts when the connection between the Digital input port and GND is broken and stops when the connection is made. This is reversed when set to 'Activate on Make'.
- To capture data, indicate the desired universes and channel range by selecting the corresponding checkboxes and adjusting the input universe fields accordingly.
- Toggle Live Preview on to send the recorded data to your fixtures of your S-PLAY's outputs as defined on the Settings page.
Live Preview
- If you are recording looped content, enable Perfect Loop to allow the S-PLAY to automatically stop recording when it detects a loop by matching the incoming frames with the first 10 frames of the recording.
Perfect Loop
- Once the options for capturing are selected, press on the Start Rec button to start the recording, or prime the S-PLAY MINI ready to receive the start trigger if one was defined. The timer in the top right of the window will start running as soon as data begins to be captured. The DMX values captured will be shown for their corresponding universes.

Recording Tips: During Art-Net or sACN recording, when utilizing the 'live preview' function, it is crucial to ensure that no other active Art-Net/sACN device is outputting on the same universes that are being recorded (including the S-PLAY itself). This precaution eliminates the possibility of interference loopback, which can result in erratic or inaccurate recordings. To adjust the output settings of your S-PLAY, navigate to the Settings page.
When recording with the physical DMX ports, make sure that these ports are not already configured as outputs on the Settings page. If a DMX port is set as an output, it will be unable to receive data during recording.
When recording live generated content, Perfect Loop may have inconsistent results due to the dynamic nature of the live content generation, where the exact same 10 frames may not always be generated.
Effects
Effects in the S-PLAY MINI rely on a gradient, which makes it perfect whether fine-tuning a multitude of single channel dimmers or RGB/RGBW lights in 16 or 8bit variants. To create an Effect, press the green icon and select Effect as the cue type to open the Effect editor window:
- Firstly, provide a cue name to aid identification.
- If you wish to view the output live whilst creating your effect, press the preview button at the top left of the interface to send the recorded data to your fixtures of your S-PLAY's outputs as defined on the Settings page.

- Next, Fixture Control Tab is where user can define the LED type that the effect will refer to and the LED start address that the first fixture will start on (i.e. the DMX Start address of your first fixture). The Address offset will be populated accordingly, however, you can increase this value to a larger spacing between each fixture.
- The Effect Start Channel defines the position (phase) where the gradient will apply. The Number of Fixtures sets the number of the LEDs which will be included within the effect. By inverting the gradient direction after every defined number of fixtures, the Invert Every X Fixtures allows the creation of a grid of fixtures showing in a non-linear fashion (perfect for pixel tape projects!).
- By clicking on the gradient graphic, the user can modify and define the gradient colour at any point. Each colour point can be dragged to a position to create a preferable effect. A maximum of 8 colours can be created for an Effect Cue in S-PLAY MINI. In order to create smooth loops, ensure the beginning and end colours of the Effect are the same. The exact range of fixtures that the colour point in the gradient graphic will affect can be counted based on Number of Fixtures and Position (%).
- This look can be saved as it is, or a speed and direction can be defined using the slider. (We strongly recommend using the preview option whilst doing this to ensure all is as you expect in the real world).

- Use the toggle switches below the gradient to define the universes that the effect will occupy. This is useful when layering effects or overlapping with other groups. Any universes which are not enabled will be set to 0 values on each channel.
Events
The Events page allows:
■ Create up to 16 custom Events, ready to be embedded in playlists. ■ Send Events through: Relay, UDP, OSC, DMX, Art-Net and sACN. ■ Editing, testing and deletion of Events.
Use events to allow integration between S-PLAY MINI and other devices. The S-PLAY MINI can send commands over multiple protocols and interact with the relay.

UDP
■ A UDP Event will send the command defined below when activated. ■ Commands are limited to 1024 characters. ■ UDP strings ending in \r - the \r will be replaced by a carriage return. ■ UDP strings ending in \n – the \n will be replaced by a line feed. ■ Internal UDP event can be sent by setting IP to 127.0.0.1 and Port to 5000 (or Network Settings - UDP input port).

OSC
■ When activated, this Event will send the OSC data defined in the settings. ■ OSC Strings, Floats and Integers can be defined. ■ All OSC addresses must start with a leading '/' sign.

Relay
Control the relay action.
■ NO: Normally Open ■ NC: Normally Closed
When activated in a playlist the Relay will perform the selected action.
Note: On system power-up, the Relays position is set to be normally open.

Art-Net
When activated, this Event will send the Art-Net frame with channel state defined in the settings.
■ For best practice, do not overlap Events with universes used for playback of recordings.

sACN
When activated, this Event will send the sACN frame with channel state defined in the settings.
■ For best practice, do not overlap Events with universes used for playback of recordings.

DMX
When activated, this Event will send the DMX frame with channel state defined in the settings.
■ For best practice, do not overlap Events with universes used for playback of recordings.

Triggers
The Triggers page allows:
■ Create up to 16 custom Triggers, ready to be embedded in playlists. ■ Set receiving triggers from: digital input, UDP, OSC, DMX, Art-Net and sACN ■ Editing, testing and deletion of Triggers.

Use triggers to take control of the playlist timeline. When using a trigger, the timeline will pause until the selected trigger is active.
Triggers can be used to start a playlist or at any point within the timeline.
When a playlist is awaiting a trigger, it can be played either by activating the trigger or by pressing the play button, ensuring complete control over playback even when triggers are unavailable.
When creating new triggers, the 'Test Trigger' option can be used to send the trigger being created.
UDP
UDP communication settings:
■ A Trigger will be activated when an incoming UDP command matches the one defined below. ■ When used in a playlist, the S-PLAY MINI will wait to receive the Trigger below before continuing. ■ To define a UDP input port navigate to your S-PLAY MINI's Network Settings. ■ UDP strings ending in: \r - the \r will be replaced by a carriage return. \n - the \n will be replaced by a line feed.

OSC
The S-PLAY MINI can receive OSC Triggers that can be created to start and resume playlists.
■ A Trigger will be activated when an incoming command matches the user defined Trigger string. ■ The command must be received upon the port defined within the Network Settings (default 8000). ■ All OSC commands must start with a leading '/' sign. ■ When used in a playlist, the S-PLAY MINI will wait to receive the Trigger below before continuing.
Trigger Name i OSC Trigger
Input Type i OSC
- A Trigger will be activated when an incoming command matches the user defined Trigger string.
- The command must be received upon the port defined within the settings page (default 8000).
- All OSC commands must start with a leading '/' sign.
- When used in a playlist, the S-PLAY will wait to receive the Trigger below before continuing.
Address 1
TEST TRIGGER
SAVE TRIGGER
Digital Input
S-PLAY MINI has 4 Digital input ports to activate triggers.
■ Idle position for digital inputs is high. ■ A Trigger is registered when the circuit is completed (low). ■ When used in a playlist, the S-PLAY MINI will wait to receive the Trigger below before continuing. ■ If the input remains in a low position while the timeline goes over the trigger, the playlist won't pause.
Use digital inputs with sensors, pressure pads, and wall switches to create an interactive installation.
Trigger Name i Input Type i Digital Input
• Idle position for digital inputs is high - A Trigger is registered when the circuit is completed (low). - When used in a playlist, the S-PLAY will wait to receive the Trigger below before continuing.

Input 3
GPIO Activate on Make
TEST TRIGGER
SAVE TRIGGER
Art-Net
An Art-Net trigger can be unicast or broadcast to the S-PLAY MINI.
■ The Trigger will be activated, when the incoming value is equal or greater than the Art-Net channel parameters defined. ■ To avoid clashes do not use a universe assigned for Recording/Playback. ■ When used in a playlist, the S-PLAY MINI will wait to receive the Trigger below before continuing.
Trigger Name 📄 Art-Net Trigger
Input Type Art-Net
- The Trigger will be activated when the incoming value matches the Art-Net channel parameters defined.
- To avoid clashes, do not use a universe assigned for Recording/Playback.
- When used in a playlist, the S-PLAY will wait to receive the Trigger below before continuing.
Trigger Universe 6 0 Net: 0 Subnet: 0 Universe: 0
Trigger Channel i 1
Trigger Level i 0
TEST TRIGGER
SAVE TRIGGER
sACN
The Trigger will be activated when the incoming value is equal to or greater than the sACN channel parameters defined.
To avoid clashes, do not use a universe assigned for Recording/Playback. When used in a playlist, the S-PLAY MINI will wait to receive the Trigger below before continuing.

DMX
The Trigger will be activated when the incoming value is equal to or greater than the DMX settings defined. To avoid clashes, do not use a universe assigned for Recording/Playback. When used in a playlist, the S-PLAY MINI will wait to receive the Trigger below before continuing.
Note: If DMX is selected as output protocol in the setting page, the DMX triggers will be disabled in the playlist.

Playlists
The Playlists page is where playlists can be created by combining Cues, Events and Triggers onto the timeline. Using the tools made available it is possible to:
■ Create up to 8 playlists and play simultaneously. ■ Edit, Rename and Delete Playlists. ■ Access to all Playlists. ■ Play, Pause and Stop Playlists. ■ Re-order Playlists. ■ Hide certain playlists from the home page. ■ Define loops. ■ Define fade time. ■ Define start and stop triggers or to start from start up. ■ Set Master intensity.

The playlist editor allows the user to add a maximum of 8 cues (static, dynamic or effect), events and triggers each in a sequence. These can be stored and played back at any given point.
Top Tip:
By default, cues on the timeline hold their end value on the output until a different scene is triggered. If you want to send a blackout at the end of a specific cue or timeline to all channels, set it to have a fade out time. If you require a snap to black instead of a fade out effect, set this fade out time to be 0.001 second.
Playlists Page Layout
The playlists page is comprised of 9 key elements:

A. Control all playlists playback with master level B. Global playlist control C. Search and filter bar for cues, triggers & events D. Cues, triggers & events library E. Playlist configuration F. Timeline navigation G. Cues tracks H. Event track I. Trigger track
Created Playlists
This section lists all the playlist created. The section displays basic information like the playlist name and duration and gives basic control over a playlist.
![graph LR A["RE-ORDER"] --> B["2 Playlist"] B --> C["CONTROLS"] C --> D["100° stopped"] D --> E["TIMELINE 00:01.133"] E --> F["DELETE 00:30"] G["EDIT"] --> B H["INTENSITY"] --> C I["STATUS"] --> D J["DURATION"] --> K["Duration"]](/content/2026/07/1448122/images/45ba42e5b61b955f5ef7076ee24a5270f70ed671e6149955acf40c6d58104d78.jpg)
Reorder: Drag and drop the playlist from the three dots rearranging your playlist (this will be reflected on the Home Page).
Edit: Loads the playlist in the timeline and media tracks for editing
Name: Displays the ID (set internally) and name of the playlist set in the Playlist Attribute section.
Intensity: real-time control of the master intensity of the playlist. By default, it is set to 100% and can be changed while the playlist is playing.
Control - Play: Plays the selected playlist. The playlist is also loaded into the timeline and media track section.
Control - Pause: Pauses the selected playlist. When a playlist is paused, S-PLAY MINI holds the last DMX value.
Control - Stop: Stops the selected playlist. When a playlist is stopped, S-PLAY MINI stops outputting any data (sets DMX value to 0).
Status: Shows the status of the playlist. It can be: Playing, Paused, Stopped, Waiting for Trigger.
Timeline and Duration: Shows the playback state of each playlist. Once the playlist has completed playing, it stops outputting data. The opacity of this bar matches the playlist intensity.
Delete: Deletes the playlist and the schedules where the playlist is used.
Global Playlist Control
Gives control over all playlists. When pressing play on the global control, all playlists start playing. If there are conflicts in channels, the values are merged on a Highest Takes Precedence (HTP) basis.
Search and Filter Bar
This box contains all Cues, Events, and Triggers stored on the S-PLAY MINI. To create a new playlist, select "Create New Playlist" from the list. This entry will always be the first entry in the menu.
Cues, Triggers & Events Library
Lists all the media that can be used in the playlist. It is categorized by Static Cues, Dynamic Cues, Effects, Events, and Triggers.
To use any media, drag and drop the desired cue into any of the media tracks. Please note that triggers and events have dedicated tracks.

Note: To ensure the best output frame rate and performance, it is recommended to avoid using the same dynamic cue in different playlists.
Playlist Playback Configuration


ID: Update ID of existing playlist.
Name: Set the name of the playlist.
Internal Priority: When playing multiple playlists, for any conflict between channels, the playlist with higher priority will drive the output. If the playlist has the same priority the channels will merge following HTP (Highest takes precedence) method.
Loop: Determine the number of times that the playlist will play until it stops.
Group: A group of playlists is a collection of playlists used together with the "Play one active playlist per group" option on the Settings page. This setting enables smooth fading between looks in a fixed area by ensuring that only one playlist from the group is played at a time.
Start Trigger: Options to playback this playlist either "On Power Up" or activate it using a list of triggers that are configured on the Triggers page. To utilise this feature, simply select a trigger from the dropdown menu. The playlist will start playing either by pressing the play button or by activating the chosen trigger.
Stop Trigger: Choose from a list of triggers that are configured on the Triggers page to stop the playlist; the Playlist will stop when the trigger conditions are met.
Fade: Set the fade in and fade out time for a playlist. – Fade out time will begin once the stop command is activated over the defined duration.
Playlist Settings

Cue Options: Options for any cue added into the cue track. The cue options are also active when a cue in the cue track is selected.
Zoom: Zoom In and Out using the magnifying glass with the plus and minus symbol. Note that when you zoom in/out, the values in the timeline change and the size of the cue boxes change.
Control: Gives navigation and playback over the playlist loaded in the Playlist Editor.
Save: Saves any change on the Playlist. S-PLAY MINI will ask to save any change before playing a Playlist.
Timeline navigation: Navigate back and forward between timelines using this option. Drag the timeline to navigate back and forward.
Playlist Timeline and Media Tracks
![graph TD A["CUE TRACK"] --> B["100"] B --> C["SC"] C --> D["05:00"] D --> E["TIME INDICATOR"] style C fill:#cce5ff,stroke:#333 style D fill:#ffcccc,stroke:#333](/content/2026/07/1448122/images/4229128850ae387aecca3463d2a3800badaa998c85f9655ea705ee8607049271.jpg)
S-PLAY MINI has 2 different cue tracks where any cue from the playlist media section can be dragged on.
Intensity: Each track has its own intensity and it affects all the media on the same level.
Cue tracks: Drag and drop media to this section. To remove a cue from the tracks, select the cue and click on the red x next to the right edge of the box.
When playing multiple media at the same time, i.e. 2 cues on 2 different tracks, S-PLAY MINI will use HTP (Highest value Takes Priority) merging.
Event and Trigger Tracks
These tracks are specifically designated for events and triggers. The vertical line indicates the precise timing at which the playlist will either pause until the trigger becomes active or execute the event. When triggers are used, the playlist will pause and maintain the last output value. To resume playback, simply activate the selected trigger or press the play button again.
Example Playlist
In this example, a playlist named "Playlist A" is created. It is set to automatically start playing on power up and will loop indefinitely (Play Count: Infinity).
Within the playlist, there is an Effect Cue labelled "c" that will play while simultaneously triggering an UDP Event (UET). At the 3-second mark, the playlist will pause and wait for a digital input trigger (G1) to be received before resuming the playback of the effect, which will continue until the 7-second mark.
The playlist will then proceed to send additional Events and wait for triggers as specified. Upon reaching the end of the playlist, it will loop back and replay the sequence.
Interfaces
The Interfaces page in S-PLAY MINI supports 1 custom user interface for intuitive and tailored playlist control for end users. The interface can be viewed from any device with a web-browser (i.e. a computer or smartphone) when connected to the same local network and even configured to be a default landing page.

The Interface page features the following options:
■ Interface Name: Naming (to be displayed at the top of the interface) ■ Interface Url: Configuration of a custom Interface URL. ■ Interface Group and Link Pages: Group up the interfaces and link between specific interface pages. (This is not available in S-PLAY MINI, upgrade to S-PLAY to unlock this feature.) On the S-PLAY MINI home page, there is a link displayed for accessing the Interface. By clicking on the "Hide from Home" option, the interface will no longer be visible on the home page. - Set the interface as the S-PLAY MINI's landing page when connecting to the device IP.
Interface Editor
After an interface has been created, press the 'Edit' button on the interface page to begin adding Widgets and customizing its appearance.

This opens a blank page with a Menu button to navigate back to the interfaces page at the top left and the Interface Editor to the right.


The interface editor allows interface colour and individual widgets to be added to the interface. Functions described in below table:
| Icon | Item | Function |
| [STYS] | Hide Menu | Use this button to hide the menu when editing Widgets |
 | Create New Widget | Pressing this button creates a new widget. |
 | Toggle edit mode | Toggle edit mode ON and OFF, this is useful for viewing the interface without individual widget editing to get a feel for how it will look when in use. |
 | Page Colour | Selecting this will open the page colour picker allowing you to select a colour with the colour picker or enter values directly in RGBA or HEX formats. |
 | Alignment Horizontal | Set all controls to Left, Centred or Right. (Default centred). |
 | Alignment Vertical | Set all controls to Top, Centred or Right. (Default cantered). |
After the background is set, user can add widgets to design the interface.
Widgets
Widgets are the building blocks of buttons or sliders that can be:
- edited for its display name.
- set a quick functional command. ■ displayed in customised width. ■ displayed in customised colour through RGBA colour picker.

Each widget function as below table:
| Widget | Function |
 Spacer Spacer | Used to define a fixed space between other widgets. Spacers can be set between 10 and 100% interface width. |
 all Playlists all Playlists | Widgets to control all Playlists contained on the S-PLAY MINI. |
 all Playlists all Playlists | |
 all Playlists all Playlists | |
 Playlist Playlist | Widgets to control Specific commands on the S-PLAY MINI Playlists contained on the S-PLAY MINI. |
 Playlist Playlist | |
 Playlist Playlist | |
 Intensity of Playlist Intensity of Playlist | Widgets featuring a slider to control intensity for all playlists or individual playlist. |
 Intensity of all playlists Intensity of all playlists | |
 State of Playlist State of Playlist | Widget to control Play/Stop commands for given Playlist. This button also shows the playlist's state and playback progress. |
 Color Filter for Cue Color Filter for Cue | Widget to control colour filter of a specific Effect Cue. |
Example interface
The image below shows a custom interface linked to Playlists that can trigger UDP and other protocols alongside lighting states from the S-PLAY MINI directly.
![graph TD A["My Interface"] --> B["PROJECTION ON"] A --> C["PROJECTION OFF"] B --> D["AUDITORIUM MALE IN"] B --> E["ANDITORIUM FAST START"] C --> F["Brightness"] C --> G["LECTERN 1 SPOTLIGHT ON"] C --> H["LECTERN 2 SPOTLIGHT ON"] C --> I["LECTERN 3 SPOTLIGHT ON"] C --> J["LECTERN 4 SPOTLIGHT ON"] C -…](/content/2026/07/1448122/images/f7c8d9af77f162257ece2dc82eb57311ec9fdc1d8a86c18a26b82576d207aee6.jpg)
Storage
The storage page allows the user to achieve the following:
■ View the internal system storage use / capacity. ■ Create Backup files. - Restore from a backup file in the computer. (Note: restoring a backup will erase the current shows on your S-PLAY MINI – always backup your current configuration before restoring a backup).

Backup
The S-PLAY MINI can produce a backup package that includes all:
Cues ■ Playlist ■ Settings excluding IP address.
After pressing CREATE BACKUP. The process produces a .bak package that can be downloaded and saved to any location on your computer. (Depending on the size of your cues show size this can take up to an hour to produce and compress the backup).
Restore
Use the created .bak file to restore cues, playlists and output settings.
Navigate to the Storage Menu in the web interface, then go to Restore section.
■ Select internal storage. - Click browse and locate the .bak file on your computer. ■ Insert and click on RESTORE BACKUP.
Once the restore is complete, a confirmation message will appear.
Storage & Calculating Requirements
Static Cue
Snapshots are comprised of a single DMX frame. The maximum file size of a frame of one universe with associated metadata is 518 bytes. To calculate the file size of a Static Cue.
To calculate the theoretical file size of a static cue, multiply 518 bytes by the quantity of universes you intend to capture as part of the static cue. This calculation will give a file size in bytes.
((518 bytes) * (Quantity of Universes to be captured)) = Static Cue Size (bytes)
Dynamic Cue
A dynamic cue can be thought of as a stream of Static Cues. To calculate the theoretical file size of a Dynamic Cue, the size of a single 1 universe DMX frame (518 bytes) should be multiplied by the quantity of universes being captured, the quantity of frames being recorded per second, and the duration of recording (in seconds).
((518 bytes) * (Quantity of Universes) * (Frames per Second [produced by the DMX source]) * (Intended Recording Length [seconds])) = Dynamic Cue Size (bytes)
Triggers & Events
Triggers and Events each have a maximum file size of 1Kb (1000 bytes). To calculate the theoretical storage size all Triggers and Events your configuration will occupy, multiply the total quantity of Triggers and Events you will use by 1Kb.
((1000 bytes) * (Quantity of Triggers and Events)) = Total Trigger and Event Size (bytes)
Settings
Fast navigation between each option tab can be made using the navigation menu on the left-hand side of the page.

The settings page allows the user to:
■ Set the S-PLAY MINI device name to be identical on the network. ■ Configure Art-Net and sACN output universes, destination IP and refresh rate. ■ Configure DMX output refresh rate. ■ Change the S-PLAY MINI's network configuration. ■ Define the OSC and UDP input port. ■ Update playback configuration. ■ Send black frame on playlist stop. ■ Restrict playback of one playback group at a time.
■ Update firmware.
- Download the latest firmware version from the ENTTEC website and navigate to the bottom of the Settings page.
- After updating firmware, power cycle your S-PLAY MINI and clear your web browser cache using 'Ctrl' + 'Shift' + 'R' to ensure nothing is stored in your browser from a previous firmware version.
■ Resume to factory defaults.
Device Info
Device info allows user to set unique S-PLAY MINI name for identification.
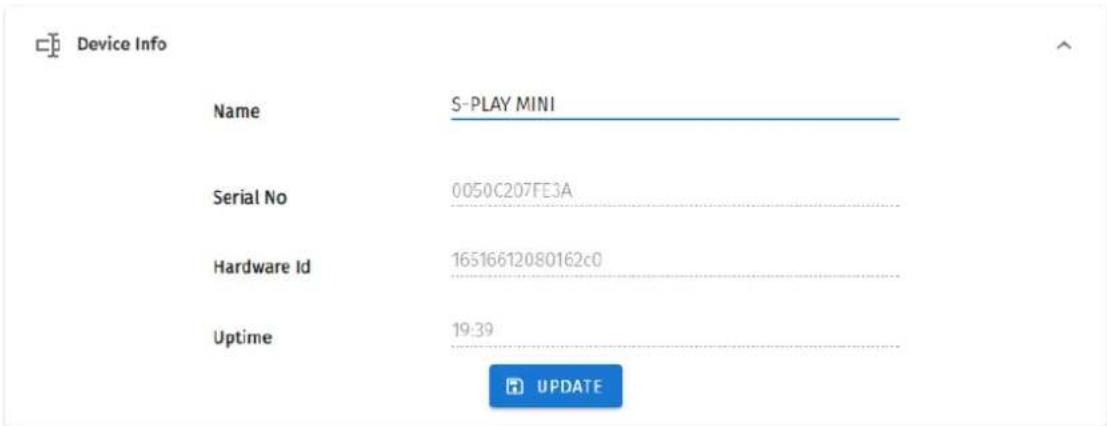
Serial No. and Hardware ID are displayed. Uptime shows the time the S-PLAY MINI has been working.
Output settings
The Output Settings allows you to assign S-PLAY MINI's internal 2 universes data to the Art-Net, sACN and DMX with settings configurable in the next section to create tailored outputs required for your project.

Drop-down in the upper right corner allows to set all outputs to one protocol with one click.
Art-Net and sACN settings
Art-Net and sACN settings allow configuration to each internal 2 Universes directed to the S-PLAY MINI. This section allows a protocol universe to be set to unicast, multicast & broadcast alongside the refresh rate between 10 to 40 FPS.
sACN ID can be re-generated and Internal Priority can be defined between 1 and 200 (default 200).

Top Tip:
The Tab key on your keyboard can be utilised to expedite the editing process when entering Universe numbers and IP addresses for sACN and Art-Net configurations.

DMX Settings

Provides control over DMX output frame rate.
Network Settings
Network Settings allow a DHCP or Manual IP address to be defined. Once update IP changes, the S-PLAY MINI will reboot in order to initiate all services.
UDP and OSC input ports for use with S-PLAY MINI Triggers can also be defined in the Network Settings.
Default Network Settings:
DHCP: Enabled
Fall Back/Static IP: 192.168.0.10
Mask: 255.255.255.0
Gateway: 192.168.0.1
Default Ports:
UDP Input Port: 5000
OSC Input Port: 8000
Network settings
Playback Configuration

Playback configuration allows global settings to be defined.
The option to restrict to one active playlist per group stops all other playbacks in the group. All stopped playlists will obey their fade times.
Firmware Update

To update firmware, download it from the ENTTEC website and upload it to this widget. Upon validating the firmware, the S-PLAY MINI will update and restart.

Note: Do not downgrade firmware version without consulting the ENTTEC support team first. Downgrading firmware version may result in playlists, schedules, Events and Triggers not operating as intended. Always perform a backup before updating firmware.
Factory Reset
A factory reset can be undertaken using either the web interface or the reset button on the device.
To reset from the reset button, please refer to the Reset Button section of the document.
To reset from Web Interface, navigate to Reset in Settings page and click on the 'Factory Reset'.

Factory reset

FACTORY RESET
Performing a factory reset will result in:
■ The Network settings resume to DHCP. ■ All cues, playlists and schedulers stored internally will be deleted. ■ The output universes will return to Art-Net. ■ Art-Net output will be set to broadcast. ■ sACN output will be set to multicast.

Note: Always take a backup before undertaking a factory reset. Factory reset cannot be stopped once initiated. Avoid powering off the S-PLAY during a factory reset.
Following a successful factory reset and the S-PLAY re-booting, ENTTEC recommends removing power for 10 seconds, then re-plugging your device. Once it boots navigate to a 404 page on the device by modifying the URL to a page that doesn't exist on the S-PLAY (i.e. http://10.0.0.100/en/404/). This will automatically clear its web cache.
User Management
User management can be found on the top right corner of the webpage. This is where users can lock the functions, Monitor DMX current, login to users account and switch languages between English and Chinese.

Monitor DMX Current
S-PLAY MINI allows the user to monitor DMX current for all universes at real time. By clicking ⓘ, an overview of each universe current setting will appear at the bottom page.
Simply click next to each output, to view the current DMX value of the universe. The current DMX value will be shown in the window as below. Click the universe number in the top row of this window to monitor all the other current DMX value from each universe.

Lock Feature
S-PLAY MINI includes a locking system to prevent settings, playlists, and cues from being modified.
By default, the S-PLAY MINI is unlocked, allowing any computer within the network to modify settings, create cues, generate playlists, and trigger playlist actions.
Sign in to access this feature using default login details provided in this document. To lock the unit, simply click on the padlock located in the top right-hand corner of the user interface. When not signed in, the unit will display only the home page with all the functional tabs hidden.

When the S-PLAY MINI is locked, users can:
■ Play and Stop any/all playlist. ■ Adjust playlist intensity
To unlock full functionality the user account must be logged in.
When a user is logged in, the unit can remain locked for the rest of the users accessing from other locations/browsers on the network. However, the unit will ensure that only one browser is open at the same time when accessing "Home", "Cue Library" and/or "Playlist Page". This is to avoid having conflicting commands that can jeopardise any part of the recording process.
To unlock the S-PLAY MINI, simply click on the padlock icon on the top right corner of the web interface.
If you forget your password, you can unlock your S-PLAY MINI by holding the:
Left + Down + Back keys on the physical S-PLAY MINI device for 5 seconds then refresh the web UI.
Default Login and Password
| User | Default Password |
| user | 123456 |

Note: Before setting a password take a full backup of your show data and settings. If the password is forgotten or lost, returning the password to default can be achieved through a full factory reset by reset button or through ENTTECT EMU Software.
Servicing, Inspection & Maintenance

■ The device has no user serviceable parts. If your installation has become damaged, parts should be replaced.
■ Power down the device and ensure a method is in place to stop the system from becoming energised during servicing, inspection & maintenance.
Key areas to examine during inspection:
■ Ensure all connectors are mated securely and show no sign of damage or corrosion. ■ Ensure all cabling has not obtained physical damage or been crushed. ■ Check for dust or dirt build up on the device and schedule cleaning if necessary. ■ Dirt or dust buildup can limit the ability for a device to dissipate heat and can lead to damage.
The replacement device should be installed in accordance with all steps within the installation guide.
To order replacement devices or accessories contact your reseller or message ENTTEC directly.
Cleaning
Dust and dirt build up can limit the ability for the device to dissipate heat resulting in damage. It's important that the device is cleaned in a schedule fit for the environment it is installed within to ensure maximum product longevity.
Cleaning schedules will vary greatly depending on the operating environment. Generally, the more extreme the environment, the shorter the interval between cleaning.

■ Before cleaning, power down your system and ensure a method is in place to stop the system from becoming energised until cleaning is complete.

■ Do not use abrasive, corrosive, or solvent-based cleaning products on this device. ■ Do not spray device or accessories. The device is an IP20 product.
To clean an ENTTEC device, use low-pressure compressed air to remove dust, dirt and loose particles. If deemed necessary, wipe the device with a damp microfiber cloth.
A selection of environmental factors that may increase the need for frequent cleaning include:
■ Use of stage fog, smoke or atmospheric devices. ■ High airflow rates (i.e., in close proximity to air conditioning vents). ■ High pollution levels or cigarette smoke. ■ Airborne dust (from building work, the natural environment or pyrotechnic effects).
If any of these factors are present, inspect all elements of the system soon after installation to see whether cleaning is necessary, then check again at frequent intervals. This procedure will allow you to determine a reliable cleaning schedule for your installation.
■ S-PLAY MINI (70093) ■ Din Clip x 2pcs + screws x 4pcs ReadMe Card
Ordering Information
For further support and to browse ENTTEC's range of products, visit the ENTTEC website.
| Item | Part No. |
| S-PLAY MINI | 70093 |
enttec.com
MELBOURNE AUS / LONDON UK / RALEIGH-DURHAM USA / DUBAI UAE
Due to constant innovation, information within this document is subject to change.

- CONTENTS
- SAFETY
- ELECTRICAL SAFETY
- SYSTEM PLANNING AND SPECIFICATION
- PROTECTION FROM INJURY DURING INSTALLATION
- INSTALLATION SAFETY GUIDELINES
- WIRING DIAGRAMS
- DISTRIBUTE DMX OUTPUT
- CONNECTION TO RELAY
- CONNECTION TO DIGITAL INPUTS
- USING MOTION SENSORS WITH THE S-PLAY MINI
- FUNCTIONAL FEATURES
- OVERVIEW
- RECORD CUES OR CREATE EFFECTS
- CREATE AND PLAYBACK PLAYLIST INTEGRATING EXTERNAL HARDWARE
- MANAGEMENT AND SUPPORT
- HARDWARE FEATURES
- S-PLAY MINI CONNECTIVITY
- LED INDICATOR
- RESET BUTTON
- TRIGGER PLAYLISTS
- BOOT LOADING
- RESET NETWORK CONFIGURATION
- RESUME FACTORY DEFAULT
- OUT OF THE BOX
- NETWORK DISCOVERY
- CHANGING THE NETWORK SETTINGS
- WEB INTERFACE
- TOP MENU
- HOME
- INTERFACES
- PLAYLISTS
- CUE
- MANAGING CUES
- STATIC CUE
- CAPTURE DMX SNAPSHOT FOR STATIC CUE
- EDIT/MODIFY STATIC CUE
- NOTE
- DYNAMIC CUE CREATION
- EFFECTS
- EVENTS
- UDP
- OSC
- RELAY
- ART-NET
- SACN
- DMX
- TRIGGERS
- DIGITAL INPUT
- TOP TIP
- PLAYLISTS PAGE LAYOUT
- CREATED PLAYLISTS
- GLOBAL PLAYLIST CONTROL
- SEARCH AND FILTER BAR
- CUES, TRIGGERS & EVENTS LIBRARY
- PLAYLIST PLAYBACK CONFIGURATION
- PLAYLIST SETTINGS
- PLAYLIST TIMELINE AND MEDIA TRACKS
- EVENT AND TRIGGER TRACKS
- INTERFACE EDITOR
- WIDGETS
- EXAMPLE INTERFACE
- STORAGE
- BACKUP
- RESTORE
- STORAGE & CALCULATING REQUIREMENTS
- DYNAMIC CUE
- TRIGGERS & EVENTS
- SETTINGS
- DEVICE INFO
- OUTPUT SETTINGS
- ART-NET AND SACN SETTINGS
- NETWORK SETTINGS
- PLAYBACK CONFIGURATION
- FIRMWARE UPDATE
- FACTORY RESET
- USER MANAGEMENT
- MONITOR DMX CURRENT
- LOCK FEATURE
- DEFAULT LOGIN AND PASSWORD
- SERVICING, INSPECTION & MAINTENANCE
- CLEANING
- ORDERING INFORMATION
- ENTTEC.COM
Brand : Enttec
Model : S-Play Mini
Category : Controller