
BEATLAB - Electronic musical instrument KORG - Free user manual and instructions
Find the device manual for free BEATLAB KORG in PDF.

| Product type | Electronic metronome / rhythm instrument |
| Brand | KORG |
| Model | BEATLAB |
| Dimensions (L x D x H) | 142 x 104 x 28 mm |
| Weight (without batteries) | 195 g |
| Weight (with batteries) | 240 g |
| Power supply | 4 AAA alkaline batteries (6 V) or DC 9 V AC adapter (sold separately) |
| Battery life | Approximately 120 hours (alkaline batteries, program mode, tempo 120, max volume) |
| Tempo range | 30 to 300 beats/minute |
| Beat range | 0 to 9 beats |
| Tempo accuracy | ±0.2% |
| Number of programs | 24 |
| Number of chains | 8 |
| Number of bars per chain | Up to 16 |
| Number of training patterns | 39 |
| Speaker | Dynamic speaker (50 mm diameter) |
| Connection terminal | Headphone jack (6.3 mm) |
| Display | LCD with backlight |
| Main functions | Program mode (playback of 24 programs), Chain mode (linking programs), Training mode (39 rudiment patterns), tap tempo, save/write |
| Maintenance and cleaning | Clean with a clean, dry cloth. Do not use solvents or flammable products. |
| Safety | Avoid exposure to sunlight, heat, moisture, dust, vibration, and magnetic fields. Do not place liquid containers nearby. Intended for use only in the country of purchase. |
| Included accessories | Instruction manual, 4 AAA alkaline batteries (for testing) |
Frequently Asked Questions - BEATLAB KORG
User questions about BEATLAB KORG
0 question about this device. Answer the ones you know or ask your own.
Ask a new question about this device
Download the instructions for your Electronic musical instrument in PDF format for free! Find your manual BEATLAB - KORG and take your electronic device back in hand. On this page are published all the documents necessary for the use of your device. BEATLAB by KORG.
USER MANUAL BEATLAB KORG
Using the unit in the following locations can result in a malfunction.
In direct sunlight
- Locations of extreme temperature or humidity
- Excessively dusty or dirty locations
- Locations of excessive vibration
- Close to magnetic fields
Power supply
Be sure to turn the power switch to OFF when the unit is not in use. Remove the battery in order to prevent it from leaking when the unit is not in use for extended periods.
Interference with other electrical devices
Radios and televisions placed nearby may experience reception interference. Operate this unit at a suitable distance from radios and televisions.
Handling
To avoid breakage, do not apply excessive force to the switches or controls.
Care
If the exterior becomes dirty, wipe it with a clean, dry cloth. Do not use liquid cleaners such as benzene or thinner, or cleaning compounds or flammable polishes.
Keep this manual
After reading this manual, please keep it for later reference.
Keeping foreign matter out of your equipment
Never set any container with liquid in it near this equipment. If liquid gets into the equipment, it could cause a breakdown, fire, or electrical shock. Be careful not to let metal objects get into the equipment.
THE FCC REGULATION WARNING (for U.S.A.)
This equipment has been tested and found to comply with the limits for a Class B digital device, pursuant to Part 15 of the FCC Rules. These limits are designed to provide reasonable protection against harmful interference in a residential installation. This equipment generates, uses, and can radiate radio frequency energy and, if not installed and used in accordance with the instructions, may cause harmful interference to radio communications. However, there is no guarantee that interference will not occur in a particular installation. If this equipment does cause harmful interference to radio or television reception, which can be determined by turning the equipment off and on, the user is encouraged to try to correct the interference by one or more of the following measures:
- Reorient or relocate the receiving antenna.
- Increase the separation between the equipment and receiver.
- Connect the equipment into an outlet on a circuit different from that to which the receiver is connected.
- Consult the dealer or an experienced radio/TV technician for help.
Unauthorized changes or modification to this system can void the user's authority to operate this equipment.
CE mark for European Harmonized Standards
CE mark which is attached to our company's products of AC mains operated apparatus until December 31, 1996 means it conforms to EMC Directive (89/336/EEC) and CE mark Directive (93/68/EEC).
And, CE mark which is attached after January 1, 1997 means it conforms to EMC Directive (89/336/EEC), CE mark Directive (93/68/EEC) and Low Voltage Directive (73/23/EEC).
Also, CE mark which is attached to our company's products of Battery operated apparatus means it conforms to EMC Directive (89/336/EEC) and CE mark Directive (93/68/EEC).
IMPORTANT NOTICE TO CONSUMERS
This product has been manufactured according to strict specifications and voltage requirements that are applicable in the country in which it is intended that this product should be used. If you have purchased this product via the internet, through mail order, and/or via a telephone sale, you must verify that this product is intended to be used in the country in which you reside.
WARNING: Use of this product in any country other than that for which it is intended could be dangerous and could invalidate the manufacturer's or distributor's warranty.
Please also retain your receipt as proof of purchase otherwise your product may be disqualified from the manufacturer's or distributor's warranty.
Contents
Precautions 2
Nomenclature and Functions 7
Program Mode 10
Selecting the program 10
Starting/stopping the program replay 10
Specifying the beat 10
Specifying the tempo 10
Specifying the rhythm note volumes 11
Saving the program parameters (WRITE) 12
Chain Mode 12
Chain configuration 13
Selecting the chain 13
Starting/stopping the chain 13
Selecting the bar 14
Specifying the program 14
Selecting the tempo 14
Editing the chain 15
Saving the chain setting (WRITE) 16
Training Mode 17
Selecting the training pattern 17
Starting/stopping the training pattern 17
Specifying the tempo 18
Selecting the hand to start beating on the training pattern 18
Adjusting the volume 18
Resetting to the Factory Setting 19
Battery Power Warning 19
Replacing the Batteries 19
Specifications 21
Programs 22
Chains 22
Traning Patterns 23
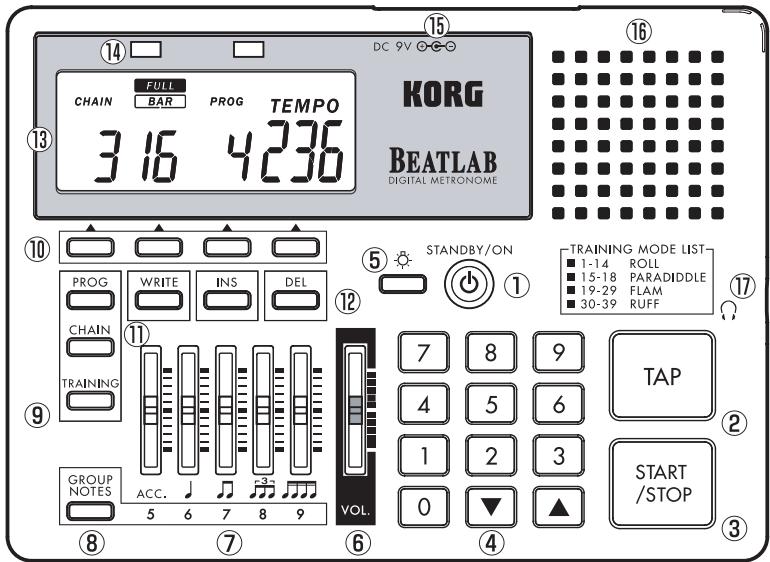
Nomenclature and Functions
(1) STANDBY/ON Switch
Switches the power on and off.
Turn the volume to zero before switching the power on.
(2) TAP Key
Specifies the tempo.
Pressing the TAP key twice or more allows you to specify the intermediate time as the tempo. When the BEATLAB pauses, replay starts immediately after you specify a tempo.
(3) START/STOP Key
Starts or stops the programs, the chains and the training patterns.
(4) Numeric Keys, (UP) Key and (DOWN) Key
Numeric Keys (0-9): Used to set the individual parameters.
The number of digits of each parameter the user can enter from the numeric keys has been pre
set. On completion of entry of the preset number of digits, the entry is accepted. When all of the digits are not entered, the BATLAB waits for about two seconds before accepting the entry. For example, as the tempo is a three-digit parameter, it changes to 120 on completion of entering "120." When "80" is entered, the BEATLAB waits for about two seconds before changing the tempo to 80.
Entering "080" in this case causes the BEATLAB to immediately change the tempo to 80. When another key is pressed before the entry is accepted, the entry is immediately accepted at the time of pressing that key.
When a value out of the parameter range is entered, the BEATLAB returns it to the previous value when the entry is accepted.
Key: Increases the preset value of each parameter by 1.
Key: Decreases the preset value of each parameter by 1.
Hold the s key or the t key for one second or
more to quickly change the preset value.
When pressing key while holding the key, the parameter value starts quickly increasing.
When pressing the key while holding the key, the parameter value starts quickly decreasing.
(5)BacklightKey()
Pressing the backlight key turns the LC display backlight on. Pressing it while the backlight is on turns it off.
The backlight automatically goes off 20 seconds after turned on.
When pressing the backlight key for two seconds or more, the backlight blinks twice, then keeps illuminating.
The backlight automatically goes off When the BEATLAB is not operated or keeps pausing for 60 seconds.
(6) Volume Slider
Adjusts the entire volume.
(7) Sliders
Use the five sliders to adjust the volumes of the individual rhythm tones.
ACC/5 Slider : Adjusts the accent and quintuple volumes.
/6 Slider : Adjusts the quarter and sextuplet volumes.
77Slider : Adjusts the eighth and septuplet volumes.
3/8 Slider : Adjusts the triplet and octuplet volumes.
//9 Slider : Adjusts the sixteenth and nonuplet volumes.
(8) GROUP NOTES Key
Selects the notes to be adjusted using the sliders listed in (7).
(9) Mode Keys
PROG : Enters the program mode.
CHAIN : Enters the chain mode.
TRAINING: Enters the training mode.
(10) Parameter Selection Keys
Pressing the key positioned under the parameter shown on the LC display allows you to select the parameter. The parameters you can select depend on the mode:
Program mode: Program, beat and tempo.
Chain mode : Chain, bar, program and tempo.
Training mode : Training pattern, left hand start, right hand start and tempo.
(11)WRITEKey
Used to save the parameters after changed.
(12) INS Key
Used to insert a program in a chain.
DEL Key: Used to delete a program from a chain.
(13) LC Display
Shows the parameters and other information.
(14)Tempo Indicators
The LEDs blink in synchronization with the tempo.
The red LED and the green LED are lit on to guide the downbeat and the upbeat, respectively. In the training mode, the red LED indicates when the left hand should be used and the green one indicates when the right hand should be used.
(15) AC Adapter Jack
Used to connect a separately-sold AC adapter (DC 9V ).
(16) Speaker
(17) Headphone Jack ( )
Used to connect the headphone having a standard plug.
Note: The BEATLAB is designed to provide a high output for the headphone volume. When using a headphone, set the volume to zero first, then gradually increase it for adjustment.
Program Mode
Press the PROG key to enter the program mode. You can replay 24 programs in this mode. In addition, you can change the parameters preset in the programs, such as the beat, the tempo, and the rhythm note volume, which can be saved.
Selecting the program
(1) In the program mode, press the parameter selection key positioned under "PROG."
(2) Enter the program number using the and keys or the numeric keys. Specify the program numbers - by two digits.
When the program is selected, the parameter values preset in the program are retrieved. When selecting a program while another is being replayed, the newly selected program starts on completion of current program.
Starting/stopping the program replay
(1) reess the START/STOP key to start replay of the program.
(2) Press the START/STOP key to stop replay of the program while it is being replayed.
Specifying the beat
(1) Press the parameter selection key positioned under "BEAT."
(2) Enter the beat number using the and keys or the numeric keys. Specify the beat by one digit. "EDIT" appears on the LC display when the setting is changed.
Specifying the tempo
(1) Press the parameter selection key positioned under "TEMPOR."
(2) Enter the tempo using the and keys or the numeric keys. Specify the tempo by three digits. If not, press the TAP key twice or more to specify the intermediate time as the tempo. When the program pauses, replay starts immediately after you specify a tempo using the
TAP key.
"EDIT" appears on the LC display when the setting is changed.
Specifying the rhythm note volumes
Use the GROUP NOTES key and the sliders to adjust the rhythm note volumes.
"EDIT" appears on the LC display when the setting is changed.
Operate the ACC/5 slider to adjust the accent note volume.
Operate the /6 slider to adjust the quarter note volume.
Operate the 7 slider to adjust the eighth note volume.
Operate the 38 slider to adjust the triplet note volume.
Operate the /9 slider to adjust the sixteenth note volume.
Operate the ACC/5 slider to adjust the quintuple note volume.
Operate the /6 slider to adjust the sextuplet note volume.
Operate the /7 slider to adjust the septuplet note volume.
Operate the 38 slider to adjust the octuplet note volume.
Operate the /9 slider to adjust the nonuplet note volume.
Use the volume slider to adjust the entire volume.
Note: The BEATLAB is designed to provide a high output for the headphone volume. When using a headphone, set the volume to zero first, then gradually increase it for adjustment.
Saving the program parameters (WRITE)
You can save the settings of the program parameters in the BEATLAB memory. If selecting other program or moving to another mode before saving the current parameter setting, the chain setting will be returned to the previous one. Be sure to save your important programs in the memory by carrying out the writing operation.
(1) Press the WRITE key after setting the parameters.
The BEATLAB goes to the program selection state, and the program number blinks on the display.
(2) Enter the program number where the settings are to be saved using the and keys or the numeric keys.
Note: Once the writing operation is executed, the program currently saved in the selected program number is overwritten.
To cancel the writing operation, press either the parameter selection key or the mode key.
(3) Press the WRITE key.
The parameters are saved and "EDIT" disappears from the display.
Chain Mode
Press the CHAIN key to enter the chain mode. In the chain mode, you can continuously replay one program after another, which has been saved in the program mode.
- The BEATLAB offers eight chains, each of which consists of one TEMPO and up to 16 BARS.
You can enter only one program number in one bar.
Chain configuration
| CHAIN 1 | TEMPO | BAR | ||||||
| PRG | 1 | 2 | 3 | 4 | 5 | ... | 16 | |
| PROGRAM | 5 | 5 | 6 | 6 | 7 | ... | 6 | |
| CHAIN 2 | TEMPO | BAR | ||||||
| 140 | 1 | 2 | 3 | 4 | 5 | ... | 16 | |
| PROGRAM | 10 | 11 | - | ... | ||||
| : | : | : | ||||||
| CHAIN 8 | TEMPO | BAR | ||||||
| 72 | 1 | 2 | 3 | 4 | 5 | ... | 16 | |
| PROGRAM | 15 | 15 | 16 | 16 | 17 | ... | ||
- When a chain is replayed, bars 1 to 16 are replayed in this order. On completion of replay of bar 16, the BEATLAB returns to bar 1 and repeats eplay. When you specify the end command to a bar, symbol “- - ” appears on the LC display. In this case, the BEATLAB continues replay from bar 1 to the bar just before the one having the end command, then returns to bar 1. In Chain 2, for example, because bar 3 has
the end command, the BEATLAB returns to bar 1 after replaying bar 2, resulting in alternative replay of bars 1 and 2.
- You can specify a tempo to the entire chain, in which case the programs are all replayed in the tempo you specify. Otherwise you can replay the individual programs in the tempospecified to them.
Selecting the chain
(1) In the chain mode, press the parameter selection key positioned under "CHAIN."
(2) Enter the chain number using the and keys or the numeric keys. Specify the chain number by one digit.
When selecting a chain while another chain is replayed, the newly selected chain starts on completion of current program of the bar.
Starting/stopping the chain
(1) Press the START/STOP key to start replay of a chain.
(2) Press the START/STOP key to stop replay
of the chain while it is being replayed.
Selecting the bar
You can select a bar to start replay there or to change the program set there.
(1) When a chain is being replayed, press the START/STOP key to stop it. No bar can be selected while a chain is being replayed.
(2) Press the parameter selection key positioned under "BAR."
(3) Enter the bar number using the and keys or the numeric keys. Specify the bar number by two digits. You can select from the bars where programs are specified to ones where the end command is specified (for which the LC display shows "- -").
In the chain configuration on page 13, for example, bars 1 to 16 in Chain 1 have preset programs, so you can select from bar 1 to bar 16.
In Chain 2, programs are preset to bars 1 and 2, and the end command, to bar 3, thus you can select from bar 1 to bar 3.
Specifying the program
(1) When a chain is being replayed, press the START/STOP key to stop it. No program can be preset while a chain is being replayed.
(2) Press the parameter selection key positioned under "PROG."
(3) Enter the program number using the and keys or the numeric keys. Specify the program number by two digits.
Entering zero causes the LC display to indicate "---" and the end command to be specified. Note, however, that the end command cannot be specified to bar 1.
"EDIT" appears on the LC display when the setting is changed.
Selecting the tempo
(1) Press the parameter selection key positioned under "TEMPOR."
(2) Enter the tempo using the and keys or the numeric keys. Specify the tempo by three digits. If not, press the TAP key twice or more to specify the intermediate time as the tempo.
When the BEATLAB pauses, replay of the chain starts immediately after a tempo is specified.
Entering zero causes the indication on the LC display to change to "PRG" and replay of the chain to start at the tempos specified in the individual programs.
"EDIT" appears on the LC display when the setting is changed.
Editing the chain
(1) When a chain is being replayed, press the START/STOP key to stop it. No program can be deleted while a chain is being replayed.
(2) Press the parameter selection key positioned under "BAR."
(3) Select the bar from which you desire to delete the program using the and keys or the numeric keys.
(4) Press the DEL key.
The program is deleted from the selected bar, causing the programs preset in the subse
quent bars to shift forward. It is unallowable to delete all the programs and specify the end command to bar 1.
On the LC display, the deleted program number disappears and the program number shifted to the bar appears at once.
"EDIT" appears on the LC display when the setting is changed.
Deleting program from bar 5
| BAR | 1 | 2 | 3 | 4 | 5 | 6 | 7 | 8 | 9 | 10 | 11 | 12 | 13 | 14 | 15 | 16 |
| PROG | 1 | 2 | 3 | 4 | 5 | 6 | 7 | 8 | 9 | 10 | 11 | 12 | 13 | 14 | 15 | 16 |
Deleting from bar 5
| BAR | 1 | 2 | 3 | 4 | 5 | 6 | 7 | 8 | 9 | 10 | 11 | 12 | 13 | 14 | 15 | 16 |
| PROG | 1 | 2 | 3 | 4 | 6 | 7 | 8 | 9 | 10 | 11 | 12 | 13 | 14 | 15 | 16 | - |
(1) When a chain is being replayed, press the START/STOP key to stop it.
(2) Press the parameter selection key positioned under "BAR."
(3) Select the bar in which you desire to insert a
program using the and keys or the numeric keys.
(4) Press the INS key.
The program is inserted into the selected bar, causing the programs preset in the subsequent bars to shift backward.
On the LC display, the selected program number disappears once and appears again at once.
Note: No program can be inserted when all of bars 1 to 16 have programs. In this case, "FULL" blinks twice on the LC display.
(5) Now the bar is ready for program insertion. Enter the program number you want to insert.
"EDIT" appears on the LC display when the setting is changed.
Inserting program in bar 4
| BAR | 1 | 2 | 3 | 4 | 5 | 6 | 7 | 8 | 9 | 10 | 11 | 12 | 13 | 14 | 15 | 16 |
| PROG | 1 | 2 | 3 | 4 | 5 | 6 | - |
↓ Inserting in bar 4
| BAR | 1 | 2 | 3 | 4 | 5 | 6 | 7 | 8 | 9 | 10 | 11 | 12 | 13 | 14 | 15 | 16 |
| PROG | 1 | 2 | 3 | 4 | 4 | 5 | 6 | - |
Inserting program 2 in bar 4
| BAR | 1 | 2 | 3 | 4 | 5 | 6 | 7 | 8 | 9 | 10 | 11 | 12 | 13 | 14 | 15 | 16 |
| PROG | 1 | 2 | 3 | 2 | 4 | 5 | 6 | - |
Saving the chain setting (WRITE)
You can save the chain setting in the BEATLAB memory. Selecting any other chain before saving the setting of the current chain causes it to return to the previous setting, not to be saved. Be sure to save your important chains in the memory by carrying out the writing operation.
(1) Press the WRITE key after setting the parameters of a chain.
The BEATLAB goes to the chain selection
state, and the chain number blinks on the display.
(2) Enter the chain number where the settings are to be saved using the and keys or the numeric keys.
Note: Once the writing operation is executed, the setting currently saved in the selected chain number is overwritten.
To cancel the writing operation, press either the parameter selection key or the mode key.
(3) Press the WRITE key.
The parameters are saved and "EDIT" disappears from the LC display.
Training Mode
Press the TRAINING key to enter the training mode.
In the training mode, 39 training patterns ideal for snare drum practice are preset. You can replay
them and adjust their tempos while replaying.
In the training mode, the sounds and the LEDs guide you to beat correct time.
The high note sound is generated and the green LED blinks at the timing of right hand beat. The low note sound is generated and the red LED blinks at the timing of left hand beat.
Selecting the training pattern
(1) In the training mode, press the parameter selection key positioned under "TRAINING."
(2) Select the training number using the and keys or the numeric keys. Specify the training number by two digits.
Starting/stopping the training pattern
(1) Press the START/STOP key to start replay of the training pattern.
The reference beat is given first and followed by the training pattern.
(2) Press the START/STOP key to stop replay of the training pattern while it is being replayed.
Specifying the tempo
The training patterns are replayed at the preset tempo. Adjust the tempo for easy training if you feel the preset tempo is too fast or too slow.
(1) Press the parameter selection key positioned under "TEMPOR."
(2) Enter the tempo using the and keys or the numeric keys. Specify the tempo by three digits. If not, press the TAP key twice or more to specify the intermediate time as the tempo. When the training pattern pauses, replay of the training pattern starts immediately after a tempo is specified.
Selecting the hand to start beating on the training pattern
- To start beating by the right hand, press the parameter selection key under the green LED. "RIGHT" appears on the LC display.
- To start beating by the left hand, press the parameter selection key under the red LED. "LEFT" appears on the LC display.
Adjusting the volume
- Using the ACC/5 slider, you can adjust the volume difference between the accented notes and the non-accented notes. Lowering the slider makes the volume difference greater and raising it makes the difference smaller.
- Using the /6 slider, you can adjust the reference beat volume.
Listening to the reference beat, you can always be conscious of the top beat of the phrase.
- Use the volume slider to adjust the entire volume.
Note: The BEATLAB is designed to provide a high output for the headphone volume. When using a headphone, set the volume to zero first, then gradually increase it for adjustment.
Resetting to the Factory Setting
To reset the BEATLAB to the factory setting, switch the power on while pressing the PROG key and the WRITE key. All the preset values are reset to the factory set values.
Battery Power Warning
When the battery power of the BEATLAB runs down, the battery mark appears on LC display. Replace the batteries with new ones as soon as possible.
Replacing the Batteries
When the battery power of the BEATLAB runs down, the replayed sounds may be distorted and the LC display and the tempo indicators may darken.
Malfunction may occur. When the battery mark appears on the LC display, replace the batteries
with new ones as soon as possible.
Replacing the batteries
(1) Be sure to switch the power off using the STANDBY/ON switch.
(2) Slide the battery cover located on the rear side of the BEATLAB in the direction of the arrow.
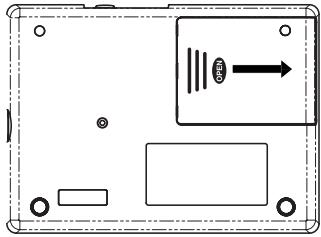
(3) Replace the old batteries with the new ones being careful to observe the correct polarity, then close the battery cover.
(4) Switch the power on by pressing the
STANDBY/ON switch and ensure that the BEATLAB operates correctly.
- The supplied batteries are used only to check the BEATLAB operation and may have a shorter life than regular batteries.
Specifications
Tempo range : = 30 to 300 beats/minute
Beat range :0 to 9 beats
Tempo accuracy : = ± 0.2%
Number of programs :24
Number of chains :8
Number of bars :Up to 16 per chain
Training patterns :39
Volume sliders :ACC/quintuplet, quarter/sextuplet, eighth/septuplet, triplet/ocuptuplet, sixteenth/nonuplet, and master volume
Speaker :Dynamic speaker (50mm in diameter)
Connection terminal : Headphone terminal (Standard 6.3-mm jack)
Power supply terminal : DC 9V @-@
Power supply :Four AAA alkaline batteries (6 V) or AC adapter (Sold separately)
Battery life :Approx.120 hours (alkaline batteries,program mode, tempo: = 120 ACC,J,master volume:maximum)
Outer dimensions : 142 mm (W) x 104 mm (D) x 28 mm (H) 5.59'' x 4.09'' x 1.10''
Weight : 195 g / 6.88 oz (excluding batteries); 240 g / 8.47 oz (including batteries)
Accessories :Owner's Manual, four AAA alkaline batteries for operation check
- The specifications and the appearance are subject to change without prior notice.
Programs
| PROG | TEMP0 | BEAT | VOLUME | ||||||||
| ACC | Quarter | 8th | Triplet | 16th | 5 | 6 | 7 | 8 | |||
| 1 | 138 | 4 | 7 | 7 | 4 | 0 | 0 | 0 | 0 | 0 | 0 |
| 2 | 156 | 4 | 7 | 7 | 0 | 0 | 2 | 0 | 0 | 0 | 0 |
| 3 | 116 | 4 | 7 | 7 | 3 | 0 | 0 | 0 | 0 | 0 | 0 |
| 4 | 174 | 5 | 7 | 7 | 3 | 0 | 0 | 0 | 0 | 0 | 0 |
| 5 | 104 | 4 | 7 | 7 | 7 | 0 | 0 | 0 | 0 | 0 | 0 |
| 6 | 112 | 4 | 7 | 7 | 7 | 0 | 0 | 0 | 0 | 0 | 0 |
| 7 | 120 | 4 | 7 | 7 | 7 | 0 | 0 | 0 | 0 | 0 | 0 |
| 8 | 132 | 4 | 7 | 7 | 7 | 0 | 0 | 0 | 0 | 0 | 0 |
| 9 | 144 | 4 | 7 | 7 | 7 | 0 | 0 | 0 | 0 | 0 | 0 |
| 10 | 152 | 3 | 7 | 7 | 5 | 0 | 0 | 0 | 0 | 0 | 0 |
| 11 | 108 | 5 | 7 | 7 | 5 | 0 | 0 | 0 | 0 | 0 | 0 |
| 12 | 138 | 4 | 7 | 7 | 0 | 0 | 0 | 0 | 0 | 0 | 0 |
| 13 | 120 | 4 | 7 | 7 | 7 | 0 | 0 | 0 | 0 | 0 | 0 |
| 14 | 100 | 4 | 7 | 7 | 0 | 7 | 0 | 0 | 0 | 0 | 0 |
| 15 | 100 | 4 | 7 | 7 | 0 | 0 | 7 | 0 | 0 | 0 | 0 |
| 16 | 92 | 4 | 7 | 7 | 0 | 0 | 0 | 7 | 0 | 0 | 0 |
| 17 | 92 | 4 | 7 | 7 | 0 | 0 | 0 | 7 | 0 | 0 | 0 |
| 18 | 92 | 4 | 7 | 7 | 0 | 0 | 0 | 0 | 7 | 0 | 0 |
| 19 | 80 | 4 | 7 | 7 | 0 | 0 | 0 | 0 | 0 | 7 | 0 |
| 20 | 80 | 4 | 7 | 7 | 0 | 0 | 0 | 0 | 0 | 0 | 7 |
| 21 | 80 | 4 | 7 | 7 | 5 | 0 | 4 | 0 | 0 | 0 | 0 |
| 22 | 80 | 3 | 7 | 7 | 5 | 0 | 4 | 0 | 0 | 0 | 0 |
| 23 | 126 | 8 | 7 | 7 | 0 | 0 | 0 | 0 | 0 | 0 | 0 |
| 24 | 126 | 7 | 7 | 7 | 0 | 0 | 0 | 0 | 0 | 0 | 0 |
Chains
| CHAIN | TEMPO | BAR | |||||||||||||||
| 1 | 2 | 3 | 4 | 5 | 6 | 7 | 8 | 9 | 10 | 11 | 12 | 13 | 14 | 15 | 16 | ||
| 1 | PRG | 5 | 5 | 6 | 6 | 7 | 7 | 8 | 8 | 9 | 9 | 8 | 8 | 7 | 7 | 6 | 6 |
| 2 | 140 | 10 | 11 | - | - | - | - | - | - | - | - | - | - | - | - | - | - |
| 3 | 132 | 12 | 12 | 13 | 13 | 15 | 15 | - | - | - | - | - | - | - | - | - | - |
| 4 | 120 | 13 | 13 | 14 | 14 | - | - | - | - | - | - | - | - | - | - | - | - |
| 5 | 128 | 21 | 21 | 21 | 22 | - | - | - | - | - | - | - | - | - | - | - | - |
| 6 | 232 | 23 | 23 | 23 | 24 | - | - | - | - | - | - | - | - | - | - | - | - |
| 7 | 92 | 13 | 13 | 14 | 14 | 15 | 15 | 17 | 17 | 19 | 19 | 17 | 17 | 15 | 15 | 14 | 14 |
| 8 | 72 | 15 | 15 | 16 | 16 | 17 | 17 | 18 | 18 | 19 | 19 | 20 | 20 | 14 | 14 | - | - |
Traning Patterns
The BEATLAB offers 39 training patterns selected from the rudiments, which are the basic phrases of the snare drum developed in the history of marching.
For the BEATLAB, the rudiments are grouped into four; roll, paradiddle, flam and ruff. With the BEATLAB, you can practice how to beat by the right and left hands at the tempo, guided by the sounds and lights that give you the timings of the right hand beats and the left hand beats.
Even without knowing of the rudiments, you can play the drums. However, just as you can communicate more widely if you know how to write down your language, your drumming performances are broadened if you know what the rudiments are all about.
First of all, practice these phrases with the BEATLAB.
For 39 kinds of phrase, please refer to page 90.
Nosyouremercionssincerement pour I'achatde notre METRONOME NUMERIQUE BEATLABkorg.
Precautions
Emplacement
- Power supply
- Interference with other electrical devices
- Handling
- Care
- Keep this manual
- Keeping foreign matter out of your equipment
- THE FCC REGULATION WARNING (for U.S.A.)
- CE mark for European Harmonized Standards
- IMPORTANT NOTICE TO CONSUMERS
- Contents
- Precautions 2
- Nomenclature and Functions 7
- Program Mode 10
- Chain Mode 12
- Training Mode 17
- Resetting to the Factory Setting 19
- Nomenclature and Functions
- STANDBY/ON Switch
- TAP Key
- START/STOP Key
- Numeric Keys, (UP) Key and (DOWN) Key
- (5)BacklightKey()
- Volume Slider
- Sliders
- GROUP NOTES Key
- Mode Keys
- Parameter Selection Keys
- (11)WRITEKey
- INS Key
- LC Display
- (14)Tempo Indicators
- AC Adapter Jack
- Speaker
- Headphone Jack ( )
- Program Mode
- Selecting the program
- Starting/stopping the program replay
- Specifying the beat
- Specifying the tempo
- Specifying the rhythm note volumes
- Saving the program parameters (WRITE)
- Chain Mode
- Selecting the chain
- Starting/stopping the chain
- Selecting the bar
- Specifying the program
- Selecting the tempo
- Editing the chain
- Saving the chain setting (WRITE)
- Training Mode
- Selecting the training pattern
- Starting/stopping the training pattern
- Selecting the hand to start beating on the training pattern
- Adjusting the volume
- Resetting to the Factory Setting
- Battery Power Warning
- Replacing the Batteries
- Specifications
- Traning Patterns
- Precautions
- Emplacement
Brand : KORG
Model : BEATLAB
Category : Electronic musical instrument