
42PMA225EZ - Plasma TV HITACHI - Free user manual and instructions
Find the device manual for free 42PMA225EZ HITACHI in PDF.

| Product type | Plasma TV |
| Brand | HITACHI |
| Model | 42PMA225EZ |
| Screen size | 42 inches (107 cm) |
| Resolution | 1024 x 768 pixels (XGA) |
| Aspect ratio | 16:9 |
| Connectivity | HDMI, component input, composite input, VGA, SCART, USB |
| Audio power | 2 x 10 W |
| Power supply | 220-240 V ~ 50/60 Hz |
| Power consumption | 350 W (max) / < 1 W (standby) |
| Weight | 34 kg (with stand) |
| Dimensions (W x H x D) without stand | 1050 x 720 x 98 mm |
| Main features | Teletext, PIP, contrast 10000:1, 100 Hz |
| Care and cleaning | Clean with a soft dry cloth, avoid chemical products |
| Safety | Do not expose to moisture, do not block ventilation slots |
| Spare parts and repairability | Parts available through HITACHI authorized service center |
| Energy class | B |
| General information | User manual available in French. Support: france.consumateur@hitachi-eu.com |
Frequently Asked Questions - 42PMA225EZ HITACHI
User questions about 42PMA225EZ HITACHI
0 question about this device. Answer the ones you know or ask your own.
Ask a new question about this device
Download the instructions for your Plasma TV in PDF format for free! Find your manual 42PMA225EZ - HITACHI and take your electronic device back in hand. On this page are published all the documents necessary for the use of your device. 42PMA225EZ by HITACHI.
USER MANUAL 42PMA225EZ HITACHI
Instructions for use
Safety Precautions 6
Before Switching On Your Monitor .... 8
Power Connection 8
How To Connect Devices 8
Inserting Batteries In The Remote Control Handset 8
Switching The Monitor
ON/OFF 9
To Switch The Monitor On 9
To Switch The Monitor Off 9
Operating With The Buttons On The Monitor 9
Operating With Remote Control 9
Volume Setting 9
Menu System 9
picture menu 9
window menu 10
audio menu 11
options menu 12
settings menu 13
Other Features 14
Freeze Picture 14
Sound Indicator 14
Mute Indicator 14
Source Button 14
PC Button 14
Connect Peripheral Equipment 14
Via the SCART 14
Decoder 15
Playback NTSC 15
Camera And Camcorder 15
Connect The Decoder To The Video Recorder 15
Connecting External Speakers (optional) 15
Connect Peripheral Equipment 16
PC Input Typical Display Modes 16
Tips 17
Care Of The Screen 17
Poor Picture 17
No Picture 17
Sound 17
Remote Control 17
Specifications 17
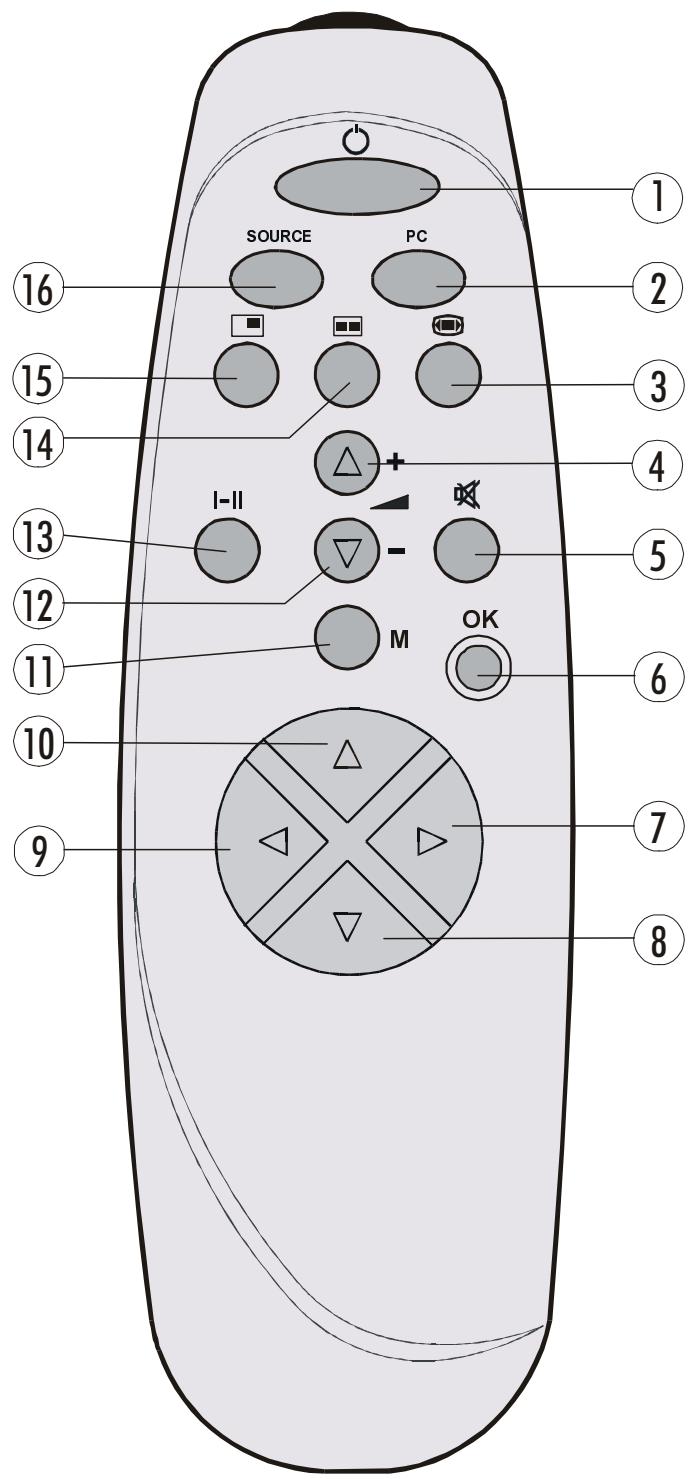
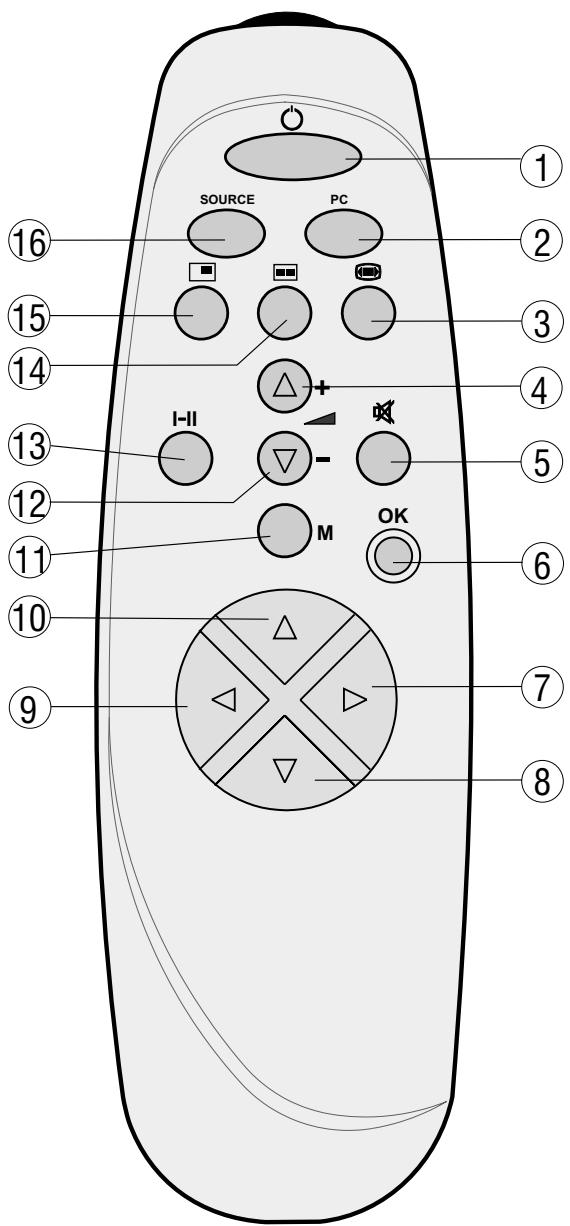
(1) O = Stand By
② PC = PC Button
3 = Image Size
4 +=Volume Up
5 =Mute
OK = Okay / Freeze
(7) = Cursor Right
8 = Cursor Down
9 Cursor Left
10 ▲ = Cursor Up
(1) M = Mnu
12 - = Volume Down
13 I-II = Mono/Stereo - Dual A-B
14 = Not used on this model
15 = Not used on this model
16 SOURCE = Source select
FRONTVIEW
REAR VIEW

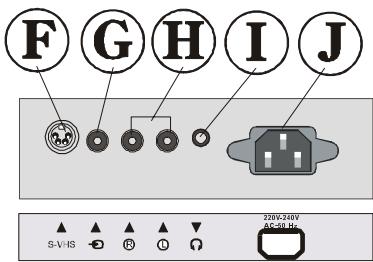
A On/Off switch
Volume Up, Volume Down buttons (Menu Navigation)
Menu Navigation buttons
Program Up, Program Down buttons
D MENU button
AV Input Select
F S-VHS Input
Video Input
Audio Input (Left, Right)
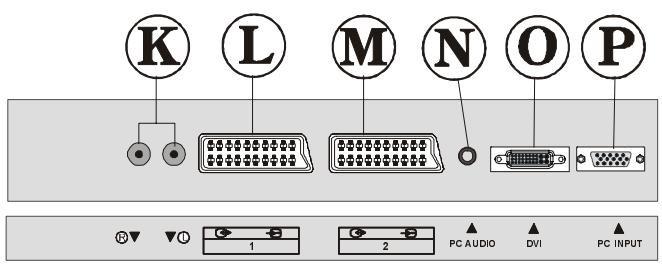
① Headphone
Power cord input
Audio Line Out L, R
Scart 1} Full Scart
Audio In (for VGA and DVI source)
DVI Input
VGA Input
Installation Of Plasma Panel To The Wall
1- The plasma panel can be installed to the wall with or without speakers. For details on how to fit the speakers, please see separate instructions packed with the speakers.
N.B. If speakers are to be fitted to the panel, this must be done before the panel if fitted to the wall.
2- Install the wall hanger as in figure 1 to the wall with 4 anchors (M10 x 50) and 4 screws (M7 x 60).
Decide the place on the wall where the plasma panel would be placed. Level and mark with a pencil the 4 mounting points on the wall hanger. Drill pilot holes for the plastic anchors and then fix the wall hanger with 4 screws (M7 x 60).
3- Raise the plasma panel and hang it to the holes on the wall hanger from the 2 hanging screws at the rear of the plasma panel.
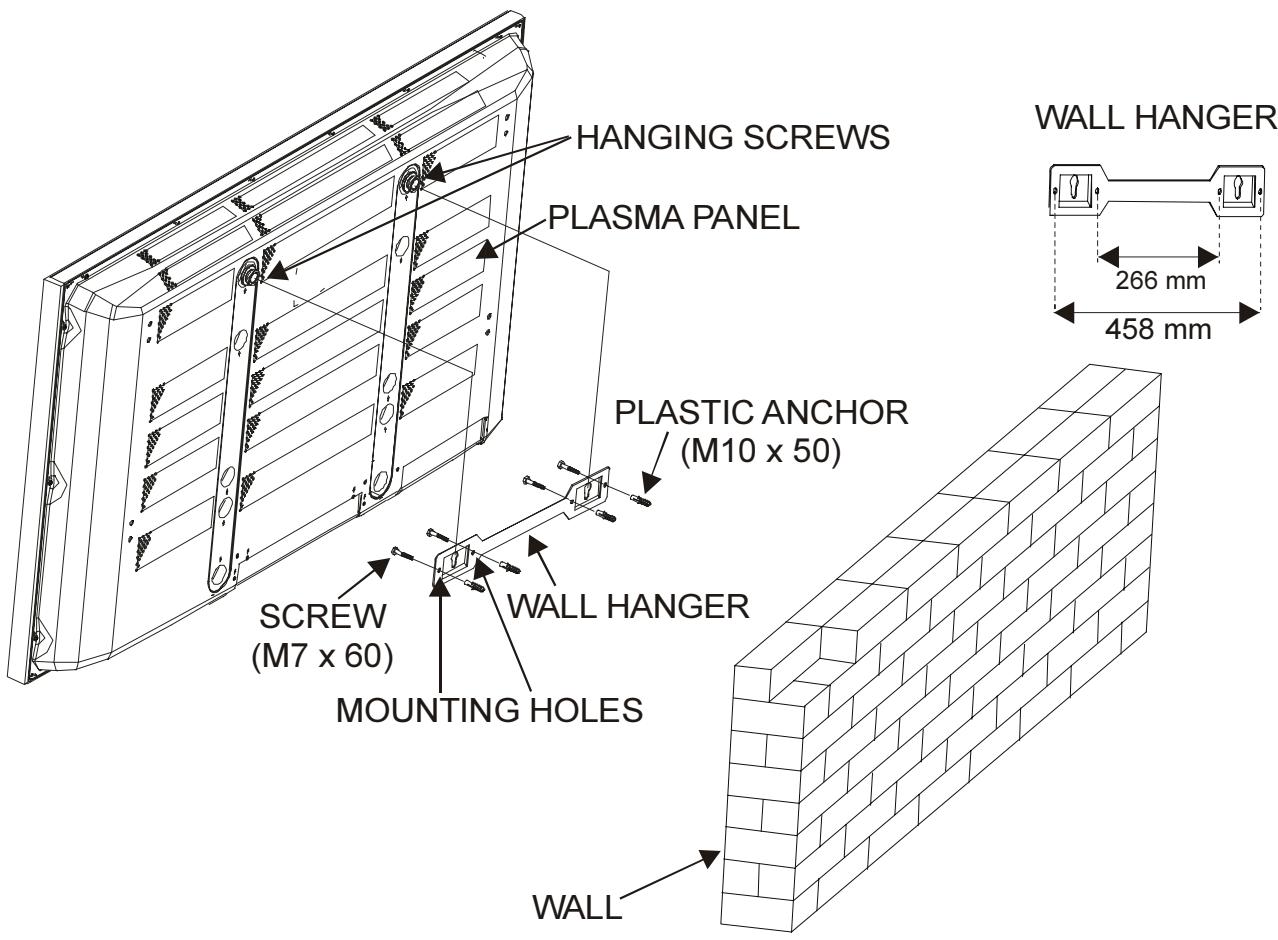
FIGURE 1
Preparation
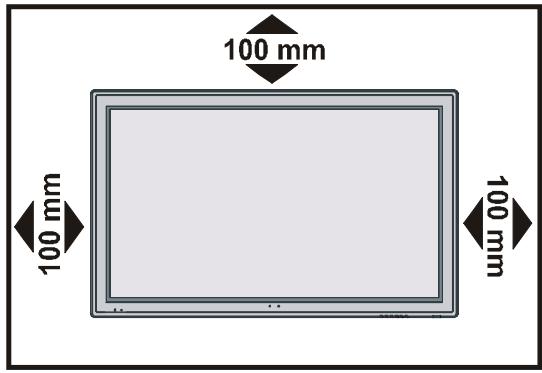
For ventilation, leave a space of at least 10 cm free all around the set. To prevent any fault and unsafe situations, please do not place any objects on top of the set.
This apparatus can be used in tropical and/or moderate climates.
Features
- Remote controlled colour monitor.
- It has 2 Euroconnector sockets for external devices (such as video, video games, audio set, etc.)
- Stereo sound system (German+Nicam).
- Headphone connection.
- Sleep timer.
Automatic sound mute when no transmission. - NTSC Playback.
- AV in socket.
- It is possible to connect external speakers (optional).
- It has PC and DVI connector for external devices such as computer.
- AVL (Automatic Volume Limiting)
- It has zoom functions.
PC input (Support Up to WVGA 1280 x 768) - 1 SVHS Input and 1 RCAAV Input are available.
- Stereo PC Audio Input
- Plug&Play for Windows 9X, ME, 2000, XP
4H Comb Filter
Audio Line Out
Panel Features
- 42-inch PLASMA display.
WVGA resolution (852 x 480) - Contrast ratio (3000:1 typical)
- Brightness (typical) 1000cd / m^2
Viewing angle (typical) 160^ - Display colour 16.7 Million.
Safety Precautions
This equipment has been designed and manufactured to meet international safety standards but, like any electrical equipment, care must be taken if you are to obtain the best results and safety is to be assured. So, please read the points below for your own safety. They are of a general nature, intended to help you with all your electronic consumer products and some points may not apply to the goods you have just purchased.
Some “DOs” and “DON'Ts” for you DO...
DO read the operating instructions before you attempt to use the equipment.
DO ensure that all electrical connections (including the mains plug, extension leads and inter-connections between pieces of equipment) are properly made and in accordance with the manufacturers' instructions.
Switch off and withdraw the mains plug before making or changing connections.
DO consult your dealer if you are ever in doubt about the installation, operation or safety of your equipment.
DO be careful with glass panels or doors on equipment.
DO NOT...
DON'T remove any fixed cover as this may expose dangerous voltages.
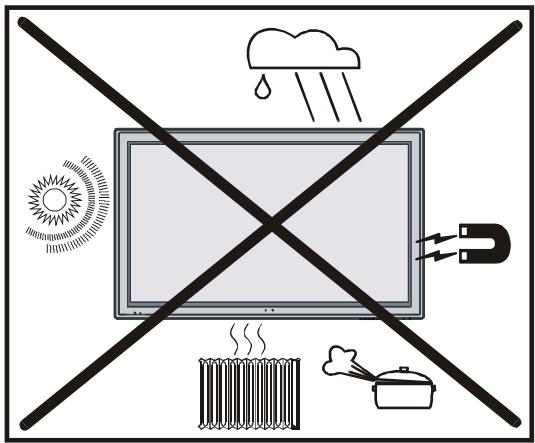
DON'T obstruct the ventilation openings of the equipment with items such as newspapers, table-cloths, curtains etc. Overheating will cause damage and shorten the life of the equipment.
DON'T allow electrical equipment to be exposed to dripping or splashing or objects filled with liquids, such as vases, to be placed on the equipment.
DON'T place hot objects or naked flame sources, such as lighted candles or nightlights on, or close to the equipment. High temperatures can melt plastic and lead to fires.
DON'T use makeshift stands and NEVER fix legs with wood screws. To ensure complete safety, always fit the manufacturer's ap
proved stand or legs with the fixings provided according to the instructions.
DON'T listen to headphones at high volume, as such use can permanently damage your hearing.
DON'T leave equipment switched on when it is unattended, unless it is specifically stated that it is designed for unattended operation or has a standby mode. Switch the equipment off and make sure your family know how to do this. Special arrangements may need to be made for infirm or handicapped people.
DON'T continue to operate the equipment if you are in any doubt about it working normally, or it is damaged in any way - switch off, withdraw the mains plug and consult your dealer.
DON'T put the empty batteries into garbage instead of recycle bin to reduce harmful effects to the environment.
ABOVE ALL – NEVER let anyone, especially children, push anything into holes, slots or any other openings in the case – this could result in a fatal electric shock.
1. Power Source
The monitor should be operated only from a 230-240V AC, 50Hz . outlet. Ensure you select the correct voltage setting for your electrical supply.
2. Power Cord
The power supply cord should be placed so that it is not likely to be walked on or pinched by items placed upon or against it. Pay particular attention to cord where it enters the plug, power outlet, and the point where it exits from the receiver.
3. Moisture and Water
Do not use this equipment in a humid and damp place (avoid the bathroom, the sink in the kitchen, and near the washing machine). Do not expose this equipment to rain or water, as this may be dangerous and do not place objects filled with liquids on top. Avoid from dripping or splashing.
4. Cleaning
Before cleaning, unplug the monitor from the main supply, outlet. Do not use liquid or aerosol cleaners. Use soft and dry cloth.
5. Ventilation
The slots and openings on the monitor are intended for ventilation and to ensure reliable operation. To prevent overheating, these openings must not be blocked or covered in anyway.
6. Lightning
In case of storm and lightning or when going on holiday, disconnect the power cord from the wall outlet.
7. Replacement Part
When replacement parts are required, be sure the service technician has used replacement parts which are specified by the manufacturer or have the same specifications as the original one. Unauthorised substitutions may result in fire, electrical shock, or other hazards.
8. Servicing
Please refer all servicing to qualified personnel. Do not remove cover as this may result in electric shock.
9. Naked Flame Sources
Do not place naked flame sources on the apparatus.
Warning!
Any intervention contrary to regulations, in particular, any modification of high voltage or a replacement of the picture tube may lead to an increased concentration of x-rays. Any device modified in this way no longer complies with license and must not be operated.
Instructions for waste disposal:
-
Packaging and packaging aids are recyclable and should principally be recycled. Packaging materials, such as foil bag, must be kept away from children.
-
Batteries, including those which are heavy metal-free, should not be disposed of with household waste. Please dispose of used batteries in an environmentally sound manner. Find out about the legal regulations which apply in your area.
"The Plasma monitor is a very high technology product giving you fine picture details. Occasionally, a few non-active pixels may remain still on the screen. Please note that this is not a fault and does not affect the performance of your product. Long-time unmoving still pictures may cause permanent shade effect on the screen even after the picture has been changed, its influence lasts as ghost picture. This ghost effect may disturb the user even though it diminishes in the course of time. To prevent this, DO NOT LEAVE STILL PICTURES FOR EXAMPLE FROZEN PICTURES ON THE SCREEN FOR A LONG TIME."
"DO NOT LEAVE YOUR MONITOR AT STAND-BY OR OPERATING WHEN YOU LEAVE YOUR HOUSE"
Before Switching On Your Monitor
Power Connection
IMPORTANT: The monitor is designed to operate on 230-240V AC, 50 Hz.
- After unpacking, allow the monitor to reach the ambient room temperature before you connect the set to the mains.
How To Connect Devices
IMPORTANT: Switch off the monitor before connecting any external device.
Sockets for external connections are at the back of the monitor. For connection of devices refer to the manuals.
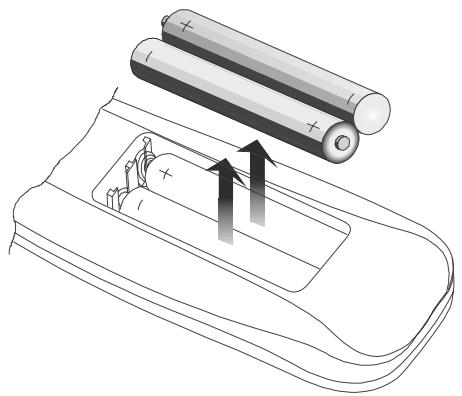
Inserting Batteries In The Remote Control Handset
- Place the batteries in the right directions as seen below.
- Remove the battery cover located on the back of the handset by gently pulling upwards from the indicated part.
- Insert two MN2400 AAA or equivalent type batteries inside.
- Replace the battery cover.
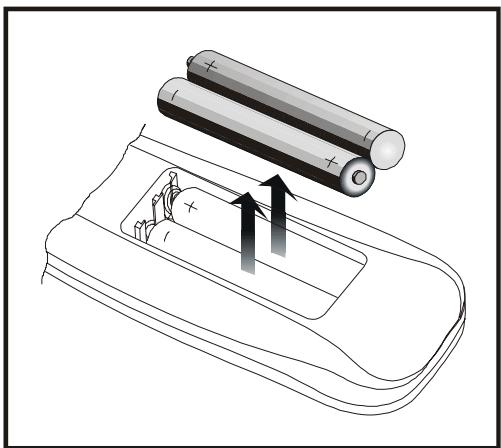
NOTE: Remove batteries from remote control handset when it is not to be used for a long period. Otherwise it can be damaged due to any leakage of batteries.
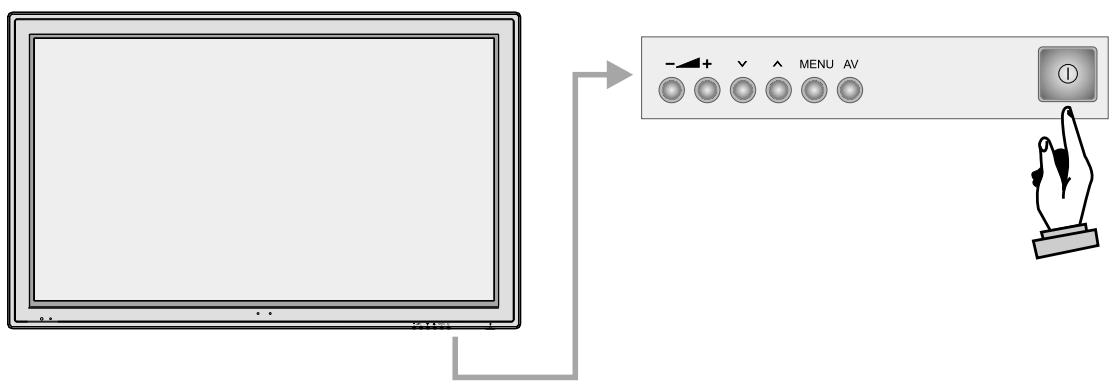
Switching The Monitor ON/OFF
To Switch The Monitor On
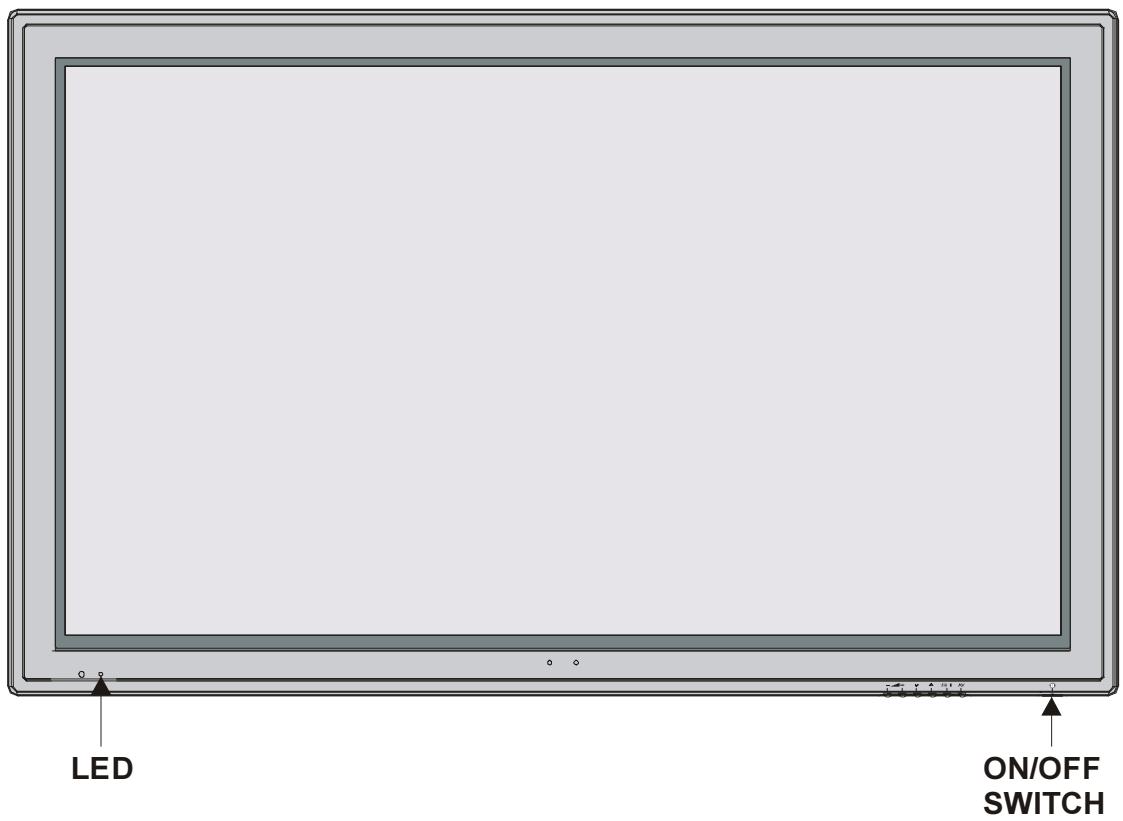
Connect the power supply cords of the monitor to the main supply. Press on/off button of the plasma monitor. The monitor switches to stand-by mode and the LED on the front of the monitor illuminates.
Wait for approximately 5 seconds before continuing with switch on.
To switch on the monitor from stand-by mode:
Press the "O" button on the remote control.
The monitor will switch on and the RED LED will turn GREEN.
To Switch The Monitor Off
Press the stand-by button on the remote control, so the monitor will switch to stand-by mode and the LED on the monitor will turn from Green to Red.
To power down the monitor completely, press On/Off switch on the panel,
or,
Unplug the power connection of the monitor.
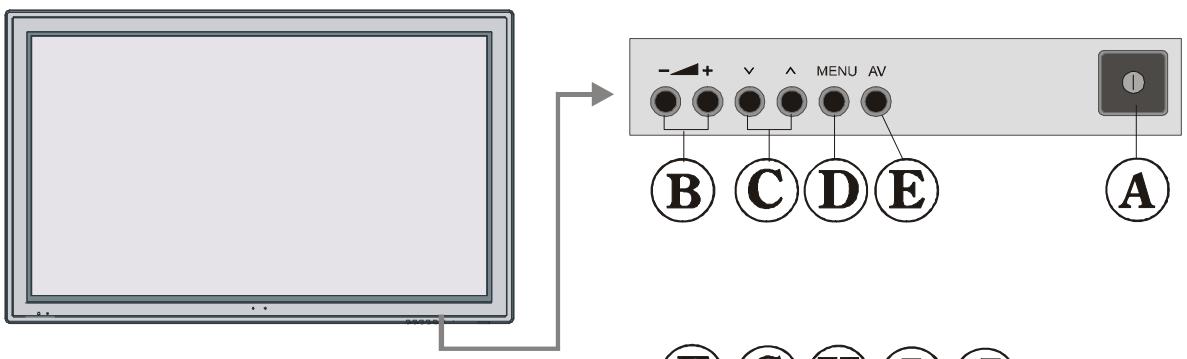
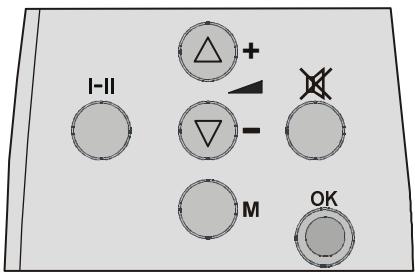
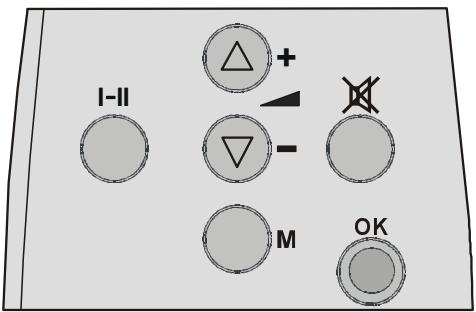
Operating With The Buttons On The Monitor
"∧"/"∨" and "+"/"-∨" buttons at the bottom of the monitor are used as navigation buttons in menu.
Operating With Remote Control
The remote control handset of your monitor is designed to control all the functions of the model. The functions will be described in accordance with the menu system of your monitor.
Functions of the menu system are described in Menu System section.
Volume Setting
Press "A +" button to increase volume.
Press "-\A" button to decrease volume. A
volume level scale (slider) will be displayed on the screen. Volume level can be adjusted between 0 and 63.

Menu System
Your monitor has been designed with a menu system to provide easy use of a multifunction system. Press the "M" (MENU) button to enter the menu. Menu button has two functions; opening and closing the menu, and closing a submenu and going to the upper menu.
Press “ ” / “ ” button to select a menu title and then “ ” / “ ” button to select a menu item and “ ” / “ ” or “OK” button to enter the menu item. To exit a menu press “M” button.
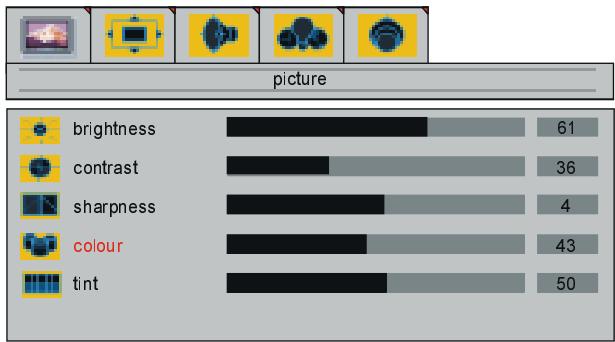
picture menu
By pressing “ ” / “ ” button, select the first icon. Picture menu appears on the screen.
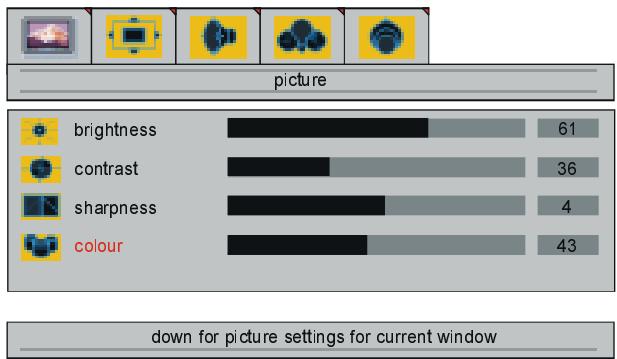
brightness
By pressing “▲” / “▼” button, select brightness. “right/left to adjust brightness” is seen on the screen. Press “▶” button to increase brightness. Press “▲” button to decrease brightness. Brightness level can be adjusted between 0 and 100.
contrast
By pressing “▲” / “▼” button, select contrast. “right/left to adjust contrast” is seen on the screen. Press “▶” button to increase contrast. Press “▲” button to decrease contrast. Contrast level can be adjusted between 0 and 100.
sharpness
By pressing “▲” / “▼” button, select sharpness. “right/left to change sharpness” is seen on the screen. Press “▶” button to increase sharpness. Press “←” button to decrease sharpness. Sharpness level can be adjusted between 0 and 8.
colour
By pressing “▲” / “▼” button, select colour. “right/left to adjust colour” is seen on the screen. Press “▶” button to increase colour. Press “▲” button to decrease colour. Colour level can be adjusted between 0 and 100.
tint
This item is displayed in picture menu if there is a NTSC signal. By pressing "▲" / "▼" button, select tint. "right/left to adjust tint" is seen on the screen. Press "▶" button to increase tint. Press "▲" button to decrease tint. Tint level can be adjusted between 0 and 100.
down for picture settings for current window
When the monitor modes are switched between AV modes; picture menu items (brightness, contrast, sharpness and colour) may require re-adjustment.
When PC is Connected To Monitor via VGA or DVI socket:
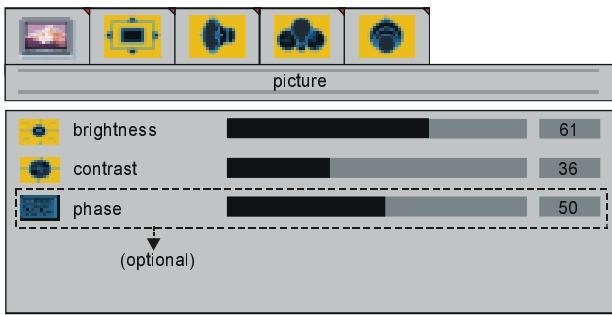
down for picture settings for current window
brightness
By pressing "▲" / "▼" button, select brightness. "right/left to adjust brightness" is seen on the screen. Press "▶" button to increase brightness. Press "▲" button to decrease brightness. Brightness level can be adjusted between 0 and 100.
contrast
By pressing "▲" / "▼" button, select contrast. "right/left to adjust contrast" is seen on the screen. Press "▶" button to increase contrast. Press "▲" button to decrease contrast. Contrast level can be adjusted between 0 and 100.
phase
This item is not available in the picture menu when PC is connected to monitor via DVI.
By pressing "▲" / "▼" button, select phase. "right/left to adjust phase" is seen on the screen. Press "▶" button to increase phase. Press "▲" button to decrease phase. Phase level can be adjusted between 0 and 100.
window menu
By pressing “ ” / “ ” button, select the second icon. Window menu appears on the screen.
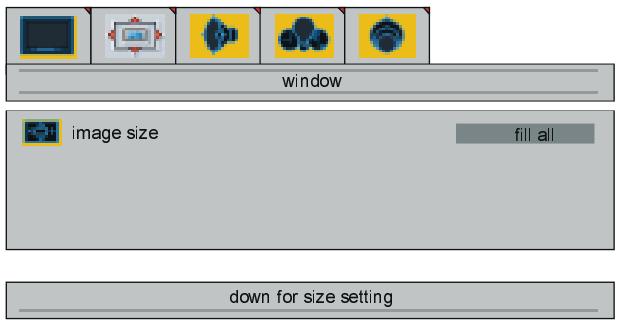
image size
By pressing "▲" / "▼" button, select image size. "right/left to change image size" is seen on the screen. By pressing "▲" / "▶" button, you can change image size to fill all, zoom, letterbox, subtitle, normal, 14:9 and auto.
When PC is Connected To Monitor via VGA socket:
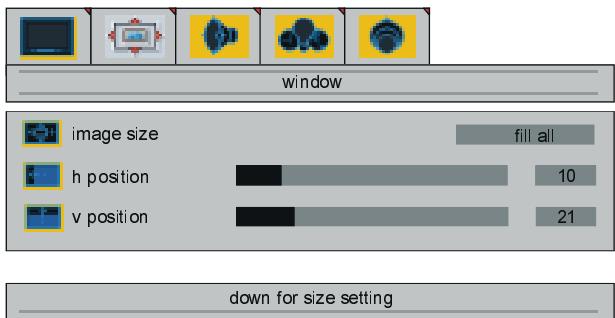
image size
By pressing “▲” / “▼” button, select image size. "right/left to change image size" is seen on the screen. By pressing “<” / “▶” button, you can change image size to fill all, fill 1:1 and fill aspect.
h position
By pressing "▲" / "▼" button, select h position. "right/left to adjust h position" is seen on the screen. Press "▶" button to slide the screen to the left. Press "▲" button to slide screen to the right. h position can be adjusted between 0 and 100.
v position
By pressing “▲” / “▼” button, select v position. "right/left to adjust v position" is seen on the screen. Press “▶” button to slide the screen to up. Press “←” button to slide
screen to down. v position can be adjusted between 0 and 100.
When PC Connected To Monitor via DVI:
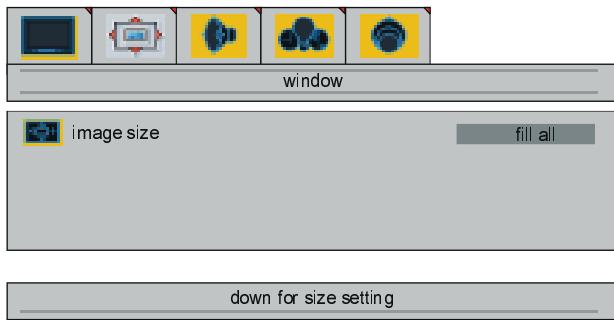
image size
By pressing "▲" / "▼" button, select image size. "right/left to change image size" is seen on the screen. By pressing "▲" / "▶" button, you can change image size to fill all, fill 1:1 and fill aspect.
audio menu
By pressing “ ” / “ ” button, select the third icon. Audio menu appears on the screen.
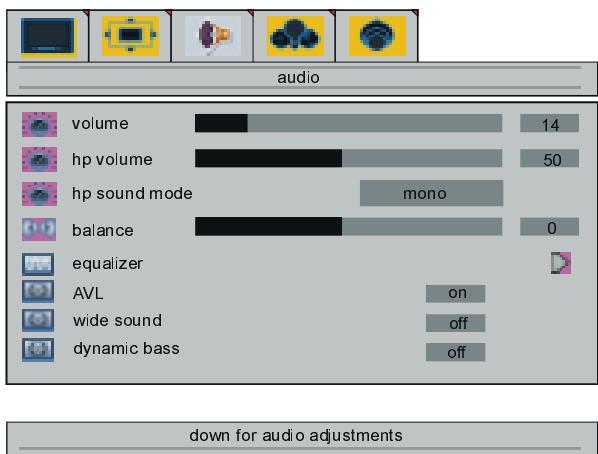
volume
By pressing “▲” / “▼” button, select volume. "right/left to adjust volume" is seen on the screen. Press “▶” button to increase volume level. Press “←” button to decrease volume level. Volume level can be adjusted between 0 and 63.
headphone volume
By pressing "▲" / "▼" button, select hp volume. "right/left to adjust hp volume" is seen on the screen. Press "▶" button to in
crease hp volume level. Press "▲" button to decrease hp volume level. Hp volume (headphone volume) level can be adjusted between 0 and 100.
headphone sound mode
By pressing "▲" / "▼" button, select hp sound mode. "right to adjust hp sound mode" is seen on the screen. Press "▶" button change hp sound mode.
Hp sound mode is used to identify sound mode of the headphone. hp sound mode can be set to mono, stereo, dual a or dual b according to the transmission.
balance
By pressing "▲" / "▼" button, select balance. "right/left to adjust balance" is seen on the screen. Press "▶" button to increase balance to the right. Press "▲" button to decrease balance to the left. Balance level can be adjusted between -50 and 50.
equalizer
By pressing "▲" / "▼" button, select equalizer. "right/left for equalizer settings" is seen on the screen. Press "▲" / "▶" or "OK" button to enter equalizer menu. In equalizer menu the sound mode can be changed to user, flat, pop, rock, jazz and classic by pressing "▲" / "▶" button. Equalizer menu settings can be changed only when sound mode is user. Select the desired frequency by "▲" / "▼" button and increase or decrease the frequency gain by pressing "▲" / "▶" button.
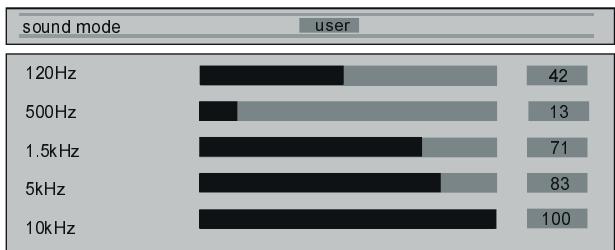
Press the "M" button to exit the equalizer menu.
AVL
By pressing “▲” / “▼” button, select AVL. "right/left for AVL on/off" is seen on the screen. By pressing “←” / “▶” button set to AVL on to activate it or off to deactivate it.
wide sound
It is used to give a spatial effect to the sound.
By pressing "▲" / "▼" button, select wide sound. "right/left for wide sound off/stereo/ mono" is seen on the screen. By pressing "▲" / "▶" button set to wide sound on to activate it or off to deactivate it.
dynamic bass
Dynamic Bass is used to increase bass effect of the monitor.
By pressing "▲" / "▼" button, select dynamic bass. "right/left for dynamic bass on/off" is seen on the screen. By pressing "▲" / "▶" button set to dynamic bass on to activate it or off to deactivate it.
options menu
By pressing “<” / “▶” button, select the fourth icon. Options menu appears on the screen.
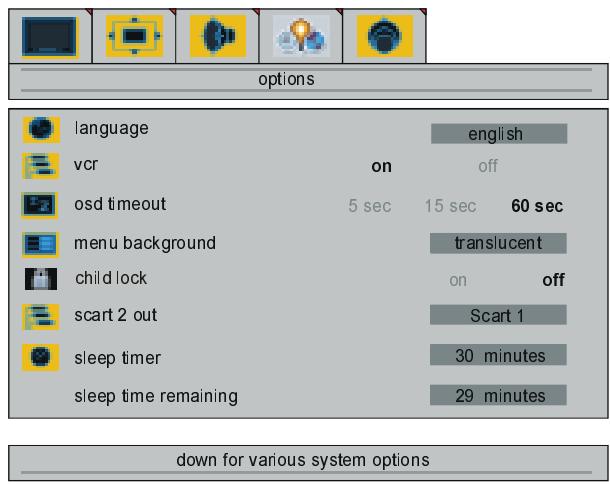
language
By pressing “▲” / “▼” button, select language. "right/left to change language" is seen on the screen. By pressing “←” / “▶” button, you can select the language.
vcr
This item is displayed only when the monitor is in AV mode. By pressing "▲" / "▼" button, select vcr. "right/left to change vcr status" is seen on the screen. By pressing "▲" / "▶" button set vcr to on or off.
osd timeout
By pressing "▲" / "▼" button, select osd timeout. "right/left to change osd timeout" is seen on the screen. By pressing "▲" / "▶" button, you can change osd timeout to 5 sec, 15 sec or 60 sec.
menu background
By pressing “▲” / “▼” button, select menu background. "right to change menu background" is seen on the screen. You can change menu background to translucent or opaque by pressing “▶” button.
child lock
You can use this feature to prevent children turning on monitor or changing programs or adjustments etc. without remote control.
By pressing "▲" / "▼" button, select child lock. "right/left to change" is seen on the screen. The child lock feature can be set by "▲" or "▶" button to either on or off. When off is selected, there will be no difference in the operation of your monitor. When on is selected, the monitor can only be controlled by the remote control handset.
scart 2 out
By pressing "▲" / "▼" button, select scart 2 out. "right/left to select scart 2 out" is seen on the screen. You can set scart 2 out to Scart 1 or FAV by pressing "▲" / "▶" button.
sleep timer
By pressing "▲" / "▼" button, select sleep timer. "adjust sleptimer" is seen on the screen. You can set the sleep time to Off, 15, 30, 60, 90 or 120 minutes by pressing "▲" / "▼" button. The sleep timer is used to turn the monitor off after a pre-defined period.
sleep time remaining
Selected and remaining sleep time is displayed at this area. Sleep time remaining item can not be selected by “▲”/“▼” button.
settings menu
By pressing “ ” / “ ” button, select the sixth icon. Settings menu appears on the screen.
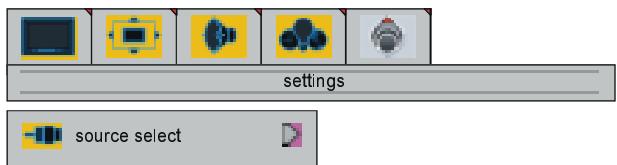
down for various system settings
By pressing "▲" / "▼" button, select source select in settings menu. "
source select
right to select source

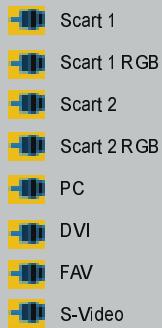
In source select menu, switch on one of the sources by pressing “▲” / “▼” button and select it by pressing “▶” button. The source types are Scart 1, Scart 1 RGB, Scart 2, Scart 2 RGB, PC, DVI, FAV and S-Video.
Other Features
Freeze Picture
You can freeze the picture on the screen by pressing "OK" button.
Sound Indicator
"I-II" button is used to select;
Stereo;
STEREO
Dual A;
DUAL A
or Dual B;
DUAL B
Mute Indicator
It is placed in the upper left side of the screen when enabled.

To cancel mute, there are two alternatives; the first one is pressing the "X" button, thus volume is set to the preceding value, and the second one is increasing or decreasing the volume level, thus it starts from the previous level to increase or decrease.
Source Button
By pressing the "SOURCE" button, you can switch your monitor to following modes: Scart 1, Scart 1 RGB, Scart 2, Scart 2 RGB, PC, DVI, FAV and S-Video.
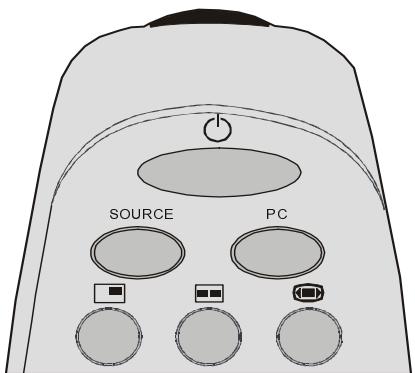
PC Button
By pressing the "PC" button, you can directly switch your monitor to PC mode.
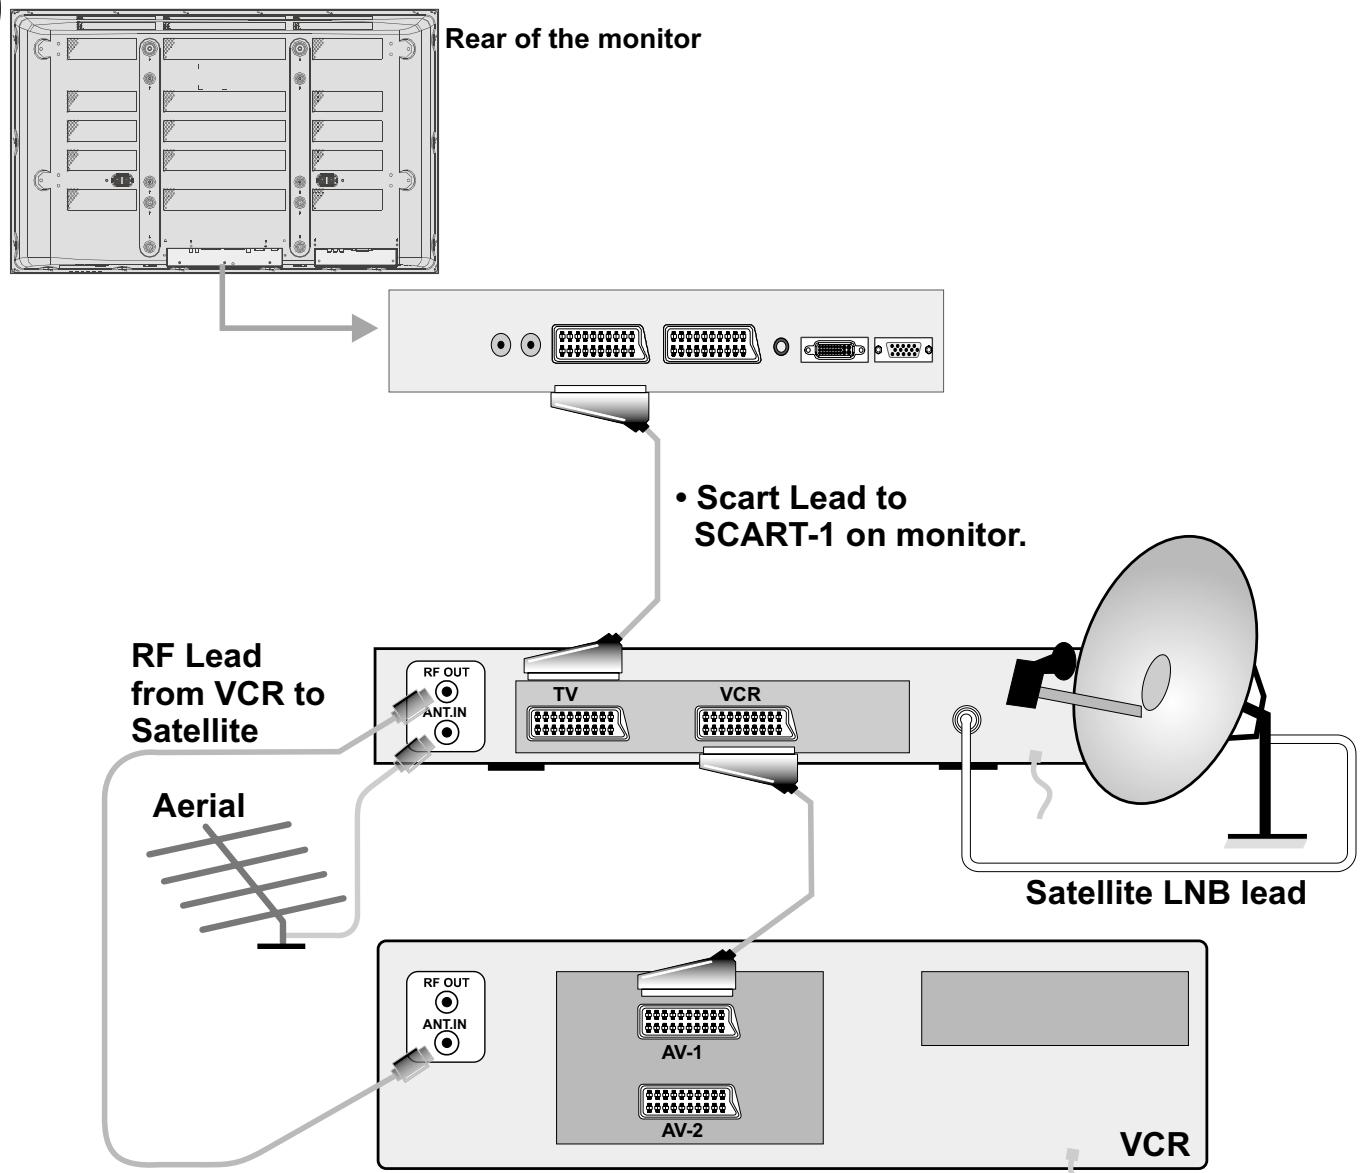
Connect Peripheral Equipment
There is a wide range of audio and video equipment that can be connected to your monitor.
The following connection diagrams show you where the different (Optional) equipment should be connected at the rear side of the Plasma monitor.
Via the SCART
Your TV set has two Euroconnector sockets. If you want to connect peripherals (e.g. video, decoder, etc.) which have Euroconnectors, to your TV, use SCART 1 or SCART 2 inputs.
If an external device is connected via Euroconnector socket TV is switched to AV mode automatically. If the signal is RGB then the RGB OSD indicator is displayed on the screen. If the external device is connected to SCART 1, choose SCART 1 RGB. If the external device is connected to SCART 2, choose SCART 2 RGB.
If you wish the set to remember the Scart RGB setting for your devices (Set Top Box, Satellite receiver or DVD), select this option from the Source Select Menu rather than the SOURCE button. Once this option has been selected in the menu it will be automatically selected every time you turn the device on.
Decoder
Cable TV offers you a wide choice of programs. Most of them are free, others are to be paid for by the viewer. This means that you will need to subscribe to the broadcasting organisation whose programmes you wish to receive. This organisation will supply you a corresponding decoder unit to allow the programmes to be unscrambled.
For further information ask your dealer. See also the booklet supplied with your decoder.
- Connect the decoder to the Plasma Monitor with a Scart to Scart cable.
Playback NTSC
To use this option you can;
- Connect NTSC VCR player to Scart socket or RCA Jacks at the rear of the Plasma Monitor.
Then, press "SOURCE" button to select proper source.
Camera And Camcorder
To Connect To AV Input
Connect your camera or camcorder to AV input at the rear of the Plasma Monitor.
- Connect your equipment to the monitor via VIDEO (yellow), AUDIO R (red) and AUDIO L (white) inputs. You should connect the jacks to the input in the same colour.
To Connect To S-VHS Input
Connect your camera or camcorder to S-VHS input at the rear of the Plasma monitor.
- Connect your equipment to the Plasma monitor via S-VHS input and audio inputs of AV inputs by using S-VHS cables.
Connect The Decoder To The Video Recorder
-
Connect a Scart cable to the Scart socket of your decoder and to the Scart socket of your video recorder. See also the booklet of your video recorder.
-
Connect your video recorder to the Scart socket of the Plasma Monitor
If you want to connect more equipment to your monitor, consult your dealer.
Connecting External Speakers (optional)
Plasma Monitor has two inputs (one for left and one for right speaker) to provide connection for external speakers. You can connect loudspeakers of minimum 8 ohms to these inputs.
Connect Peripheral Equipment
| VIDEO | AUDIO | CAMCORDER |
| DECODER AERIAL | FOR SATELLITE RECEIVER |
PC Input Typical Display Modes
The display has a maximum resolution of 1280 × 768 , vertical sync. frequency range of 50-75 Hz and a horizontal sync. frequency range of 30-69 KHz.
The following table is an illustration of some of the typical video display modes.
| Mode | Resolution | Frequency | ||
| Horizontal | Vertical | Hor. (kHz) | Ver. (Hz) | |
| 1 | 640 | 400 | 31.5 | 60 |
| 2 | 640 | 480 | 37.9 | 72 |
| 3 | 640 | 480 | 37.5 | 75 |
| 4 | 720 | 400 | 31.5 | 70 |
| 5 | 800 | 600 | 37.9 | 60 |
| 6 | 800 | 600 | 48.1 | 72 |
| 7 | 800 | 600 | 46.9 | 75 |
| 8 | 1024 | 768 | 48.4 | 60 |
| 9 | 1024 | 768 | 56.5 | 70 |
| 10 | 1024 | 768 | 60.0 | 75 |
| 11 | 1280 | 768 | 47,6 | 60 |
Tips
Care Of The Screen
Clean the screen with a slightly damp, soft cloth. Do not use abrasive solvents as they may damage the monitor screen coating layer.
Poor Picture
Is your monitor located too close to nonearthed audio equipment or neon lights, etc.?
The picture quality may degrade when two peripherals are connected to the monitor at the same time. In such a case, disconnect one of the peripherals.
No Picture
Have you pressed the correct buttons on the remote control? Try once more.
Check the cables and the equipments you have connected to the monitor.
Sound
You can not hear any sound. Did you perhaps interrupt the sound, pressing "×" button? Are external speakers connected to the monitor?
Sound is coming from only one of the speakers. Is the balance set to one direction extreme? See audio menu.
Remote Control
Your monitor no longer responds to the remote control. Perhaps the batteries are exhausted. If so you can still use the local buttons at the right bottom side of the Plasma Monitor.
Have you selected the wrong menu? Press "M" button to return to the previous menu.
No solution:
Switch your monitor off and on. If this does not work, call the service personnel; never attempt to repair it yourself
Specifications
SOURCE INDICATOR
On Screen Display
OPERATING VOLTAGE
230-240VAC, 50 Hz.
AUDIO
German+Nicam Stereo
AUDIO OUTPUT POWER (W_RMS.) (%10 THD)
2 × 10
POWER CONSUMPTION (W) (max.)
310 W (Maximum condition)
< 10 W (Stand-by)
PANEL
16:9 display, 42" Screen Size
DIMENSIONS (mm)
| DIMENSIONS (mm) | |||
| D | L | H | Weight (kg) (without foot and speakers) |
| 96 | 1045 | 645 | 30 |

IMPORTANT - Ensure there is at least a 100mm (10cm) gap to the sides, rear and top of the monitor. This is to allow for adequate ventilation during operation. Please read the main Users Guide for more
safety information before installation.
1
Insert the batteries into your handset
2
Connect a VCR and satellite decoder.
3
Connect a PC
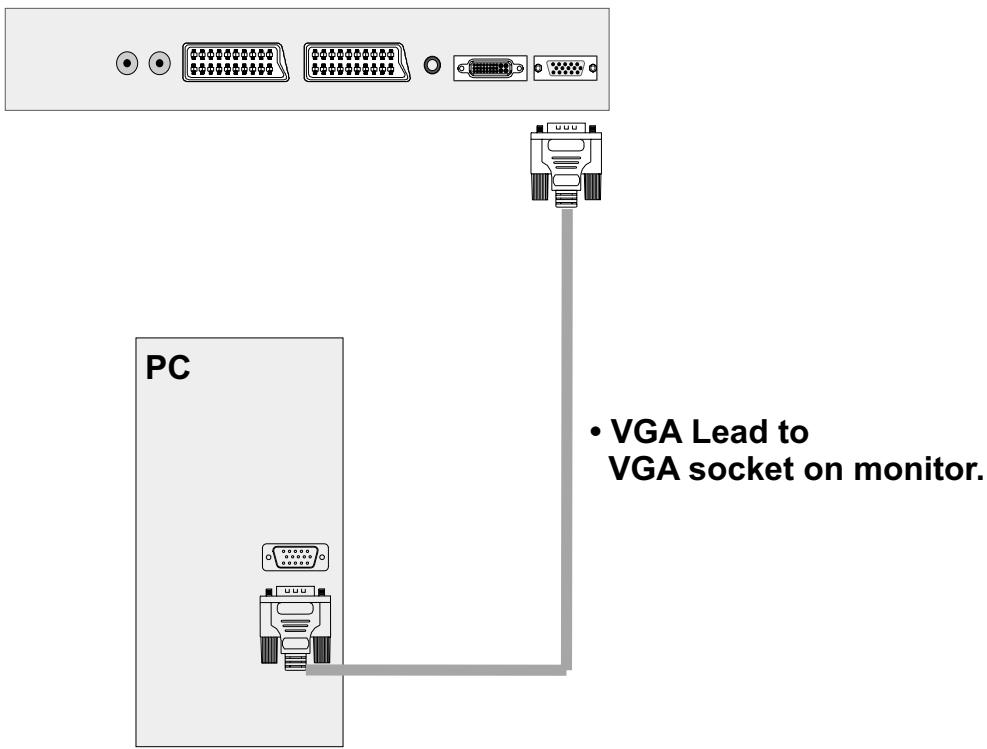
NB: You can also connect your PC to DVI socket of the monitor using a DVI lead (if your PC has a DVI socket).
4
Connect the monitor plug to the mains socket
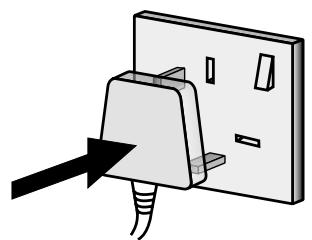
insert plug...
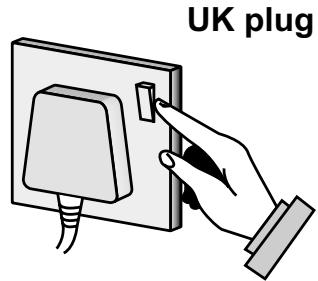
...and switch on
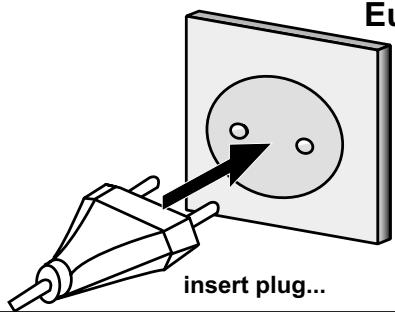
European plug
5
Switch your monitor on by pressing the On/Off switch
NB: When the set is first switched on by pressing the On/Off switch, the set will be in standby. Press the “O” or “SOURCE” button on remote control to operate.
remote control
(1) O = Stand By
② PC = PC Button
(3) = Image Size
(4) + = Volume Up
(5) = Mute
(6) OK = Okay / Freeze
(7) = Cursor Right
(8) = Cursor Down
(9) = Cursor Left
10 ▲ = Cursor Up
(11) M = Menu
12 - Volume Down
13 I-II = Mono/Stereo - Dual A-B
14 = Not used on this model
15 = Not used on this model
SOURCE = Source select
HITACHI
Hitachi, Ltd. Tokyo, Japan
International Sales Division
THE HITACHI ATAGO BUILDING,
No. 15-12 Nishi Shinbashi, 2 - Chome, Minato - Ku, Tokyo 105-8430, Japan.
Tel: 03 35022111
HITACHI EUROPE LTD,
Whitebrook Park
Lower Cookham Road
Maidenhead
Berkshire
SL6 8YA
UNITED KINGDOM
Tel: 01628 643000
Fax: 01628 643400
Email: consumer-service@hitachi-eu.com
HITACHI EUROPE S.A.
364 Kifissias Ave. & 1, Delfon Str.
152 33 Chalandri
Athens
GREECE
Tel: 1-6837200
Fax: 1-6835964
Email: service.hellas@hitachi-eu.com
HITACHI EUROPE GmbH
Munich Office
Dornacher Strasse 3
Email: HSE-DUS.service@hitachi-eu.com
HITACHI EUROPE S.A.
Gran Via Carlos III, 86, planta 5
Email: customerservice.italy@hitachi-eu.com
HITACHI Europe AB
Box 77 S-164 94 Kista
SWEDEN
Tel: +46 (0) 856271100
Fax: +46 (0) 8562711 13
Email: csgswe@hitachi-eu.com
HITACHI EUROPE S.A.S
Lyon Office
B.P. 45, 69671 BRON CEDEX
FRANCE
Tel: +33 04 72 14 29 70
Fax: +33 04 72 14 29 99
HITACHI EUROPE LTD (Norway) AB
STRANDVEIEN 18
1366 Lysaker
NORWAY
Tel: 67 5190 30
Fax:67519032
Email: csgnor@hitachi-eu.com
HITACHI EUROPE AB
Egebaekgård
Egebækvej 98
DK-2850 Nærum
DENMARK
Tel: +45 43 43 6050
Fax: +45 43 60 51
Email: csgnor@hitachi-eu.com
HITACHI EUROPE AB
Neopoli / Niemenkatu 73
FIN-15140 Lahti
FINLAND
Tel: +358 3 8858 271
Fax: +358 3 8858 272
Email: csgnor@hitachi-eu.com
Hitachi Europe Ltd
Bergensesteenweg 421
1600 Sint-Pieters-Leeuw
BELGIUM
Tel: +32 2 363 99 01
Fax: +32 2 363 99 00
Email: sofie.van.bom@hitachi-eu.com
HITACHI EUROPE LTD
Na Sychrove 975/8
101 27 Praha 10 - Bohdalec
CZECH REPUBLIC
Tel: +420 267 212 383
Fax: +420 267 212 385
Email: csgnor@hitachi-eu.com