
SILHOUETTE - Baby swing GRACO - Free user manual and instructions
Find the device manual for free SILHOUETTE GRACO in PDF.
| Product type | Baby swing |
| Brand | GRACO |
| Model | SILHOUETTE |
| Minimum child weight | 2.5 kg |
| Maximum child weight | 11 kg |
| Main power supply | 4 D LR20 batteries (1.5 V) |
| Vibrator power supply | 1 D LR20 battery (1.5 V) |
| Number of swing speeds | 6 |
| Sound functions | 10 tracks, volume control (5 levels), timer up to 30 minutes |
| Nature sounds | 5 sounds, with timer |
| Vibrator | 2 intensities (high and low) |
| Adjustable recline | Yes, via side buttons |
| Safety harness | 5-point, with sliding buckle |
| Head support | Included, use exclusively with this swing |
| Removable tray | Yes, swivel |
| Mobile | Removable (on select models) |
| Cover care | Machine wash cold, gentle cycle, air dry. Do not bleach. |
| Frame care | Clean with mild soap and warm water. Do not bleach. |
| Recommended batteries | Alkaline disposable size D LR20 (1.5 V). Do not mix battery types or new/used batteries. |
| Included accessories | Seat cover, head support, tray, mobile (depending on model) |
Frequently Asked Questions - SILHOUETTE GRACO
User questions about SILHOUETTE GRACO
0 question about this device. Answer the ones you know or ask your own.
Ask a new question about this device
Download the instructions for your Baby swing in PDF format for free! Find your manual SILHOUETTE - GRACO and take your electronic device back in hand. On this page are published all the documents necessary for the use of your device. SILHOUETTE by GRACO.
USER MANUAL SILHOUETTE GRACO
WARNING IMPORTANT! KEEP FOR FUTURE REFERENCE
Parts List
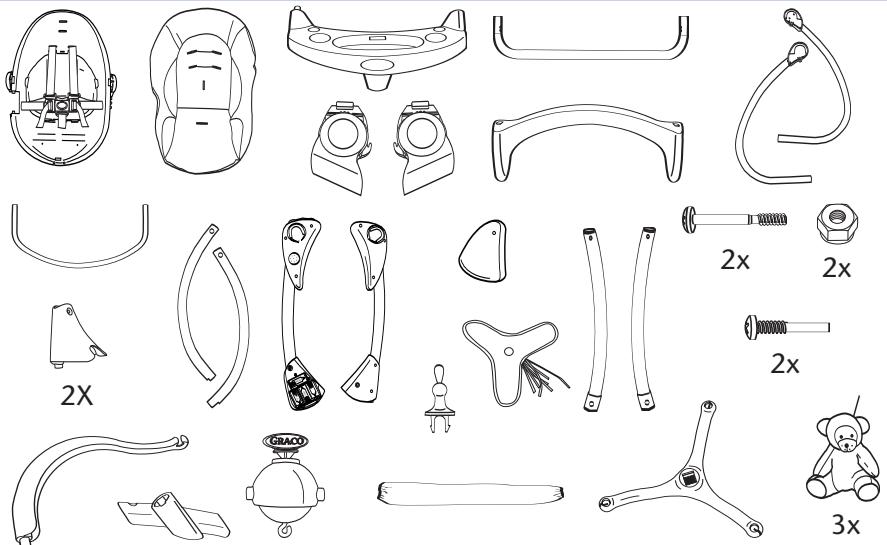
Accessories (certain models only)
Assembly


To Use Vibrator

Attaching Tray
Attaching Seat Pad
Attaching Seat to Frame
Head Support
To Adjust Recline
For Storage
To Secure your Child

Installing Batteries
Starting Swing


Mobile Assembly

Mix 'N Move Toys

UK GRACO CONSUMER SERVICES
Newell Rubbermaid
Graco Children's Product
First Floor
900 Pavilion Drive
Northampton NN4 7RG
United Kingdom
0870 909 0501
CONTINENTAL EUROPE GRACO CONSUMER SERVICES
Newell Rubbermaid Luxembourg SARL
IMPORTANT! KEEP FOR FUTURE REFERENCE
PLEASE SAVE OWNER'S MANUAL FOR-FUTURE USE.
To prevent serious injury or death from child falling or being strangled in straps: Always use seat belt.
Never leave child unattended.
Stop using swing when child attempts to climb out or reaches 25 pounds (11 kg).
WARNING: It is dangerous to place this swing on an elevated surface.
Some newborns cannot sit in a reclined or upright position and have special needs. Check with your doctor about when to start using this swing. Do not use with a child that weighs less than 5.5 pounds (2.5 kg). Use in most reclined position until child can sit up unassisted.
STRANGULATION HAZARD:
DO NOT place swing in any location where there are cords, such as window blind cords, drapes, phone cords, etc.
Strings can cause strangulation. DO NOT place items with a string around your child's neck, such as hood strings or pacifier cords.
DO NOT suspend strings over the swing or attach strings to toys.
DO NOT USE SWING without the seat cover.
DISCONTINUE USING YOUR SWING should it become damaged or broken.
THIS PRODUCT REQUIRES ADULT ASSEMBLY. Follow assembly instructions carefully. If you experience any difficulties, please contact the Customer Service Department.
Electronic toys (on certain models): Do not open. No serviceable parts inside. Remove and immediately discard plastic tab from slot in toy.
FOR SAFE BATTERY USE
Keep the batteries out of children's reach.
Only the recommended batteries or equivalent are to be used, volts and size.
Batteries are inserted with the correct polarity.
Remove exhausted batteries from the product.
DO NOT short-circuit supply terminals.
Rechargeable batteries are to be removed from the toy before being charged
Rechargeable batteries are only to be charged under adult supervision.
Any battery may leak battery acid if mixed with a different battery type, if inserted incorrectly (put in backwards) or if all batteries are not replaced or recharged at the same time. Do not mix old and new batteries. Do not mix alkaline, standard (carbon-zinc) or rechargeable (nickel-cadmium) batteries.
Any battery may leak battery acid or explode if disposed of in fire or an attempt is made to charge a battery not intended to be recharged. Never recharge a cell of one type in a recharger made for a cell of another type.
Discard leaky batteries immediately. Leaky batteries can cause skin burns or other personal injury. When discarding batteries, be sure to dispose of them in the proper manner, according to your state and local regulations.
Always remove batteries if the product is not going to be used for a month or more. Batteries left in the unit may leak and cause damage.
Recommended type batteries—alkaline disposables, size D-LR20 (1.5V). NEVER mix battery types. Change batteries when product ceases to operate satisfactorily.

The crossed out wheelie bin symbol indicates the product is to be recycled.
CARE AND MAINTENANCE
FROM TIME TO TIME CHECK YOUR SWING for loose screws, worn parts, torn material or stitching. Replace or repair the parts as needed. Use only Graco replacement parts.
REMOVABLE CLOTH SEAT COVER may be machine washed in cold water on delicate cycle and drip-dried. NO BLEACH.
TO CLEAN FRAME, use only household soap and warm water.
NO BLEACH or detergent.
Excessive exposure to sun or heat could cause fading or warping of parts.
PROBLEM SOLVING
Swing won't operate:
I. No batteries in swing.
2. Batteries dead.
3. Speed setting too low.
4. Batteries in backwards — check "+" and "-".
5. Corrosion on battery terminals. Rotate batteries in place against terminals, or clean with sandpaper or steel wool if corrosion is severe.
6. Baby leaning too far forward.
7. Baby grabbing swing legs. (Discontinue use.)
8. Seat not pushed high enough for a good start.
9. Protective device activated. (Turn off motor, wait 3 minutes, then restart swing.)
Seat doesn't swing very high:
- Control setting too low.
- Blanket hanging down, causing increased wind resistance.
- Batteries too weak.
- Baby leaning too far forward.
- Baby too heavy or too active. (Discontinue use.)
- Soft carpet (swings higher on hard floors).
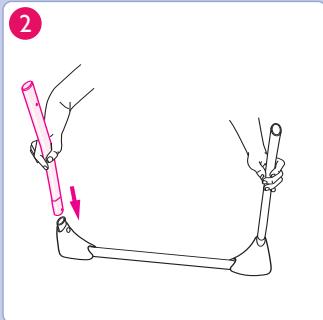
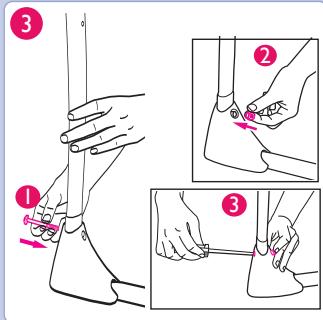
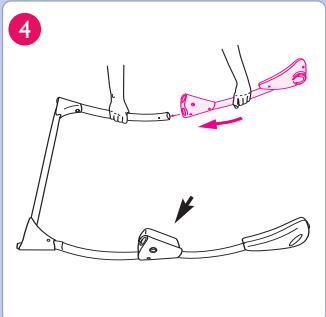
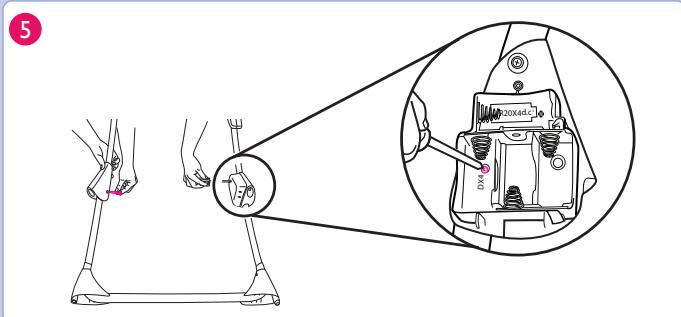
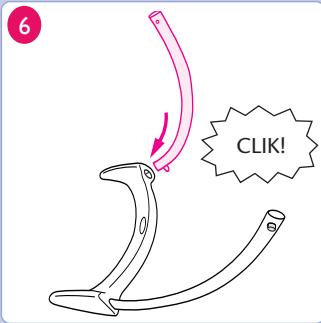
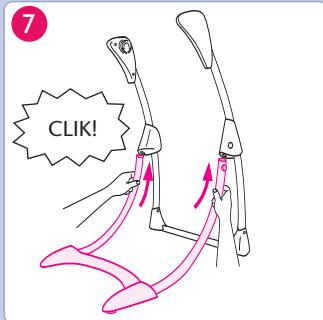
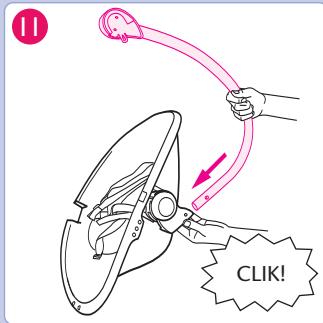
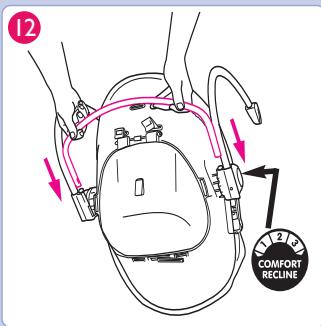
Assembly
See images 1-12
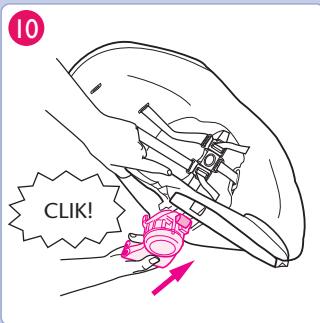
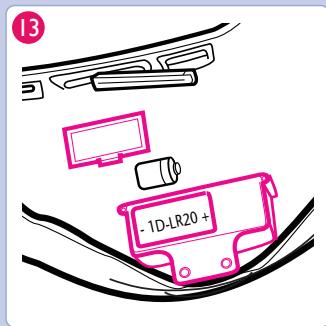
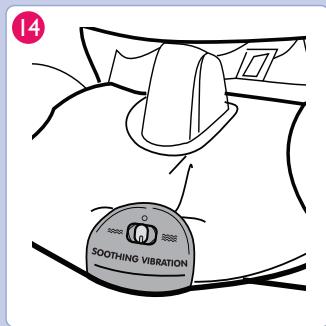
To Use Vibrator
13 Remove battery lid, found under seat, with a key and insert I-D-LR20 (I.5V) battery in module. Replace lid.
Push button to low or high.
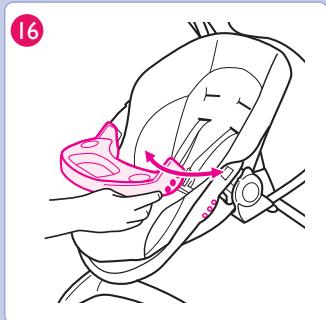
Attaching Tray
15 Insert bottom of peg into opening on side of seat, as shown.
16 Rotate tray to close or open.
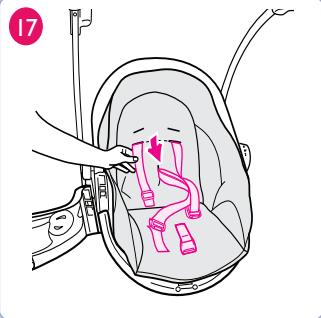
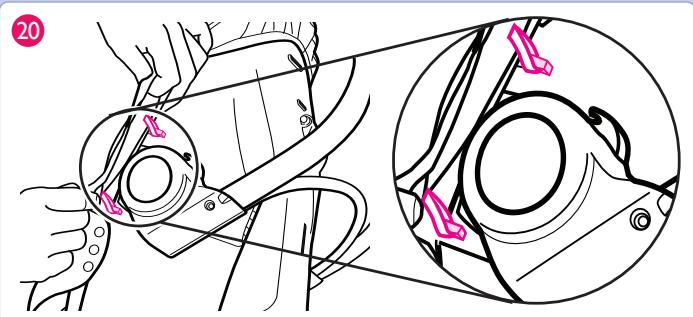
Attaching Seat Pad
Pull harness straps and crotch strap through slots in the back of seat pad.
Pull back of seat pad over back of seat.
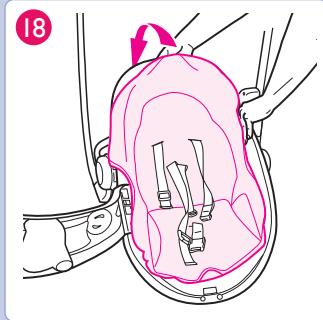
Pull sides of seat pad around edge of seat and over vibration unit.
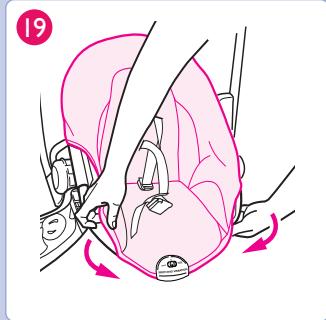
20 Fasten two elastic loops attached to the seat pad to the two tabs on both sides of the seat as shown.
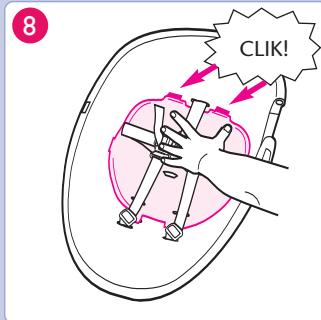
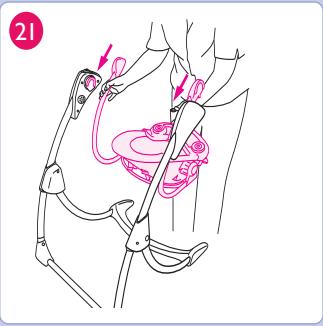
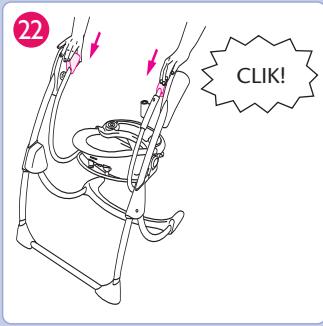
Attaching Seat to Frame
See images 21-22
Slide swing seat onto the top brackets.
Secure swing seat by pushing down gently, the arms will snap into place.
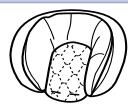
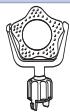
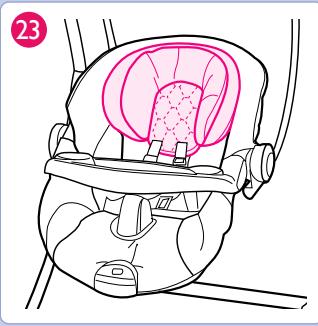
Head Support
Only use this head support on this swing. Never use this head support on any other product.
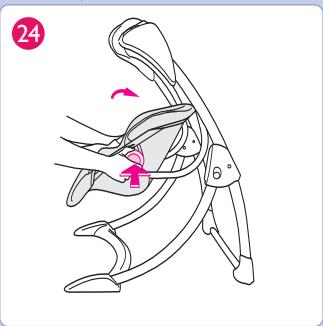
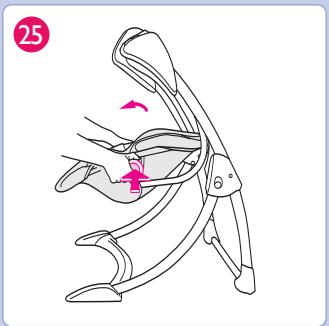
To Adjust Recline
24 Press in recline buttons on each side of seat to lower.
Press in recline buttons on each side of seat to raise seat.
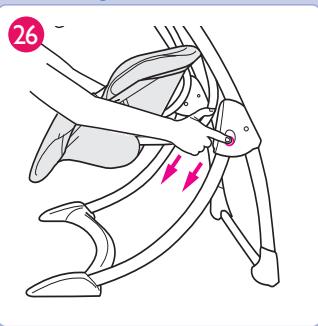
For Storage
Press buttons on each side of swing to remove front legs for storage.
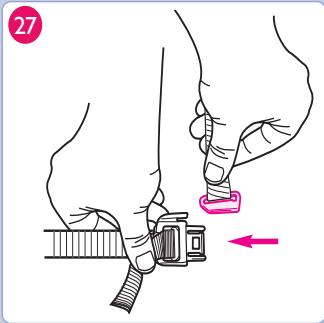
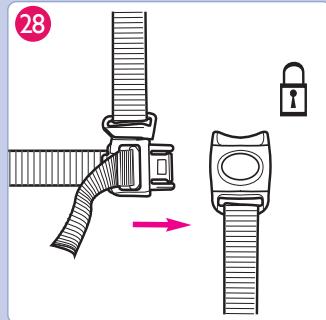
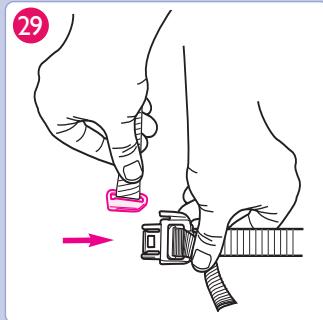
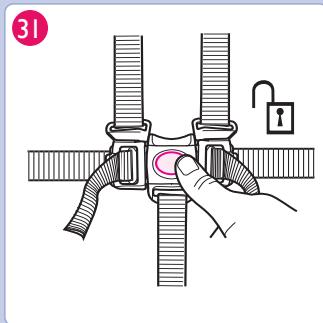
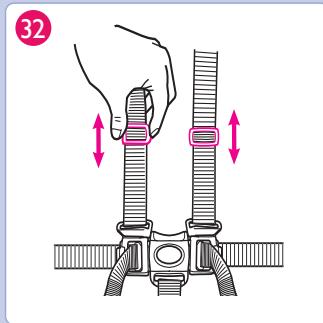
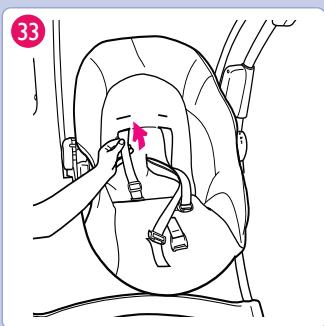
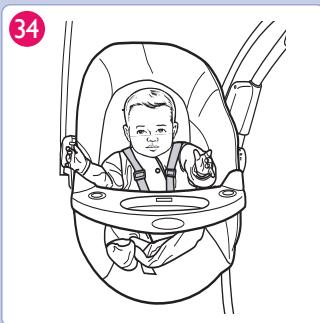
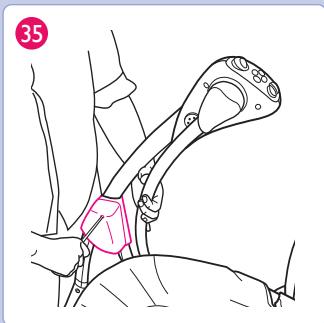
To Secure Your Child
See Images 27-34
WARNING Falling Hazard: Always use the seat belt.
Use slide adjuster at shoulder and waist for further adjustment. Repeat on other side.
33 When changing harness strap slots, MAKE SURE harness straps are going through same slots in seat pad and seat back.
The harness straps must go into the slot that is even with or slightly above the shoulders. Avoid twisting straps.
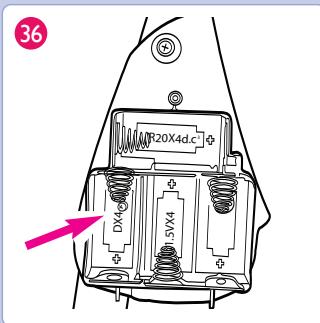
Installing Batteries
See Images 35-36
With baby out of swing, open the battery compartment lid by unfastening screw. Insert four "D"-LR20 (1.5V) batteries. Replace battery lid.
Starting Swing
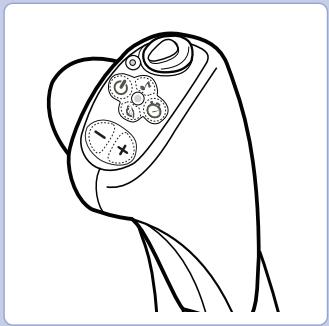
37 SPEED - Rotate "Swing Speed" knob clock-wise and select speed setting from 1-6. Turn "Swing Speed" knob counter clock-wise to lower speed. When the speed is turned off, motion will stop and green light will go out. When green light starts to flash, batteries are low.
38 MUSIC/NATURE OFF - Press button to turn OFF Music or Nature sounds.
39 MUSIC - Push "Music" button to turn on music selection, and the green light will turn on. The music will start at track 1 at volume 3 and continue through to track 10. Push button to continue to next track. Music cycles back to track 1.
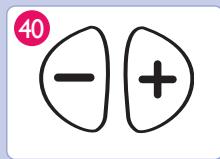
40 VOLUME— Press the plus (+) to raise the volume and the minus (-) to lower the volume. There are 5 volume settings.
41 NATURE SOUNDS—Push "Nature" button to turn on nature sound selection. Each press will change to the next nature sound. After the 5th sound is selected, it will return to the first track.
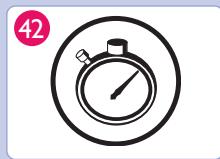
42 TIMER—Push “Timer” button to set the timer for Music/Nature sounds. If the button is not pushed, music/nature sound will continue to play. If the button is pushed once, the green light will flash once and timer is set for 10 minutes. Each additional push will increase timer setting by 10 minutes; up to 30 minutes.
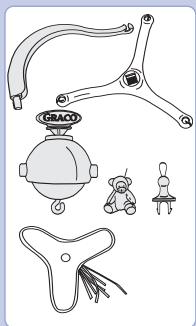
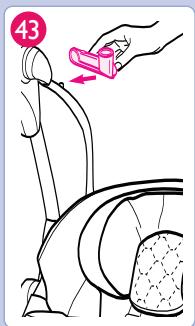
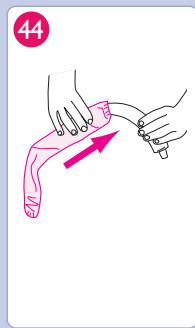
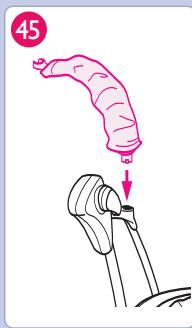
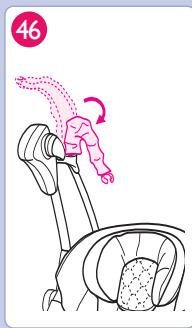
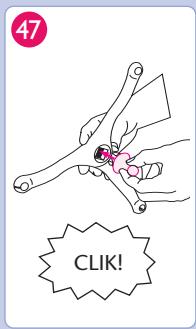
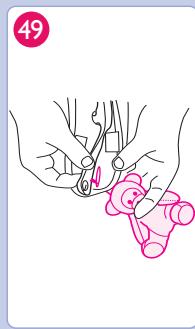
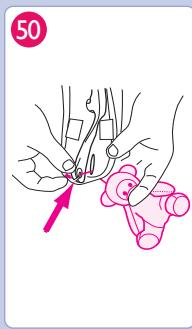
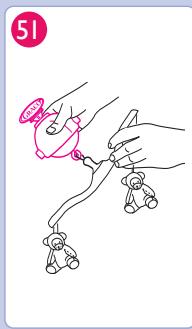
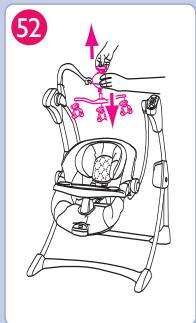
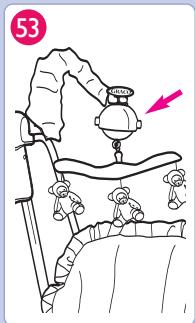
Assembling Mobile
See Images 43-53
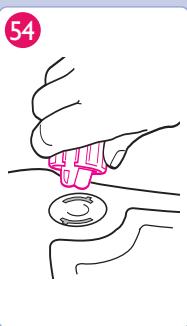
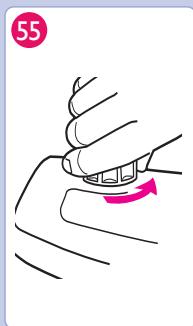
Mix N' Move Toys
Insert toy as shown.
55 Fasten toy by tightening it into place.
IMPORTANT ! À CONSERVER POUR REFERENCE ULTÉRIÉURE
CONSERVER LE MANUEL DE L'UTILISATEUR POUR UN USAGE ULTERIEUR.
STRANGULATIONSGEFAHR:
Installation of batterier
Se billed

- 36
- Parts List
- Accessories (certain models only)
- Assembly
- Attaching Seat Pad
- Attaching Seat to Frame
- Head Support
- To Adjust Recline
- For Storage
- To Secure your Child
- Installing Batteries
- IMPORTANT! KEEP FOR FUTURE REFERENCE
- STRANGULATION HAZARD:
- FOR SAFE BATTERY USE
- CARE AND MAINTENANCE
- PROBLEM SOLVING
- Swing won't operate:
- Seat doesn't swing very high:
- To Use Vibrator
- Attaching Tray
- Starting Swing
- Assembling Mobile
- Mix N' Move Toys
- IMPORTANT ! À CONSERVER POUR REFERENCE ULTÉRIÉURE
- STRANGULATIONSGEFAHR:
- Installation of batterier
Brand : GRACO
Model : SILHOUETTE
Category : Baby swing