
TEC648WP EcoSpeed - Tumble dryer MIELE - Free user manual and instructions
Find the device manual for free TEC648WP EcoSpeed MIELE in PDF.
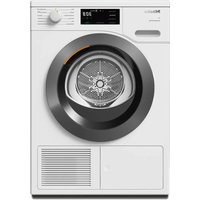


| Brand | Miele |
| Model | TEC648WP EcoSpeed |
| Product type | Tumble dryer |
| Load capacity | 8 kg |
| Energy efficiency class | A++ |
| Drying type | Heat pump condensation |
| EcoSpeed function | Yes, for faster drying |
| Humidity sensors | Yes, with automatic shut-off |
| Programs | More than 12 programs including cotton, synthetics, wool, delicates |
| Dimensions (H x W x D) | 85 x 60 x 63 cm |
| Net weight | 57 kg |
| Power supply | 230 V ~ 50 Hz, 10 A |
| Power consumption | 2800 W |
| Noise level | 65 dB (A) |
| Display | LCD screen with indicators |
| Delayed start | Yes, up to 24 hours |
| Child lock | Yes |
| Anti-crease system | Yes |
| Filter maintenance | Clean after each cycle |
| Condensed water tank | Drain regularly |
| Manufacturer warranty | 2 years (parts and labor) |
| Repairability index | 8.5/10 |
Frequently Asked Questions - TEC648WP EcoSpeed MIELE
User questions about TEC648WP EcoSpeed MIELE
0 question about this device. Answer the ones you know or ask your own.
Ask a new question about this device
Download the instructions for your Tumble dryer in PDF format for free! Find your manual TEC648WP EcoSpeed - MIELE and take your electronic device back in hand. On this page are published all the documents necessary for the use of your device. TEC648WP EcoSpeed by MIELE.
USER MANUAL TEC648WP EcoSpeed MIELE
Unscrew the 4 feet of the tumble dryer.
Risk of tipping over due to incorrect washer-dryer stack statics.
The washing machine must never be mounted on the tumble dryer. This will impair the statics of the washer-dryer stack.
Always use the washing machine as the base for the washer-dryer stack.
Washer-dryer stack dimensions

a = at least 2 cm
b = 172 cm
c = 65 cm
Components of the washer-dryer stacking kit

① Frame ② Sealing rings ③ Countersunk screws for fastening the stacking kit in place
Preparing the stacking kit

Place the stacking kit upside down on a soft surface, e.g., a blanket.

Stick the 6 sealing rings to the underside of the stacking kit.

Turn the stacking kit the right way up and place it on the washing machine lid.
Aligning the stacking kit

Align the stacking kit flush with the washing machine on the left, right, and front.

Fix the aligned stacking kit to the lid with adhesive tape.
Fastening the stacking kit in place
Use the 6 countersunk screws included with the delivery to fasten the stacking kit in place.

Carefully screw the stacking kit onto the washing machine lid by hand. Do not overtighten the screws.
Preparing the tumble dryer
Unscrew the 4 tumble dryer feet.
Mounting the tumble dryer on the washer-dryer stacking kit
Placing the tumble dryer on the washing machine
This step must be carried out by 2 people.
Lift the tumble dryer and tilt it back slightly for installation.

1. Place the rear feet in the stacking kit first and push them all the way back. 2. Then set down the front feet.
The tumble dryer feet are positioned securely in the stacking kit.
Removing the washer-dryer stacking kit
When the washer-dryer stacking kit is removed, holes remain in the lid of the washing machine. The holes in the lid mean that the washing machine is no longer leak-proof. The washing machine must not be operated.
Options for sealing the holes:
- Seal the holes with silicone.
- Have a new lid fitted by a professional.
■ Glue the 6 sealing rings to the underside of the connecting element.

■ Turn the connecting element over and place it on the washing machine lid.
Aligning the connecting element
■ Unscrew the 4 feet from the tumble dryer.
Placing the tumble dryer on the connecting element
Placing the dryer on the washing machine
This step requires 2 people.
■ Lift the dryer and tilt it slightly backwards when positioning it.

1 First place the rear feet into the connecting element and push them all the way back. 2 Then position and lower the front feet.
The dryer feet stand firmly in the connecting element.
■ Temporarily secure the adjusted intermediate piece to the lid with adhesive tape
■ Align the installation kit flush with the washing machine on the left and right sides and at the front.

Fix the aligned mounting kit to the lid using adhesive tape.
Align the connecting element left, right, and front with the washing machine.

Fix the aligned connecting element to the lid with adhesive tape.
Glue 6 sealing rings to the underside of the connecting element.

Turn the connecting element over and place it on the lid of the washing machine.
Align the connecting element so that it is flush with the washing machine on the left, right, and front.

Unscrew the 4 feet of the tumble dryer.
Mounting the tumble dryer on the connecting element of the washer-dryer
Placing the tumble dryer on the washing machine
This step requires 2 people.
1 First place the rear feet into the connecting element and push them all the way back. 2 Then lower the front feet.
The feet of the tumble dryer fit firmly in the connecting element.


- WASHER-DRYER STACK DIMENSIONS
- COMPONENTS OF THE WASHER-DRYER STACKING KIT
- PREPARING THE STACKING KIT
- ALIGNING THE STACKING KIT
- FASTENING THE STACKING KIT IN PLACE
- MOUNTING THE TUMBLE DRYER ON THE WASHER-DRYER STACKING KIT
- REMOVING THE WASHER-DRYER STACKING KIT
- PLACING THE TUMBLE DRYER ON THE CONNECTING ELEMENT
- MOUNTING THE TUMBLE DRYER ON THE CONNECTING ELEMENT OF THE WASHER-DRYER
Brand : MIELE
Model : TEC648WP EcoSpeed
Category : Tumble dryer