
60-3857-0 - Leaf blower MTD - Free user manual and instructions
Find the device manual for free 60-3857-0 MTD in PDF.


User questions about 60-3857-0 MTD
0 question about this device. Answer the ones you know or ask your own.
Ask a new question about this device
Download the instructions for your Leaf blower in PDF format for free! Find your manual 60-3857-0 - MTD and take your electronic device back in hand. On this page are published all the documents necessary for the use of your device. 60-3857-0 by MTD.
USER MANUAL 60-3857-0 MTD
Gas Powered Mulching Blower / Vacuum
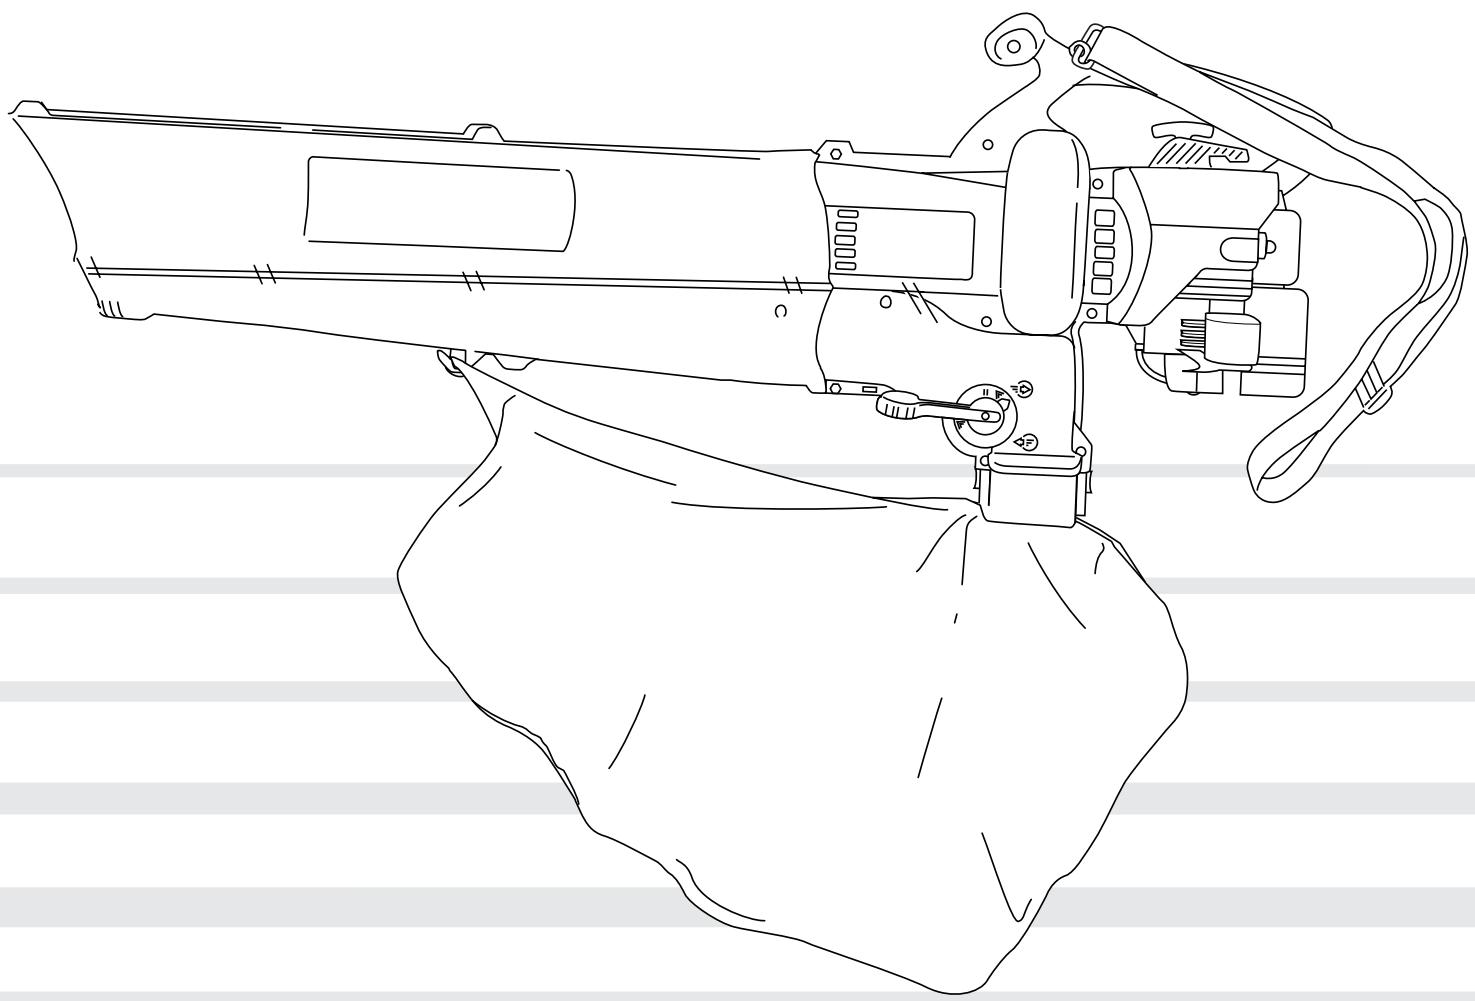
OPERATOR'S MANUAL
FOR QUESTIONS, CALL 1-888-939-0992
INTRODUCTION
THANK YOU
Thank you for buying this quality product. This modern outdoor power tool will provide many hours of useful service. You will find it to be a great labor-saving device. This operator's manual provides you with easy-to-understand operating instructions. Read the whole manual and follow all the instructions to keep your new outdoor power tool in top operating condition.
PRODUCT REFERENCES, ILLUSTRATIONS AND SPECIFICATIONS
All information, illustrations and specifications in this manual are based on the latest product information available at the time of printing. We reserve the right to make changes at any time without notice.
Copyright © 2003 MTD SOUTHWEST INC
All Rights Reserved.
SERVICE INFORMATION
Service on this unit both within and after the warranty period should be performed only by an authorized and approved service dealer.
Dial:
- 1-888-939-0992 in Canada to obtain a listing of authorized service dealers near you.
DO NOT RETURN THE UNIT TO THE RETAILER.
NOTE: PROOF OF PURCHASE WILL BE REQUIRED FOR WARRANTY SERVICE.
Make sure you carefully read and understand this manual before starting or operating this equipment. THIS PRODUCT IS COVERED BY ONE OR MORE US PATENTS, OTHER PATENTS PENDING.
TABLE OF CONTENTS
I. Rules for Safe Operation 3-7
A. Important Safety Information 4
B. Safety and International Symbols 6
C. Know Your Unit 7
II. Assembly Instructions 8-9
A. Attaching and Removing the Blower/Vacuum Tube . . .8
B. Attaching and Removing the Vacuum Bag 9
C. Installing and Adjusting the Shoulder Harness 9
III. Oil and Fuel Information 10
IV. Starting/Stopping Instructions 11
V. Operating Instructions 12-14
A. Holding the Blower / Vacuum 12
B. Operating Tips 12
C. Operating as a Blower 12
D. Operating as a Vacuum 13
E. Clearing a Bloked Tube/Impeller 14
F. Empty the Vacuum Bag 14
VI. Maintenance and Repair Instructions 15-18
A.Maintenance Schedule 15
B. Air Filter Maintenance 15
C. Spark Arrestor Maintenance 16
D.Carburetor Adjustment 17
E. Replacing the Spark Plug 17
F. Cleaning and Storage 18
G. Accessories/Replacement parts 18
VII. Troubleshooting Chart 19
VIII. Specifications 20
IX. Warranty 22
X. Parts List .Inside Back Cover
CONTENTS OF CARTON
This unit includes the following:
Gas-powered Mulching Blower/Vacuum
- Blower/Vacuum Tube
Vacuum bag
Shoulder Harness
- Hardware Pack
- Bottle of 2-Cycle Oil
Operator's Manual
Examine all parts to make certain that nothing is missing and no breakage has occurred during shipping. Any damaged or missing part must be replaced before using this product.
CALIFORNIA PROPOSITION 65 WARNING

WARNING

THE ENGINE EXHAUST FROM THIS PRODUCT CONTAINS CHEMICALS KNOWN TO THE STATE OF CALIFORNIA TO CAUSE CANCER, BIRTH DEFECTS OR OTHER REPRODUCTIVE HARM.
SPARK ARRESTOR
NOTE: For users on U.S. Forest Land and in the states of California, Maine, Oregon and Washington. All U.S. Forest Land and the state of California (Public Resources Codes 4442 and 4443), Oregon and Washington require, by law that certain internal combustion engines operated on forest brush and/or grass-covered areas be equipped with a spark arrester, maintained in effective working order, or the engine be constructed, equipped and maintained for the prevention of fire. Check with your state or local authorities for regulations pertaining to these requirements. Failure to follow these requirements could subject you to liability or a fine. This unit is factory equipped with a spark arrestor. If it requires replacement, ask your LOCAL SERVICE DEALER to install the Accessory Part #182747 Spark Arrestor Kit.
WARNING!
Read the Operator's Manual(s) and follow all warnings and safety instructions. Failure to do so can result in serious injury to the operator and/or bystanders.
FOR QUESTIONS, CALL 1-800-345-8746 IN U.S. OR 1-800-668-1238 IN CANADA
The purpose of safety symbols is to attract your attention to possible dangers. The safety symbols, and their explanations, deserve your careful attention and understanding. The safety warnings do not by themselves eliminate any danger. The instructions or warnings they give are not substitutes for proper accident prevention measures.
NOTE: Advises you of information or instructions vital to the operation or maintenance of the equipment.
SYMBOL MEANING

SAFETY ALERT SYMBOL: Indicates danger, warning or caution. Attention is required in order to avoid serious personal injury. May be used in conjunction with other symbols or pictographs.
SYMBOL MEANING

DANGER: Failure to obey a safety warning will result in serious injury to yourself or to others. Always follow the safety precautions to reduce the risk of fire, electric shock and personal injury.

WARNING: Failure to obey a safety warning can result in injury to yourself and others. Always follow the safety precautions to reduce the risk of fire, electric shock and personal injury.

CAUTION: Failure to obey a safety warning may result in property damage or personal injury to yourself or to others. Always follow the safety precautions to reduce the risk of fire, electric shock and personal injury.
WARNING: When using the unit, you must follow the safety rules. For your own safety and that of bystanders, please read these instructions before operating the unit. Please keep the instructions for later use.
- Read the instructions carefully. Be familiar with the controls and proper use of the unit.
- Do not operate this unit when tired, ill, or under the influence of alcohol, drugs, or medication.
- Children and teens under the age of 15 must not use the unit, except for teens guided by an adult.
- All guards and safety attachments must be installed properly before operating the unit.
- Inspect the unit before use. Replace damaged parts. Check for fuel leaks. Make sure all fasteners are in place and secure. Replace parts that are cracked, chipped, or damaged in any way. Do not operate the unit with loose or damaged parts.
- Carefully inspect the area before starting the unit. Remove all debris and hard or sharp objects such as glass, wire, etc.
- Clear the area of children, bystanders, and pets. At a minimum, keep all children, bystanders, and pets outside a 50 feet (15 m.) radius; there still may be a risk to bystanders from thrown objects. Bystanders should be encouraged to wear eye protection. If you are approached, stop the unit immediately.
SAFETY WARNINGS FOR GAS UNITS

WARNING: Gasoline is highly flammable, and its vapors can explode if ignited. Take the following precautions:
- Store fuel only in containers specifically designed and approved for the storage of such materials.
- Avoid creating a source of ignition for spilled fuel. Do not start the engine until fuel vapors dissipate.
- Always stop the engine and allow it to cool before filling the fuel tank. Never remove the cap of the fuel tank, or add fuel, when the engine is hot. Never operate the unit without the fuel cap securely in place. Loosen the fuel tank cap slowly to relieve any pressure in the tank.
- Mix and add fuel in a clean, well-ventilated outdoor area where there are no sparks or flames. Slowly remove the fuel cap only after stopping engine. Do not smoke while fueling or mixing fuel. Wipe up any spilled fuel from the unit immediately. Always wipe unit dry before using.
- Move the unit at least 30 feet (9.1 m) from the fueling source and site before starting the engine. Do not smoke or allow sparks and open flames near the area while adding fuel or operating the unit.
WHILE OPERATING
- Never start or run the unit inside a closed room or building. Breathing exhaust fumes can kill. Operate this unit only in a well-ventilated outdoor area.
- To reduce the risk of injury associated with thrown objects, wear safety glasses or goggles that are marked as meeting ANSI Z87.1 standards.
- Never run the unit without the proper equipment attached. When using this unit, always install the blower/vacuum tubes and vacuum bag depending on model. Make sure the vacuum bag is completely zipped closed.
- To reduce the risk of hearing loss associated with sound level(s), always wear ear/hearing protection when operating this unit.
- Wear heavy, long pants, boots, and gloves. Do not wear short pants, sandals, or go barefoot.
- To avoid static electricity shock, do not wear rubber gloves or any other insulated gloves while operating this unit.
- To reduce the risk of injury associated with objects being drawn into rotating parts, do not wear loose clothing, jewelry, scarves, and the like. Secure hair above shoulder level.
- Wear a face or dust mask if the operation is dusty. Long sleeve shirts are recommended.
- Use the unit only in daylight or good artificial light.
- Keep outside surfaces free from oil and fuel.
- Avoid accidental starting. Be in the starting position whenever pulling the starter rope. The operator and unit must be in a stable position while starting. Refer to Starting/Stopping Instructions.
- Do not set unit on any surface except a clean, hard area while engine is running. Debris such as gravel, sand, dust, grass, etc. could be picked up by the air intake and thrown out by the discharge opening, damaging unit, property, or causing serious injury to bystanders or operator.
- Use the right tool. Only use this tool for the purpose intended.
- Do not force unit. It will do the job better and with less likelihood of injury at a rate for which it was designed.
- Do not overreach or use from unstable surfaces such as ladders, trees, steep slopes, rooftops, etc. Always keep proper footing and balance.
- Always hold the unit with a firm grip when operating.
- Keep hands, face, and feet at a distance from all moving parts. Do not touch or try to stop the impeller when it is rotating. Do not operate without guards in place.
- Do not put any object into openings. Do not use with any opening blocked; keep free of dirt, debris and anything that may reduce the air flow.
- Do not touch the engine or muffler. These parts get extremely hot from operation. When turned off they remain hot for a short time.
- Do not operate the engine faster than the speed needed to do the job. Do not run the engine at high speed when not in use.
- Always stop the engine when operation is delayed or when walking from one location to another.
- Stop the engine for maintenance, repair, to install or remove the blower tubes or vacuum attachments. The unit must be stopped and the impeller no longer turning to avoid contact with the rotating blades.
- Use only Genuine Factory Parts™ replacement parts when servicing this unit. These parts are available from your authorized service dealer. Do not use unauthorized parts, accessories, or attachments for this unit. Doing so could lead to serious injury to the user, or damage to the unit, and void your warranty.
- Never use this unit for spreading chemicals, fertilizers or other substances which may contain toxic materials.
- To reduce fire hazard, replace faulty muffler and spark arrestor, keep the engine and muffler free from grass, leaves, excessive grease or carbon build up.
- Never point the blower in the direction of people or pets, or in the direction of windows. Always direct the blowing debris away from people, animals, and windows. Use extra caution when blowing debris near solid objects such as trees, automobiles, walls, etc.
-
Avoid situations that could catch the vacuum bag on fire. Do not operate near an open flame. Do not vacuum warm ash from fireplaces, barbecue pits, brush piles, etc. Do not vacuum discarded cigars or cigarettes unless the cinders are completely cool.
-
The unit is designed to pickup dry material such as leaves, grass, small twigs, and bits of paper. Do not attempt to vacuum wet debris and/or standing water as this may result in damage to the blower/ vacuum. To avoid severe damage to the impeller, do not vacuum metal, broken glass, etc.
OTHER SAFETY WARNINGS
- Always disconnect the spark plug before performing maintenance or accessing movable parts.
- Never store the unit, with fuel in the tank, inside a building where fumes may reach an open flame (pilot lights, etc.) or sparks (switches, electrical motors, etc.).
- Allow the engine to cool before storing or transporting. Be sure to secure the unit while transporting.
- Store the unit in a dry place, either locked up or up high to prevent unauthorized use or damage. Keep out of the reach of children.
- Never douse or squirt the unit with water or any other liquid. Keep handles dry, clean, and free from debris. Clean after each use, see Cleaning and Storage instructions.
- Keep these instructions. Refer to them often and use them to instruct other users. If you loan this unit to others, also loan these instructions to them.
SPECIAL NOTE: Exposure to vibrations through prolonged use of gasoline powered hand tools could cause blood vessel or nerve damage in the fingers, hands, and joints of people prone to circulation disorders or abnormal swelling. Prolonged use in cold weather has been linked to blood vessel damage in otherwise healthy people. If symptoms occur such as numbness, pain, loss of strength, change in skin color or texture, or loss of feeling in the fingers, hands or joints, discontinue use of this tool and seek medical attention. An anti-vibration system does not guarantee avoidance of these problems. Users who operate power tools on a regular basis must closely monitor their physical condition and the condition of this tool.
SAVE THESE INSTRUCTIONS
SAFETY AND INTERNATIONAL SYMBOLS
This operator's manual describes safety and international symbols and pictographs that may appear on this product. Read the operator's manual for complete safety, assembly, operating and maintenance and repair information.
SYMBOL

MEANING
- SAFETY ALERT SYMBOL
Indicates danger, warning, or caution. May be used in conjunction with other symbols or pictographs.

WARNING - READ OPERATOR'S MANUAL
Read the Operator's Manual(s) and follow all warnings and safety instructions. Failure to do so can result in serious injury to the operator and/or bystanders.

- WEAR EYE AND HEARING PROTECTION
WARNING: Thrown objects and loud noise can cause severe eye injury and hearing loss. Wear eye protection meeting ANSI Z87.1-1989 standards and ear protection when operating this unit. Use a full face shield when needed.
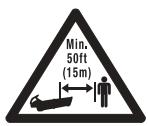
- KEEP BYSTANDERS AWAY
WARNING: Keep all bystanders, especially children and pets, at least 50 feet (15 m.) from the operating area.
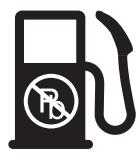
- UNLEADED FUEL
Always use clean, fresh unleaded fuel.

OIL
Refer to operator's manual for the proper type of oil.
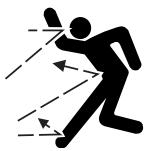
- THROWN OBJECTS AND ROTATING CUTTER CAN CAUSE SEVERE INJURY
WARNING: Keep clear of blower outlet. Never point the blower at yourself or others. Objects can be thrown from blower. Do not operate unit without proper attachments and guards in place.
SYMBOL

MEANING
ON/OFF STOP CONTROL ON / START / RUN

ON/OFF STOP CONTROL OFF OR STOP

- HOT SURFACE WARNING
Do not touch a hot muffler or cylinder. You may get burned. These parts get extremely hot from operation. When you turn off the unit, they remain hot for a short time.


- CHOKE CONTROL
A • FULL choke position
B·PARTIAL choke position
C·RUN position

- BLOWERS - ROTATING IMPELLER BLADES CAN CAUSE SEVERE INJURY
WARNING: Stop the engine and allow the impeller to stop before you open the vacuum door, clean the unit, service the unit or install/ change the tubes or the bag.

A

B
- BLOWER/VACUUM MODE CHANGE-OVER LEVER
A - Vacuum mode
B - Blower mode


- THROTTLE CONTROL
Indicates "HIGH" or "FASTEST" speed.
- THROTTLE CONTROL
Indicates "IDLE," "LOW" or "SLOWEST" speed.
- Cleaning yards, garages, driveways, porches, patios, around walls, fences and more
As a vacuum: - Picking up leaves and other light debris
ASSEMBLY INSTRUCTIONS
ATTACHING AND REMOVING THE BLOWER/VACUUM TUBE

WARNING: To avoid serious personal injury, the blower/vacuum tube and vacuum bag must be used when operating this unit.
Attaching
NOTE: The blower/vacuum tube comes unassembled on this unit. Installation is required to provide safe and easy use for the operator.

WARNING: To prevent serious personal injury, stop the engine, disconnect the spark plug wire and allow the impeller to stop before attaching or removing tubes.
- Remove the screws and nuts provided from the hardware pack.
- Insert the blower/vacuum tube all the way into the opening on the motor housing until the holes in the tabs on the blower/vacuum tube align with the screw holes in the housing (Fig. 1).
- Insert the 2 (two) 8 - 32 × 3 / 4'' slotted T20 Torx screws into the right side of the motor housing and the 2 (two) nuts into the left side of the motor housing (Fig. 1).
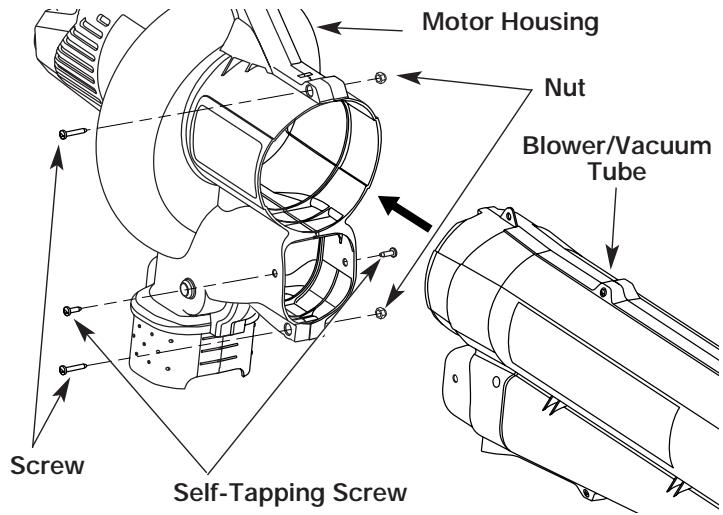
Fig. 1
- Tighten the screws firmly. Do not over-tighten.
- Install the 2 (two) remaining self-tapping 8 - 16 × 3 / 4'' slotted T20 Torx screws into the holes on either side of the housing (Fig. 1). Tighten until snug, but do not over-tighten.
Removing
NOTE: It may be necessary to remove the blower/vacuum tube to clear a blocked tube or impeller.

WARNING: To prevent serious personal injury, stop the engine and allow the impeller to stop before attaching or removing tubes.
- Remove the 2 (two) self-tapping screws from either side of the housing.
- Remove the 2 (two) screws and nuts holding the blower/vacuum tube on the housing (Fig. 2).
NOTE: Keep the hardware in a safe place for future use.
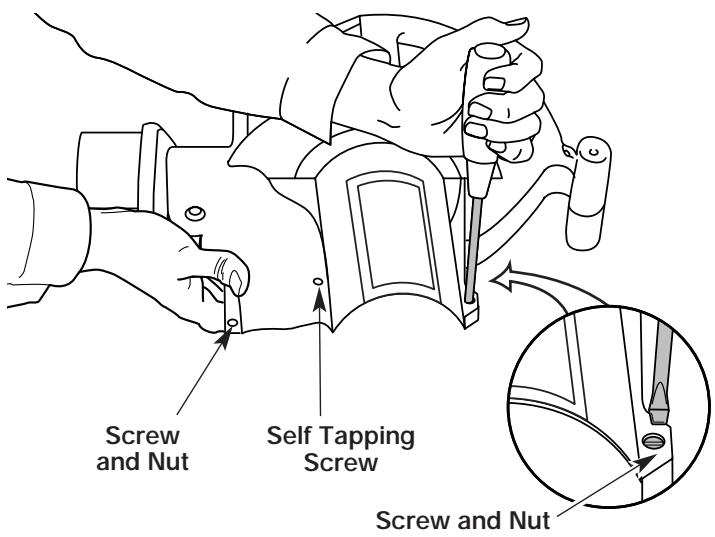
Fig. 2
- Remove the blower/vacuum tube from the motor housing.
- Replace the blower/vacuum tube before use.
ASSEMBLY INSTRUCTIONS
ATTACHING AND REMOVING THE VACUUM BAG Attaching
- Attach the vacuum bag to the vacuum bag hook on the blower/vacuum tube (Fig. 3).

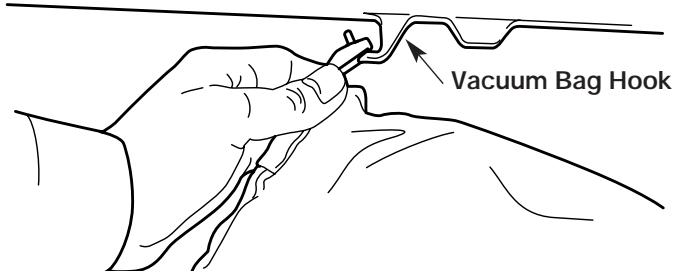
Fig. 3
- Slide the vacuum bag tube over the debris exhaust tube on the housing. Push the tube until the latching tabs on both sides click into place, securing the bag on the unit (Fig. 4).
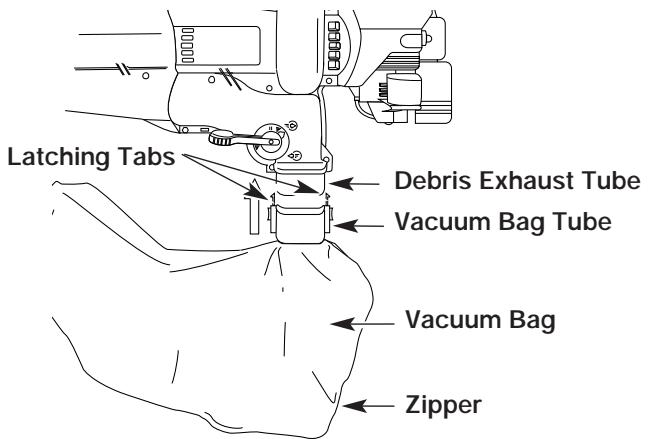
Fig. 4
Removing
- Press the latching tabs on both sides of the vacuum bag tube and pull the vacuum bag down from the unit (Fig. 5).
- Detach the vacuum bag from the vacuum bag hook.
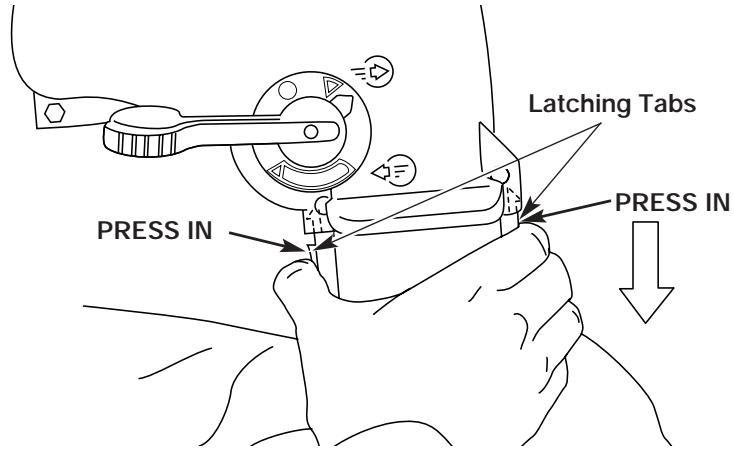
Fig. 5
WARNING: To avoid serious personal injury, never attempt to start the unit when you are standing and the unit is clipped to the shoulder strap. Always follow the starting procedures as described in the Starting/ Stopping Instructions section.
- Push the strap through the center of the buckle.
- Pull the strap over the cross bar and down through the slot in the buckle (Fig. 6).
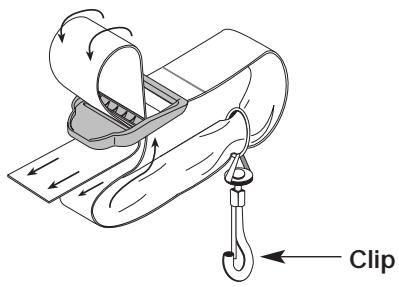
Fig. 6
- Snap the clip on to the support fitting (Fig. 7).
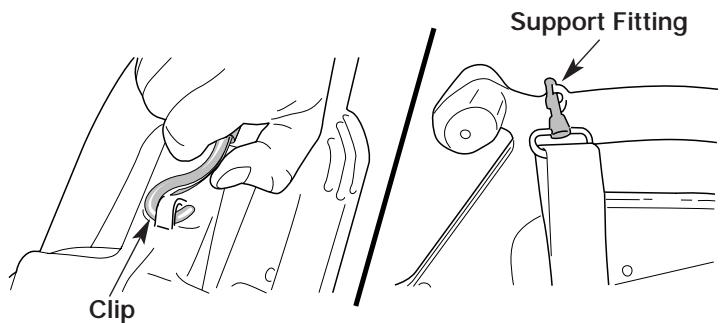
Fig. 7
- While standing in the operating position adjust the length to fit the operator's size. Pull the tab to lengthen, pull the strap to shorten (Fig 8).
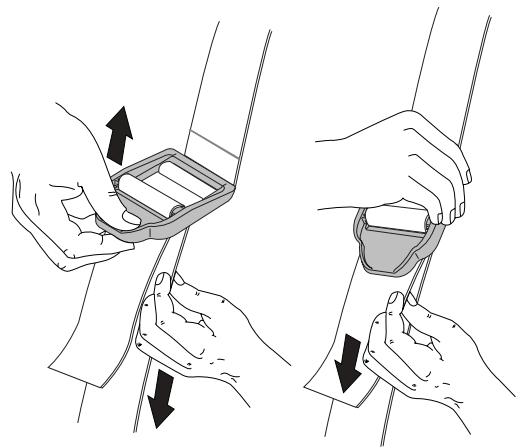
Fig. 8
- Unclip the shoulder strap from the unit before you start the unit.
OIL AND FUEL INFORMATION
OIL AND FUEL MIXING INSTRUCTIONS
Old and/or improperly mixed fuel are the main reasons for the unit not running properly. Be sure to use fresh, clean unleaded fuel. Follow the instructions carefully for the proper fuel/oil mixture.
Definition of Blended Fuels
Today's fuels are often a blend of gasoline and oxygenates such as ethanol, methanol, or MTBE (ether). Alcohol-blended fuel absorbs water. As little as 1% water in the fuel can make fuel and oil separate. It forms acids when stored. When using alcohol-blended fuel, use fresh fuel (less than 60 days old).
Using Blended Fuels
If you choose to use a blended fuel, or its use is unavoidable, follow recommended precautions:
- Always use the fresh fuel mix explained in your operator's manual
- Always agitate the fuel mix before fueling the unit
- Drain the tank and run the engine dry before storing the unit
Using Fuel Additives
The bottle of 2-cycle oil that came with your unit contains a fuel additive which will help inhibit corrosion and minimize the formation of gum deposits. It is recommended that you use our 2-cycle oil with this unit. If unavailable, use a good 2-cycle oil designed for air-cooled engines along with a fuel additive, such as STA-BIL® Gas Stabilizer or an equivalent. Add 0.8 oz. (23 ml.) of fuel additive per gallon of fuel according to the instructions on the container. NEVER add fuel additives directly to the unit's fuel tank.

CAUTION: For proper engine operation and maximum reliability, pay strict attention to the oil and fuel mixing instructions on the 2-cycle oil container. Using improperly mixed fuel can severely damage the engine.
Thoroughly mix the proper ratio of 2-cycle engine oil with unleaded gasoline in a separate fuel can. Use a 40:1 fuel/oil ratio. Do not mix them directly in the engine fuel tank. See the table below for specific gas and oil mixing ratios.
NOTE: One gallon (3.8 liters) of unleaded gasoline mixed with one 3.2 oz. (95 ml.) bottle of 2-cycle oil makes a 40:1 fuel/oil ratio.
MIXING RATIO - 40:1
| + UNLEADED GAS | 2 CYCLE OIL |
| 1 GALLON US (3.8 LITERS) | 3.2 FL. OZ. (95 ml) |
| 1 LITER | 25 ml |
| WARNING: Gasoline is extremely flammable. Ignited Vapors may explode. Always stop the engine and allow it to cool before filling the fuel tank. Do not smoke while filling the tank. Keep sparks and open flames at a distance from the area. |
| ! | WARNING: Remove fuel cap slowly to avoid injury from fuel spray. Never operate the unit without the fuel cap securely in place. |
| 警告 | WARNING: Add fuel in a clean, well ventilated outdoor area. Wipe up any spilled fuel immediately. Avoid creating a source of ignition for spilt fuel. Do not start the engine until fuel vapors dissipate. |
NOTE: Dispose of the old fuel/oil mix in accordance to Federal, State and Local regulations.
STARTING/STOPPING INSTRUCTIONS
STARTING INSTRUCTIONS

WARNING: Operate this unit only in a well-ventilated outdoor area. Carbon monoxide exhaust fumes can be lethal in a confined area.

WARNING: Avoid accidental starting. Make sure you are in the starting position when pulling the starter rope (Fig. 11). To avoid serious injury, the operator and unit must be in a stable position while starting.
Do not set unit on any surface except a clean, hard area while starting. Debris such as gravel, sand, dust and grass could be picked up by the air intake and thrown out by the discharge opening. This could damage the unit, property, or cause serious injury to bystanders or the operator.
- Mix gas with oil. Fill fuel tank with fuel/oil mixture. Refer to Oil and Fuel Mixing Instructions.

WARNING: To avoid serious personal injury, always remove the vacuum bag prior to refueling the unit. The bag may become a fire hazard when saturated with fuel.
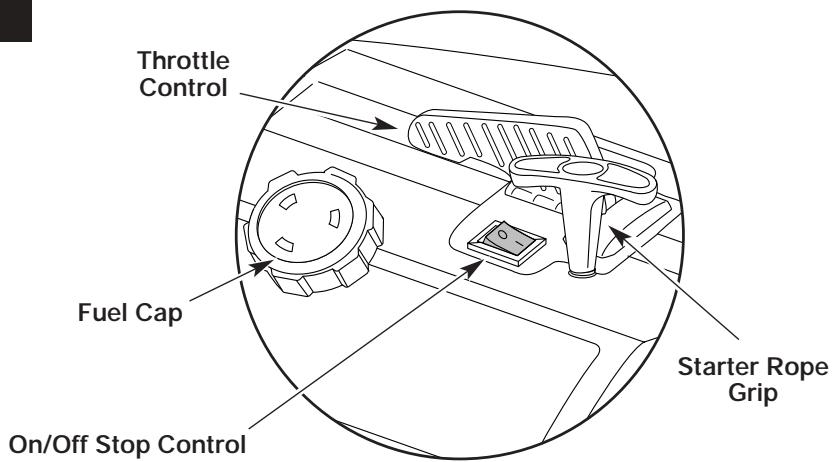
NOTE: The throttle control will remain in the position it's placed until moved. Fast position is to the right.
NOTE: Put on the shoulder harness and adjust it, but don't clip it to the support until the unit has started.
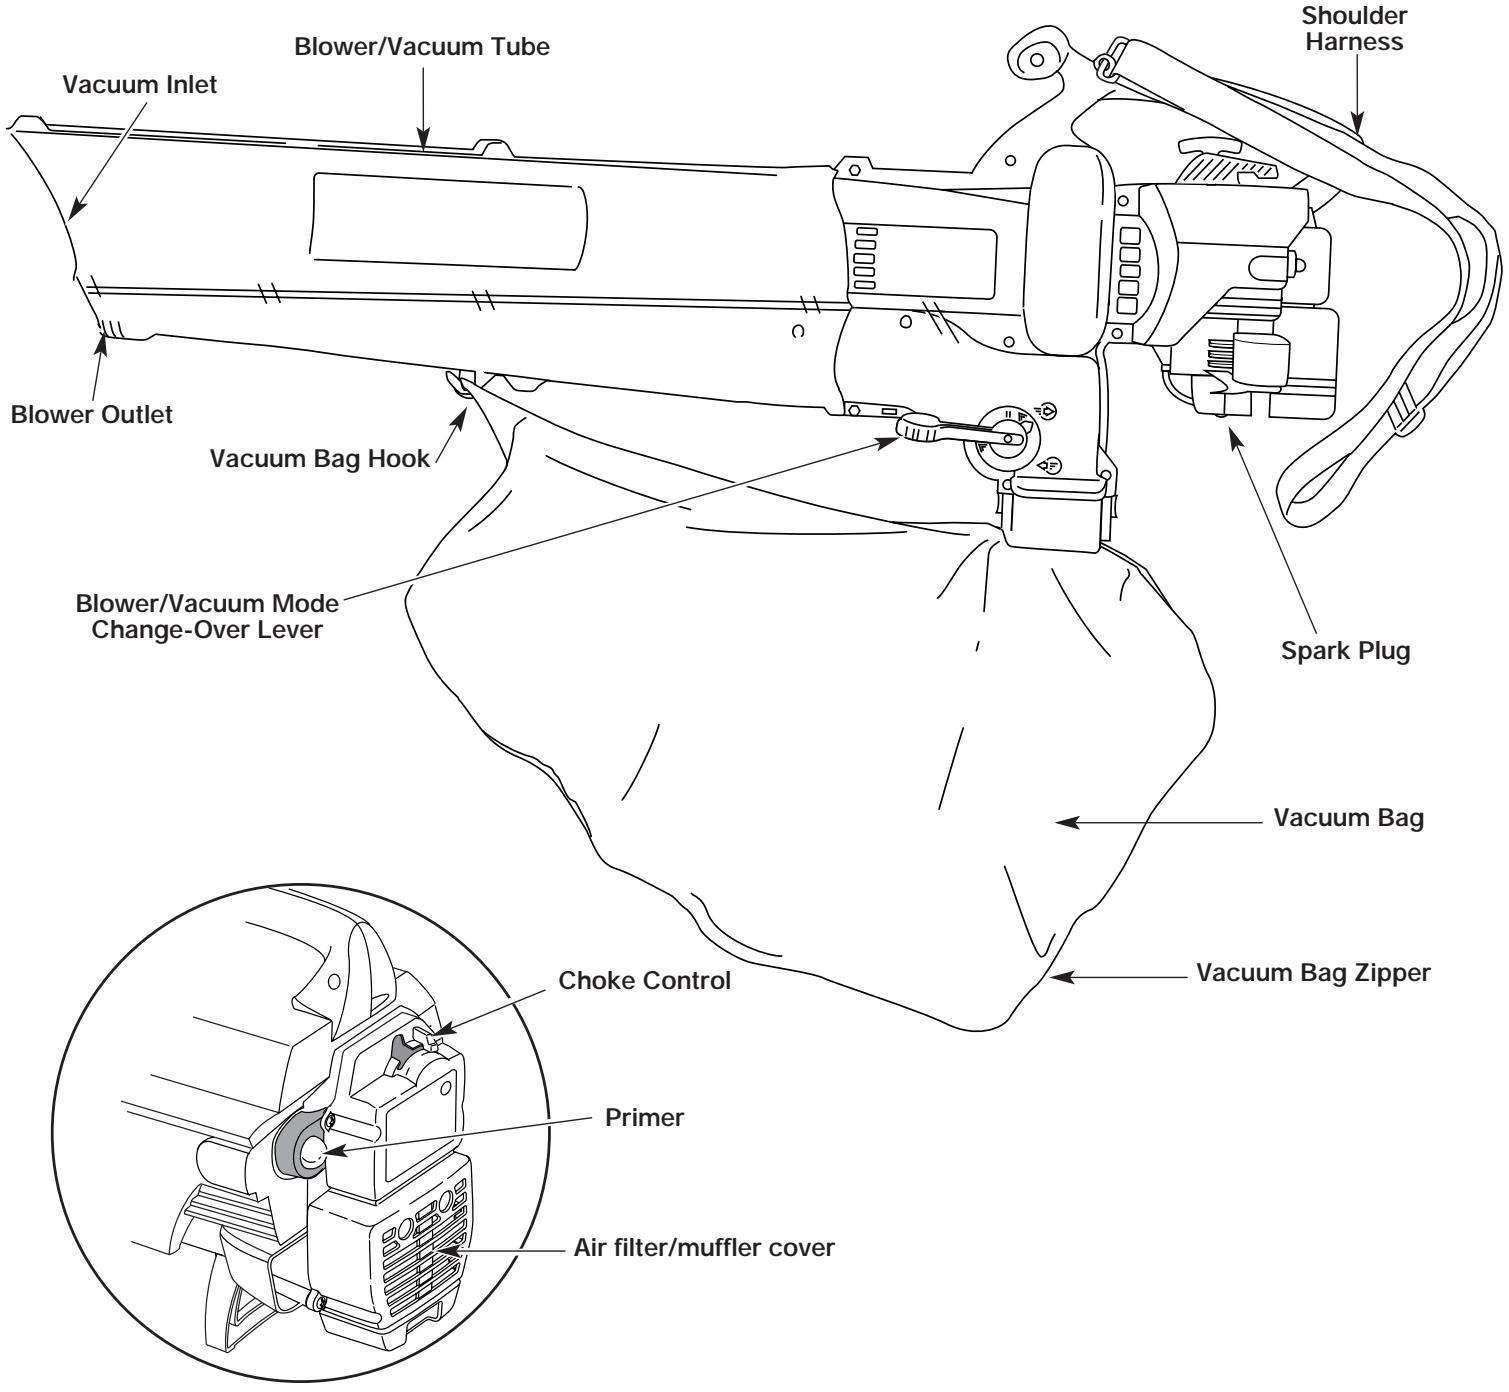
- Set the blower/vacuum mode change-over lever to the up position (Blower Mode). See Operating as a Blower. This prevents the vacuum bag from filling up while starting the engine.
- Fully press and release the primer bulb 10 times, slowly, until FUEL IS VISIBLE IN THE PRIMER BULB (Fig. 10). If you can't see fuel in the bulb, press and release the bulb as many times as it takes before you can see fuel in it.
- Place the choke lever in the FULL choke (▶) position (Fig. 10).
- Place the unit in the starting position (Fig. 11). Move the throttle control to the fast position ( ) (Fig. 9).
- Pull the starter rope briskly 5 times while still in the FULL choke ( | | ) position. If the engine attempts to run before the fifth pull, proceed to Step 7.
NOTE: The engine won't run in the FULL choke (▶-) position.
- Place the choke lever in the PARTIAL choke (▶) position (Fig. 10).
- Pull starter rope briskly 1 to 3 times to start the engine (Fig. 11).
- If the engine does not start, repeat steps 3 through 8.
NOTE: If the engine floods while trying to start, place the choke lever in the RUN (I+I) position (Fig. 10). Move the throttle control to the fast position (Fig 9). Pull the starter rope briskly. The engine should start with three (3) to eight (8) pulls.
- Allow the engine to warm up up for 5 to 10 seconds. Place the choke lever in the RUN (I+I) position.
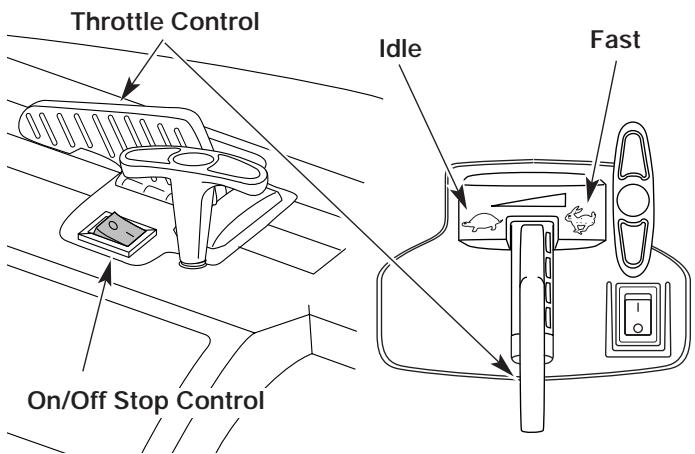
Fig. 9
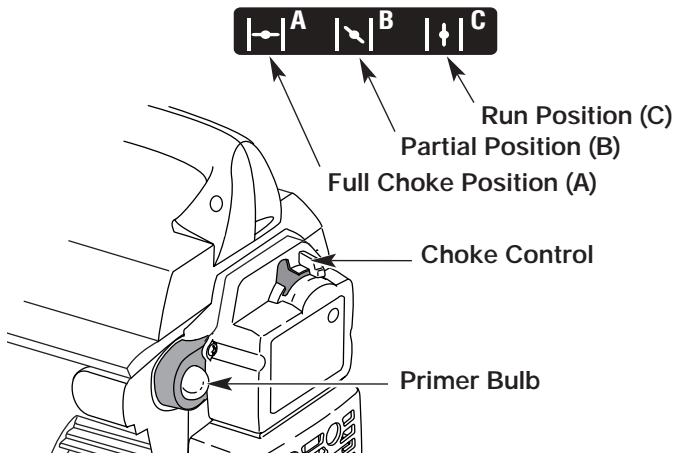
Fig. 10
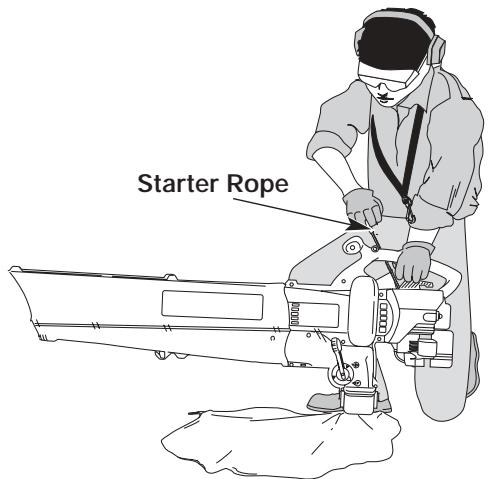
Fig. 11
NOTE: Choking is unnecessary when starting a warm engine. Put the throttle control in the fast position (♂) (Fig. 9) and start unit with the choke control in the PARTIAL (↓) position (Fig. 10).
STOPPING INSTRUCTIONS
- Move the throttle control to the idle position (Fig. 9). Allow the engine to cool down by idling for 10-15 seconds.
- Press the On/Off Stop control down in the STOP (O) position until the engine comes to a complete stop.
OPERATING INSTRUCTIONS
HOLDING THE BLOWER/VACUUM
Before operating the unit, stand in the operating position. (Fig. 12). Check for the following:
- Operator is wearing proper clothing, such as boots, safety glasses or goggles, ear/hearing protection, gloves, long pants and long sleeve shirt

WARNING: To avoid serious personal injury, wear goggles or safety glasses at all times when operating this unit. Wear a face mask or dust mask in dusty locations
- If the conditions are dusty, the operator is wearing a dust mask or face mask
- The unit is in good working condition
- The tubes and guards are in place and secure

WARNING: To prevent serious personal injury or damage to the unit, make sure blower tubes or vacuum tubes and the vacuum bag are in place before you operate the unit.
OPERATING TIPS
- Be sure the vacuum bag is zipped closed before operating the unit.
Assure the unit is not directed at anybody or at any loose debris before starting the unit. - Verify that the unit is in good working condition. Make sure the tubes and guards are in place and secure.
- Always hold the unit with both hands when operating. Keep a firm grip on both the front and rear handle or grips.
- To reduce the risk of hearing loss associated with sound level(s), hearing protection is required.
- Operate power equipment only at reasonable hours—not early in the morning or late at night when people might be disturbed. Comply with times listed in local ordinances. Usual recommendations are 9:00 am to 5:00 pm, Monday through Saturday.
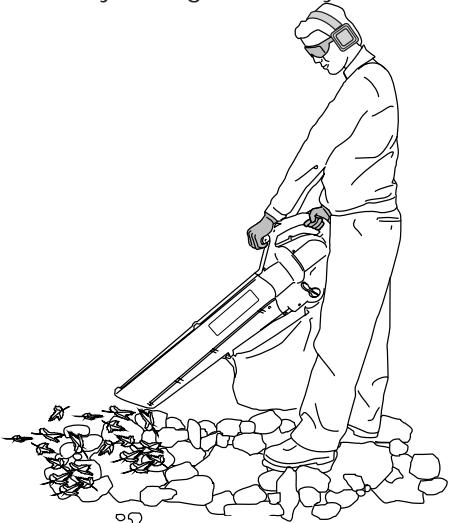
Fig. 12
- To reduce noise levels, limit the number of pieces of equipment used at any one time.
- To reduce noise levels, operate power blowers at the lowest possible speed to do the job.
- Check your equipment before operation, especially the muffler, air intakes and air filters.
- Use rakes and brooms to loosen debris before blowing.
- In dusty conditions, slightly dampen surfaces or use a mister attachment when water is available.
- Conserve water by using power blowers instead of hoses for many lawn and garden applications, including areas such as gutters, screens, patios, grills, porches and gardens.
- Watch out for children, pets, open windows or freshly washed cars, and blow debris safely away.
- Use the full blower nozzle extension so the air stream can work close to the ground.
- Clean up after using blowers and other equipment. Dispose of debris appropriately.
Converting to a Blower
- Start the engine. See Starting/Stopping Instructions.
- Set the blower/vacuum mode change-over lever to the up position (Blower Mode) (Fig. 13).
NOTE: Never use the unit with the lever in a position half way between either mode.
- Place the shoulder harness over your head, onto your shoulder and adjust it if necessary. Refer to Installing the Shoulder Harness.
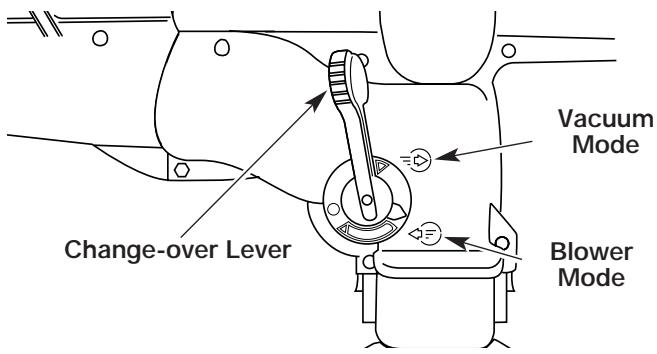
Fig. 13
OPERATING INSTRUCTIONS
Blower Operating Procedures
Hold the blower as shown in Figures 14, 15, and 16. Sweep from side to side with the nozzle several inches above the ground or floor. Slowly advance the unit, keeping the accumulated pile of debris in front of you. Most dry blowing operations are better suited to low speeds, rather than high. High speed blowing is a better way to move heavier items like large debris or gravel.
1 Use the blower for trees, shrubs, flower beds and hard-to-clean areas (Fig. 14).
2. Use the unit around buildings and for other normal cleaning procedures (Fig. 15).
3. Use the blower around walls, overhangs, fences and screens (Fig. 16).
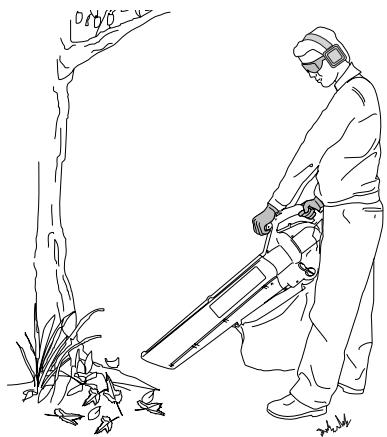
Fig. 14
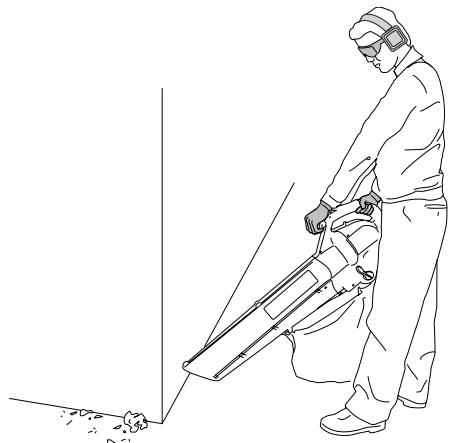
Fig. 15
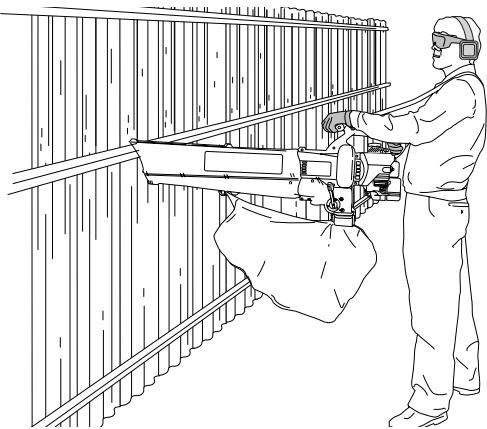
Fig. 16
Converting to Vacuum
- Start engine. See Starting/Stopping Instructions.
- Set the blower/vacuum mode change-over lever to the down position (Vacuum Mode) (Fig. 17).
NOTE: Never use the unit with the lever in a position half way between either mode.
3. Place the shoulder harness over your head, onto your shoulder and adjust it if necessary. Refer to Installing the Shoulder Harness.
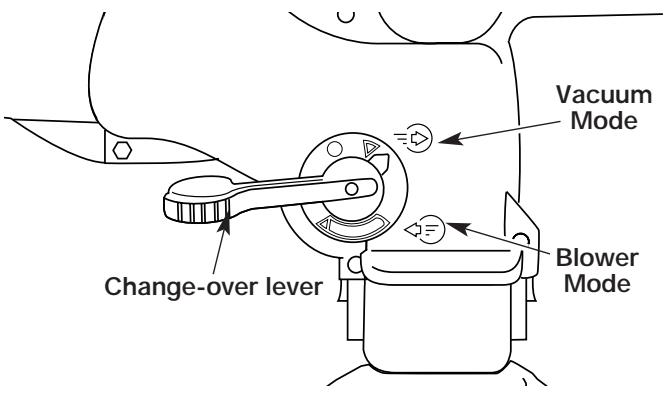
Fig. 17

WARNING: To prevent serious personal injury or damage to the unit, always install vacuum tubes, the vacuum bag and make sure the vacuum bag is completely zipped closed when operating this unit as a vacuum.
Vacuum Operation Procedures
Check for the following before operating the unit:
- Operator is wearing proper clothing, such as boots, safety glasses or goggles, ear/hearing protection, gloves, long pants and long sleeve shirt
- If the conditions are dusty, operator is equipped with a dust mask or face mask
- The unit is in good working condition-- the vacuum tubes and vacuum bag are in place and secure.
- The shoulder harness is in place and correctly adjusted
Use the unit for vacuuming up light debris like leaves and paper.
Hold the vacuum, tilting the suction tube slightly (2-4 in or 50-100 mm), and use a sweeping action to collect light debris (Fig. 18). The debris will flow into the vacuum bag. Items such as small leaves and small twigs will be mulched as they pass through the fan housing, allowing the vacuum bag to hold more debris.
When the bag is full, suction will noticeably decrease. Turn off the unit and allow the impeller to stop before you remove and unzip the bag. Unzip the bag and empty the contents before continuing. Refer to Emptying the Vacuum Bag.
OPERATING INSTRUCTIONS
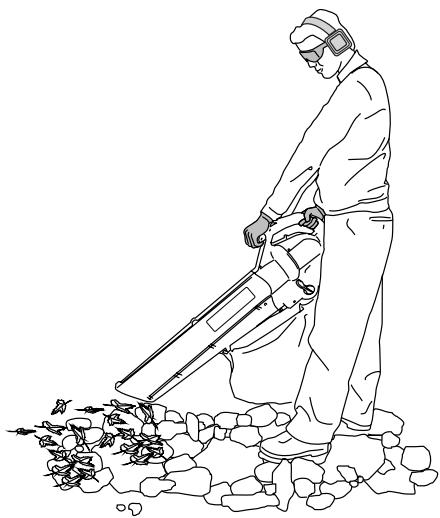
Fig. 18

WARNING: To avoid serious personal injury, never unzip the vacuum bag without stopping the unit first.

WARNING: As a vacuum, the unit is designed to pick up dry material such as leaves, grass, small twigs and bits of paper. To avoid serious personal injury, do not attempt to vacuum wet debris and/or standing water as this may result in damage to the blower/ vacuum. To avoid severe damage to the impeller, do not vacuum metal, broken glass or similar items.

WARNING: Avoid situations that could catch the vacuum bag on fire. Do not operate near an open flame. Do not vacuum warm ash from fireplaces, barbecue pits, brush piles, etc. Do not vacuum discarded cigars or cigarettes unless the cinders are completely cool.
When the bag is full, suction will noticeably decrease. Turn off the unit before removing the bag. Remove and unzip the bag and empty the contents before continuing.
NOTE: Empty the bag after each use to avoid deterioration and obstructing air flow, which will reduce the performance of the vacuum.
CLEARING A BLOCKED TUBE / IMPELLER

WARNING: To avoid serious personal injury, be sure the unit is off before cleaning or performing any maintenance on it.

WARNING: To avoid serious personal injury, always wear gloves to protect yourself from the impeller blades or other sharp objects.
-
Press the On/Off Stop control down in the STOP (O) position until the engine comes to a complete stop (Fig. 9).
-
Disconnect the spark plug wire to prevent the unit from starting.
- Remove the blower/vacuum tube and the vacuum bag.
- Carefully remove material blocking the tube or impeller. Inspect the blades to assure no damage has occurred. Rotate the impeller blades by hand to assure the blockage is completely cleared.
- Reinstall the vacuum bag and blower/vacuum tube.
- Reconnect the spark plug wire.
EMPTYING THE VACUUM BAG

WARNING: To avoid serious personal injury, never unzip or remove the vacuum bag without first turning the unit off.
NOTE: Empty the bag after each use to avoid deterioration and obstructing air flow, which will reduce the performance of the vacuum.
- While pressing the latching tabs on both sides of the vacuum bag tube, pull the vacuum bag down off the unit (Fig. 19).

WARNING: Wear eye protection and a dust mask when emptying the vacuum bag.
- Detach the vacuum bag from the vacuum bag hook.
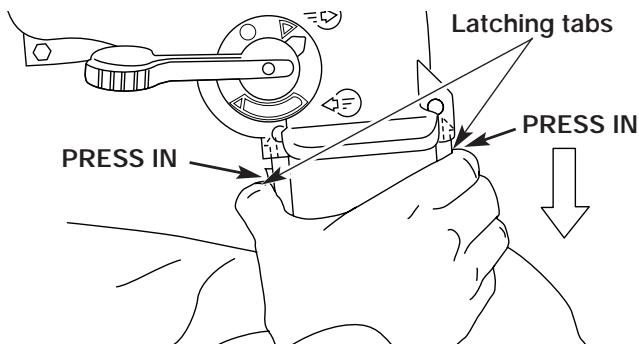
Fig. 19
- Unzip the bag and empty the contents into a garbage bag or container.
- Turn the bag inside out after initial emptying and vigorously shake out dust and debris.
- Return the bag to outside in, zip the bag closed and reinstall vacuum bag.
MAINTENANCE AND REPAIR INSTRUCTIONS
MAINTENANCE SCHEDULE
Perform these required maintenance procedures at the frequency stated in the table. These procedures should also be a part of any seasonal tune-up.
NOTE: Some maintenance procedures may require special tools or skills. If you are unsure about these procedures take your unit to any non-road engine repair establishment, individual or authorized service dealer.

WARNING: To prevent serious injury, never perform maintenance or repairs with unit running. Always service and repair a cool unit. Disconnect the spark plug wire to ensure that the unit cannot start.
NOTE: Maintenance, replacement, or repair of the emission control devices and system may be performed by any non-road engine repair establishment, individual or authorized service dealer.
In order to assure peak performance of your engine, inspection of the engine exhaust port may be necessary after 50 hours of operation. If you notice lost RPM, poor performance or general lack of acceleration, this service may be required. If you feel your engine is in need of this inspection, refer service to any non-road engine repair establishment, individual or authorized service dealer for repair. DO NOT attempt to perform this process yourself as engine damage may result from contaminants involved in the cleaning process for the port.
| FREQUENCY | MAINTENANCE REQUIRED | REFER TO |
| Before starting engine | Fill fuel tank with fresh fuel | Page 10 |
| Every 10 hours | Clean and re-oil air filter | Page 15 |
| Every 25 hours | Check and clean spark arrestor Check spark plug condition and gap | Page 16 Page 17 |
| Every 50 hours | Inspect exhaust port and spark arrestor screen for clogging or obstruction to assure maximum performance levels | Page 16 |
AIR FILTER MAINTENANCE
Removing the Air Filter/Muffler Cover

WARNING: To avoid serious personal injury, always turn your unit off and allow it to cool before you clean or service it.
- Place the choke lever in the PARTIAL choke position (B).
NOTE: The choke lever must be in the PARTIAL choke position (B) to remove the air filter/ muffler cover. - Remove the four (4) screws securing the air filter/muffler cover (Fig. 20). Use a flat blade or T-20 Torx bit screwdriver.
- Pull the cover from the engine. Do not force.
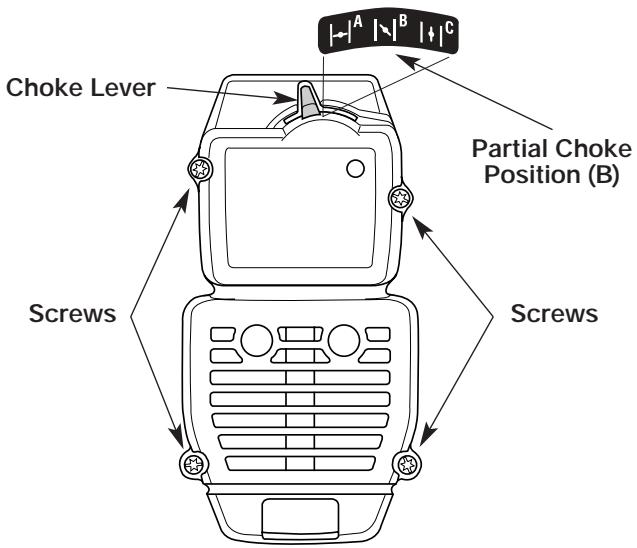
Fig. 20
Cleaning the Air Filter
Clean and re-oil the air filter every 10 hours of operation. It is an important item to maintain. Failure to maintain the air filter will Void the warranty.
- Remove air filter/muffler cover. Refer to Removing the Air Filter/Muffler Cover.
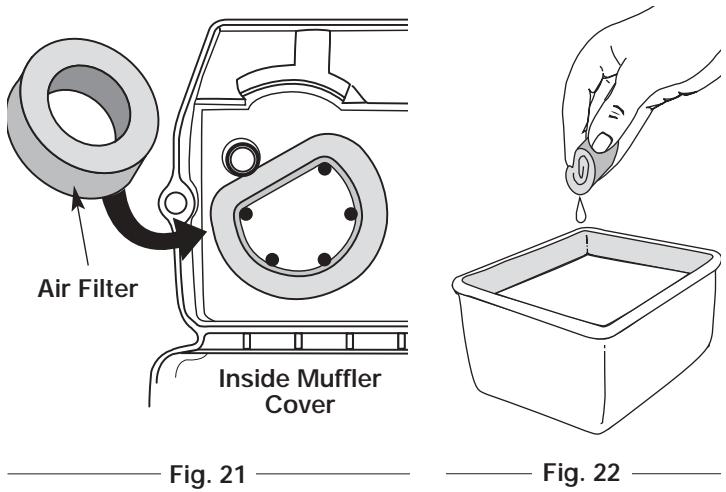
- Turn cover over and look inside to locate the air filter. Remove the air filter from inside the air filter/muffler cover (Fig. 21).
- Wash the filter in detergent and water (Fig. 22). Rinse the filter thoroughly. Squeeze out excess water. Allow it to dry completely.
MAINTENANCE AND REPAIR INSTRUCTIONS
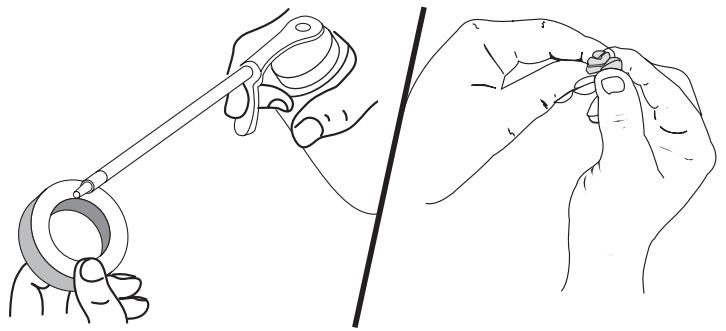
Fig. 23
Fig. 24
- Apply enough clean SAE 30 oil to lightly coat the filter (Fig. 23).
- Squeeze the filter to spread and remove excess oil (Fig. 24).
- Replace the air filter inside the air filter/muffler cover (Fig. 21).
NOTE: Operating the unit without the air filter and air filter/muffler cover assembly will Void the warranty.
Reinstalling the Air Filter/Muffler Cover
- Place the air filter/muffler cover over the back of the carburetor and muffler. Align the screw holes.
- Insert the four (4) screws into the holes in the air filter/muffler cover (Fig. 20) and tighten. Do not over tighten.
SPARK ARRESTOR MAINTENANCE
- Remove air filter/muffler cover. Refer to Removing the Air Filter/Muffler Cover.
- Locate muffler front and the two (2) bolts securing it to the engine (Fig. 25). Remove the two (2) bolts using a flatblade screwdriver or 5/16-inch socket or nut driver. Pull muffler off of the engine.
- Turn muffler over to the back side and locate the exhaust gasket. Remove the muffler gasket from the muffler (Fig. 25).
NOTE: If the exhaust gasket is torn or damaged, replace it with a new gasket before reassembling muffler.
- Using a small flatblade screwdriver, carefully pry up the spark arrestor from the recessed hole (Fig. 26). Remove the spark arrestor from the muffler.
- Clean the spark arrester with a wire brush. Replace it if it is damaged or if it is impossible to clean thoroughly (Fig. 26).
-
Reinstall the spark arrestor by pressing it into the recessed hole on the muffler's back side. Make sure it fits tightly against the muffler and is not raised up.
-
Place the exhaust gasket against muffler's back side. Align the gasket bolt holes with the bolt holes in the muffler. While holding exhaust gasket in place, insert the bolts into the muffler's front side (Fig. 25).
- Place the muffler (with the exhaust gasket in place and bolts inserted), against the engine, aligning the bolt holes. Tighten the bolts to secure the muffler to the engine.
If using a torque wrench, torque to:
80-90 in. • lb. (9-10.2 N·m)
- Reinstall the air filter/muffler cover.

WARNING: If the muffler is not tightened securely, it could fall off causing damage to the unit and possible serious personal injury
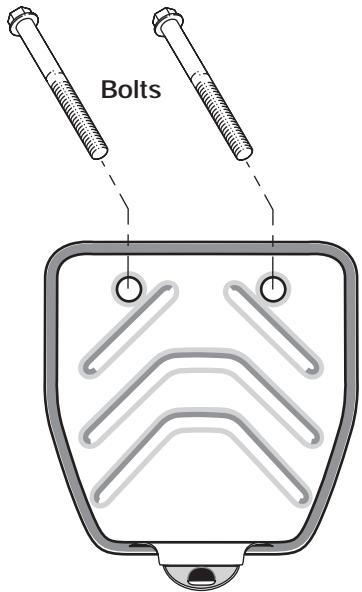
Muffler - Front Side
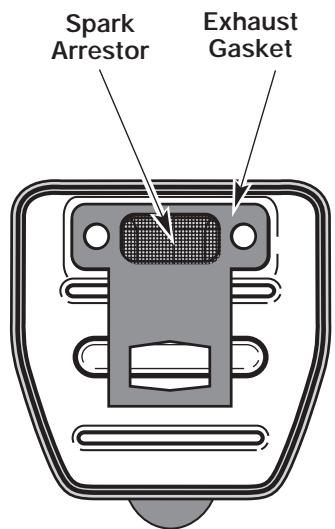
Muffler - Back Side
Fig. 25
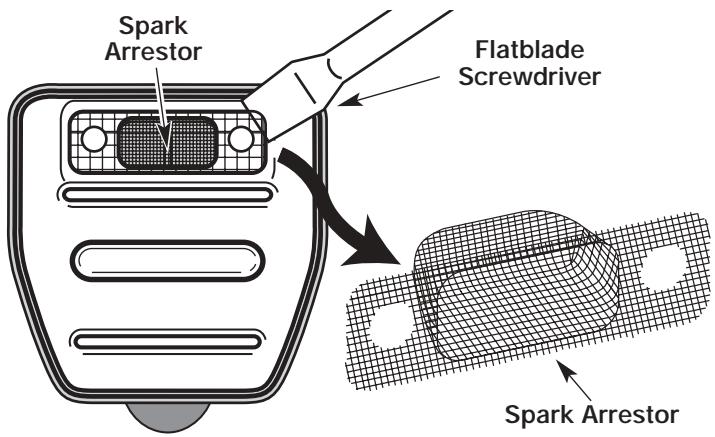
Muffler - Back Side
Fig. 26
MAINTENANCE AND REPAIR INSTRUCTIONS
CARBURETOR ADJUSTMENT
The idle speed of the engine is adjustable through the air filter/muffler cover (Fig. 27).
NOTE: Careless adjustments can seriously damage your unit. An authorized service dealer should make carburetor adjustments.
Check Fuel Mixture
Old and/or improperly mixed fuel is usually the reason for improper unit performance. Drain and refill the tank with fresh, properly-mixed fuel prior to making any adjustments. Refer to Oil and Fuel Information.
Clean Air Filter
The condition of the air filter is important to the operation of the unit. A dirty air filter will restrict air flow and change the air/fuel mixture. This is often mistaken for an out of adjustment carburetor. Check the condition of the air filter before adjusting the idle speed screw. Refer to Air Filter Maintenance.
Adjust Idle Speed Screw

WARNING: This unit will need to be running during idle speed adjustment. Wear protective clothing and observe all safety instructions to prevent serious personal injury.
Also, DO NOT set unit on any surface except a clean, hard area while starting or performing any adjustments. Debris such as gravel, sand, dust, grass, etc. could be picked up by the air intake and thrown out by the discharge opening, damaging unit, property, or causing serious injury to bystanders or operator.
If, after checking the fuel mixture and cleaning the air filter the engine still will not idle, adjust the idle speed as follows:
- Start the engine and let it run at a high idle for a minute to warm up.
- Set the blower/vacuum mode change-over lever to the up position (Blower Mode). Refer to Operating as a Blower.
NOTE: Setting the lever to the blower mode prevents the vacuum bag from filling up while starting or running the unit.
- Move the throttle control and let the engine idle. If the engine stops, insert a small phillips or flat blade screwdriver into the hole in the air filter/muffler cover (Fig. 27). Turn the idle speed adjuster in, clockwise, 1/8 of a turn at a time (as needed) until the engine idles smoothly.
- If the unit appears to be idling too fast, turn the idle speed adjuster counterclockwise 1/8 of a turn at a time (as needed), to reduce idle speed.
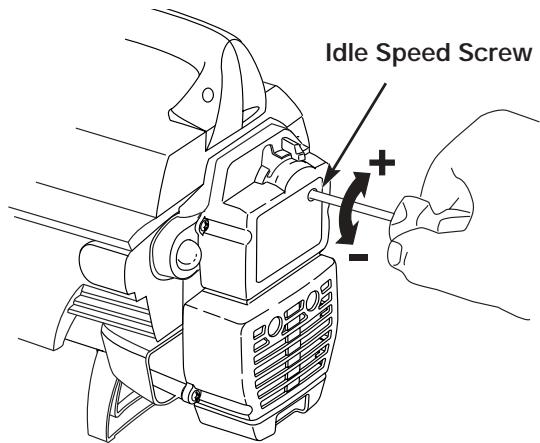
Fig. 27
Checking the fuel mixture, cleaning the air filter, and adjusting the idle speed should solve most engine problems. If not and all of the following are true:
- the engine will not idle
- the engine hesitates or stalls on acceleration
- there is a loss of engine power
Have the carburetor adjusted by an authorized service dealer.
REPLACING THE SPARK PLUG
Use a Champion RDJ7Y spark plug, or equivalent. The correct air gap is 0.020 inch (0.5 mm). Remove the plug after every 25 hours of operation and check its condition.
- Stop the engine and allow it to cool. Grasp the plug wire firmly and pull it from the spark plug.
- Clean around the spark plug. Remove the spark plug from the cylinder head by turning a 5/8-inch socket counterclockwise.
- Replace a cracked, fouled or dirty spark plug. Set the air gap at 0.020 in. (0.5 mm) using a feeler gauge (Fig. 28).

CAUTION: Do not sand blast, scrape or clean electrodes. Grit in the engine could damage the cylinder.
- Install a correctly-gapped spark plug in the cylinder head. Tighten by turning the 5/8-inch socket clockwise until snug.
If using a torque wrench torque to:
110-120 in. lb. (12.3-13.5 N·m)
Do not over tighten.
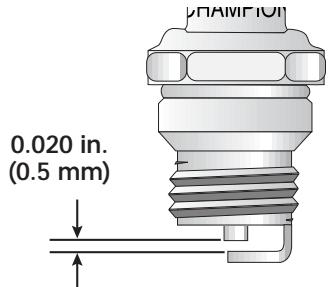
Fig. 28
MAINTENANCE AND REPAIR INSTRUCTIONS
CLEANING THE UNIT

WARNING: To avoid serious personal injury, always turn your unit off and allow it to cool before you clean or service it.
Use a small brush to clean off the outside of the unit. Do not use strong detergents. Household cleaners that contain aromatic oils such as pine and lemon, and solvents such as kerosene, can damage plastic housing or handle. Wipe off any moisture with a soft cloth.
CLEANING THE VACUUM BAG
- Empty the bag after each use to avoid deterioration and obstructing air flow, which will reduce the performance of the vacuum.
- Wearing eye protection and a dust mask, clean the bag as needed. Turn the bag inside out after initial emptying and vigorously shake out dust and debris.
- Wash the bag once a year or more often if needed:
a. Remove the vacuum bag.
b. Turn bag inside out.
c. Hang it up.
d. Hose it down thoroughly.
e. Hang to dry.
f. Turn bag right-side out and reinstall.
STORAGE
- Never store a fueled unit where fumes may reach an open flame or spark.
- Allow the engine to cool before storing.
- Store the unit locked up to prevent unauthorized use or damage.
- Store the unit in a dry, well-ventilated area.
- Store the unit out of the reach of children.
LONG TERM STORAGE
If you plan on storing the unit for an extended time, use the following storage procedure:
-
Drain all fuel from the fuel tank into a container with the same 2-cycle fuel mixture. Do not use fuel that has been stored for more than 60 days. Dispose of the old fuel/oil mix in accordance to Federal, State and Local regulations.
-
Start the engine and allow it to run until it stalls. This ensures that all fuel has been drained from the carburetor.
- Allow the engine to cool. Remove the spark plug and put 1 oz. (30 ml) of any high quality motor oil or 2-cycle oil into the cylinder. Pull the starter rope slowly to distribute the oil. Reinstall the spark plug.
NOTE: Remove the spark plug and drain all of the oil from the cylinder before attempting to start the unit after storage.
4. Thoroughly clean the unit and inspect it for any loose or damaged parts. Repair or replace damaged parts and tighten loose screws, nuts or bolts. The unit is ready for storage.
TRANSPORTING
- Allow the engine to cool before transporting.
- Drain fuel from unit.
- Tighten fuel cap before transporting.
- Secure the unit while transporting.
ACCESSIONS/ REPLACEMENT PARTS
2-Cycle Oil 147543
Spark Plug 610311
Fuel Cap 180000
Vacuum Bag 753-04102
Blower/Vacuum Tube Assembly 182606
Shoulder Harness .682075
For specific replacement parts, refer to the parts list located on the inside back cover of this manual.
TROUBLESHOOTING
ENGINE WILL NOT START
CAUSE
Choke is in the incorrect position
Empty fuel tank
Primer bulb wasn't pressed enough.
Engine flooded
Old or improperly mixed fuel
Fouled spark plug
Plugged spark arrestor
ENGINE WILL NOT IDLE
CAUSE
Air filter is plugged
Old or improperly mixed fuel
Improper carburetor adjustment
ENGINE WILL NOT ACCELERATE
CAUSE
Old or improperly mixed fuel
Improper carburetor adjustment
Dirty air filter
Plugged spark arrestor
ENGINE LACKS POWER OR STALLS
CAUSE
Old or improperly mixed fuel
Air filter is plugged
Improper carburetor adjustment
Fouled spark plug
Plugged spark arrestor
UNIT WILL NOT BLOW OR VACUUM
CAUSE
Bag full
Blocked tube
Blocked impeller
Damaged impeller
ACTION
Refer to the Starting/Stopping Instructions
Fill fuel tank with properly mixed fuel
Press primer bulb fully and slowly 10 times
Use starting procedure WITHOUT USING the CHOKE
Drain gas tank / Add fresh fuel mixture
Replace or clean the spark plug
Clean or replace spark arrestor
ACTION
Replace or clean the air filter
Drain gas tank / Add fresh fuel mixture
Adjust according to the Carburetor Adjustments section
ACTION
Drain gas tank / Add fresh fuel mixture
Take to an authorized service dealer for carburetor adjustment
Clean or replace the air filter
Clean or replace spark arrestor
ACTION
Drain gas tank / Add fresh fuel mixture
Replace or clean the air filter
Take to an authorized service dealer for carburetor adjustment
Replace or clean the spark plug
Clean or replace spark arrestor
ACTION
Empty bag, as described in Empty the Vacuum Bag
Clear the blockage as described in Clearing aBlocked Tube/ Impeller
Clear the blockage as described in Clearing aBlocked Tube/ Impeller
Take the unit to an authorized service dealer
If further assistance is required, contact your authorized service dealer.
SPECIFICATIONS
ENGINE
| Engine Type | Air-Cooled, 2-Cycle |
| Displacement | 31 cc (1.9 cu. in) |
| Operating RPM | 7,100+ rpm |
| Idle Speed RPM | 3,600-4,800 rpm |
| Ignition Type | Electronic |
| On/Off Stop Control | Rocker Switch |
| Spark Plug Gap | 0.020 inch (0.5 mm) |
| Lubrication | Fuel/Oil Mixture |
| Fuel/Oil Ratio | 40:1 |
| Carburetor | Diaphragm, All-Position |
| Starter | Auto Rewind |
| Muffler | Baffled with Guard |
| Fuel Tank Capacity | 13 ounces (384 ml) |
BLOWER / VACUUM
| Throttle Control | Finger-Tip Lever |
| Blower Velocity | up to 160 mph (257 kmh) |
| Blower Air Output | up to 424 cfm (12.1 cmm) |
| Mulching Ratio | up to 10:1 |
| Vacuum Bag Capacity | 0.75 bushels (26.4 Liters) |
| Shoulder Harness | Single Quick-Snap |
| Approximate Unit Weight (no fuel, with blower/vacuum tube and empty vacuum bag) | 13.5 lb. (6 kg) |
EPA Emission Control Warranty Statement
Your Warranty Rights and Obligations
The Environmental Protection Agency and MTD LLC (MTD) are pleased to explain the emission control system warranty on your 2002 and later small off-road engine. New small off-road engines must be designed, built and equipped to meet stringent anti-smog standards. Yardworks must warrant the emission control system on your small off-road engine for the periods of time listed below provided there has been no abuse, neglect or improper maintenance of your small off-road engine.
Your emission control system may include parts such as the carburetor or fuel-injected system, the ignition system, and catalytic converter. Also included may be hoses, belts, connectors and other emission-related assemblies.
Where a warrantable condition exists, Yardworks will repair your small off-road engine at no cost to you including diagnosis, parts and labor.
The 2002 and later small off-road engines are warranted for two years. If any emission-related part on your engine is defective, the part will be repaired or replaced by Yardworks.
Owners Warranty Responsibilities
- As the small off-road engine owner, you are responsible for the performance of the required maintenance listed in your operator's manual. Yardworks recommends that you retain all receipts covering maintenance on your small off-road engine, but Yardworks cannot deny warranty solely for the lack of receipts or for your failure to ensure the performance of all scheduled maintenance.
- As the small off-road engine owner, you however should be aware that Yardworks may deny you warranty coverage if your small off-road engine or a part has failed due to abuse, neglect, improper maintenance or unapproved modifications.
- You are responsible for presenting your small off-road engine to a Yardworks Authorized Service Center as soon as a problem exists. The warranty repairs should be completed in a reasonable amount of time, not to exceed 30 days.
If you have any questions regarding your warranty rights and responsibilities, you should call 1-888-939-0992.
Manufacturer's Warranty Coverage
- The warranty period begins on the date the engine or equipment is delivered to the retail purchaser.
- The manufacturer warrants to the initial owner and each subsequent purchaser, that the engine is free from defects in material and workmanship which cause the failure of a warranted part for a period of two years.
- Repair or replacement of warranted part will be performed at no charge to the owner at an Authorized Yardworks Service Center. For the nearest location please contact Yardworks at: 1-888-939-0992.
- Any warranted part which is not scheduled for replacement, as required maintenance or which is scheduled for only for regular inspection to the effect of "Repair or Replace as Necessary" is warranted for the warranty period. Any warranted part which is scheduled for replacement as required maintenance will be warranted for the period of time up to the first scheduled replacement point for that part.
- The owner will not be charged for diagnostic labor which leads to the determination that a warranted part is defective, if the diagnostic work is performed at an Authorized Yardworks Service Center.
- The manufacturer is liable for damages to other engine components caused by the failure of a warranted part still under warranty.
- Failures caused by abuse, neglect or improper maintenance are not covered under warranty.
- The use of add-on or modified parts can be grounds for disallowing a warranty claim. The manufacturer is not liable to cover failures of warranted parts caused by the use of add-on or modified parts.
- In order to file a claim, go to your nearest Authorized Yardworks Service Center. Warranty services or repairs will be provided at all Authorized Yardworks Service Centers.
- Any manufacturer approved replacement part may be used in the performance of any warranty maintenance or repair of emission related parts and will be provided without charge to the owner. Any replacement part that is equivalent in performance or durability may be used in non-warranty maintenance or repair and will not reduce the warranty obligations of the manufacturer
- The following components are included in the emission related warranty of the engine, air filter, carburetor, primer, fuel lines, fuel pick up/ fuel filter, ignition module, spark plug and muffler.
LIMITED TWO-YEAR WARRANTY
YARD WORKS
The limited warranty set forth below is given by YARDWORKS Canada, Toronto Canada, M4S 2B8 ("YARDWORKS") with respect with new merchandise purchased and used in Canada. YARDWORKS warrants this product against defects in material and workmanship for a period of two (2) years commencing on the date of original purchase and will, at its option, repair or replace, free of charge, any part found to be defective in material or workmanship. This limited warranty shall only apply if this product has been operated and maintained in accordance with the Operator's Manual furnished with the product, and has not been subject to misuse, abuse, commercial use, neglect, accident, improper maintenance, alteration, vandalism, theft, fire, water or damage because of other peril or natural disaster. Damage resulting from the installation or use of any accessory or attachment not approved by YARDWORKS for use with the product(s) covered by this manual will void your warranty as to any resulting damage. This warranty is limited to ninety (90) days from the date of original retail purchase for any YARDWORKS product that is used for rental or commercial purposes, or any other income-producing purpose.
HOW TO OBTAIN SERVICE: Warranty service is available, WITH PROOF OF PURCHASE THROUGH YOUR LOCAL AUTHORIZED SERVICE DEALER. To locate the dealer in your area, please contact the Customer Service Department of YARDWORKS Canada by calling 1-888-939-0992 or writing to YARDWORKS Canada, Toronto Canada, M4S 2B8
No product returned directly to the factory will be accepted unless prior written permission has been extended by the Customer Service Department of YARDWORKS Canada.
This limited warranty does not provide coverage in the following cases:
A. Wear items - Bump Knobs, Outer Spools, Cutting Line, Inner Reels, Starter Pulley, and Starter Ropes.
B. YARDWORKS does not extend any warranty for products sold or exported outside of the Canada.
YARDWORKS reserves the right to change or improve the design of YARDWORKS product without assuming any obligation to modify any product previously manufactured.
No implied warranty, including any implied warranty of merchantability or fitness for a particular purpose, applies after the applicable period of express written warranty above as to the parts as identified. No other express warranty or guaranty, whether written or oral, except as mentioned above, given by any person or entity, including a dealer or retailer, with respect to any product shall bind YARDWORKS. During the period of the Warranty, the exclusive remedy is repair or replacement of the product as set forth above. (Except where this limitation may not apply.)
The provisions as set forth in this Warranty provide the sole and exclusive remedy arising from the sales. YARDWORKS shall not be liable for incidental or consequential loss or damages including, without limitation, expenses incurred for substitute or replacement lawn care services, for transportation or for related expenses, or for rental expenses to temporarily replace a warranted product. (Except where this limitation may not apply) In no event shall recovery of any kind be greater than the amount of the purchase price of the product sold. Alteration of the safety features of the product shall void this Warranty. You assume the risk and liability for loss, damage, or injury to you and your property and/or to others and their property arising out of the use or misuse or inability to use the product. This limited warranty shall not extend to anyone other than the original purchaser, original lessee or the person for whom it was purchased as a gift. This warranty gives you specific legal rights, and you may also have other rights, which may vary from province to province.
To locate your nearest service dealer dial 1-888-939-0992 in Canada.
SAVE THESE INSTRUCTIONS FOR FUTURE REFERENCE.
60-3857-0
INSTRUCTIONS D'ARRÉT
Item Part No. Description
1 791-182059 Air Cleaner/Muffler Cover Assembly
(includes 2 & 32)
2 791-180350B Air Cleaner Filter
3 791-180351 Carburetor Mounting Screw
4 791-180226 Wavey Washer
5 791-182061 Choke Lever Assembly (includes 6)
6 791-182070 Choke Knob and Screw
7 791-182060 Choke Lever and Plate (includes 5)
8 753-04320 Carburetor Assembly (includes 9 & 20)
9 791-610675 Carburetor Gasket
10 791-181860 Carb Mount Screw
11 791-683974B Primer and Hose Assembly
753-1196 Carb Mount Assembly
(includes 10,13 & 14)
791-684451 Reed Assembly
753-1208 Carburetor Mount Gasket
15 753-04328 Crank Case Service Assembly (includes 10)
16 791-612134 Rear Mounting Pad
17 753-04310 Fuel Tank Assembly (includes 18-20)
18 791-182438 Fuel Cap Assembly
19 791-181168 Fuel Return Line
20 791-682039 Fuel Line Assembly
21 791-145308 Front Mounting Pad
791-182401 Shroud Extension (includes 32)
23 791-182736 Flywheel Assembly
24 791-181525 Spacer
25 753-04232 Recoil Pulley Assembly
26 791-613102 Recoil Spring
Item Part No. Description
27 791-611061 Rope Guide
28 791-180930 Pulley Retainer Assembly
29 791-181079 Pull Handle
30 791-613103 Rope
31 791-181862 Housing Screw
32 791-181345 Cover Screw
33 791-181931 Starter Housing Assembly (includes 25-32)
34 791-182402 Wire Lead Assembly
35 753-04324 Module Assembly
36 791-147095 Spark Plug
37 753-04159 Exhaust Gasket
38 791-182747 Spark Arrestor Screen
39 791-182066 Muffler Assembly (includes 37, 38 & 40)
40 791-147575 Muffler Mounting Bolt Assembly
41 753-04323 Cylinder Assembly (includes 43 & 44)
42 753-1207 Piston and Rod Assembly
43 753-1197 Cylinder Gasket
791-182723 Cylinder Bolt
45 791-181524 Crankshaft Extension
-
753-04134 Engine Gasket Kit
-
791-180602 O.E.M. Carburetor Repair Kit
- 791-181873 Gasket Diaphragm Repair Kit
- 753-1209 Piston Ring
- 753-04395 Short Block Assembly (includes 10, 15, 36, 41-44)
- Items Not Shown
HOUSING PARTS - MODEL 60-3857-0
2-CYCLE GAS MULCHING BLOWER VACUUM
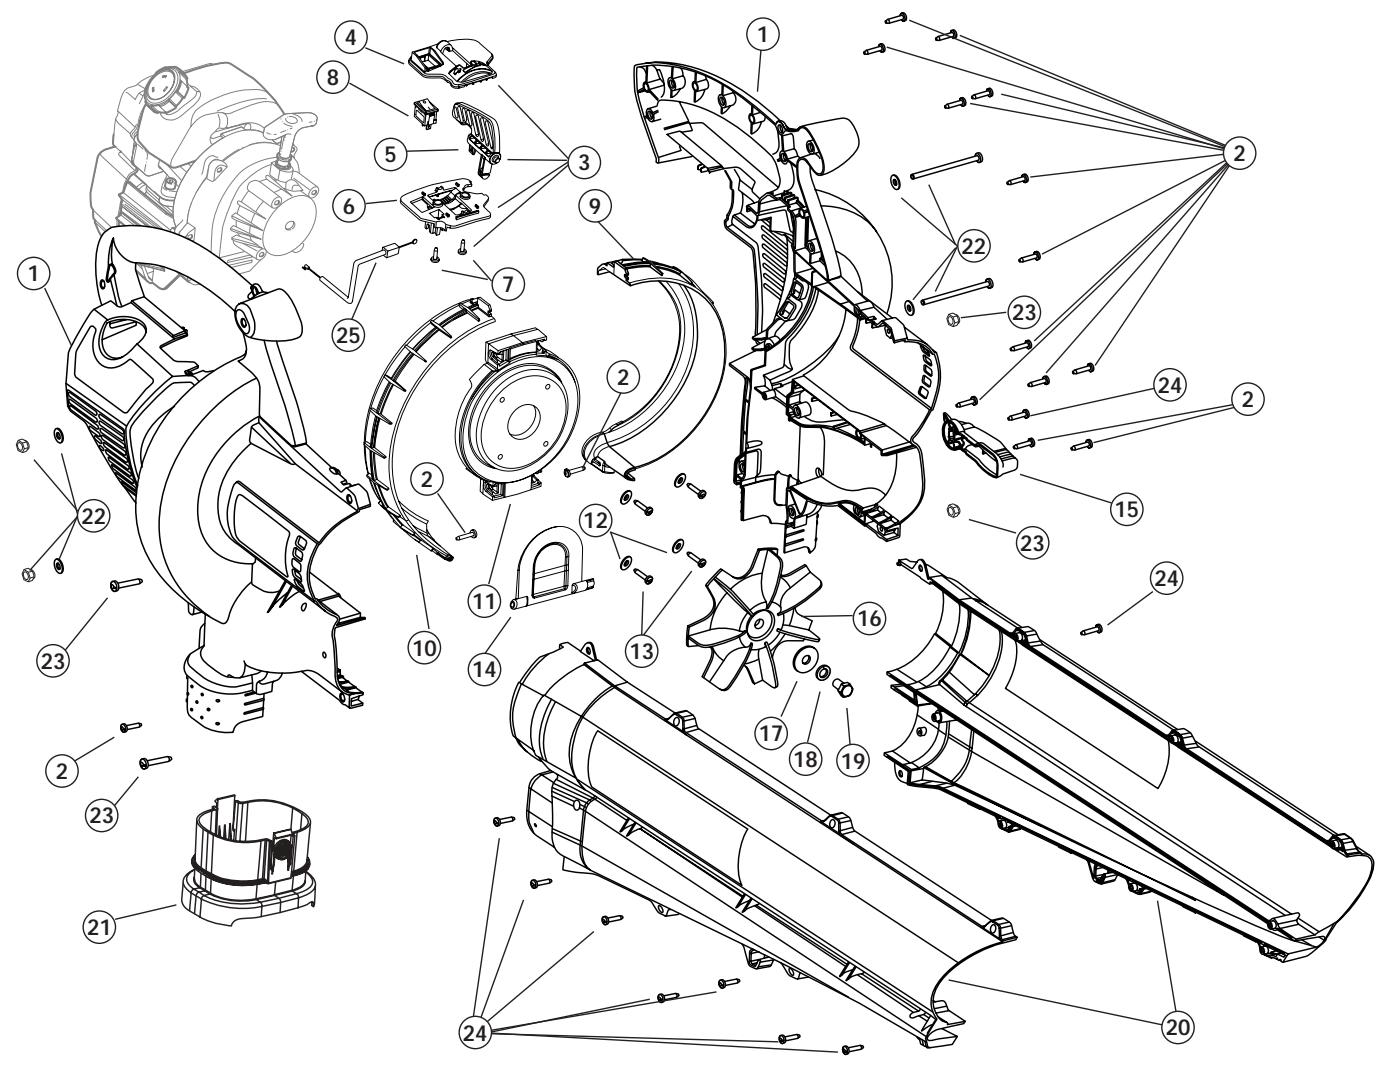
Item
Part No.
Description
1 753-04394
791-181345
Engine Cover Assembly (includes 2)
3 791-182419
Cover Screw
4 791-182420
Upper Throttle Control Plate
5 791-182728
Throttle Control Lever
6 791-182422
Lower Throttle Control Plate
7 791-182423
Screw, Plastic
8 791-182405
Rocker Switch Assembly
9 753-04140
Left Side Liner
10 753-04139
Right Side Liner
11 791-182408
Engine Mounting Plate (includes 12 & 13)
12 791-182409
Washer
13 791-181903
Screw
14 791-182410
Mode Control Flapper
15 791-182411
Mode Control Lever (includes 24)
Item
Part No.
Description
16 791-147353
Impeller Blade
17 791-182412
Washer
18 791-182413
Lock Washer
19 791-182414
Bolt
20 753-04102
Blower/Vac Tube Assembly (includes 24)
21 791-182417
Vacuum Bag Adapter
22 791-182424
Mounting Plate Hardware
23 791-182425
Blower/Vac Tube Mounting Hardware
24 791-181482
Screw
25 791-00049
Throttle Cable
- 791-612930
Cable Tie
- 791-182606
Vacuum Bag Assembly
(includes 21, Vacuum Bag & Cable Tie)
- Items Not Shown