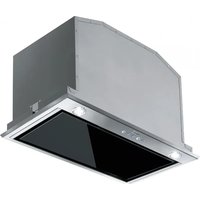
USER MANUAL FBI 537 XS/BK FRANKE
Instructions for use and installation
GB
Cooker Hood
- Disconnect the wires to the Commands at the connectors.
- Disconnect the wires to the Light at the connectors.
- The Hood can be installed directly on the underside of the wall unit.
- Create an opening in the bottom of the wall unit, as shown.
- Insert the hood until the side supports snap into place.
- Fasten using the 10 screws 12a provided.
- Lock in position by tightening the screws Vf from underneath the hood.
- Open the suction panel by turning the specific knob.
- Disconnect the panel from the hood canopy by sliding the fixing pin lever.
- Remove grease filters.
- Screw the Frame into place using the 6 screws 12f, reconnect the wires to the Commands and Light, replace the metal grease filter and the Panel.


CZŃNecąiŻŃsc
AERcOUTLETcDUCTENHcVERSEONc
When installing the Ducting version, join the Hood to the outlet duct using a rigid or flexible pipe φ 150 or 120 mm, selection of which is at the discretion of the installation technician.
- Insert flaps 11b on the Hood Canopy Outlet.
- Fasten the pipe using suitable pipe clamps. The materials required to do so are not provided.
Connecting the ø 150 pipe
Connecting the φ 120 pipe
- To connect using a φ 120 mm pipe, insert the reduction Flange 9 onto the Hood Canopy Outlet.
- Fasten the pipe using suitable pipe clamps. The materials required to do so are not provided.
- In both cases, any Activated Charcoal Filters must be removed.


RECERCULATEONcVERSEONcAERcOUTLETc
- Cut a hole φ 125 mm in any shelf that may be positioned over the hood.
- Insert the reducer flange 9 on the hood body outlet.
- Connect the flange to the outlet on the shelf over the hood by using a flexible or rigid pipe φ 120 mm.
- Fix the pipe in position using sufficient pipe clamps (not supplied).
- Fix the air outlet grid 8 on the recirculation air outlet by using the 2 screws 12e (2,9 x 9,5) provided.
- Ensure that the activated charcoal filters have been inserted.

ELECTRECALcCONNECTEONc
- Connect the hood to the mains through a two-pole switch having a contact gap of at least 3 mm..
CŻNąśŻIcpaŃelc

T1 Motor Turns the Motor off.
T2 Speed Turns the Motor on at Speed one. Button lights up continuously.
T3 Speed Turns the Motor on at Speed two. Button lights up continuously.
T4 Speed When pressed briefly, turns the Motor on at Speed three. Button lights up continuously.
Pressed for 2 Seconds. Button flashes.
Activates Speed four with a timer set to 6 minutes, after which it returns to the speed that was set previously. Suitable to deal with maximum levels of cooking fumes.
L Light Turns the Lighting System on and off. Button lights up continuously.
OpeÑiÑgcPaÑelc
- Open the Panel by pulling it.
- Clean the outside with a damp cloth and neutral detergent.
- Clean the inside using a damp cloth and neutral detergent; do not use wet cloths or sponges, or jets of water; do not use abrasive substances.

Hśeasecfiląęśsc
- The filters must be cleaned every 2 months of operation, or more frequently for particularly heavy usage, and can be washed in a dishwasher.
- Pull the comfort panels to open them.
- Remove the filters one by one pushing them towards the back side of the hood unit and simultaneously pulling downwards.
- Any kind of bending of the filters has to be avoided when washing them. Before fitting them again into the hood make sure that they are completely dry. (The colour of the filter surface may change throughout the time but this has no influence to the filter efficiency).
- When fitting the filters into the hood pay attention that they are mounted in correct position the handle facing outwards.
- Close the comfort panel.

These filters are not washable and cannot be regenerated, and must be replaced approximately every 4 months of operation, or more frequently with heavy usage.
REPLACENHcTDEcACTEVATEDcCDARCOALcSELTERc
- Open the comfort panels pulling them downwards.
- Remove the metal grease filters
- Remove the saturated activated charcoal filter as shown (A).
• Fit the new filters (B).
- Replace the metal grease filters.
- Close the comfort panels.

LighạiÑgczŃiac
- For replacement contact technical support ("To purchase contact technical support").
i кРерклЧкpropriЧksicurezzЧкекрerkilkcorrettokfunzionЧmentokdell'ЧррЧrecchio, ксік preЁЧkdikleЁЁerekЧttentЧmentekquestokmЧнуЧлекprimЧkdell'instЧllЧzioneекек dellЧкmessЧкinkfunzione.кЯенerekquestekistruzioniksemprekinsiemек Чл'ЧррЧrecchio,кЧнсекinkсЧsokdikcessionекоктЧsferimentokЧктерzi.кЁк importЧнтекснекЁликutilizzЧtorikconoscЧпоктуттеклексЧгЧтteristichekдик funzionЧmentokексicurezzЧkdell'ЧррЧrecchio.к
⚠️ κίκκολεËmentokdeikcЧvikdevekesserekeffettuЧтокдЧкunktecnicokcompetente.к
εκίκφΨЩΨricЧnteknonкротàkritenersikresponsЧЩilekperkeventuЧlikдЧnnikrisultЧntikc
un'instЧШЧzionекокutilizzЧzioneкимpropriч.
εκλγκdīstζηzζκmīnɪmζκdiksicurezzζκτρζκίκριζηοκcotturζκεκλζκςζρρζκζψirζητεκήκd 650κμπκ(ζιcunikmodellikpossonokesserekinstζιζιχικυν'ζιtezzζκinferiore; vedereκίκρζιγξερζινοκζιλεκdimensioniκdικζινοκεκζιν'instζιλγερια)。
εκЦекlekistruzionikdikinstЧИЧzioneкделкриЧпокcottурЧкЧкЁЧскspecificЧпокунЧ distЧnzЧкмЧЁЁiorekdikquellЧksoprЧkindicЧтЧ,кńknecessЧrioktenernekconto.
εκControlЧрекчеклЧктensionekdikreteκcorrispondЧкЧкquellЧkindicЧтЧksullЧктЧрЁЧ
дЧтікЧрпlicЧтЧкЧлл'internokdellЧксЧррЧ.
εκλκdispositivikdiksezionЧmentokdevonokesserekinstЧИЧтіknell’impiЧntokfissokin conformitàкЧІлекnormЧтiveksuiksistemikдіксЧЩІЧЁЁю.
εκPerkËlikЧррЧrecchikdikClЧsseκl,кcontrolЧrekcheklЧkretekdkічлimentЧzione domesticЧкdisponËЧдікunkЧдеËуЧтокcolleËЧментокЧкмЧssЧ.
εκColleЁЧрекІЧксЧррЧкЧІІЧксЧnnЧkfumЧриЧкконкuntuЩокдікдиЧmetrokminimokдік1 mm.КІІккрерcorsокдеikfumikdevekesserekілкріексортокpossiЩile.
εκDevonokesserekrispettЧтектуттеклекnormЧтivekriЁуЧрдЧнтіклоксЧricokdell'ЧриЧ.
скФонкcolleЁЧрекЧксЧррЧкЧspirЧнтекЧикcondottikfumЧrikchektrЧsportЧнокфумиди
comЩustionek(perkes.кдиксЧldЧие,ксЧминikecc.).
€ ЦекЧксЧррЧкнкutilizzЧтЧкinkcomЩinЧzionеккончрчrecchiknonkelettriЧррЧrecchikЧкЁЧs),kdevekesserekЁЧгЧнтитокunksufficientекЁгЧдокдикЧерЧzionекно locЧлекреркimpedirekilkritornokdikflussokdeikЁЧскдиксЧrico.кМуЧндокЧксЧррЧкре cucinЧкнкutilizzЧтЧкinkcomЩinЧzionеккончрчrecchiknonкЧлimentЧтіkdЧІЧ correnteкеlettricЧ,кІЧкpressionекнеЁЧтівЧкnelklocЧлекпонкdeveksuperЧгrek0,04 mЩЧркеркеvitЧRECCHекіkfumikvenЁЧпокриЧspirЧтікnelklocЧлекдЧІЧксЧррЧ.
εκλ'ЧriЧкnonkdevekesserekevЧcuЧтЧкЧтtrЧversokunkcondottokutilizzЧтокperkloscЧricokdeikfumikдЧкЧррЧrecchikdikcomЩustionекЧлimentЧтікЧкЁЧскокЧltricomЩustiЩili.


CŽNÉssiŽNic
USCETAcAREAcVERSEONEcASPERANTEc
TASTO FUNZIONI
ŚiląśicaŃaigśassŻc
ŚiląśicaNạiŻdŻsecalcCaśbŻNecaaqivŻc3VeśsiŻNecŚiląśaŃi qeec
cQbAYcccccDZczAeNaaaiZNc
1ккНЧнuelkd'instructionsк


MŻNąagecdżccŻspscdechŻąęc
AVANTcDEcMONTERcLAcДОТTEcDANScL'ARMOEREcMURALEcSUEVREcLAcMARCДЕcCEiDESSOUSc:c


Raccordements
SORTIE DE L'AIR VERSION ASPIRANTE
TOUCHE FONCTIONS
ŚiląśescaŃąiigśaissec

Пclaiśagec


AÑschlÉssec
LUŠTAUSTRETTcENcDERcABZUHSiVERSEONc
TASTE FUNKTIONEN
Śeaafiląeśc
BeleżchążÓgc
LED-Strahler
DavlžAbaMcHчvdesiNiNcMŽNajic
DAVLUMBAZEcMUTŚACcHΓVDESÍNEcBAĞLAMADANcEVVELcŞUNLAREcYAPEN:c


BağlaNaçıc
ДАВАсБЕСЕŞLEcASPERATГРс
TUŞ FONKSİYON


PŻdłącMeŃiac
WYLOTcPOWEETRZAcWERSKAcZcWYCEAHEEMc
PRZYCISK FUNKCJE
FiltśPctlżsMcMŻΦec


3'єднання
КНОПКА ФУНКЦІЇ


PřipŽjenic
VÝSTUPcVZDUCĐUcUcNASÁVACÍĐOcPROVEDENÍc
TLAČÍTKO FUNKCE
TżkŻvYcfiltrPc
ČEŠTĚNÍcCOVOVÝCDcSAMONOSNÝCDcTUCOVÝCDcFELTRŮc
UhlikZvYcfiltśPcpsZticMupachżc3filtśačNïcpsZvedeNiec