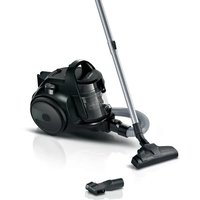
Serie 2 BGS05BA2 - Vacuum Cleaner BOSCH - Free user manual and instructions

Find the device manual for free Serie 2 BGS05BA2 BOSCH in PDF.

BOSCH Serie 2 BGS05BA2 - Vacuum Cleaner
📄 80 pages English EN Download 💬 AI Question 12 questions ⚙️ Specs
Notice BOSCH Serie 2 BGS05BA2 - page 14
Pick your language and provide your email: we'll send you a specifically translated version.
Product typeCanister vacuum cleaner
BrandBosch
ModelSeries 2 BGS05BA2
Dimensions (L x W x H)400 x 280 x 220 mm
Weight5.8 kg
Dust bag capacity4 liters (bag)
Power700 W
Noise level76 dB
Operating radius9 m
Filter typeHEPA 12
Filtration systemPowerProtect
Bag typeDisposable bag
Main functionsHard floor and carpet vacuuming, power adjustment
Maintenance and cleaningChange the bag regularly, wash the filter every month
SafetyAutomatic shutdown in case of overheating
Spare parts availableBags, filters, crevice nozzle, brush
Repairability index7.5 / 10
Warranty2 years
Included accessoriesCrevice nozzle, upholstery brush
ColorBlack and red

Frequently Asked Questions - Serie 2 BGS05BA2 BOSCH

How to change the bag in the Bosch Series 2 BGS05BA2 vacuum cleaner?
Open the front cover, remove the full bag, insert a new bag by pushing it all the way in, then close the cover.
How often should the filter be washed?
It is recommended to wash the filter every month with lukewarm water and let it dry completely before putting it back.
Does the bag full indicator light up?
Yes, your vacuum cleaner is equipped with a saturation indicator that lights up red when the bag is full.
What types of floors can I vacuum with this vacuum cleaner?
You can vacuum hard floors, carpets, and rugs thanks to the combined brush and height adjustment.
How to adjust the suction power?
Use the dial on the vacuum cleaner body to adjust the power according to the floor type.
What to do if the vacuum cleaner overheats and stops?
Let the appliance cool down for about 30 minutes. Check that the filter is not clogged and that the bag is not full.
How to clean the main brush?
Remove the brush by pressing the clip, remove accumulated hair and threads with scissors, then put it back in place.
Where to buy replacement bags for the Bosch Series 2?
Replacement bags (Bosch FSK-2 type or compatible) are available in stores or online from authorized dealers.
Can the vacuum cleaner be used without a bag?
No, this vacuum cleaner is designed only with a disposable bag. Never use it without a bag.
How to store the power cord?
Press the cable rewind pedal located at the back of the vacuum cleaner to automatically store it.

User questions about Serie 2 BGS05BA2 BOSCH

2 questions about this device. Answer the ones you know or ask your own.

Ask a new question about this device

Your email remains private: it is only used to notify you if someone answers your question.

The brush wheels no longer turn, how do I remove them?
Frequently Asked Questions - 24 d
Response Notice-Facile

If the wheels of the BGS05BA2 brush no longer turn, it usually means they are blocked by debris or tangled hair.

How to remove them:

  • Turn the device over to access the brush from the bottom
  • Locate the wheel attachment mechanism (usually a clip or a shaft on each side)
  • Free the wheels by gently pulling on the sides or pressing the release clip if it exists
  • Clean the wheels with a damp brush to remove any debris
  • Check that the wheels turn freely before putting them back in place

Tip: before removing the wheels, check that hair or debris is not wrapping around the shaft. Use scissors to carefully cut any tangled hair before removing the wheels. To maintain proper functioning, clean the brush and its wheels every 2 to 3 weeks, especially if you have pets or long hair.

Respond (be the first)
How to remove the wheels from the brush if hair gets tangled on them?
Frequently Asked Questions - 24 d
Response Notice-Facile

The brush of the BOSCH Series 2 BGS05BA2 easily accumulates hair, especially on the side wheels. Here’s how to clean them:

Removing the brush

  • Turn the device upside down to access the brush
  • Locate the button or release tab on the side or front of the brush
  • Press or pull this mechanism to release the brush
  • Gently pull the brush towards you to fully extract it

Cleaning the wheels

  • The side wheels (small cylinders) can be cleaned once the brush is removed
  • Carefully wrap the hair around a pair of tweezers or a fine comb and pull to detach it
  • You can also use scissors to cut the hair, then remove it manually
  • Wipe the wheels with a damp cloth to remove any residue
  • Let dry before reinstalling

Reinstallation

  • Once cleaned and dry, reinsert the brush into its grooves
  • Push it in until you hear a click or feel it lock in place
  • Check that the brush spins freely without resistance

To avoid excessive buildup, clean the brush every 2 to 3 weeks if you have pets or long hair. This regular maintenance will extend the life of the brush and maintain the efficiency of your vacuum cleaner.

Respond (be the first)

Download the instructions for your Vacuum Cleaner in PDF format for free! Find your manual Serie 2 BGS05BA2 - BOSCH and take your electronic device back in hand. On this page are published all the documents necessary for the use of your device. Serie 2 BGS05BA2 by BOSCH.

USER MANUAL Serie 2 BGS05BA2 BOSCH

BOSCH Serie 2 BGS05BA2 - 1

[de]Scannen Sie den QR-Code oder besuchen Sie die Webseite, um die erweiterten Hinweise zur Benutzung zu öffnen. Dort finden Sie zusätzliche Informationen zu Ihrem Gerät oder Zubehör.
[en]Scan the QR code or visit the website to open the Further Notices for Use. You can find additional information about your appliance or accessory here.
[fr]Scanner le code QR ou visiter le site Web pour ouvrir les informations d'utilisation complémentaires. Vous y trouverez des informations supplémentaires concernant votre appareil ou accessoire.
[it]Scansionare il codice QR oppure visitare il sito Web per indicazioni dettagliate sull'uso. Si trovano informazioni aggiuntive sull'apparecchio o gli accessori.
[nl]Scan de QR-code of bezoek de website om de uitgebreide gebruiksinstructies te openen. Hierin vindt u meer informatie over het apparaat of toebehoren.
[da]Scan QR-koden, eller besøg hjemmesiden, for at åbne de udvidede anvisninger om anvendelse. Der kan der findes yderligere oplysninger om apparatet eller tilbehøret.
[no]Skann QR-koden eller besøk nettstedet for å åpne mer informasjon om bruken. Der finner du mer informasjon om apparatet eller tilbehøret.
[sv]Scanna QR-koden eller gå till webbplatsen och öppna de utökade användningsanvisningarna. Där finns mer information om din apparat eller dina tillbehör.
[fi]Skannaa QR-koodi tai vieraile internet-sivustollamme, jotta voit avata laajennetut käyttötiedot. Sieltä löydät laitetta tai varustetta koskevia lisätietoja.
[es]Para abrir las indicaciones ampliadas sobre el uso, visite la página web o escanee el código QR. Allí encontrará más información sobre el aparato o los accesorios.
[pt]Leia o código QR ou visite a página web para abrir as indicações avançadas relativas à utilização. Aí encontra informações adicionais sobre o seu aparelho ou acessório.
[pl]Aby uzyskać rozszerzone informacje na temat zastosowań urządzenia, należy zeskanować kod QR albo wejść na stronę internetową. Można tam znaleźć dodatkowe informacje na temat posiadanego urządzenia i akcesoriów.
[ru]Чтобы узнать больше о пользовании, отсканируйте QR-код или зайдите на сайт. Там вы найдете более подробные сведения о приборе и принадлежностях.
[ro]Scanați codul QR sau accesăți site-ul web pentru a obține mai mult recomandări privind utilizarea. Acolo veți găsi mai multe informații privind aparatul dumneavoastră sau accesoriiile.
[kk]QR- кодын сканерленіз немесе кенейтілген пайдалану нүсқаулықты ашу үшін веб-сайтқа кірініз. Онда сіз құрылғы немесе керек-жарактар туралы көбірек акпарат таба аласыз.
[uk]Щоб отримати докладніші вказівки з користування, зіскануйте QR-код або відвідайте сайт. Там ви знайдете додаткові відомості про прилад або приладдя.

1 2 3 4 5 6 7 8 10 11 12 13 14

CLICK

2

CLICK

3

Illustration of a blue pen being inserted into a cylindrical tube with a black arrow indicating the insertion process (no text or symbols present).

4

Diagram of a robotic arm with a blue rod and black arrow indicating force or movement (no text or symbols).

5

max

6

Illustration of a hand using a blue tool to adjust or install a mechanical component, with no visible text or symbols.

7

Illustration of a hand using a blue tool to press down a component, with a black arrow indicating the downward motion (no text or symbols present).

8

min max

9

Illustration of a hand holding a medical device with a blue cap, showing a black arrow indicating force or movement (no text or symbols present).

10

Illustration of a hand using a vacuum cleaner to press down a device, with arrows indicating motion (no text or symbols).

Illustration of a blue vacuum cleaner with a black arrow indicating the process (no text or symbols present).

12

Illustration of a hand using a vacuum cleaner to press or install a component, with no visible text or symbols.

Diagram showing two steps of a device repair or installation: step 1 indicates a switch to a component, and step 2 shows the tool being inserted into a plug.

14

Illustration of a vacuum cleaner with blue adjustment knobs, shown from front and side views (no text or symbols).

Diagram of a vacuum cleaner with blue tubing and mechanical components (no text or symbols).

16

Diagram of a vacuum cleaner with blue tubing and black arrows indicating assembly or operation (no text or symbols).

CLICK

18

Illustration of a robotic arm holding a blue object with black arrows indicating motion or force direction (no text or symbols).

Illustration of a blue handheld device with black arrows indicating motion or rotation (no text or symbols).

20

Diagram showing two labeled steps of a blue tool or device being inserted, with arrows indicating direction and component placement.

21

Illustration showing hand cleaning a vacuum cleaner with three labeled items: a plastic bag, a brush, and a bottle, each marked with an 'X' symbol.

22

max —

23

Illustration of a hand holding a blue sensor component on a car intake manifold (no text or symbols).

24

Illustration of a hand using a power tool to clean or install a mechanical component (no text or symbols visible).

Illustration of a hand using a tool to adjust or install a mechanical component (no text or symbols visible).

Illustration of a hand inserting a blue component into a device (no text or symbols).

Diagram illustrating a mechanical process with labeled components and directional arrows, including a numbered step indicator.

CLICK CLICK

26

Diagram of a blue portable device with labeled parts and directional arrows indicating rotation or adjustment.

Therefore, m = 3/11

Illustration of a hand using a tool to adjust or install a blue mechanical component (no text or symbols visible).

28

Diagram showing a blue oval object with internal particles and a magnified cross-section of a circular structure (no text or symbols).

Illustration of a hand holding a blue oval-shaped object above a container with particles (no text or symbols present).

30

Two illustrations showing a showerhead spraying water into a circular container with internal patterns (no text or symbols).

Therefore, m = 3/11

Diagram showing a blue oval object interacting with a circular mechanical component, with an arrow indicating direction (no text or symbols present).

24 h

CLICK

Diagram of a mechanical device with two blue components and upward arrows indicating motion or assembly (no text or symbols).

Diagram of a mechanical device with labeled parts and directional arrows indicating motion or flow.

Illustration of a handwashing device with blue spray, showing two scenarios (no text or symbols).

① ② 24 h

Diagram of a mechanical device with a downward arrow indicating force or movement, showing internal components (no text or symbols).

Illustration of a car interior with a blue plastic seat and a hand inserting a component (no text or symbols).

Diagram showing a blue solar panel installation with numbered arrows indicating process steps.

1 M

Diagram of a blue hair dispenser spraying water onto a grid-patterned air conditioner unit (no text or symbols)

CLICK 24 h

CLICK

BOSCH Serie 2 BGS05BA2 - 50

Safety

  • Read this instruction manual carefully.
  • Keep the instruction manual and the product information safe for future reference or for the next owner.

■ Do not connect the appliance if it has been damaged in transit. Only use this appliance:

■ with genuine parts and accessories. Damage caused by using third-party products is not covered under the warranty.

■ for cleaning surfaces.

■ in private households and in enclosed spaces in a domestic environment at room temperature.

■ up to an altitude of max. 2000 m above sea level.

Do not use the appliance:

■ for vacuum-cleaning persons or animals. ■ for vacuuming up harmful, sharp-edged, hot or burning substances. ■ for vacuuming up damp substances or liquids. ■ for vacuuming up highly flammable or explosive materials and gases. ■ for vacuuming up ash or soot from stoves and central heating systems. ■ for vacuuming up toner dust from printers and photocopiers. ■ for vacuuming up building rubble.

Disconnect the appliance from the power supply when:

■ cleaning the appliance.

This appliance may be used by children aged 8 or over and by people who have reduced physical, sensory or mental abilities or inadequate experience and/or knowledge, provided that they are supervised or have been instructed on how to use the appliance safely and have understood the resulting dangers.

Do not let children play with the appliance.

Cleaning and user maintenance must not be performed by children unless they are being supervised.

  • Repairs to the appliance should only be carried out by trained specialist staff. ▶ Only use genuine spare parts when repairing the appliance.

▶ If the power cord of this appliance is damaged, it must be replaced by the manufacturer, the manufacturer's Customer Service or a similarly qualified person in order to prevent any risk. ▶ Never operate a damaged appliance. ▶ Never operate an appliance with a cracked or fractured surface. ▶ Call customer services. → Page 17 ▶ Only use the appliance in enclosed spaces. ▶ Never expose the appliance to intense heat or humidity. ▶ Do not use steam- or high-pressure cleaners to clean the appliance. ▶ Never let the power cord come into contact with hot appliance parts or heat sources. ▶ Never let the power cord come into contact with sharp points or edges. ▶ Never kink, crush or modify the power cord. ▶ Connect and operate the appliance only in accordance with the specifications on the rating plate. ▶ Connect the appliance to a power supply with alternating current only via a properly installed socket with earthing. ▶ The protective conductor system of the domestic electrical installation must be properly installed. ▶ When cleaning the appliance, do not use flammable substances or substances that contain alcohol. ▶ Pull out the power cord completely. ▶ Keep clothing, hair, fingers and other body parts away from the openings on the appliance and the moving parts. ▶ Never point the pipe or the nozzles towards eyes, hair, ears or mouths. ▶ When vacuuming stairs, ensure that there are no persons underneath the appliance. ▶ When taking a break from vacuuming, switch off the appliance and pull out the mains plug. ▶ Retract the power cord. ▶ When the cord is being rewound automatically, ensure that the mains plug is not thrown in the direction of persons, body parts, animals or objects. ▶ Keep packaging material away from children.

▶ Do not let children play with packaging material.

Preventing material damage

▶ Never place the appliance on the hose. ▶ Regularly check the running surfaces of the nozzles for wear. ▶ Replace worn nozzles. ▶ Never operate the appliance without the motor protection filter. ▶ Never operate the appliance without the exhaust filter.

Overview

You can find an overview of the parts of your appliance here.

Note: Individual details and colours may differ, depending on the appliance model.

→ Fig. 1

1Adjustable floor tool 1
2Hose
3Telescopic tube with sliding switch 1
4Handle
5Hose holder 1
6Dust container release button
7Handle
8Rear flap
9Power cord
10Cable rewind button
11Suction power control switch 1
12Storage aid
13On/off switch
14Dust container 1

1 Depending on the appliance specifications

Operation

Installing the appliance

→ Fig. 2 - 5

Operating the appliance

Note: A dashed frame indicates optional appliance equipment.

→ Fig. 6 - 14

Storing the hose

→ Fig. 15 - 18

Removing the appliance

→ Fig. 19 - 21

Cleaning and servicing

To keep your appliance working efficiently for a long time, it is important to clean and maintain it carefully.

Cleaning the appliance

Requirement: The appliance is switched off.

Clean the appliance and the accessory using a soft cloth and a commercially available plastic cleaner.

→ Fig. 22

Emptying the dust container

→ Fig. 23 - 26

Cleaning the filter in the dust container

→ Fig. 27 - 34

Cleaning the fluff filter

→ Fig. 35 - 39

Cleaning the exhaust filter

→ Fig. 40 - 45

Troubleshooting

▶ Repairs to the appliance should only be carried out by trained specialist staff. ▶ Only use genuine spare parts when repairing the appliance.

If the power cord of this appliance is damaged, it must be replaced by the manufacturer, the manufacturer's Customer Service or a similarly qualified person in order to prevent any risk.

Suction is reduced.

Nozzle, telescopic tube or hose are blocked.

  1. Dismantle the appliance.
  2. Remove the blockage.

Dust container is full

  1. Check the fill level of the dust container.
  2. Empty the dust container as needed.

Filter in the dust container is soiled.

  1. Switch off the appliance.
  2. Clean the filter in the dust container.

Exhaust filter is dirty.

▶ Clean the exhaust filter.

Disposing of old appliance

- Dispose of the appliance in an environmentally friendly manner.

Information about current disposal methods are available from your specialist dealer or local authority.

BOSCH Serie 2 BGS05BA2 - Disposing of old appliance - 1

This appliance is labelled in accordance with European Directive 2012/19/EU concerning used electrical and electronic appliances (waste electrical and electronic equipment - WEEE). The guideline determines the framework for the return and recycling of used appliances as applicable throughout the EU.

Customer Service

Detailed information on the warranty period and terms of warranty in your country is available from our after-sales service, your retailer or on our website.

The contact details for Customer Service can be found in the enclosed Customer Service directory or on our website.

BOSCH Serie 2 BGS05BA2 - Customer Service - 1

Safety

BOSCH Serie 2 BGS05BA2 - Safety - 1

Safety

Manual assistant
Powered by Anthropic
Waiting for your message
Product information

Brand : BOSCH

Model : Serie 2 BGS05BA2

Category : Vacuum Cleaner