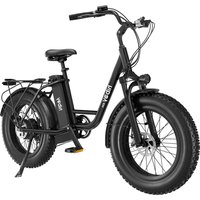
EX6 - Electric bike Hiboy - Free user manual and instructions
Find the device manual for free EX6 Hiboy in PDF.


| Product Type | Electric Bike |
| Brand | Hiboy |
| Model | EX6 |
| Dimensions (L x W x H) | 66 x 24 x 43 inches (167 x 61 x 109 cm) |
| Weight | 48.5 lb (22 kg) |
| Motor | 350W brushless rear hub motor |
| Battery | 36V 10Ah lithium-ion, removable |
| Range | Up to 40 miles (64 km) on pedal assist |
| Max Speed | 20 mph (32 km/h) on throttle |
| Charging Time | 4-6 hours |
| Frame Material | 6061 aluminum alloy |
| Brakes | Mechanical disc brakes, 160mm rotors |
| Transmission | Shimano 7-speed derailleur |
| Tires | 26 x 4.0 inch fat tires |
| Display | LED display with speed, battery, and odometer |
| Modes | Pedal assist (5 levels) and thumb throttle |
| Front Suspension | Adjustable front fork suspension |
| Lighting | Integrated LED headlight and rear reflector |
| Max Load | 330 lb (150 kg) |
| Water Resistance | IPX4 (splash resistant) |
| Warranty | 1 year on frame, 6 months on battery |
| Maintenance | Regularly check tire pressure, brakes, and chain lubrication |
| Cleaning | Wipe with damp cloth; avoid pressure washers |
| Safety | Always wear a helmet; obey local traffic laws |
| Spare Parts | Available from Hiboy official store or authorized dealers |
Frequently Asked Questions - EX6 Hiboy
User questions about EX6 Hiboy
0 question about this device. Answer the ones you know or ask your own.
Ask a new question about this device
Download the instructions for your Electric bike in PDF format for free! Find your manual EX6 - Hiboy and take your electronic device back in hand. On this page are published all the documents necessary for the use of your device. EX6 by Hiboy.
USER MANUAL EX6 Hiboy
EX6
Electric Bike
The manufacturer reserves the right to make changes to the product and update this manual at any time.
USER MANUAL
Contents
Important! Before Riding, You Should 01
-
Package Contents 02
-
Product Overview 03
-
Installation Instructions 05
-
Operating Instructions 12
-
Battery Key Positions 15
-
Remove The Battery 16
-
Charging 17
-
Important Safety Instructions 22
-
Moving And Storage 24
-
Limited Warranty Statement 26
-
Daily Care And Maintenance 28
-
Battery Maintenance 30
-
Specifications 42
-
G&A And Troubleshooting 43
-
Contact Us
IMPORTANT! BEFORE RIDING, YOU SHOULD
• Make sure your electric bike is fully charged before the first ride.
• Make sure the pedals are light
- Make sure the front wheel is installed properly and tightly
- Check to be sure the tires are inflated properly
- Learn how to use the display
• Wear a helix, when riding is highly advised
When riding, please
• always respect pedestrians
- Drey local traffic rules
- Pay attention to other running vehicles around you
After riding
- If there are any abnormality or loose parts, please check and
repair them as soon as possible.
- After riding on a sixty day, please clear up the Estimated and
reciment immediately
If you have any trouble with the installation, please contact Hiboy
Consult the electronic version of the user manual sb.
https://cdn.stogfly.com/s/les/130425063802247/nles/EXS_E-BIRE_USER_MANUAL.pdf
IMPORTANT ! AVANT DE ROULER, VOUS DEVRIEZ
Please check package contents carefully. If anything is missing or damaged, please contact Hiboy customer service for support:support@hiboy.com
- Product Overview
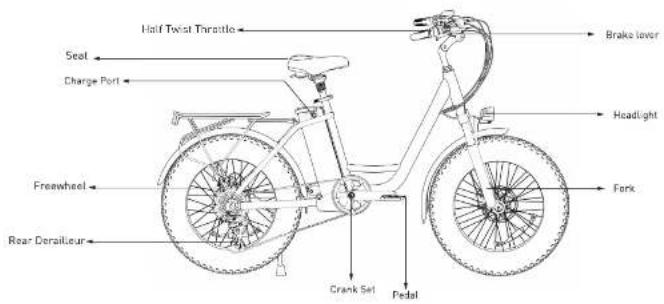

4
- Installation Instructions

To ensure you assemble your electric bike correctly, we recommend watching our official installation video. Use your smartphone to scan the QR code above to access the stop-by-stop installation guide on Hiboy YouTube channel.
5
Installing The Front Wheel


- Insert the front wheel in between the front fork on the bike. Be sure the fork is resting on the outside of the axle.
- As shown in figure 2, align the wheel side with the disc brake slot, put the brake disc into the disc brake slot. Keep the skewer and spring on the RIGHT side of electric bike's riding direction, and the other spring and the end nut on the LEFT side of electric bike's riding direction. Then insert the skewer into the wheel side, shown in figure 1.
- Screw the shower with the end nut and tighten.
- Engage the lever lock and elevate the lever until it aligns parallel with the front fork. This maneuver has successfully installed the front wheel.
WARNING! Improper assembly may lead to wheel detachment and rollover risk.
Installing The Pedals
①
⑦

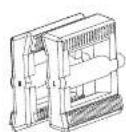
1. Identify the Left and Right labels on the sides. They can only be installed in their own side. INCOM & LCT INSTALLATION WILL CAUSE DAMAGE. PLEASE BE AWARE TO DISTINGUSH LEFT & RIGHT BEFORE INSTALLATION.
2. L is for the Left pedal of the riding direction; R is for the Right pedal of the riding direction, the chain
3. Take the wrench to tighten the part in the direction of the arrow
WARNING! Insufficient tightening may cause sudden loss of control and crash hazards.
Installing The Headlight

-
Take out the front tender and align the hola of the front tender with the hola of the headlight. Then use the headlight screw to align and pass through the washer, headlight hole, front tender hole, and headlight bracket in sequence.
-
Tighten the screw with nut by using hexagon wrench and open-end wrench.
-
Adjust the headlight and the front fender to the right position and tighten the headlight screw.
-
Install the fender stay onto the fender mount using a screw and tighten it with a hexagon wrench.
WARNING! Loose mounting may result in light/mudguard detachment and fork jamming accidents.
Installing The Handlebar

- As shown in the figure, adjust the handlebar to face the front of the bike as indicated by the arrow.
-
Put the handlebar in the handlebar mount and be careful with the wires.
-
Inserting screws is not necessary for installing this handle. Simply place the handle inside and tighten the screws that are already attached to it.
-
Verify and check all items are light.
WARNING: Unsecured handlebars may loosen/detach, causing steering failure and serious injury.
Over-tightening the screws may lead to the risk of stripping the threads on the riser or screws.
Adjusting The Handlebar Height

Operation steps
- Loosen screw (1) using a hexagon wrench as shown in the figure.
- Adjust the range of the angle according to your needs, with a minimum angle of 10 degrees and a maximum angle of 50 degrees.
- After adjusting to the appropriate height, tighten screw (1) again with a hexagon wrench.
- Loosen screw (5) with a hex wrench and adjust the balance of the handsetbar. Finally, use a hexagon wrench to tighten screw (3).
Installing The Saddle
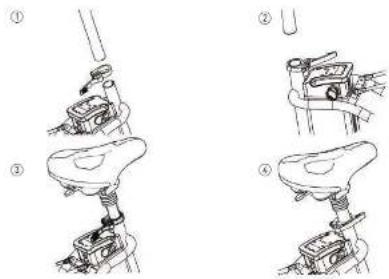
- Install the saddle according to the picture.
- Push the saddle down, pull up or push down to adjust the height.
- Check to make sure the saddle is fully inserted and adjust it accordingly.
- Lack the handle.
WARNING! Inadequate fastening may compromise handling stability and lead to falls.
Display Introduction


12
How to Use The Display, Headlight & Horn

- Press and hold for 3 seconds ⏻ to turn on the display. Your bike will be turned on. Press and hold for 3 seconds again to turn off. The display will turn off automatically when there is no operation or riding for 5 minutes.
- Short press the "+" or "-" button to change the boost level between 0-5 levels. 0 is the output power, 1 is the minimum boost, 5 is the maximum boost level.
- Short press ⏻ to switch the display data of multi-function area when the display is on,
-
When the power is on, press and hold " to enter 3.7MPH towing mode, release " to cancel towing mode
-
Press the light button to turn on/off the headlight
-
Press the horn button for horn control

13
4. Operating Instructions
After the bike has been properly assembled according to the assembly video provided via the QR code above, all components are secured correctly, a certified, reputable mechanic has checked the assembly, and you have read this entire manual, turn on the bike and select a pedal assist level following the steps below.
-
Test the battery lock security. Ensure the key port is aligned with the OFF icon, which indicates the battery is off and locked into the frame mount. Carefully use both hands to pull up on the battery to test that the lock is secure.
-
Ensure proper handlebar and seat adjustment. Note that lowering the seat so the rider can put one or both feet flat on the ground without dismounting from the seat may offer a safer and more comfortable introduction to operating the bike. Ensure the handlebar faceplate bolts and seabpost quick-release are fully end properly secured.
-
Turn the bike on. Locate the LCD Display (near the left handlebar grip). Hold down the LCD Display power for approximately 2 seconds until power is delivered to the LCD Display.
-
Select the desired level of pedal assistance [PAS] between a level 0 through b using the “-” and “+” on the LCD display. Level 1 corresponds to the lowest level of pedal assistance, and level 5 corresponds to the highest level of pedal assistance. Level 0 indicates pedal assistance is inactive. Select in PAS level 0 or 1 and adjust from there.
WARNING: Engaging the pedal assist feature, especially at a high setting, will cause acceleration that may be greater than expected, especially for relatively new riders, and that can cause loss of control, serious injury, or death. To minimize risk, start at PAS level 0 or 1.
-
Begin riding carefully. With the proper safety gear and rider knowledge, you may now operate your bike. On a flat surface, in a low gear (1 or 2), most riders should be able to begin pedating the bike with pedal assist level 0 or 1. You may also use the throttle to accelerate and maintain your desired speed.
-
Use the throttle first to the right handlebar grip by slowly and carefully roasting it toward the rider. Do not use the throttle unless you're on the bike, and note that the throttle can be activated with a beat any time the bike is powered on. WARNING. Be careful not it accidentally twist the throttle, which can cause sudden escalation. If you're not prepared for this acceleration, you will lose control of the bike, which can lead to serious injury or death. To minimize this risk, always keep at least 30 minutes, and then do not take a longer to cut off power or the motor. When you dismantle, power off the bike before moving it.
- Please check line pressure, tire tread, chain, power, shift, brakes, lights, sokes, and peats to ensure a safe ride.
- Rear rock maximum lane 35 lbs.
5. Battery key positions
Familiarize yourself with the keyport and key positions before riding the bike.

| Key Position/con | Description |
| A | Power on, battery locked to frame |
| B | Power off, battery locked to frame |
| C | Power off, battery unlocked from frame(for battery installation and removal) |
-
Any time the battery is in key position A, [power on, battery locked to the frame] the power button on the LED display will turn the bike on and off, and the battery cannot be removed.
-
If the battery is in key position B, (power off, battery locked to the frame) no buttons or controls can be activated, the bike will remain off, and the battery can not be removed.
-
Anytime the battery is in key position "C" lacquer off, battery unlocked (from the frame), it can be removed from the bike as long as the abike is not moving or being ridden.
NOTICE:
You have to press the key then you can switch to unlock position
6. Remove The Battery

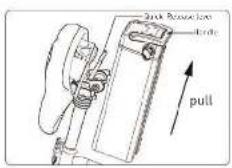
- Locate the seat quick-release lever and lift or tilt the saddle upward to access the battery.
- Press and rotate the key to the UNLOCK icon.
- Carefully slide the battery upwards and lift it out of the frame.
To reinstall the battery, align the slot at the bottom of the battery and reinsert it into the frame. Turn the key to the locked position.
To check the battery level without turning on the bike, press and hold the button located on the top of the battery for a few seconds. The current capacity of the battery will be displayed.
long press

7. How to Charge The Battery
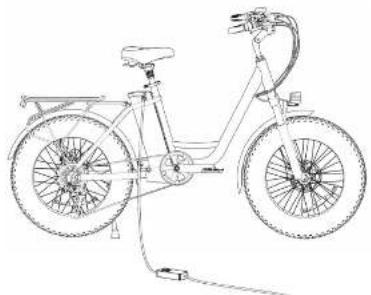
Your electric bike will be fully charged when the LED light on the charger changes from red [charging] to green [fully charged]. After the battery is fully charged, the charger will automatically stop charging.
However, we still do not recommend charging your electric bike for extended periods of lime. Do not connect the charger if the charging port is wet. Cover the charging port when not in use.
Notes of Charging
- Charging time: 6 hours 80% full charge, full charge in 7-8 hours.
- The small light on the charger in RED indicates it is in charging; GREEN indicates it is fully charged.
- Insufficient charging will not influence the battery lifecycle. AVOIDING deep discharge is helpful to protect the battery and extend its lifecycle.
- Pay attention to check whether the surface temperature of the battery case rises too high during charging. It is FORBIDDEN to cover battery while charging.
- Due to high temperature in summer, it is NOT advised to charge the battery immediately after riding. In winter, it is FORBIODEN to charge it OUTSIDE where the temperature is below 32°F. You are recommended to charge it in room temperature.
&. If the battery will not be used for a long time, take it off from the bike and discharge its capacity to 60%-80% for stock. Disconnect it from the charger and place it in a dry, ventilated place without direct sunlight. IN ORDER TO MAINTAIN A LONG LIFECYCLE, IT IS RECOMMENDED TO CHARGE THE BATTERY EVERY TWO MONTHS. - When charging or not riding, place the bicycle in a safe, well-ventilated environment at room temperature, protected from direct sunlight or rain.
- Charging of the electric bike shall only be performed with the manufacturer's recommended charger.
Notas de Carga
8. Improtant Safety Instructions
WARNING
- When using this product, basic precautions should always be followed
including the following:
- 01. Read all the instructions before using the product
- 02 Ensure that all, luding mechanisms are securely locked and roll once before riding.
- 30. Check that the brakes are functioning properly before riding.
- 04. Ensure the handlebars are tight and not wobbly before riding.
- 05. Please make sure the front quick release is locked before riding
- 06. Please make sure the battery is locked in place before riding
- 07. Please make sure the seat is not loose before riding.
• 06. Please use the original charger.
• 05. Retract the kickstand before riding.
• 10. Please ensure that the tire pressure is in accordance with the tire pressure standard before.
- 15. To reduce the risk of injury, close supervision is necessary when the product is used near children.
• 12. Please don't put fingers or hands into the product.
- 13. Please don't use this product if the flexible power cord or out put cable is frayed, has broken insulation, or any other signs at damage.
- 16. This equipment is not intended to be used at ambient temperatures less than -10°C (18°F) or above ambient temperatures of 45°C (113°F). The equipment's recommended storage temperature is between 10°C (50°F) and 45°C (113°F).
- 15. The battery is intended to be charged when the ambient temperature is between 10°C (50°F) and 40°C (104°F). Never charge the battery when ambient temperatures are outside this range. The battery is not intended to be used at ambient temperature less than -10°C (16°F) or above ambient temperature of 40°C (112°F). The battery's recommended storage temperature is between 15°C (9°F) and 25°C (77°F).
ATTENTION
When transporting the electric bike, ensure that the device is in the off position to avoid accidental activation by inadvertent switch contact.
Advise users to adopt the correct lifting posture by raising the electric bike vertically to prevent the device from tilting or falling.
When handling, please hold it gently.
When the electric bike's not in use, keep it indoors where it is dry and cool.
Do not put it outdoors for a long time. Excessive sunlight, overheating and overcooling accelerate tire aging and compromise the electric bike and the battery pack's lifespan.
10. Limited Warranty Statement
30 DAY SATISFACTION GUARANTEED RETURN POLICY
If you are unsatisfied with your purchase, Hibby's return policy allows you to return your undamaged Hibby product purchased on the Authorization channel within 30 days counting from the date of receipt of shipment, and request a refund from the Authorization channel for any reason. Note: The cost at return shipping will be borne by the customer if the product has no quality issue.
For the return request, Hiloy is not responsible for last packages due to the carrier, or products received that cannot be verified. Received products that have damage determined to have been caused by the end-user may be subject to denial of the return request.
TO QUALIFY FOR A REFUND, ALL THE FOLLOWING CONDITIONS MUST BE MET:
- A Return Merchandise Authorization (EMA) must be requested from Hibcy within 30 days from the date of receipt of shipment. To
request an HMA, contact Hboy Service Team at support@hboy.com.
-
The cost of return shipping will be borne by the customer
-
For warranty service, please keep your receipt and/or invoice to validate proof of purchase.
-
Returned product must be in good physical condition (not physically broken or damaged).
-
All accessories originally included with your purchase must be included with your return
n. If you return a product in Hilms (a) without an RMS from Hilms [b] without all parts included in the original package, Hilms retains the
right to refuse delivery of such return.
LIMITED PRODUCT WARRANTY
Hipsy product basically will be free from defects in materials and workmanship under normal use for a period aforementioned
Hibay does not warrant the operation of the product will be uninterrupted or error-free.
Honey is not responsible for damage arising from failure to follow instructions relating to the product's usage.
REMEDIES
If a hardware defect is found and a value claim is receded by Hibbay within the Warranty Period. Hibbay will, at its option and to the extent permitted by law, either I-II repair the product at no charge, using new or refurbished replacements, parts or, I-II replace the product with a new or refurbished product. In the event of a defect, to the extent permitted by law, these any your sole and exclusive renewables. Shipping and handling charges may apply except where prohibited by applicable law. This Limited Warranty is valid only in the jurisdictions where the products are sole by www.hibay.com, and is valid to the extent permitted by the applicable laws at such jurisdictions. Any replacement hardware product will be warranted for the remainder of the warranty period or thirty 100 days, whichever is a sign or for any additional period of time that may be applicable in your jurisdiction.
HOW TO OBTAIN WARRANTY SERVICE
A Warranty Service Order must be requested from Hibay within Warranty Period from the date of receipt of shipment. In request a Warranty Service Order, contact Hibay Service Team support@hibay.com. To obtain warranty service, you must offer the product, in another its original packaging or packaging providing an equal degree of protection, to the address specified by Hibay in accordance with applicable law, Hibay may require the customer to furnish proof of purchase details and/or comply with registration requirements before receiving warranty service, which is provided for a period of thirty days or the minimum period required by your jurisdiction, whichever is longer.
LIMITATION OF DAMAGES
Except to the extent prohibitive by applicable law, Hibby shall not be liable for any incidental, indirect, special, or consequential damages, including but not limited to loss of profits, revenue or data, resulting from any breach of express or implied warranty or condition, or under any other legal theory, even when Hibby has been advised of the possibility of such damages. Some jurisdictions do not allow the exclusion of limitation of special, indirect, incidental or consequential damages, so the above limit arising on exclusion may not apply to you.
11. Daily Care And Maintenance
Cleaning and storage
If you see stains on the electric bike's body, wipe them off with a damp cloth. If you see scratches on plastic parts, use sandpaper or other abrasive materials to polish them.
Notes: Do not clean the electric bike with alcohol, gasoline, kerosene or other corrosive and volatile chemical solvents to prevent dire damage. Do not wash the electric bike with a high-pressure water spray. During cleaning, make sure that the electric bike's turned off, the charging cable is unplugged as water leakage may result in electric shock or other major problems.
Electric Bike Care Basics & Best Practices
- Always store your electric bike in a clean dry place to prevent rust and battery damage.
- Clean the blue frame with a damp cloth and a mild, non-corrosive cleaner. Lubricate moving parts as necessary after clearing.
- HIBOY electric bikes are not waterproof and should not be submerged in water, as this may damage the electrical system. Store the bike under shelter and avoid exposing it to rain. If the bike gets wet, dry it immediately. Rube Water damage and corrosion are not caused from warranty.
- If you live or die in coastal areas, your bike will be exposed to salt, which has corrosive effects. Wipe down the bike more frequently was apply and used in treatment for all unspecified and using paints.
- Ensure the tire pressure are always in contact to the pressure range covered as the ice sieves walls. Use a tire stump with a built-in air pressure gauge to maintain the correct tire pressure.
- Before each side, check that all electrical wires are connected and secure.
Recommended Ongoing Service
HIBOY recommends regular inspections and the following maintenance schedule:
| OPERATION INSPECT THE FOLLOWING SERVICE REPLACE | |||
| Weekly102-200 miles7450.02 km | • Inspect boxers for proper torque.• Inspect the car wheel on proper alignment and turn-onincluding the clean, fresh/soft, chelting, and rear/neck• Clean and lubricate the chair.• Inspect the contact of the frame and cards for damage.• Inspect and breakable parts• Inspect the p case. | • Clean frame withadams and cold and cold comp as impacted.• Litter cars shafts.• Litter wheels adjworsing to higher clearance/make cables if processed. | • In each wayCompressorconformed to severe or damaged |
| Netport850-250 miles,402 1207 cm | • Inspect brake pad alignment and brake cable tension.• Inspect blocks in shifting priority.• Inspect chairs douching using a crew member ring bolt (not inclined).• Inspect blocks are shifter buttons for turnover or ringing.• Inspect time and crate spine better. • Tighten any socket economical, flumeer blocks, flionalor that ring ether wash with spitters or the air can. | • Intrasonic lock, lockers, and switches.• Clean and turn-on side rotations.• Clocks worked & putal lamps.• Ice and motion wheels of any loose spokes aredislocated.• Drain and recycling the battery fully. | • Inspect brake and shift traction if necessary.• Inspect brake pulls if necessary |
| Entry & Kevits792-1250 miles/1250-2001 km | • Inspect steering [board, headwind, crank out, conlllent]• Inspect all seats and no drops.• Inspect hub bearing and lower front bracket. | • Standard turn-up is certified and reputableblue mechanism to correct reduces.• Greene battery in rack. | • Inspect brake partsP worn. Replace tiresP worn.• Inspectciles and houndings if necessary |
| Annually Biegetrises of dollar cap | house your tools like water used by a certified turn mechanism. | • Standard turn up as a certified and reputable blue mechanism is recommended.• Oil pump battery in rack. | • Replace brake pods• Inspect brake parts• Replace tires P worn. |
12. Battery Maintenance
The battery should be stored within the temperature and humidity ranges specified in the product specification. Otherwise, it may cause loss of performance characteristics, leakage, or rust.
The batteries should be stored at room temperature, charged to about 30% to 30% of capacity. If the battery is kept for a long time it is strongly recommended to preserve it in a dry environment [humidity below 60%] and at low temperature (less than 20°C), with no dust and no corrosive gas atmosphere. To avoid over-discharging, the battery should be re-examined approximately every six months, and batteries below the storage capacity should be recharged to maintain about 30% to 30% of capacity. Storage with higher voltage may cause greater loss of performance characteristics.
| Storage temperature and time levoid over-discharging | 45-60°C: 1 months |
| 25-45°C: 3 months | |
| -20-25°C: 12 months |
Due to the nature of the battery's chemical reaction, its performance will decrease over time, even under standard storage and use conditions. Battery performance will deteriorate over time even if stored for a long period without use. Additionally, it usage conditions such as charge, discharge, or ambient temperature are not maintained within specified ranges, the battery's life expectancy may be shortened, or the device may be damaged by electrolyte leakage. If the battery cannot maintain a charge for long periods, even when charged correctly, it may be time to replace it.
Warnings and Cautions
WARNING
● The charger must be equipped with a full charge detection system. It should detect the fully charged state using a timer, current detection, or open circuit voltage detection. When the charger detects a full charge, it must stop charging. Do not use continuous charging (isikole charging).
- Do not put the battery into fire or heat it. Keep the battery away from heat and fire. Do not store the battery in high-temperature environments.
- Do not connect the battery with reversed positive (+) and negative (-) terminals in the charger or equipment.
- Do not let the battery terminals (+ and -) contact a wire or any metal [like a metal necklace or hairpin] with which it is carried or stored. This may cause a short circuit.
- Do not drive a nail into, hit with a hammer, or stamp on the battery. Do not strike the battery in other ways.
- Do not disassemble or alter the battery's external structure. Welding is not allowed on the battery.
● Do not directly solder the battery terminals.
● Do not attempt to disassemble or modify the battery in any way. - Do not submerge the battery in water or well during storage.
● Avoid charging the battery near a fire source or in direct sunlight - Do not directly contact a leaking battery.
- Do not allow children to replace batteries without adult supervision.
CAUTION
● The battery should be charged and discharged with the proper charger, following correct operation procedures.
●Children should not be allowed to play with batteries.
- Do not use the battery with other manufacturers' batteries, different types, or models of batteries (such as dry batteries,
nickel-metal hydride batteries, nickel-cadmium batteries), or mix new and old lithium batteries.
- Do not charge the battery continuously for more than 12 hours, and do not leave the battery on the charger for extended periods (over 24 hours).
- Do not use the battery if it omits an odor, heats up, changes color or shape, leaks electrolyte, or shows any other abnormality. If the battery is in use or being recharged, remove it from the device or charger immediately and discontinue use.
- When the battery is not in use for a long time, store it safely in a half-charged state. Wrap the battery with non-conductive materials to prevent metallic materials from contacting it directly, which may cause damage. Keep the battery in a cool and dry place. - If the battery leaks and electrolyte gets into your eyes, do not rub them. Rinse with clean running water and seek medical attention immediately. Electrolyte can cause eye injury if not treated promptly.
Battery maintenance
-
Use original battery packs, use of other models or brands may bring about safety issues.
-
Do not touch the contacts. Do not dismantle or puncture the casing. Keep the contacts away from metal objects to prevent short circuit which may result in battery damage or even injuries and deaths.
3 Use original power adapter to avoid potential damage or fire
-
Mishandling of used batteries may do tremendous harm to the environment. To protect natural environment, please follow local regulations to properly dispose used batteries.
-
After every use, fully charge the battery to prolong its lifespan.
Do not place the battery in an environment where the ambient temperature is higher than 104°F or lower than 14°F (e.g., do not leave the electric bike or the battery pack in a car under direct sunlight for an extended time). Do not throw the battery pack into fire as it may lead to battery failure, battery overheating, and even another fire. If the electric bike is expected to be left idle for more than 30 days, please fully charge the battery and place it in a dry and cool place. Keep in mind to recharge it every 60 days to protect the battery from potential damage which is beyond limited warranty.
Always charge before exhouting the battery to prolong the battery's lifespan. The battery pack performs better at normal temperature, and poor when it is below 32°F. For instance, when it is below -4°F, the riding range is only half or less at normal state. When the temperature rises, the riding range restores.
The damage caused by prolonged no charge is irreversible and is beyond limited warranty. Once the damage is done, the battery can not be recharged.
| Exk | Items | Specifications |
| Dimensions | Package Size [1] | 50" x 12"x 23"x 4x 11"x 31"x 70"x 12" |
| Time | Plasmatic time 20" x 6" in | |
| Weight | Ion Weight | 66 us (30 kΩ) |
| Riding Requirements | Vac. Load | 265 lbs (120 Kb) |
| Age | 14-50 | |
| Main Parameters | Max Speed | 25 mph (10'00'00") |
| Pure Electric Rising Dist (Load 145 lb) [2] | 41 miles (45 KM) | |
| Pedal Assist Rising Dist (Load 145 lb) [2] | 75 miles (120KM) | |
| Max Angia of Climb | 20% | |
| IP Rating | Blue IPX, Battery IPX | |
| Variable Speed | 7 speeds | |
| Frame Material | High Carbon Steel | |
| Battery 'Jack | Rated Voltage | 48V |
| Max. Input Voltage | 34 kV | |
| Rated Capacity | 14.4AH | |
| Intelligent Battery Management System | Unusual temperature/short circuit/under voltage/over current/protections, etc | |
| Wheel Motor | Rated Power | 100W |
| Max. Power | 940W | |
| Charging Adapter | Input Vol | AC 100-360V |
| Output Vol | DC 6kV 2A | |
| Charging Time | 7-8 hours |
[1] Item height: from the ground to the top of the bike.
[2] Pure Electric Riding Dist./Pedal Assist Riding Dist.: On flat surfaces, no wind, and 77°F, the bike was pedal-assisted in 1st gear assist with a fully charged load of 145 lbs.
The real battery life vary with different factors of the load, humidity, wind speed and operation habits, etc.
14. Question & Answer
- Is there any necessary information need to be included before contacting with Hibay Support Team?
At Yes, if you need any support from liboy, please contact us at support@hiboy.com, and please always include your order number correct model No. descriptions of the problem, pictures, and videos that can show details about the issue in the email, thanks. - My electric bike can't be turned on, what can I do?
A. First please make sure you are not turning on the electric bike during charging, because for safety consideration, we have set the electric bike can't be turned on during charging. Second please make sure the electric bike has been charged for a while to have enough battery to support it can be turned on, otherwise please contact us at support@hibey.com for further support. - I can't charge my electric bike, what's the problem?
A: Please note if the electric bike is charging, then the led on the charger will show red color, if the electric bike is fully charged, then the led on the charger will show green color.
So please help to verify if the charger is defective first. Plug the charger into the socket but not connecting to electric bike, if the charger led is NOT on or it is NOT open color. Then it means the charger is defective.
If the charger is not defective, please contact us at support@hiboy.com for further support - What if the electric bike arrived missing accessory or broken car?
A: Please take a photo and send to Hiboy Support Team's email: support@hiboy.com, Hiboy Support Team will reply you soon and send correct accessory or part replacement - My electric bike is stolen, can you help me?
A: I'm sorry we can't track on the location or serial number of the electric bike, please call the local policeman and ask them for help. -
I have written several emails to support@hbuy.com, but no responses received, why?
A: Our Hibay Support Team will reply to you within 1 working day, if you didn't receive any reply from us, please also kindly check your spam box, and add support@hibay.com on your whitelist to make sure our reply is not blocked. In addition, you can also contact us on the platform where you purchased the electric bike for example Amazon chat box, leave message on Hibay.com website, eBay chat box, etc. -
Why the speed can't reach 25 mph?
A: Please make sure you have clicked the power button to set the assit lever to mode 5 on the left of the handlebar and the speed mode to 7s on the right.
After setting the speed mode to 5 and the power mode to 7s and the speed still can't reach 26 mph, then please contact how support team to change
the controller:
In addition, the battery status, rider weight and road situation will also influence the max speed, with enough battery, within 220 lbs weight and ride on
flat road can reach 25 mph speed easily.
- Why the max distance is lower than advertised max distance?
A: Pascet milt the max distance a maximum after the is now one at 579°, with the electric hole fully adjacent, still at an open contact of 24 maw 133.8 k=10
on a flat surface with a load of 165 pounds 170 kg. The real battery life vary with different factors of the load, humidity, wind speed and operation habits, etc.
- Can ride the electric bike in the rains days?
A. Kindly note the electric bike waterproof level is IPXA, we don't suggest you to ride it in the rainy days.
- is there any caution for storing the electric bike if I need to go out for a long time vacation?
A. Please make sure the electric bike is stored in a dry & cool place, do not put it outdoors for long time, and if the electric bike is expected to be left
idle for more than 30 days, please fully charge the battery, keep in mind to recharge it every 60 days to protect the battery from potential damage which
is beyond limited warranty
Trouble Shooting
| Error code | Error description | Solution |
| E2 | Brake handle error | Need to replace the brake handle |
| E3 | Sensor error | Need to replace the sensor |
| E6 | Battery low voltage error | Need to replace the battery and controller |
| E7 | Meter error | Need to replace the motor |
| E8 | Handlebar error | Need to replace the handlebar |
| E9 | Controller error | Need to replace the controller |
| E10 | Communication error | Plug and unplug the communication cable again, if there is still an error of 10, replace the communication cable |
| / | Headlight not work/Horn not sound | Need to replace the headlight only |
15. Contact Us
Contact us if you experience issues relating to riding, maintenance and safety, or errors/faults with your Hiboy electric bike EX6
E-mail Service: support@hiboy.com

hiboyofficial

@Hiboy

@hiboyofficial

@Hiboy_Official

www.hiboy.com
Pasos de operación

- Charging times 6 hours 80% full charge, full charge in 7-8 hours.
- The small light on the charger in RED indicates it is in charging; GREEN indicates it is fully charged.
- Insufficient charging will not influence the battery lifecycle. AVOCING deep discharge is helpful to protect the battery and extend its lifecycle.
- Pay attention to check whether the surface temperature of the battery case rises too high during charging. It is FORBIDDEN to cover battery while charging.
- Due to high temperature in summer, it is NOT advised to charge the battery immediately after riding. In winter, it is FORBIODEN to charge it OUTSIDE where the temperature is below 32°F. You are recommended to charge it in room temperature.
- If the battery will not be used for a long time, take it off from the hike and discharge its capacity to 60%-80% for stock. Disconnect it from the charger and place it in a dry ventilated place without direct sunlight. IN ORDER TO MAINTAIN A LONG LIFECYCLE, IT IS RECOMMENDED TO CHARGE THE BATTERY EVERY TWO MONTHS.
- When charging or not riding, place the bicycle in a safe, well-ventilated environment at room temperature, protected from direct sunlight or rain.
- Charging of the electric bike shall only be performed with the manufacturer's recommended charger.
充电注意事项
The battery should be stored within the temperature and humidity ranges specified in the product specification. Otherwise, it may cause loss of performance characteristics, leakage, or rust.
The batteries should be stored at room temperature, charged to about 30% to 50% of capacity. If the battery is kept for a long time, it is strongly recommended to preserve it in a dry environment (humidity below 60%) and at low temperature (less than 20°C),
with he dust and he corrosive gas atmosphere. To avoid over-discharging, the battery should be re-examined approximately every six months, and batteries below the storage capacity should be recharged to maintain about 30% to 50% of capacity. Storage with higher voltage may cause greater loss of performance characteristics.
| Storage temperature and time [avoid over discharging] | 45-60°C: 1 months |
| 25-45°C: 3 months | |
| 20-25°C: 12 months |
Due to the nature of the battery's chemical reaction, its performance will decrease over time, even under standard storage and use conditions. Battery performance will deteriorate over time even if stored for a long period without use. Additionally,
if usage conditions such as charge, discharge, or ambient temperature are not maintained within specified ranges, the battery's life expectancy may be shortened, or the device may be damaged by electrolyte leakage. If the battery cannot maintain a charge for long periods, even when charged correctly, it may be time to replace it.
Warnings and Cautions
WARNING
● The charger must be equipped with a full charge detection system. It should detect the fully charged state using a timer, current detection, or open circuit voltage detection. When the charger detects a full charge, it must stop charging. Do not use continuous charging (trickle charging).
- Do not put the battery into fire or heat it. Keep the battery away from heat and fire. Do not store the battery in high-temperature environments.
- Do not connect the battery with reversed positive I-I and negative I-) terminals in the charger or equipment.
- Do not let the battery terminals [ and ] contact a wire or any metal [like a metal necklace or hairpin] with which it is carried or stored. This may cause a short circuit.
- Do not drive a nail into, hit with a hammer, or stamp on the battery. Do not strike the battery in other ways.
- Do not disassemble or alter the battery's external structure. Welding is not allowed on the battery.
- Do not directly solder the battery terminals.
● Do not attempt to disassemble or modify the battery in any way - Do not submerge the battery in water or wet 1 during storage.
● Avoid charging the battery near a fire source or in direct sunlight.
● Do not directly contact a leaking battery.
● Do not allow children to replace batteries without adult supervision.
CAUTION
● The battery should be charged and discharged with the proper charger, following correct operation procedures.
●Children should not be allowed to play with batteries.
- Do not use the battery with other manufacturers' batteries, different types, or models of batteries (such as dry batteries,
nickel-metal hydride batteries, nickel-cadmium batteries), or mix new and old lithium batteries.
- Do not charge the battery continuously for more than 12 hours, and do not leave the battery on the charger for extended periods (over 24 hours).
- Do not use the battery if it emits an odor, heats up, changes color or shape, leaks electrolyte, or shows any other abnormality.
If the battery is in use or being recharged, remove it from the device or charger immediately and discontinue use.
- When the battery is not in use for a long time, store it solely in a half-charged state. Wrap the battery with non-conductive
materials to prevent metallic materials from contacting it directly, which may cause damage. Keep the battery in a cool and dry place.
- If the battery leaks and electrolyte gets into your eyes, do not rub them. Rinse with clean running water and seek medical
attention immediately. Electrolyte can cause eye injury if not treated promptly.
Battery maintenance
- Use original battery packs, use of other models or brands may bring about safety issues.
- Do not touch the contacts. Do not dismentle or puncture the casing. Keep the contacts away from metal objects to prevent short circuit which may result in battery
damage or even injuries and deaths - Use original power adapter to avoid potential damage of hire.
- Minhandling placed batteries may do instantaneous harm in the
- Misconducting of used batteries may be discontinued to the environment. To protect natural environment, please follow local regulations to properly dispose used batteries.
- After every use, fully charge the battery to prolong its lifespan.
Do not place the battery in an environment where the ambient temperature is higher than 104°F or lower than 14°F (e.g., do not leave the electric bike or the battery
pack in a car under direct sunlight for an extended time]. Do not throw the battery pack into line as it may lead to battery failure, battery overheating, and even
another fire. If the electric bike is expected to be left idle for more than 30 days, please fully charge the battery and place it in a dry and cool place. Keep in mind to recharge it every 40 days to protect the battery from potential damage which is beyond limited warranty.
Recharge in every 60 days to protect the battery from possible damage which is beyond limited murramp.
Always charge before exhausting the battery to proturing the battery's lifespan. The battery pack performs better at normal temperature, and poor when it is below 32°F. For instance, when it is below -4°F, the rising range is only half or less at normal state. When the temperature rises, the riding range restores.
The damage caused by prolonged no charge is irreversible and is beyond limited warranty. Once the damage is done, the battery cannot be recharged.
电池维护

- CONTENTS
- IMPORTANT! BEFORE RIDING, YOU SHOULD
- WHEN RIDING, PLEASE
- AFTER RIDING
- IMPORTANT ! AVANT DE ROULER, VOUS DEVRIEZ
- OPERATION STEPS
- DISPLAY INTRODUCTION
- HOW TO USE THE DISPLAY, HEADLIGHT & HORN
- OPERATING INSTRUCTIONS
- BATTERY KEY POSITIONS
- NOTICE
- REMOVE THE BATTERY
- HOW TO CHARGE THE BATTERY
- NOTES OF CHARGING
- NOTAS DE CARGA
- IMPROTANT SAFETY INSTRUCTIONS
- WARNING
- ATTENTION
- LIMITED WARRANTY STATEMENT
- TO QUALIFY FOR A REFUND, ALL THE FOLLOWING CONDITIONS MUST BE MET
- LIMITED PRODUCT WARRANTY
- REMEDIES
- HOW TO OBTAIN WARRANTY SERVICE
- LIMITATION OF DAMAGES
- DAILY CARE AND MAINTENANCE
- CLEANING AND STORAGE
- ELECTRIC BIKE CARE BASICS & BEST PRACTICES
- RECOMMENDED ONGOING SERVICE
- BATTERY MAINTENANCE
- WARNINGS AND CAUTIONS
- CAUTION
- QUESTION & ANSWER
- CONTACT US
- PASOS DE OPERACIÓN
- 充电注意事项
- 电池维护
Brand : Hiboy
Model : EX6
Category : Electric bike