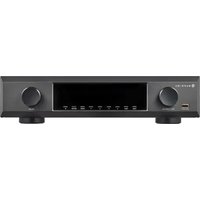
HD-AVA - Receiver NuPrime - Free user manual and instructions
Find the device manual for free HD-AVA NuPrime in PDF.


| Product Type | AV Receiver |
| Brand | NuPrime |
| Model | HD-AVA |
| Dimensions (W x H x D) | 430 mm x 70 mm x 300 mm |
| Weight | 5.0 kg |
| Power Supply | AC 100-240 V, 50/60 Hz |
| Power Consumption | 200 W (standby <0.5 W) |
| Audio Output Power | 100 W per channel (8 ohms, 2 channels driven) |
| Supported Audio Formats | Dolby Atmos, DTS:X, PCM, FLAC, DSD |
| Video Support | 4K UHD, HDR10, Dolby Vision, 3D |
| HDMI Inputs | 5 (HDMI 2.0 with HDCP 2.2) |
| HDMI Output | 2 (ARC supported) |
| Other Connections | Optical, Coaxial, Analog RCA, USB, Ethernet, Wi-Fi |
| Main Functions | Amplification, audio/video switching, streaming, room calibration |
| Care and Cleaning | Wipe with a soft dry cloth; do not use solvents |
| Safety Precautions | Avoid moisture, do not block vents, use grounded outlet |
| Spare Parts and Repairability | Contact authorized service center; user-serviceable parts: none |
| General Information | Refer to user manual for detailed setup and operation |
Frequently Asked Questions - HD-AVA NuPrime
User questions about HD-AVA NuPrime
0 question about this device. Answer the ones you know or ask your own.
Ask a new question about this device
Download the instructions for your Receiver in PDF format for free! Find your manual HD-AVA - NuPrime and take your electronic device back in hand. On this page are published all the documents necessary for the use of your device. HD-AVA by NuPrime.
USER MANUAL HD-AVA NuPrime
FCC Notice - Declaration of Conformity Information
This equipment has been tested and found to comply with the limits for a Class B digital device, pursuant to part 15 of the FCC Rules. These limits are designed to provide reasonable protection against harmful interference in a residential installation. This equipment uses and can radiate radio frequency energy and, if not installed and used in accordance with the instructions, may cause harmful interference to radio communications.
However, there is no guarantee that interference will not occur in a particular installation. If this equipment does cause harmful interference to radio or television reception, which can be determined by turning the equipment off and on, the user is encouraged to try to correct the interference by one or more of the following measures:
• Reorient or relocate the receiving antenna.
- Increase the separation between the equipment and receiver.
- Connect the equipment into an outlet on a circuit different from that to which the receiver is connected.
- Consult the dealer or an experienced radio/TV technician for help.
WARNING: Only peripherals complying with the FCC class B limits may be attached to this equipment.
Changes or modifications made to this equipment, not expressly approved by us or parties authorized by us could void the user's authority to operate the equipment. This device complies with part 15 of the FCC Rules. Operation is subject to the following two conditions: (1) This device may not cause harmful interference, and (2) this device must accept any interference received, including interference that may cause undesired operation.
Notice for customers: The following information is only applicable to equipment sold in countries applying EU Directives.
EU Declaration of Conformity

Hereby, NuPrime Audio, Inc. declares that this device is in compliance with the essential requirements and other relevant provisions of Directive 2004/108/EC.
The manufacturer of this product is NuPrime Audio, Inc., 1712 Pioneer Ave. Ste 1817, Cheyenne, Wyoming 82001, USA
The Authorized Representative for EMC and product safety is NuPrime Audio, Inc., 1712 Pioneer Ave. Ste 1817, Cheyenne, Wyoming 82001, USA.
For any service or guarantee matters please refer to the addresses given in separate service or guarantee documents.
For customers in Europe

Disposal of Old Electrical & Electronic Equipment (Applicable in the European Union and other European countries with separate collection systems) This symbol on the product or on its packaging indicates that this product shall not be treated as household waste. Instead it shall be handed over to the applicable collection point for the recycling of electrical and electronic equipment. By ensuring this product is disposed of correctly, you will help prevent potential negative consequences for the environment and human health, which could otherwise be caused by inappropriate waste handling of this product. The recycling of materials will help to conserve natural resources. For more detailed information about recycling of this product, please contact your local Civic Office, your household waste disposal service or the shop where you purchased the product.
SAFETY INSTRUCTIONS
There are two categories of Safety Instructions included in this manual:
- Product Warnings, (i.e., what must never be done to assure avoiding those hazards that could cause bodily injury or property damage); and
- User Directions (i.e., what must always be done to assure the safe use of your device).
The Safety Instructions contained in this manual have been categorized in accordance with the seriousness of the potential hazards through the use of Signal Words. Those Signal Words, and their intended meanings, are as follows:
DANGER: Indicates that a failure to observe the Safety Instructions could result in death or catastrophic bodily injury.
WARNING: Indicates that a failure to observe the Safety Instructions could result in serious bodily injury.
CAUTION: Indicates that a failure to observe the Safety Instructions could result in minor bodily injury or property damage.
NOTE: Designates important information that relates to activities and/or conditions that might result in loss of data and/or damage to your device.
Safe Use and Operation of Your Device
This equipment emits stray RF energy and will interfere with the reception of signals by airborne electronic navigational devices or medical devices. Do not operate this equipment near any sensitive medical devices.
WARNING: Use only grounded AC power cords.
Always immediately disconnect the power to the equipment in the event the device emits an unusual odor or sound or generates smoke.
WARNING: Never attempt to disassemble, repair or make any modification to your device.
Disassembly, modification or any attempt at repair could cause bodily injury or property damage, as well as damage to the device itself.
WARNING: Your device is not a toy. Never allow children to play with your device. Misuse, rough or improper handling of your device by children could result in serious bodily injury for any of the enumerated safety warnings in this manual. In addition, always keep all accessories and components out of the reach of small children as small parts might present a choking hazard. Seek immediate medical attention if choking occurs or if any small part has been swallowed.
CAUTION: Never raise the sound volume level too high when using your device with earphones. An excessive sound volume level could cause damage to your hearing.
WARNING: To reduce the risk of fire or electric shock, do not expose the unit to moisture or water.
Do not allow foreign objects to get into the enclosure. If the unit is exposed to moisture, or a foreign object gets into the enclosure, immediately disconnect the power cord from the wall. Take the unit to a qualified service person for inspection and necessary repairs.
Read all the instructions before connecting or operating the component.
NuPrime
Keep this manual so you can refer to these safety instructions.
Heed all warnings and safety information in these instructions and on the product itself. Follow all operating instructions.
Do not use this unit near water.
You must allow a minimum 10 cm or 4 inches of unobstructed clearance around the unit. Do not place the unit on a bed, sofa, rug, or similar surface that could block the ventilation openings. If the unit is placed in a bookcase or cabinet, there must be ventilation of the cabinet to allow proper cooling. Keep the component away from radiators, heat registers, stoves, or any other appliance that produces heat.
The unit must be connected to a power supply only of the type and voltage specified on the rear panel. Connect the component to the power outlet only with the supplied power supply cable or an exact equivalent. Do not modify the supplied cable.
Do not route the power cord where it will be crushed, pinched, bent, exposed to heat, or damaged in any way. Pay particular attention to the power cord at the plug and where the cord exits the back of the unit.
The power cord should be unplugged from the wall outlet during a lightning storm or if the unit is to be left unused for a long period of time.
Immediately stop using the component and have it inspected and/or serviced by a qualified service agency if:
• The power supply cord or plug has been damaged.
- Objects have fallen or liquid has been spilled into the unit.
- The unit has been exposed to rain.
• The unit shows signs of improper operation.
• The unit has been dropped or damaged in any way.
Table of Contents
- Introduction......5
- Front Panel Overview....6
- Rear Panel Overview....7
- Remote Control....9
- NuPrime HD-AVA / HD-AVP Input Setup ....10
5.1.HDMI 10
5.1.1. ARC Function....12
5.1.2. CEC Function....12
5.1.3. Off-Through Function 12
5.2. Digital Audio 13
5.2.1. USB DAC....14
5.2.2. Coaxial & Optical 18
5.2.3. USB Expansion Port (Optional BT module)....18
5.2.4. USB Host Ports (USB memory storage drives) 19
5.3. Analog Audio 20
6. NuPrime HD-AVA/HD-AVP Output Setup 21
6.1. USB DAC Analog Output....22
6.2. Build-in Amplifier & Stereo Speaker Output / Balance XLR Output 22
6.3. 7.1 Multichannel Output....24
7. NuPrime HD-AVA/HD-AVP Mix & Zone Setup....25
7.1. Mix Function ......25
7.2. Zone Function....26
8. NuPrime HD-AVA/HD-AVP Internet Setup....27
8.1. Lan Connection Setup 27
8.2. WiFi Connection Setup 28
9. Miracast & Airplay Connection Guide ....28
9.1. Miracast 28
9.2. Airplay....28
10. Antenna Installation Guide for Tuner ......29
11. Speaker Setup – Positioning the Speakers....30
12. Home Menu Setup ....31
12.1. Network Setup 32
12.2. Audio Setup 32
12.3. Video Setup 32
12.4. System Setup 32
13. OSD Menu Setup....33
13.1.Input....33
13.2. Mode 34
13.3. Parameter 35
13.4. Zone 36
13.5. Setup 37
13.5.1 Input Setup 38
13.5.2 Mode Setup 39
NuPrime
13.5.3 Speaker Setup 40
13.5.4 Auto Room / EQ....41
13.5.5 Option 42
13.5.6 Language....43
13.5.7 Load Default 43
13.5.8 Version....44
14. Specification & Features......45
14.1. Inputs 45
14.2. Outputs 45
1. Introduction
The NuPrime HD-AVA/ HD-AVP HT preamp/processor delivers ultra-high resolution USB audio decoding at PCM 384K or DSD256, 24bit/192kHz digital audio, hard-disk media playback, wireless streaming and superb 4K HD video. There are six HDMI, two optical, two coaxial, four stereo analog, one USB Audio and three USB Host (for storage drive) inputs. The audio outputs include 7.1-channel RCA, 2-channel Zone1, Zone2, Zone3, USB DAC analog out, and 4-channel XLR / stereo speaker out. A built-in Wi-Fi network supports Airplay, DLNA and Miracast. Two HDMI outputs can be selected from any of the six inputs. The HD-AVA/HD-AVP easily accommodates the most complex home theater system configurations.
Audio Features:
- Supporting the latest HD audio decoding, including Dolby TrueHD, Dolby Digital Plus, DTS Master, DTS Hi-Res.
- SD audio decoding compatible with Dolby Digital (EX), DTS, DTS ES (D6.1, M6.1), DTS 96/24, up to 192k PCM for 7.1 CH etc.
- Supporting matrix technology such as Dolby Pro Logic IIz, DTS Neo:6 etc.
- Intelligent room acoustic scanning feature
- Powerful bass management feature for individually managing front, center, surround, and rear speakers over a cross-over filter. Increasing the performance of single / double post positioning devices.
- Comes with an equalizer of eleven different options and settings.
- Comprehensive cross-over design.
Video Features:
- Supporting HDMI 1.4
- 6 HDMI inputs, 2 HDMI outputs: HDMI 1/ HDMI 2/ HDMI 3/ HDMI 4 support up to 4K, HDMI 5 / HDMI 6 supports up to 1080P.
- HDMI supports up to 4K, YUV, RGB, supporting DVI mode, supporting HD audio, 8 CH LPCM.
- Supporting 3D video playback
- Supporting HDMI CEC control management
- Supporting HDMI ARC audio return
- Video input compatibility: HDMI/DVI, 480P, 576P, 720P50, 720P60, 1080i 50, 1080i 60, 1080P 50, 1080P 60, 1080P 24, 2160P 30, 2160P 24.
- Including hard-disk player, 3 USB ports (1 in front panel 2 in back panel), capable of playing audio/video directly from USB drive or hard-disk drive.
The HDMI 1.4 specification supports multiple 4K formats:
3840 pixels wide by 2160 pixels high @ 24Hz | 25Hz | 30Hz
4096 pixels wide by 2160 pixels high @ 24Hz
Below is the comparison of HDMI 1.4 and HDMI 2.0. HDMI 2.0 is not supported.
(Grey color represents HDMI 1.4)
| 8bit | 10bit | 12bit | 16bit | |
| 4K@24 | RGB | RGB | RGB | RGB |
| 4K@25 | 4:4:4 | 4:4:4 | 4:4:4 | 4:4:4 |
| 4K@30 | 4:2:2 | |||
| RGB | 4:2:0 | 4:2:0 | ||
| 4K@504K@60 | 4:4:44:2:0 | 4:2:24:2:0 |
2. Front Panel Overview
HD-AVA/HD-AVP
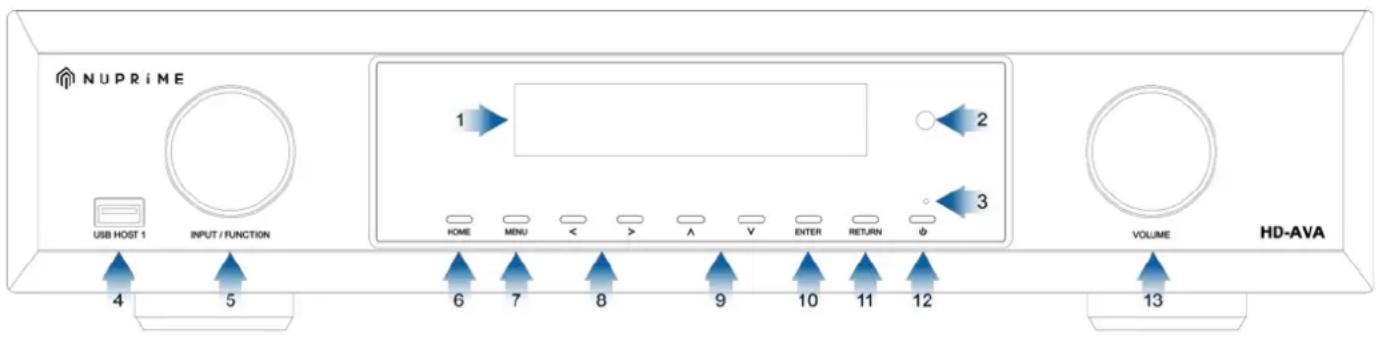
- VFD Display: On screen display for various information
- Remote Control signal receiver
- Stand by indicator: LED lid up when HD-AVA is in standby.
- USB Host 1: For connecting to USB thumb drive or hard-drive storage.
- Input Selection: Input selection by turning the knob. (TV, Player, HDMIs, Tuner, Coaxial, Optical, Analog, USB)
- Home button: opens up on-screen Home menu.
- Menu button: Access menu settings.
- Left and Right selection cursor: In Player input selection and menu, move cursor according to the direction on the on-screen menu. Toggle input channel selection if not in Player input selection mode.
- Up and Down selection cursor: Moving up and down in menu.
- Enter: confirm selection on the on-screen menu
- Return: return to the previous screen on the menu
- Power button: Power on/off button
- Volume Control: decrease and increase volume, ranging from -∞ +15dB , 0.5dB increments.
On-Screen Display
- Video Input source information: Displays the selected input source,
Note: Factory default is set at HDMI 1 input.
-
Audio input source information: Displays the source of audio signal.
-
Volume information: Display current volume information.

3. Rear Panel Overview
HD-AVA

HD-AVP

- FM Antenna: For antenna installation to boost signal.
- Stereo Analog In: 4 sets of Analog inputs (AN1/SAT, AN2, AN3, AN4)
- USB DAC Input & Output (support native DSD):
- Digital In: 2 Coaxial & 2 Optical (CO1/DVD, CO2 : OPT1/CD, OPT2)
- HDMI Output: HDMI 1 and HDMI 2 output. Only HDMI 1 has ARC function.
- HDMI inputs: 6 individual HDMI inputs (HDMI/BD, HDMI2/Box, HD3, HD4, HD5, HD6)
- Setup Mic: Connecting to microphone for room equalization
NuPrime
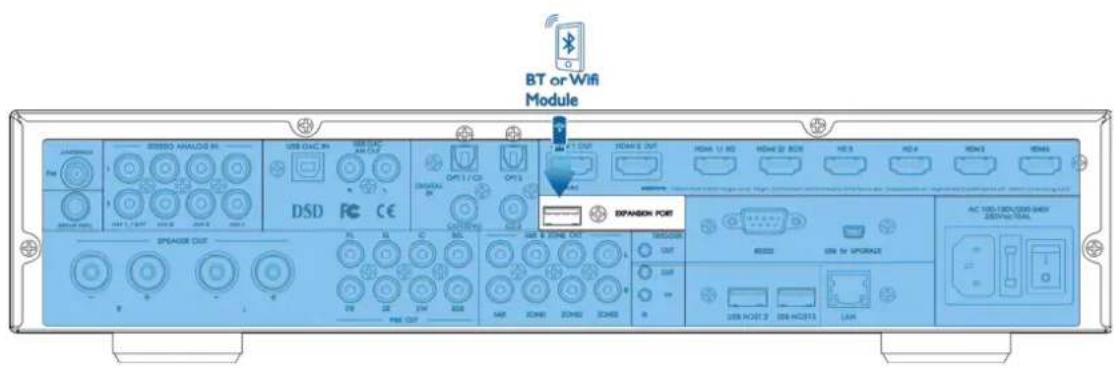
- Bluetooth expansion port: For connecting NuPrime BTR-8 Bluetooth receiver, supporting APT-X.
- Trigger Out: Connecting to power amplifier unit enables power on by NuPrime HD-AVA. (12V/120mA)
- RS232: Serial com port
- Mini USB port (For upgrade): For upgrading firmware for NuPrime HD-AVA/AVP.
- HD-AVA: Stereo Speaker Output. HD-AVP: 4 channel XLR Balanced Output.
- 7.1 CH output (Un-balanced): FR, FL, SR, SL, SRB, SLB, Center, and Subwoofer.
- Mix Output L/R: Stereo output capable of combining multiple audio signal inputs.
- Zone output: Providing three additional and independent zones for multi-room capability. Each zone can be set with independent signal input and volume level.
- IR In/Out: Supporting IR receiver and IR transmitter allowing receiving and sending remote signals with indirect line of sight.
- USB Host 2 / USB Host 3: For connecting to USB thumb drives or hard-drive storages.
18 LAN port: For internet connection.
19 AC inlet & Fuse compartment: For power cord to connect to household power outlet and installation of fuse.
4. HD-AVA / HD-AVP Remote Control
-
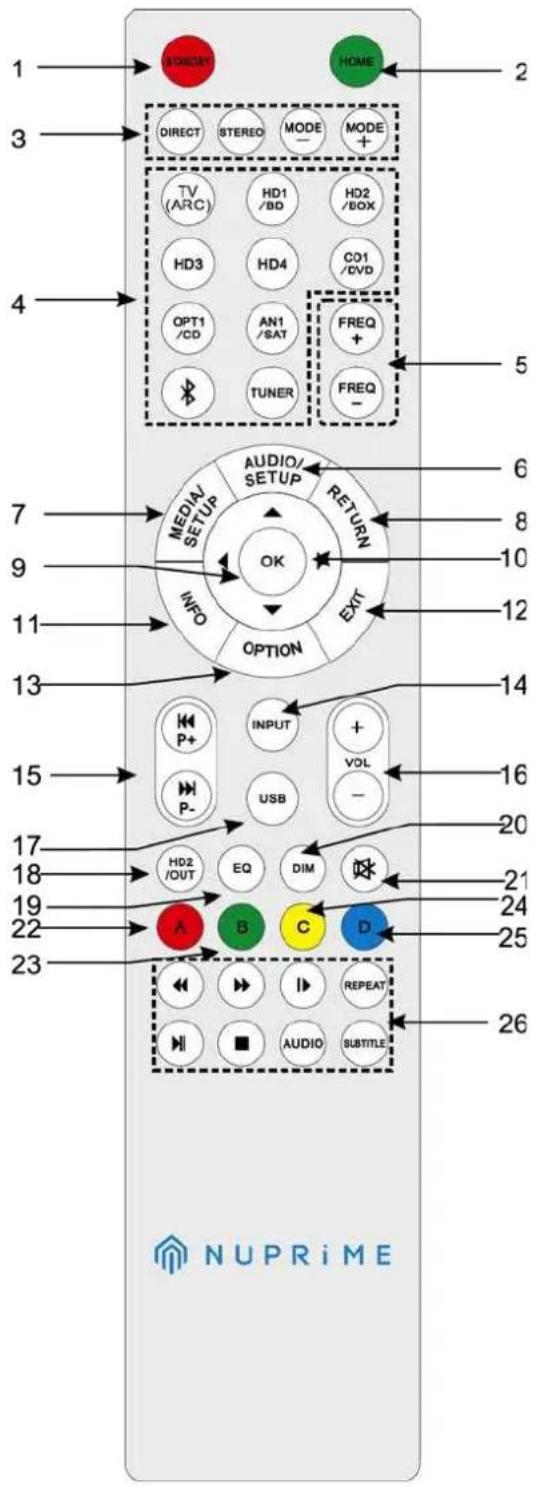
Standby - Turn the unit into Standby mode.
-
Home - Open on screen Player menu
- Mode+/- - Switch between listening
modes
- Input Selection – Direct select input source
- Tuner - Adjust Tuner frequency.
- Audio/Setup – Opens up on screen audio menu
- Media/Setup - Opens up on-screen menu
- Return button – Return to the previous screen on the menu
- OK (Enter button) - Confirm selection on the on-screen menu
- Arrow keys – Move cursor according to the direction on the on-screen menu
- Info - In Player mode, display playback status.
- Exit - Exit from on-screen menu
- Option – In Player mode only. Display the option for current playback status.
- Input - Toggle between inputs
- P+/- - During Player mode, selecting previous or next audio/video track/file. In Tuner mode, selecting preset channels.
- Vol +/- - Volume adjustment.
- USB - Direct access to USB thumb drive and hard-drive storage root menu.
- HD2/Out - Selecting input signal for HDMI 2 Out.
- EQ - Select preset EQ settings.
- DIM - On-screen light adjustment.
- Mute: Mute audio.
- \~ 25. ABCD - N/A. Reserve buttons.
- DVD/BD Player CEC Controller.
5. Input Setup for NuPrime HD-AVA/HD-AVP
NuPrime HD-AVA/AVP input connection consists of three major categories.
5.1. HDMI
5.2. Digital
5.3. Analog
Input Illustration
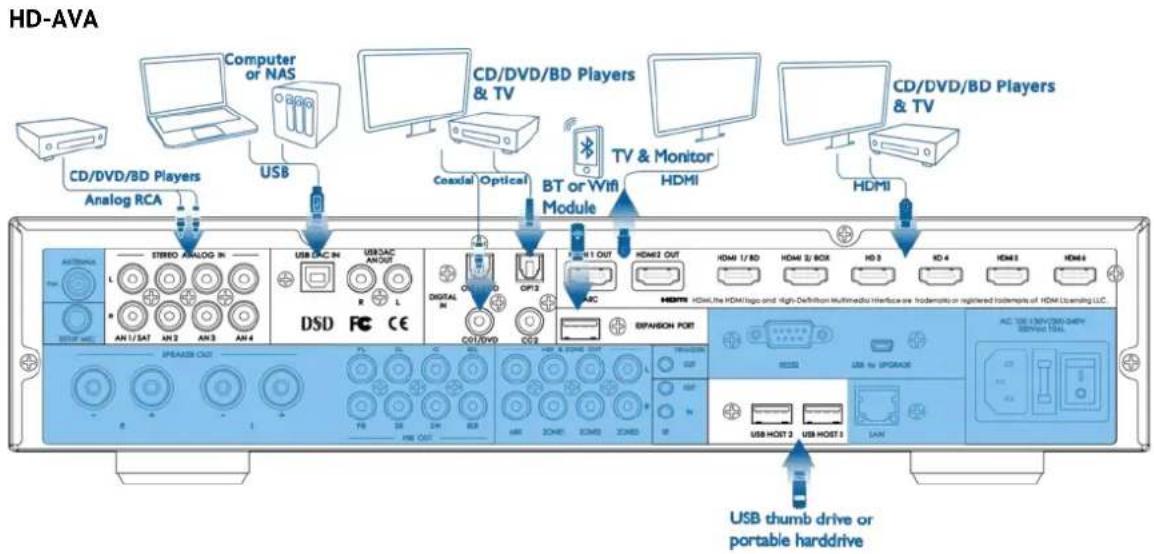
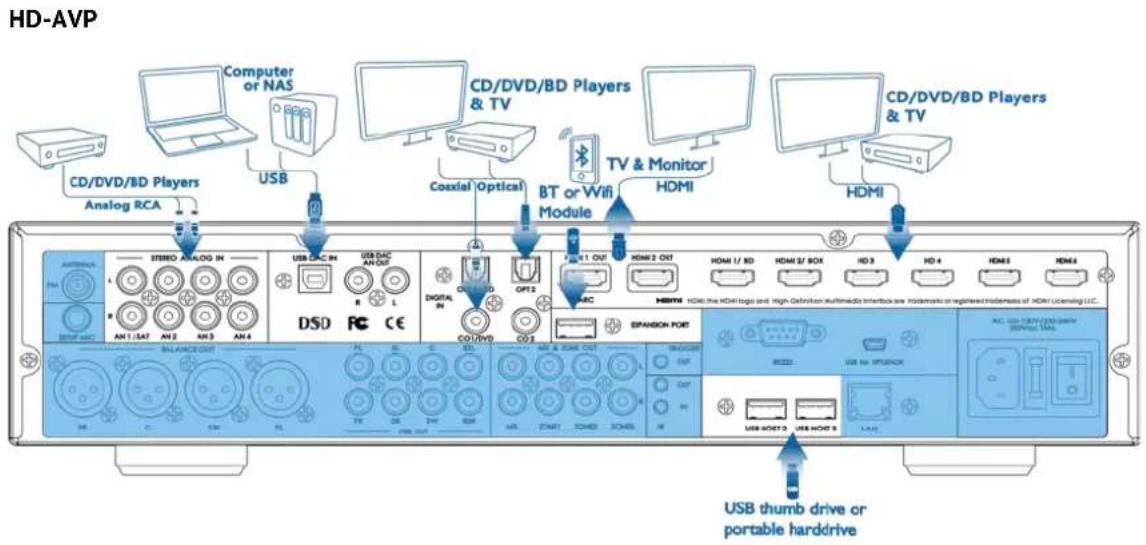
5.1. HDMI connection:
Designed to meet the needs of digital television design, HDMI (High Definition Multimedia Interface) is a new digital interface standard for connecting TVs, projectors, DVD / BD players, set-top boxes and other video devices. With HDMI, a single cable can carry control signals, digital video, and up to eight channels of digital audio signals (including dual-channel PCM, digital audio signals and multi-channel PCM multichannel).
HD-AVA

HD-AVP
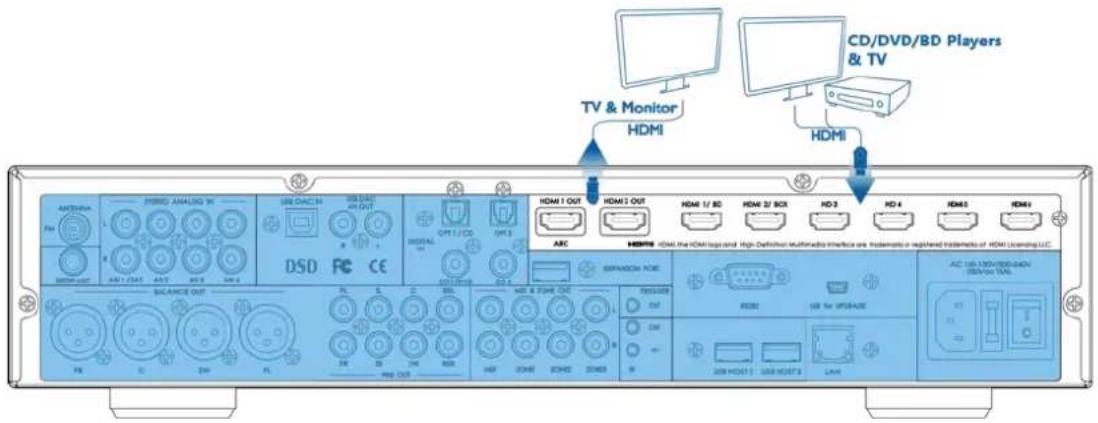
NuPrime HD-AVA/HD-AVP supports wide varieties of HDMI input devices such as DVD/BD players, TVs, musical set top box, game consoles, etc.
| High-Definition Multimedia Interface | Connector Port | Description | |
| HDMI |  | [YBYH] | HDMI is a audio/video interface for transferring uncompressed video data and compressed or uncompressed digital audio data from HDMicompliant source device. |
HDMI Video:
NuPrime HD-AVA/HD-AVP contains two HDMI outputs and six HDMI inputs.
The HDMI supports HDMI 1.4 and 3D video playback.
When Deep Color signals transmission option is enabled, please be sure to use "High Speed HDMI cable" or High speed Ethernet HDMI cable".
If the video input signal does not match the resolution of the monitor, may result no output signal. In this case, please make sure the resolution of the Blu-ray Disc/DVD player is switched to the monitor resolution compatibility.
HDMI Audio:
The digital audio signal received from HDMI inputs is typically connected to HD-AVA multi-channel output.
HDMI interface supports the following audio formats:
- Two-channel linear PCM (32-192 kHz, 16/20/24 bit)
- Multi-channel linear PCM (up to 7.1 channels, 32-192 kHz, 16/20/24 bit)
- Bit stream: DOLBY DIGITAL, DOLBY DIGITAL Plus, DOLBY TrueHD, DTS, DTS-HD High Resolution Audio, DTS-HD Master Audio. Your DVD / BD players must support HDMI output of the above audio formats.
5.1.1. HDMI ARC Function:
ARC Mode: Audio Return Channel (ARC) enables an ARC-enabled TV to send audio data to HD-AVA/AVP without via extra external audio signal connection such as optical or coaxial.
Only HDMI Output 1 supports ARC function.
To setup ARC: Go to Audio Setup (OSD) menu > Setup > Input Config > Input Setup. Under TV option, you can set the Audio option to HDMI ARC to enable ARC function. (See OSD menu setup for detail explanation. See page 38)
5.1.2. HDMI CEC Function:
Consumer Electronics Control (CEC) is a set of commands that utilizes HDMI's two-way communication to allow for single remote control of any CEC-enabled devices connected with HDMI. A CEC command will trigger the necessary commands over HDMI for an entire system to auto-configure itself to respond to the command. When devices that support HDMI Control (CEC) are connected, the following modes of operation can be executed via the HD-AVA/AVP or the external device using any of the device's remote control.
To Setup CEC: Go to Audio Setup (OSD) Menu > Setup > Option > Under HDMI CEC Control. (See OSD menu setup for detail explanation. See page 42)
5.1.3. HDMI Off Through Function:
Enable audio signal remain functional through HDMI outputs even when HD-AVA/AVP is on standby.
To Setup Off Through function: Go to Audio Setup (OSD) Menu > Setup > Option > Under HDMI OFF Through. Default sets to OFF. (See OSD menu setup for detail explanation. See page 42)
5.2. Digital Audio connection:
NuPrime HD-AVA/HD-AVP contains several digital audio inputs.
HD-AVA

HD-AVP

5.2.1. One USB DAC input for computer (support native DSD) or NAS.
5.2.2. Two coaxial and two optical inputs for CD/DVD/BD, TV, and game consoles.
5.2.3. One Expansion port for optional Bluetooth module enables HD-AVA/AVP to support mobile phones and other Bluetooth enable devices.
5.2.4. Three USB Host ports for supporting USB thumb drives or portable hard drive storages.
For HD-AVA/HD-AVP to support Dolby Digital and DTS without HDMI, please use digital inputs (Optical and Coaxial) instead of Analog inputs.
5.2.1. USB DAC Input:
HD-AVA

HD-AVP

HD-AVA/HD-AVP USB DAC supports Windows and Mac IOS as well as NAS system. NuPrime USB DAC supports the latest high-resolution music formats and is capable of decoding sample rates ranging from 44.1kHz to 384kHz (PCM) as well as native DSD decoding ranging from DSD 64 up to DSD 256.

HD-AVA/HD-AVP does not guarantee that all NAS will operate and be compatible due to wide variety of brands and custom specs. It is recommended to connect NAS via LAN network.
To run the NuPrime HD-AVA/HD-AVP on Mac- PCM:
- Power on NuPrime HD-AVA/HD-AVP, select USB input. The device will enumerate as a USB Audio device on your Mac.
- In Audio Midi Setup, select the "NuPrime HD-AVA/NuPrime HD-AVP" device as your default Input and Output device.
- The sample rate of the device can be selected using the drop down menu.
- The audio is also output over SPDIF.
To run the NuPrime HD-AVA/HD-AVP on Mac- DSD:
- Install playback software on MAC.
Ex: Audirvana 15 days free http://audirvana.com/site/?page_id=112 - In Preferences Setup, Audio System selects the "NuPrime HD-AVA/NuPrime HD-AVP" as your Default Device.
- The Native DSD Capability select the "DSD Over PCM standard 1.0"
- SPDIF output is not working on DSD playback.
To run the NuPrime HD-AVA/HD-AVP on Windows - PCM:
- Please visit
www.nuprimeaudio.com and download the latest driver.

- Connect computer to USB DAC and power on NuPrime HD-AVA/NuPrime HD-AVP, select USB DAC input. The device will enumerate as a USB Audio device on your PC.
- Install the latest driver just download via NuPrime website.
- In Control Panel->Sound, select "NuPrime HD-AVA/NuPrime HD-AVP" as your Default Device.
To run the NuPrime HD-AVA/NuPrime HD-AVP on Windows - DSD
Install playback software on Windows
- Install the Foobar media player
http://www.foobar2000.org/getfile/079dd178a05e1c51445e77506daa5dd2/
- Download the 'SACD' plugin
http://sourceforge.net/projects/sacddecoder/files/latest/download
a. To install, in Foobar goto File->Preferences and select Components
b. Click the Install... button
c. Select the zip file
d. Click Apply (foobar will restart)
- Download the ASIO plugin from
http://www.foobar2000.org/components/view/foo_out_asio
a. Install the plugin
b. Click Apply (foobar will restart)
- Configure the Output Device
a. Go to Playback->Output
b. Select the Device: ASIO foo_dsd_asio

- Configure the ASIO output
a. Go to Playback->Output->ASIO, double-click on foo_dsd_asio
b. Select the NuPrime ASIO Driver
c. Select ASIO Native
d. Select PCM to DSD Method: None
e. Select Fs: DSD128
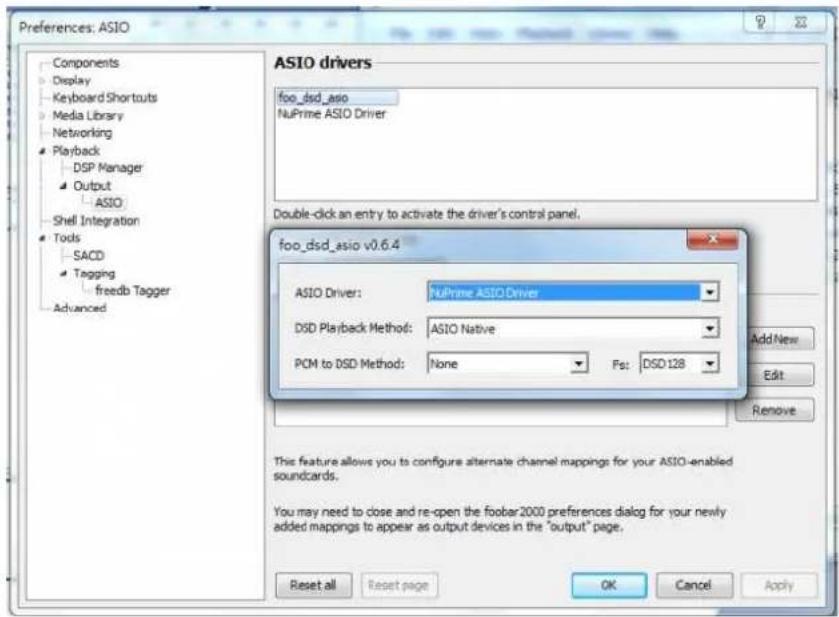
- Configure the SACD plugin to play DSD (and not convert from DSD to PCM)
a. Goto Tools->SACD
b. Set ASIO Driver Mode to DSD
c. Set PCM Sample Rate to 352800

5.2.2. Coaxial and Optical inputs:
HD-AVA

HD-AVP
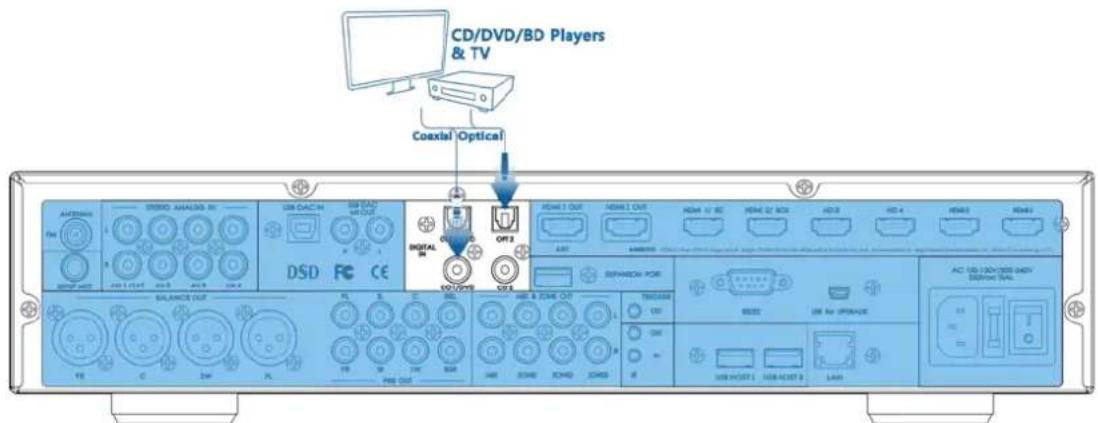
HD-AVA/HD-AVP consists of 2 coaxial and 2 optical inputs to connect to the corresponding optical or coaxial digital output of sources such as CD or BD/DVD players, digital cable box, digital tuners and other applicable components. All available coaxial and digital input can be variably assigned to any of the desired sources.
5.2.3. Expansion port inputs:
HD-AVA
HD-AVP

For wireless convenience, you can connect an optional Bluetooth module and connect your mobile phones and Bluetooth enable devices and stream music to the HD-AVA/HD-AVP.
5.2.4. USB Host inputs:
HD-AVA

HD-AVP

The three USB host connection ports (1 on the front panel and 2 on the rear panel) allow direct access all the media files from the USB thumb drives and portable hard-drive storage.
To access the media files from USB thumb drives and portable hard drive storage.
Go to Home Menu > File Manager > USB to access the root of the storage files.
It is recommended to only connect one portable hard drive storage at one giving time. HD-AVA/AVP does not guarantee that all USB memory devices or portable hard drive storage will operate or receive power. When using a portable USB connection type HDD of the kind to which an AC adapter can be connected to supply power, use the AC adapter.
USB thumb drives can be connected up to 3 drives. USB memory devices will not work via a USB hub.
5.3. Analog Audio connection:
HD-AVA
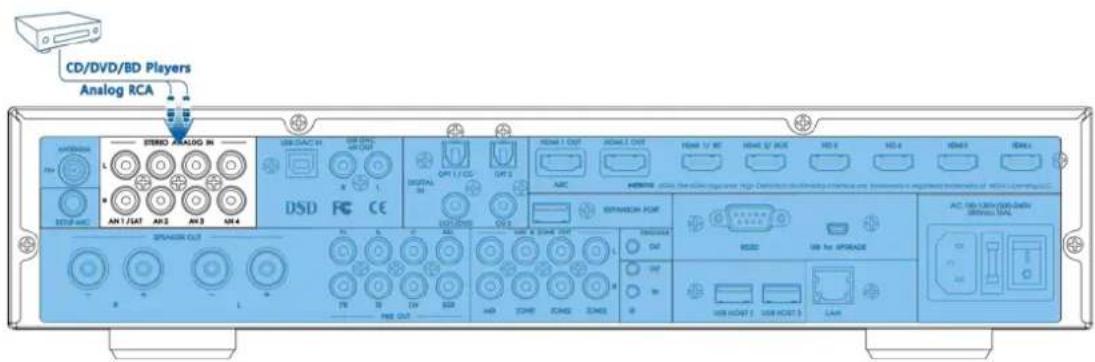
For more traditional sources the HD-AVA/HD-AVP can accept up to 4 set of analog RCA inputs from your CD, DVD or Blu-ray player. All available analog inputs can be variably assigned to any of the desired sources.
6. Output Setup for NuPrime HD-AVA/HD-AVP
NuPrime HD-AVA/HD-AVP output connection consists of three major categories.
6.1. USB DAC Out
6.3. 7.1-CH Out
6.2. Speaker/ XLR Balanced Out
Output Illustration
HD-AVA

HD-AVP

6.1. USB DAC Analog output:
HD-AVA

HD-AVP

Exclusive stereo analog output designed for USB DAC. This output provides 2V RCA Analog output for compatibility with a broad variety of systems such as Mono/Stereo amplifiers. In addition to its native DSD-format decoding capability, this function is ideal for upgrading existing high-end non-DSD DACs.
6.2. Stereo Speaker output/ XLR Balanced output:
HD-AVA
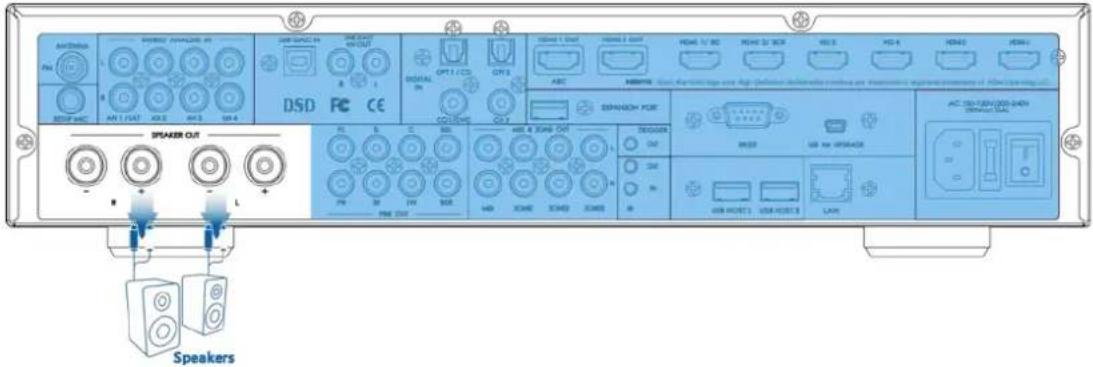
Unique to NuPrime HD-AVA is the build-in NuPrime proprietary Class D amplifier module and PSU capable of supporting stereo speaker outputs.
Speaker Output Spec:
• Power: 2 X 200W at 8 Ohms
• Input Impedance: 23.5k Ohms (To be confirm)
• Gain: 28 dB (To be confirm)
• Signal to Noise Ratio: 110dB at 1W, 10W, 100W (To be confirm)
• Frequency Response: 0Hz to 60kHz (To be confirm)
Connecting the Speaker:
- Unplug all power cords before connecting the speakers
- Follow the instruction manual of the speakers
- Make sure the correct polarity is connected
- Please connect one speaker per connector
- An over-length speaker cable might effects the sound quality
- Short circuiting on the cable might damage the amplifier
- Please make sure the core of the cable is not in contact of the rear panel of the unit
- Connecting multiple cables to one speaker might damage the amplifier
HD-AVP
NuPrime
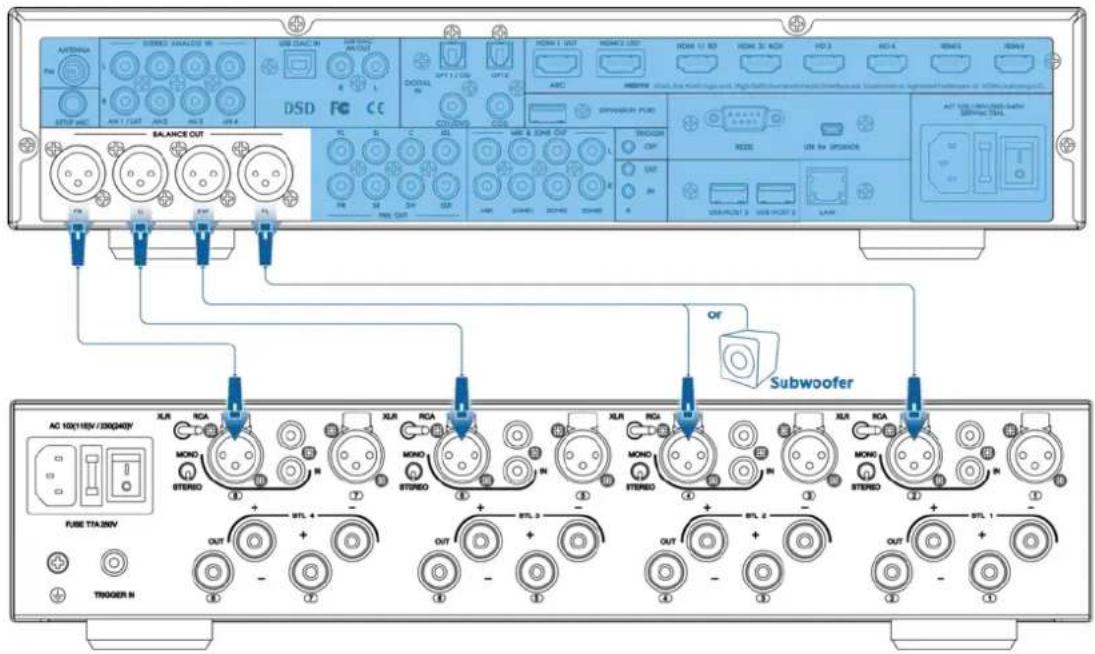
Unique to NuPrime HD-AVP is the XLR Balanced output. The Balanced output supports up to 4 channels or 3 channels with subwoofer.
6.3. 7.1 Pre Out multi-channel output:
HD-AVA
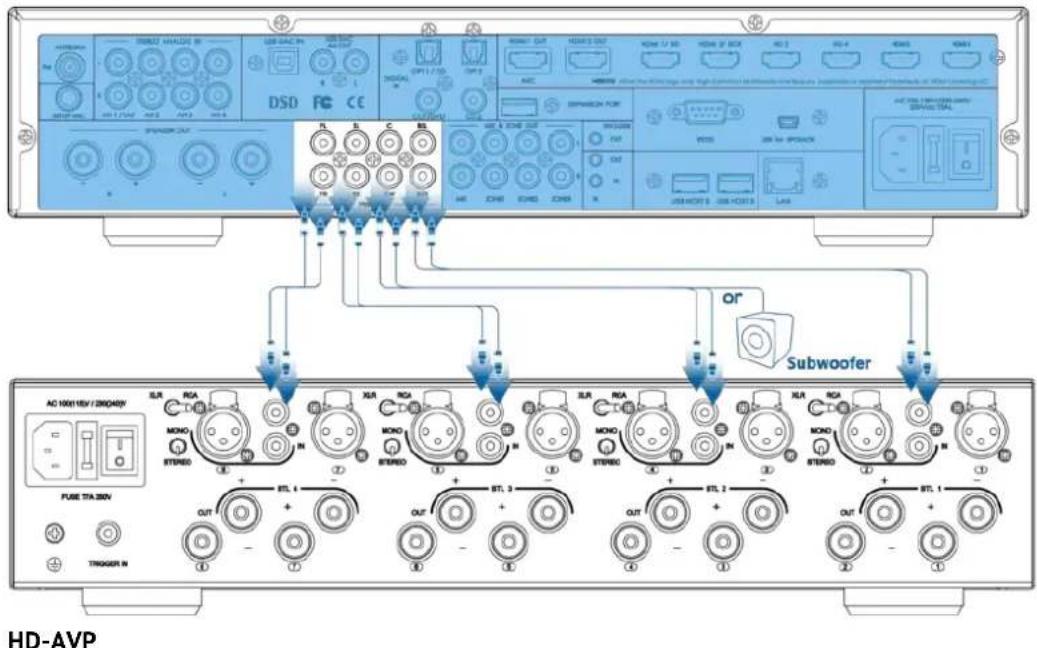

HD-AVA/HD-AVP also supports multi-channel of up to 8 channels with Pre Out function to ensure maximum compatibility and performance. Devices such as NuPrime MCH-K38 with a multi-channel amplifier output can be connected to HD-AVA/AVP Pre Out as shown in illustrations.
FL - Front left
SW - Active Subwoofer or Multichannel
FR - Front right
amplifier RCA input.
LS - Left surround
LBS - Left back surround
RS - Right surround
RBS - Right back surround
C - Center
7. Mix & Zone Setup for NuPrime HD-AVA/HD-AVP
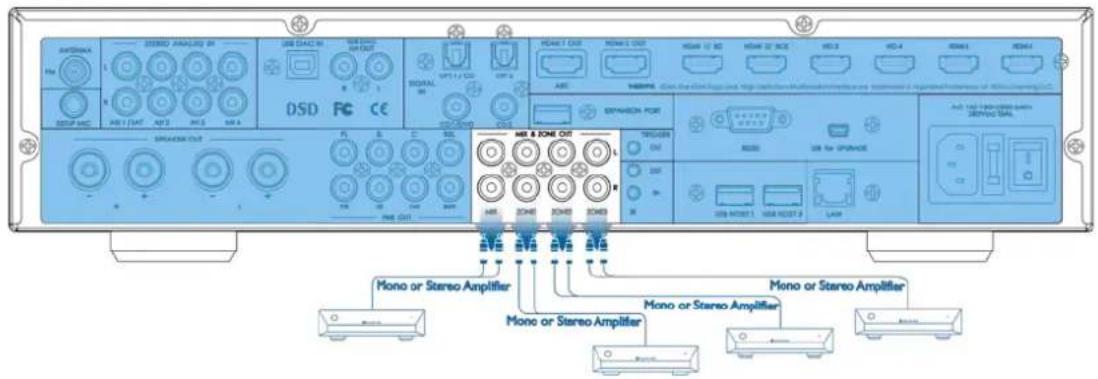
NuPrime HD-AVA Mix & Zone connection consists of two categories.
7.1. Mix
7.2. Zone (Zone 1, Zone 2, Zone 3)
Output Illustration
HD-AVA
HD-AVP
NuPrime

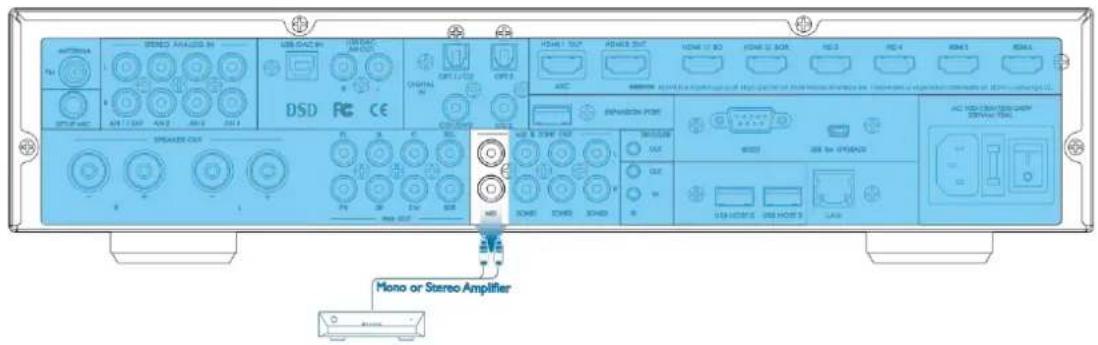
7.1. Mix connection output:
HD-AVA
HD-AVP

Mix Output: Mix output combines all audio signals from all input sources and output all the signals through mix output at the same time. Mix output combines all Left input audio signal and mix before outputting to Mix output Left channel, and vice versa for the right channel. All center and bass input audio signal is evenly distributed to both Mix output left and right channels.
Only one of the Stereo Analog inputs (AN1, AN2, AN3, or AN4) is mixed into Mix
output. They can't all be mixed simultaneously.
7.2. Zone connection output:
HD-AVA

HD-AVP

Zone or multi-room function provides three additional standalone and independent stereo outputs to your main system. Each of these three zones has its independent control, independent input source selection, independent volume control, and each has independent power on switch to activate according to your settings.
To Setup Zone: Go to Audio Setup (OSD) Menu > Zone. (See OSD menu setup for detail explanation. See page 36)
8. To connect NuPrime HD-AVA/HD-AVP to internet
8.1. LAN Connection
8.2. WiFi Connection
8.1. LAN connection:
HD-AVA
NuPrime

HD-AVP

Plug in the RJ-45 Ethernet cable to the LAN port on the back panel of NuPrime HD-AVA/HD-AVP. Once connected, "Ethernet" indicator appears on the top right corner of the main menu. IP address will also change to inner IP address provided by the router. To be able to use Miracast or Airplay, make sure the devices are also connected to the same Local Area Connection.
8.2. WiFi connection:
Connect to internet using Wi-Fi connection on NuPrime HD-AVA/HD-AVP. Please go to Setup on the main menu. Choose Network and select Wi-Fi Connection to search for your desired Wi-Fi signal for connection. To return NuPrime HD-AVA /HD-AVP back to direct mode. Go to Setup, choose Network and select "Return Direct mode". Direct mode setup contents information for NuPrime HD-AVA/HD-AVP internet generator password to prevent others from accessing NuPrime HD-AVA/HD-AVP.
To Setup internet connection: Go to Home Menu > Setup > Network > WiFi connection. (See Home Menu setup for detail explanation. See page 32)
9. Miracast and Airplay connection guide
9.1. Using Miracast: Turn on the Wi-Fi connection on your android device. Searching and connecting to NuPrime HD-AVA/HD-AVP (XXXX) in the search list. To disconnect the Miracast, please open Wi-Fi setting and click on NuPrime HD-AVA/HD-AVP and select "Forget network". Once the IP re-appears on the menu, HD-AVA/HD-AVP is able for reconnection.
9.2. Using Airplay: Turn on the Wi-Fi connection on your Apple device. Searching and connecting to NuPrime HD-AVA/HD-AVP (XXXX) in the search list. To disconnect the Airplay, please open Wi-Fi setting and click on NuPrime HD-AVA/HD-AVP and select "Forget network". Once the IP re-appears on the menu, HD-AVA/HD-AVP is able for reconnection.
The Wi-Fi signals for above connections are generated by HD-AVA/HD-AVP, no internet connection is required.
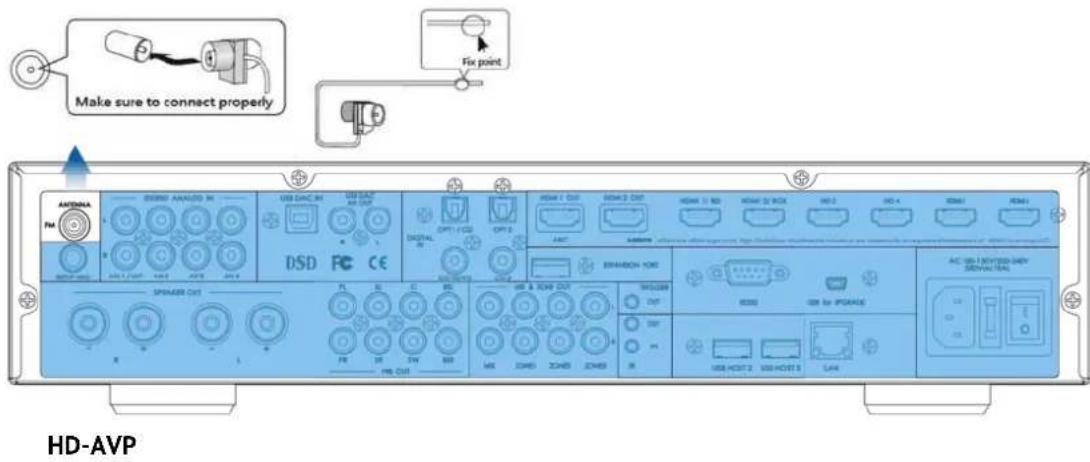
10. Antenna Installation guide for Tuner
HD-AVA
NuPrime

To install FM antenna for NuPrime HD-AVA/HD-AVP, please make sure the provided antenna cable is properly connected to the antenna port on the back panel. Once the cable is properly connected, please turn on the Tuner on the NuPrime HD-AVA/HD-AVP and select a desired channel. Adjust the cable to acquire the best reception and fix the cable with tape or thumbtack to keep the signal reception stable.
- Speaker Setup - Positioning Your Speakers

Setup for Room Equalization:
The intelligent acoustic room scanning involves a testing Mic. It can automatically test the number of connected speakers, the optimal inflection point frequency and the distance between speakers and the audience. Through capturing noise in the room, it will adjust frequency and time thresholds to solve distortion problem caused by noise. The scanning system can also automatically set the EQ. The equalizer with 11 segments can maintain the balance within octave. Before doing the acoustic scanning, please make sure all speakers are connected.
Connecting the testing mic:
- Connect the test mic included in the package to the SETUP MIC jack on the rear panel before scanning. Place the mic in the main listening position and parallel with the listener's ear when sitting down. Make sure the mic is standing up straight with the sensor pointing up. In order to ensure the accuracy of the testing, please do not hold or touch the mic while doing the acoustic scanning.
- Please enter the on-screen menu and go to Setup.
- Select the option Auto Room EQ.
- Follow the on screen instructions to complete the testing process.
(See OSD menu Auto Room /EQ setup for detail explanation. See page 41)
12. Home Menu
Press the home button on the remote control will bring NuPrime HD-AVA/HD-AVP to Player home menu.

-
Unit name + 4 random numbers. This ensures each unit has a unique name during the Wi-Fi connection.
-
NuPrime HD-AVA/AVP IP address indicator. When in Direct Mode HD-AVA/AVP generates internally a fixed IP address: 192.168.59.254. During internet connection, Local Area Network generates an IP address for HD-AVA/AVP.
-
Display NuPrime HD-AVA/AVP PIN Code.
-
File management: NuPrime HD-AVA/AVP has three USB Host connection ports to accept USB thumb drive and hard-drive storage. File management allows NuPrime HD-AVA/AVP to access those storages and also to access network storages and play the files within.
-
Source Input: Opens up output/input selection menu allowing HDMI outputs to select between input signals.
-
Audio setup: Opens up NuPrime HD-AVA/AVP OSD setup menu.
-
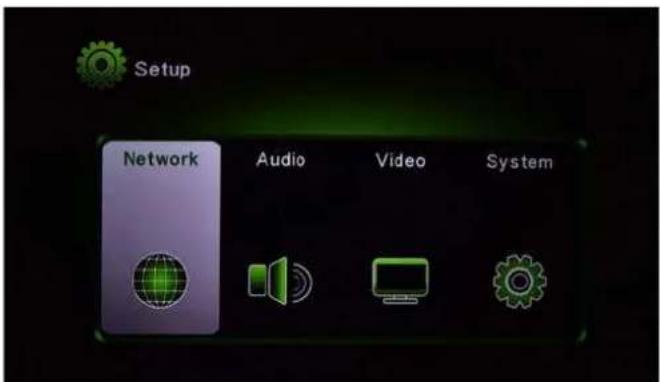
Setup:
12.1. Network
12.2. Audio
12.3. Video
12.4. System
See next page for detail setup information
12.1. Network setup:
- Wired (LAN) connection setup: For internet connection via LAN; IP and DNS configuration.
- Device Name setup: Allowing to change Device Name (Default: HD-AVA/AVP).
- Wi-Fi Connection: For Wireless connection setting. Connecting to internet via Wi-Fi Network.
- Direct mode setting: Internal Wi-Fi generator setup (password and safety information.)
- Network information: Display internet connection information.
- Return Direct connection mode: Return HD-AVA/AVP to internal Wi-Fi connection.
12.2. Audio Setup:
Opens up NuPrime HD-AVA/AVP OSD setup menu.
12.3. Video Setup:
- Aspect Ratio: Display resolution setting
- Enable/Disable video output scaled down to 90%.
- Enable/Disable Deep color.
12.4. System setup:
- Language: Selecting preferable language.
- Font code: Selecting display font code format.
- Factory Default: Return all settings to factory default setup.
- Version info: Display version information.
- USB upgrade: Upgrading Player Firmware via USB connection.
- MCU Upgrade: Upgrading MCU Firmware via USB connection.
13. NuPrime HD-AVA/HD-AVP OSD setup
| Input | Mode | Parameter | Zone | Setup |
13.1.Input 13.4.Zone
13.2. Mode 13.5. Setup
13.3. Parameter
13.1. Input: Display all input selection and its set audio option.
To setup input options, please go to OSD Menu > Setup > Input Config > Input Setup. (Please check here for detail setup, page 38)
| Mode | Parameter | Zone | Setup | |
| Tuner | Preset: | 01 98.00MHz | ||
| TV | Audio: | HDMI ARC | ||
| PLAYER | Audio: | PLAYER | ||
| HD1/BD | Audio: | HDMI 1 | ||
| HD2/BOX | Audio: | HDMI 2 | ||
| HD3 | Audio: | HDMI 3 | ||
| HD4 | Audio: | HDMI 4 | ||
| HD5 | Audio: | HDMI 5 | ||
| HD6 | Audio: | HDMI 6 | ||
| CO1/DVD | Audio: | Coaxial 1 | ||
| CO2 | Audio: | Coaxial 2 | ||
| OPT1/CD | Audio: | Optical 1 | ||
| OPT2 | Audio: | Optical 2 | ||
| AN1/SAT | Audio: | Analog 1 | ||
| AN2 | Audio: | Analog 2 | ||
| AN3 | Audio: | Analog 3 | ||
| AN4 | Audio: | Analog 4 | ||
| USB DAC | Audio: | USB DAC | ||
| Bluetooth | Remote Device: | No Remote Device | ||
| ^Move Cursor | [ENTER] Select | [RETURN] Return | ||
13.2. Mode: Listening mode selection. (Pure Direct, Pure Audio, All Stereo, PLIIx, Neo:6, Direct.)
| Input | Mode | Parameter | Zone | Setup |
| Pure Direct | ||||
| Pure Audio | ||||
| All Stereo | ||||
| PLIIx | ||||
| NEO:6 | ||||
| Direct | ||||
| ^Move Cursor | [ENTER] Select | [RETURN] Return | ||
13.3. Parameter: Speaker parameter setting. Adjustment of 0.5dB increments, parameter ranging from -10dB to +10dB.
| Input | Mode | Parameter | Zone | Setup |
| Front Left | 00.0 dB | |||
| Center | 00.0 dB | |||
| Front Right | 00.0 dB | |||
| Left Surround | 00.0 dB | |||
| Right Surround | 00.0 dB | |||
| Back Surround Left | 00.0 dB | |||
| Back Surround Right | 00.0 dB | |||
| SubWoofer | 00.0 dB | |||
| Midnight | Off | |||
| Center Width | 00 | |||
| Center Dimension | 00 | |||
| Move Cursor | [ENTER] Select | [RETURN] Return | ||
13.4. Zone: Multi-room setting. (Three set of room settings. Each Zone has independent power setting, volume adjustment, and input selection)
A. Zone Power: Enable / Disable the multi-room function. Each Zone can be enabled or disabled independently.
B. Zone Volume: Volume setting. Each Zone can set a desired independent volume.
C. Zone Source: Input selection. The signal source can be set to one of the following: Sync by Main, FM Tuner, Analog inputs (AN1, AN2, AN3, & AN4).
| Input | Mode | Parameter | Zone | Setup |
| Zone 1 | Zone Power | Off | ||
| Zone 2 | Zone Volume | 40 | ||
| Zone 3 | Zone Source | Sync by Main | ||
| FM 87.00MHz | ||||
| AN1 / SAT | ||||
| AN2 | ||||
| AN3 | ||||
| AN4 | ||||
| Move Cursor | [ENTER] Select | [RETURN] Return | ||
13.5. Setup: System setting menu. This is all major configurations can be set here.
13.5.1. Input Config
13.5.5. Option
13.5.2. Mode Setup
13.5.6. Language
13.5.3. Speaker Setup
13.5.7. Load Default
13.5.4. AutoRoom/EQ
13.5.8. Version
| Input | Mode | Parameter | Zone | Setup |
| Input Config | ||||
| Mode Setup | ||||
| Speaker Setup | ||||
| Auto Room / EQ | ||||
| Option | ||||
| Language | ||||
| Load Default | ||||
| Version | ||||
| Move Cursor | [ENTER] Select | [RETURN] Return | ||
13.5.1. Input Config:
a. Input Setup
b. Trigger Mode
| Input | Mode | Parameter | Zone | Setup |
| Input Config | Input Setup | |||
| Mode Setup | Trigger Mode | Always On | ||
a. Input setup: Various settings for all Input selections:
| Input | Mode | Parameter | Zone | Setup |
| TV | Enable | ON | ||
| Player | Video | Player | ||
| HD1 / BD | Audio | HDMI ARC | ||
| HD2 / Box | Rename | TV | ||
| HD3 | Lip Sync | 0 mS | ||
| HD4 | Input Level | 00 dB | ||
| HD5 | Trigger | ON | ||
| HD6 | Independent Vol | OFF |
-
Enable: Turn on/off the input selection. Only the input selections that are not hotkey to the remote control can be turn off.
-
Video: Select the video signal for the Input.
-
Audio: Select the audio signal for the Input.
-
Rename: Rename the Input selection to your desired name.
-
Lip sync: Matching the audio with video. Sync time adjustment range 0 \~ 999 mS.
-
Input Level: Audio level: adjustment range -10dB \~ + 10dB.
-
Trigger: Enable/disable trigger function. When set to ON, if the Input is selected, 12V/120mA is given and sent to turn on the unit that is connected to Trigger out on the rear panel.
-
Independent Vol.: Enable the selected input to have independent volume setting. Set to off by default.
b. Trigger mode: Set the condition for trigger out: Always off, Always on, Input Selection, Zone 1/2/3 Power on.
13.5.2. Mode Setup: Listening mode configuration. Each listening mode can also be configured.
| Input | Mode | Parameter | Zone | Step |
| Analog 2 CH | Last used | Music | ||
| PCM | Pure Direct | Movie | ||
| Multi PCM | Pure Audio | |||
| Dolby D 2/0 | PLIIx | |||
| Dolby D | NEO:6 | |||
| Dolby D EX | Direct | |||
| Dolby D+ | All Stereo | |||
| Dolby HD | ||||
| DTS 2/0 | ||||
| DTS | ||||
| DTS-ES | ||||
| DTS-HD | ||||
| Move Cursor | [ENTER] Select | [RETURN] Return | ||
| Analog 2CH | PureDirect, PureAudio, PLIIx, NEO:6, All Stereo |
| PCM | |
| Multi PCM | Pure Direct, PureAudio, PLIIx, All Stereo |
| DOLBY 2/0 | PureDirect, PureAudio, PLIIx, NEO:6, Direct, All Stereo |
| DOLBY D | PureDirect, PureAudio, PLIIx, Direct, All Stereo |
| DOLBY EX | PureDirect, PureAudio, Direct, All Stereo |
| DOLBY HD | PureDirect, PureAudio, PLIIx, Direct, All Stereo |
| DOLBY D+ | |
| DTS 2/0 | PureDirect, PureAudio, PLIIx, NEO:6, Direct, All Stereo |
| DTS | PureDirect, PureAudio, PLIIx, Direct, All Stereo |
| DTS ES | PureDirect, PureAudio, Direct, All Stereo |
| DTS HD | PureDirect, PureAudio, PLIIx, Direct, All Stereo |
13.5.3. Speaker Setup: Speaker configuration.
a. Size/Crossover: To configure the speaker size Large (Main speaker) or Small (Surround speaker) and crossover frequency manually. Auto Room / EQ can be used for automatic smart room equalization.
b. Noise Test: To configure speaker soundstage level. Auto Room / EQ can be used for automatic smart room equalization
c. Speaker Distance: To configure the speaker distance manually. Auto Room / EQ can be used for automatic smart room equalization.
d. LFE Level: Low Frequency Equalization configuration for subwoofer.
e. Speaker Mode Select: Selecting the best suited speaker mode.
- Bi-amp
- Dual-amp
- Standard Speaker
| Input | Mode | Parameter | Zone | Setup |
| Input Config | Size / Crossover | |||
| Mode Setup | Noise Test | |||
| Speaker Setup | Speaker Distance | |||
| Auto Room / EQ | LFE Level | |||
| Option | Speaker Modes Select | |||
13.5.4. Auto Room/EQ:
a. Auto Room: Connecting to microphone for smart room equalization
b. Manual EQ1/2/3: 3 sets of EQ presets that can be selected using with remote control.
c. Auto EQ: System presets automatically.
d. EQ Select: EQ selection.
| Input | Mode | Parameter | Zone | Setup |
| Input Config | Auto Room | |||
| Mode Setup | Manual EQ 1 | Adjust | ||
| Speaker Setup | Manual EQ 2 | Adjust | ||
| Auto Room / IQ | Manual EQ 3 | Adjust | ||
| Option | Auto EQ | Adjust | ||
| Language | EQ Select | Manual 1 | ||
| Load Default | Manual 2 | |||
| Version | Manual 3 | |||
| Auto EQ | ||||
| EQ Off | ||||
| Move Cursor | [ENTER] Select | [RETURN] Return | ||
13.5.5. Option:
a. OSD Depth: Adjust the visibility of the OSD menu.
b. OSD Popup: Enable or disable the pop up notification on the bottom screen when signal is changed.
c. HDMI CEC Control: Enable or disable CEC function. CEC enables using NuPrime Remote control to control DVD/BD players.
d. HDMI Audio Out: Enable or disable audio signal out from HDMI outputs.
e. HDMI Off Through: Enable or disable audio signal remain functional through HDMI outputs even when HD-AVA is on standby.
f. Volume Mode: Selecting volume mode.
| Input | Mode | Parameter | Zone | Setup |
| Input Config | OSD Depth | 10 | ||
| Mode Setup | OSD Pop up | All Operational | ||
| Speaker Setup | HDMI CEC Control | Off | ||
| Auto Room / EQ | HDMI Audio Out | Amplifier | ||
| Option | HDMI OFF Through | Off | ||
| Language | Volume Mode | True Gain | ||
13.5.6. Language: Selecting OSD Menu display language.
| Input | Mode | Parameter | Zone | Setup |
| Input Config | English | |||
| Mode Setup | 中文 | |||
| Speaker Setup | ||||
| Auto Room / EQ | ||||
| Option | ||||
| Language | ||||
| Load Default | ||||
| Version | ||||
| ^^Move Cursor | [ENTER] Select | [RETURN] Return | ||
13.5.7. Load Default: Return to factory default.
Load and restore all settings to factory default setting.
13.5.8. Version: Display Main CPU version.
| Input | Mode | Parameter | Zone | Setup |
| Input Config | Main CPU: | V2.5 | ||
| Mode Setup | Bluetooth Module | No Module | ||
| Speaker Setup | ||||
| Auto Room / EQ | TV : DVI | ADI ADV762X | ||
| Option | ||||
| Language | ||||
| Load Default | ||||
| Version | ||||
| ^Move Cursor | [ENTER] Select | [RETURN] Return | ||
14. Specification and Features
Specification:
14.1. Inputs:
1 x USB PCM / DSD Digital (PCM up to 384KHz & DSD UP TO DSD256)
6 x HDMI V1.4
2 x Coaxial Digital S/PDIF
2 x Optical Digital S/PDIF
1 x Bluetooth Receiver (optional) input
3 x USB host ports for storage drivers.
4 x Analog Stereo RCA
1 x Antenna for FM/AM
14.2. Outputs:
1 x USB DAC Analog Out (Stereo)
2 x HDMI Out
7.1 x Analog RCA output
1 x Mix output
3 x Stereo Zone output
1 x Stereo Speaker output ( HD-AVA)
or
4 x XLR Balanced output (HD-AVP)
Features:
- Miracast for mobile phone and tablet, wireless transmitting audio and video.
- Dedicated microphone for setting environmental sound field.
- Extended IR receiver for remote control
- Remote control shortcut keys for “stereo mode”, "VFD monitor on/off", "retain TV display"
- FM/AM radio
- Standard 2U Chassis height
- DIM function
- Trigger Out for connecting to power amplifiers
NuPrime's Limited Warranty and Limitation of Liabilities
ADDITIONAL RIGHTS
FOR CONSUMERS, WHO ARE COVERED BY CONSUMER PROTECTION LAWS OR REGULATIONS IN THEIR COUNTRY OF PURCHASE OR, IF DIFFERENT, THEIR COUNTRY OF RESIDENCE, THE BENEFITS CONFERRED BY THIS WARRANTY ARE IN ADDITION TO ALL RIGHTS AND REMEDIES CONVEYED BY SUCH CONSUMER PROTECTION LAWS AND REGULATIONS. THIS WARRANTY DOES NOT EXCLUDE, LIMIT OR SUSPEND ANY RIGHTS OF CONSUMERS ARISING OUT OF NONCONFORMITY WITH A SALES CONTRACT. SOME COUNTRIES, STATES AND PROVINCES DO NOT ALLOW THE EXCLUSION OR LIMITATION OF INCIDENTAL OR CONSEQUENTIAL DAMAGES OR ALLOW LIMITATIONS ON HOW LONG AN IMPLIED WARRANTY OR CONDITION MAY LAST, SO THE LIMITATIONS OR EXCLUSIONS DESCRIBED BELOW MAY NOT APPLY TO YOU. THIS WARRANTY GIVES YOU SPECIFIC LEGAL RIGHTS, AND YOU MAY ALSO HAVE OTHER RIGHTS THAT VARY BY COUNTRY, STATE OR PROVINCE. THIS LIMITED WARRANTY IS GOVERNED BY AND CONSTRUED UNDER THE LAWS OF THE COUNTRY IN WHICH THE PRODUCT PURCHASE TOOK PLACE.
LIMITED WARRANTY
For a period of ONE (1) YEAR from the date of retail purchase by the original end-user purchaser (“Warranty Period”), NuPrime warrants (in) this product against defects in materials and workmanship, and (ii) that each Product, unmodified and under normal use and conditions, will substantially comply with NuPrime’ applicable written technical documentation for the Product. NuPrime reserves the right to make substitutions and modifications from time to time in the specifications of Products sold by NuPrime, provided that such substitutions or modifications do not materially affect overall Product performance.
If a hardware defect exists and a valid claim is received within the Warranty Period, at its option and to the extent permitted by law, NuPrime will (1) repair the hardware defect at no charge, using new or refurbished replacement parts, (2) exchange the product with a product that is new or which has been manufactured from new or serviceable used parts and is at least functionally equivalent to the original product, or (3) refund the purchase price of the product. NuPrime may request that you replace defective parts with user-installable new or refurbished parts that NuPrime provides in fulfillment of its warranty obligation. A replacement product/part assumes the remaining warranty of the original product or ninety (90) days from the date of replacement or repair, whichever provides longer coverage for you. When a product or part is exchanged, any replacement item becomes your property and the replaced item becomes NuPrime's property. When a refund is given, your product becomes NuPrime's property.
OBTAINING WARRANTY SERVICE
If you purchased the product in the U.S., deliver the product, at your expense, to any NuPrime Service Center located in the U.S. If you purchased the product outside of the U.S., deliver the product to any NuPrime Authorized Importer in the country where you purchased the product. Be aware, however, that not all countries have NuPrime Authorized Service Providers ('NASP') and not all Authorized Service Providers outside the country of purchase have all parts or replacement units for the product. If the product cannot be repaired or replaced in the country it is in, it may need to be sent to a different country or returned to the country of purchase at your expense for repair or replacement. If you seek service in a country that is not the country of original purchase, you will comply with all applicable import and export laws and regulations and be responsible for all custom duties, V.A.T. and other associated taxes and charges. Where international service is available, NuPrime may repair or exchange defective products and parts with comparable products and parts that comply with local standards.
You can always deliver the product to NuPrime's U.S. main service center for obtaining warranty service, however, you may have to pay for return shipping cost.
NuPrime may send you user-installable new or refurbished replacement product or parts to enable you to service or exchange your own product ("DIY Service"). Upon receipt of the replacement product or part, the original product or part becomes the property of NuPrime and you agree to follow instructions, including, if required, arranging the return of original product or part to NuPrime in a timely manner.
When providing DIY Service requiring the return of the original product or part, NuPrime may require a credit card authorization as security for the retail price of the replacement product or part and applicable shipping costs. If you follow instructions, NuPrime will cancel the credit card authorization, so you will not be charged for the product or part and shipping costs. If you fail to return the replaced product or part as instructed or the replaced product or part is not eligible for warranty service, NuPrime will charge the credit card for the authorized amount.
EXCLUSIONS AND LIMITATIONS
This Limited Warranty applies only to hardware products manufactured by or for NuPrime that can be identified by the "NuPrime" trademark, trade name, or logo affixed to them. The Limited Warranty does not apply to any non-NuPrime hardware products or any accessories, even if packaged or sold with NuPrime hardware. Non-NuPrime manufacturers, suppliers, may provide their own warranties. Other accessories distributed by NuPrime under the NuPrime brand name are not covered under this Limited Warranty. This warranty does not apply: (a) to damage caused by accident, abuse, misuse, misapplication, liquid contact, fire, earthquake, non-NuPrime products, or other external causes; (b) to damage caused by service performed by anyone who is not a NASP; (c) to a product or a part that has been modified without the written permission of NuPrime; (d) to consumable parts, such as batteries, or protective coatings designed to diminish over time unless failure has occurred due to a defect in materials or workmanship; (e) to cosmetic damage, including but not limited to scratches, dents, and broken plastic on ports; (f) to defects caused by normal wear and tear or otherwise due to the normal aging of the product; or (g) if any NuPrime serial number has been removed or defaced.
Important: Do not open the hardware product. Opening the hardware product may cause damage that is not covered by this warranty. Only NuPrime or a NASP should perform service on this hardware product.
THIS WARRANTY AND REMEDIES SET FORTH ABOVE ARE EXCLUSIVE AND IN LIEU OF ALL OTHER WARRANTIES, REMEDIES AND CONDITIONS, WHETHER ORAL OR WRITTEN, EXPRESS OR IMPLIED. NUPRIME SPECIFICALLY DISCLAIMS ANY AND ALL IMPLIED WARRANTIES, INCLUDING, WITHOUT LIMITATION, WARRANTIES OF MERCHANTABILITY AND FITNESS FOR A PARTICULAR PURPOSE. IF NUPRIME CANNOT LAWFULLY DISCLAIM IMPLIED WARRANTIES UNDER THIS LIMITED WARRANTY, ALL SUCH WARRANTIES, INCLUDING WARRANTIES OF MERCHANTABILITY AND FITNESS FOR A PARTICULAR PURPOSE ARE LIMITED IN DURATION TO THE DURATION OF THIS WARRANTY. No NuPrime reseller, agent, or employee is authorized to make any modification, extension, or addition to this warranty.
NUPRIME IS NOT RESPONSIBLE FOR DIRECT, SPECIAL, INCIDENTAL OR CONSEQUENTIAL DAMAGES RESULTING FROM ANY BREACH OF WARRANTY OR CONDITION, OR UNDER ANY OTHER LEGAL THEORY, INCLUDING BUT NOT LIMITED TO LOST PROFITS, DOWNTIME, GOODWILL, DAMAGE TO OR REPLACEMENT OF EQUIPMENT AND PROPERTY, ANY COSTS OF RECOVERING, REPROGRAMMING, OR REPRODUCING ANY PROGRAM OR DATA STORED IN OR USED WITH NUPRIME PRODUCTS, AND ANY FAILURE TO MAINTAIN THE CONFIDENTIALITY OF DATA STORED ON THE PRODUCT. NUPRIME SPECIFICALLY DOES NOT REPRESENT THAT IT WILL BE ABLE TO REPAIR ANY PRODUCT UNDER THIS WARRANTY OR MAKE A PRODUCT EXCHANGE WITHOUT RISK TO OR LOSS OF PROGRAMS OR DATA.
Some states and provinces do not allow the exclusion or limitation of incidental or consequential damages or exclusions or limitations on the duration of implied warranties or conditions, so the above limitations or exclusions may not apply to you. This warranty gives you specific legal rights, and you may also have other rights that vary by state or province.
Proof of purchase in the form of a bill of sale or receipted invoice which is evidence that the unit is within the Warranty period must be presented to obtain warranty service.
REPLACEMENT AS PROVIDED UNDER THIS WARRANTY IS THE EXCLUSIVE REMEDY OF THE CONSUMER. NUPRIME SHALL NOT BE LIABLE FOR ANY INCIDENTAL OR CONSEQUENTIAL DAMAGES FOR BREACH OF ANY EXPRESS OR IMPLIED WARRANTY ON THIS PRODUCT. EXCEPT TO THE EXTENT PROHIBITED BY APPLICABLE LAW, ANY IMPLIED WARRANTY OF MERCHANTABILITY OR FITNESS FOR A PARTICULAR PURPOSE ON THIS PRODUCT IS LIMITED IN DURATION TO THE DURATION OF THIS WARRANTY.
- FCC NOTICE - DECLARATION OF CONFORMITY INFORMATION
- EU DECLARATION OF CONFORMITY
- FOR CUSTOMERS IN EUROPE
- SAFETY INSTRUCTIONS
- SAFE USE AND OPERATION OF YOUR DEVICE
- WARNING: USE ONLY GROUNDED AC POWER CORDS
- NUPRIME
- TABLE OF CONTENTS
- NUPRIME HD-AVA/HD-AVP OUTPUT SETUP 21
- NUPRIME HD-AVA/HD-AVP MIX & ZONE SETUP....25
- NUPRIME HD-AVA/HD-AVP INTERNET SETUP....27
- MIRACAST & AIRPLAY CONNECTION GUIDE ....28
- ANTENNA INSTALLATION GUIDE FOR TUNER ......29
- SPEAKER SETUP – POSITIONING THE SPEAKERS....30
- HOME MENU SETUP ....31
- OSD MENU SETUP....33
- SPECIFICATION & FEATURES......45
- INTRODUCTION
- AUDIO FEATURES
- VIDEO FEATURES
- FRONT PANEL OVERVIEW
- ON-SCREEN DISPLAY
- REAR PANEL OVERVIEW
- HD-AVA / HD-AVP REMOTE CONTROL
- INPUT SETUP FOR NUPRIME HD-AVA/HD-AVP
- HDMI CONNECTION
- HDMI VIDEO
- HDMI AUDIO
- HDMI ARC FUNCTION
- HDMI CEC FUNCTION
- HDMI OFF THROUGH FUNCTION
- DIGITAL AUDIO CONNECTION
- USB DAC INPUT
- TO RUN THE NUPRIME HD-AVA/HD-AVP ON MAC- PCM
- TO RUN THE NUPRIME HD-AVA/HD-AVP ON WINDOWS - PCM
- TO RUN THE NUPRIME HD-AVA/NUPRIME HD-AVP ON WINDOWS - DSD
- COAXIAL AND OPTICAL INPUTS
- EXPANSION PORT INPUTS
- USB HOST INPUTS
- ANALOG AUDIO CONNECTION
- OUTPUT SETUP FOR NUPRIME HD-AVA/HD-AVP
- OUTPUT ILLUSTRATION
- HD-AVA
- USB DAC ANALOG OUTPUT
- STEREO SPEAKER OUTPUT/ XLR BALANCED OUTPUT
- SPEAKER OUTPUT SPEC
- 7.1 PRE OUT MULTI-CHANNEL OUTPUT
- MIX & ZONE SETUP FOR NUPRIME HD-AVA/HD-AVP
- MIX CONNECTION OUTPUT
- HD-AVP
- ZONE CONNECTION OUTPUT
- TO CONNECT NUPRIME HD-AVA/HD-AVP TO INTERNET
- WIFI CONNECTION
- MIRACAST AND AIRPLAY CONNECTION GUIDE
- ANTENNA INSTALLATION GUIDE FOR TUNER
- CONNECTING THE TESTING MIC
- HOME MENU
- NETWORK SETUP
- AUDIO SETUP
- VIDEO SETUP
- SYSTEM SETUP
- NUPRIME HD-AVA/HD-AVP OSD SETUP
- INPUT: DISPLAY ALL INPUT SELECTION AND ITS SET AUDIO OPTION
- INPUT CONFIG
- MODE SETUP: LISTENING MODE CONFIGURATION. EACH LISTENING MODE CAN ALSO BE CONFIGURED
- SPEAKER SETUP: SPEAKER CONFIGURATION
- AUTO ROOM/EQ
- OPTION
- LANGUAGE: SELECTING OSD MENU DISPLAY LANGUAGE
- LOAD DEFAULT: RETURN TO FACTORY DEFAULT
- SPECIFICATION AND FEATURES
- SPECIFICATION
- INPUTS
- OUTPUTS
- FEATURES
- NUPRIME'S LIMITED WARRANTY AND LIMITATION OF LIABILITIES
- ADDITIONAL RIGHTS
- LIMITED WARRANTY
- OBTAINING WARRANTY SERVICE
Brand : NuPrime
Model : HD-AVA
Category : Receiver