
QII-11381 - Compact computer Qian - Free user manual and instructions
Find the device manual for free QII-11381 Qian in PDF.


| Product Type | Portable Bluetooth Speaker |
| Dimensions | 150 x 80 x 50 mm (5.9 x 3.1 x 2.0 in) |
| Weight | 200 g (7.1 oz) |
| Power Input | USB-C 5V 1A |
| Battery Capacity | 2000 mAh |
| Playback Time | Up to 10 hours at 50% volume |
| Charging Time | Approximately 3 hours |
| Bluetooth Version | 5.0 |
| Bluetooth Range | Up to 10 m (33 ft) |
| Speaker Driver | 40 mm (1.57 in) |
| Output Power | 5 W RMS |
| Frequency Response | 100 Hz – 20 kHz |
| Microphone | Built-in for hands-free calls |
| Audio Input Options | Bluetooth, AUX 3.5 mm, TF card |
| Water Resistance | IPX5 (splash-proof) |
| Package Contents | Speaker, USB-C cable, AUX cable, manual |
| Compatibility | Bluetooth-enabled smartphones, tablets, laptops |
| Material | ABS plastic and fabric mesh |
| Safety Features | Overcharge protection, short circuit protection |
| Repairability | Battery and speaker driver replaceable by professional |
| Warranty | 1 year limited warranty |
Frequently Asked Questions - QII-11381 Qian
User questions about QII-11381 Qian
0 question about this device. Answer the ones you know or ask your own.
Ask a new question about this device
Download the instructions for your Compact computer in PDF format for free! Find your manual QII-11381 - Qian and take your electronic device back in hand. On this page are published all the documents necessary for the use of your device. QII-11381 by Qian.
USER MANUAL QII-11381 Qian
MINI PC WITH INTEL® CORE™ i3 11TH GEN MINI PC CON INTEL® CORE™ i3 11TH GEN

MODEL: QII-11381

128GB

8GB

Bluetooth

Dual Band Wi-fi Banda dual Wi-fi

HDMI & DP Port

USB-C (Data & Display) USB-C (Datos y Monitor)
Please read carefully before using your equipment and store this manual for future reference.
WARRANTY AND PRODUCT INFORMATION
These terms shall be governed and construed under laws of the jurisdiction in which the product was purchased, if any term here is held to be invalid or unenforceable, such term (in so far as it is invalid or unenforceable) shall be given no effect and deemed to be excluded without invalidating any of the remaining terms. Qian reserves the right to amend any term at any time without notice.

- Please use the original power supply, we cannot be held responsible for any problems or failures caused by any third party adapters.
- Users may use music videos, images and software provided by third parties, but we cannot be held responsible for copyright issues or software failures.
- If the product failure, we will strictly abide by the warranty terms, but we will not be held responsible for any property damage or financial loss that may be caused during use.
- The equipment comes with built-in software at the factory, which can be used after the actual test. However, it will not affect the machine in any way if it is removed or not when looking for compatibility or other issues. Please note that it is not a product quality issue.
- The company reserves the right to make improvements to its products and product specifications and designs are subject to change without notice! Please refer to the actual product.
PRODUCT INTERFACE DESCRIPTION

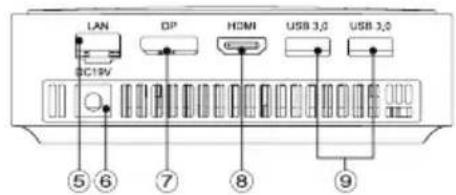
1.TYPE-C
5.RJ45 Network
9.USB 3.0*2
2.USB 3.0*2
6.DC19V
- Audio Jack
7.DP Port
4.Power button
8.HDMI Port
QUICK INSTALLATION
![graph TD A["Display"] --> B["Connect the display device via HDMI line or DP line or TYPE-C line"] A --> C["Connect the power supply via the DC adapter (factory accessories)"] A --> D["Connect the keyboard and mouse (self-provided) via USB interface"] A --> E["Power Adapter"] E --> F["Connect the int…](/content/2026/06/1407827/images/414f35b3f9eb25a865154d44a739a88e6a5200d0050bcc9f4ddb1fea83391094.jpg)
Preparation for upgrade
A. Switch off all peripheral devices connected to the Mini PC.
B. Turn off the Mini PC and disconnect the power cord.
C. Open the top magnetic cover.OP: 200mV
1. Replacing memory
To upgrade the memory, please be sure to select a memory module that meets the following requirements:
DDR4 :2133/2400/3200MHz SO-DIMM
Note: If you intend to install only one memory module, please install it in the lower memory slot.
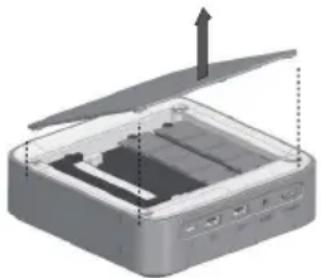
Figure 1
Remove the old memory module Gently unfold the metal retaining clips on each end of the memory slot to allow the module to pop out of the slot (C). Hold the module by its edges and remove it from the socket, then store it in its anti-static packaging.

Figure 2
Install the new memory module Firstly, align the notch on the bottom edge of the memory module with the protrusion on the slot holder, then insert the bottom edge of the memory module into the socket (A) at a 45 degree angle. After inserting the module, push down on the outer edge of the module until the retaining clip snaps into place (B), and ensure the clips are securely in place.
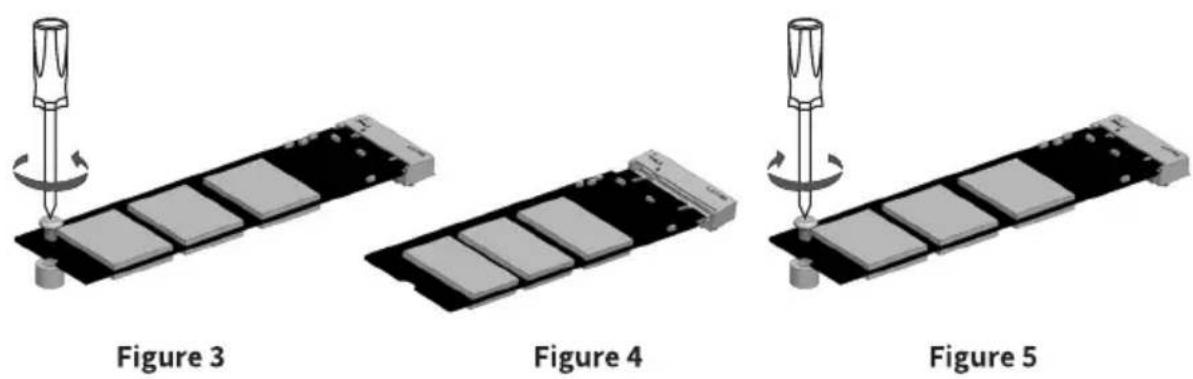
Remove the pre-installed (if any) SSD from the connector with a screwdriver counterclockwise (shown in Figure 3); align the notch on the bottom of the new M.2 SSD with the tab on the connector, then insert the bottom edge of the M.2 SSD into the connector (shown in Figure 4), and finally use a screwdriver clockwise to Secure the M.2 SSD to the bracket with screws (shown in Figure 5).
INSTALLATION OF VESA BRACKET
Please follow the instructions below to install and use the VESA mounting bracket:
1 .Fix the two brass screws A included in the box into the corresponding screw holes on the back of the mini pc (as shown in Figure 6).
2. Using the four small black screws included in the box, attach the VESA bracket to the back of the monitor or TV (as shown in Figure 7).
3. Fix the mini pc through the two screws A fixed to the bottom of the main unit, slip over the VESA mounting bracket hole B to complete the installation.
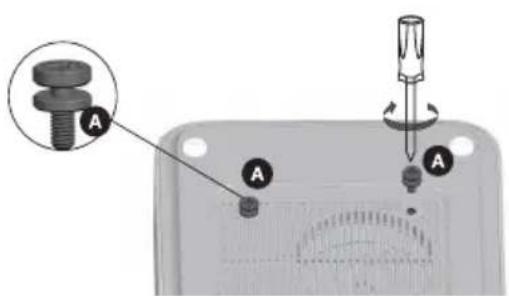
Figure 6
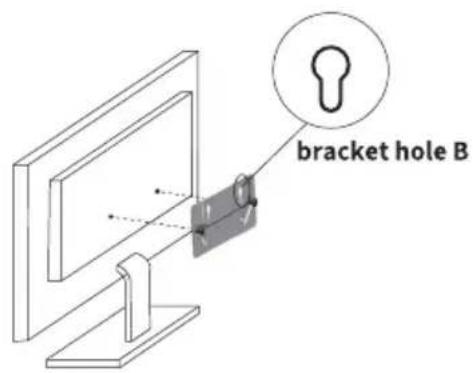
Figure 7
PACKING LIST
| Mini PC*1 | Power Adapter*1 |
| User Manual*1 | Hard disk fixing screws*4 |
| Mini PC copper fixing screws*2 | HDMI Cable*1 |
| VESA Mounting Bracket*1 | VESA Mounting Bracket Screws*2 |
- Be extremely careful when performing operations that may cause file damage or loss.
- Pay attention to the virus protection, try to use the virus firewall during using this Mini PC.
- If you don't use the device for a long time, please trun off it, and disconnect the power.
- Do not turn on and off the device frequently for a short period of time.
It is recommended that the interval between two boots should be at least 10 seconds, preferably no less than 60 seconds. - Pay attention to moisture, keep the use environment clean and sanitary, if there is dust on the device, please wipe it with a dry soft cloth.
- Avoid direct exposure of strong light to the device, and stay away from strong magnetic fields.
- Don't get water, food and other fluids onto the device, and don't pull the data and power lines with force.
1.TIPO-C
5.Red RJ45
9.USB 3.0*2
2.USB 3.0*2
6.DC19V
-
Conector de audio
-
Puerto PD
DDR4 :2133/2400/3200MHz SO-DIMM
Figura 1
Figura 2
figura 6


Brand : Qian
Model : QII-11381
Category : Compact computer