Automatic XP 10 - Vacuum Cleaner Sebo - Free user manual and instructions
Find the device manual for free Automatic XP 10 Sebo in PDF.


| Product Type | Canister Vacuum Cleaner |
| Brand | Sebo |
| Model | Automatic XP 10 |
| Power Consumption | 1200 W |
| Suction Power | Up to 300 air watts |
| Dust Bag Capacity | 5 L |
| Filtration System | HEPA 13 exhaust filter + Microfilter |
| Cleaning Radius | 12 m |
| Cord Length | 10 m |
| Weight | 8.5 kg |
| Dimensions (H x W x D) | 320 x 280 x 430 mm |
| Noise Level | 72 dB(A) |
| Power Cord Type | Automatic cord rewind |
| Suction Control | Electronic slide control on handle |
| Floor Nozzle | Combination carpet/hard floor nozzle |
| Accessories Included | Crevice tool, upholstery nozzle, dusting brush, turbo brush |
| Bag Type | Sebo X-type dust bags (disposable) |
| Filter Maintenance | Washable pre-motor filter; replace HEPA filter annually |
| Safety Features | Thermal overload protection, automatic shut-off |
| Repairability | Modular design; replaceable motor, switches, and wheels |
| Warranty | 5 years motor warranty |
Frequently Asked Questions - Automatic XP 10 Sebo
User questions about Automatic XP 10 Sebo
0 question about this device. Answer the ones you know or ask your own.
Ask a new question about this device
Download the instructions for your Vacuum Cleaner in PDF format for free! Find your manual Automatic XP 10 - Sebo and take your electronic device back in hand. On this page are published all the documents necessary for the use of your device. Automatic XP 10 by Sebo.
USER MANUAL Automatic XP 10 Sebo

Please Retain for Reference
SEBO AUTOMATIC X-Series Owner's Manual
Table of Contents
Technical Details 2
Important Safety Instructions 3
Special SEBO Product Features 5
Automatic Power Head Height Adjustment 5
Brush Roller Obstruction - Auto Shut-Off 5
Brush Roller Worn Warning 5
Stationary Use Warning 5
Bag Full or Clog Warning - Auto Shut-Off 5
Identification of Parts 6
Assembly 6
Optional Attachments 6
Standard Attachments 6
Operating Instructions 7
Starting the Machine 7
Operating Positions 7
Boost function.... 7
Using the Attachment Tube, Hose & Attachments 8
The Display Panel 8
The Adjustment Wheel 8
The Search Light 8
Maintenance 9
Changing the Dust Bag 9
Changing the Micro Filter 9
Changing the Exhaust Filter 9
Changing the Brush Roller(s) 9
Changing the Sealing Strip 9
Clog Removal 10
Clogs in the Base 10
Clogs in the Attachment Hose 10
Clogs in the Attachment Tube 10
Clogs in the Entrance to Dust Bag 10
Clogs in the Swivel Neck 10
Trouble-Shooting Guide 11
Carpet cleaning 12
Technical Details
Motor Wattage 890W
Dust bag .... Ultra-bag 5,3 l
Working width X7 - 308 mm
X8 - 378 mm
Brush drive ...... tooth belt
Brush speed.... 2700 rpm
Floor adjustment ...... automatic
sensor advised
Cable 10 m
Weight X7 - 7,4 kg
X8 - 7,6 kg
Protection..... double insulated
SEBO (UK) Ltd
The Merlin Centre
Cressex Business Park
High Wycombe
Bucks HP12 3QL.
Tel. 01494 465533
Fax. 01494 461044
www.sebo.co.uk

Please read all instructions before using this machine
ELECTRICAL APPLIANCE
CAUTION! Failure to follow the safety instructions marked with this symbol can pose a hazard.
- Do not use with a damaged cable.
- Disconnect from mains when not in use and before handling the machine for any purpose other than vacuuming.
Always turn off and unplug the machine before undertaking any maintenance.
This machine must not be used for picking up liquid, sharp objects, hot material, such as fire ash, or hazardous/harmful dust.
- Do not operate with wet hands.
- Do not use in presence of flammable gases.
• Use correct mains supply.
• Repairs must be done by qualified personnel in accordance with the guarantee.
- This appliance can be used by children aged from 8 years and above and persons with reduced physical, sensory or mental capabilities, or lack of experience and knowledge if they are given supervision or instruction concerning use of the appliance in a safe way and understand the hazards involved. Children should not play with the appliance. Cleaning and user maintenance should not be done by children without strict supervision.
• Children and pets must be strictly supervised during use of this appliance.
- If the cable is damaged it must be replaced with a genuine SEBO part. For safety reasons this must be done by a SEBO service representative or an authorized Service technician.
- Keep the cable away from sharp edges and prevent it becoming trapped or crushed, or over-stretched (e.g. by winding on too tightly).
Use on dry surfaces only. Do not store and use outdoors, or in damp conditions.
This machine should only be operated with genuine SEBO filter bags, filters and replacement parts. The use of non-genuine parts will waive the warranty for this product and could pose a serious safety risk.
ROTATING BRUSH
Do not run over mains cable.
- Do not leave plugged in or switched on and unattended.
- Please do not touch the brush or SEBO PT-C* when it is turning as this will cause a risk of injury to the fingers.
- Ensure vacuum is upright and the brush is above floor level when using the hose.
- Do not tilt the brush head onto the floor when using the hose. This can cause marking.
- Do not run the brush over rug/carpet edges and fringes.
- Some floor coverings and surfaces may be damaged by upright vacuums. As with any vacuum with a rotating brush, this machine could cause damage to loosely woven carpets or rugs, wool loop carpets, very long piled carpets, handmade rugs or soft / sensitive floor surfaces such as cushion vinyl. Please ensure suitability before use. If necessary, purchase the Delicate Floor Brush (Part No. 5010 GE), combination nozzle or parquet brush.
TO ENSURE GUARANTEE COVER
- Do not re-use bags.
- Do not wash filters.
- Do not vacuum sharp objects, hot material, eg. fire ash or hazardous/harmful dust.
- Do not leave near heat source, eg. fires, ovens, radiators, etc.
- Do not remove any screws. All repairs must be authorised by SEBO.
- Do not use on inappropriate surfaces, eg. concrete, stone, gravel.
- Do not expose to liquid or moisture.
- Change bags and filters at correct intervals.

Only use genuine SEBO bags, filters and spares.
For full details of guarantee, please refer to the separate guarantee card.
MISCELLANEOUS PROVISIONS
The declared values of this series has been evaluated according to the commission delegated regulation (EU) No. 665/2013 and commission regulation (EU) No. 666/2013 applying the harmonized standards EN 60312-1, and the applicable parts of the EN 60335.
The series is classified as carpet vacuum cleaners according to the named regulations above and has to be tested as such. With the SEBO AUTOMATIC X model with Boost function we recommend the use of this function for high energy efficiency and a deep and intensive cleaning performance on carpets. The series is not suitable for use on hard floors as defined by the EU Energy label.
Note on disposal

For disposal of used appliances, please follow the advice of your local authority.
SPECIAL SEBO PRODUCT FEATURES
Your SEBO AUTOMATIC X series vacuum cleaner is the most technically advanced upright vacuum cleaner in the world. Along with its excellent filtration system (99.9% to 0.3 microns), one of its most important features is its ability to monitor the resistance of the brush roller against the floor, so that the proper cleaning height is consistently maintained. In addition, the machine has warning systems and automatic shut-off capabilities that are designed to alert the user to machine problems that, if ignored, will damage the machine or diminish performance.
Your SEBO Automatic's five most unique features are:
- Automatic Power Head Height Adjustment. Based upon the resistance of the brush roller against the floor, the power head automatically adjusts up or down to the appropriate cleaning height. The adjustment process is indicated by two green lights labelled "UP" and "DOWN" located on top of the power head. The height adjustment chosen by the machine ensures proper brush action, while providing optimal air flow. This prevents reduction of air flow due to improper height adjustment.
- Brush Roller Obstruction - Auto Shut-Off. If the brush roller is obstructed, the machine will shut off and the red "CHECK BRUSH" light located on top of the power head will flash. The user should turn the switch off, unplug the machine and immediately remove the obstruction. If the user restarts the machine without removing the obstruction, the machine will again shut off and the "CHECK BRUSH" light will flash.
- Brush Roller Worn Warning. The red "CHECK BRUSH" light will illuminate (after a 10 second delay) to notify the user that the brush roller is too worn and, therefore, should be replaced. The light will remain illuminated until the worn brush roller is replaced, but the machine will continue to operate in the meantime.
- Stationary Use Warning. When the machine has its handle in the upright-locked position, it is designed to disengage the brush roller from the floor by raising the height of the power head. If the power head reaches its highest brush height but is still engaged in the carpet, the "CHECK BRUSH" light will slowly flash to alert the user. This can occur on extremely high pile carpet, such as loose- pile, shag, or on carpets with extraordinarily thick padding underneath. However, it is typically caused by the user pulling forward on the machine while using the attachment hose or active wand. This feature is designed to be an alert to the user to take care while the machine is stationary. An operating machine should not stand stationary on the floor for inappropriate periods of time.
- Bag Full or Clog Warning - Auto Shut-Off. If the vacuum's air flow pathway becomes restricted due to a full bag or the existence of a clog, the red "CHECK BAG" light located on top of the power head will illuminate. If the user ignores this warning for approximately 30 seconds, the machine will shut off and the "CHECK BAG" light will flash. The user should turn the switch off, unplug the machine and immediately insert a new bag or remove the clog (to remove a clog, refer to the Clog Removal section on page 9). If the user restarts the machine without having solved the problem, the "CHECK BAG" light will again illuminate and the machine will shut off in 30 seconds.

The display panel is located on the power head.

Identification of Parts
- Handle grip
- On/Off switch
- Handle assembly
- Retaining ring
- Cover release flap
- Dust bag housing
- Front cover
- Housing release button
- Power head with brush
- Cable (cord)
- Attachment tube handle
-
Attachment hose
-
Handle catch
- Carrying handle
- Cable (cord) hook
- Attachment tube (active wand)
- Crevice nozzle
- Upholstery nozzle
- Foot pedal
- Swivel neck
- Support lever
- Projection tab
- Connecting tube
- Exhaust Filter Cover

Optional Attachments
- Wall and floor brush - Part No 1325 GY
- Turbo brush for stairs - Part No 6179 ER
- Radiator brush - Part No 1496 ER
- Extension hose - Part No 1495 ER*
- Straight tube - Part No 1084 GY
- Dusting brush clamp - Part No 5460 GY*
- Dusting brush - Part No 1329 GY*
* Standard with some models.
Other attachments are available.
Also for odour control there is a combined micro/charcoal filter - Part No. 5425 ER.
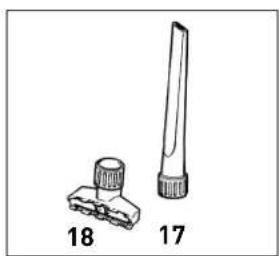
Standard Attachments
- Crevice nozzle
- Upholstery nozzle


Note
All illustrations shown in this manual represent the X7 models. Where part numbers and instructions are different for the X8 model illustrations for both X7 and X8 will be shown.
Assembly
Place the power head (9) on the floor with the swivel neck (20) and the support lever (21) upright. Hold the dust bag housing (6) vertically and place it over the swivel neck and support lever. Push firmly and evenly down so that the housing release button (8) snaps outward to its "locked" position. Slide the dusting brush clamp (47) onto the handle tube and tighten the screw. The handle of the dusting brush (48) will now snap into the clamp.
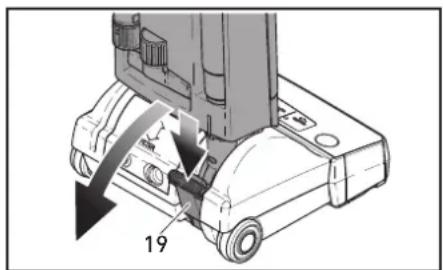
To lock the handle (3) to the dust bag housing (6), turn the handle catch (19) at the handle joint of the filter bag housing (6) forward to "open" position. Then slide the handle assembly (3) in as far as possible and lock it in by turning the handle catch to the closed position.
Push the black end of the attachment hose (12) into the connecting tube (26) so that it clicks into place. Insert the attachment tube (15) into the swivel neck and push the handle (11) over the projection tab (22).
If the machine does not work, then the steps above have not been executed properly. Please ensure the parts are properly pushed together and locked in place.

Operating Instructions
Starting The Machine
A. Before turning on your vacuum cleaner, make sure that the vacuum handle is in its upright locked position and that you have a firm hold on the handle grip to keep the machine from moving forward.
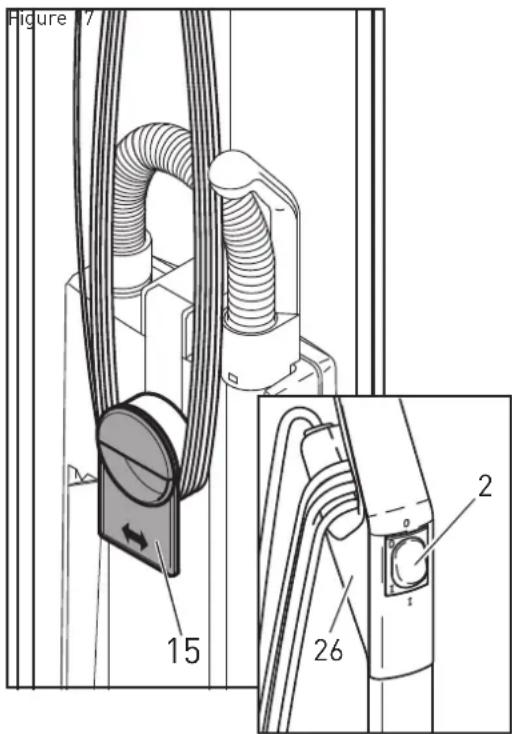
- Turn the quick release cable hook (15) to the up position by moving it to the left or right and release the cable.
- Release the cable from the upper cable hook [26].
- Plug in and press the switch (2) to the "I" position.
Switch Position
0 = 0 FF
I = 0 N
Operating Positions
B. When the machine is switched on with the handle in the upright locked position (see A above) the power head and brush automatically rise from the carpet. To release the machine from the upright locked position, press down on the foot pedal (19) and lower the handle into the normal operating position. The power head and brush will automatically lower to the appropriate height.
As delivered the handle will go from vertical to horizontal in one movement. To lift the brush over obstacles please lock the vacuum in the upright position and tilt it backwards. To lower the machine back into the horizontal position, press the foot pedal again.
Boost function*
For high energy efficiency and deep cleaning of the carpet, the SEBO AUTOMATIC X* is equipped with a boost button (49). Press the button (49) by hand to activate the boost function. Once activated, the button(49) will shine green. To deactivate the boost function, press the button (49) again.
Please note that the boost function will be deactivated automatically when the machine is turned off. After switching on the machine again, the boost function has to be activated separately.
*Depending on model

WARNING! The quality, condition, coating, texture, age and manufacturing technique of all floor surfaces vary. There-upright vacuums with rotating brushes, including your SEBO, may damage some floor coverings or surfaces. Some types and floor dressing, cushion vinyl, wool loop carpets and other delicate carpets and rugs are vulnerable to damage by rotatrushes. Check with your flooring supplier before use and treat with care. To ensure that your new SEBD vacuum cleaner incompatible with your floor, please test the vacuum cleaner on each type of flooring surface in a small inconspicuous area determine if any damage occurs. If damage occurs, stop using the vacuum cleaner immediately! It is your responsibility to establish suitability. SEBO cannot accept liability for damage due to use on inappropriate floor coverings.
The standard brush roller on your SEBO vacuum is appropriate for most types of floor surfaces. However, a soft-bristle brush roller (X7 part no. 5010 GE or X8 part no. 5290 GE) is available that is designed for use on delicate flooring including loop pile carpet, handmade rugs and vinyl surfaces. As with the standard brush roller, you should test the machine using the soft-bristle brush roller in an inconspicuous area prior to widespread use. The soft-bristle roller will wear more quickly than the standard brush roller, so it will need to be replaced more often. Also, because the bristles are softer, the height adjustment on the machine will be slightly lower than normal and the red brush light may come on. Care must be taken to ensure that the bottom plate of the machine does not contact hard floors. If this happens, damage to the floor could occur. If damage occurs, stop using the vacuum cleaner immediately!

Figure 1
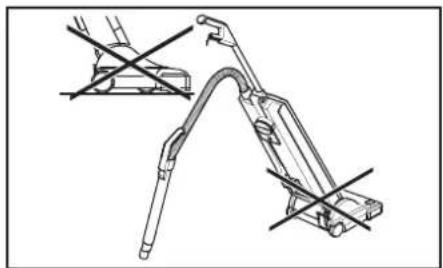
Figure 2

Figure 3
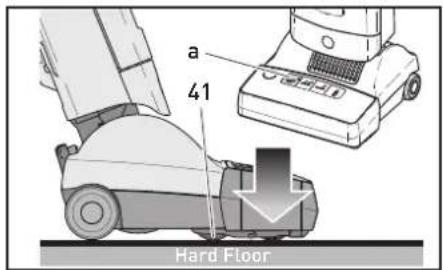
Figure 4
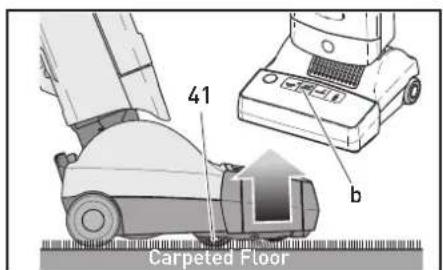
Figure 5
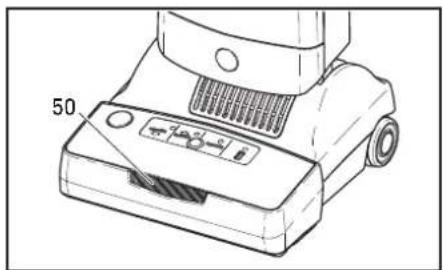
Figure 6
Using the Attachments Tube, Hose & Attachments - Figures 1 & 2
The attachment tube (16) is useful for vacuuming corners and hard-to-reach areas. The handle grip (1) should be in the upright, locked position (as shown in figure 1). Grip the attachment tube handle (11), pull it up and away from the machine and stretch out the hose (12) until it locks (this locking action will prevent the hose from retracting back into the attachment tube while it is in use). Various attachments may be inserted onto the end of the tube.
After use, remove attachment and re-insert the attachment tube into the back of the machine. Be sure that the attachment tube handle (11) is inserted over the projection tab (see #22, page 6). If the attachment tube handle is properly seated over the projection tab, the hose will automatically retract and you may resume vacuuming. There is no need to turn off the vacuum while switching from upright vacuuming to using the attachment tube or hose.
To use the hose without the attachment tube, pull the hose out of the attachment tube while the tube is still attached to the machine and securely seated over the projection tab (22). Connect an attachment tool, if desired, on to the end of the flexible hose. You may also release the hose while the attachment tube is disengaged from the machine by pressing the release button at the base of the handle (11). The hose should never be used with the brush still in contact with the floor.
While using attachment tools, if the power head brush roller is not able to disengage from the floor surface, you may keep the brush roller off the carpet by placing the handle (1) in its upright locked position and lowering the handle with one hand to raise the brush roller off of the floor. Operate attachment accessories with the other hand. Or, with the handle in the upright locked position, the machine may be tipped backward so that it rests on the rear of the bag housing (6), and the power head is locked in a perpendicular position to the floor.
To vacuum walls, under beds, or higher-reach areas, etc., the SEBO automatic can be fitted with an additional straight tube and the wall and floor brush. The machine can then be used like a cylinder vacuum.
The Display Panel - Figure 4
Green light (a): Brush is lowering
Green light (b): Brush is rising
Red light (c): Flashing and motor off - brush jammed - clear jam
Red light (c): Flashing and motor on (when machine is in upright, locked position) - Take care, brush in contact with carpet
Red light (c): Continuous - change brush roller
Red light (d): Continuous - change bag or clear clog
Red light (d): Flashing - motor switched off due to full bag or clog
For detailed information on the display panel, see page 5.
The Adjustment Wheel - Figures 4 & 5
On hard floors (figure 5), the adjustment wheel [40], moves upward into the machine so that the brush lowers and becomes flush with the floor.
On carpeted floors (figure 6). the adjustment wheel [40] moves downward out of the machine so that the brush rises. The adjustment wheel moves up and down automatically to adjust the brush to the correct setting. This provides proper brush action, while maintaining optimal air flow.
The Search Light - Figure 6
Some models of SEBO AUTOMATIC X7 and X8 are equipped with a Search Light (50). The light operates if the vacuum cleaner is powered on and tilted into working position. The light illuminates the area immediately in front of the vacuum to make fine dust or small objects (which perhaps should not be sucked in) more visible.
Some models may feature the Boost function, the Search Light, or both. All three possible styles have to be incorporated in the factory and cannot be retro-fitted.

Figure 7


Figure 8


Figure 9


Figure 9a

Figure 10 (X7)


Figure 10a (X8)

Figure 11 (X7)
Sealing Strip
Part No 5400-1ER (X7)
Part No 5400-2ER (X8)

Figure 11a (X8)
Maintenance

Always unplug vacuum from socket before handling!
Changing the Dust Bag - Figure 7
To change the dust bag, pull the cover release flap forward (#5 on page 5) and lift the cover (7) from the dust bag housing. The cover release flap must remain in a forward "pulled-out" position to change dust bags and lock them into place. Squeeze the clamps on both sides of the dust bag sealing plate, slide the plate (28) from the holder (29) and push the cap (43) on to seal the bag. Slide the sealing plate (28) of a new bag into the holder and push it in firmly. Re-insert cover into dust bag housing, push it forward, then lock it in place by pushing down the cover release flap. You may find it convenient to store the bag cap inside the dust bag housing below the dust bag.
Changing the Micro Filter - Figure 8
The Micro Filter (30) needs to be changed when it becomes dirty. It is important to replace the filter before it becomes clogged with dust. To change the Micro Filter, pull the cover release flap [#5 on page 5] forward and lift the cover from the dust bag housing. Then, slide the filter out at the bottom. To replace, lift the safety lever (31) and slide the new filter in using the tracks as guides.
Changing the Exhaust Filter - Figure 9
We recommend changing the exhaust filter (31) at the same time as the Micro Filter (30). The Exhaust Filter is located underneath the cover (24) on the back of the power head.
Removal of the Exhaust Filter:
Disconnect machine from the mains.
Move the dustbag housing into the upright position and make sure that it is locked. Remove the exhaust filter cover (24) by pressing the two recessed grips (A) to the middle and lifting it upwards.
The exhaust filter (31) is locked to the machine with an additional catch (B). Lift the catch slightly and pull the filter out of the housing.
Fitting a new Exhaust Filter:
Slide the filters closed end first into the machine.
Fit filter end (C) to the air channel (D) and lock the catch (B).
The correct positioning of the filter can be checked through the slots (E) on the front of the power head. Please ensure it is smooth and flat.
Finally replace the exhaust filter cover (24). Fit it to the top of the opening in the power head housing and move it downwards until an audible click occurs.
Changing the Brush Roller(s)
Figure 10 (X7), Figure 10a (X8)
To remove the brush roller(s) (35 or 35a), push the button(s) (36 or 36a), remove the side plate(s) (37 or 37a), turn the brush(s) clockwise a quarter of a turn, and pull the old brush roller(s) out. Slide the new brush roller(s) into the brush housing and turn it until it locks into position. While slightly pushing the button(s) (36 or 36a), press the side plate(s) (37 or 37a) back into the locked position.
Changing the Sealing Strip
Figure 11 (X7). Figure 11a (X8)
The sealing strip (39) is located just behind the brush roller opening. The sealing strip seals the power head to hard floors to prevent kick-back of debris while vacuuming. To replace a worn sealing strip, push the release button, remove the side plate (36 and 37 in figure 11 & 11a) and slide old strip out. Insert the new strip into the slot and slide into place.

Figure 12

Figure 13
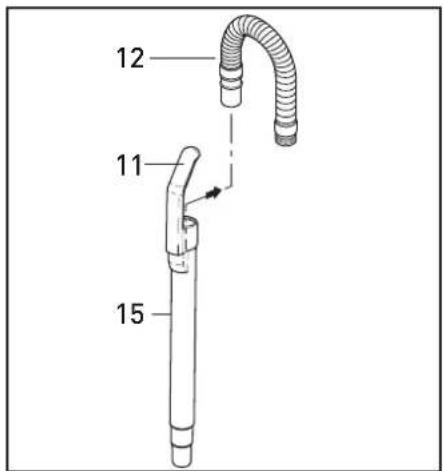
Figure 14

Figure 15

Figure 16
Clog Removal

Always unplug vacuum from socket before handling!
Clogs in the Base - Figure 12
Most clogs can be removed by accessing the airflow pathway via the orange access door [38] located on the underside of the power head. However, other clogs may only be removed by accessing the airflow pathway by disassembling the machine in the opposite sequence of the machine's original assembly (see assembly, page 5).
Clogs in the Attachment Hose - Figure 13
Blockages in the hose can be cleared by removing the attachment hose (12) from the machine by squeezing the retaining ring (4) and inserting the opposite end of the hose in the connecting tube (23). Stretch the hose upright and switch on the machine. If necessary, quickly lift your hand on and off the end of the hose. If this procedure does not clear the clog, a straight piece of wood can be inserted into the hose to push out the clog. Take care not to damage the hose when unblocking it.
Clogs in the Attachment Tube - Figure 14
Remove attachment hose (12) from the attachment tube (16). Then, grip attachment tube handle (11) and remove tube from the machine. A straight piece of wood can be inserted into the tube to push out the clog.
Clogs in Entrance to Dust Bag - Figure 15
Remove attachment hose (12) from vacuum cleaner (see figure 13) and remove front cover (7). Clean out connecting tube (23) and/or entrance to bag (28).
Clogs in the Swivel Neck - Figure 16
Clogs in the swivel neck (20) can be removed by first pressing the housing release button (8) and lifting off the dust bag housing (6). Lift upward firmly and evenly to properly remove the dust bag housing. Then, release the foot pedal (19). Lower the swivel neck to 45°, check inside the swivel neck channel closest to the foot pedal (see arrow), and clean out pathway.
Trouble-Shooting Guide

Always unplug vacuum from socket before handling!
| PROBLEM | REASON | SOLUTION |
| Does not turn on or machine shut off intermittently | 1. Handle not fully inserted into the bag housing, causing a faulty connection. | 1. Release handle catch, push handle down, close handle catch. |
| 2. Not plugged into good socket. | 2. Use another socket. | |
| 3. Cable worn/ damaged. | 3. Replace cable. | |
| 4. Dust bag housing (6) not fitted to power head correctly. | 4. Re-fit dust bag housing. | |
| Bag full or clog light on or flashing & machine shuts off | 1. Bag full. | 1. Replace bag. See No 5 on page 4. |
| 2. Clog in base, attachment hose, attachment tube, swivel neck or entrance to dust bag. | 2. See Clog Removal on page 9. Also, see No 5 on page 4. | |
| 3. Filter dirty. | 3. Replace Micro Filter and Exhaust Filter. | |
| Brush light on | 1. Brush worn. | 1. See No 3 on page 4. |
| Brush light slowly flashing | 1. Vacuum is stationary and in upright locked position. | 1. See No 4 on page 4. |
| Brush light flashing & machine shuts off | 1. Brush jammed. | 1. See No 2 on page 4. |
| Up & down lights flicker | 1. Operating on uneven floor. | 1. Ignore. |
| Does not pick up | 1. Bag or filters need changing. | 1. See page 8. |
| 2. Brush roller needs changing. | 2. See page 8. | |
| 3. Blocked. | 3. See page 9. | |
| Front bag door won't fully close | 1. Cover release flap not fully closed. | 1. Re-insert bag. Lock the cover release flap down firmly. |
| 2. Bag not inserted properly. | 2. Re-insert bag with cover release flap (5) up, until firmly latched in bag holder (see pg.8, figure 7). | |
| 3. Micro Filter not properly inserted. | 3. Re-insert filter (see pg.8, figure 8). | |
| Hose doesn't retract after attachment tube is inserted | 1. Attachment tube not properly inserted. | 1. Re-insert making sure top of handle is pointing back and tube is fully seated on the protruding tab (22) on top of the dust bag housing. |

Carpet cleaning with the SEBO AUTOMATIC upright vacuum cleaners and SEBO DUO-P Carpet cleaning powder
Step 1
Disconnect the hose by squeezing the retaining ring (No. 4 in the instruction manual) and pulling the hose end out of the connecting tube (No. 23 in the manual). Then simply leave the hose end free.
Step 2
Spot clean any prominent stains with DUO-P cleaning powder and the brush from the SEBO Clean Box.
Step 3
Sprinkle DUO-P cleaning powder evenly over the area to be cleaned. The idea is to brush in the DUO-P as soon after spreading as possible, so if it is a large area sprinkle and brush in section by section. The amount of DUO-P used depends on pile depth and soilage, but on average a 500 gm sachet will cover 10-20 square metres.
Step 4
Using the SEBO AUTOMATIC X with the hose disconnected, brush in the DUO-P thoroughly. If possible brush in a number of different directions.
Step 5
Leave a DUO-P to absorb soiling for at least 30 minutes until completely dry. It doesn't matter if you walk on it or place furniture on it.
Step 6
Reconnect the hose by pushing it into the connecting tube (No. 23 in the manual). It will automatically lock in place. Then thoroughly vacuum out the DUO-P from the carpet.
When finished:
- It is advisable to clean out powder residues from the brush head. Remove the brush roller/rollers which is very easy (see Page 8) - and wipe out powder from the brush housing with a dry cloth or vacuum it out with the hose and crevice nozzle.
- Ensure that the CleanBox or DUO-P sachets are resealed after use or the cleaning agents will evaporate away.


- SEBO AUTOMATIC X-SERIES OWNER'S MANUAL
- TABLE OF CONTENTS
- TECHNICAL DETAILS
- PLEASE READ ALL INSTRUCTIONS BEFORE USING THIS MACHINE
- ELECTRICAL APPLIANCE
- ROTATING BRUSH
- TO ENSURE GUARANTEE COVER
- MISCELLANEOUS PROVISIONS
- NOTE ON DISPOSAL
- SPECIAL SEBO PRODUCT FEATURES
- IDENTIFICATION OF PARTS
- OPTIONAL ATTACHMENTS
- STANDARD ATTACHMENTS
- NOTE
- ASSEMBLY
- OPERATING INSTRUCTIONS
- STARTING THE MACHINE
- OPERATING POSITIONS
- BOOST FUNCTION
- USING THE ATTACHMENTS TUBE, HOSE & ATTACHMENTS - FIGURES 1 & 2
- THE DISPLAY PANEL - FIGURE 4
- THE ADJUSTMENT WHEEL - FIGURES 4 & 5
- THE SEARCH LIGHT - FIGURE 6
- MAINTENANCE
- ALWAYS UNPLUG VACUUM FROM SOCKET BEFORE HANDLING
- CHANGING THE DUST BAG - FIGURE 7
- CHANGING THE MICRO FILTER - FIGURE 8
- CHANGING THE EXHAUST FILTER - FIGURE 9
- CHANGING THE BRUSH ROLLER(S)
- FIGURE 10 (X7), FIGURE 10A (X8)
- CHANGING THE SEALING STRIP
- FIGURE 11 (X7). FIGURE 11A (X8)
- CLOG REMOVAL
- CLOGS IN THE BASE - FIGURE 12
- CLOGS IN THE ATTACHMENT HOSE - FIGURE 13
- CLOGS IN THE ATTACHMENT TUBE - FIGURE 14
- CLOGS IN ENTRANCE TO DUST BAG - FIGURE 15
- CLOGS IN THE SWIVEL NECK - FIGURE 16
- TROUBLE-SHOOTING GUIDE
- CARPET CLEANING WITH THE SEBO AUTOMATIC UPRIGHT VACUUM CLEANERS AND SEBO DUO-P CARPET CLEANING POWDER
- STEP 1
- STEP 2
- STEP 3
- STEP 4
- STEP 5
- STEP 6
- WHEN FINISHED
Brand : Sebo
Model : Automatic XP 10
Category : Vacuum Cleaner