
IKR3082F - Cooker Pelgrim - Free user manual and instructions
Find the device manual for free IKR3082F Pelgrim in PDF.


| Type | Freestanding Electric Cooker |
| Brand | Pelgrim |
| Model | IKR3082F |
| Product Dimensions (HxWxD) | 850 x 600 x 600 mm |
| Net Weight | 55 kg |
| Energy Source | Electric |
| Power Supply | 230 V ~ 50 Hz, 16 A |
| Oven Capacity | 65 L |
| Hob Type | Ceramic (4 cooking zones) |
| Oven Functions | Conventional, Grill, Fan, Defrost, Bottom heat |
| Cleaning | Easy-clean enamel interior, removable oven door |
| Safety Features | Child lock, Overheat protection, Automatic shut-off |
| Spare Parts | Available through authorized Pelgrim service centers |
| Warranty | 2 years (extendable) |
| Color | Stainless steel / Black |
Frequently Asked Questions - IKR3082F Pelgrim
User questions about IKR3082F Pelgrim
0 question about this device. Answer the ones you know or ask your own.
Ask a new question about this device
Download the instructions for your Cooker in PDF format for free! Find your manual IKR3082F - Pelgrim and take your electronic device back in hand. On this page are published all the documents necessary for the use of your device. IKR3082F by Pelgrim.
USER MANUAL IKR3082F Pelgrim
Instructions for use
Induction hob with extractor
INHOUDSOPGAVE
natural_image
Illustration of cooking pots on a black heating mat with a kitchen pan nearby (no text or symbols)natural_image
Two identical cooking pots with checkmarks and X marks, one emitting smoke from a lid (no text or symbols)

Boost

Boost
natural_image
Technical illustration showing a kitchen appliance with cooling fan and lock mechanism, and a hand pouring liquid into a bowl (no text or symbols)Rooster en filters reinigen
natural_image
Technical illustration of a mechanical assembly with cross-sectional views and directional arrows (no text or symbols)natural_image
Exploded view diagram of a battery pack assembly showing internal components and mounting base (no text or labels)
natural_image
Symbol of a trash bin with crossed lines indicating no waste or discharge (no text or numbers present)Indications in the display 8
Safety
Temperature safety 9
Cooking-time limiter 9
Power management 9
Before first use
Use of the touch keys and slide control 10
Induction noises 10
Apropriate pans 10
Pan detection 11
Cooking levels 11
Cooking guidelines 12
Use of the downdraft 13
Operation of the hob
Start cooking 14
Boost 15
Pan detection symbol 15
Finish cooking 16
Switch on the automatic heat-up function 16
Switch on the keep warm function 17
Connecting the Bridge induction cooking zones 17
Pause cooking 18
Recall function 18
Using the minute minder 19
Using the cooking timer 20
Child safety lock 21
Locking function for rapid cleaning during cooking 22
Operation of the extractor unit
Switch off the automatic extraction mode 23
Switch off the automatic extraction mode during cooking 23
CONTENTS
Manually switch on the extractor unit 24
Boost 24
Set a number of minutes delay time 25
Saturation of the grease filter 25
Saturation of the odour filter 26
Reset the memory of the filter saturation indication 26
User menu
27
Power limiter
29
Maintenance
Cleaning 31
Water collector 31
Cleaning the grid and filters 32
Troubleshooting
34
Technical specifications
Technical data 36
Information according regulation (EU) 66/2014 36
Environmental aspects
Disposal of packaging and appliance 39
Pictograms used


Important information
Nice to know
Electrical connection
Introduction
Congratulations on your choice of this Pelgrim appliance. This product was designed with simple operation and optimum comfort in mind.
This manual describes the best way to use this appliance. In addition to information on operation, you will also find background information that may come in handy when using the appliance.

Please read the separate safety instructions carefully before using the appliance.
Read this manual before using the appliance and keep it in a safe place for future use.
This manual serves as reference material for the service department. Please, stick the appliance rating label in the rectangle on the back of the manual. The appliance rating label contains all the information that the service department will need in order to respond appropriately to your needs and questions.
Description
IKR3093____
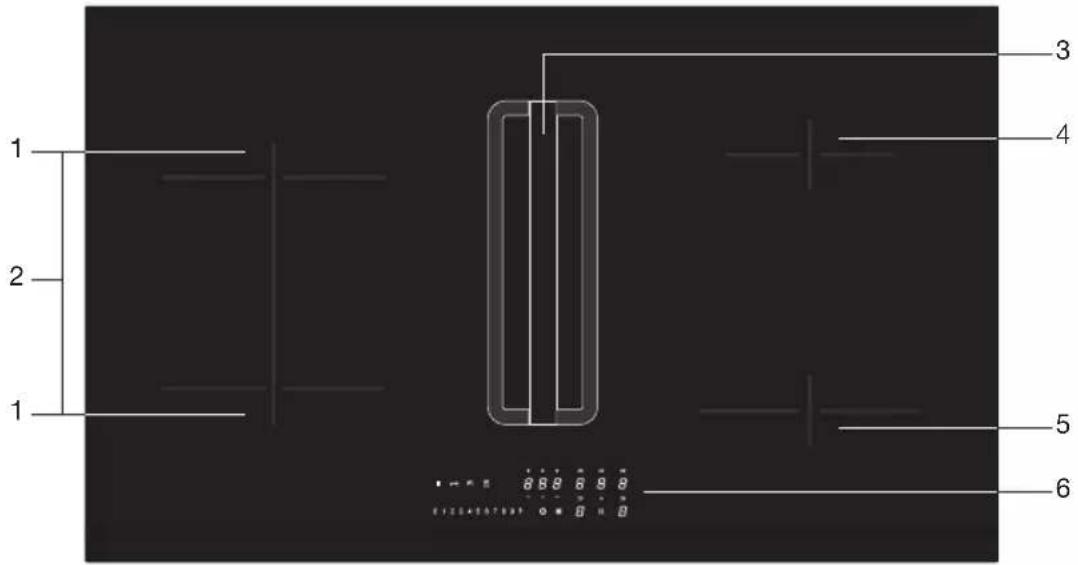
IKR3084_

- Cooking zone octa 210 x 190 mm / 2.1 kW (boost 3.0 kW)
- Connected cooking zones on the left 210 x 390 mm / 3.7 kW (only for type IKR3093 ...)
- Extractor
- Cooking zone ∅160 mm / 1,85 kW (boost 2.1kW)
- Cooking zone ∅210 mm / 2,3 kW (boost 3.0 kW)
- Control panel
IKR3063_
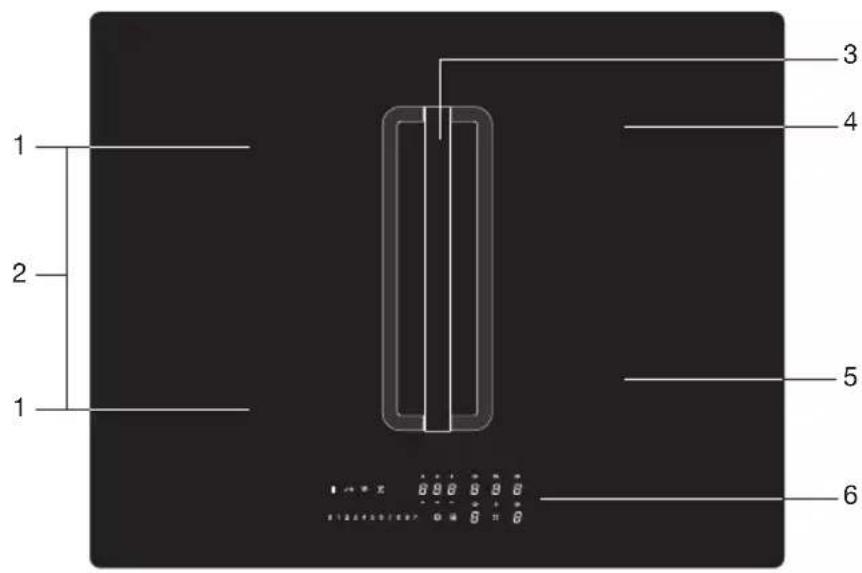
IKR3082_

- Cooking zone octa 210 x 190 mm / 2.1 kW (boost 3.0 kW)
- Connected cooking zones 190 x 430 mm / 3.7 kW
- Extractor
- Cooking zone ∅160 mm / 1.85 kW (boost 2.1kW)
- Cooking zone ∅145 mm / 1.4 kW (boost 1.85 kW)
- Control panel
Control panel

-
Pause key
-
Lock key
-
Keep warm key
-
Minute minder key
-
Timer display
-
Plus key timer
-
Minus key timer
-
Cooking zone key rear left (cooking zone display) and timer symbol
-
Extraction key (extractor unit display) and timer symbol
-
Cooking zone key rear right (cooking zone display) and timer symbol
-
Cooking zone key front right (cooking zone display) and timer symbol
-
Key 'Automatic extraction mode'
By default the automatic mode is active. When a cooking zone is selected and a power level (>2) is set, the extractor automatically switches on and sets the necessary extraction level.
-
Cooking zone key front left (cooking zone display) and timer symbol
-
Grease filter symbol
-
On/Off key
-
Boost key for a cooking zone and for the extraction
-
Slide control (from position 0 to position 9) for:
▶ setting a value for a cooking zone and for the extraction
Indications in the display
| Cooking zone display | Description |
 | Power level; 1 = low level / 9 = high level. |
 | Boost level active. |
 | No (suitable) pan on cooking zone (pan detection symbol). |
 | Residual heat indicator; The hob has a residual heat indicator for each cooking zone to show those which are still hot. Although the hob is switched off, the indicator ‘H’ will remain on for as long as the cooking zone is hot! Avoid touching them when this indicator is lit. |
 | Danger! Risk of burns. |
 | Child safety lock active. |
 | Automatic heat-up function active. |
 | Keep warm function active. |
 | Pause function active. |
 | Connected Bridge induction zones active(only for type IKR3093..., IKR3063_ and IKR3082...). |
| Extractor unit display Description | |
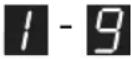
| 1 - 9 | Extractor speed level: 1 = low level / 9 = high level. |
| P | Boost level active. |
| C | Odour filter saturation indication. |
| Timer display Description | |
 | Timer has not been set. |
 | Timer has been set (1 hour and 25 minutes). |

Before use, read the separate safety instructions.
Temperature safety
A sensor continuously measures the temperature of certain parts of the hob. Every cooking zone is equipped with a sensor that measures the temperature of the bottom of the pan to avoid any risk of overheating when a pan boils dry. In case of temperatures rising too high, the cooking level is reduced automatically or the hob switches off automatically.
Cooking-time limiter

The cooking-time limiter is a safety function of your cooking appliance. It will operate if you forget to switch off your hob. Depending on the power level you have chosen, the cooking time will be limited as follows:
| Power level Maximum | operating time ( in hours, minutes) |
| 1 8 hours, 36 min. | |
| 2 6 hours, 42 min. | |
| 3 5 hours, 18 min. | |
| 4 4 hours, 18 min. | |
| 5 3 hours, 30 min. | |
| 6 2 hours, 18 min. | |
| 7 2 hours, 18 min. | |
| 8 1 hour, 48 min. | |
| 9 1 hour, 30 min. | |
| P (boost) 5 min (then switches back to level 9) | |
Power management
Two cooking zones one in front of the other effect each other. When both of these cooking zones are switched on at the same time, the power is automatically shared between them. When the Boost function is selected, the other cooking zone will be set to a somewhat lower setting. If a cooking zone is set at boost and you want to set the other one to setting 9, the cooking zone with boost will automatically go to a lower setting. Automatic heat-up function is deactivated.
Use of the touch keys and slide control
Place the tip of your finger flat on a key or the slide control to achieve the best results. You do not have to apply any pressure. The touch keys only react to the light pressure of a fingertip. Do not operate the controls with any other objects.
Induction noises
A ticking sound
This is caused by the capacity limiter on the left and right zones. Ticking can also occur at lower cooking levels.
Pans are making noise
Pans can make some noise during cooking. This is caused by the energy flowing from the hob to the saucepan. At high levels, this is perfectly normal for some pans. It will not damage either the pans or the hob.
The fan is making noise
To enlarge the lifespan of the electronics, the appliance is equipped with a fan. If you use the appliance intense, the fan is activated to cool down the appliance and you will hear a buzzing sound. The fan runs on for several minutes after the hob has been switched Off.
Appropriate pans
Induction cooking requires a pan with a thick flat bottom (minimum 2.25 mm). Use pans made of magnetic material or pans with a sandwich bottom. Pans made of copper, aluminum or ceramic material are not appropriate.

Only use pans with a flat bottom. A hollow or rounded bottom can interfere with the operation of the empty cooking protection, causing the appliance to become too hot. This may lead to damages. Damage caused by using pans that are not appropriate or that boil dry is excluded from the guarantee.

Pans that have been used on a gas hob cannot be used on an induction hob.

Be careful with thin enamelled sheet-steel pans! The enamel may become damaged at high settings if the pan is too dry. High power level settings may cause the bottom of the pan to warp.
Minimum pan diameter
- The minimum pan diameter per zone is as follows:
145 mm: minimum pan diameter 120 mm.
160 mm : minimum pan diameter 120 mm.
210 mm: minimum pan diameter 140 mm.
▶ Octa zone: minimum pan diameter 140 mm.
- You will achieve the best results by using a pan with the same diameter as the zone. If a pan is too small, the zone will not work.
- A pan used on connected Bridge induction cooking zones must have a diameter of at least 240 mm.

Attention
Grains of sand may cause scratches which cannot be removed. Only put pans with a clean bottom on the hob. We recommend that you lift pans and not slide them over the hob.
Pan detection
- The pan detection system automatically detects a pan that is put on a cooking zone. The display of this cooking zone lights up more intensely and the dot stops flashing.
- If the hob does not detect a (ferrous) pan after a pan is put on a cooking zone, the pan detection symbol flashes in the display. After 20 seconds, the cooking zone switches off.
Cooking levels
The cooking zones have 9 levels and a ‘boost’ level (P). Set the cooking level by touch and slide over the slide control. By slide over the slide control, the cooking setting is changed. By move to the right, the level increasing, while moving to the left decreases the level. When you move your finger away from the slide control, the cooking zone starts to operate at the level set.
Boost function
- You can use the 'boost' function to cook at the highest cooking level during a short period of time (max. 5 minutes). After the maximum boost time the power will be reduced to setting 9.
- The Boost function is not available when Bridge induction cooking zones are connected!
Cooking guidelines
Because the levels depend on the quantity and composition of the contents of the pan, the table below is intended as a guideline only.
Use level 'boost' to:
- bring the food or liquid to the boil quickly;
- 'shrink' greens;
- heat oil and fat;
- wok.
Use level 9 to:
- sear meats;
- cook fish;
- cook omelettes;
- fry boiled potatoes;
- deep fry foods.
Use level 7 and 8 to:
- fry thick pancakes and make French toast;
- fry thick slices of breaded meat;
- fry breaded fish;
- fry bacon (fat);
- cook raw potatoes;
- cook through pasta;
- fry thin slices of (breaded) meat.
Use level 4-6 to:
• complete the cooking of large quantities;
• defrost hard vegetables;
- fry thick slices of breaded meat.
Use level 1-3 to:
- simmer bouillon;
- stew meats;
- simmer vegetables;
- melt chocolate;
- poach;
- melt cheese.
Use of the downdraft

natural_image
Illustration of cooking pots on a black heating board with kitchen utensils below (no text or symbols)▶ Preferably cook with a lid on the pan; this reduces cooking odors and energy consumption. An odour filter that is too moist due to water vapours, also reduces the effectiveness of the odour filter. If desired, place the lid on the pan at an angle with the opening to the exhaust side. This ensures optimal extraction.

natural_image
Two identical cooking pots with checkmarks and X marks, one emitting smoke from a lid (no text or symbols)
Please read the chapter 'Before first use' very carefully before you start cooking. This prevents incorrect use of the hob.
Start cooking
- Touch and hold the on/off key until you hear an audio signal.
▶All displays light up; the induction hob is in standby mode.
The cooking zones and the extraction unit have power level zero.


If the hob is not used for 20 seconds, it will shut off automatically.
- Place a suitable pan on the cooking zone.
The cooking zone automatically detects the pan; the display of this cooking zone lights up more intensely and the dot stops flashing.

As long as the dot is not flashing, the cooking zone is selected and the power level can be set.
- When the response time has elapsed, or during cooking, you can activate the cooking zone by manually selecting the display of the desired cooking zone.

- Within 10 seconds, set the power level by touching the slide control.
The cooking zone starts at the level that has been set.
The extraction unit switches on automatically from position 3. The extraction unit can be switched on manually at position 1 and 2.
The extractor unit automatically switches on with the necessary extraction speed. By default the automatic extraction mode is active.
▷Set a higher or lower level with the slide control.
▶ Touch the key ‘Automatic extraction mode’ to deactivate the automatic extraction mode. The extraction can now be set manually, if desired. See ‘Operating the extractor unit’.
▶ After 10 seconds the slide control will switch off and the cooking time counter is hidden.

Boost
You can use the boost function to cook for max. 5 minutes at the highest cooking level. You can use the Boost function for a maximum of two cooking zones alongside each other at the same time.
- Touch power level P to select the Boost function.
^4 'P' shows on the display.
▶ After the maximum boost time the power will be reduced to power level 9.
Pan detection symbol
When the pan detection symbol appears in the display:

- you have not placed a pan on the correct cooking zone;
- the pan you're using is not suitable for induction cooking;
- the pan is too small or not properly centred on the cooking zone.
The cooking zone will not work unless there is a suitable pan on the cooking zone.
Finish cooking
- Set the power level to '0' to switch off the cooking zone.
- Switch off the induction hob by touching the On/off key.

Symbol H will appear in the display of the cooking zone which is too hot to touch. The symbol disappears when the surface has cooled down to a safe temperature. It can also be used as an energy saving function; if you want to heat other pans, use the cooking zone that is still hot.
Switch on the automatic heat-up function
This function sets the cooking zone at the highest level in order to bring your pan rapidly up to the required temperature. After a given time interval, the power level returns to the established level. This function is available for power level 1 to 8.
| Power level Heat-up time (seconds) | |
| 1 | 48 |
| 2 144 | |
| 3 230 | |
| 4 312 | |
| 5 408 | |
| 6 120 | |
| 7 168 | |
| 8 216 | |
- Switch on the hob and select the desired cooking zone.
- Touch and hold the slide control for at least 3 seconds at the desired level (from 1 to 8).
An ‘A’ appears in the display alternating with the selected power level. When the automatic heat-up time has expired, the cooking zone will switch automatically to the selected level which will show permanently on the display.
- To stop the automatic heat-up function, select the cooking zone and touch the slide control.
Switch on the keep warm function
- Switch on the hob and put a suitable pan on a cooking zone.
- Touch the cooking zone key of the desired cooking zone.
The '0' of the selected cooking zone will light up clearly and a single beep sounds.
- Touch the keep warm key.
The keep warm symbol ‘u’ appears in the display. The keep warm function is selected.

- Set the power level to '0' or touch the keep warm key to switch off the keep warm function.
Connecting the Bridge induction cooking zones (IKR3093..., IKR3063\_and IKR3082.)
Two Bridge induction cooking zones can be connected to each other. This creates one large zone that can be used, for example, with a grill plate or a fish pan on the same power level. The pan must be large enough to cover the centres of the front and rear bridge induction cooking zone (at least 240 mm).
Connection of Bridge induction cooking zones
- Switch on the hob.
- Simultaneously touch the left-hand side cooking zone keys.
The rear cooking zone display shows a connection symbol to indicate that the two cooking zones are connected.

- Set the power level by touching the slide control.
The front cooking zone display shows the power level.
Disconnection of Bridge induction cooking zones
- Simultaneously touch the cooking zone keys of the connected cooking zones.
The connection symbol will disappear on the rear cooking zone display.

Pause cooking
This function stops the cooking activity temporarily (max. 10 minutes); timers are also paused.
- Touch the pause key for at least 1 second.
▶All the displays show the pause symbol.

- To continue cooking, touch the pause key for at least 1 second until it flashes.
- Touch any other key within 10 seconds and the cooking process will continue.
The hob will automatically switch off after 10 minutes if the pause function is not switched off in the meantime.
Recall function
If the hob was switched off accidentally with the On/off key, all settings can be restored using the recall function.
-
Touch the on/off key again within 5 seconds.
The pause key is flashing. -
Touch the pause key within 6 seconds.
The previous settings are active again.
Using the minute minder

The minute minder is not connected to a cooking zone. The minute minder does not switch off a cooking zone.
The hob is switched on and no power level has been set for any cooking zone.
- Touch the minute minder key to switch on the minute minder.
The timer display shows '0.00'.

- Use the ‘+’ or ‘-’ key to set the desired time (from 1 minute to 9 hours and 59 minutes).
The left position of the timer display shows the hours, the other positions the minutes.
▷When the time is set, it will begin to countdown.
The timer display will show the remaining time.
The last 10 minutes will be displayed in minutes and seconds.
The timer flashes and the alarm beeps after the set time has passed.
- Touch the timer display to stop the alarm.
The alarm stops automatically after 2 minutes.

Touch the timer display and then touch the '-' key to set the time to '0.00' to switch off the minute minder before the time has passed.

When the hob is switched off; touch the on/off key twice to switch off the minute minder before the time has passed.
Using the cooking timer

The cooking timer is connected to a cooking zone. After the set time has elapsed, the cooking zone will switch off automatically.
The hob is switched on and for at least one cooking zone a power level has been set.
-
Touch the desired cooking zone key.
-
Touch the timer display.
The timer symbol of the active cooking timer lights up brightly.
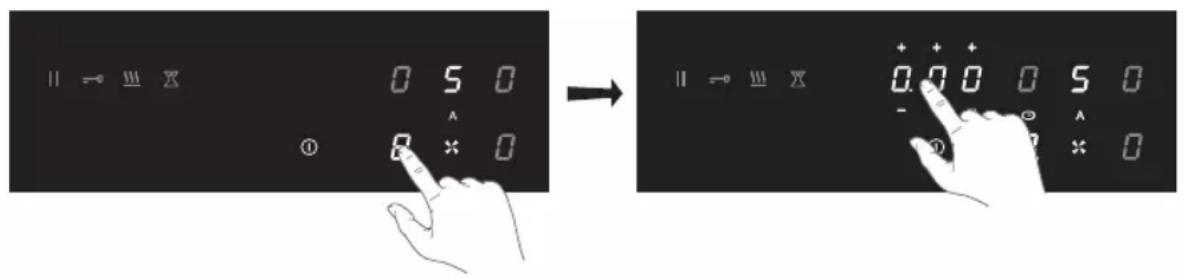
- Use the ‘+’ or ‘-’ key to set the desired time (from 1 minute to 9 hours and 59 minutes).
The left position of the timer display shows the hours, the other positions the minutes.
When the time is set, it will begin to countdown and the timer symbol flashes slowly.
The timer display will show the remaining time.
The last 10 minutes will be displayed in minutes and seconds.
The selected cooking zone will switch off automatically once the set time has elapsed.
The timer flashes and the alarm beeps after the set time has passed.
- Touch the timer display to stop the alarm.
The alarm stops automatically after 2 minutes.

All the cooking zones can have a cooking timer that has been set. The display will always show the time of the cooking zone with the shortest time remaining.
Changing the pre-set cooking time
The cooking time can be changed anytime during the operation.
- Touch the relevant cooking zone key.
- Touch the timer display.
- Use the '+' or '-' key to change the time.
Checking the remaining cooking time
- Touch the cooking zone key to select the zone of which you want to see the remaining time.
A zone connected to the cooking timer is identified by a flashing timer symbol above the cooking zone display.
The timer will display the remaining time of the selected cooking zone.
During the last 10 minutes of countdown, the remaining time will be displayed in minutes and seconds.
Switching off the cooking timer
If you want to switch off the cooking timer before the end of pre-set time:
-
Touch the cooking zone key to select the zone of which you want to switch off the cooking timer.
A zone connected to the cooking timer is identified by a flashing timer symbol above the cooking zone display. -
Touch the '-' key(s) to set the time to '0.00'.
The timer symbol is no longer brightly lit.
Child safety lock
To activate the child safety lock, the steps described must be completed within 10 seconds.
- Switch on the hob.
- Touch and hold any of the cooking zone keys for 3 seconds.

- Release and slide your finger from 0 to 9 along the slide control.
▷All displays show the symbol 'L'.
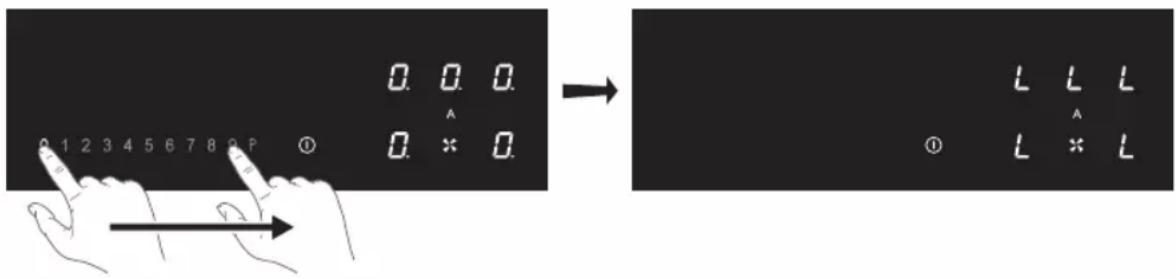
The hob is now locked. It prevents unintended switching on. After 20 seconds, the hob will switch off automatically.
To deactivate the child safety lock, the steps described must be completed within 10 seconds.
- Switch on the hob.
- Touch and hold any of the cooking zone keys for 3 seconds.
- Release and slide your finger from 9 to 0 along the slide control.

Locking function for rapid cleaning during cooking
- Touch the lock key.
The lock key lights up brightly; the settings of the hob are locked to allow rapid cleaning. - Touch the lock key again after the rapid cleaning to switch off the function.


By default, the automatic extraction mode is active; the key lights up more intensely. In automatic extraction mode the extraction level adjusts automatically to the use of the cooking zones.

If the hob is switched off and is still hot (symbol H is visible), the extractor unit will operate in follow-up mode for another 15 minutes.
Switch off the automatic extraction mode
- Touch and hold the on/off key until you hear an audio signal.
▶All displays light up; the induction hob is in standby mode.
The cooking zones and the extraction unit have power level zero. - Touch the 'Automatic extraction mode' key.
The ‘Automatic extraction mode’ key is now less brightly lit; the automatic extraction mode is switched off.

Switch off the automatic extraction mode during cooking
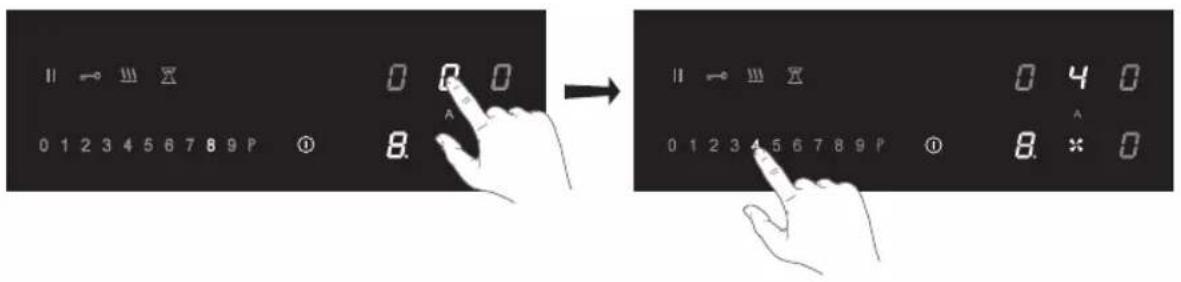
A cooking zone is operating (level 8) and the automatic extraction mode is active (level 5).
- Touch the 'Automatic extraction mode' key.
The ‘Automatic extraction mode’ key is now less brightly lit. The extractor unit can now be set manually.

Manually switch on the extractor unit
- Touch the extraction key.
The display of the extractor unit lights up.
- Set the extractor speed level within 3 seconds by touching the slide control (1 to 9).
The extractor unit switches on with the extraction speed that is set.
▷Set a higher or lower level with the slide control.
Boost
- Switch on the hob and set a power level (>2).
- Touch the 'Automatic extraction mode' key to switch off the automatic extraction mode.

- Touch the extraction key.
The display of the extractor unit lights up.
- Touch level P to select 'Boost'.
The extractor unit switches on at speed level P (Boost).
^▷ 'P' shows on the display.

Set a number of minutes delay time
Use this function to switch off the extractor unit with a delay of a number of minutes.

The automatic extraction mode must be switched off.
- Switch on the hob.
- Touch the extraction key and set an extractor speed level.

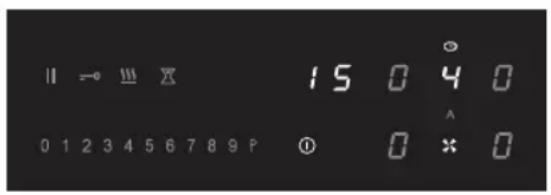
- Touch the timer display.
The timer symbol of the extractor unit lights up brightly. - Use the '+' or '-' key to set the desired delay time.
▷Countdown starts automatically.
The extractor unit switches off after the time that has been set.

Saturation of the grease filter
After 100 operating hours, the grease filter symbol is illuminated; it is necessary to perform maintenance of the grease filter (see 'Maintenance/Cleaning the filters). The grease filter saturation indication is always enabled.
Saturation of the odour filter
After 200 operating hours, a flashing 'C' will appear in the extractor unit display; it is necessary to perform maintenance of the odour filter (see 'Maintenance/Cleaning the grid and filters).
By default the odour filter saturation indication is deactivated (when the extraction is operating in ducted mode). Activate the odour filter saturation indication if the extraction unit is installed as a recirculation application.
Activation of the odour filter saturation indication
- Touch the extraction key.
- Again, touch and hold the extraction key for 5 seconds.
The odour filter symbol 'C' lights up intensely for 1 second.
Now the symbol 'C' is illuminated in the display when it is necessary to perform maintenance of the odour filter.
Deactivation of the odour filter saturation indication
- Touch the extraction key.
- Again, touch and hold the extraction key for 5 seconds.
The odour filter symbol 'C' blinks twices.
Reset the memory of the filter saturation indication
Reset the memory after replacing the grease filter and/or the odour filter
-
Switch on the hob.
-
Touch and hold the key 'Automatic extraction mode' for 5 seconds.
The grease filter symbol or the odour filter symbol will go off, and the memory starts counting over again.
The user menu enables the user to set the signals on the hob as desired. This concerns both audio (tone and volume) and visual signals.
- Touch the on/off key twice within three seconds. ▶The pause key is blinking.
- Touch and hold the pause key.
- Then, touch each cooking zone key clockwise (start with the cooking zone key on the front left).

- Release pause key.
- “U” is flashing alternately with a number between 2 and 7 on the cooking zone display on the rear left. - The configuration value appears in the cooking zone display on the front left.
- Touch the cooking zone key on the rear left and choose the correct number of the menu code (see table).

- Touch the cooking zone key on the front left and select the correct value (see table).
- Confirm the setting; touch and hold the on/off key until you hear an audio signal.

USER MENU
| Menu code | Discription Configuration value | |
| U2 Volume key sound 0 - 1 - 2 - 3 | ||
| U3 Volume alarm signal 0 - 1 - 2 - 3 | ||
| U4 Lighting level display Max. 0 - 1 - 2 - 3 - 4 - 5 - 6 - 7 - 8 - 9 Min. | ||
| U5 Countdown animation (on or off) 0 - 1 | ||
| U6 Pan detection (on or off) 0 - 1 | ||
| U7 Audio signal countdown timer 0 - 1 - 2 | ||

Setting the power limiter should only be carried out by a registered and qualified installer. Please read the safety regulations and the installation instructions carefully.
The hob is equipped with a power limiter. If the total power of operating cooking zones exceeds the maximum available amount of power, the power is automatically reduced. The display of the cooking zone who is being reduced in its power is first flashing; the level is then automatically reduced to the highest available power.
- The limiter is set at 7400W by the factory, but it is possible to change it to 2800W, 3500W or 4500W.
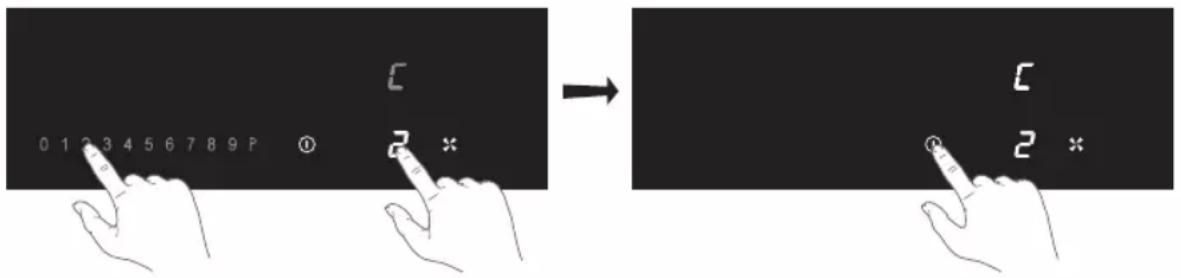
Power limiter configuration
Make sure there are no pots or pans on the hob before you start!
- Disconnect the appliance from the main power supply by removing the power connector from the socket, by removing the fuse or turning the circuit breaker off.
- Reconnect the appliance to the power supply. ▶The keep warm key is flashing.
- Perform, within 2 minutes after reconnecting the hob to the power supply, the following steps.
- Make sure all cooking zones are switched off.
- Touch and hold the keep warm key.
- Then, touch each cooking zone key counterclockwise (start with the cooking zone key on the front right).
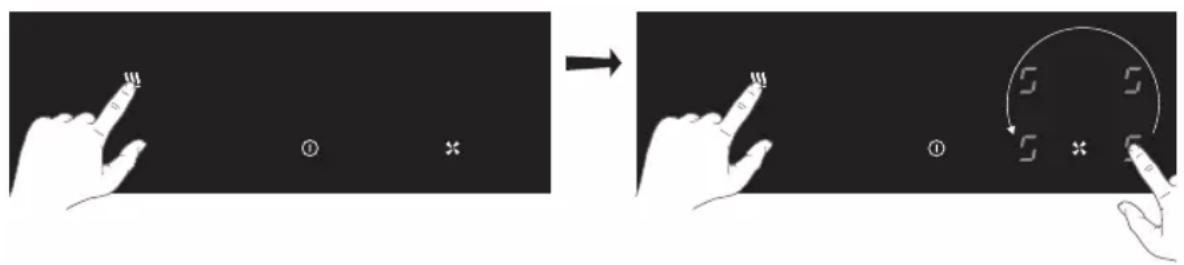
- Release the keep warm key.
“C” is flashing alternately with “0” on the cooking zone display on the rear left.
The configuration value appears in the cooking zone display on the front left.
- Touch the cooking zone key on the rear left and choose "8" by using the slide control.
“C” is flashing alternately with “8” on the cooking zone display on the rear left.

- Touch the cooking zone key on the front left and select the power limitation wanted with the slide control (see table).
- Then, touch and hold the On/off key until all the display segments disappear.
The hob is now ready for use with the selected power limiter active.
- Although food spills cannot burn into the glass, we nevertheless recommend you to clean the hob immediately after use.
- Best for daily cleaning is a damp cloth with a mild cleaning agent.
• Dry with kitchen paper or a dry teacloth.
Stubborn stains
- Stubborn stains can also be removed with a mild cleaning agent such as washing-up liquid.
- Remove watermarks and lime scale with vinegar.
• Metalmarks (caused by sliding pans) can be difficult to remove. Special agents are available. - Use a glass scraper to remove food spills. Melted plastic and sugar is also best removed with a glass scraper.

Never use abrasives. They leave scratches in which dirt and lime scale can accumulate. Never use anything sharp such as steel wool or scourers.
Water collector
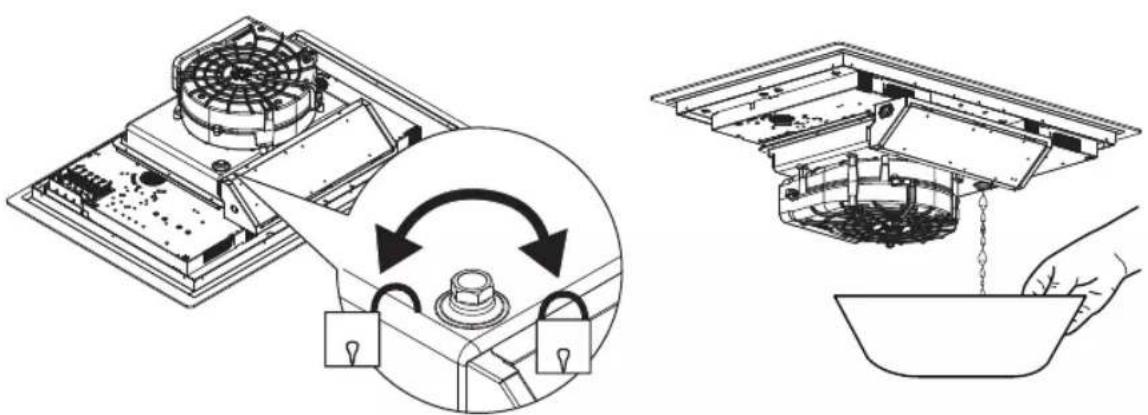
It is recommended to check and empty the water collector every two weeks.
natural_image
Technical line drawing showing a mechanical assembly with a fan, lock, and internal components, plus a hand pouring liquid into a bowl (no text or symbols)Cleaning the grid and filters
- Remove the grid with the filter from the extraction inlet.
- Carefully slide the grease filter off the grid.

natural_image
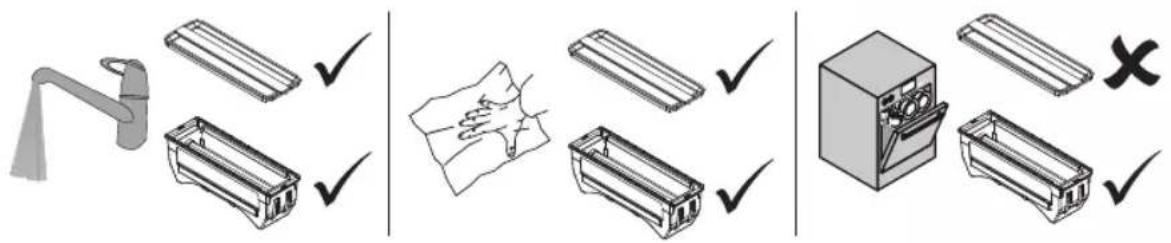
Technical illustration of a mechanical assembly with cross-sectional views and directional arrows (no text or symbols)- Clean the grid with hot water and neutral soap, without using abrasive sponges (do not use detergents!). Do not wash the cast iron grid in a dishwasher.
- Clean the grease filter, when in use, at least every week (or when the filter saturation indication system indicates this necessity. This will maintain good performance of the extractor and prevent a potential fire hazard, caused by excessive grease build-up.
- Clean the grease filter with a non-aggressive detergents, preferably by hand or els in the dishwasher, which must be set to a low temperature and a short cycle.
Odour filters (recirculation use)
The odour filters are located on both sides of the grease filter and on the underside of the grease filter. These filters are regenerable by washing and drying them well. To do this, follow the next procedure.
The regenerable odour filters can be washed by hand or in the dishwasher at a maximum temperature of 65 °C . The washing cycle must be done without other dishes and without dishwasher detergent. Do not use any cleaning agents!
MAINTENANCE
Remove excess water. Be careful to avoid damaging the filter. Place the filter in the oven to dry for at least 1 hour at a maximum temperature of 80 °C . After up to 3 years (or if the filtres are damaged), the filters will need to be replaced.

natural_image
Exploded view diagram of a battery pack assembly showing internal components and casing (no text or labels)
It is important that the grease filter and the regenerable odour filters are properly dried before installation.

Attention
If you see a crack in the glass top (however small), switch off the hob immediately and disconnect it from the power mains. Contact the service department.
If the appliance does not work properly, this does not always mean that it is defective. Try to deal with the problem yourself first by checking the table below. You can also take a look on our website for more information. If the problem continues, contact the service department.
| Symptom Possible cause Solution | ||
| The display lights up when the hob is activated for the first time. | This is the standard set-up routine. | Normal operation. |
| The fan runs on for several minutes after the hob has been switched off. | The hob is cooling. Normal operation. | |
| A slight smell is noticeable the first few times the hob is used. | The new appliance is heating up. | This is normal and will disappear once it has been used a few times. Ventilate the kitchen. |
| The pans make a noise while cooking. | This is caused by the energy flowing from the hob to the saucepan. | At high levels this is perfectly normal for some pans. It will not damage either the pans or the hob. |
| You have switched on a cooking zone, but the display shows u. | The pan you are using is not suitable for induction cooking, or has a to small diameter. | Use a suitable pan. |
| A cooking zone suddenly stops working and you hear a signal. | The time that has been set for the timer has ended. | Touch the left or right timer key to stop the alarm. |
| The hob is not working and nothing appears in the display. | There is no power supply due to a defective cable or a faulty connection. | Check the fuses or the electric switch (if there is no plug). |
| A fuse blows as soon as the hob is switched on. | The hob has been wrongly connected. | Contact a professional installer. |
| L shows on the display. Child safety lock is activated. See chapter ‘Operation of the hob/Child safety lock’. | ||
| C shows on the display of the extractor unit. | Saturation of the odour filter. It is necessary to perform maintenance of the odour filter (see ‘Maintenance/Cleaning the grid and filters). | |
| Symptom Possible cause Solution | ||
| Error code ER 03 and continuous beep. | You have pressed two or more keys at the same time. | Do not operate more than one key at the same time. |
| The control panel is dirty or has water lying on it. | Clean the control panel. | |
| Error code ER21. | Overheating. Let the hob cool down. | |
| Error code E2. | Excess temperature of the induction element. Empty cookware might have been used. | Do not heat empty cookware. |
| Error code E3. | Wrong pan. Use appropriate pans. | |
| Error code E8. | Malfunction of the extractor unit. The extractor unit may be blocked. | Remove any blockages and clean the extractor unit. |
| Other error codes. | Contact the service department. | |
Technical data
| Hob | ||
| Unit Value | ||
| Pruduct type Built-in | ||
| Dimensions Width mm 650/800/860 | ||
| Depth mm 520 | ||
| Height mm 230 | ||
| Power supply voltage/frequency V / Hz ~380 | -415V 50/60Hz | ~220-240V 50/60Hz |
| Power W 7620 | ||
| Weight Kg 21 | ||
| Extraction unit | ||
| Airflow max* - Exhaust installation m | ^3/h | 450 |
| Noise max* - Exhaust installation | dBA | 63 |
| Extraction unit power | W 220 | |
* Maximum speed (boost excluded)
Information according regulation (EU) 66/2014
Measurements according EN60350-2
| Model identification | IKR3084_ |
| Type of hob | Induction hob |
| Number of electric cooking zones and/or areas | 4 |
| Heating technology | Induction cooking zones and cooking areas |
| For circular electric cooking zones: diameter of useful surface area per electric heated cooking zone in mm |  |
| Energy consumption per cooking zone or area calculated per kg (ECelectric hob) in Wh/kg |  |
| Energy consumption for the hob calculated per kg (ECelectric hob) in Wh/kg | 171.0 |
| Model identification IKR3093 | --- |
| Type of hob Induction hob | |
| Number of electric cooking zones and/or areas 4 | |
| Heating technology Induction cooking zones | and cooking areas |
| For non-circular cooking zones or areas: lenght and width of useful surface area per electric heated cooking zone or area in mm |  |
| For circular electric cooking zones: diameter of useful surface area per electric heated cooking zone in mm | |
| Energy consumption per cooking zone or area calculated per kg (ECelectric hob) in Wh/kg | 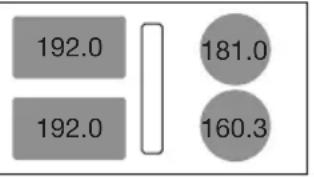 |
| Energy consumption for the hob calculated per kg (ECelectric hob) in Wh/kg | 181.0 |
| Model identification IKR3082 | |
| Type of hob Induction hob | |
| Number of electric cooking zones and/or areas 4 | |
| Heating technology Induction cooking zones | and cooking areas |
| For non-circular cooking zones or areas: lenght and width of useful surface area per electric heated cooking zone or area in mm |  |
| Energy consumption per cooking zone or area calculated per kg (ECelectric hob) in Wh/kg | 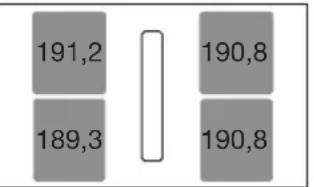 |
| Energy consumption for the hob calculated per kg (ECelectric hob) in Wh/kg | 190,5 |
| Model identification IKR3063 | - |
| Type of hob Induction hob | |
| Number of electric cooking zones and/or areas 4 | |
| Heating technology Induction cooking zones | and cooking areas |
| For non-circular cooking zones or areas: lenght and width of useful surface area per electric heated cooking zone or area in mm |  |
| For circular electric cooking zones: diameter of useful surface area per electric heated cooking zone in mm | |
| Energy consumption per cooking zone or area calculated per kg (ECelectric hob) in Wh/kg |  |
| Energy consumption for the hob calculated per kg (ECelectric hob) in Wh/kg | 186.0 |
Disposal of packaging and appliance
In the manufacturing of this appliance durable materials were used. Make sure to dispose of this equipment responsibly at the end of its lifecycle. Ask the authorities for more information regarding this.
The appliance packaging is recyclable. The following may have been used:
- cardboard;
• polythene film (PE);
• CFC-free polystyrene (PS hard foam).
Dispose of these materials in a responsible manner and in accordance with government regulations.

As a reminder of the need to dispose of household appliances separately, the product is marked with the symbol of a crossed-out wheeled dustbin. This means that at the end of its working life, the product must not be disposed of as urban waste. It must be taken to a special local authority differentiated waste collection centre or to a dealer providing this service.
Disposing of a household appliance separately avoids possible negative consequences for the environment and health deriving from inappropriate disposal and enables the constituent materials to be recovered to obtain significant savings in energy and resources.
Declaration of conformity
CE We declare that our products meet the applicable European Directives, Decisions and Regulations and the requirements listed in the standards referenced.

The appliance identification card is located on the bottom of the appliance.
When contacting the service department,
have the complete type number to hand.
Adressen en telefoonnummers van de serviceorganisatie vindt u op de garantiekaart. You will find the addresses and phone numbers of the service organisation on the guarantee card.
www.pelgrim.nl
www.pelgrim.be

890266
Pelgrim
- INHOUDSOPGAVE
- Boost
- Rooster en filters reinigen
- Safety
- Before first use
- Operation of the hob
- Operation of the extractor unit
- CONTENTS
- User menu
- Power limiter
- Maintenance
- Troubleshooting
- Technical specifications
- Environmental aspects
- Pictograms used
- Introduction
- Please read the separate safety instructions carefully before using the appliance.
- Description
- Control panel
- Indications in the display
- Before use, read the separate safety instructions.
- Temperature safety
- Cooking-time limiter
- Power management
- Use of the touch keys and slide control
- Induction noises
- A ticking sound
- Pans are making noise
- The fan is making noise
- Appropriate pans
- Minimum pan diameter
- Attention
- Pan detection
- Cooking levels
- Boost function
- Cooking guidelines
- Use level 'boost' to:
- Use level 9 to:
- Use level 7 and 8 to:
- Use level 4-6 to:
- Use level 1-3 to:
- Use of the downdraft
- Start cooking
- Pan detection symbol
- Finish cooking
- Switch on the automatic heat-up function
- Switch on the keep warm function
- Connecting the Bridge induction cooking zones (IKR3093..., IKR3063\_and IKR3082.)
- Connection of Bridge induction cooking zones
- Disconnection of Bridge induction cooking zones
- Pause cooking
- Recall function
- Using the minute minder
- Using the cooking timer
- Changing the pre-set cooking time
- Checking the remaining cooking time
- Switching off the cooking timer
- Child safety lock
- To activate the child safety lock, the steps described must be completed within 10 seconds.
- To deactivate the child safety lock, the steps described must be completed within 10 seconds.
- Locking function for rapid cleaning during cooking
- Switch off the automatic extraction mode
- Switch off the automatic extraction mode during cooking
- Manually switch on the extractor unit
- Set a number of minutes delay time
- Saturation of the grease filter
- Saturation of the odour filter
- Activation of the odour filter saturation indication
- Deactivation of the odour filter saturation indication
- Reset the memory of the filter saturation indication
- Power limiter configuration
- Stubborn stains
- Water collector
- Cleaning the grid and filters
- Odour filters (recirculation use)
- Information according regulation (EU) 66/2014
- Disposal of packaging and appliance
- Declaration of conformity
Brand : Pelgrim
Model : IKR3082F
Category : Cooker