
H6 ID48C5HTB - Oven HAIER - Free user manual and instructions
Find the device manual for free H6 ID48C5HTB HAIER in PDF.


| Product Type | Built-in Electric Oven |
| Brand | Haier |
| Model | H6 ID48C5HTB |
| Energy Source | Electric |
| Energy Efficiency Class | A |
| Oven Type | Multifunction |
| Capacity | 48 L |
| Dimensions (H x W x D) | 595 x 595 x 550 mm |
| Weight | 35 kg |
| Number of Functions | 8 |
| Temperature Range | 50-250 °C |
| Cleaning Type | Hydrolytic Cleaning |
| Safety Features | Child Lock, Cool Door, Automatic Shut-off |
| Control Type | Touch Control |
| Door Hinge | Drop-down |
| Color | Stainless Steel |
| Power Consumption | 3.5 kW |
| Interior Light | Yes |
| Grill Function | Yes |
| Convection | Yes |
| Defrost Function | Yes |
| Number of Shelves | 2 |
Frequently Asked Questions - H6 ID48C5HTB HAIER
User questions about H6 ID48C5HTB HAIER
0 question about this device. Answer the ones you know or ask your own.
Ask a new question about this device
Download the instructions for your Oven in PDF format for free! Find your manual H6 ID48C5HTB - HAIER and take your electronic device back in hand. On this page are published all the documents necessary for the use of your device. H6 ID48C5HTB by HAIER.
USER MANUAL H6 ID48C5HTB HAIER

WELCOME
This installation manual is designed for kitchen manufacturers who will deal with these products. To ensure safety and get the best results, please read this manual carefully, including safety instructions, and keep it for future reference. Before proceeding with installation, take note of the serial number, as you may need it in case of repairs. Check for any damage during transport and consult a technician if in doubt before using. Always keep all packing material away from children.
NOTE: Features, pictures in the manual and product accessories may vary depending on the model purchased.
Index
1 Safety warnings for installation p. 2-3
2 Where to install the product
3 Oven dimensions p.4-5
4 Dimensions of combinable products p.6-13
4.1 Compact oven h45 drop down opening 4.2 Compact oven h38 drop down opening 4.3 Compact oven h38 side wing opening 4.4 Warming drawer
5 Installation tools p.14
6 Furniture and ventilation p.14 - 21
6.1 Precautions 6.2 Undertop installation 6.3 Combination with cooktop 6.4 Corner installation 6.5 Installation oven in column 6.6 Installation compact oven in column 6.7 Installation compact oven + warming drawer in column 6.8 Drawer adjustments 6.9 Installation oven + compact oven h45 in column 6.10 Installation oven + compact oven h38 in column
7 Connection to the mains p.22 - 25
7.1 Safety warnings 7.2 Instructions 7.3 Other tips
8 Instructions for Oven installation p.26 - 31
8.1 Important warnings 8.2 Fixing to the cabinet 8.3 Installation step by step
9 Delivery to the user p.32
10 First startup p.32
11 Disassembling the product p.32
Observe these directions before beginning the installation of the product.
- Your safety is very important to us. Please read this information carefully before using the oven;
- Installation must be carried on by a qualified technician who must know and respect the laws in force in the country of installation and the manufacturer's instruction;
- If manufacturer service is required to eliminate faults resulting from improper installation, such service is not covered by the fix;
- Remove the packing material before operating the appliance;
- After unboxing the appliance, always check it is not damaged, in case of issue contact the customer service before installing and do not connect to the power supply;
- A damaged product can be the cause of a short circuit, electric shock, fire start and other hazards;
- Check the packaging for accessories or accompanying materials (envelopes with screws, documents, brochures, etc.) and, if so, remove and store them;
- The oven can be located high in a column or under a worktop;
- Before fixing, you must ensure good ventilation in the oven space to allow proper circulation of the fresh air required for cooling and protecting the internal parts. Make the openings specified on the illustrations according to the type of fitting. Always fix the oven to the furniture with screws provided with the appliance;
- No additional operation/setting is required in order to operate the appliance at the rated frequencies;
- The appliance must not be installed behind a decorative door in order to avoid overheating.
- If the assistance of the manufacturer is required to rectify faults arising from incorrect installation, this assistance is not covered by the guarantee. The installation instructions for professionally qualified personnel must be followed.
- Incorrect installation may cause harm or injury to people, animals or belongings. The manufacturer cannot be held responsible for such harm or injury.
- Safe use is only guaranteed if installation has been carried out properly according to these instructions. In case of damage due to improper installation, the responsibility lies with the person who installed the product.
- During installation the oven should be disconnected from the mains to avoid overheating.
- During installation do not use the oven door's handle to lift and move the oven.
- It is recommended to wear protective gloves during installation to avoid cut injuries.
- The installation furniture and the adjacent ones must withstand temperatures of 95°C.
- Warranty does not cover damage caused by improper installation.
- In case of incorrect installation, tampering with the device and improper connection, the validity of the product warranty will expire.
- Make sure that when the product's power supply cable is completed, it is not accessible.
- After assembly, the power cord must not come into contact with moving parts of kitchen components (such as a drawer) and must not be exposed to mechanical stresses.
- This product requires constant ventilation during use. Do not cover the air vents.
- When delivering the product to the end user, the technician must ensure that it has been installed correctly.
Where to install the product
2
• Install and use this product in a closed, covered, dry and well-ventilated environment; - Do not install the product in open environments exposed to atmospheric agents; - This appliance is designed to be used at altitude lower than 2000m; - Mount the product near an electrical outlet; - Use the product only when placed in a recessed compartment, otherwise you risk injury and burns.
3 Oven Dimensions
Dimensions in mm
Frontal axonometric view
Back axonometric view Cable 1100 mm
Dimensions in mm
Side view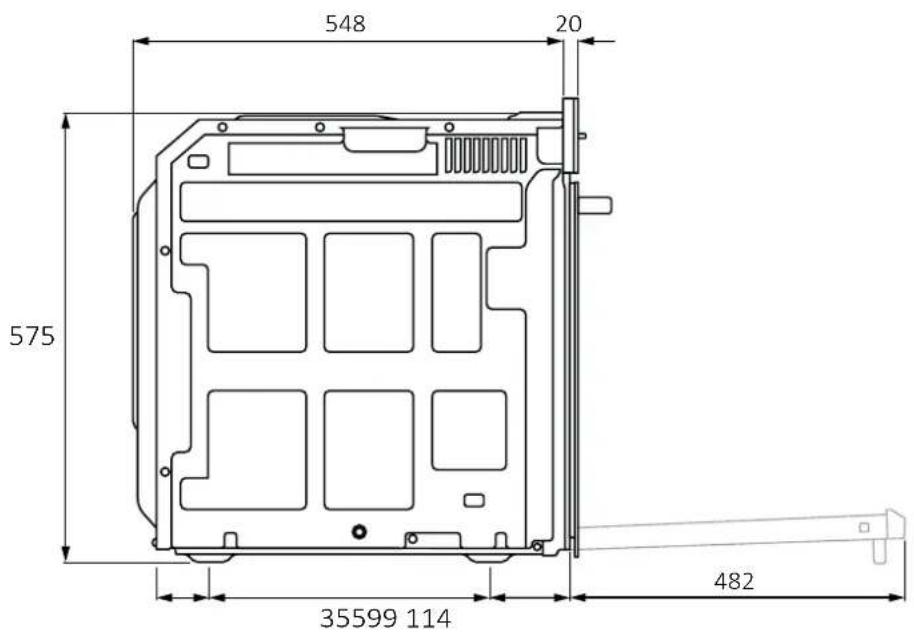
Back view
Product codes
| H6 ID23B3HTX | H6 ID23B4HTB | H6 ID46G5YTB | H6 ID66C3HTB | H6 ID48L5YTB | H6 ID2P5B3YTX | H6 ID68CSYTB1 |
| H6 ID23B3YTB | H6 ID25B3LYTB | H6 ID66G5YTB | H6 ID46C3YTB | H6 ID48M5HTB | H6 ID43B3HTB | H6 ID48M5YTB1 |
| H6 ID25B3LHTX | H6 ID25B4LYTB | H6 ID46G3SHTB | H6 ID66C3YTB | H6 ID68M5HTB | H6 ID46C3HTB1 | H6 ID68M5YTB1 |
| H6 ID25G3HTX | H6 ID46G3HTB | H6 ID46G3SYTB | H6 ID48C5HTB | H6 ID48M5YTB | H6 ID66C3HTB1 | H6 ID48M5HTB1 |
| H6 ID25G3HTB | H6 ID46G3YTB | H6 ID46G5SHTB | H6 ID48C5YTB | H6 ID68M5YTB | H6 ID46C3YTB1 | H6 ID68M5HTB1 |
| H6 ID25G3YTX | H6 ID65G3YTB | H6 ID46G5SYTB | H6 ID68C5YTB | H6 ID46B3HTB | H6 ID66C3YTB1 | H6 ID2P5B3YTB |
| H6 ID25G3YTB | H6 ID66G3HTB | H6 ID46R5YTB | H6 ID48C5SYTB | H6 ID2P3T1HTB | H6 ID25G3HTB1 | H6 ID25G5SYTX |
| H6 ID25C3YTX | H6 ID46G5HTB | H6 ID46C3HTB | H6 ID68C5SYTB | H6 ID2P3T1HTX | H6 ID25G3YTB1 | H6 ID66G3SHTB |
| H6 ID23B3HTB |
4 Dimensions of combinable products
Compact oven h45 drop down opening 4.1
Dimensions in mm
Frontal axonometric view

Back axonometric view
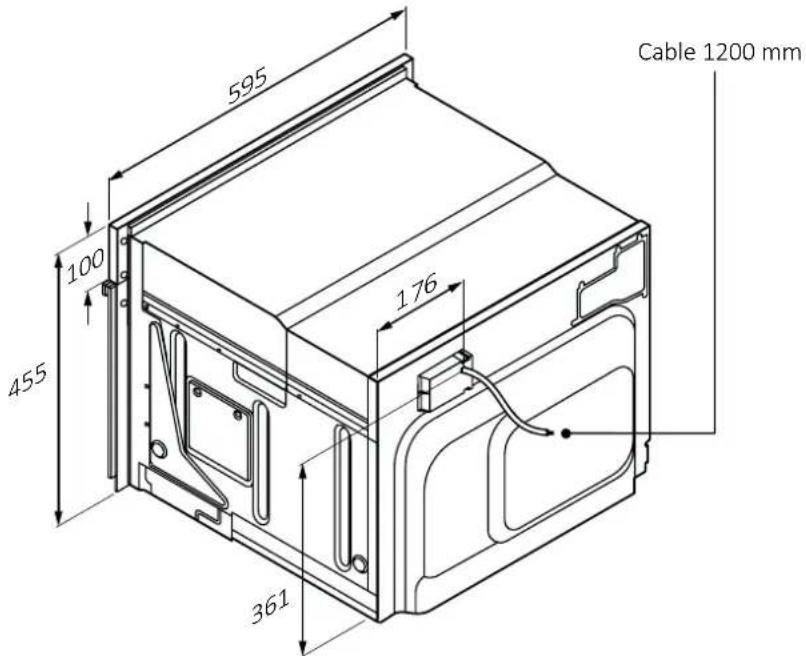
4.1 Compact oven h45 drop down opening
Dimensions in mm
Side view

Back view
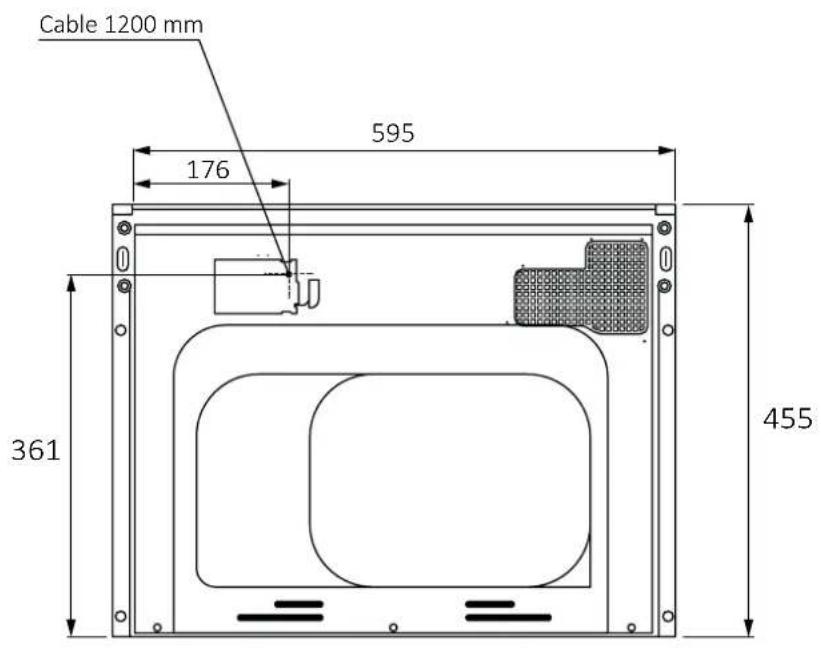
Product codes
H4MWID29G6NQB H4MWID49G6NQB H4MWID69G6NQB H4MWID49C6NQB H4MWID69C6NQB H4MWID69P6NQB H4MWID49P6NQB
4 Dimensions of combinable products
Compact oven h38 drop down opening 4.2
Dimensions in mm
Frontal axonometric view

Back axonometric view
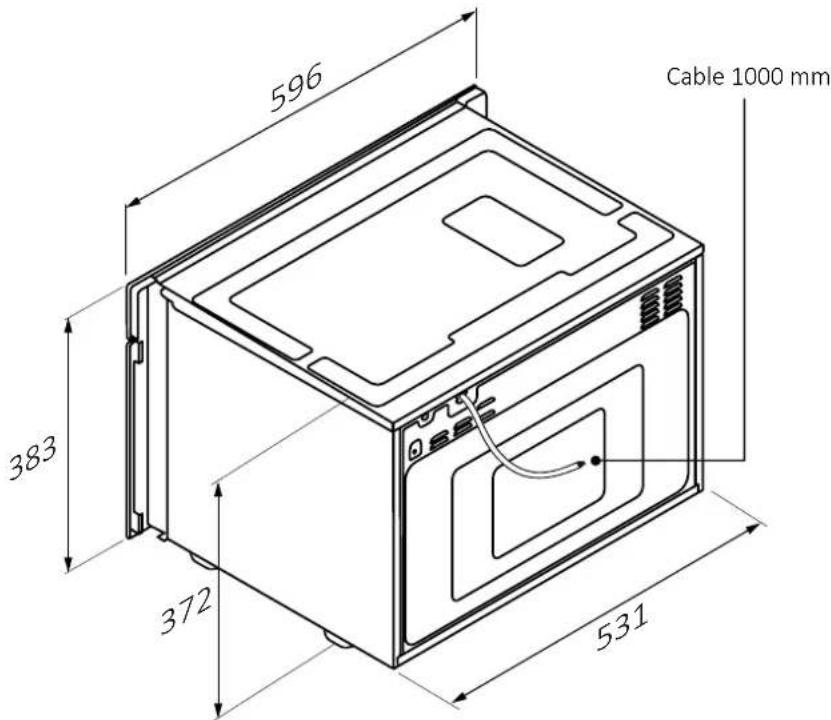
4.2 Compact oven h38 drop down opening
Dimensions in mm
Side view
Back view
Product codes
H38DMWID26NB
H38DMWID26NX
H38DMWID46NB
4 Dimensions of combinable products
Compact oven h38 side wing opening4.3
Dimensions in mm
Frontal axonometric view
Back axonometric view
4.2 Compact oven h38 side wing opening
Dimensions in mm
Side view
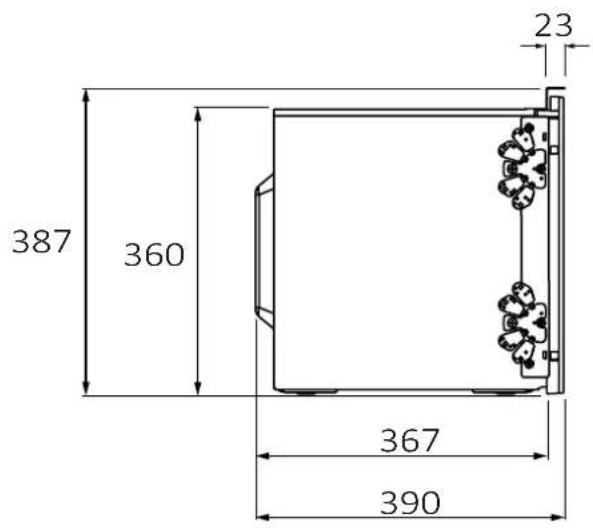
Back view

Product codes
H38MWID4ID27N
H38FMWID627N
H38FMWID4ID27N
H38FMWID2S7
4 Dimensions of combinable products
4.4 Warming drawer
Dimensions in mm
Frontal axonometric view

Back axonometric view
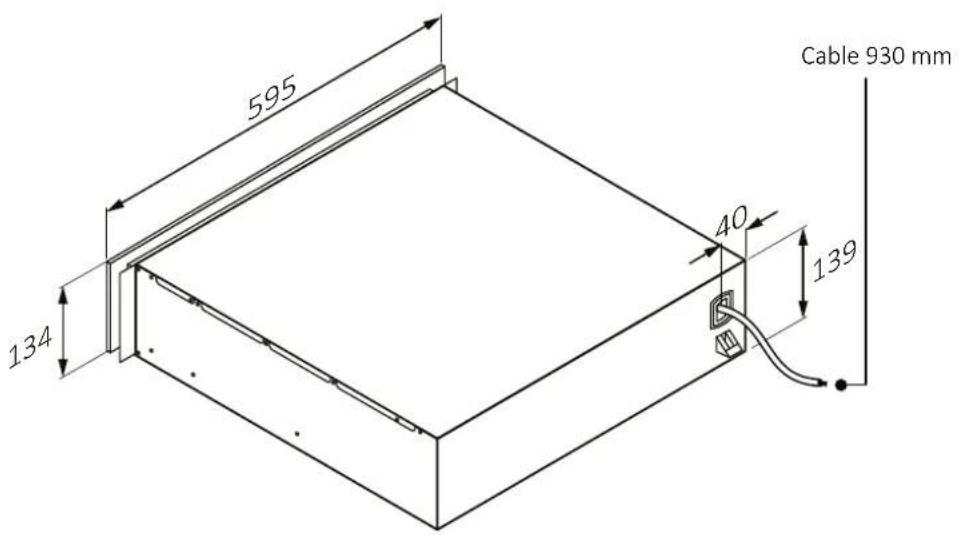
4.3 Warming drawer
Dimensions in mm
Side view

Back view

Product codes
HWD14ID6E HWD14ID4E
5 Installation tools
Tools needed: cutter

gloves
screwdriver
Tools provided with the product: screws x2
6 Furniture and ventilation
6.1 Precautions
- Provide the recessed compartment without a back wall; • Products protrude 20 mm from the cabinet edge;
- For ventilation of the product, follow the instructions in this manual;
- If the product is installed under a cooktop, also refer to the cooktop installation instructions; • The connection socket must not be within area A;
- It is recommended that the cabinet be fixed to the wall to prevent tipping over;
6.2 Undertop installation

No connections in this area
6.3 Combination with cooktop
To ensure proper ventilation, also refer to the cooktop installation instructions;


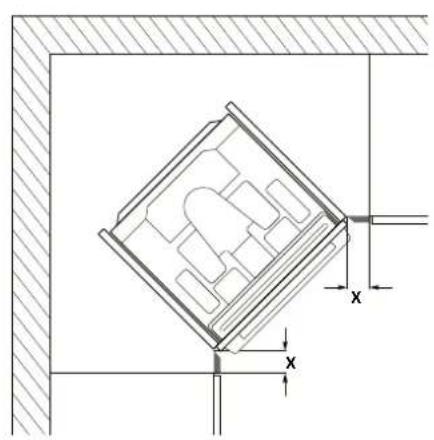
6.4 Corner installation
For corner installation, observe the dimensions and flush-installation instructions;
- In order to allow the opening of the door, take into account the minimum dimensions of the corner mounting;
- The X measurement depends on the thickness of the cabinet front and handle.

6 Furniture and ventilation
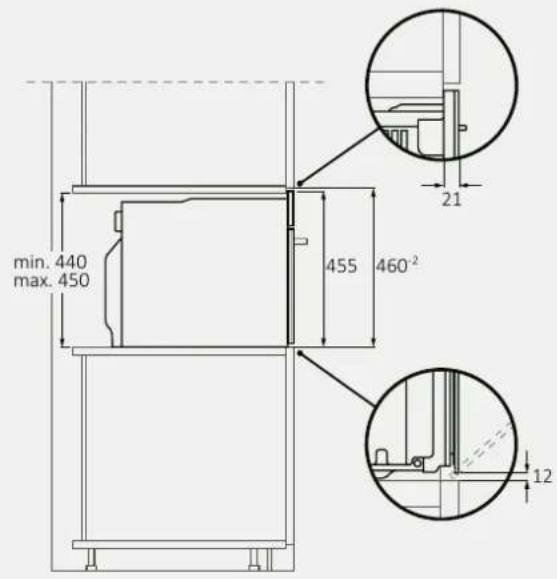
6.5 Installation oven in column
For column installation, observe the dimensions and flush-installation instructions;
- A rear slit is needed for ventilation of products;
- Pay attention that the air exchange is in accordance with the drawings below; • Install products at a height where accessories can be easily picked up.

Single product Side view

6.6 Installation compact oven in column

Single product Side view
6 Furniture and ventilation
6.7 Installation compact oven + warming drawer in column

Combined products
Compact oven + warming drawer
Side view

Note: The drawer front protrudes in height. Use caution during installation.
6.8 Drawer adjustments
Installation in combination with another appliance: make sure the warming drawer is aligned with the matching appliance.

- To adjust the depth of the warming drawer, loosen screws "A" and adjust brackets "B" until the front panel is properly aligned with the matching appliance;
- Retighten screws "A" until fully secured.

- The angle of the front panel can be adjusted after loosening screws "A". When the panel is parallel to the cabinet and the front of the matching appliance, tighten screws "A" again until fully secured.
6 Furniture and ventilation
6.9 Installation oven + compact oven h45 in column

Combined products
Oven + compact oven h45 side wing opening
Side view

Note: to reduce the gap between machines, we suggest using shims to raise the kiln a few millimeters.
6.10 Installation of oven + compact oven h38 in column
Drop-down opening in column

Side wing opening in column

Note: to reduce the gap between machines, we suggest using shims to raise the kiln a few millimeters.
7.1 Safety warnings
To carry out the electrical connection of the device safely, observe the following warnings:
- Any improperly performed repair, installation and maintenance can seriously endanger the user;
- The producer declares that it assumes no liability for direct or indirect damage caused by incorrect installation, maintenance or repair. It is also not liable for damage caused by missing or interrupted grounding pipeline (electric shock);
- Have the oven connected to the power grid only by a qualified technician who knows and complies with local regulations and additional regulations of the local power company;
- The product falls under protection class I and can operate only if it is equipped with a grounding conductor;
- The product must be voltage-free during installation;
- Connect the product using only the supplied cable;
- The product must be connected to a properly made electrical system;
- In case of incorrect installation, tampering with the device and improper connection, the validity of the product warranty will expire;
- If the power cord is damaged, it should be replaced by the manufacturer, a service technician or similarly qualified person to avoid risk. For any repairs, contact customer service only and ask that original spare parts be used;
- For any repairs, contact Customer Service exclusively and request the use of original spare parts;
- Disconnect the product from the power supply before performing any work or maintenance on it;
- To avoid electric shock, make sure the appliance is turned off before replacing the bulb.
NOTE: Because the oven may need servicing, it is advisable to keep another wall outlet available to plug the oven into if it is moved away from the space where it is installed.
Instructions 7.2
Power absorbed
See product data plate.
Differential circuit breaker (life-saving)
The use of a residual current circuit breaker (earth leakage circuit breaker) with trip current complying with current standards is recommended.
Separation devices
In the event that it is necessary to use it, the oven must be connected to the power supply via an omnipolar disconnection device that ensures a separation between contacts complying with overvoltage category III. Such a device must withstand the maximum loads connected and comply with current standards.
⚠ WARNING: To avoid any danger caused by accidentally resetting the thermal cut-off device, the appliance must not be powered by an external switching device, such as a timer, or be connected to a circuit that is regularly switched on and off. The product is not designed to be operated by an external timer or a separate remote control system.
The product can be supplied by the producer:
A) Unplugged: Direct connection to the mains; B) Without plug: Can be added during installation; C) With plug: Direct connection to the socket;
A) Unplugged: Direct connection to the mains
The product is connected directly to the power supply by including an omnipolar switch in the circuit;
The yellow-green ground wire must not be interrupted by the switch;
The omnipolar switch used for connection must be easily accessible when the product is installed;
The connection to the power supply must be made taking into account the polarity of the oven and the power source.
Connect the cables of the network connection respecting the color allocation:
- Green-yellow = ground;
- Blue = neutral;
- Brown = phase.
B) Without plug: Can be added during installation

NOTE: The appliance can only be connected to a grounded outlet installed according to current standards. If you do not wish to add the plug, follow step A.
If you want to add the plug:
- A plug suitable for the loads indicated on the product and complying with current standards must be applied;
- Insert the plug into the grounded outlet. If the product is recessed, the plug of the power cord must be freely accessible after installation. If free access to the plug is not possible, an omnipolar separation device must be installed in the fixed electrical system in accordance with the installation standards;
- The yellow-green ground wire must not be interrupted by the switch;
- The omnipolar switch used for connection must be easily accessible when the product is installed.
C) With plug: Direct connection to the socket
The product can only be connected to a grounded outlet.
- Insert the plug into the grounded outlet. If the product is recessed, the plug of the power cord must be freely accessible. If free access to the plug is not possible, an omnipolar separation device must be installed in the fixed electrical system in accordance with the installation standards;
- The yellow-green ground wire must not be interrupted by the switch;
- The omnipolar switch used for connection must be easily accessible when the equipment is installed;
- The socket must be suitable for the load indicated on the nameplate and must have the ground contact connected and working;
- In case of incompatibility between the socket and the plug of the appliance, ask a qualified electrician to replace the socket with one of a suitable type. The plug and socket must comply with the standards in force in the country of installation;
- Should the product be supplied with a polarized plug, it should be connected only to a polarized outlet.
Replacing the power cord
- Do not replace the cable yourself. Contact the authorized service center.
7.3 Other advice
The use of any household appliance requires adherence to certain basic rules:
- Do not pull the power cord to disconnect the appliance from the power supply;
- Do not touch the appliance with wet or damp hands or feet;
- In general, the use of adapters, power strips or extension cords is discouraged;
- In case of malfunction and/or drop in performance, turn off the appliance and do not tamper with it.
8 Instructions for oven installation
8.1 Important warnings
- For safety reasons, the product should be used only when recessed; • In order to properly work, the product needs a sufficient amount of fresh air flowing in; • Make sure that the intermediate shelf on which the product rests does not touch the wall;
- The surfaces in the recessed compartment are resistant to the temperatures required by EN 60335;
- If installing the product below a cooktop, follow the instructions provided by the cooktop manufacturer;
8.2 Fixing to the cabinet
- Insert the product all the way in and center it;
- Secure the product with the screws; • Cover the screws with the caps.
Column with handle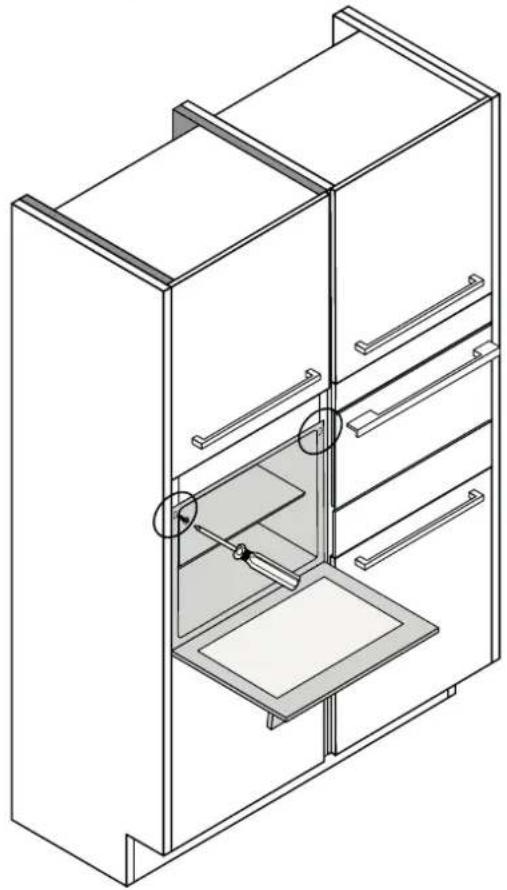


In case of kitchens with integrated vertical handle (vertical groove):
- Apply a suitable piece of filler to cover any sharp edges and ensure secure mounting; • Pre-drill aluminum profiles to make a screw fitting;
- Secure the product with suitable screw (not provided);
Column with aluminum profile
8.3 Installation step by step
The following pictures show the steps of installing the product in a column.
You can view the product installation video by scanning the QR code

or by clicking this

1
Place the product next to the cabinet for embedding;

2
Remove the packaging using a box cutter, making sure not to damage the product;

3
Remove all accessories in the oven and close the door again;

4
Position the product close to the cabinet for recessing. After consulting the installation manual, proceed with the electrical connections;
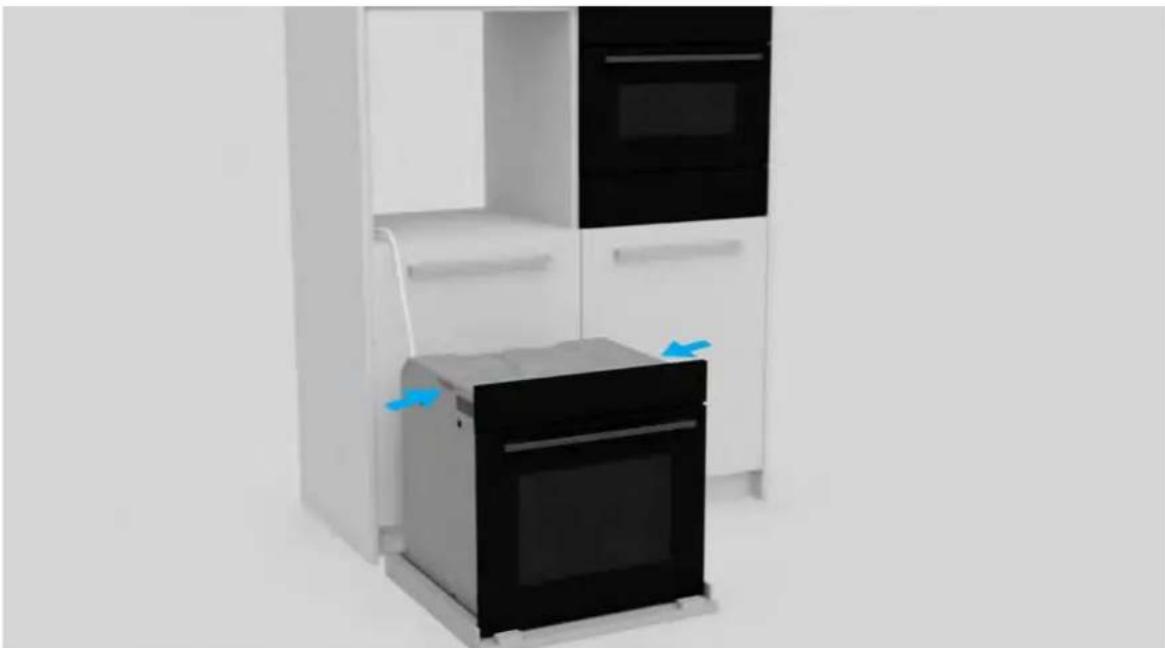
5
Lift the product by the side handles using gloves. Do not lift by door handle;

6
Insert the product into the recessed compartment;

7
Open the door to secure the product to the cabinet. Screw the product to the top ends; cover the screws with the caps provided.
Delivery to the user
At the end of installation:
• Inform the user about essential functions; • Inform the user about all aspects relevant to safe use and handling; - Deliver accessories and instructions for use and assembly to the user to be kept with care.
After installation is complete, remove the protective film, tape, and all other packing materials and remove the supplied accessories from inside the oven.
WARNING: The product requires adequate ventilation for normal operation. Do not obstruct the ventilation openings for any reason.
NOTE: The actual appearance of the oven depends on the model chosen.
First startup
When the product is preheated for the first time, slight odors and smoke may form when the door is opened. When the product is turned on for the first time, the following settings can be made, if available:
- Set time;
- Select the language;
- Set brightness and volume;
- Set amperage;
- For more information, see the product's user manual.
Disassembling the product
- Disconnect the product from the power supply;
- Unscrew the fixing screws;
- Lift the product slightly and pull it out completely;
- This product will not damage the cabinet, which can also be used with a new appliance.


WELCOME

8.3 Step-by-step installation
or by clicking
at the following


1
2
3
4
5
6
7
Haier
- WELCOME
- INDEX
- OBSERVE THESE DIRECTIONS BEFORE BEGINNING THE INSTALLATION OF THE PRODUCT
- WHERE TO INSTALL THE PRODUCT
- OVEN DIMENSIONS
- DIMENSIONS OF COMBINABLE PRODUCTS
- COMPACT OVEN H45 DROP DOWN OPENING
- COMPACT OVEN H38 DROP DOWN OPENING
- COMPACT OVEN H38 SIDE WING OPENING
- WARMING DRAWER
- INSTALLATION TOOLS
- FURNITURE AND VENTILATION
- PRECAUTIONS
- UNDERTOP INSTALLATION
- COMBINATION WITH COOKTOP
- CORNER INSTALLATION
- INSTALLATION OVEN IN COLUMN
- INSTALLATION COMPACT OVEN IN COLUMN
- INSTALLATION COMPACT OVEN + WARMING DRAWER IN COLUMN
- COMBINED PRODUCTS
- DRAWER ADJUSTMENTS
- INSTALLATION OVEN + COMPACT OVEN H45 IN COLUMN
- INSTALLATION OF OVEN + COMPACT OVEN H38 IN COLUMN
- SAFETY WARNINGS
- TO CARRY OUT THE ELECTRICAL CONNECTION OF THE DEVICE SAFELY, OBSERVE THE FOLLOWING WARNINGS
- INSTRUCTIONS
- POWER ABSORBED
- DIFFERENTIAL CIRCUIT BREAKER (LIFE-SAVING)
- SEPARATION DEVICES
- UNPLUGGED: DIRECT CONNECTION TO THE MAINS
- WITHOUT PLUG: CAN BE ADDED DURING INSTALLATION
- IF YOU WANT TO ADD THE PLUG
- WITH PLUG: DIRECT CONNECTION TO THE SOCKET
- REPLACING THE POWER CORD
- OTHER ADVICE
- INSTRUCTIONS FOR OVEN INSTALLATION
- IMPORTANT WARNINGS
- FIXING TO THE CABINET
- IN CASE OF KITCHENS WITH INTEGRATED VERTICAL HANDLE (VERTICAL GROOVE)
- INSTALLATION STEP BY STEP
- DELIVERY TO THE USER
- FIRST STARTUP
- DISASSEMBLING THE PRODUCT
- STEP-BY-STEP INSTALLATION
- HAIER
Brand : HAIER
Model : H6 ID48C5HTB
Category : Oven