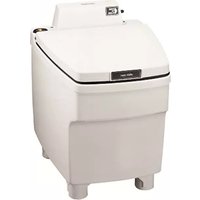
Electra Magic 12V - Toilet THETFORD - Free user manual and instructions
Find the device manual for free Electra Magic 12V THETFORD in PDF.


| Product Type | Electric Flush Toilet |
| Brand | Thetford |
| Model | Electra Magic 12V |
| Power Supply | 12V DC |
| Power Consumption | Approximately 10-15A during flush (typical) |
| Flush Mechanism | Electric macerator flush |
| Water Consumption per Flush | Approximately 0.5 liters (variable) |
| Holding Tank Capacity | Not specified; typical model 10-20 liters (depending on installation) |
| Dimensions (W x D x H) | Approx. 35 x 40 x 45 cm |
| Weight | Approximately 12 kg |
| Bowl Material | Porcelain |
| Seat Material | Plastic with soft-close option |
| Water Supply | Fresh water connection required (12V pump if not gravity) |
| Waste Outlet | 3-inch (76 mm) hose connection |
| Venting Requirements | Optional vent for tank |
| Installation | Designed for marine or RV use; flush mounting on floor |
| Cleaning | Use mild detergents; avoid abrasive cleaners |
| Maintenance | Regular descaling and inspection of seals |
| Safety Features | Fused power connection; waterproof connectors |
| Spare Parts Availability | Available through Thetford dealers; include seals, motors, control boards |
| Repairability | Modular design; many parts replaceable by user |
| Warranty | Typically 2 years (check local terms) |
Frequently Asked Questions - Electra Magic 12V THETFORD
User questions about Electra Magic 12V THETFORD
0 question about this device. Answer the ones you know or ask your own.
Ask a new question about this device
Download the instructions for your Toilet in PDF format for free! Find your manual Electra Magic 12V - THETFORD and take your electronic device back in hand. On this page are published all the documents necessary for the use of your device. Electra Magic 12V by THETFORD.
USER MANUAL Electra Magic 12V THETFORD
natural_image
Abstract black and white geometric pattern resembling a fan or segmented arc (no text or symbols)THETFORD
ELECTRA MAGIC®
Owner's Manual
RV and Marine Recirculating Toilets

natural_image
White portable washing machine with black lid, placed beside a floral arrangement and a glass vase (no visible text or symbols)
Because We Take Your Leisure Seriously
Congratulations!
…on your purchase of Thetford's Electra Magic recirculating toilet, the most popular recirculating toilet in the world.
This unit is a 100% self-contained sanitation system which requires no pressure water connection or holding tank installation (an optional holding tank may be installed to increase total capacity). The Electra Magic is operated by a simple D.C. hookup, available in a 12-Volt or a 24-Volt model, and may be discharged directly into the sewer or into an optional holding tank.
Unique Filtration
Thetford's unique filtration system puts an end to unpleasant clogging. The exclusive filter cone assures that only filtered fluid is delivered to the recirculating pump.
Operating Instructions
1. Initial Flush Charge
A. Fill until water reaches slightly above the charge level (blue line) on indicator dial.
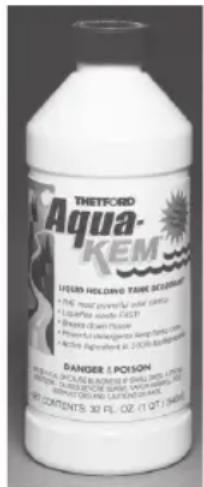
B. Add Thetford Aqua-Kem ^® Liquid Holding Tank Deodorant as per instructions on package.
2. To Flush
Depress flush button. (Note: Do not depress button when unit is empty.)
To Empty RV Model
The Electra Magic is fitted with a termination valve on the bottom of the unit. Depending on the installation, follow one of these procedures:
A. Without holding tank – attach discharge hose to outlet and open termination valve.
B. With holding tank – open termination valve. This dumps contents of unit into the holding tank.
To Evacuate Marine Model
See your boat owner's manual.
Any Questions...
about your toilet or this Owner's Manual?
Simply call Thetford's
Customer Relations Department at
1-800-523-3939
Electrical Hookup
RV and Marine Models
Connect your 12-Volt or 24-Volt model Electra Magic directly to the appropriate D.C. source as a separate circuit. Use minimum size #14 gauge wire. (Black wire to positive [hot], white to negative [ground].)
Important - Be sure polarity of power supply has been properly determined and correctly connected to lead wires before operating.
Installation
RV Model
-
Install the two closet bolts in closet flange.
-
While holding bolt up so the head touches underside of closet flange, install one nut on each bolt and screw

nuts down until they touch top of gauge. If gauge is misplaced, bottom surface of nuts should be 1.34 in. (3.4 cm) above floor.
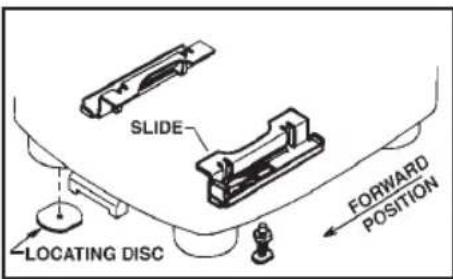
- Turn the toilet upside-down and install closetflange seal on Slide-EZ Valve with flat side against toilet.
-
Make sure white fork-shaped slides are in forward position.
-
Place unit on closet flange and locate position for plastic locator disc by tracing around one of the front legs. Drill 5/32" dia. hole in floor and fasten disc to floor with flat sides oriented as shown. Use #10 screw provided.
Important: This disc prevents toilet from moving on floor.
- Lower toilet onto closet flange until nuts on closet bolts go through rectangular holes in metal brackets, seal rests on closet flange, and leg locates over locating disc.
Installation
Marine Model
CAUTION: Toilet is not explosion proof and must not be located in an area where an explosive atmosphere exists, such as gasoline fumes, etc.

(Right bracket assembly shown.)
-
Install white fork-shaped slides on brackets. Make one right bracket assembly and one left bracket assembly.
-
Mount bracket assemblies and sump to bottom of toilet with four screws. Brackets are sandwiched between sump and toilet.

- Locate toilet position with template and install bolts in floor drilling 7/32" dia. hole in floor, putting acorn nut on screw, and driving bolts into floor with wrench. Remove acorn nuts.
- Also using template, locate position for plastic locator disc. Drill 5/32" dia. hole in floor and fasten disc to floor with flat sides oriented parallel to sides of toilet.
Important: This disc prevents toilet from moving on floor.
- Install one nut on each bolt and screw nuts down until they

touch top of gauge. If gauge is misplaced, bottom surface of nuts should be 1.34 in. (3.4 cm) above floor.
- Lower toilet over bolts until nuts go through rectangular holes in metal brackets, and the unit rests on its feet.
Marine Installation Instructions continue on Page 5.
Installation Continued
RV and Marine Models
- Insert a screwdriver or other long rigid instrument under toilet. With a sharp blow drive each slide back until it slides under nut and snaps into position.

- If slides cannot be driven by one or two blows, remove toilet and adjust each nut one-half turn upward and repeat procedure from Step 6.
- If toilet wobbles excessively, remove slides by catching tabs with a hooked instrument and pulling forward, as shown below. Lift toilet off, adjust each nut one-half turn downward and repeat procedure from Step 6.

Extension Handle Valve
Toilet Model 24320 Only
Multiple positions using extension handle valve:

Parts List
RV and Marine Models
(12- and 24-Volt Models are available.)

Key Part
No. No.Description
1 03921 Hinge Pin (2)
2 03922 Retaining Ring (2)
3 03916 Seat Cover Assy.*
4 08166 Lid Seal
5 03953 Left Hinge*
6 03904 Seat & Bumper Assy.*
7 03936 Cap*
8 05656 Splash Guard
9 03912 Cover & Bowl Assy.*
10 03984 Vinyl Skirt Assy.
11 03946 Inlet Tube
12 12938 Left Side Base Moulding
13 12979 Base Moulding w/Hole*
14 08167 Main Housing Seal
15 1284057 Main Housing Assy.*
16 03943 Front Screw (2)
17 03923 Cover Mtg. Screw (2)
18 03924 Motor Cover Assy.*
Key Part
No. No. Description
19 03905 Right Hinge*
20 03927 Nut (4)
21 03990 Lock Washer (4)
22 03979 Rear Screw (2)
23 24615 Level Indicator
24 03937 Hinge Mtg. Screw (2)
25 03928 Pump Mtg. Gasket
26 03925 Pump Mtg. Screw (4)
27 05700 Motor Kit: 12 Volt
14082 Motor Kit: 24 Volt
28 05534 Filter Cone
29 03950 Pump Assy.: 12 Volt**
14083 Pump Assy.: 24 Volt**
30 05248 Right Side Base Moulding*
31 03915 Moulding Mtg. Screw (2)
** Includes Motor
* Indicate Color When Ordering
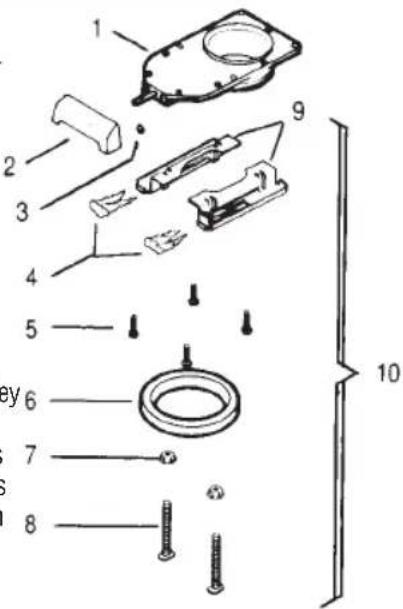
RV Slide-EZ Valve
Key Part
No. No. Description
1 12836 Slide-EZ Valve
2 03911 Handle*
3 03913 Retaining Ring
4 08637 Slides (2)
5 08737 Screw (4)
6 24304 Flange Seal
7 02690 Nut (2)
8 12525 Closet Bolt (2)
9 08636 Mtg. Bracket (2)
10 12838 Mounting Package (comprised of Parts 4-9)
Note: Slide-EZ Valve No. 03632 is used on pre-1978 toilets. Toilets manufactured in 1978 or later use an ABS-Slide EZ Valve No. 12836.
Key Part
No. No. Description
1 03940 Sump Assy.
2 08637 Slides (2)
3 01663 Screw (4)
4 12984 Acorn Nut (2)
5 12983 Bolt (2)
6 08636 Mtg. Bracket (2)
7 05063 Mounting Package (comprised of Key Parts 2-6)

Record Your Product ID Information Here
MODEL : ____
PART NO : ____
CODE :
(See Parts List on Pg. 6 for location of Product ID Label)
(For Service/Part info, call 1-800-523-3939)
Disassembly
RV and Marine Models
1. Fuse Replacement
A. Remove two (2) #03923 cover mounting screws and #03924 Motor Cover Assembly.
B. The fuse is now readily accessible for checking or changing.
2. Switch Removal
A. Disconnect lead wires from power source.
B. Remove two (2) #03923 cover mounting screws and #03924 Motor Cover Assembly.
C. Remove switch retaining nut and remove wires from switch terminals.
3. Slide-EZ Valve Removal
A. Disconnect lead wires from power source.
B. Completely evacuate unit.
Note: If you have a#24320 extension handle unit, cotterpin and extension handle must be removed at this point.
C. Remove two (2) #03915 moulding mounting screws and remove two (2) base mouldings (See Pg. 6).
D. Remove slides by catching tabs with a hooked instrument and pulling forward (Pg. 5).
E. Lift toilet from closet flange and invert unit.
F. Remove four (4) #08737 screws; remove valve (Pg. 5).
4. Sump Removal
A. Disconnect lead wires from power source.
B. Completely evacuate unit.
C. Remove two (2) #03915 moulding mounting screws and remove two (2) base mouldings (Pg. 6).
D. Remove slides by catching tabs with a hooked instrument and pulling forward (Pg. 5).
E. Remove flexible hose from sump and invert unit.
F. Remove four (4) #01663 screws; remove sump (Pg. 7).
5. Pump Removal
A. Complete steps 2A and 2B above.
B. Completely evacuate unit.
C. Remove cover and bowl assembly screws two (2) #03979 in rear from top side and two (2) #03943 in front from bottom side and remove #03912 cover and bowl assembly (Pg. 6).
D. Remove four (4) #03925 pump mounting screws.
E. Disconnect #03946 inlet tube from pump outlet.
F. Remove #03950 pump assembly (Pg. 6).
Service Parts
For parts and/or service – including those under warranty – contact a local Thetford Certified Service Center (CSC), or a RV or Marine Dealer. Or, call Thetford's Customer Relations Department for information at 1-800-523-3039.
For warranty consideration, parts must be sent to Thetford. Call 1-800-523-3039 for a Returned Goods Authorization Number before sending it in. When you call have this information available:
- Your name and address.
- The toilet Model, Part No. and Code (located on the ID label on the front of the toilet).
- Reason for return.
- Date of vehicle/toilet purchase.
For warranty in Europe, please visit www.thetford-europe.com
Accessories

natural_image
Close-up of a metallic plumbing fixture with bolts and screws, no visible text or symbolsREFILL PKG. #03947
Chrome-plated refill adapter connects Electra Magic directly to vehicle or vessels demand water supply. Opening refill valve allows easy toilet recharging and cleaning. Eliminates need for manually adding recharge water.

natural_image
Assorted white hoses and mechanical components including bolts, flanges, and connectors (no text or symbols visible)VENT KIT #05223
(Included in Model #24330)
Provides extra venting to reduce odors. Primarily for marine use.
Maintenance
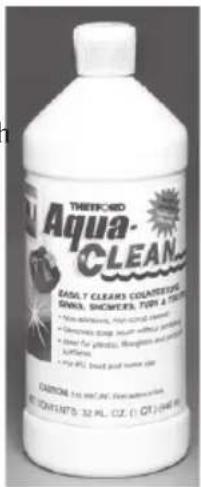
To clean unit, use Thetford's Aqua-Clean™ or other high grade, non-abrasive cleaner. DO NOT use highly concentrated or high-acid content household cleaner, nor those containing abrasive, such as cleaning or scouring powder. These may damage the seals or the plastic parts of the toilet.
Storage
A. Completely evacuate unit as described under Operating Instructions.
B. Refill unit to bottom of bowl with fresh water.
C. Add a cup (8oz./236.56 cc) of Aqua-Clean™.
D. Cycle three times by depressing flush button for 10 seconds each.
E. Let stand a few minutes for cleaning action.
F. Completely evacuate unit again.
Winter Use/Winterizing
For winter use, replace one-half of the charge water with an approved RV anti-freeze. For winter storage, completely evacuate unit.
Specifications
RV and Marine Models

Capacity: 6.2 Gallons (23.5 liters)
Model #24330 United States Coast Guard Certification Number: 159.015/1804/0 (for inspected and uninspected vessels).
_ | _ | _
一 |
Thetford: The Industry Leader
Thetford Corporation has been the world's leading manufacturer of RV sanitation products and chemicals for more than 40 years.
A continuing commitment to high-quality products, customer care, and development of creative solutions has helped Thetford establish a long list of industry-leading innovations.
Aqua-Kem®, the number-one selling concentrated holding tank deodorant, anchors Thetford's comprehensive chemical line. Powerful and effective, Aqua-Kem outsells all of its competitors combined.
Thetford is also the world's leading supplier of both permanent and portable toilets.
Thetford's line of low-water-use RV toilets is the most popular permanent toilet, while the Porta Potti® line – the first two-piece, hand-carried portable toilet – remains the world's top-seller.
See your dealer for more information about Thetford products. Or, write or call:
Thetford Corporation
P.O. Box 1285
Ann Arbor, MI 48106
1-800-543-1039
(734-769-6000 in Michigan)
Aqua-Kem ^® , Aqua-Magic ^® and Porta Potti ^® are registered trademarks of Thetford Corporation. Aqua-Clean ^™ is a trademark of Thetford Corporation.


- THETFORD
- ELECTRA MAGIC®
- Owner's Manual
- RV and Marine Recirculating Toilets
- Congratulations!
- Unique Filtration
- Operating Instructions
- Initial Flush Charge
- To Flush
- To Empty RV Model
- To Evacuate Marine Model
- Any Questions...
- Electrical Hookup
- RV and Marine Models
- Installation
- RV Model
- Marine Model
- Installation Continued
- Extension Handle Valve
- Toilet Model 24320 Only
- Parts List
- RV Slide-EZ Valve
- Record Your Product ID Information Here
- Disassembly
- Fuse Replacement
- Switch Removal
- Slide-EZ Valve Removal
- Sump Removal
- Pump Removal
- Service Parts
- Accessories
- REFILL PKG. #03947
- VENT KIT #05223
- Maintenance
- Storage
- Winter Use/Winterizing
- Specifications
- Capacity: 6.2 Gallons (23.5 liters)
- Thetford: The Industry Leader
Brand : THETFORD
Model : Electra Magic 12V
Category : Toilet