
Roborock E2 - Vacuum Cleaner Xiaomi - Free user manual and instructions
Find the device manual for free Roborock E2 Xiaomi in PDF.


| Product Type | Robot Vacuum Cleaner with Mopping Function |
| Brand | Xiaomi |
| Model | Roborock E2 |
| Dimensions | 350 x 350 x 95 mm (13.8 x 13.8 x 3.7 in) |
| Net Weight | 3.5 kg (7.7 lbs) |
| Battery Type | Lithium-ion, 2600 mAh |
| Dustbin Capacity | 480 ml |
| Water Tank Capacity | 150 ml |
| Suction Power | 2000 Pa |
| Navigation System | Gyroscope-based (Smart Navigation) |
| Noise Level | ≤ 60 dB (Standard Mode) |
| Connectivity | Wi-Fi IEEE 802.11 b/g/n, Mi Home / Roborock App |
| Filter Type | High-Efficiency Filter (HEPA) |
| Mopping Function | Yes, with electronic water pump |
| Sensors | Drop sensors, cliff sensors, bumper, gyroscope |
| Charging Time | Approx. 3-4 hours |
| Runtime | Up to 100 minutes (in Standard Mode) |
| Power Consumption | 40 W (Max) |
| Recharge and Resume | Yes |
| Supported Surfaces | Hard floors, low-pile carpets |
| Included Accessories | Charging dock, power adapter, cleaning tool, extra filter, water tank pad |
Frequently Asked Questions - Roborock E2 Xiaomi
User questions about Roborock E2 Xiaomi
0 question about this device. Answer the ones you know or ask your own.
Ask a new question about this device
Download the instructions for your Vacuum Cleaner in PDF format for free! Find your manual Roborock E2 - Xiaomi and take your electronic device back in hand. On this page are published all the documents necessary for the use of your device. Roborock E2 by Xiaomi.
USER MANUAL Roborock E2 Xiaomi
User Manual of Xiaowa Robotic Vacuum Cleaner
Please read this user manual carefully before use and keep it well for future reference.
Xiaowa
| 2017 | 2016 | |
| (€ million) | ||
| Total assets | 3,458 | 3,394 |
| Liabilities and other liabilities | (€ million) | (€ million) |
| Net assets | 3,458 | 3,394 |
| Liabilities and other liabilities | (€ million) | (€ million) |
| Net assets | 3,458 | 3,394 |
| Liabilities and other liabilities | (€ million) | (€ million) |
| Net assets | 3,458 | 3,394 |
| Li liabilities: | ||
| Total liabilities | 3,458 | 3,394 |
| Liabilities and other liabilities | (€ million) | (€ million) |
| Net liabilities | 3,458 | 3,394 |
| Liabilities and other liabilities | (€ million) | (€ million) |
| Net liabilities | 3,458 | 3,394 |
| Li liabilities and other liabilities | (€ million) | (€ million) |
| Net liabilities and other liabilities | (€ million) | (€ million) |
| Net liabilities and other liabilities | (€ million) | (€ million) |
| Net liabilities and other liabilities | (€ million) | (€ million) |
| Net liabilities and other liabilities | (€ million) | (€ million) |
| Net liabilities and other liabilities | (€ million) | (€ million) |
| Net liabilities and other liabilities | (€ million) | |
| Net liabilities and other liabilities | (€ million) | |
| Net liabilities and other liabilities | (€ million) | |
| Net liabilities and other liabilities | (€ million) | |
| Net liabilities and other liabilities | (€ million) | |
| Net liabilities and other liabilities | (€ million) | |
| Net liabilities and other liabilities | (€ million) | |
| Net liabilities and other liabilities | (€ million) | |
Safety Information
Restrictions
- This product is designed for indoor floor cleaning only. Please do not use it outdoors (such as an open-ended terrace), on any surface instead of the ground (such as a sofa), or in a commercial or industrial environment.
- Please do not use the product on any elevated surface without barriers (such as the floor of a loft, an open-ended terrace, and the surface of furniture).
- Please do not use the product when the temperature is higher than 40°C or lower than 4°C, or when there is any liquid or sticky substance on the floor.
- Before using the product, please put aside wires on the floor to avoid them being dragged around when the cleaner is working.
- To prevent the cleaner from being blocked while it is working and your valuables from any damage from slight crashes, please clean up fragile objects and odds and ends on the floor before switching on the cleaner (such as vases and plastic bags). Children should be supervised to ensure that they do not play with the appliance.
- This appliance is not intended for use by persons (including children) with reduced physical, sensory, or mental capabilities, or lack of experience and knowledge, unless they have been given supervision or instruction concerning use of the appliance by a person responsible for their safety (CB).
Safety Information
- This appliance can be used by children aged from 8 years and above and persons with reduced physical, sensory, or mental capabilities or lack of experience and knowledge if they have been given supervision or instruction concerning use of the appliance in a safe way and understand the hazards involved. Children shall not play with the appliance. Cleaning and user maintenance shall not be made by children without supervision (EU).
- Please keep the main brush cleaning tools out of reach of children.
- Do not place any object (including children and pets) on the cleaner, whether it is working or not.
- Keep hair, loose clothing, fingers, and all parts of body away from openings and moving parts.
- Do not use the cleaner on any burning object (such as a burning cigarette butt).
- Do not use the cleaner on plush carpets (the cleaner might not work well on some dark-colored carpets either).
- Do not use the cleaner to clean hard or sharp objects (such as decoration wastes, glass and nails).
- Do not carry the cleaner by the cap on the distance laser sensor, the cover on the main unit or the collision buffer.
- The appliance must be switched off and the plug must be removed from socket-outlet before cleaning or maintaining the appliance.
Safety Information
- Do not use a wet piece of cloth or any liquid to clean any part of the product.
- Do not use the mopping module on carpets.
- Please use the product according to the manual. Any loss or damage caused from improper use will be borne by the user.
Battery and Charging
WARNING
- For the purposes of recharging the battery, only use the detachable supply Unit xiaowa CDZ03RR or CDZ04RR provided with this appliance.
- Do not arbitrarily dismantle, repair or modify the battery or dock charger.
- Please keep the dock charger away from heat (such as heating plates).
- The battery must be removed from the appliance before it is scrapped.
- The appliance must be disconnected from the supply mains when removing the battery.
- The battery is to be disposed of safely. Please do not discard waste batteries. Leave them to a professional recycling organization.
- Do not wipe or clean the charger's shrapnel with a piece of wet cloth or wet hands.
- If the supply cord is damaged, it must be replaced by the manufacturer, its service agent or similarly qualified persons in order to avoid a hazard.
- Please make sure the cleaner is powered off in shipment and original packaging is advised.
Safety Information
- If left unused for a long period, please store the cleaner in a cool and dry place after having it fully charged and switched off, charge it at least every three months to avoid the battery being over discharged.
Table of Faults of Robotic Vacuum Cleaner
| Table of Faults of Robotic Vacuum Cleaner | |
| Item | Faults |
| Main Unit | Failure of the functions given in the manual |
| Failure of power on | |
| Malfunction of the main brush, the side brush, the fan or the main wheel | |
| Dock Charger | Failure of charging the main unit |
| Power cable Failure | of supply electricity to the dock charger |
Dock Charger xiaowa CDZ03RR/ CDZ04RR suitable for Xiaowa Robotic Vacuum Cleaner: E2*****,E3*****(*can be 0 to 9, A to Z, a to z, "-", "_", "", "/" or blank, for marketing purpose.), which build-in Rechargeable Li-on battery pack. Rechargeable Li-on battery pack information
| Product model | E2 ***** (*can be 0 to 9, A to Z, a to z."-", ".", "", "/" or blank, for marketing purpose.) | E3 ***** (*can be 0 to 9, A to Z, a to z."-", ".", "", "/" or blank, for marketing purpose.) |
| Model | BRR-1P4S-2600S/BRR-1P4S-2600D | BRR-2P4S-5200S/BRR-2P4S-5200D |
| Rated capacity | 2600mAh/37.44Wh | 5200mAh/74.88Wh |
| Rated voltage | 14.4VDC | 14.4VDC |
| Limited charge voltage | 16.8VDC | 16.8VDC |
| Cell number | 4 | 8 |
Laser Safety
The laser distance sensor of this product meets the standards for Class I Laser Products in IEC 60825-1:2014 and will not generate hazardous laser radiation.
Introduction
Machine

Introduction
Part list

Water tank

Mopping cloth
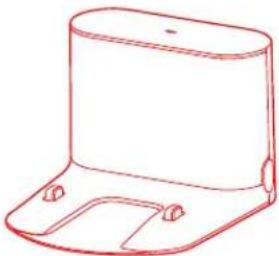
Dock charger

Moistureproof mat
Main brush cleaning tool
Power cable
Introduction
Dust bin
Machine

Introduction
Machine and sensor
Installation
1. Clip the dock charger into the groove of the waterproof mat and install it in place.

2. Place the dock charger against a wall on a level floor and connect it to the power supply.

Notes:
- Ensure that 0.5 m or above on both sides and 1.5 m in the front are retained for the dock charger.
- The power cable, when vertical to the floor, may be dragged by the machine body, thereby resulting in displacement or disconnection of the dock charger.
- The dock charger indicator is normally on when the dock charger is electrified, and off when the dock charger works.
Power on and charge
Press and hold the ⏻ key to power on, wait until the power light is normally on, and then dock the machine body to the dock charger for charging.
The machine is equipped with a built-in high performance lithium-ion rechargeable battery pack. To maintain battery performance, please keep the machine charged for normal use.

The color of the POWER light indicates the battery level.
- White: battery capacity ≥ 20% • Red: battery capacity < 20%
Note: The machine may not be powered on when the battery is low. Please directly dock the machine body to the dock charger.
Connect your mobile phone client (this can be skipped)
Installation
The product is compatible with Mi Home intelligent platform and could be controlled by Mi Home app. It supports the MIUI system and can be interconnected with other Mi Home intelligent products. Quick Setup
① Download App
Search "Mi Home" in App store/Google play or scan the QR code below to download and install the Mi Home app.

② Add Device
Go to the "My Device" page of the Mi Home app and tap "+" on the top right corner of the page to add a device. You can find the newly added device on the "My Device" list.
③ Reset WIFI
If anything is wrong with the WIFI connection, you can try to reset WIFI to default.
Open the upper cover to check the WIFI indicator status next to the reset button. Press and hold the ☐ key and ⏰ key until you hear the voice "Reset WIFI". The resetting is completed when the WIFI indicator starts to flash slowly and the cleaner will enter a pending connection state.
Installation

WIFI indicator
• Slow flashing: Waiting for connection • Fast flashing: Connecting • Glowing: WIFI is connected
Note: When your mobile phone fails to connect to the machine, please refer to "User Manual" – "Reset WIFI"
Install the mopping module5
① Refill the water tank: open the water tank and reinstall the water tank cover after refilling with tap water.

Note: Please be aware that some floor cleaners or disinfectants may cause blockage of the water tank filter.
② Install the mopping cloth: dampen the mopping cloth and squeeze it dry. Insert it to the end along the slot of the water tank and stick it firmly.

Note: Do not use the mopping module when there is nobody at home.
③ Install the module: push the module in parallel along the alignment signs on the rear of the machine and on the mopping module. It is installed in place when you hear a "click" sound.

Note: To get a better mopping effect, it is recommended to install the mopping module after cleaning 3 times.
Installation
Start cleaning 6
When the power light changes from white breathing flash to normally on, charging is complete. Press the ⏻ key or use your mobile phone client to start cleaning.
Note:
- Do not use the mopping module when there is nobody at home.
- It is recommended to clean the mopping cloth every 30 minutes to ensure water flow rate and cleaning effect.
Remove the mopping module 7
After the machine completes cleaning and returns to the dock charger, use your hands to push the two buckles on both sides, drag the mopping module backwards, and remove it.
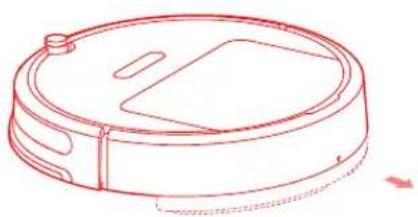
Note:
- Remove the mopping module when the machine is charging or left unused. Empty water residue in the water tank and clean the mopping cloth to prevent mildew or undesirable odor.
- When the dock charger is placed on a wooden floor, always place a moisture-proof mat under it to avoid moisture on the floor.
Routine Maintenance
Main brush *Clean weekly
- Flip the machine over and push the buckle to remove the main brush cover.
- Lift the main brush up and clean its bearing
- Use the supplied main brush cleaning tool to cut off hair entangled onto the main brush
- Reinstall the main brush and clamp tightly the buckle on the main brush cover
Note: It is recommended to replace the main brush every 6–12 months to ensure the cleaning effect

Use of main brush cleaning tool
Routine Maintenance
Dust bin and strainer *Clean weekly
- Remove the top cover of the machine and press the dust bin buckle to lift up and remove the dust bin

- Open the dust bin cover as indicated by arrow, and empty trash out


Clean the washable strainer *Clean every two weeks
- Open the dust bin cover as indicated by arrow

- Fill the dust bin with clean water and close the cover. Shake the dust bin and then pour out the dirty water

Note: Please rinse with clean water without adding any detergents
Routine Maintenance
- Remove the filter and rinse with water

Note: Do not touch the surface of the filter with hands, brushes, or sharp objects to avoid damaging it.
- Rinse repeatedly and gently pat the filter to remove dirt. Continue until it is clean.

- Dry the filter thoroughly and reinstall it before use.
Note:
• Always dry the filter thoroughly before use (dry for at least 24 hours). • It is recommended to alternate between two strainers.
Side brush × Clean monthly
- Flip the machine over to remove the fixing screw on the side brush.
- Remove and clean the side brush.
- Reinstall the side brush and tighten the screw. Note: It is recommended to replace the side brush every 3–6 months to ensure the cleaning effect.

Omni-directional wheel *Clean monthly
- Flip the machine over and lift the omni-directional wheel up.
- Remove hair and dirt on the wheel body and axle.
- Reinstall the wheel body and press tightly.
Note: flush it with tap water and reinstall after drying.

Routine Maintenance
Mopping cloth *Clean after use
- Remove the mopping cloth from the mopping module

2. Clean the mopping cloth and dry it
Note:
• Always remove the mopping cloth for cleaning and avoid backflow of dirty water that may block the filter - If the mopping cloth is too dirty, the mopping effect may be affected. Please clean it before use - It is recommended to replace the mopping cloth every 3–6 months to ensure the cleaning effect
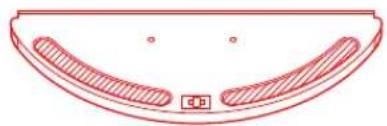
Filter assembly *Replace every 1-3 months
- Use your finger to remove the filter assemblies on the left and right along the notch
- Install a new filter assembly in place
Note: It is recommended to replace a filter assembly every 1–3 months to ensure the cleaning effect, depending on the quality of water and frequency of use.
Battery
The machine is internally provided with a high performance lithium-ion rechargeable battery pack. To maintain battery performance, please keep the machine charged in normal use
Note: If the machine is left unused for a prolonged period of time, please power it off before storage and charge it at least every 3 months to avoid degradation due to over-discharge
Routine Maintenance
Machine sensor *Clean monthly
Use soft dry cloth to wipe and clean each sensor, including:
- Four diff sensors on the bottom of the machine
- IR decelerate sensor in front of the machine
- Charging contact on the bottom of the machine
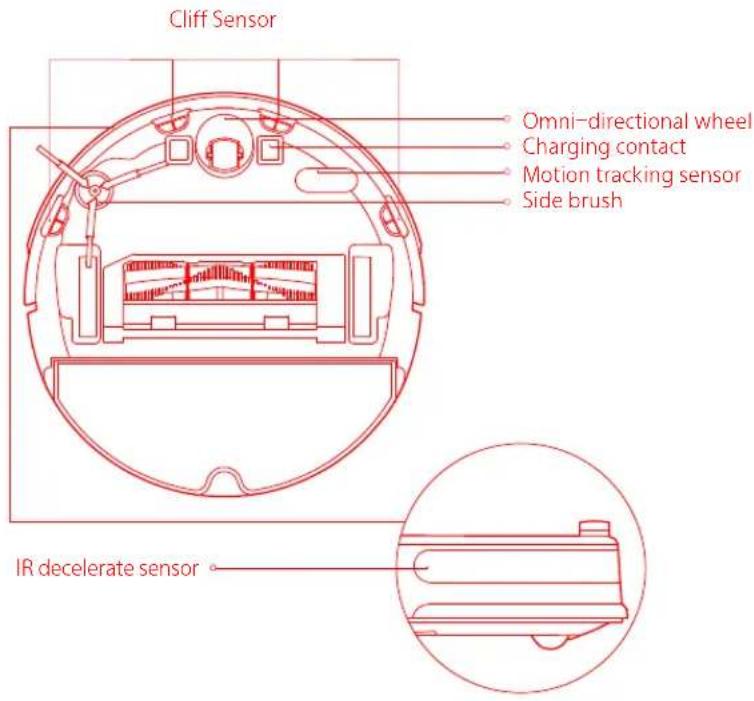
Dock charger *Clean monthly
Use soft dry cloth to clean the charging contact of the dock charger
Firmware update
You can use your mobile phone client to update firmware for the machine. Please connect it to the dock charger and ensure that the battery capacity is more than 20% before update. The power indicator is fast flashing in white during firmware update
Reset system
When pressing keys makes no response or the machine cannot be shut down, please try to reset the system by pressing the ⏻ key;
the machine will be restarted automatically after resetting
Restoring to Factory Defaults
If the system still doesn't work after resetting, please press and hold the 🔊 ⏻ button simultaneously, until the system prompts for "Start restoring initial version". The machine will be restored to factory defaults in this way
Basic parameters
Machine
| Name Specs Specs | |
| Model | E2 *****, can be 0 to 9, A to Z, a to z, "-" , " _ ", "", /" or blank,for marketing purpose.) |
| 353x350x90.5mm 353x350x90.5mmOutline Dimension | |
| Battery | 14.4V/2600mAh lithium battery 14.4V/$200mAh lithium battery |
| Weight | About 3.0kg About 3.2kg |
| Wireless connection | WIFI Smart Connect WIFI Smart Connect |
| Voltage rating | 14.4VDC 14.4VDC |
| Power rating | 54W 58W |
Dock charger
| Name Specs | |
| Model CDZ03RR or CDZ04RR | |
| Outline Dimension | 151x130x98mm |
| Power rating | 42W |
| Input rating | 100-240VAC |
| Output rating | 20VDC 1.8A |
| Frequency rating | 50-60Hz |
Xiaowa Model Comparison
| Xiaowa Lite Xiaowa Xiaowa Plus | |||
| Model ( can be 0 to 9, A to Z, to z."-",",","" or blank, for marketing purpose.) | Xiaowa C1 ***** | Xiaowa E2 ***** | Xiaowa E3 ***** |
| Cleaning method | |||
| Wet mopping function | No mopping | Sweeping + mopping | Sweeping + mopping |
| Navigation method | Adaptive random navigation | Inertial navigation route planning | Inertial navigation route planning |
| Automatic recharge | √√ | √ | |
| Cleaning capacity | |||
| Obstacle clearance height 2.0cm 2.0cm 2.0cm | |||
| Max suction 1600Pa 1800Pa 2000Pa | |||
| Dust bin capacity 640 ml 640 ml 640 ml | |||
| Max run time 60 minutes 90 minutes 150 minutes | |||
| Battery capacity 2600mAh 2600mAh 5200mAh | |||
| Extended app functions | |||
| Cleaning map | No map | Pixel map Pixel map | |
| Timer cleaning | √√ | √ | |
| Smart home interconnection | √√ | √ | |
| Carpet Boost | √√ | √ | |
| Hardware system | |||
| Fall prevention | √√ | √ | |
| Washable strainer | √ | √ | |
| Moistureproof mat | √ | √ | |
Troubleshooting
When a runtime error occurs, the power indicator flashes red quickly and a voice prompt is given. Use the table below to solve the problem.
| Fault display | Solution |
| Error 2: Please clean and lightly tap the bumper | The bumper is stuck. Please lightly and repeatedly tap the bumper to remove any foreign matter. If no foreign matter is found, please move the machine to a new location and start it; |
| Error 3: Please move the machine to a place near its original location and start it | The wheels are suspended. Please move the machine to a place near its original location; |
| Error 4: Please wipe the cliff sensor and move the machine to a place near its original location and start it | The machine is suspended. Please move it to a place near its original location and start it. This problem may also be caused when the cliff sensor is too dirty. Please wipe the cliff sensor to eliminate this problem; |
| Error 5: Please remove the main brush to clean the brush and bearing | The main brush may be entangled with foreign matter. Please remove the main brush and its bearing for cleaning; |
| Error 6: Please remove and clean the side brush | The side brush may be entangled with foreign matter. Please remove and clean the side brush; |
| Error 7: Main wheel exception | Please check whether the main wheel is entangled with foreign matter or move the machine to a place near its original location and start it; |
| Error 8: Please clear obstacles around the machine | The machine may get stuck or caught on objects. Please clear obstacles around the machine; |
| Error 9: Please reinstall the dust bin and filter | Please reinstall the dust bin and filter and check that they are installed in place. If the problem persists, please try replacing the filter; |
| Error 10: Please check that the filter is dry or clean the filter | The filter is not completely dry. Please leave it to dry for at least 24 hours. The filter may be blocked. Please clean it. If the problem persists, please replace the filter; |
| Error 11: A high-intensity magnetic field is detected. Please keep far away from the virtual wall before starting | The machine is too close to the virtual wall when starting up. Please move it to a new location and start it; |
Troubleshooting
| Error 12: Battery level is too low. Please recharge Low battery. Please charge it before use; | |
| Error 13: Charging error. Please clean the charging contact areas | Please use a dry cloth to wipe the charging contact of the machine and the charging tab of the dock charger; |
| Error 14: Battery error | The battery temperature is too high or too low. Please wait until the battery temperature is normal before use; |
| Error 17: Side brush module error.Please try to reset the system | A malfunction has occurred with the side brush module. Please try resetting the system; |
| Error 18: Vacuum cleaner fan error. Please try to reset the system | A malfunction has occurred with the suction fan. Please try resetting the system; |
| Error 20: Please clean the motion tracking sensor and place the machine back to its original location and start it | The motion tracking sensor may be dirty or blocked. Please use a dry cloth to wipe the motion tracking sensor and place the machine back to its original location and start it; |
| Error 23: Please clear the signal emission area of the dock charger | The dock charger is blocked by dust or foreign matter. Please remove it. |
| Internal error, please reset the system Malfunction due to internal error. Please try to reset the system. | |
Notes: 1. Resetting the system may solve some problems. 2. Error 1, error 15, error 16, error 19, error 21, and error 22 are error codes for other models and are not applicable to this machine.
If the problem persists after using the recommendations in the table above,
please email our after-sales service team:
US/Non-Europe Support: support@roborock.com
Europe Support: support@roborock-eu.com
EU Declaration of Conformity
Hereby we:
| Name of manufacturer | Beijing Roborock Technology Co.,Ltd. |
| Address | Floor6,Suite6016,6017,6018,BuildingC,Kangjian Baosheng Plaza,No.8 Heiquan Road,Haidian District, Beijing,P.R.CHINA |
declare that this DoC is issued under our sole responsibility and that the products:
| Product description | Robotic Vacuum Cleaner and Accessories |
| Type(model) designation(s) | E2*****;E3** (*can be 0 to 9, A to Z, a to z, "-", "_", "", "/" or blank, for marketing purpose.) |
are in conformity and verified through testing with the provision of the following EU directives:
| RED Directive 2014/53/EUArticle 3.1 a): Safety&Health1. EN 60335-1:2012 + A11:2014 +AC:2014+ A13:20172. EN 60335-2-2:2010 + A11:2012 + A1:20133. 1999/519/EC4. EN 62311:20085. EN 62233:2008 | 1.Household and similar electrical appliances-Safety-Part 1: General requirements2.Household and similar electrical appliances-Safety-Part 2-2: Particular requirements for vacuum cleaners and water suction cleaning appliance3.COUNCIL RECOMMENDATION of 12 July 1999 on the limitation of exposure of the general public to electromagnetic fields (0 Hz to 300 GHz)4.Assessment of electronic and electrical equipment related to human exposure restrictions for electromagnetic fields (0 Hz - 300 GHz)5.Measurement methods for electromagnetic fields of household appliance and similar apparatus with regard to human exposure |
EU Declaration of Conformity
| RED Directive 2014/53/EUArticle 3.1 b): EMC1. Draft EN 301 489-1 V2.2.02. Draft EN 301 489-17 V3.2.03. EN 55014-1:20174. EN 55014-2: 20155. EN 61000-3-2: 20146. EN 61000-3-3: 2013 | 1.Electromagnetic Compatibility (EMC) standard for radio equipment and services;Part 1: Common technical requirements; Harmonized Standard covering the essentialrequirements of article 3.1(b) of Directive 2014/53/EU and the essential requirements ofarticle 6 of Directive 2014/30/EU2.Electromagnetic Compatibility (EMC) standard for radio equipment and services;Part 17: Specific conditions for Broadband Data Transmission Systems. HarmonizedStandard covering the essential requirements of article 3.1(b) of Directive 2014/53/EU3.Electromagnetic Compatibility-Requirements for household appliances, electric toolsand similar apparatus Part 1: Emission4.Electromagnetic compatibility - Requirements for household appliances, electric toolsand similar apparatus Part 2: Immunity - Product family standard5.Electromagnetic compatibility (EMC) - Part 3-2: Limits - Limits for harmonic currentemissions (equipment input current 16 A per phase).6.Electromagnetic compatibility (EMC) - Part 3-3: Limits - Limitation of voltage changes,voltage fluctuations and flicker in public low-voltage supply systems, for equipment withrated current 16 A per phase and not subject to conditional connection. |
| RED Directive 2014/53/EUArticle 3.2: Radio SpectrumEN 300 328 V2.1.1 | Wideband transmission systems; Data transmission equipment operating in the 2,4 GHzISM band and using wide band modulation techniques. Harmonized Standard coveringthe essential requirements of article 3.2 of Directive 2014/53/EU |
| ROHS Directive 2011/65/EUEN50581:2012 | Technical documentation for the assessment of electrical and electronic products withrespect to the restriction of hazardous substances |
| Product description | Dock Charger and Accessories |
| Type(model) designation(s) | Dock Charger, models: CDZ03RR or CDZ04RR. |
are in conformity and verified through testing with the provision of the following EU directives:
EU Declaration of Conformity
| Low Voltage Directive 2014/35/EU1. EN 60335-1:2012 + A11:20142. EN 60335-2-29:2004 + A2:20093. EN 62233:2008 | 1.Household and similar electrical appliances-Safety-Part 1: General requirements2.Household and similar electrical appliances-Safety-Part 2-29: Particular requirements for battery chargers3.Measurement methods for electromagnetic fields of household appliance and similar apparatus with regard to human exposure |
| EMC Directive 2014/30/EU1. EN 55014-1:20172. EN 55014-2: 20153. EN 61000-3-2: 20144. EN 61000-3-3: 2013 | 1.Electromagnetic Compatibility-Requirements for household appliances, electric tools and similar apparatus Part 1: Emission2.Electromagnetic compatibility - Requirements for household appliances, electric tools and similar apparatus Part 2: Immunity - Product family standard3.Electromagnetic compatibility (EMC) - Part 3-2: Limits - Limits for harmonic current emissions (equipment input current ≤ 16 A per phase).4.Electromagnetic compatibility (EMC) - Part 3-3: Limits - Limitation of voltage changes, voltage fluctuations and flicker in public low-voltage supply systems, for equipment with rated current ≤ 16 A per phase |
| ROHS Directive 2011/65/EUEN50581:2012 | Technical documentation for the assessment of electrical and electronic products with respect to the restriction of hazardous substances |
Person responsible for making this declaration:
Printed name: Rui Shen
Position/Title: Quality Director
Signature: Rui Shen
Date of issue: Jun 14, 2018
WEEE Information
Correct Disposal of this product. This marking indicates that this product should not be disposed with other household wastes throughout the EU. To prevent possible harm to the environment or human health from uncontrolled waste disposal, recycle it responsibly to promote the sustainable reuse of material resources. To return your used device, please use the return and collection systems or contact the retailer where the product was purchased. They can take this product for environmental safe recycling.

Warranty Information
The seller provides warranty in accordance with the legislation of the customer's own country of residence, with a minimum of 1 year, starting from the date on which the appliance is sold to the end user.
The warranty only covers defects in material or workmanship.
The repairs under warranty may only be carried out by an authorized service centre. When making a claim under the warranty, the original bill of purchase (with purchase date) must be submitted.
The warranty will not apply in cases of:
Normal wear and tear
Incorrect use, e.g. overloading of the appliance, use of non-approved accessories. Use of force, damage caused by external influences. Damage caused by non-observance of the user manual, e.g. connection to an unsuitable mains supply or non-compliance with the installation instructions.
Partially or completely dismantled appliances

Robotic Vacuum Cleaner
Manufacturer: Beijing Roborock Technology Co., Ltd.
Product Model: E2****, E3** (can be 0 to 9, A to Z, a to z, "-", "-", "/ or blank, for marketing purpose)
Address of Manufacturer: Floor 6, Suite 6016, 6017, 6018, Building C, Kangjian Baosheng Plaza,
No. 8 Heiquan Road, Haidian District, Beijing, P.R. CHINA
For more product information, please visit our website: www.roborock.com
For after-sales support, please email our after-sales service team;
US/Non-Europe Support: support@roborock.com
Europe Support: support@roborock-eu.com


- USER MANUAL OF XIAOWA ROBOTIC VACUUM CLEANER
- SAFETY INFORMATION
- RESTRICTIONS
- WARNING
- LASER SAFETY
- INTRODUCTION
- INSTALLATION
- NOTES
- POWER ON AND CHARGE
- INSTALL THE MOPPING MODULE
- START CLEANING
- REMOVE THE MOPPING MODULE
- NOTE
- ROUTINE MAINTENANCE
- MAIN BRUSH *CLEAN WEEKLY
- SIDE BRUSH × CLEAN MONTHLY
- OMNI-DIRECTIONAL WHEEL *CLEAN MONTHLY
- MOPPING CLOTH *CLEAN AFTER USE
- CLEAN THE MOPPING CLOTH AND DRY IT
- FILTER ASSEMBLY *REPLACE EVERY 1-3 MONTHS
- BATTERY
- MACHINE SENSOR *CLEAN MONTHLY
- DOCK CHARGER *CLEAN MONTHLY
- FIRMWARE UPDATE
- RESET SYSTEM
- RESTORING TO FACTORY DEFAULTS
- BASIC PARAMETERS
- TROUBLESHOOTING
- EU DECLARATION OF CONFORMITY
- WEEE INFORMATION
- WARRANTY INFORMATION
Brand : Xiaomi
Model : Roborock E2
Category : Vacuum Cleaner