
AC1736 - Air purifier PHILIPS - Free user manual and instructions
Find the device manual for free AC1736 PHILIPS in PDF.


| Product Type | Air Purifier |
| Brand | Philips |
| Model | AC1736 |
| Dimensions (H x W x D) | 36 cm x 24 cm x 24 cm |
| Weight | 2.0 kg |
| Power Supply | 220-240 V, 50/60 Hz |
| Power Consumption | 15 W |
| Airflow Rate (max) | 100 m³/h |
| Coverage Area | Up to 20 m² |
| Filter Type | HEPA + Pre-filter |
| Filter Life | 6-12 months |
| Noise Level (max) | 35 dB |
| CADR (Dust/PM2.5) | 80 m³/h |
| Operating Modes | Auto, Speed 1-3, Sleep |
| Key Functions | PM2.5 detection, filter replacement indicator, auto mode, child lock |
| Maintenance | Clean pre-filter monthly; replace HEPA filter as needed |
| Safety Features | Thermal fuse, auto shut-off, stable base |
| Accessories Included | Power cord, user manual |
| Spare Parts Available | HEPA filter, pre-filter |
| Repairability | Replacement filters only; no user-serviceable parts |
Frequently Asked Questions - AC1736 PHILIPS
User questions about AC1736 PHILIPS
0 question about this device. Answer the ones you know or ask your own.
Ask a new question about this device
Download the instructions for your Air purifier in PDF format for free! Find your manual AC1736 - PHILIPS and take your electronic device back in hand. On this page are published all the documents necessary for the use of your device. AC1736 by PHILIPS.
USER MANUAL AC1736 PHILIPS

natural_image
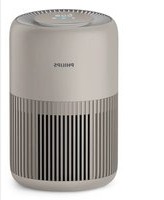
Exterior view of a Philips air purifier with perforated grille and brand logo (no text-heavy elements)ZH-S 用户手册 1
EN User manual 14


目录
1 您的空气净化器 2
产品概述 2
控件概述 3
2 使用入门 3
安装滤网 3
3 使用空气净化器 4
空气质量指示灯 4
打开和关闭 5
更改模式设置 6
切换显示指示灯 6
使用灯光开/关功能 7
检查滤网状态 7
4 清洁和维护 8
清洁空气净化器的机身 8
清洁微粒感应器 8
清洁滤网表面 9
更换滤网 10
滤网重置 11
5 存放 11
6 故障排除 12
1 您的空气净化器
感谢您的惠顾,欢迎光临飞利浦!
natural_image
Simple line drawing of a hand pressing a button on a circle (no text or symbols)- 轻触 ⏻ 可打开空气净化器。

natural_image
Simple line drawing of a hand pressing a button on a circle with a crescent moon above (no text or symbols)
natural_image
Line drawing of a cylindrical device with a handle, showing internal structure and no text or symbols清洁微粒感应器
natural_image
Illustration of a hand holding a pen over a smartphone screen (no text or symbols visible)natural_image
Diagram showing three connected components with no visible text or symbolsnatural_image
Illustration of a hand holding a cylindrical object with a handle, no text or symbols present3 使用吸尘器清洁滤网表面。

4 把滤网放回产品内。

5 重新装上后盖。

natural_image
Simple line drawing of a hand cursor clicking a circular button (no text or symbols)6 轻触 ⏻ 按钮启动产品。

natural_image
Line drawing of a hand spraying a spray gun (no text or symbols)8 清洁滤网后,彻底清洗双手。
更换滤网
注意:
natural_image
Simple line drawing of a hand pressing a button on a circle (no text or symbols)2 轻触 ⏻ 按钮启动产品。

natural_image
Line drawing of a hand cleaning a surface with a spray gun (no text or symbols)4 更换滤网后,彻底清洗双手。
滤网重置
natural_image
Simple line drawing of a hand pressing a button on a circle (no text or symbols)natural_image
Hand inserting a plug into an electrical socket (no text or symbols visible)2 将电源插头插入电源插座。

2 Getting started 16
Installing the filter 16
3 Using the air purifier ....17
Air quality light 17
Turning On and Off 18
Changing the mode setting 19
Switching the display indicator 19
Using the light on/off function 20
Checking the filter status ....20
4 Cleaning and maintenance ....21
Cleaning the body of the air purifier 21
Cleaning the particle sensor 21
Cleaning the surface of the filter 22
Replacing the filter 23
Filter reset 24
5 Storage 24
6 Troubleshooting 25
1 Your air purifier
Congratulations on your purchase, and welcome to Philips!
To fully benefit from the support that Philips offers, register your product at www.philips.com/welcome.
Product overview

Controls overview

2 Getting started
Installing the filter
Note: Make sure the air purifier is unplugged from the electrical outlet before installing the filter.
1

●

●

●

●

1 Pull the back cover and remove it from the appliance.
2 Pull the filter from the appliance.
3 Remove all packaging materials of the air purification filter.
4 Put the filter back into the appliance.
5 Reattach the back cover.
3 Using the air purifier
Air quality light
After approximately 30 seconds, the particle sensor selects the color that corresponds to the surrounding air quality of airborne particles.
Note: The color of the air quality light is determined by the highest risk index among PM2.5, IAI and readings.
PM2.5 refers to airborne particle pollutants smaller than 2.5 micrometers.
| PM2.5 level Air quality light color Air quality level | ||
| ≤35 Blue Good | ||
| 36-75 Blue-purple Fair | ||
| 76-115 Purple-red Poor | ||
| >115 Red Very poor |
IAI refers to the level of indoor air allergen.
| IAI level Air quality light color Air quality level | ||
| 1-3 | Blue | Good |
| 4-6 | Blue-purple | Fair |
| 7-9 | Purple-red | Poor |
| 10-12 | Red Very poor | |
Turning On and Off
Note:
- Put the plug of the air purifier in the power socket.
- If the purifier stays connected to the electrical outlet after turning OFF, the air purifier will operate under the previous settings when turned ON again.

natural_image
Simple line drawing of a hand pressing a button on a circle (no text or symbols)- Touch to switch on the air purifier.

- The “-” displays on the screen during warming up. Then the air purifier shows the PM2.5/IAI level after measuring the air quality.

• The air purifier operates in the auto mode with PM2.5 displayed on the screen.

- Touch and hold the button for 3 seconds to switch off the air purifier.
Changing the mode setting
You can choose Auto mode, Turbo mode, Gentle mode or the Sleep mode by touching the button.

Auto mode (A): The air purifier automatically adjusts the fan speed in accordance with the ambient air quality.

Turbo mode (@: The air purifier operates on the highest speed.

Gentle mode ( ☑): The air purifier operates at a low speed.

natural_image
Simple line drawing of a hand pointing at a circular button with a crescent moon above (no text or symbols)Sleep mode ( ): The air purifier operates quietly at a low speed. After 3 seconds, the screen lights off.
Switching the display indicator
Note:
• The appliance display PM2.5 level by default.

Using the light on/off function

You can touch the light on/off button manually to turn off all lights and the control panel. Touch any button to wake up all lights.
With the light sensor:
- The control panel can automatically turn on, turn off or dim according to the ambient light.
• The control panel will be off or dim when the ambient light is dark.
You can touch any button to wake up all lights. If no further operation, all lights will be off or dim again to match with the ambient light.
Checking the filter status
- Touch the filter status check/reset 📋 button to check the filter service life status.

| Icon color Display (%) | |
| Blue 16-100 | |
| Blue-purple 9-15 | |
| Purple-red 4-8 | |
| Red 0-3 |
Note: The appliance goes back to normal display if no operations after 3 seconds.
4 Cleaning and maintenance
Note:
- Do not attempt to clean the particle sensor with a vacuum cleaner.
- Switch off the air purifier and unplug from the power socket before following action.
Cleaning the body of the air purifier
Use a soft, dry cloth to clean both the interior and exterior of the air purifier and the air outlet.

natural_image
Line drawing of a cylindrical device with a handle, showing internal structure and wiring (no text or symbols)Cleaning the particle sensor
Clean the particle sensor every 2 months for optimal functioning of the appliance.

natural_image
Illustration of a hand holding a pen, interacting with a device (no text or symbols visible)1 Clean the particle sensor inlet and outlet with a soft brush.

natural_image
Diagram showing three types of electrical connectors or wires, one with a bulb and two others, without any text or symbols.2 Clean the particle sensor with a damp cotton swab. Dry all parts thoroughly with a dry cotton swab.
Cleaning the surface of the filter

Clean the surface of filter with vacuum cleaner when the filter cleaning alert 🎨 display on the screen.

1 Pull the back cover and remove it from the appliance.

2 Pull the filter from the appliance.

natural_image
Illustration of a hand using a hammer to handle a cylindrical object (no text or symbols visible)3 Clean the surface of the filter with a vacuum cleaner.

4 Put the filter back into the appliance.

5 Reattach the back cover.

natural_image
Simple line drawing of a hand pressing a button on a circle (no text or symbols)6 Touch the button to switch on the appliance.

7 Touch and hold the filter status check/reset button 📋 for 3 seconds to reset the filter cleaning time.

natural_image
Line drawing of a hand spraying a spray gun (no text or symbols)8 Wash your hands thoroughly after cleaning the filter.
Replacing the filter
Note:
• The filter is not washable or reusable.
- Do not smell the filter as it has collected pollutants from the air.

When the filter need to be replaced, the filter replacement alert lights up red.
1 Replace the filter with Philips NanoProtect filter Series 3 (FY2122/00), Please follow the step of Chapter "Installing the filter".

natural_image
Simple line drawing of a hand pressing a button on a circle (no text or symbols)2 Touch the button to switch on the appliance.

3 Touch and hold the filter status check/reset button 📄 for 3 seconds to reset the filter replacement time.

natural_image
Line drawing of a hand holding a spray gun, no text or symbols present4 Wash your hands thoroughly after after replacing the filter.
Filter reset
You can also replace the filter before filter replacement alert (☐) displays on the screen. After replacing a filter, you need to reset the filter lifetime counter manually.

natural_image
Simple line drawing of a hand cursor clicking a circular button with letter 'A' (no text or symbols beyond the icon)1 Touch the power ⏻ button for 3 seconds to turn off the appliance and unplug from power socket.

natural_image
Hand inserting a plug into a socket with a cable, showing electrical connection (no text or symbols)2 Put the power plug in the power socket.

3 Within 15 seconds after power on, touch and hold and button for 3 seconds to reset the filter lifetime counter.
5 Storage
1 Turn off the air purifier and unplug from the power socket.
2 Clean the air purifier, particle sensor and the surface of the filter (see the chapter "Cleaning and maintenance").
3 Let all parts air dry thoroughly before storing.
4 Wrap the filter in air tight plastic bags.
5 Store the air purifier, filter in a cool, dry location.
6 Always thoroughly wash hands after handling filters.
6 Troubleshooting
This chapter summarizes the most common problems you could encounter with the appliance. If you are unable to solve the problem with the information below, contact the Consumer Care Center in your country.
| Problem Possible solution | |
| The appliance does not work properly. | · The filter replacement alert has been on continuously but you have not replaced the corresponding filter. As a result, the appliance is now locked. In this case, replace the filter and long press to reset the filter lifetime counter. |
| The airflow that comes out of the air outlet is significantly weaker than before. | · The surface of the filter is dirty. Clean the surface of the filter (see the chapter “Cleaning and maintenance”). |
| The air quality does not improve, even though the appliance has been operating for a long time. | · Check if the packing material is removed from the filter. · The filter has not been placed in the appliance. Make sure that the filter (FY2122/00) is properly installed. · The particle sensor is wet. The humidity level in your room is high and causes condensation. Make sure that the particle sensor is clean and dry (see the chapter “Cleaning and maintenance”). · Room size is large or the outdoor air quality is poor. For optimum purification performance, please close the doors and windows when operating the air purifier. · There are indoor pollution resources. For instances, smoking, cooking, incense, perfume or alcohol. · Filter reaches the end of life. Replace the filter with a new one. |
| The color of the air quality light always stays the same. | · The particle sensor is dirty. Clean the particle sensor (see the chapter “Cleaning and maintenance”). |
Problem Possible solution
| The appliance produces a strange smell. | · The first few times you use the appliance, it may produce a plastic smell. This is normal. However, if the appliance produces a burnt smell even if removing filters, contact your Philips dealer or an authorized Philips service center. The filter may produce smell after being used for a while because of the absorption of indoor gases. It's recommended that you reactivate the filter by putting it in direct sunlight for repeated use. If odor still exists, replace the filter. |
| The appliance is extra loud. | · It's normal if the appliance runs at the Turbo mode.· In the Auto mode, if the appliance is too loud, maybe the appliance runs at high speed because air quality becomes worse, or your personalized setting in App triggers a higher fan speed. You can choose the Sleep mode, or change the settings in the App.· If anything drops into air outlet, it may also cause abnormal loud sound. Immediate turn off appliance, turn appliance upside down, to get foreign objectives out of appliance.· If there is abnormal sound, contact the Consumer Care Center in your country. |
| The appliance still indicates that I need to replace a filter, but I already did. | · Perhaps you did not reset the filter lifetime counter. Switch on the appliance. Then touch and hold the reset button ( [IMAGE] for 3 seconds. |
| Error code “E1” displays on the screen. | · The motor has malfunctions. Contact the Consumer Care Center in your country. |
PHILIPS
产品保用卡
保修及服务:
- 目录
- 您的空气净化器 2
- 使用入门 3
- 使用空气净化器 4
- 清洁和维护 8
- 存放 11
- 故障排除 12
- 您的空气净化器
- 清洁微粒感应器
- 更换滤网
- 注意:
- 滤网重置
- Getting started 16
- Using the air purifier ....17
- Cleaning and maintenance ....21
- Storage 24
- Troubleshooting 25
- Your air purifier
- Controls overview
- Getting started
- Installing the filter
- Using the air purifier
- Air quality light
- Turning On and Off
- Note:
- Changing the mode setting
- Switching the display indicator
- Using the light on/off function
- With the light sensor:
- Checking the filter status
- Cleaning and maintenance
- Cleaning the body of the air purifier
- Cleaning the particle sensor
- Cleaning the surface of the filter
- Replacing the filter
- Filter reset
- Storage
- Troubleshooting
- PHILIPS
- 产品保用卡
- 保修及服务:
Brand : PHILIPS
Model : AC1736
Category : Air purifier