
VL-MV72 - Intercom PANASONIC - Free user manual and instructions
Find the device manual for free VL-MV72 PANASONIC in PDF.


| Product Type | Video Intercom System |
| Brand | Panasonic |
| Model | VL-MV72 |
| Display | 7-inch color TFT LCD |
| Camera | 1/4-inch CMOS, night vision (IR LEDs) |
| Audio | Full-duplex two-way communication |
| Door Release | Remote unlock via monitor or keypad |
| Power Supply | AC 100-240V, 50/60Hz (adapter included) |
| Power Consumption | Approx. 10W (operating) |
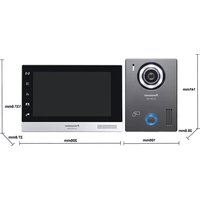
| Dimensions (Monitor) | 200 mm x 130 mm x 25 mm |
| Weight (Monitor) | Approx. 500 g |
| Dimensions (Door Station) | 130 mm x 100 mm x 40 mm |
| Weight (Door Station) | Approx. 300 g |
| Viewing Angle | 120° horizontal, 90° vertical |
| Night Vision Range | Up to 5 meters |
| Memory | Supports SD card up to 32GB (not included) |
| Connectivity | Wired (2-wire or 4-wire system) |
| Additional Features | Call history, intercom between units, voice changer |
| Mounting | Wall mount (monitor and door station) |
| Operating Temperature | -10°C to 50°C |
| Care & Cleaning | Wipe with a soft dry cloth; do not use solvents |
| Safety | Low voltage system (SELV) |
Frequently Asked Questions - VL-MV72 PANASONIC
User questions about VL-MV72 PANASONIC
0 question about this device. Answer the ones you know or ask your own.
Ask a new question about this device
Download the instructions for your Intercom in PDF format for free! Find your manual VL-MV72 - PANASONIC and take your electronic device back in hand. On this page are published all the documents necessary for the use of your device. VL-MV72 by PANASONIC.
USER MANUAL VL-MV72 PANASONIC
Operating Instructions
| Model Name | Model No. |
| Video Intercom System | VL-SV71VL-SV72 |
| Main Monitor Station | VL-MV71VL-MV72 |
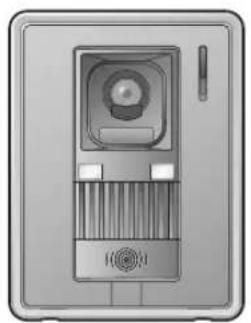

Thank you for purchasing a Panasonic product.
Please read this document before using the product and save it for future reference.
Carefully read the information found in the section titled "For your safety" in particular.
This system is an auxiliary system; it is not designed to provide complete protection from property loss. Panasonic will not be held responsible in the event that property loss occurs while this system is in operation.
Installation Guide is supplied separately.
1. Introduction
Introduction
1.1 Model composition ....3 1.2 Accessory information ....3 1.3 Additional/replacement accessories ....4 1.4 General information ....5 1.5 Symbols, expressions, and styles ....6 1.6 Trademarks and registered trademarks ....6
2. Important information
Important information
2.1 For your safety ....7 2.2 Important safety instructions ....7 2.3 For best performance ....7 2.4 Other important information .....7 2.5 For India only 8
3. Preparation
Preparation
3.1 Controls ....10 3.2 Using the display .....12 3.3 Setting the language, date and time .....12 3.4 Wide/zoom settings and zoom position settings ....12
4. Talking and monitoring
Talking and monitoring
4.1 Answering doorphone calls .....14 4.2 Transferring doorphone calls .....14 4.3 Monitoring the outside with the doorphone ....14 4.4 Talking with other devices .....15
5. Recording and playing
Recording and playing
5.1 Recording doorphone images .....16 5.2 Playing recorded images .....16
6. Using electric locks and PBXs
Using electric locks and PBXs
6.1 Using electric locks ....18 6.2 Panasonic PBX integration .....18
7. Incoming call operations
Incoming call operations
7.1 When another incoming call is received ....19
8. Additional functions
Additional functions
8.1 Zooming in and out (wide/zoom, pan/tilt) 20 8.2 Sound and display settings for calls and monitoring ....20 8.3 Ringtone settings ......21
8.4 Main monitor/extension monitor - function settings list ....21
9. Expanding the system
Expanding the system
9.1 Registering extension monitors .....24 9.2 Cancelling devices ......24
10. General information
General information
10.1 Cleaning 25 10.2 Specifications ......25
11. Troubleshooting
Troubleshooting
11.1 Troubleshooting .....26 11.2 Error messages - main monitor .....27 11.3 Error messages - extension monitor .....28
12. VL-V900 basic operations
VL-V900 basic operations
12.1 Controls 29 12.2 Lobby station operations ......29 12.3 Main monitor operations with the lobby station ....30 12.4 System conditions and limitations .....31
13. Index
13.1 Index....32
1.1 Model composition
| Model composition | Main Monitor Station*1(Main monitor*2) | Door Station(Doorphone*2) |
| VL-SV71 VL-MV71 VL-V522L | ||
| VL-MV71 VL-MV71 - | ||
| VL-SV72 VL-MV72 VL-V522L | ||
| VL-MV72 VL-MV72 - |
*1 Can be configured to be used as an extension monitor. *2 Product names used in this document.
Caution:
- Before attempting to connect or operate this product, please read the label on the rear of the main monitor.
1.2 Accessory information
1.2.1 Supplied accessories
Note:
- Accessories for installing the main monitor and the doorphone are described in the supplied Installation Guide.
1.3 Additional/replacement accessories
Please contact your Panasonic dealer for sales information.
As of June, 2017
| Accessory item Order number | Number of devices that can be connected |
| Door Station VL-V555 (surface mount) | Max. of 2 |
| (referred to as "doorphone" in this document) | |
| VL-V554 (surface mount) | |
| VL-V554U (flush mount) | |
| VL-V522L (surface mount) | |
| Lobby Station*1 | VL-V590 |
| Video Intercom System for Apartment Complexes*1 | VL-V900 and VL-V700 series Contact your building manager for more information. |
| Extension monitor VL-MV71 | Max. of 3 (notincluding the main monitor) |
| VL-MV72 |
*1 Contact your building manager for more information.
Note:
- The specifications differ depending on the models of doorphone and lobby station. The following functions are not available for the VL-V522L (supplied doorphone) and VL-V590.
- VL-V590: Monitoring the outside with the doorphone (page 14)
- VL-V590: Doorphone LED lights' illumination settings (page 20)
- VL-V590: Doorphone backlight compensation settings (page 20)
- VL-V522L/VL-V590: Wide/zoom settings and zoom position settings (page 12)
1.3.1 Compatible Panasonic PBXs
This unit can be used with Panasonic PBXs (page 18). Consult your dealer for more information.
Compatible Panasonic PBXs *1
- KX-TDA30/TDA100/TDA100D/TDA200/TDA600 series
- KX-TDE100/TDE200/TDE600 series
- KX-NS300/NS500/NS700/NS1000 series
- KX-NSX1000/NSX2000 series *1 As of June, 2017.
1.4 General information
- In the event of problems, you should contact your equipment supplier in the first instance.
- The available products differ depending on your region. For more information, please consult your dealer.
- In this document, the suffix of each model number (e.g., the "BX" in "VL-SV71BX") is omitted unless necessary. When the suffixes are used to describe models (e.g., "BX models"), the suffixes refer to all models in the series.
- All the functions listed in this document are available for the supplied main monitor. However, the functions available for the doorphone and lobby station differ depending on the model of the doorphone and lobby station. For more information about optional doorphone and lobby station, see "1.3 Additional/replacement accessories" on page 4.
- Design and specifications are subject to change without notice.
- The illustrations in the supplied document(s) may vary slightly from the actual product.
House mode and Apartment mode
The main monitor can be configured to be used in two modes: House mode and Apartment mode.
- House mode refers to when the main monitor is used as a stand-alone system and is not connected to a larger system comprised of a VL-V900 lobby station. This document describes the operations for House mode.
- Apartment mode refers to when the main monitor is used connected to a larger system comprised of a VL-V900 lobby station, such as in apartment complexes. Operations for Apartment mode are described in 12 VL-V900 basic operations (Page 29) of this document as well as the Supplemental Information. The Supplemental Information can be accessed from the following Web site.
https://panasonic.net/cns/pcc/support/intercom/v900
For Europe
Contact to Authorised Representative:
Panasonic Testing Centre
Panasonic Marketing Europe GmbH
Winsbergring 15, 22525 Hamburg, Germany
Ecodesign information
Ecodesign information under EU Regulation (EC) No. 1275/2008 amended by (EU) Regulation No. 801/2013. From 1 January 2015.
Please visit here: www.ptc.panasonic.eu/erp
Click [Downloads]
→ Energy related products information (Public)
Power consumption in networked standby and guidance are mentioned in the Web site above.
This device is classified as a HiNA device (networked equipment with high network availability), according to Ecodesign requirements.
Graphical symbols for use on equipment and their descriptions
| 1 2 | 3 4 5 6 | --- | ⊥ | ⊥ | ⊥ | ||||||
| 7 8 | 9 10 11 12 | | | ○ | ○ | ○ |
- Alternating current (A.C.) 2. Direct current (D.C.) 3. Protective earth 4. Protective bonding earth 5. Functional earth 6. For indoor use only 7. Class II equipment (equipment in which protection against electric shock relies on Double Insulation or Reinforced Insulation) 8. "ON" (power) 9. "OFF" (power) 10. Stand-by (power) 11. "ON"/"OFF" (power; push-push) 12. Caution, risk of electric shock
1.5 Symbols, expressions, and styles
The following symbols, expressions, and styles are used in this document.
| Item How it is expressed | Example | |
| Text displayed on the product's display | Text is displayed in a special font, usually enclosed in quotation marks | “Initial settings” |
| Icons displayed on the product's display | Black-and-white illustration of icon is used |  |
| Buttons with printing on them or near them | Button printing is displayed, usually wrapped in thick brackets |   |
| Soft keys Black-and-white | illustration of the corresponding soft key icon is used |  |
| Procedures Usually written | in an abbreviated style. The verb may be omitted. Unless otherwise stated, all procedures are for both the main monitor and extension monitor. | Main monitor/extension monitor example “Brightness”• Meaning:Press the soft key under the displayed “Brightness”• Meaning:Press the soft key under the displayed  soft key icons to select “Display” press the soft key icons to select “Display” press the [BDXK] select “Brightness”. [BDXK] select “Brightness”. |
1.6 Trademarks and registered trademarks
- The software of this product is based in part on the work of the Independent JPEG Group.
- All other trademarks identified herein are the property of their respective owners.
2.1 For your safety
To prevent severe injury and loss of life/property, read this section carefully before using the product to ensure proper and safe operation of your product.

WARNING
Preventing fire and electric shock
- Use only the power source marked on the product. If you are not sure of the type of power supplied to your home, consult your dealer or local power company.
- Use only the specified power supply unit and AC cable.
- Do not attempt to disassemble or modify this product. Contact an authorized service center for repairs.
- Never touch the power supply unit, AC cable, and power plug with wet hands.
- Do not touch the power supply unit, AC cable, and power plug during an electrical storm.
- Do not use the product (excluding the doorphone) in areas that are exposed to rain, moisture, steam, or oily smoke, or areas that have excessive dust.
- Do not perform any actions (such as fabricating, twisting, stretching, bundling, forcibly bending, damaging, altering, exposing to heat sources, or placing heavy objects on the power cable) that may damage the power cable. Using the product with a damaged power cable may cause electric shock, short circuits, or fire. Contact an authorized service center for repairs.
- Do not overload the power outlet or wiring above the specified levels. Overloading by having many connections on one power outlet may cause heat generation, resulting in a fire.
- Never put metal objects inside the product. Never spill any liquid on the product (excluding the doorphone).
If metal objects enter the product or the product becomes wet, unplug the product from the power outlet and contact an authorized service center.
- Do not use a microwave oven or other devices, such as electromagnetic cookers, to speed up the drying process of any parts of the product.
- Completely insert the AC cable plug and power plug into the power outlets. Failure to do so may cause electric shock and/or excessive heat resulting in a fire. Do not use damaged AC cable plug, power plug, or power outlets.
- Regularly remove any dust, etc., from the AC cable plug and power plug by unplugging them from the power outlets, then wiping them with a dry cloth. Accumulated dust may cause an insulation defect from moisture, etc., resulting in a fire.
- Unplug the product from the power outlet if the product emits smoke, an abnormal smell or makes unusual noise, or if the product has been dropped or physically damaged. These conditions can cause fire
or electric shock. Confirm that smoke has stopped emitting and contact an authorized service center.
- Hold the main body (not the metal parts) of the AC cable plug and power plug when unplugging them. Unplugging the AC cable plug and power plug while holding their cords or cords' plugs may result in fire, electric shock, or injury.

CAUTION
Preventing accidents, injuries, and property damage
- Do not use the product in unstable areas or areas prone to strong vibrations. This may cause the product to fall, resulting in damage to the product or injury.
- Do not put your ear(s) near the speaker, as loud sounds emitted from the speaker may cause hearing impairment.
2.2 Important safety instructions
When using this product, basic safety precautions should always be followed to reduce the risk of fire, electric shock, or personal injury.
- Do not use this product near water. For example, near a bathtub, wash bowl, kitchen sink, or laundry tub, in a wet basement, or near a swimming pool, etc.
- Use only the power cable, power supply unit, and AC cable indicated in this document.
SAVE THESE INSTRUCTIONS
2.3 For best performance
Environment
- Keep the unit away from electrical noise generating devices, such as fluorescent lamps and motors.
- The unit should not be exposed to direct sunlight.
- The unit should be kept away from heat sources such as radiators, cookers, etc. It should not be placed in rooms where the temperature is less than 0 °C or greater than 40 °C. Damp basements should also be avoided.
- Do not install the product in locations that are subject to sudden changes in temperature. Failure to do so may cause condensation to form on the product, causing malfunction.
- In areas surrounded by a high electrical field, disturbances may occur in the unit's image or sound.
2.4 Other important information
- The AC cable plug and power plug are used as the main disconnect device. Ensure that the power outlet is installed near the product and is easily accessible.
Privacy and rights of portrait
When installing or using the doorphone, please take into consideration the rights of others with regard to privacy.
- It is generally said that "privacy" means the ability of an individual or group to stop information about themselves from becoming known to people other than those whom they choose to give the information. "Rights of portrait" means the right to be safe from having your own image taken and used indiscriminately without consent.
Personal information
The main monitor's/extension monitor's internal memory records personal information (image and audio recordings of visitors, etc.). Panasonic assumes no liability for any unforeseen damages arising from the exposure of the recorded information.
- Disclaimer
Recorded data may be altered or deleted as a result of incorrect operations, exposure to static electricity, accidents, malfunction, repairs or other operations. Panasonic assumes no liability for any direct or indirect damages resulting from the loss or alteration of recorded images.
Requesting repairs for the product
- Before submitting the main monitor/extension monitor for repair, initialize them. This will delete all information saved in the main monitor/extension monitor.*1
- Even if the product is sent for repairs without being initialized, the memory (including recorded data and settings) for the main monitor/extension monitor may be cleared and set to factory default after repair.
- If operations cannot be performed due to the main monitor/extension monitor malfunction, consult with the place of purchase for appropriate action.
Note for product disposal, transfer, or return
- This product can store your private/confidential information. To protect your privacy/confidentiality, we recommend that you erase the information (recorded images) from the memory before you dispose of, transfer or return the product. All the recorded images can be erased at once by initializing the main monitor/extension monitor. *1
*1 Main monitor/extension monitor: perform "Factory Setting" in "Initialize settings" (page 23).
Information on Disposal in other Countries outside the European Union

The above symbol (①) is only valid in the European Union. If you wish to discard this product, please contact your local authorities or dealer and ask for the correct method of disposal.
Others
- It is prohibited to disassemble or modify this product. Contact the dealer where you purchased this product for repair.
- When power fails, this product cannot be used.
- For the recorded image: The recorded image may be lost when:
- Mishandled – Electric shock occurs. – The power is turned off during use.
- Panasonic may not be liable for damages due to external factors such as power failures.
- If you stop using the main monitor/extension monitor and the doorphone, remove the main monitor/extension monitor and the doorphone from the walls to prevent them from falling off. (Consult your dealer for information about removing the product.)
2.5 For India only
Declaration of Conformity with the requirements of the E-Waste (Management) Rules
The Product is in conformity with the requirements of the reduction of hazardous substances of the E-Waste Rules.
The content of hazardous substance with the exemption of the applications listed in SCHEDULE II of the E-Waste Rules:
- Lead (Pb) – not over 0.1% by weight;
- Cadmium (Cd) – not over 0.01% by weight;
- Mercury (Hg) – not over 0.1% by weight;
- Hexavalent chromium (Cr6+) – not over 0.1% by weight;
- Polybrominated biphenyls (PBBs) – not over 0.1% by weight;
- Polybrominated diphenyl ethers (PBDEs) – not over 0.1% by weight.
Disposal information

For the purpose of recycling to facilitate effective utilization of resources, please return this product to a nearby authorized collection centre, registered dismantler or recycler, or Panasonic service centre when disposing of this product.
Please see the Panasonic website for further information on collection centres, etc., or call the toll-free number below.
Website:
http://www.panasonic.com/in/corporate/sustainability/
panasonic-india-i-recycle-program.html
Service helpline: 1800 103 1333 or 1800 108 1333
3.1 Controls
3.1.1 Doorphone
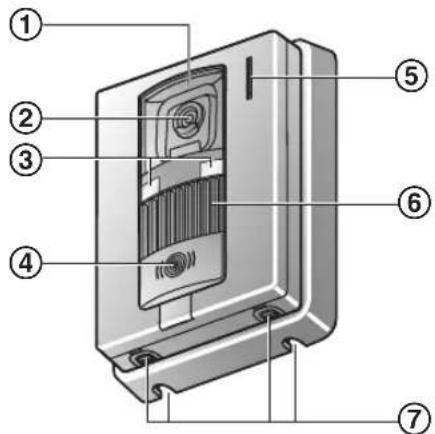
① Lens cover ② Camera lens ③ LED lights
Used to illuminate the visitor's face or the area in front of the doorphone so that the visitor's face can be seen in the dark.
④ Call button and indicator (red) Lights in red when the power is on. ⑤ Microphone ⑥ Speaker ⑦ Water drain holes
These holes allow rain water to drain. Do not cover them.
Doorphone image quality
The quality of doorphone images may change depending on the installation environment, settings, lighting conditions, the time of day, etc.
See page 26 for more information.
3.1.2 Main monitor/extension monitor

① Display (page 12) ② Speaker ③ Play lamp (blue)
Lights when there is an unplayed image. The indicator turns off when the unplayed image is displayed.
④ TALK button (【1/2】)ALK ⑤ Play button (【】)
Press to display the image playing screen when the main monitor is idle.
It can also be used as a soft key (page 11).
⑥ Page button (【·】)
Press to page extension monitors when the main monitor is idle or transfer calls.
It can also be used as a soft key (page 11).
⑦ Information button (【1】)
Press to display the information screen when the main monitor is idle.
It can also be used as a soft key (page 11).
⑧ Menu button (【主
Press to display the setting screen when the main monitor is idle.
It can also be used as a soft key (page 11).
⑨ Monitor button (☐)
Press to monitor the outside when the main monitor is idle.
It can also be used as a soft key (page 11).
⑩ Microphone ⑪ OFF button (【OFF ⑫ RESET button
If the main monitor cannot be correctly operated, press the [RESET] button with a pointed object to reset the main monitor. (Recorded images and configured settings are not affected.)
Soft keys

① Soft key icons
Indicate the item that will be selected when you press the soft key directly under each icon. The icons displayed vary depending on the current screen and operation.
② Soft keys
Select the items displayed on the screen directly above each soft key.
3.2 Using the display
3.2.1 Main monitor - display information
Image viewing screen
① Status icons (page 12)
② Soft key icons (page 11)
Status icons (main monitor)
| Indicates which doorphone is calling, monitoring, or on a call. ("1" indicates the device number.) | |
| Indicates there is a call from the doorphone when monitoring or on a call with another device (page 19). | |
| Indicates that the main monitor is on a call. | |
| Indicates that a doorphone and a PBX extension are talking. | |
| Indicates that the main monitor is monitoring. | |
| Indicates that images are being recorded (page 16). | |
| Indicates that the doorphone's LED lights are on (page 20). | |
| Indicates that "Press-to-talk" mode is on (page 14). |
Information screen
The information screen can be displayed by pressing [icon] when the main monitor is idle. The information screen is used to display information such as the current status of the main monitor.
3.3 Setting the language, date and time
When you use the main monitor for the first time, you will be prompted to set the display language, date, and time settings.
- The play lamp lights if these settings are not configured.
1 Press the [ ] button to turn on the display. 2 Press the soft keys under the and ▲ ▼ soft key icons to select the desired language. 3 Press . OK 4 Press again 5 Set the date and time.
- Press ▶ to select an item (i.e. year, month, day, etc.).
- Press — or to change the setting.
6 When finished, press . OK
- A beep sounds and the display turns off.
Changing the language, date and time
You can change the language, date, and time settings later if desired. Press the [≡] button, use the ▲▼, and softkeys to navigate to "Initial settings".
Note:
- The date and time settings may be deleted when there is a power outage. In this case, reconfigure the settings.
- The time may become out of sync over time (about 60 seconds per month).
3.4 Wide/zoom settings and zoom position settings
These functions are not available for the supplied doorphone (VL-V522L). You can use these functions with optional doorphones (page 4).
You can configure how doorphone images are initially displayed on the main monitor. Images can be displayed in wide mode or in zoom mode. You can choose different settings for when visitors call you, and for when you are monitoring.

Wide mode (default setting)
Zoom mode
Images are not zoomed. The full camera image is displayed.
Images are zoomed. Images are displayed 2 times larger than wide display.
Note:
- The zoom feature uses a digital zoom. As a result, the image quality of zoomed images is lower than wide display images.
- You can switch between wide and zoom modes and adjust the zoom position while monitoring or on a call. See page 20.
Selecting wide or zoom
- Press [☐≡] → select "Initial settings" → OK.
- Select "Wide/Zoom settings" → OK.
- If there are multiple doorphones, select the doorphone to be configured → OK.
- Select the desired setting → . OK
- “When visitors come”: Your settings will be used when you answer calls from visitors.
- “When monitoring”: Your settings will be used when you are monitoring.
- Select the desired display mode → OK.
- A beep sounds and the settings are changed.
- When finished, press [OFF]
Note:
- If you select "Zoom", adjust the zoom position so that people or objects that you want to view are displayed centrally in the screen.
- When images are recorded in zoom mode, only the zoomed area is recorded.
Selecting the zoom position (pan/tilt position)
You can select which area of the image is displayed when displaying zoomed images.
- Press [☐≡] → select "Initial settings" → OK.
- Select "Zoom position settings" → OK
- If there are multiple doorphones, select the doorphone to be configured → OK.
- A zoomed image from the doorphone is displayed.
- Select the desired zoom position → OK
- A beep sounds, the settings are changed, and the display turns off.
- When finished, press [OFF].
Note:
- If you do not perform any operations for 90 seconds while changing this setting, the setting is cancelled and the screen turns off.
4.1 Answering doorphone calls
When you receive a call from a doorphone, the main monitor and extension monitor ring, and display an image from the doorphone.
To answer the call
Press【15】TALK
- Speak within about 50 cm of the microphone.
- Speak alternatively with the visitor. If you and the visitor speak at the same time, you will not hear each other.
- You can talk for up to about 90 seconds.
To end the call
Press [OFF].
Note:
- The display will turn off if you do not answer a call within about 30 seconds.
- The displayed images are automatically recorded to the main monitor (page 16).
Features available during incoming calls
– Monitoring feature (page 14)
Features available while talking
- Adjusting wide/zoom and pan/tilt settings (page 20) *1
- Turn on or off the operation guide (page 20)
- Adjusting sound and display settings (page 20)
- Using "press-to-talk" (page 14) – Transferring calls to other devices (page 14) *1 These functions are not available for the supplied doorphone (VL-V522L). You can use these functions with optional doorphones (page 4).
Press-to-talk mode
If it is difficult for you and the visitor to hear each other due to noise, the "press-to-talk" mode can make conversations easier to hear.
- While talking, activate press-to-talk mode by pressing and holding 【WE TALK】 for about 2 seconds.
- A beep sounds and 📄 is displayed.
2. To speak to the visitor
Speak while pressing and holding 【TALK】. To listen to the visitor Release 【TALK】
Note:
- Press-to-talk mode is cancelled when the call ends.
4.2 Transferring doorphone calls
You can transfer a doorphone call between the main monitor and extension monitor.
To transfer a call
- While talking with the visitor at the doorphone, press
- If there are multiple devices, select the device to transfer the call to → OK.
- To page all devices, select "Call all together" → OK.
- Page the other party.
- When the paged party answers, ask them to receive the call from the doorphone → [OFF].
- To cancel transferring the call and talk to the visitor again, press [TALK]
To receive a call
- When the intercom call is received, press [TALK] to talk to the paging party.
- When the image from the doorphone is displayed, talk to the visitor.
- When finished, press [OFF].
Note:
- The visitor cannot hear voices during paging.
4.3 Monitoring the outside with the doorphone
You can monitor the sounds and images from the doorphone using the main monitor and extension monitor.
1 Press [ ] .
- If there are multiple doorphones, select the desired doorphone → OK.
- The images from the doorphone are displayed.
2 Monitor the sound and image.
- You can talk to the monitored party by pressing [TALK].
3 When finished, press [OFF].
Note:
- The sound from your end will not be heard at the doorphone.
- You can monitor for up to about 3 minutes.
Features available while monitoring
– Recording doorphone images (page 16) - Adjusting wide/zoom and pan/tilt settings (page 20) *1 – Turn on or off the operation guide (page 20) - Adjusting sound and display settings (page 20) *1 These functions are not available for the supplied doorphone (VL-V522L). You can use these functions with optional doorphones (page 4).
4.4 Talking with other devices
You can make intercom calls between the main monitor and extension monitor.
To make a call
- Press [ ]
- If there are multiple devices, select the device to page → OK.
- To page all devices, select "Call all together" → OK.
- Page the other party.
- Talk with the paged party when they answer the call.
- When finished, press [OFF].
To receive a call
- When the intercom call is received, press [TALK] to talk to the paging party.
- When finished, press [OFF]
Note:
- Paging automatically ends after about 30 seconds and intercom calls automatically end after about 90 seconds.
5.1 Recording doorphone images
The main monitor and extension monitor can record doorphone images (still images). They can save images from up to 50 doorphone calls or monitoring sessions. Each time new images are recorded, they are saved in an image set of up to 8 images.
5.1.1 Recording automatically (recording a received call)
When a visitor calls you, the main monitor and extension monitor record 8 images automatically (whether you answer the call or not). Recording starts about 2 seconds after you receive the call.
When you do not answer a call
The recorded images are saved as unplayed images, and the play lamp lights.
When there are multiple doorphones
- When you are talking or monitoring and there is an incoming call from another doorphone, images from the incoming call will not be displayed and recorded. In order to display and record incoming calls, you must end the current call or stop monitoring.
- If there is an incoming call from another doorphone while receiving an incoming call, the number of recorded images from the 1st caller (8 images) are reduced.
When the memory is full (auto image updating)
When the memory is full, new images overwrite the oldest images automatically. This occurs even if the oldest images are unplayed images.
5.1.2 Recording manually (recording while monitoring)
The main monitor and extension monitor can manually record images while monitoring. While monitoring, press 📄. Up to 8 images will be recorded. - is displayed on the screen when recording.
5.2 Playing recorded images
When there are new (i.e., unplayed) images recorded, the play lamp (page 10) lights.
Note:
- Images manually recorded by the main monitor and extension monitor can only be played by the device that recorded the images.
1 Press [ ▶ ] .
- "Recorded image list" screen is displayed.
2 Select "Unplayed images" (for new images) or "Played images" (for images that have been played) → . OK - The most recent image set of the selected type is displayed.
3 Browse the image sets and images.
- The following operations are available when browsing images. • See page 16 for a list of all available operations.

Plays back all images in an image set continuously

Browses image sets, from older ones to newer ones

Browses image sets, from newer ones to older ones

Displays the options menu

Returns to the previous screen
4 When finished, press [ OFF]
Note:
- The play lamp turns off when the unplayed image is displayed.
5.2.1 Image playing screen
Image playing screen![[4] 22 December 2016 9:18](/content/2026/06/1402969/images/464395f25127cba41e0f2aa6cbdef77076590c38d4ffe5ed23827a9f35262546.jpg)
① Device number ② Image set number ③ Image position within an image set ④ Indicates that the image has not been played. ⑤ Recording date and time
Status icons

Indicates the number of the doorphone that recorded the image.

Indicates that the image is protected (i.e., cannot be deleted)
Available soft keys

Plays back all images in an image set continuously

Browses image sets, from older ones to newer ones

Browses image sets, from newer ones to older ones

Displays the options menu

Returns to the previous screen

Pauses continuous playback

Plays the previous image in an image set when continuous play is paused.

Plays the next image in an image set when continuous play is paused.
5.2.2 Options available when playing images
While playing images, you can press ☐ to display the options menu and change the following settings.
To turn off the operation guide

- While the guide is turned off, the soft keys do not operate their respective features. Press any soft key to display the guide again briefly. During this time, the soft keys can be operated as normal.
To turn on the operation guide
Press any soft key to display the guide → ☐≡→ select "Guide on" → OK.
To turn protection on and off

- When "Protect" is selected, the image cannot be deleted. ● A maximum of 20 image sets can be protected.
To delete the current image

- You can use "Delete all images" to delete all images in one operation. See page 23.
To adjust the screen brightness
≡ → select “Brightness” → adjust the brightness.
6.1 Using electric locks
When a commercially available electric lock is connected to the main monitor, you can unlock a door or gate using the main monitor. You can also select the length of time control signals are sent for to unlock the door or gate. (How long the door or gate remains unlocked depends on each electric lock's specification.)
- A maximum of 2 electric locks can be connected to the main monitor. When you use an additional doorphone, the maximum number of the electric locks that can be connected to the doorphone depends on the type of doorphone. Consult your dealer for further information.
- For detailed information about connections, see the operating instructions included with the electric lock and the Installation Guide of this product.
6.1.1 Configuring electric locks
1 Press【】 2 Select "Connected devices" → OK. 3 Select "Electric lock" → OK. 4 Select the doorphone ("Doorphone 1" or "Doorphone 2") that you want to assign the electric lock to → OK. 5 Select the type of the electric lock → OK. 6 Select the device that the electric lock is connected to → OK. 7 Select the unlocking time → OK. 8 When finished, press [OFF]
Electric lock settings
Options listed below are available.
"Unlocking buzzer sound":
Determines whether the doorphone sounds a buzzer when the electric lock is unlocked. See page 22.
"View extension after unlocking":
Determines whether to extend the displaying time of the doorphone image when the electric lock is unlocked. See page 22.
6.1.2 Unlocking electric locks
1 Press while talking or monitoring.
- If there are 2 electric locks available, select the electric lock to be unlocked → OK → press O to unlock another electric lock.
Note:
- You can only unlock the door or gate when talking or monitoring.
- When using multiple electric locks with different doorphones, you can only operate the locks from the doorphone that they are connected to.
6.2 Panasonic PBX integration
Connecting the main monitor to a PBX allows you to use PBX extensions to answer doorphone calls.
Please use only a Panasonic PBX (page 4).
For detailed information about connections, see the operating instructions included with the PBX and the Installation Guide of this product.
Note:
- If you answer a doorphone call with a PBX extension, the doorphone camera image will be displayed on the main monitor, and is displayed to indicate that a PBX extension is on the call.
- While is displayed, you cannot answer calls using the main monitor.
- The display will turn off when the call between the doorphone and the PBX extension ends, or after 3 minutes.
- If you answer a doorphone call with the main monitor, the call will continue to ring at the extension for about 15 to 30 seconds. After you answer the call, the extension user cannot answer the call or join the call, even if the extension is ringing.
When using two doorphones (excluding an optional VL-V590 lobby station; page 4)
From the PBX extension, you can only call the doorphone that you last received call from or talked with.
7.1 When another incoming call is received
When another incoming call is received while talking, monitoring, or receiving an incoming call, the ringtone sounds and notifications are received in the following manner for the main monitor and extension monitor.
Main monitor example:
When there is an incoming call from doorphone 2 while talking with doorphone 1.
Main monitor example:
When there is an incoming call from a doorphone during an intercom call.

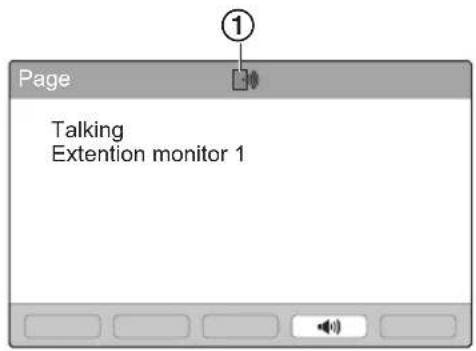
① Incoming call's icon
| Receive an incoming call when Next action | |
| Already receiving an incoming call from a doorphone | The display changes to the new incoming call, and the previous incoming call is terminated. |
| Talking or monitoring with a doorphoneTalking on an intercom call | The ringtone sounds and the incoming call's icon is displayed (1).To answer the incoming call:Press [OFF]– The original call or monitoring is terminated and the displayed image is changed.– Press [WETALK] to talk with the visitor at the doorphone. |
| Transferring a doorphone call | The ringtone sounds and the incoming call's icon is displayed (1).To answer the incoming call:Press [OFF]– Transferring is terminated, and then the original call's image is displayed and you can talk to the original caller.– Press [OFF] again to display the new incoming call's image.– Press [WETALK] to talk with the visitor at the doorphone. |
8.1 Zooming in and out (wide/zoom, pan/tilt)
These functions are not available for the supplied doorphone (VL-V522L). You can use these functions with optional doorphones (page 4).
When on a call or monitoring, you can display images in wide mode or in zoom mode. During zoom mode, you can change the zoom position (also called "pan/tilt").
To switch from wide mode to zoom mode
Press
To switch from zoom mode to wide mode
Press .
To change the zoom position in zoom mode

Note:
- See page 12 for examples of wide mode and zoom mode.
- The zoom feature uses a digital zoom. As a result, the image quality of zoomed images is lower than wide display images.
- When images are recorded in zoom mode, only the zoomed area is recorded.
- If you adjust these settings, the settings will be cancelled the next time you display an image. To change how doorphone images are initially displayed on the main monitor, see page 12.
8.2 Sound and display settings for calls and monitoring
While monitoring or on a call, you can press to display the options menu and change sound and display settings.
To adjust the incoming call volume *1

volume" → adjust the volume.
To adjust the volume heard at the doorphone *1

volume" → select the desired setting.
To use the voice changer *1 (makes the voice heard at the doorphone sound deeper)

changer" → select the desired setting.
To turn off the operation guide

- While the guide is turned off, the soft keys do not operate their respective features. Press a soft key other than [icon] to display the guide again briefly.
During this time, the soft keys can be operated as normal.
To turn on the operation guide
Press a soft key other than [图标] to display the guide → ≡ → “Guide on” → OK
To adjust the screen brightness
≡ → "Display" → OK → "Brightness" → select the desired setting.
To adjust backlight compensation
≡ → "Display" → OK → "Backlight compensation" → select the desired setting.
To turn the LED lights on or off

"Illumination" → select the desired setting.
• 5 displayed when the LED lights are on.
*1 These settings cannot be changed during an incoming call.
8.3 Ringtone settings
You can change the ringtone type and volume that is heard during an incoming call.
- For information about how to configure settings, see page 21.
8.4 Main monitor/extension monitor - function settings list
You can change the settings to match how the main monitor or extension monitor is used.
1 Press【】
2 Select the desired item → . OK
- Repeat this step as necessary to navigate to the desired setting.
3 Select the desired setting → . OK
4 Press [OFF
Note:
- If you do not perform any operations for 90 seconds while changing these settings, or if an incoming call is received, the setting is cancelled and the screen turns off.
- In the following table, default settings are indicated by < > .
- While changing settings, “●” is displayed to the left of the currently selected item.
Item name: "Initial settings"
| Sub-menu | Settings | |||
| 1 2 3 | ||||
| Time and date settings*2 | -- 2017-1-1 0:00 | |||
| Zoom position settings*1, *3 | Doorphone 1 - 2 | - | - | For details see page 20. |
| Wide/Zoom settings*1, *3 | Doorphone 1 - 2 | When visitors come/When monitoring | Zoom, | |
| Power supply frequency*1 | --<50 Hz>, 60 Hz | - To prevent mottled or uneven colour from being displayed, choose the appropriate power supply frequency for your area. | ||
| Select language*2 | --, العربية | |||
*1 These functions are not available for the extension monitor. *2 When using the product for the first time, follow the on-screen instructions to configure this setting (page 12). *3 These functions are not available for the supplied doorphone (VL-V522L). You can use these functions with optional doorphones (page 4).
Item name: "Ringtone"
| Sub-menu | Settings | ||
| 1 | 2 | ||
| Ring volume | Doorphone | Extra loud, , Normal, Quiet, Mute | |
| Page | Extra loud, , Normal, Quiet | ||
| Ringtone | Doorphone 1 | , Sound 2, Sound 3 | , Repeat |
| Doorphone 2 | Sound 1, , Sound 3 | , Repeat | |
Item name: "Connected devices"*1
| Sub-menu | Settings | ||||
| 1 2 3 4 | |||||
| Doorphone connection*2 | Doorphone 1 | -- | ce connected>, | Auto detection, Device not connected | |
| Doorphone 2 | --Device connected, | auto detection>, Device not connected | |||
| Electric lock | Doorphone 1 - 2 | Electric door lock/ Electric vehicle gate lock | Connect to the electric lock 1/ Connect to the electric lock 2/ Connect to the doorphone/ | - Unlock for 1 second> | |
| Unlocking buzzer sound | --, | Off | For details see page 18. | ||
| View extension after unlocking*5 | -- Enable, | ||||
| Automatic illumination *3 | Doorphone 1 - 2 | When visitors come/When monitoring | --, Disable | ||
| Lobby connection*4,*5 | ---Device connected, | not connected> | |||
*1 These functions are not available for the extension monitor. *2 Select "Device not connected" for doorphones that are no longer used. *3 With this setting, you can select whether or not to automatically turn on the LED lights when the area surrounding the doorphone is dark. *4 Only used for the VL-V590 lobby station. *5 These functions are not available for Apartment mode.
Item name: "Register/Cancel"
| Sub-menu | Settings | ||
| 1 2 3 | |||
| Register | Main monitor | - | Extension monitor 1 - Extension monitor 3 |
| Extension monitor | Yes Extension | monitor 1 - Extension monitor 3 | |
| No | - | ||
| Cancel | Extension monitor 1 - Extension monitor 3 | - | - |
Item name: "Other"
| Sub-menu | Settings | |
| 1 | 2 | |
| Play lamp | - | , Disable |
| Delete all images Delete all images/Delete Non-protected images | Yes, No | |
| Initialize settings | Default setting*1/Factory setting*3- Select “Factory setting” when disposing, transferring, or returning the product. | Yes, No |
| Demo mode*2,*3 | -On, | |
*1 The following settings are not initialized: "Power supply frequency", "Select language", and "Electric lock" settings. Also, registration information of devices registered to the main monitor is not initialized. (All devices remain registered to the main monitor even after initialization.) *2 These functions are not available for the extension monitor. *3 These functions are not available for Apartment mode.
Item name: "Operating instructions"
| Sub-menu | Settings |
| 1 | |
| Operating instructions Displays the Web site for downloading the Operating Instructions. | |
9.1 Registering extension monitors
Extension monitors can be registered to the main monitor.
9.1.1 Registering extension monitors
1 Main monitor:
Press [☐≡] → select "Register/Cancel" → OK.
2 Select "Register" → OK.
- When you are prompted to register your main monitor, select "Main monitor" → OK.
3 Select the registration number of the extension monitor to be registered → OK.
4 Extension monitor:
Press [☐≡] → select "Register/Cancel" → OK.
5 Select "Register" → OK.
- When you are prompted to register your extension monitor, select "Extension monitor" → OK → Yes.
6 Select the registration number of the extension monitor to be registered → OK.
- Make sure to select the same registration number that was selected on the main monitor. - Registration is complete when the extension monitor restarts.
7 Main monitor: Press [OFF].
9.2 Cancelling devices
1【≡】→select "Register/Cancel" →OK.
2 Select "Cancel" → OK.
3 Select the device to cancel 1 → OK 1 → Yes.
- A beep sounds and "Cancel completed" is displayed.
*1 Not displayed when using as an extension monitor.
Note:
- When you want to change an extension monitor's registration number or re-register an extension monitor, first use the extension monitor to cancel itself, and then re-register it again as an extension monitor. (Extension monitors become main monitors again when they are cancelled.)
10.1 Cleaning
Wipe the product with a soft, dry cloth.
For excessive dirt, wipe the product with a moist cloth.
Important:
- Do not use any cleaning products that contain alcohol, polish powder, powder soap, benzine, thinner, wax, petroleum, or boiling water. Also do not spray the product with insecticide, glass cleaner, or hair spray. This may cause a change in colour or quality of the product.
10.2 Specifications
Main monitor (VL-MV71/VL-MV72)
| Power source ● | VL-MV71:220-240 V AC, 50/60 HzVL-MV72:power supply unit(VL-PS241) 24 V DC, 0.4 A |
| Power consumption | VL-MV71:Standby: 2.0 WDuring operation: 10.5 WVL-MV72:Standby: 1.6 WDuring operation: 9.8 W |
| Dimensions (mm) (height × width × depth) | Approx. 158×243×29.5(excluding protruding sections) |
| Mass (weight) ● | VL-MV71BX:approx. 825 gVL-MV71CX/ML:approx. 875 gVL-MV71SX:approx. 850 gVL-MV71AZ:approx. 835 gVL-MV72AZ:approx. 710 g |
| Operating environment | Ambient temperature: approx.0 °C to +40 °CRelative humidity(non-condensing): up to 90 % |
| Display Approx. 17.8 cm (7.0 incheswide colour display) | |
| Talking method Hands-free | |
| Installation method | Wall mount (mounting bracket supplied) |
Power supply unit (VL-PS241) (indoor use only)
| Power source Input: 220-240 V AC, 0.2 A,50/60 HzOutput: 24 V DC, 0.6 A |
| Dimensions(mm) (height × width × depth) | Approx. 104×100×54(excluding protruding sections) |
| Mass (weight) Approx. 215 g | |
| Operating environment | Ambient temperature: approx.0 °C to +40 °CRelative humidity(non-condensing): up to 90 % |
| Installation method | Attach to DIN rail |
Doorphone (VL-V522L)
| Power source Power supplied by the main monitor | |
| Dimensions (mm) (height × width × depth) | Approx. 131×99×36.5(excluding protruding sections) |
| Mass (weight) Approx. 200 g | |
| Operating environment | Ambient temperature: approx.-15 °C to +55 °CRelative humidity(non-condensing): up to 90 % |
| Viewing angle Horizontally: approx. 87°Vertically: approx. 66° | |
| Installation method | Wall mount (mounting base supplied) |
| Minimum illuminance required | 1 lx(within approx. 50 cm from the camera lens) |
| Lighting method LED lights | |
11.1 Troubleshooting
Monitor display (doorphone images)
| Problem Cause & | Solution Page | |
| Images appear distorted. | Images may appear distorted because of the characteristics of the camera lens. This is not a malfunction. | - |
| The image of the subject is displayed in black and white (or bluish-purple). | At night or when there is poor light in the area around the doorphone, the image of the subject may be displayed in black and white (or bluish-purple).–When using a doorphone equipped with LED lightsThe doorphone's LED lights may be turned off.Turn on the LED lights when it is dark.-When using a doorphone not equipped with LED lightsWe recommend installing extra lights in the area around the doorphone. | 2022 |
| The background appears greenish. | At night or when there is poor light in the area around the doorphone, lights or white objects near the doorphone may appear greenish. This is not a malfunction. | - |
| Images at night are dark and faces cannot be identified. | “Automatic illumination” is set to “Disable”.→ Change the setting to “Enable”.Even when the doorphone's LED lights are lit, because the light from the LED lights cannot illuminate the edges of the visible area (the areas directly next to the doorphone), faces of people may not be identifiable even when they are close to the doorphone.→ We recommend installing extra lights in the area around the doorphone. | 22- |
| The images of people's faces are dark. | Images of people's faces appear dark when there is strong sunlight or a backlight in the area around the doorphone.→ Use the backlight compensation function. | 20 |
| Images are dirty or unclear. Images are not in focus. | There is dirt on the surface of the doorphone's lens.→ Wipe the lens with a soft, dry cloth.There is water condensation on the surface of the doorphone's lens.→ Wait for the condensation to evaporate. | 25- |
| Images are white or black. | The brightness of the display is not correctly adjusted.→ Adjust the brightness when images are displayed. | 17 |
| Images are white, or white lines or circles are shown on the display. | Strong light such as sunlight is shining into the lens of the doorphone causing images to be difficult to see on the display. (This is not a malfunction.)→ Locating the doorphone away from direct sunlight or changing the angle that the doorphone is installed may help reduce this problem. | - |
| There is a small black dot in the background. | If the sun can be seen, its centre appears as a black dot. This is not a malfunction. | - |
| Images are flickering. ● AC (alternating current) lights such as fluorescent lights are used near the doorphone.→ AC (alternating current) lights such as fluorescent lights may cause flickering in dark environments. (This is not a malfunction.) | - | |
| Images of the area you want to view in the zoom screen are not displayed correctly.*1 | Change the zoom position setting to a suitable position.→ Configure the “Zoom position settings” settings. | 12 |
*1 The wide/zoom setting is not available for the supplied doorphone (VL-V522L).
Ringtone
| Problem Cause & Solution Page | ||
| The ringtone for the doorphone does not sound. | ● The ringtone volume is muted.→ Activate the sound for the ringtone. | 21 |
Calls
| Problem Cause & | Solution Page | |
| Sound cuts in/out or fades. | The area surrounding the main monitor, extension monitor, or doorphone are noisy, causing the sound to cut out or fade.→ Try using the "Press-to-talk" mode. | 14 |
| Calls cannot be heard because of noise or feedback. | Noise or feedback may occur when you are too close to the other party.→ Move away from the other party. | - |
| Your voice cannot be heard by the visitor but the visitor's voice can be heard. | You are using the "Press-to-talk" mode. (i.e. displayed on the main monitor/extension monitor.)→ When using the "Press-to-talk" mode, the visitor can hear your voice only while you are pressing【e】TALK | 14 |
Others
| Problem Cause & | Solution Page | |
| “Demo mode” is displayed on the screen.The ringtone regularly sounds.You cannot talk or make calls. | The “Demo mode” feature is enabled.→ Set “Demo mode” to “Off”. | 23 |
| The product does not work with correct operations.The product does not work properly. | Perform the following operations.→ Press the [RESET] button on the bottom side of the main monitor with a pointed object. (Recorded images and configured settings are not affected.) | 10 |
| The main monitor does not work properly.Nothing is displayed on the monitor.The ringtone does not sound.Voices cannot be heard. | Check the power connection.If the power is connected, there may be a problem with the electrical wiring.→ Contact an authorised service centre. | - |
11.2 Error messages - main monitor
Error messages can be viewed by pressing [1].
| Display Cause & | Solution Page | |
| “Cannot register.” | ● Registration failed because it was not completed within the specified time.→ Check that the devices to be registered are correctly connected and receiving power, and then try again. | 24 |
11. Troubleshooting
| Display Cause & | Solution Page | |
| “Cannot be used.” | The wiring between the main monitor and extension monitor is not connected.→ Check the wiring connections.The registration number used for the extension monitor is different on the main monitor and extension monitor.→ Use the same registration number on the main monitor and extension monitor.2 extension monitors are using the same registration number.→ Cancel 1 of the extension monitors so that it becomes a main monitor again and then re-register it with a different registration number.Power is not connected to the extension monitor.→ Connect power to the extension monitor. | 2424 |
| “Not registered.” | The extension monitor has not been registered on the main monitor. | 24 |
11.3 Error messages - extension monitor
Error messages can be viewed by pressing [1].
| Display Cause & | Solution Page | |
| “Cannot connect to the main monitor.Please check the connection or the registration of the main monitor.” | The wiring between the main monitor and extension monitor is not connected.→ Check the wiring connections.The extension monitor has not been registered on the main monitor.→ Register the extension monitor on the main monitor.The registration number used for the extension monitor is different on the main monitor and extension monitor.→ Use the same registration number on the main monitor and extension monitor. | 24 |
This section explains the basic operations of the VL-V900 lobby station (Video Intercom System for Apartment Complexes) when used with the VL-MV71/VL-MV72 main monitor.
For further information about features and operations, visit our Web site and find the document:
https://panasonic.net/cns/pcc/support/intercom/v900
12.1 Controls
12.1.1 Lobby station

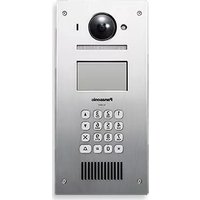
① Heat sensor Turns on the display when a visitor is detected. ② Lens cover ③ Light Illuminates subjects in dark environments. ④ Display ⑤ Keypad ⑥ Speaker ⑦ Camera lens ⑧ Microphone ⑨ Search buttons (▲ and ▼) Used to select items shown on the display. ⑩ Cancel button (X) ⑪ Call button (△)
12.2 Lobby station operations
12.2.1 Calling a resident
Entering a room number
- Enter the resident's room number.
- Press [ ] to call.
Searching by first letter of the name
- Press [ *].
- Use the keypad to enter the first letter of the resident's name.
- Press a key repeatedly to scroll through the letters assigned to that key.
- Note the hints displayed at the bottom of the screen.
- Press [▲] or [▼] to search for the desired name.
- Press [ ] to call.
Searching through all names
- Press [▼].
- Press [▲] or [▼] to search for the desired name.
- Press [ ] to call.
Switching the image displayed on the main monitor
While talking to the main monitor, press [#] to switch the image displayed on the main monitor from the lobby station to the camera. To return to the lobby image, press [*].
12.2.2 Calling a receptionist
1 Press [▼]. 2 Press [▲] or [▼] to search for the receptionist. 3 Press [ ] to call.
12.2.3 Opening the door by entering an unlock code
1 Press [#]. 2 Enter the 4-digit unlock code. 3 Press [ ]
12.3 Main monitor operations with the lobby station
12.3.1 Image viewing screen of the main monitor
Image from lobby station Image from camera

Status icons

Indicates which lobby station is calling, monitoring, or talking. ("1" indicates the device number.)

Indicates which camera is monitoring. ("1" indicates the device number.)

Indicates that the main monitor is talking.

Indicates that the main monitor is monitoring.
12.3.2 Monitoring the outside with the lobby station or camera
1 Press

- If there are multiple devices, select the desired device → OK.
- The images from the device are displayed.
- If a camera is connected to the lobby station, you can alternate monitoring between the lobby station and camera by pressing 📄Camera or 📄Lobby.
2 When finished, press [OFF].
Note:
- Depending on the composition of the system that the VL-V900 lobby station is connected to, monitoring may not be available.
12.3.3 Opening entrance doors
You can open the entrance door while talking to a visitor or monitoring with a lobby station or camera.
To open the entrance door while talking or monitoring, press ON.
12.3.4 Calling extension telephones
1 Press TALK. 2 Select the desired extension telephone.
- Up to 4 extension telephones may be displayed.
3 Press OK → Yes.
4 When finished, press [OFF].
12.3.5 Door bells
A door bell may be connected to your main monitor. In this case, the main monitor will ring when the door bell button is pressed.
12.4 System conditions and limitations
Please note the following system conditions and limitations.
- Only one call or monitoring session can be handled at a time. Subsequent calls will disconnect the current call (if the current call has lower priority), or will not be connected (if the current call has higher priority). Low priority: Monitoring Medium priority: General calls (lobby station to main monitor, main monitor to PBX extension, etc.) High priority: Emergency calls
- All calls and monitoring sessions are disconnected after the pre-programmed "timeout" time elapses.
- In order to perform the above operations, optional devices and configuration for those devices are required. Contact your building manager for more information.
13.1 Index
A
Accessories: 4
Adding devices (Register)
Extension monitor: 24
B
Backlight compensation: 20
Brightness
Image brightness: 17
Screen brightness: 20
Call button: 10
Camera lens: 10
Cancel: 24
Changing the volume
Owner's voice volume: 20
Receiver volume: 20
Cleaning: 25
Delete all images: 23
Display: 10
Door Station: 3, 4
Doorphone: 10
Doorphone monitoring: 14
E
Electric lock: 18
Entrance doors: 30
Extension monitor: 4, 10, 24
Extension telephones: 31
F
Function settings - Main monitor
Automatic illumination: 22
Cancel: 23
Delete all images: 23
Demo mode: 23
Doorphone connection: 22
Electric lock: 22
Initialize settings: 23
Lobby connection: 22
Operating instructions: 23
Play lamp: 23
Power supply frequency: 21
Register: 22
Ring volume: 21
Ringtone: 21
Select language: 21
Time and date settings: 21
Wide/Zoom settings: 21
Zoom position settings: 21
G
Guide off: 20
Guide on: 20
|
Illumination settings
Automatic illumination: 22
Manually on/off: 20
Images (recording)
Auto image updating: 16
Deleting: 17
Playing: 16
Information button: 10
Intercom calls: 15
L
LED lights: 10
Lens cover: 10
Lobby connection: 22
Lobby Station: 4
Lobby station (VL-V900)
Controls: 29
M
Main monitor: 10
Main Monitor Station: 3
Menu button: 10
Microphone: 10
Monitor button: 10
Monitoring: 14
0
Owner's voice volume: 20
P
Page button: 10
Paging
Intercom calls: 15
Transferring calls: 14
Pan/tilt: 20
PBX integration: 18
Play button: 10
Play lamp: 10
Playing recorded images: 16
Press-to-talk: 14
R
Recording images
Automatic recording: 16
Automatically updating recorded images: 16
Manually recording: 16
Register (adding devices)
Extension monitor: 24
Reset: 10, 27
Reset button: 10, 27
s
Select language: 12
Speaker: 10
Specifications: 25
Supported models: 4
T
Talk button: 10
Time: 12
Time and date settings: 12
Transferring calls: 14
V
Voice changer: 20
Volume: 20
Volume heard at doorphone: 20
W
Wide display: 12, 20
Wide/zoom: 12, 20
Wide/Zoom settings: 12
Z
Zoom display: 12, 20
Zoom position settings: 12
Panasonic Corporation
1006, Oaza Kadoma, Kadoma-shi, Osaka 571-8501, Japan
http://www.panasonic.com
© Panasonic Corporation 2017
- OPERATING INSTRUCTIONS
- INTRODUCTION
- IMPORTANT INFORMATION
- PREPARATION
- TALKING AND MONITORING
- RECORDING AND PLAYING
- USING ELECTRIC LOCKS AND PBXS
- INCOMING CALL OPERATIONS
- ADDITIONAL FUNCTIONS
- EXPANDING THE SYSTEM
- GENERAL INFORMATION
- TROUBLESHOOTING
- VL-V900 BASIC OPERATIONS
- INDEX
- MODEL COMPOSITION
- CAUTION
- ACCESSORY INFORMATION
- SUPPLIED ACCESSORIES
- NOTE
- ADDITIONAL/REPLACEMENT ACCESSORIES
- COMPATIBLE PANASONIC PBXS
- HOUSE MODE AND APARTMENT MODE
- FOR EUROPE
- CONTACT TO AUTHORISED REPRESENTATIVE
- ECODESIGN INFORMATION
- SYMBOLS, EXPRESSIONS, AND STYLES
- TRADEMARKS AND REGISTERED TRADEMARKS
- FOR YOUR SAFETY
- WARNING
- PREVENTING FIRE AND ELECTRIC SHOCK
- PREVENTING ACCIDENTS, INJURIES, AND PROPERTY DAMAGE
- IMPORTANT SAFETY INSTRUCTIONS
- SAVE THESE INSTRUCTIONS
- FOR BEST PERFORMANCE
- ENVIRONMENT
- OTHER IMPORTANT INFORMATION
- PRIVACY AND RIGHTS OF PORTRAIT
- PERSONAL INFORMATION
- DISCLAIMER
- REQUESTING REPAIRS FOR THE PRODUCT
- NOTE FOR PRODUCT DISPOSAL, TRANSFER, OR RETURN
- INFORMATION ON DISPOSAL IN OTHER COUNTRIES OUTSIDE THE EUROPEAN UNION
- OTHERS
- FOR INDIA ONLY
- DECLARATION OF CONFORMITY WITH THE REQUIREMENTS OF THE E-WASTE (MANAGEMENT) RULES
- DISPOSAL INFORMATION
- CONTROLS
- DOORPHONE
- DOORPHONE IMAGE QUALITY
- MAIN MONITOR/EXTENSION MONITOR
- SOFT KEYS
- USING THE DISPLAY
- MAIN MONITOR - DISPLAY INFORMATION
- INFORMATION SCREEN
- SETTING THE LANGUAGE, DATE AND TIME
- CHANGING THE LANGUAGE, DATE AND TIME
- WIDE/ZOOM SETTINGS AND ZOOM POSITION SETTINGS
- WIDE MODE (DEFAULT SETTING)
- ZOOM MODE
- SELECTING WIDE OR ZOOM
- SELECTING THE ZOOM POSITION (PAN/TILT POSITION)
- ANSWERING DOORPHONE CALLS
- TO ANSWER THE CALL
- TO END THE CALL
- FEATURES AVAILABLE DURING INCOMING CALLS
- FEATURES AVAILABLE WHILE TALKING
- PRESS-TO-TALK MODE
- TO SPEAK TO THE VISITOR
- TRANSFERRING DOORPHONE CALLS
- TO TRANSFER A CALL
- TO RECEIVE A CALL
- MONITORING THE OUTSIDE WITH THE DOORPHONE
- FEATURES AVAILABLE WHILE MONITORING
- TALKING WITH OTHER DEVICES
- TO MAKE A CALL
- RECORDING DOORPHONE IMAGES
- RECORDING AUTOMATICALLY (RECORDING A RECEIVED CALL)
- WHEN YOU DO NOT ANSWER A CALL
- WHEN THERE ARE MULTIPLE DOORPHONES
- WHEN THE MEMORY IS FULL (AUTO IMAGE UPDATING)
- RECORDING MANUALLY (RECORDING WHILE MONITORING)
- PLAYING RECORDED IMAGES
- WHEN FINISHED, PRESS [ OFF]
- IMAGE PLAYING SCREEN
- STATUS ICONS
- AVAILABLE SOFT KEYS
- OPTIONS AVAILABLE WHEN PLAYING IMAGES
- TO TURN OFF THE OPERATION GUIDE
- TO TURN ON THE OPERATION GUIDE
- TO TURN PROTECTION ON AND OFF
- TO DELETE THE CURRENT IMAGE
- TO ADJUST THE SCREEN BRIGHTNESS
- USING ELECTRIC LOCKS
- CONFIGURING ELECTRIC LOCKS
- ELECTRIC LOCK SETTINGS
- UNLOCKING ELECTRIC LOCKS
- PANASONIC PBX INTEGRATION
- PLEASE USE ONLY A PANASONIC PBX (PAGE 4)
- WHEN USING TWO DOORPHONES (EXCLUDING AN OPTIONAL VL-V590 LOBBY STATION; PAGE 4)
- WHEN ANOTHER INCOMING CALL IS RECEIVED
- MAIN MONITOR EXAMPLE
- ZOOMING IN AND OUT (WIDE/ZOOM, PAN/TILT)
- SOUND AND DISPLAY SETTINGS FOR CALLS AND MONITORING
- RINGTONE SETTINGS
- MAIN MONITOR/EXTENSION MONITOR - FUNCTION SETTINGS LIST
- REGISTERING EXTENSION MONITORS
- MAIN MONITOR
- SELECT "REGISTER" → OK
- SELECT THE REGISTRATION NUMBER OF THE EXTENSION MONITOR TO BE REGISTERED → OK
- EXTENSION MONITOR
- MAIN MONITOR: PRESS [OFF]
- CANCELLING DEVICES
- CLEANING
- IMPORTANT
- SPECIFICATIONS
- ERROR MESSAGES - MAIN MONITOR
- ERROR MESSAGES - EXTENSION MONITOR
- LOBBY STATION
- LOBBY STATION OPERATIONS
- CALLING A RESIDENT
- ENTERING A ROOM NUMBER
- SEARCHING BY FIRST LETTER OF THE NAME
- SEARCHING THROUGH ALL NAMES
- SWITCHING THE IMAGE DISPLAYED ON THE MAIN MONITOR
- CALLING A RECEPTIONIST
- OPENING THE DOOR BY ENTERING AN UNLOCK CODE
- MAIN MONITOR OPERATIONS WITH THE LOBBY STATION
- IMAGE VIEWING SCREEN OF THE MAIN MONITOR
- MONITORING THE OUTSIDE WITH THE LOBBY STATION OR CAMERA
- PRESS
- WHEN FINISHED, PRESS [OFF]
- OPENING ENTRANCE DOORS
- CALLING EXTENSION TELEPHONES
- DOOR BELLS
- SYSTEM CONDITIONS AND LIMITATIONS
- A
- B
- E
- F
- G
- L
- M
- P
- R
- S
- T
- V
- W
- Z
- PANASONIC CORPORATION
Brand : PANASONIC
Model : VL-MV72
Category : Intercom