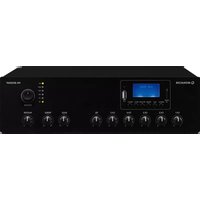
PA-803DAP - Receiver Monacor - Free user manual and instructions
Find the device manual for free PA-803DAP Monacor in PDF.


| Product Type | PA Receiver / Amplifier |
| Brand | Monacor |
| Model | PA-803DAP |
| Category | Receiver |
| Color | Black |
| Dimensions (W x H x D) | 482 x 88 x 280 mm (19", 2U) |
| Weight | 5.5 kg |
| Power Supply | AC 230 V~, 50 Hz |
| Power Consumption | 300 W |
| Frequency Response | 20 Hz – 20 kHz |
| Input Impedance | 10 kOhm (line) |
| Output Power | 8 x 200 W (RMS, 4 Ohm) |
| Number of Channels | 8 |
| Signal-to-Noise Ratio | > 90 dB |
| Total Harmonic Distortion | < 0.05% |
| Inputs | 8 x XLR/Jack combo, 2 x RCA stereo, 1 x USB |
| Outputs | 8 x Speakon, 1 x Line out, 1 x Headphone |
| Cooling | Temperature-controlled fan |
| Accessories Included | Power cord, rack ears, user manual |
| Safety Instructions | Do not expose to moisture; ensure proper ventilation; disconnect power before cleaning. |
| Maintenance | Clean with a dry, lint-free cloth; ensure air vents are free of dust. |
| Spare Parts Availability | Contact Monacor customer service for spare parts. |
| Warranty | 2 years (depending on region) |
Frequently Asked Questions - PA-803DAP Monacor
User questions about PA-803DAP Monacor
0 question about this device. Answer the ones you know or ask your own.
Ask a new question about this device
Download the instructions for your Receiver in PDF format for free! Find your manual PA-803DAP - Monacor and take your electronic device back in hand. On this page are published all the documents necessary for the use of your device. PA-803DAP by Monacor.
USER MANUAL PA-803DAP Monacor
with Audio Player, DAB+/ FM Radio, Bluetooth


PA-803 DAP
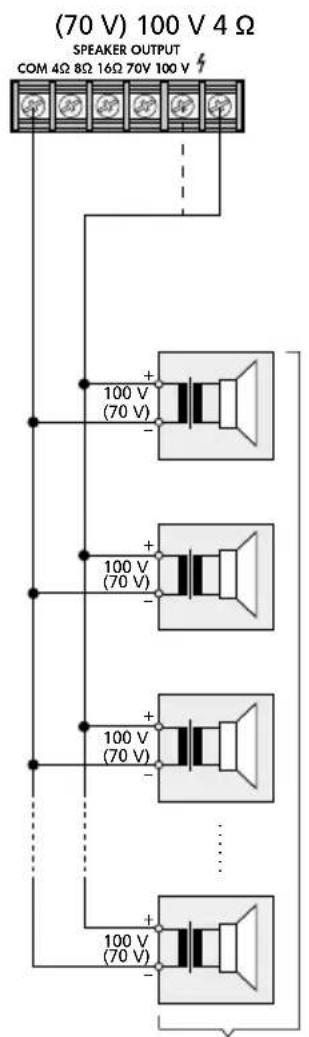
Examples for connecting speakers
Nennbelastung : 30 W
Rated load : 30 W
①

English ..... Page 10
ELA-Mischverstärker
These instructions are intended for installers of PA systems and for users without any specific technical knowledge (chapter 4). Please read the instructions carefully prior to installation and keep them for later reference.
1 Applications
This amplifier with a power rating of 30 W is specially designed for PA systems. Either use 100 V or 70 V speakers or low-impedance speakers (minimum impedance: 4 Ω). Apart from mains operation, it also allows 24 V operation for mobile applications.
For reproducing speech and music, up to 3 microphones and up to 4 other audio sources can be connected. The connection TEL INPUT is available for important (emergency) announcements. In addition, a remotely controllable music module with Bluetooth receiver, DAB+/FM radio and audio player for micro SD memory cards / USB flash drives* is integrated.
*Due to the large number of storage device manufacturers and device drivers, it cannot be guaranteed that all storage media are compatible with the audio player.
2 Safety Notes
This product corresponds to all relevant directives of the EU and is therefore marked with €€
WARNING

This product uses dangerous mains voltage. Leave servicing to skilled personnel only and do not insert anything into the air vents. Risk of electric shock!
During operation, there is a hazard of contact with a dangerous voltage of up to 100 V at the terminals SPEAKER OUTPUT. Always put the protective caps on the terminals when operating the product.
- The product is suitable for indoor use only. Protect it against dripping water, splash water and high air humidity. The admissible ambient temperature range is 0–40°C.
-
Do not place any vessels filled with liquid, e. g. drinking glasses, on the product.
-
The heat generated inside the product must be dissipated by air circulation. Never cover the air vents of the housing.
-
Do not use the product and immediately disconnect it from the power supply
-
if the unit or the mains cable is visibly damaged,
-
if a defect might have occurred after the unit was dropped or suffered a similar accident,
-
if malfunctions occur.
In any case the product must be repaired by skilled personnel.
- Never pull the mains cable to disconnect the mains plug from the mains socket, always seize the plug.
- For cleaning the product only use a dry, soft cloth; never use water or chemicals.
- No guarantee claims for the product and no liability for any resulting personal damage or material damage will be accepted if the product is not correctly used or if it is not expertly repaired.

If the product is to be put out of operation definitely, dispose of the product in accordance with local regulations
3 Installation
Set up the amplifier on a flat, horizontal surface so that air will be able to flow freely through the air vents on the sides and on the rear to ensure sufficient cooling. Always switch off the amplifier before making or changing any connections. After connecting, put the protective caps on the screw terminals to protect you against any accidental contact.
3.1 Inputs
1) To connect a microphone, use the jack CH 1, CH 2 or CH 3. The input CH 1 or TEL INPUT has highest priority (selectable with DIP switch No. 4), i. e. when a signal is available at one of these two inputs, all other channels will be muted. Set the DIP switches SELECT to the required positions:

 SELECT SELECT | ||||
| No. 1 2 | 3 4 | |||
| for input | CH 2 CH 3 CH 1 | CH 1 and TEL INPUT | ||
| Position OFF | Mikrophone level | phantom power OFF | CH 1 has highest priority | |
| Position ON | line level | phantom power ON* | TEL INPUT has highest priority | |
*Important: When phantom power has been activated, do not connect any microphone or audio unit with unbalanced output signal to the input CH1; the microphone/audio unit may be damaged.
Note: When announcements are being made via the channels CH 2 and CH 3, the signals of the music module and of the inputs CH 4 and CH 5 will be slightly attenuated.
2) To connect audio sources with line level output (e. g. CD player, mixer), use the following jacks:
- RCA jacks CH 4 and CH 5
- 6.3 mm jacks CH 2 and CH 3
Note: The inputs CH4 and CH5 are provided with a pair of jacks for the connection of audio stereo sources. The amplifier will create a mono signal from the stereo signal. To connect stereo audio sources to the inputs CH 2 and CH 3, use a stereo/mono adapter (e.g. SMC-1).
When connecting the audio sources to the jacks CH 2 and CH 3, set the DIP switches 1 and 2 to the position ON (also see table).
3) For important (emergency) announcements, use the input TEL INPUT. It is possible to connect, for example, a telephone system with line level output to this input.
Note: A signal at the input TEL INPUT will mute all other channels. When DIP switch 4 is in the position OFF, however, announcements made via the input
CH 1 will have highest priority and will also mute the channel TEL INPUT.
4) Connect a DAB/FM antenna to the jack ANTENNA. With good reception conditions, the wire antenna provided can be used.
5) If it is necessary to mute the speaker outputs, connect the two MUTE terminals, e. g. via a switch.
3.2 Outputs
1) Speakers: Either connect 100V or 70V speakers to the terminals "100V" or "70V" and "COM" (page 2, fig. 1). The load by the speakers must not exceed the power rating of the amplifier (chapter 5); otherwise, the protective circuit will interrupt the connection to the speaker terminals.
Or connect a speaker or a speaker group to the terminals "4 Ω", "8 Ω" or "16 Ω" and "COM". The total impedance of the speakers must not fall below the value indicated at the terminal used. Figure 2 on page 2 shows various ways to observe the minimum impedance. There are, however, also other possibilities.
2) At the RCA jacks REC OUT 1 and 2, the mixed signal is available. The control MASTER will not have any effect on the volume of this signal. The jacks can also be used, for example, for a recorder or additional PA amplifiers if more speakers are required than PA-803DAP can handle.
3) The output MOH OUTPUT (music on hold) is able to provide, for example, music on hold for a telephone system. The mixed signal is also available at this output. The control MASTER will not have any effect on the volume.

3.3 Power supply
For power supply, either connect the jack "230V\~" to a mains socket (230V/50 Hz) using the mains cable provided or, for mobile applications for example, connect the terminals "24V==" to a 24V DC voltage source.
4 Operation
1) Before first-time operation, make sure that the initial volume is not too high: Set the control MASTER for the total volume approximately to the position "9 o'clock". Then switch on the amplifier with the switch POWER. The green power LED ON will light up.
2) Use the controls CH1-5 and TEL to mix the signals of the audio sources or to fade them in or out. Set the controls of the inputs which are not used to "0".
3) Adjust the total volume with the control MASTER. The LEDs “-30, -10, 0dB, CLIP” will indicate the output level. To prevent distortions, only turn up the control MASTER to such a level that the red LED “CLIP” will not light up.
4) Use the controls BASS and TREBLE to adjust the sound.
5) If the LED "PROT" lights up, the amplifier is overheated or overloaded or has a short circuit at one of the speaker outputs. In this case, switch off the amplifier and have the fault eliminated.
When a storage medium is inserted in the music module, the replay will automatically start after the amplifier has been switched on. When two storage media are used, the memory card will take precedence. When no storage medium is inserted, the operating mode most recently used (Bluetooth receiver, digital radio, FM radio) will be resumed (chapter 4.2).
4.1 Infrared remote control

Power supply of the remote control for the music module is provided by means of a 3V button cell. If the remote control is supplied with the battery inserted, remove the protective film (to protect the battery against discharge) from the battery support: The remote control will then be ready for operation. When pressing a button on the remote control, always point the remote control at the IR sensor above the USB port.
Make sure that there are no obstacles between the IR sensor and the remote control.
If the remote control is not used for a longer period of time, remove the battery as a precaution. It may leak and damage the remote control.
4.1.1 Replacing the battery
1) Push the latch of the battery holder to the right (first arrow in the figure below) and remove the holder (second arrow).

2) Remove the old battery and insert the new battery (3V button cell, type CR 2025) into the holder with the positive pole facing upwards.
3) Push the holder back into the remote control.

Never put discharged batteries in the household waste. Always dispose of the batteries in accordance with local regulations.
4.2 Music module
The music module provides the following operating modes:
– File reproduction from a memory card
- File reproduction from a USB flash drive
– Reception from a Bluetooth audio source
- DigitalradioDAB/DAB+
- FM radio
To switch between the operating modes, briefly press the button MODE on the module or on the remote control.
If no function of the music module is required, the music module can be switched off: either press the button ⏻ on the remote control or keep the button MODE ⏻ on the module pressed. When the music module is switched on again via these buttons, the operating mode most recently used will be resumed provided that the amplifier was not switched off with the switch POWER in the meantime.
The following operating options are available irrespective of the operating mode:
| Remote control | Function | ||
| Module | |||
| MODE/ ⏻ | × | to switch the module on / off(to switch off, keep the buttonpressed for 2 seconds) | |
| ⏻ | × | to switch the module on / off | |
| MODE × × | press the button briefly to select theoperating modeaudio player (microSD/USB)Bluetooth receiverdigital radioDAB/DAB+FM radio | ||
| V-/V+VOL-/VOL+ | × | × | to adjust the volume „VOL 00 ... 30”Keep the button pressed on themodule to adjust the volume |
| ⏻1 | × | to mute / unmute the sound | |
| EQ2 | × | to select sound presetsNOR /ROCK /POP /CLAS /JAZZ /COUNOLD /INEL /INEL /INEL /INEL /INEL | |
1 cannot be used in Bluetooth mode
2 The sound presets are not available in the operating modes “Digital radio” and “FM radio”.
4.2.1 Audio player
The audio player can replay files in the MP3 and WAV formats that have been stored on a micro SD [HC / XC] memory card or on a USB flash drive. The files may have been stored in different folders on the storage medium.
Connect a USB flash drive to the jack USB and / or insert a memory card (contacts facing to the right) into the slot MICRO SD.

1 Replay status: replay ▶ / pause ||
2 Replay mode (see following table)
3 Total number of titles / current title number
4 Current sound preset
5 Storage medium: card 📄 / USB flash drive
6 Current folder (Root = root directory)
7 Playing time elapsed / playing time of the title
8 Title name (file name)
| Remote control ↓ | Function | ||
| Module ↓ | |||
| PLAY►II | × | × | to pause / to continue replay |
| 0,1...9 | × | to select title number* | |
| PRE / NEXT|◄◄/ ►►| | × | × | previous/nexttitle |
| |◄◄/ ►►| | × | keep the button pressed:fast reverse / forward within a title | |
| FOLDER | × | to select folder | |
| U/SD | × | to switch between USB flash drive and memory card | |
| RPT | × × | replay modeA continuous repeat of all titlesN one-time replay of all titlesI continuous repeat of a single titleX continuous random replayP continuous repeat of all titles within a folder | |
*Not possible in the replay mode R. In the replay mode F, only a title in the current folder can be selected.
4.2.2 Bluetooth receiver
Wireless connection of the integrated Bluetooth receiver to the audio source is supported to replay music from a Bluetooth audio source (e.g. smartphone or tablet computer) via the amplifier.

1 Replay status: replay ▶/ pause Ⅱ
2 Current sound preset
3 Connection status:
BT NOT LINK = no connection
BT LINK OK = connection exists
When the connection has not been established yet, "BT NOT LINK" will be shown. To establish the connection in the operating mode "Bluetooth receiver":
1) Activate the Bluetooth function at the Bluetooth source. On the list of available devices, the amplifier will appear as "Monacor".
2) When prompted for the PIN number, enter 1234.
3) Pair the Bluetooth source with the amplifier (see manual of the Bluetooth source, if required). The devices will be connected automatically.
Operation can be made at the Bluetooth source, via the buttons on the module or by means of the remote control.
| Remote control | Function | ||
| Module | |||
| PLAY▶II | × | × | to pause / to continue replay |
| PRE / NEXT|◀◀/▶▶ | × | × | previous/nexttitle |
The volume of the Bluetooth replay depends on the settings made at the Bluetooth source and the music module.
4.2.3 Digital radio DAB/ DAB+

1 Strength of signal received
2 Station name
3 Information about programme and station
When the operating mode Digital radio receiver (DAB/ DAB+) is used for the first time, start the automatic station scan first. During the scan, "Scanning.." and the number of stations already found will be shown. After the scan, the stations found can be selected.
Repeat the scan when there is a change in the local stations offered, when you have changed your location or when the antenna or its alignment have been modified.
| Remote control ↗ | Function | ||
| Module ↘ | |||
| RPT/SCAN SCN (U/SD) | × | × | to start automatic station scan „Scanning..“ |
| PRE / NEXT | ◀◀ / ▶▶ | × | × | previous/nextstation „Select station“ |
| FOLDER × | to switch between the information shown (3):programme informationchannel and frequency transmission standard stereo/monotime and date strength and quality of signal received | ||
4.2.4 FM radio

1 Sound muted ✗ unmuted ✗
2 Storage location currently used / number of storage locations
3 Frequency in MHz
4 Frequency scale with current position
All stations can be automatically scanned and stored. However, it is also possible to directly select the frequency of a station and to store it. Stored stations can be deleted.
| Remote control | Function | ||
| Module | |||
| RPT/SCAN SCN (U/SD) | × | × | to start automatic station scanAll stations found will be automatically stored.At the module, keep the buttonpressed until automatic scan starts. |
| PRE / NEXT|◀◀/▶▶ | × | × | previous/next storage location |
| 0, 1...9× | to enter the frequencyexample: 9→1→1 for 91.1MHz | ||
| FOLDER EQ | × | × | to reduce the frequency by 100 kHz |
| RPT × × | press the button briefly to increase the frequency by 100 kHz | ||
| |◀◀ / ▶▶ | I | × | keep the button pressed to scan the next / previous station that can be received; the station will be stored |
| PLAY►II | × | × | press the button briefly to store a stationpress the button for 2 seconds to delete a station storedpress the button for 5 seconds to delete all storage locations |
5 Specifications
| Amplifier | |
| Power rating: | 30W |
| THD: | < 0.5 % |
| Frequency range: | 60 Hz-15 kHz |
| Inputs (sensitivity/impedance; connection) | |
| CH 1: | 4.5 mV/600Ω; XLR bal. |
| CH 2, CH 3 | |
| Microphone level: | 4.5 mV/600Ω; |
| 6.3 mm jack, unbal. | |
| Line level: | 120 mV/10 kΩ; |
| 6.3 mm jack, unbal. | |
| CH 4, CH 5: | 60 mV/10 kΩ; |
| RCA(L/R), unbal. | |
| TEL INPUT: | 90mV/600 Ω; screw terminals, unbal. |
| S/N ratio |
| Microphone inputs: ..... 72 dB |
| Line inputs: ..... 85 dB |
| Phantom power supply for CH 1: == 48 V, switchable |
| Outputs |
| Speakers: ..... 4/8/16 Ω, 70/100 V; screw terminals |
| RCA jacks REC OUT: ..... mixed signal with line level |
| MOH OUTPUT: ..... mixed signal with line level; screw terminals |
Bluetooth version: 4.2
| Power supply |
| Mains: 230V/50 Hz |
| Power consumption: 100VA |
| DC voltage: 24V |
| Current consumption: 2.5A |
Ambient temperature: 0–40°C
Dimensions (W × H × D): ..... 320 × 95 × 245 mm
Weight: 3.95 kg
5.1 Conformity and approval
Herewith, MONACOR INTERNATIONAL declare that the product PA-803DAP complies with the directive 2014/53/EU. The EU declaration of conformity is available on the Internet:
www.monacor.com
The product is generally approved for operation in EU and EFTA countries; it is licence-free and requires no registration.
Subject to technical modification.
Deutsch
ELA-Tischmikrofon
These instructions are intended for users without any specific technical knowledge. Please read these instructions carefully prior to operation and keep them for later reference.
1 Applications
This desk microphone has especially been designed for PA systems. It is suitable for all applications which require a stable desk microphone for announcements, lectures, etc.
2 Important Notes
The microphone corresponds to all relevant directives of the EU and is therefore marked with CE.
- The microphone is suitable for indoor use only. Protect it against humidity and heat (admissible ambient temperature range 0–40°C).
- For cleaning only use a dry, soft cloth, never use chemicals or water.
- No guarantee claims for the microphone and no liability for any resulting personal damage or material damage will be accepted if the micro-
phone is used for other purposes than originally intended, if it is not correctly operated, or if it is not repaired in an expert way.

If the microphone is to be put out of operation definitively, take it to a local recycling plant for a disposal which is not harmful to the environment.
3 Connection
Model PDM-300 with 6.3 mm plug is designed for connection to an unbalanced microphone input, model PDM-302 with XLR plug for connection to a balanced microphone input. Connect the desk microphone via its cable to the corresponding microphone input at the amplifier or mixer.
4 Operation
The microphone is switched on and off via its toggle switch:
- For short announcements, keep the switch pressed upwards (will not engage) and speak into the microphone. After the announcement
release the switch so that it returns to mid-position (microphone off).
- For longer announcements, put the switch into the lower position (will engage) and speak into the microphone. To switch off the microphone after the announcement, set the switch to mid-position.
5 Specifications
System:.....dynamic,cardioid
Frequency range: .... 60–12 000 Hz
Sensitivity: ....3.2 mV/Pa at 1 kHz
Impedance: 600 Ω
Connection
PDM-300: ..... 1 m cable with 6.3 mm plug, unbal.
PDM-302: ..... 5 m cable with XLR plug, bal.
Dimensions:.....console housing
120 × 60 × 160 mm,
gooseneck length 310 mm
Weight: 810g
Subject to technical modification.
Français
Microphone de table Public Adress
PA Speaker System for 100 V Operation or 8 Ω Operation
These instructions are intended for installers with sufficient knowledge in 100 V technology for PA applications. Please read the instructions carefully prior to installation and keep them for later reference.
1 Applications
This speaker system for wall mounting is especially designed for applications in PA systems. It is equipped with a transformer for operation in 100 V systems, but it can also directly be connected to a low-impedance amplifier output. The connected load is matched via a rotary switch. As a 2-way system, the speaker system can be used for speech and music reproduction. Due to its weatherproof cabinet (IP 65), it is also suitable for outdoor use.
2 Important Notes
The speaker system corresponds to all relevant directives of the EU and is therefore marked with €€.
- Protect the speaker system against extremely high and low temperatures (admissible ambient temperature range -20°C to +50°C ).
- For cleaning only use a soft cloth, dry or slightly damp; never use chemicals or aggressive detergents.
- No guarantee claims for the speaker system and no liability for any resulting personal damage or material damage will be accepted if the speaker system is used for other purposes than originally intended, if it is not expertly mounted or correctly connected, or if it is overloaded.

If the speaker system is to be put out of operation definitively, take it to a local recycling plant or a disposal which is not harmful to the environment.
3 Mounting
Use the mounting bracket to screw the speaker to a suitable place on the wall or ceiling. To adjust the speaker, release the locking screws of the bracket, turn the speaker accordingly, then retighten the screws.
4 Installation
WARNING During operation in 100 V systems, there is a hazard of contact with a voltage of up to 100 V at the speaker cable. The installation must be made by skilled personnel only.
Observe the load of the PA amplifier by the speakers. An overload may damage the amplifier! The total power of all speakers connected must not exceed the amplifier power.
1) Before installing the speaker system, switch off the PA amplifier completely so that the speaker cable will not carry any voltage!
2) Use a screwdriver to adjust the desired rated power for 100 V operation at the rotary switch (a) or select the position "8 Ω" for directly operating the speaker at a low-impedance amplifier output. (Set the switch to the left stop, then turn it back for the corresponding number of lock-in positions according to the marking.)
CAUTION! Never use the speaker in a 100 V system when the position "8 Ω" has been selected. The speaker and possibly the amplifier will be damaged.
3) Remove the protecting cap from the terminals (b) and guide the cable through the hole in the protecting cap. Connect the cable to the terminals and replace the protecting cap. When connecting multiple speakers, make sure that all speakers have the same polarity and that the PA amplifier will not be overloaded.
4) Align the speaker system in an optimum way to the speaker zone.
Subject to technical modification.
| Technische Daten | Specifications | ESP-215/WS | ESP-230/WS | ESP-250/WS |
| Nennbelastbarkeit | Power rating | 100V: 15/10/5/2,5/1,5W8 Ω: 30W | 100V: 30/20/10/5/2,5W8 Ω: 50W | 100V: 50/40/30/20/10W8 Ω: 50W |
| Musikbelastbarkeit | Music power load | 60W | 100W | 100W |
| Kennschalldruck (1 W/1 m) | SPL (1 W/1 m) | 90 dB | 92 dB | 92 dB |
| Frequenzbereich | Frequency range | 100–20 000 Hz | 80–20 000 Hz | 80–20 000 Hz |
| Gehäuseschutzart | Protective class of housing | IP 65 | IP 65 | IP 65 |
| Abmessungen (B × H × T) | Dimensions (W × H × D) | 98 × 195 × 105 mm | 157 × 260 × 170 mm | 157 × 260 × 170 mm |
| Gewicht | Weight | 0,85 kg | 1,8 kg | 2,5 kg |
| Anschluss | Connection | Lautsprecher-Klemmanschluss • spring-loaded speaker terminal | ||

Français


- EXAMPLES FOR CONNECTING SPEAKERS
- ELA-MISCHVERSTÄRKER
- 1 APPLICATIONS
- 2 SAFETY NOTES
- WARNING
- 3 INSTALLATION
- 3.1 INPUTS
- 3.2 OUTPUTS
- 3.3 POWER SUPPLY
- 4 OPERATION
- 4.1 INFRARED REMOTE CONTROL
- 4.1.1 REPLACING THE BATTERY
- 4.2 MUSIC MODULE
- 4.2.1 AUDIO PLAYER
- 4.2.2 BLUETOOTH RECEIVER
- 4.2.3 DIGITAL RADIO DAB/ DAB
- 4.2.4 FM RADIO
- 5 SPECIFICATIONS
- 5.1 CONFORMITY AND APPROVAL
- DEUTSCH
- ELA-TISCHMIKROFON
- 2 IMPORTANT NOTES
- 3 CONNECTION
- FRANÇAIS
- MICROPHONE DE TABLE PUBLIC ADRESS
- PA SPEAKER SYSTEM FOR 100 V OPERATION OR 8 Ω OPERATION
- 3 MOUNTING
- 4 INSTALLATION
Brand : Monacor
Model : PA-803DAP
Category : Receiver