
DS-530 II - Scanner EPSON - Free user manual and instructions
Find the device manual for free DS-530 II EPSON in PDF.


| Product Type | Document Scanner |
| Scanning Element | CIS (Contact Image Sensor) |
| Optical Resolution | 600 dpi |
| Scan Speed (Simplex) | 35 ppm (200/300 dpi) |
| Scan Speed (Duplex) | 70 ipm (200/300 dpi) |
| Document Feeding | Automatic Document Feeder (ADF), 50 sheets |
| Daily Duty Cycle | Up to 4,000 scans |
| Interfaces | USB 3.0 (Type B) |
| Dimensions (W x D x H) | 11.6 x 6.6 x 6.3 in (295 x 168 x 161 mm) |
| Weight | Approx. 6.6 lb (3.0 kg) |
| Power Supply | AC adapter (100-240 V, 50/60 Hz) |
| Power Consumption | Operation: ~13 W, Standby: ~4 W, Sleep: ~1.4 W |
| Supported Media Types | Paper, Card, Plastic Cards (up to 1.3 mm) |
| Supported Media Sizes | Legal, Letter, A4, A5, A6, B5, B6, Business Card |
| Scan Software | Epson Scan 2, Document Capture Pro |
| Maintenance & Cleaning | Clean ADF rollers and glass with lint-free cloth; use cleaning sheets if needed. |
| Safety Precautions | Place on stable, level surface; do not block vents; use only supplied AC adapter. |
| Spare Parts & Reparability | Replacement ADF roller kit available; serviceable by qualified technicians. |
| General Information | 1-year limited warranty; compatible with Windows, macOS |
Frequently Asked Questions - DS-530 II EPSON
User questions about DS-530 II EPSON
0 question about this device. Answer the ones you know or ask your own.
Ask a new question about this device
Download the instructions for your Scanner in PDF format for free! Find your manual DS-530 II - EPSON and take your electronic device back in hand. On this page are published all the documents necessary for the use of your device. DS-530 II by EPSON.
USER MANUAL DS-530 II EPSON
Specifications of Originals and Placing Originals
Basic Scanning
Maintenance
Solving Problems
Copyright
No part of this publication may be reproduced, stored in a retrieval system, or transmitted in any form or by any means, electronic, mechanical, photocopying, recording, or otherwise, without the prior written permission of Seiko Epson Corporation. No patent liability is assumed with respect to the use of the information contained herein. Neither is any liability assumed for damages resulting from the use of the information herein. The information contained herein is designed only for use with this Epson product. Epson is not responsible for any use of this information as applied to other products.
Neither Seiko Epson Corporation nor its affiliates shall be liable to the purchaser of this product or third parties for damages, losses, costs, or expenses incurred by the purchaser or third parties as a result of accident, misuse, or abuse of this product or unauthorized modifications, repairs, or alterations to this product, or (excluding the U.S.) failure to strictly comply with Seiko Epson Corporation's operating and maintenance instructions.
Seiko Epson Corporation and its affiliates shall not be liable for any damages or problems arising from the use of any options or any consumable products other than those designated as Original Epson Products or Epson Approved Products by Seiko Epson Corporation.
Seiko Epson Corporation shall not be held liable for any damage resulting from electromagnetic interference that occurs from the use of any interface cables other than those designated as Epson Approved Products by Seiko Epson Corporation.
© 2020 Seiko Epson Corporation
The contents of this manual and the specifications of this product are subject to change without notice.
Trademarks
EPSON, EPSON EXCEED YOUR VISION, EXCEED YOUR VISION and their logos are registered trademarks or trademarks of Seiko Epson. Microsoft, Windows, and Windows Vista are registered trademarks of Microsoft Corporation. Apple, macOS, and OS X are registered trademarks of Apple, Inc. Adobe, Adobe Reader, and Acrobat are either registered trademarks or trademarks of Adobe Systems Incorporated in the United States and/or other countries. Intel is a registered trademark of Intel Corporation. The SuperSpeed USB Trident Logo is a registered trademark of USB Implementers Forum, Inc. General Notice: Other product names used herein are for identification purposes only and may be trademarks of their respective owners. Epson disclaims any and all rights in those marks.
Contents
Copyright
Trademarks
About This Manual
Introduction to the Manuals..... Marks and Symbols.... Descriptions Used in this Manual.. Operating System References.....
Important Instructions
Safety Instructions.... Restrictions on Copying......
Product Features
Paper Protection to Reduce Damage to the Originals.... Notification of Dirt on the Sensor. Double-Feed Detection Feature with Selectable Stop Timing.... High-Quality Scanning with Automatic Document Detection....
Scanner Basics
Part Names and Functions......
Buttons and Lights on the Control
Buttons....
Lights....2
Error Indicators......
Information on Applications.....
Application for Scanning Documents (Document Capture Pro / Document Capture). . 22
Application for Controlling the Scanner (Epson Scan 2)....
Application for Updating Software and Firmware (EPSON Software Updater)....23
Software for Managing Devices on the Network (Epson Device Admin)
Application for Creating Driver Packages (EpsonNet Setup Manager).....
Option Items and Consumables Information.....24 Carrier Sheet Codes...... Roller Assembly Kit Codes..... Cleaning Kit Codes......
Flatbed Scanner Dock Codes....
Specifications of Originals and Placing Originals
Specifications of Originals.... General Specifications for Originals being Scanned 28 Types of Originals that Require Attention..... 31 Types of Originals that Must Not be Scanned. . . .32
-Placing Originals....33
Standard Size Originals....
Long Paper 38
Plastic Cards....40
Laminated Cards....44
Large Size Originals....4
Irregular Shaped Originals.....
Photographs.... 52
Envelopes....55
14Mixture of Originals....5
.....14
Basic Scanning
Scanning Using a Scanner Button....
Scanning from a Computer....
Scanning Using Document Capture Pro (Windows) 62
Scanning Using Document Capture (Mac OS)...69
Scanning Using Epson Scan 2....
a n e l....2 0
Advanced Scanning
Setting a Job....82
Creating and Registering a Job (Windows).... 82
-Creating and Registering a Job (Mac OS)....88
Assigning a Job to the Scanner Button (Windows) 89
Assigning a Job to the Scanner Button (Mac OS) 89
Scanning Different Sizes or Types of Originals One by One (Automatic Feeding Mode)...
Various Scanning Settings for Document
Capture Pro (for Windows Only)....
Dividing documents using a specified number of pages....92
Dividing documents using blank sheets of paper. 95
Creating and saving folders using the barcode character information.....
.....25
25
Creating two levels of folders using two types of barcode....
Saving files with file names using the barcode character information.....
Creating and saving folders using OCR characters.....
Saving files with file names using OCR characters....
Creating and saving folders for each form....124
Useful Features
Setting the Glass Surface Stain Detection Feature . . . 131
Setting the Document Protection F
Setting the Operation When a Double-Feed is Detected . . .
Detected . . .
Using the Flatbed Scanner Dock
About the Flatbed Scanner Dock . . .
Part Names and Functions of the Flatbed Scanner Dock . . .
Scanner Dock . . .
Scanning from the Scanner Glass
Notes on Using the Flatbed Scann
Maintenance . . .
Troubleshooting for the Flatbed Scanner Dock . . . 145
Maintenance
Cleaning Outside the Scanner . . .
Cleaning Inside the Scanner.....
Resetting the Number of Scans After Regular Cleaning....
Replacing the Roller Assembly Kit
Resetting the Number of Scans After Replacing the Rollers.
Energy Saving....
Transporting the Scanner....
Updating Applications and Firmware
Solving Problems
Scanner Problems....
Scanner Lights Indicate an Error
The Scanner Does Not Turn On....
Problems Starting Scanning.....
Cannot Start Scanning from Computer
Paper Feeding Problems. 165
Multiple Originals Are Fed (Double Feed)....165
Removing Jammed Originals from the Scanner. 166
The Original Jams in the Scanner Frequently...167
Paper Protection Does not Work Correctly....168
1 0 3The Originals Get Dirty....16
Scanning Speed Slows Down when Scanning
. Conl 0i7n u o u s l y....168
Scanning Takes a Long Time....1
1 Scanned Image Problems....1
1.1 Straight Lines Appear when Scanning from
1 1 A D F....169
Glass Dirt Alert Does Not Disappear....
Colors Are Uneven in the Scanned Image.... 169
Expanding or Contracting the Scanned Image. . 170
Offset Appears in the Background of Images. . . 170
Scanned Image or Text is Blurred....
Moiré Patterns (Web-Like Shadows) Appear. . . 171
2.2 The Edge of the Original is Not Scanned
when Automatically Detecting the Size of the
Original. 172
Character is not Recognized Correctly..
Cannot Solve Problems in the Scanned Image. . 173
Uninstalling and Installing Applications. . . . . . . . . 173
1 3 Uninstalling Your Applications. . . . . . . . . . . . . . . 173
Installing Your Applications....
er Dock.....139
Technical Specifications
General Scanner Specifications....177
Dimensions and Weight Specifications....
Electrical Specifications....
Electrical Specifications
AG Adapter Electrical Specifications....178
Environmental Specifications....
Flatbed Scanner Dock Specifications.....
System Requirements 17
158
Standards and Approvals
Standards and Approvals for European Models. . . 182
Standards and Approvals for Australian Models. . . 182
Standards and Approvals for U.S. Models. . . . . . . . 182
Where to Get Help
Technical Support Web Site....
Contacting Epson Support....
Before Contacting Epson....1
Help for Users in Europe....1
Help for Users in Taiwan....18
Help for Users in Australia. 186
Help for Users in Singapore.... 186
Help for Users in Thailand....1
Help for Users in Vietnam....187 Help for Users in Indonesia....188 Help for Users in Hong Kong....189 Help for Users in Malaysia....190 Help for Users in India....190 Help for Users in the Philippines....190
About This Manual
Introduction to the Manuals....8
Marks and Symbols....8
Descriptions Used in this Manual....
Operating System References....8
Introduction to the Manuals
The latest versions of the following manuals are available from the Epson support website.
http://www.epson.eu/support (Europe)
http://support.epson.net/ (outside Europe)
☐Start Here (paper manual)
Provides you with information on setting up the product and installing the application.
User's Guide (digital manual)
Provides instructions on using the product, maintenance, and solving problems.
As well as the manuals above, see the help included in the various Epson applications.
Marks and Symbols

Caution:
Instructions that must be followed carefully to avoid bodily injury.

Important:
Instructions that must be observed to avoid damage to your equipment.
Note:
Provides complementary and reference information.
Related Information
Links to related sections.
Descriptions Used in this Manual
Screenshots for the applications are from Windows 10 or macOS High Sierra. The content displayed on the screens varies depending on the model and situation. Illustrations used in this manual are for reference only. Although they may differ slightly from the actual product, the operating methods are the same.
Operating System References
Windows
In this manual, terms such as "Windows 10", "Windows 8.1", "Windows 8", and "Windows 7" refer to the following operating systems. Additionally, "Windows" is used to refer to all versions.
Microsoft® Windows® 10 operating system
Microsoft® Windows® 8.1 operating system, Microsoft® Windows® 8 operating system, Microsoft® Windows® 7 operating system
Mac OS
In this manual, "Mac OS" is used to refer to macOS Catalina, macOS Mojave, macOS High Sierra, macOS Sierra, OS X El Capitan, and OS X Yosemite.
Important Instructions
Safety Instructions....11
Restrictions on Copying....12
Safety Instructions
Read and follow these instructions to ensure safe use of this product and options. Make sure you keep this manual for future reference. Also, be sure to follow all warnings and instructions marked on the product and options.
Some of the symbols used on your product and options are to ensure safety and proper use of the product. Visit the following Web site to learn the meaning of the symbols.
http://support.epson.net/symbols
Place the product and options on a flat, stable surface that extends beyond the base of the product and options in all directions. If you place the product and options by the wall, leave more than 10 cm between the back of the product and options and the wall.
Place the product and options close enough to the computer for the interface cable to reach it easily. Do not place or store the product and options or the AC adapter outdoors, near excessive dirt or dust, water, heat sources, or in locations subject to shocks, vibrations, high temperature or humidity, direct sunlight, strong light sources, or rapid changes in temperature or humidity.
Do not use with wet hands.
Place the product and options near an electrical outlet where the adapter can be easily unplugged.
The AC adapter cord should be placed to avoid abrasions, cuts, fraying, crimping, and kinking. Do not place objects on top of the cord and do not allow the AC adapter or the cord to be stepped on or run over. Be particularly careful to keep the cord straight at the end.
Use only the power cord supplied with the product and do not use the cord with any other equipment. Use of other cords with this product or the use of the supplied power cord with other equipment may result in fire or electric shock.
Use only the AC adapter that comes with your product. Using any other adapter could cause fire, electrical shock, or injury.
The AC adapter is designed for use with the product with which it was included. Do not attempt to use it with other electronic devices unless specified.
Use only the type of power source indicated on the AC adapter's label, and always supply power directly from a standard domestic electrical outlet with the AC adapter that meets the relevant local safety standards.
When connecting this product and options to a computer or other device with a cable, ensure the correct orientation of the connectors. Each connector has only one correct orientation. Inserting a connector in the wrong orientation may damage both devices connected by the cable.
Avoid using outlets on the same circuit as photocopiers or air control systems that regularly switch on and off.
If you use an extension cord with the product, make sure the total ampere rating of the devices plugged into the extension cord does not exceed the cord's ampere rating. Also, make sure the total ampere rating of all devices plugged into the wall outlet does not exceed the wall outlet's ampere rating.
Never disassemble, modify, or attempt to repair the AC adapter, product, or product options by yourself except as specifically explained in the product's guides.
Do not insert objects into any opening as they may touch dangerous voltage points or short out parts. Beware of electrical shock hazards.
If damage occurs to the plug, replace the cord set or consult a qualified electrician. If there are fuses in the plug, make sure you replace them with fuses of the correct size and rating.
Unplug the product, options, and the AC adapter, and refer servicing to qualified service personnel under the following conditions: The AC adapter or plug is damaged; liquid has entered the product, options, or the AC adapter; the product or the AC adapter has been dropped or the case has been damaged; the product, options, or the AC adapter does not operate normally or exhibits a distinct change in performance. (Do not adjust controls that are not covered by the operating instructions.)
Unplug the product and the AC adapter before cleaning. Clean with a damp cloth only. Do not use liquid or aerosol cleaners except as specifically explained in the product's guides. If you are not going to use the product for a long period, be sure to unplug the AC adapter from the electrical outlet. After replacing consumable parts, dispose of them correctly following the rules of your local authority. Do not disassemble them.
Restrictions on Copying
Observe the following restrictions to ensure the responsible and legal use of your product.
Copying of the following items is prohibited by law:
Bank bills, coins, government-issued marketable securities, government bond securities, and municipal securities. Unused postage stamps, pre-stamped postcards, and other official postal items bearing valid postage. Government-issued revenue stamps, and securities issued according to legal procedure.
Exercise caution when copying the following items:
Private marketable securities (stock certificates, negotiable notes, checks, etc.), monthly passes, concession tickets, etc.
Passports, driver's licenses, warrants of fitness, road passes, food stamps, tickets, etc.
Note:
Copying these items may also be prohibited by law.
Responsible use of copyrighted materials:
Products can be misused by improperly copying copyrighted materials. Unless acting on the advice of a knowledgeable attorney, be responsible and respectful by obtaining the permission of the copyright holder before copying published material.
Product Features
Paper Protection to Reduce Damage to the Originals....
Notification of Dirt on the Sensor....1
Double-Feed Detection Feature with Selectable Stop Timing.....
High-Quality Scanning with Automatic Document Detection.....
Paper Protection to Reduce Damage to the Originals
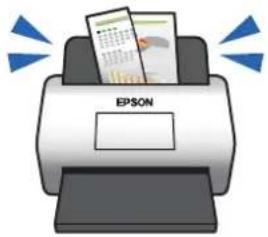
This scanner comes with a paper protection feature. This feature reduces damage to originals by stopping scanning when it detects a feeding error, such as when scanning stapled documents by mistake.
Related Information
→“Setting the Document Protection Feature” on page 132
Notification of Dirt on the Sensor
This scanner can detect dirt on the scanning sensor, and notifies you that you need to clean the sensor before dirt can cause lines in the scanned images.
You can easily keep the sensor clean, and avoid a decline in image quality.

Related Information
→“Setting the Glass Surface Stain Detection Feature” on page 131
Double-Feed Detection Feature with Selectable Stop Timing
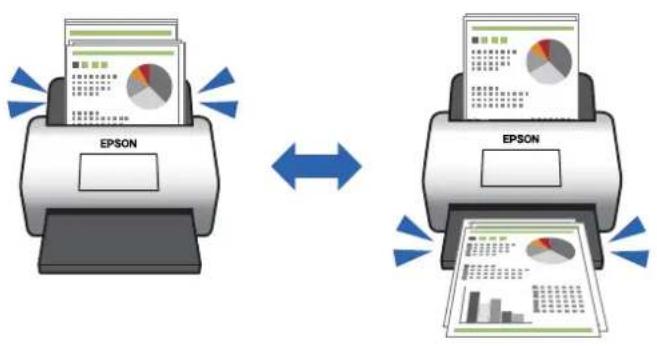
When multiple documents are fed during scanning, the double-feed detection feature will stop scanning. When a double-feed is detected, you can select between stopping the scan immediately or stopping after ejecting the document.
For example, when scanning slips attached to sheets of paper, selecting After Eject detects a double-feed and stops after ejecting the paper, but allows you to continue scanning.
Related Information
→“Setting the Operation When a Double-Feed is Detected” on page 133
High-Quality Scanning with Automatic Document Detection
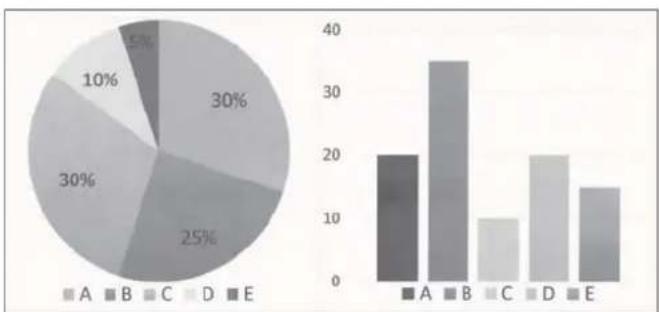
You can set Color/Black & White automatic detection as well as Color/Grayscale automatic detection according to the document and application being used.
When set to Color/Grayscale automatic detection, you can attain high-quality images by scanning monochrome documents that include figures and tables in grayscale.
Color/Black & White

Color/Grayscale
Related Information
→“Application for Controlling the Scanner (Epson Scan 2)” on page 23
Scanner Basics
Part Names and Functions....18
Buttons and Lights on the Control Panel....
Information on Applications....22
Option Items and Consumables Information....
Part Names and Functions
Front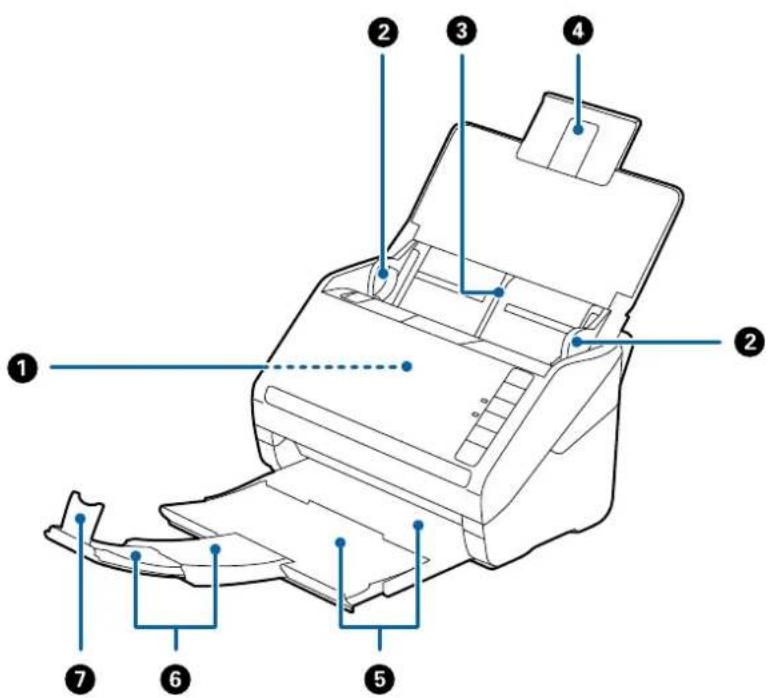
| 1 | ADF (Automatic Document Feeder) Feeds loaded originals automatically. |
| 2 | Edge guides Feeds originals straight into the scanner. Slide to the edges of the originals. |
| 3 | Input tray Loads originals. Pull out the tray extension if originals are too big for the input tray. This prevents paper from curling and causing paper jams. |
| 4 | Input tray extension |
| 5 | Output tray Holds originals ejected from the scanner. Pull out the extension tray to the length of the originals. |
| 6 | Output tray extension |
| 7 | Stopper Prevents ejected originals from falling off the extension tray. Adjust it to the length of the originals. |
Back
| 1 | Security slot Inserts a security lock for theft prevention. |
| 2 | USB port Connects a USB cable. |
| 3 | DC inlet Connects the AC adapter. |
Inside
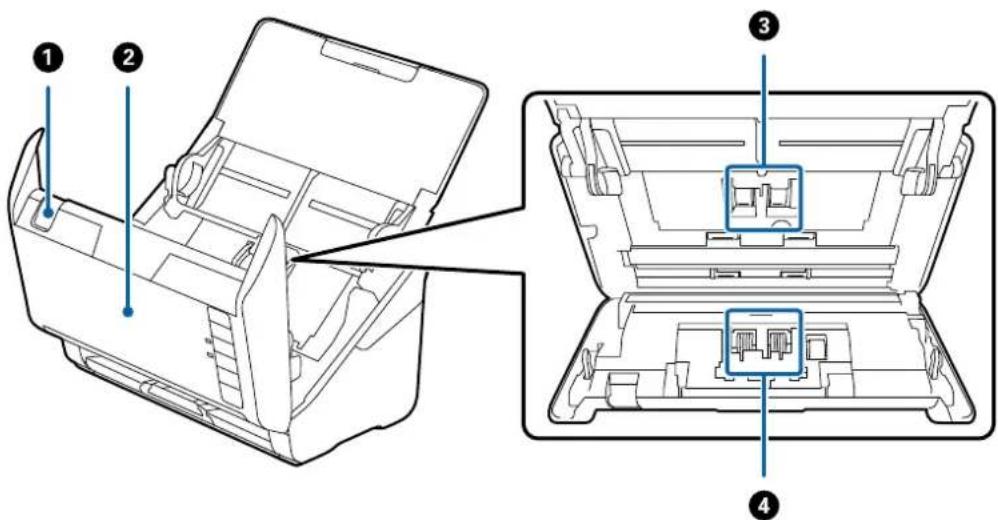
| 1 | Cover open lever Pull the cover open lever and open the scanner cover. |
| 2 | Scanner cover Pull the cover open lever and open the scanner cover when cleaning inside of the scanner and removing jammed paper. |
| 3 | Pickup roller Feeds originals. This needs to be replaced when the number of scans exceeds the service number of papers. |
| 4 | Separation roller Feeds originals separately one by one. This needs to be replaced when the number of scans exceeds the service number of papers. |
Related Information
→“Cleaning Inside the Scanner” on page 148 →“Replacing the Roller Assembly Kit” on page 154
Buttons and Lights on the Control Panel
Buttons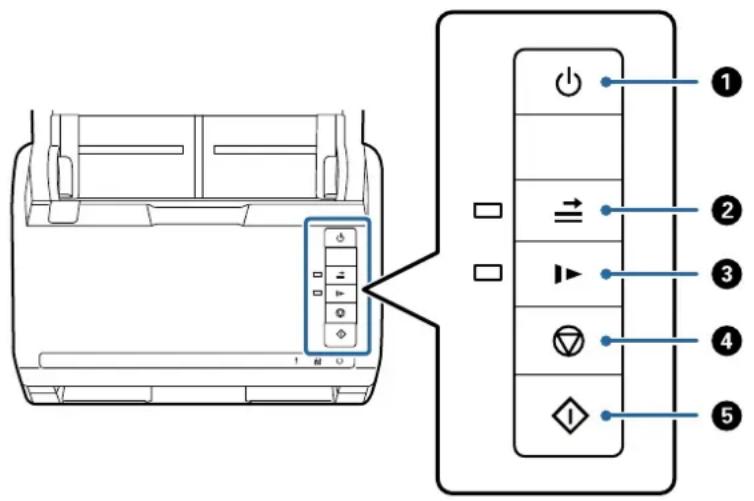
| 1 | ↓ | Power button Turns the scanner on or off. |
| 2 | → | Double feed detection skip button N normally, an error occurs when detecting double feeds when loading envelopes, plastic cards, originals with labels or stickers, and so on. Press the → button before scanning to skip this error once (one sheet). The light is on when this is enabled. Follow the steps below to restart scanning when a double feed error has occurred (the error light flashes).1. Open the scanner cover, and then remove the originals.2. Close the scanner cover, and then press the → button.3. Load the originals.4. Restart scanning by pressing the start button or the software button. |
| 3 | |▶ | Slow mode button Slow down the feeding speed when scanning. The light is on when this is enabled.Press this button in the following situations:□when originals jam frequently□when loading thin originals |
| 4 | ▽ | Stop button □Cancels scanning.□Finishes Automatic Feeding Mode. |
| 5 | ◇ | Start button □Starts scanning.□Press this when cleaning the inside of the scanner. |
Related Information
→“Placing Plastic Cards” on page 41
→“Placing Laminated Cards” on page 44 →“Placing Envelopes” on page 56 →“Cleaning Inside the Scanner” on page 148
Lights
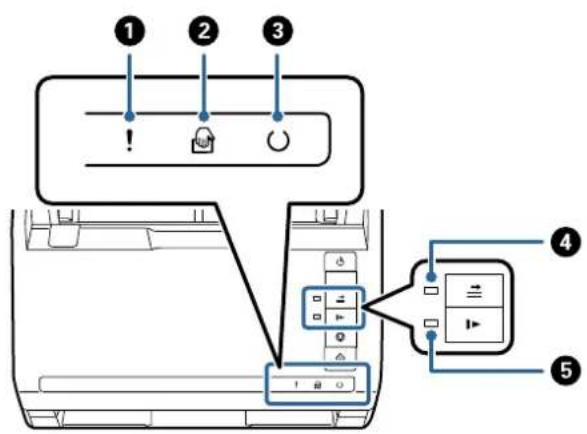
| 1 | ! | Error light An error has occurred. See “Light Error Indicators” for more details. | |
| 2 | Automatic Feeding Mode light | The scanner is in Automatic Feeding Mode. Scanning starts when an original is placed in the input tray. | |
| 3 | Ready light On: The scanner is | ready to be used. | |
| Flashing: The scanner is scanning, waiting to scan, processing, or sleeping. | |||
| Off: The scanner cannot be used because the power is off or an error has occurred. | |||
| 4 | Skip double feed detection light | This is on when skipping double feed detection is enabled. | |
| 5 | Slow mode light This is on during slow mode. | ||
Related Information
→“Error Indicators” on page 22 →“Scanning Different Sizes or Types of Originals One by One (Automatic Feeding Mode)” on page 90
Error Indicators
Scanner errors
| Indicators Situation Solutions | ||
| ! Flashing slowly | A paper jam or double feed occurred. Open the scanner cover, and then remove jammed originals. Close the cover to release the error. Load the originals again. | |
 | The scanner cover is opened. Close the scanner cover. | |
 [58KB] [58KB] | A fatal error has occurred. Turn the power off and on again. If the error continues to occur, contact your local dealer. | |
[5D0D][TXXD][XDZS][2Y5S] | The scanner has started in recovery mode because the firmware update failed. | Follow the steps below to try to update the firmware again.1. Connect the computer and the scanner with a USB cable. (During recovery mode, you cannot update the firmware over a network connection.)2. Visit your local Epson website for further instructions. |
Related Information
→ “Removing Jammed Originals from the Scanner” on page 166
Information on Applications
This section introduces the application products available for your scanner. The latest application can be installed at the Epson Web site.
Application for Scanning Documents (Document Capture Pro / Document Capture)
Document Capture Pro* is an application that allows you to efficiently scan originals such as documents.
You can register a set of operations, such as Scan-Save-Send, as a "job". By registering a series of operations in advance as a job, you can perform all of the operations by simply selecting the job. By assigning a job to the button on scanner's control panel, you can start a job by pressing the button.
See the Document Capture Pro help (Windows) or Document Capture (Mac OS) for details on using the application.
* The name is for Windows. For Mac OS, the name is Document Capture.
Starting on Windows
Windows 10
Click the start button, and then select Epson Software > Document Capture Pro.
Windows 8.1/Windows 8
Enter the application name in the search charm, and then select the displayed icon.
Windows 7
Click the start button, and then select All Programs > Epson Software > Document Capture Pro.
Starting on Mac OS
Select Go > Applications > Epson Software > Document Capture.
Application for Controlling the Scanner (Epson Scan 2)
Epson Scan 2 is a scanner driver that allows you to control the scanner. You can adjust the size, resolution, brightness, contrast, and quality of the scanned image. You can also start this application from a TWAIN-compliant scanning application.
See the Epson Scan 2 help for details on using the application.
Starting on Windows
Windows 10
Click the start button, and then select EPSON > Epson Scan 2.
Windows 8.1/Windows 8
Enter the application name in the search charm, and then select the displayed icon.
Windows 7
Click the start button, and then select All apps > EPSON > Epson Scan 2.
Starting on Mac OS
Select Go > Applications > Epson Software > Epson Scan 2.
Application for Updating Software and Firmware (EPSON Software Updater)
EPSON Software Updater is an application that installs new software, and updates firmware and manuals over the Internet. If you want to check for update information regularly, you can set the interval for checking for updates in EPSON Software Updater's auto update settings.
Starting on Windows
Windows 10
Click the start button, and then select Epson Software > EPSON Software Updater.
Windows 8.1/Windows 8
Enter the application name in the search charm, and then select the displayed icon.
Windows 7
Click the start button, and then select All Programs > Epson Software > EPSON Software Updater.
Starting on Mac OS
Select Go > Applications > Epson Software > EPSON Software Updater.
Software for Managing Devices on the Network (Epson Device Admin)
Epson Device Admin is a multifunctional application software that manages the device on the network.
The following functions are available.
Monitor or manage up to 2,000 printers or scanners over the segment. Make a detailed report, such as for the consumable or product status. Update the firmware of the product. Introduce the device to the network. Apply the unified settings to multiple devices.
You can download Epson Device Admin from Epson support website. For more information, see the documentation or help of Epson Device Admin.
Application for Creating Driver Packages (EpsonNet SetupManager)
EpsonNet SetupManager is software used to create a package for a simple scanner installation, such as installing the scanner driver and so on. This software allows the administrator to create unique software packages and distribute them among groups.
For more information, visit your regional Epson website.
http://www.epson.com
Option Items and Consumables Information
Carrier Sheet Codes
Using a Carrier Sheet allows you to scan irregularly shaped originals or photos that can be easily scratched. You can scan originals larger than A4 size with a carrier sheet by folding it in half.
| Part name | Codes*1 | Replacement cycle |
| Carrier Sheet B12B819051 | 3,000*2 |
*1 You can only use the carrier sheet with the code. *2 This number is a guide to the replacement cycle. Do not use a Carrier Sheet that is scratched.
Related Information
→“General Specifications for Originals being Scanned” on page 28 →“Placing Large Size Originals” on page 47 →“Placing Irregular Shaped Originals” on page 50 →“Placing Photographs” on page 53
Roller Assembly Kit Codes
Parts (the pickup roller and separation roller) should be replaced when the number of scans exceeds the service number. You can check the latest number of scans in the Epson Scan 2 Utility.
A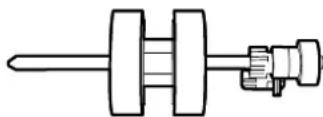
B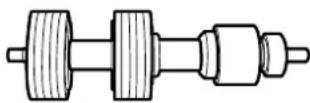
A: pickup roller, B: separation roller
| Part name Codes Life cycle | ||
| Roller Assembly Kit B12B819671 | B12B819681 (India only) | 200,000* |
* This number was reached by consecutively scanning using Epson test original papers, and is a guide to the replacement cycle. The replacement cycle may vary depending on different paper types, such as paper that generates a lot of paper dust or paper with a rough surface that may shorten the life cycle.
Related Information
→“Replacing the Roller Assembly Kit” on page 154 →“Resetting the Number of Scans After Replacing the Rollers” on page 158
Cleaning Kit Codes
Use this when cleaning inside the scanner. This kit is composed of cleaning liquid and a cleaning cloth.
| Part name Codes | |
| Cleaning Kit B12B819291 |
Related Information
→“Cleaning Inside the Scanner” on page 148
Flatbed Scanner Dock Codes
The dock combines the product (the sheet feed scanner) and a flatbed scanner allowing you to use it as a single scanner. This allows you to scan cardboard, booklets, and so on, that you cannot feed using the ADF.
| Part name Codes | |
| Flatbed Scanner Dock* | B12B819011B12B819021 (China only) |
| Flatbed Scanner Epson Perfection V19/V39 |
Specifications of Originals and Placing Originals
Specifications of Originals 28
Placing Originals.... 33
Specifications of Originals
This section explains the specifications and conditions of originals that can be loaded in the ADF.
General Specifications for Originals being Scanned
| Type of Original Thickness Size | ||
| Plain paper | 27 to 413 g/m 2 | Maximum: 215.9×6,096.0 mm(8.5×240.0 in.) |
| Fine paper | A8 size or less: 127 to 413 g/m 2 | Minimum: 50.8×50.8 mm (2.0×2.0 in.) |
| Recycled paper | Plastic cards: 1.24 mm (0.05 in.) or less(including emboss) | The loadable size varies depending onthe type of the originals and thescanning resolution. |
| Post card | ||
| Business card | Laminated Cards: 0.8 mm (0.03 in.) orless | |
| Envelopes | ||
| Plastic cards complying with ISO7810ID-1 type (with or without emboss) | ||
| Laminated cards | ||
| Thermal paper |
Note:
All originals must be flat at the leading edge.
Make sure that curls on the leading edge of the originals are kept within the following range.
① must be 3 mm or less. ② must be 1 mm or less while ② is equal to or less than ③. When ③ is equal to or more than 10 times the size of ②, ② can be more than 1 mm.
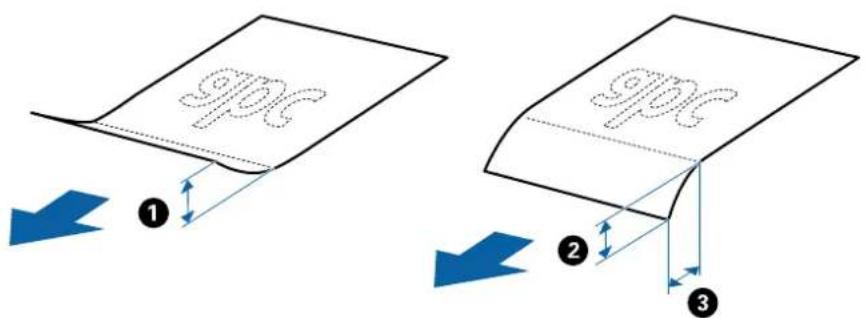
Even when the original meets the specifications for originals that can be placed in the ADF, it may not feed from the ADF or the scan quality may decline depending on the paper properties or quality.
Specifications of Standard Size Originals
The list of the standard size originals you can load on the scanner.
| Size Measurement | Thickness Paper Type | Loading Capacity * | ||
| A4 210×297 mm | (8.3×11.7 in.) | 27 to 413 g/m2Plain paper | Fine paperRecycled paper | Thickness of the originals stack: under 6 mm (0.23 in.)80 g/m2: 50 sheets90 g/m2: 43 sheets104 g/m2: 37 sheets127 g/m2: 31 sheets157 g/m2: 25 sheets209 g/m2: 19 sheets256 g/m2: 15 sheets413 g/m2: 9 sheetsThe loading capacity varies depending on the paper type. |
| Letter 215.9×279 | 4 mm | |||
| (8.5×11 in.) | ||||
| Legal 215.9×355.6 | mm | |||
| (8.5×14 in.) | ||||
| B5 182×257 mm | (7.2×10.1 in.) | |||
| A5 148×210 mm | (5.8×8.3 in.) | |||
| B6 128×182 mm | (5.0×7.2 in.) | |||
| A6 105×148 mm | (4.1×5.8 in.) | |||
| A8 52×74 mm | (2.1×2.9 in.) | 127 to 413 g/m2 | ||
| Business Card 55 | ×89 mm(2.1×3.4 in.) | 210 g/m2Thickness of the originals stack: | under 6 mm (0.23 in.)15 sheets |
You can refill the originals up to the maximum capacity during scanning.
Specifications of Long Paper
The specification of long paper you can load into the scanner.
| Size Thickness Paper Type Loading Capacity | |||
| Maximum width: 215.9 mm (8.5 in.)Maximum length: 6,096.0 mm (240.0 in.)* | 50 to 130 g/m2 | Plain paperFine paperRecycled paper | 1 sheet |
The following shows the maximum lengths according to the scanning resolution. 50 to 200 dpi: 6,096.0 mm (240.0 in.) 201 to 300 dpi: 5,461.0 mm (215.0 in.) 301 to 600 dpi: 1,346.0 mm (53.0 in.)
Specifications of Plastic Cards
The specification of plastic card you can load into the scanner.
| Size Card Type Thickness | Loading Capacity | Loading Direction | ||
| ISO7810 ID-1 Type54.0×85.6 mm(2.1×3.3 in.) | With embossing 1.24 mm (0.05 in.) or less | 1 card Horizontal (Landscape) | ||
| Without embossing 0.76 mm (0.03 in.) to 1.1 mm (0.04 in)* | 5 cards | |||
| Less than 0.76 mm (0.03 in.) | 5 cards | |||
You can scan these cards only when the resolution is 300 dpi or less, and disabling Slow mode.
Specifications of Laminated Cards
The specification of laminated cards you can load into the scanner.
| Size Thickness Loading Capacity | ||
| 120.0×150.0 mm (4.7×5.9 in.) or less 0.8 mm (0.03 in.) or less 1 card |
Specifications for Originals Using the Carrier Sheet
The optional Carrier Sheet is a sheet designed to transport originals through the scanner. You can scan originals that are larger than A4/Letter size, important documents or photos which must not be damaged, thin paper, irregularly shaped originals, and so on.
The following table provides the conditions for using the Carrier Sheet.
| Type Size Thickness Loading | Capacity of | the Carrier Sheet | |
| Originals that cannot be loaded directly into the scanner | A3*1A4B4*1LetterLegal*1B5A5B6A6A8Custom size:Width: up to 431.8 mm (17 in.)*2Length: up to 297 mm (11.7 in.)*3 | 0.3 mm (0.012 in.) or less(excluding the thickness of the Carrier Sheet) | 5 sheets |
*1 Fold in half to set. *2 Originals that are wider than 215.9 mm (8.5 in.) need to be folded in half. *3 The leading edge of the original must be placed at the binding part of the Carrier Sheet when scanning an original approximately 297 mm (11.7 in.) long. Otherwise, the length of the scanned image may be longer than intended as the scanner scans to the end of the Carrier Sheet when you select Auto Detect as the Document Size setting in the application.
Related Information
→“Carrier Sheet Codes” on page 24
Specifications of Envelopes
The specification of envelopes you can load into the scanner.
| Size Measurement Thickness | Loading Capacity | ||
| C6 114×162 mm (4.49×6.38 in.) | (standard size) | 0.38 mm (0.015 in.) or less 5 envelopes | |
| DL 110×220 mm (4.33×8.66 in.) | (standard size) | ||
Types of Originals that Require Attention
The following types of originals may not be successfully scanned.
☐ Originals with an uneven surface such as letterhead paper
☐ Originals with wrinkles or fold lines ☐ Perforated originals ☐ Originals with labels or stickers ☐ Carbon-less paper ☐ Curled originals ☐ Coated paper
Note:
☐ Because carbon-less paper contains chemical substances that may harm the rollers, if paper jams occur frequently, clean the pickup roller and the separation roller. ☐ Wrinkled originals may scan better if you slow down the feeding speed during scanning or smooth out the wrinkles before loading. ☐ To scan delicate originals or originals that are easily wrinkled, use the Carrier Sheet (sold separately). ☐ To scan originals that are incorrectly detected as double feeds, press the (Double Feed Detection Skip) button before scanning or select Off in Detect Double Feed on the Main Settings tab in Epson Scan 2 window. When you are using Document Capture Pro, you can open the Epson Scan 2 window by pressing the Detailed Settings button on the Scan Settings screen. ☐ Labels or stickers must be firmly stuck to the originals with no glue protruding. ☐ Try to flatten the curled originals before scanning.
Related Information
→“Scanner Basics” on page 17 →“Maintenance” on page 147
Types of Originals that Must Not be Scanned
The following types of originals must not be scanned.
□Photos Booklets □Bank books □Passports □Non-paper original (such as clear files, fabric, and metal foil) ☐Originals with staples or paper clips ☐Originals with glue attached □Ripped originals □Heavily wrinkled or curled originals □Transparent originals such as OHP film ☐Originals with carbon paper on the back ☐Originals with wet ink ☐Originals with sticky notes attached
Note:
☐ Do not feed photos, valuable original artwork, or important documents which you do not want to damage or deface into the scanner directly. Misfeeding may wrinkle or damage the original. When scanning such originals, make sure you use the Carrier Sheet (sold separately). ☐ Rippled, wrinkled, or curled originals can also be scanned if you use the Carrier Sheet (sold separately).
Related Information
→“Photographs” on page 52
Placing Originals
Standard Size Originals
Specifications of Standard Size Originals
The list of the standard size originals you can load on the scanner.
| Size Measurement | Thickness Paper Type | Loading Capacity * | ||
| A4 210×297 mm | (8.3×11.7 in.) | 27 to 413 g/m2Plain paper | Fine paperRecycled paper | Thickness of the originals stack: under 6 mm (0.23 in.)80 g/m2: 50 sheets90 g/m2: 43 sheets104 g/m2: 37 sheets127 g/m2: 31 sheets157 g/m2: 25 sheets209 g/m2: 19 sheets256 g/m2: 15 sheets413 g/m2: 9 sheetsThe loading capacity varies depending on the paper type. |
| Letter 215.9×279 | 4 mm(8.5×11 in.) | |||
| Legal 215.9×355.6 | mm(8.5×14 in.) | |||
| B5 182×257 mm | (7.2×10.1 in.) | |||
| A5 148×210 mm | (5.8×8.3 in.) | |||
| B6 128×182 mm | (5.0×7.2 in.) | |||
| A6 105×148 mm | (4.1×5.8 in.) | |||
| A8 52×74 mm | (2.1×2.9 in.) | 127 to 413 g/m2 | ||
| Business Card 55 | ×89 mm(2.1×3.4 in.) | 210 g/m2Thickness of the originals stack: | under 6 mm (0.23 in.)15 sheets |
* You can refill the originals up to the maximum capacity during scanning.
Placing Standard Size Originals
- Open the input tray and extend the input tray extension. Slide out the output tray, extend the output tray extension, and then raise the stopper.
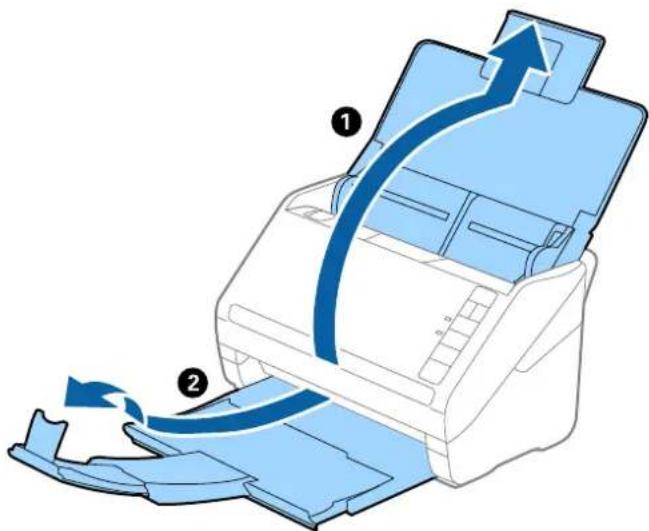
Note:
☐ For A4 size or larger originals, make sure you pull out and extend the input tray extension. ☐ Make sure you pull out and extend the output tray extensions so that they are a little bit longer than the length of the original, and raise the stopper so that the ejected originals can be stacked comfortably on the output tray. ☐ The stopper can move forward and backward on the output tray extension so that you can easily adjust the stopper position to the best position for the originals being scanned. ☐ If thick originals bump into the output tray and fall from it, store the output tray and do not use it to stack the ejected originals. ☐ If scanned images are still affected by ejected originals hitting the surface below the scanner, we recommend placing the scanner on the edge of a table where the ejected originals can drop freely and you can catch them.
- Slide the edge guides on the input tray all the way out.
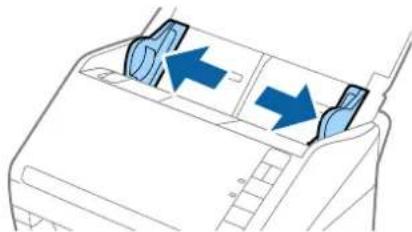
- Fan the originals.
Hold both ends of the originals and fan them a few times.
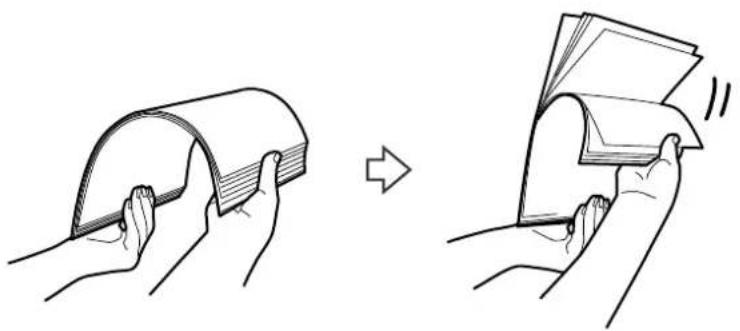
- Align the edges of the originals with the printed side facing down and slide the leading edge into a wedge shape.

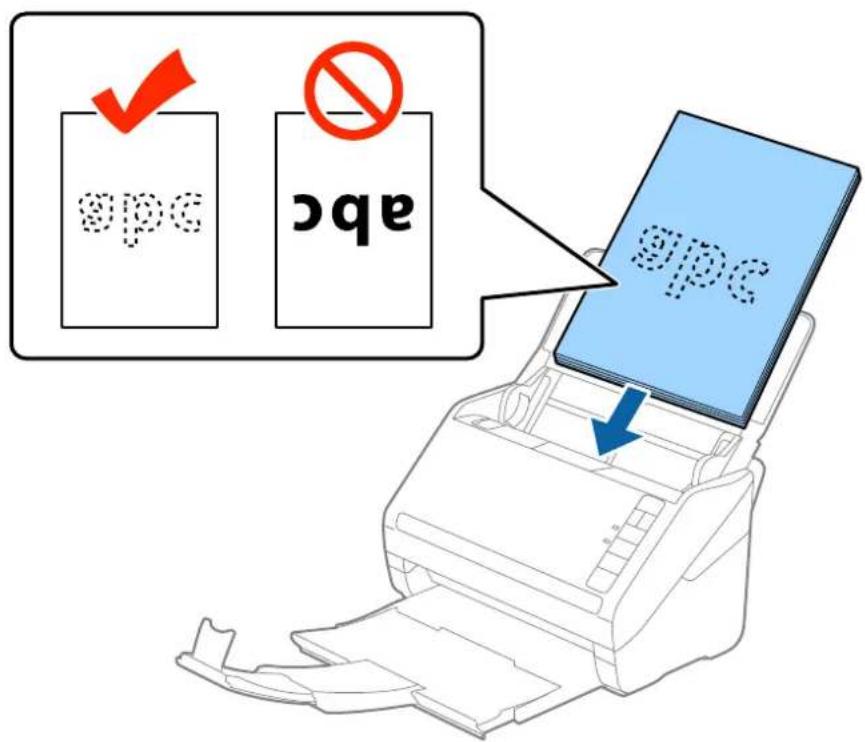
- Load the originals into the input tray facing down with the top edge facing into the ADF. Slide the originals into the ADF until they meet resistance.
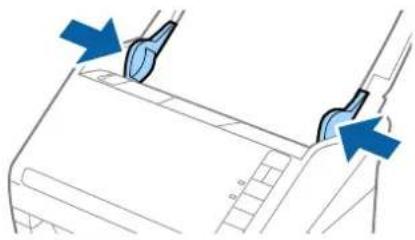
- Slide the edge guides to fit the edge of the originals making sure there are no gaps between the originals and the edge guides. Otherwise, the originals may be fed skewed.
Note:
☐ When scanning originals with punch holes such as loose leaf paper, load the originals with the holes facing the side or facing down. There must not be any holes within a 30 mm (1.2 inches) strip at the center of the originals. However, there can be holes within 30 mm (1.2 inches) from the leading edge of the originals. Make sure that the edges of the punch holes do not have burrs or curls.

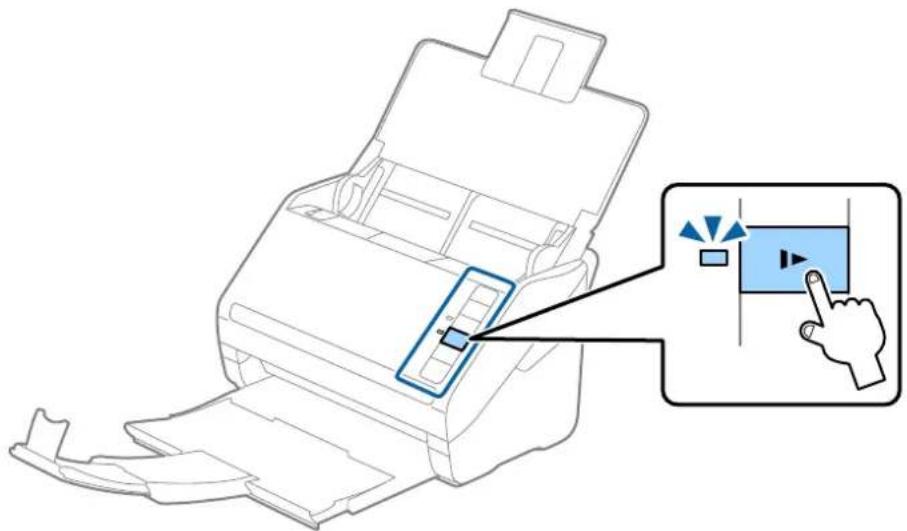
☐ When scanning thin paper with crinkles that are causing paper jams or double feeds, you may be able to improve the situation by pressing the ▶ (Slow Mode) button to slow down the feeding speed. Pressing the ▶ (Slow Mode) button once slows down the paper feeding speed; press it again to return to normal speed.
Long Paper
Specifications of Long Paper
The specification of long paper you can load into the scanner.
| Size Thickness Paper Type Loading Capacity | |||
| Maximum width: 215.9 mm (8.5 in.)Maximum length: 6,096.0 mm (240.0 in.)* | 50 to 130 g/m2Plain paper | Fine paperRecycled paper | 1 sheet |
* The following shows the maximum lengths according to the scanning resolution.
□50 to 200 dpi : 6,096.0 mm ( 240.0 in.)
☐201 to 300 dpi : 5,461.0 mm (215.0 in.)
☐301 to 600 dpi: 1,346.0 mm (53.0 in.)
Placing Long Paper
- Open the input tray, and then slide out the output tray.
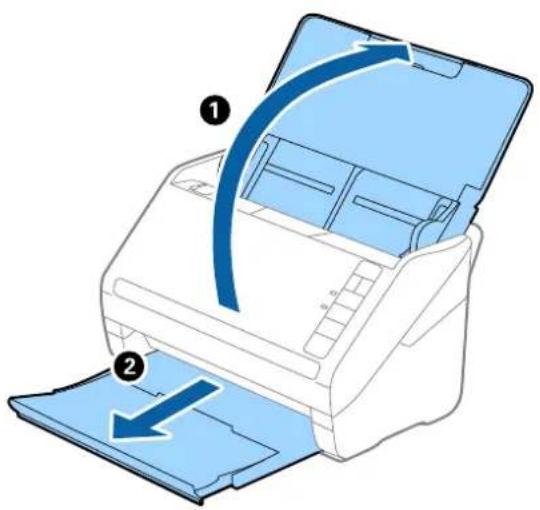
Note:
Do not extend the input tray extension and output tray extensions and do not raise the stopper.
- Slide the edge guides on the input tray all the way out.
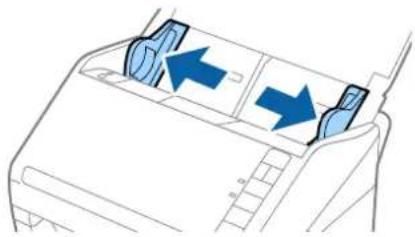
- Load the original straight into the input tray, facing down with the top edge facing into the ADF. Slide the original into the ADF until it meets resistance.

- Adjust the edge guides to fit the edge of the long paper making sure there are no gaps between the edge of the paper and the edge guides. Otherwise, the originals may be fed skewed.
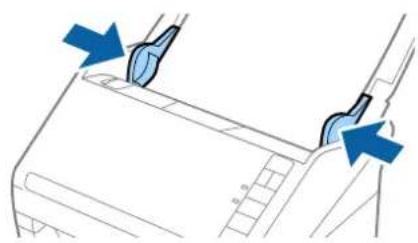
Note:
☐The following shows the maximum lengths according to the scanning resolution.
· 50 to 200 dpi: 6,096.0 mm (240.0 in.) · 201 to 300 dpi: 5,461.0 mm (215.0 in.) · 301 to 600 dpi: 1,346.0 mm (53.0 in.)
☐You need to specify the paper size in the Epson Scan 2 window.
When you are using Document Capture Pro, you can open the Epson Scan 2 window by pressing the Detailed Settings button on the Scan Settings screen.
There are three ways to specify the paper size in Epson Scan 2. If the paper length is 3,048 mm (120 inches) or less, you can select Auto Detect (Long Paper) to detect the size automatically.
If the paper length is more than 3,048 mm (120 inches), you need to select Customize and enter the size of the paper. If the paper length is 5,461 mm (215 inches) or less, you can use Detect paper length instead of entering the paper height. If the paper is longer than 5,461 mm (215 inches), you need to enter both width and height size of the paper.
To guarantee scanning quality, the scanning speed for long paper is slowed down automatically.
Support the long paper at the input side so that it does not drop out of the ADF, and the output side so that the ejected paper does not fall from the output tray.
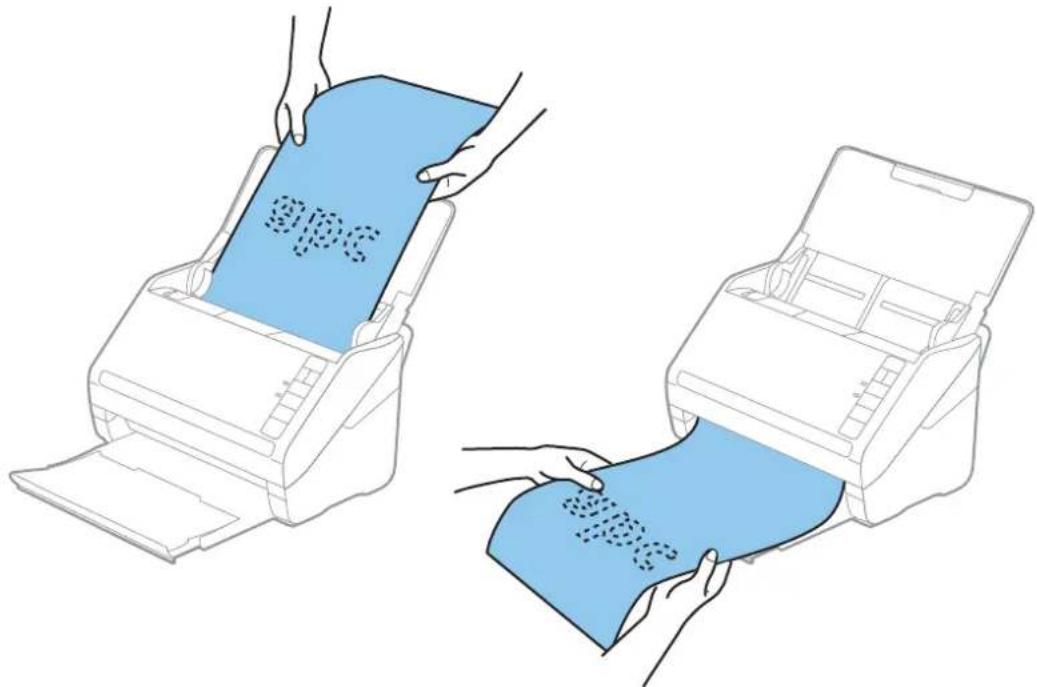
Related Information
See “Required Settings for Special Originals in Epson Scan 2 Window” on page 79.
Plastic Cards
Specifications of Plastic Cards
The specification of plastic card you can load into the scanner.
| Size Card Type Thickness | Loading Capacity | Loading Direction | ||
| ISO7810 ID-1 Type 54.0×85.6 mm (2.1×3.3 in.) | With embossing 1.24 mm (0.05 in.) or less | 1 card Horizontal (Landscape) | ||
| Without embossing 0.76 mm (0.03 in.) to 1.1 mm (0.04 in)* | 5 cards | |||
| 5 cards | ||||
You can scan these cards only when the resolution is 300 dpi or less, and disabling Slow mode.
Placing Plastic Cards
- Open the input tray, and then slide out the output tray and raise the stopper.
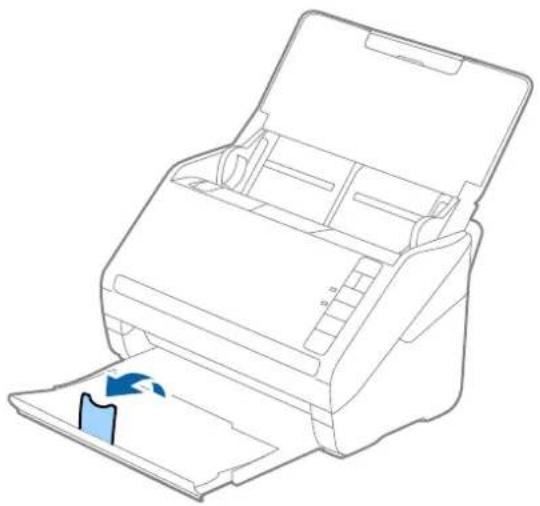
- Slide the edge guides on the input tray all the way out.
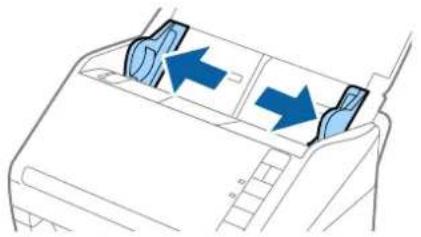
- Load the plastic cards into the input tray facing down with the top edge facing into the ADF. Slide the plastic cards into the ADF until they meet resistance.
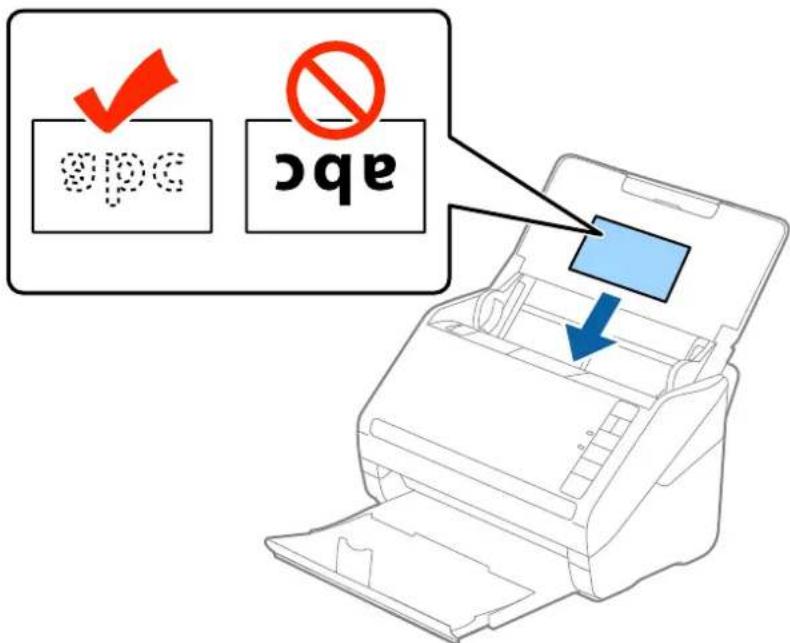

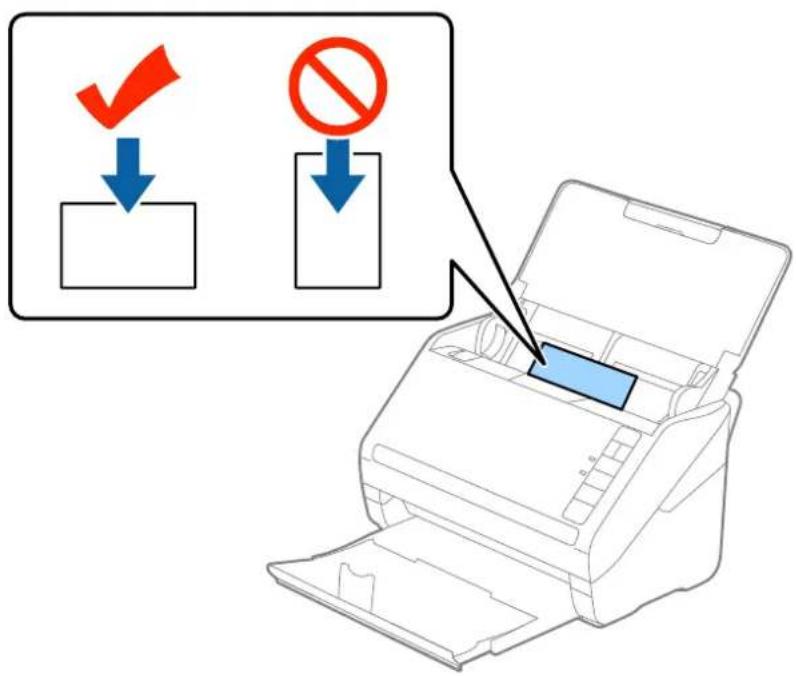
Important:
Do not load plastic cards vertically.
- Slide the edge guides to fit the edge of the plastic cards.
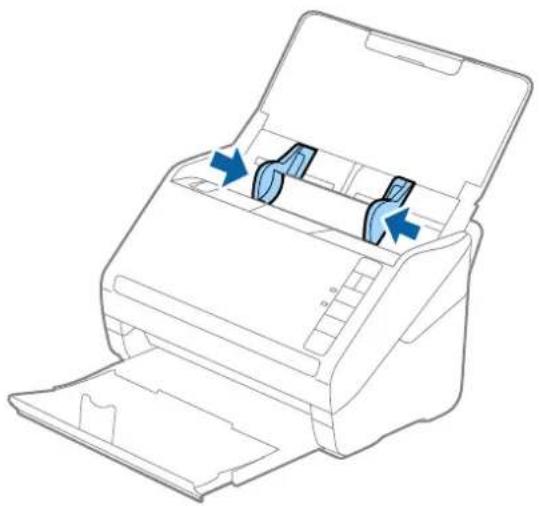
Note:
To scan plastic cards, set the appropriate setting in the Epson Scan 2 window.
When you are using Document Capture Pro, you can open the Epson Scan 2 window by pressing the Detailed Settings button on the Scan Settings screen.
Select Plastic Card in Document Size or select Off in Detect Double Feed on the Main Settings tab in Epson Scan 2. See the Epson Scan 2 help for details.
If you forget to disable Detect Double Feed in Epson Scan 2 and a double feed error occurs, remove the card from the ADF and then reload it, press the → (Double Feed Detection Skip) button on the scanner as shown below to disable
Detect Double Feed for the next scan, and then scan again. The → (Double Feed Detection Skip) button only disables Detect Double Feed for one sheet.
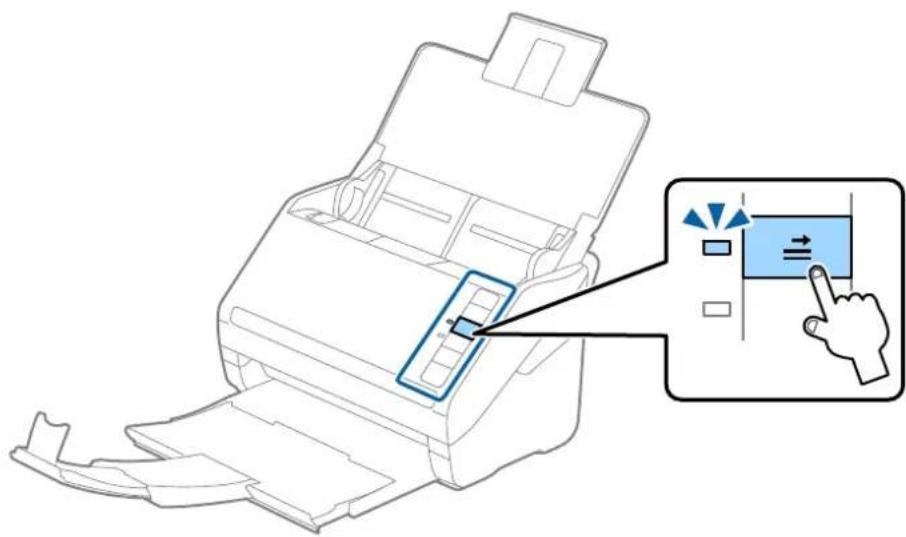
Related Information
→ “Required Settings for Special Originals in Epson Scan 2 Window” on page 79
Laminated Cards
Specifications of Laminated Cards
The specification of laminated cards you can load into the scanner.
| Size Thickness Loading Capacity | ||
| 120.0×150.0 mm (4.7×5.9 in.) or less 0.8 mm (0.03 in.) or less 1 card |
Placing Laminated Cards
- Open the input tray, and then slide out the output tray and raise the stopper.
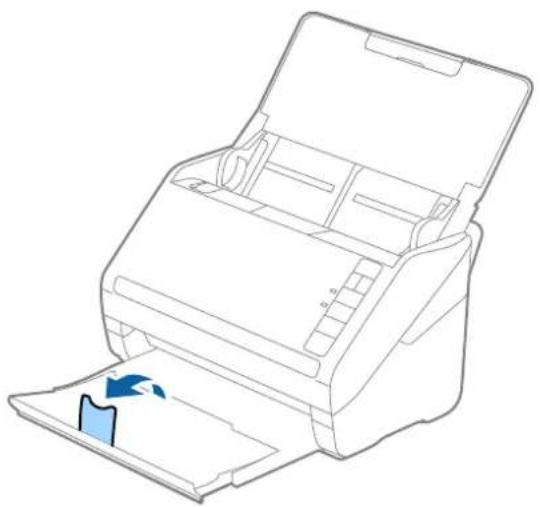
- Slide the edge guides on the input tray all the way out.
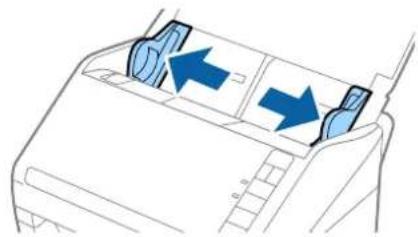
- Load the laminated cards into the input tray facing down with the top edge facing into the ADF. Slide the laminated cards into the ADF until they meet resistance.
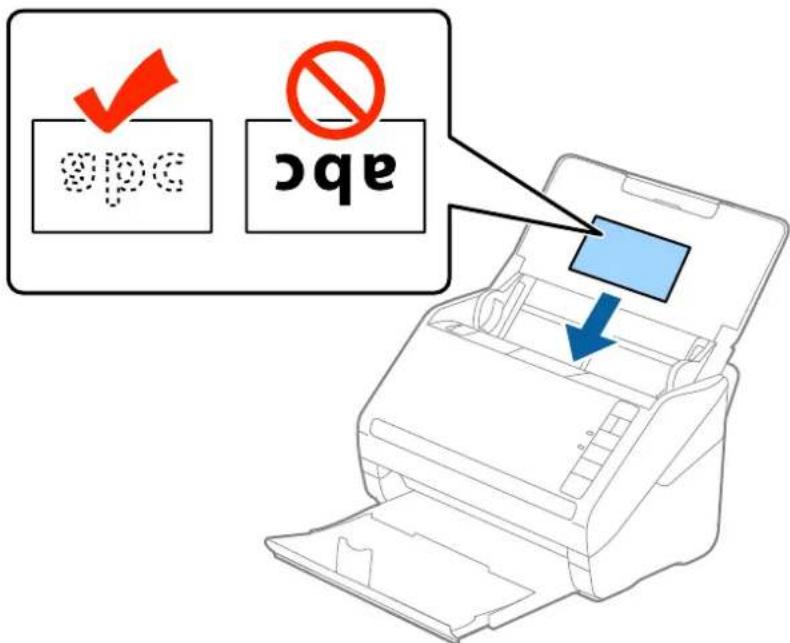
- Slide the edge guides to fit the edge of the laminated cards.

Note:
To scan laminated cards, set the appropriate setting in the Epson Scan 2 window.
When you are using Document Capture Pro, you can open the Epson Scan 2 window by pressing the Detailed Settings button on the Scan Settings screen.
Select Scan laminated card on the Settings window on the Main Settings tab in Epson Scan 2 to increase the accuracy of auto size detection. See the Epson Scan 2 help for details. Select Off in Detect Double Feed on the Main Settings tab in Epson Scan 2. See the Epson Scan 2 help for details. If you forget to disable Detect Double Feed in Epson Scan 2 and a double feed error occurs, remove the card from the ADF and then reload it, press the (Double Feed Detection Skip) button on the scanner as shown below to disable Detect Double Feed for the next scan, and then scan again. The (Double Feed Detection Skip) button only disables Detect Double Feed for one sheet.
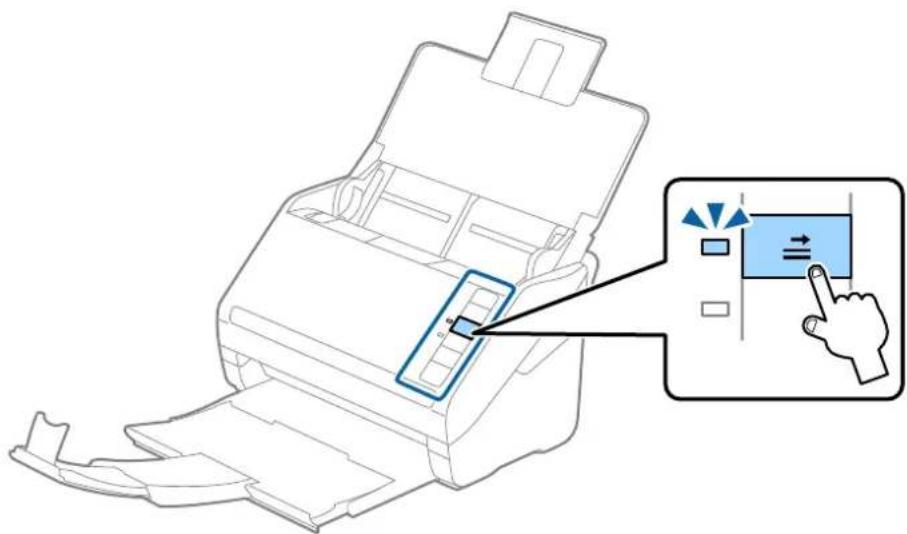
Related Information
→“Required Settings for Special Originals in Epson Scan 2 Window” on page 79
Large Size Originals
Specifications of Large Size Originals
By using the Carrier Sheet sold separately and folding the originals in half, you can scan originals larger than A4 size, such as A3 or B4 sizes.
| Size Thickness Paper Type Loading Capacity of the | Carrier Sheet | ||
| Up to A3 0.3 mm (0.012 in.) or less(excluding the thickness of the Carrier Sheet) | Plain paperFine paperRecycled paper | 5 carrier sheets | |
Placing Large Size Originals
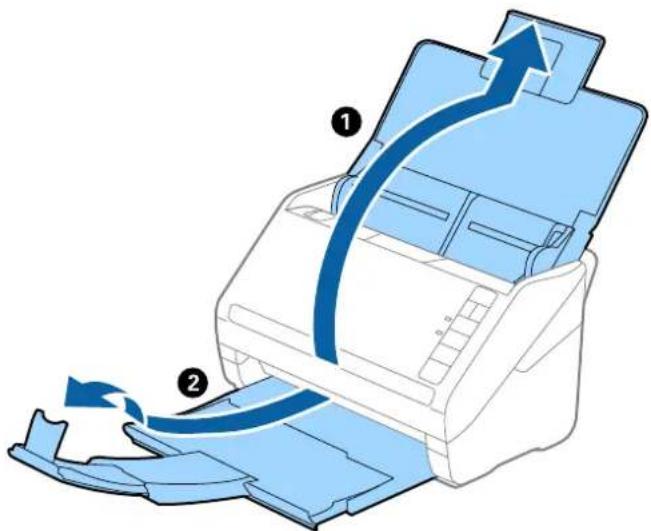
- Open the input tray and extend the input tray extension. Slide out the output tray, extend the output tray extension, and then raise the stopper.
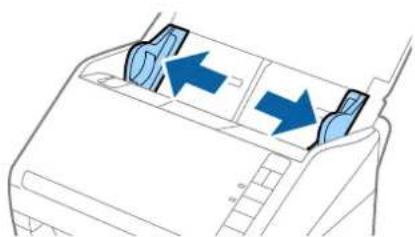
- Slide the edge guides on the input tray all the way out.
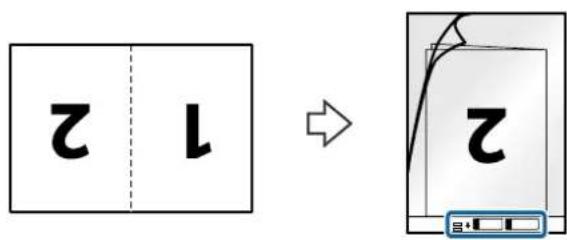
- Place the Carrier Sheet with the illustration on the front edge facing up and place the original in the carrier sheet by folding it in half so that the side to be scanned is facing out, with the right side at the front.
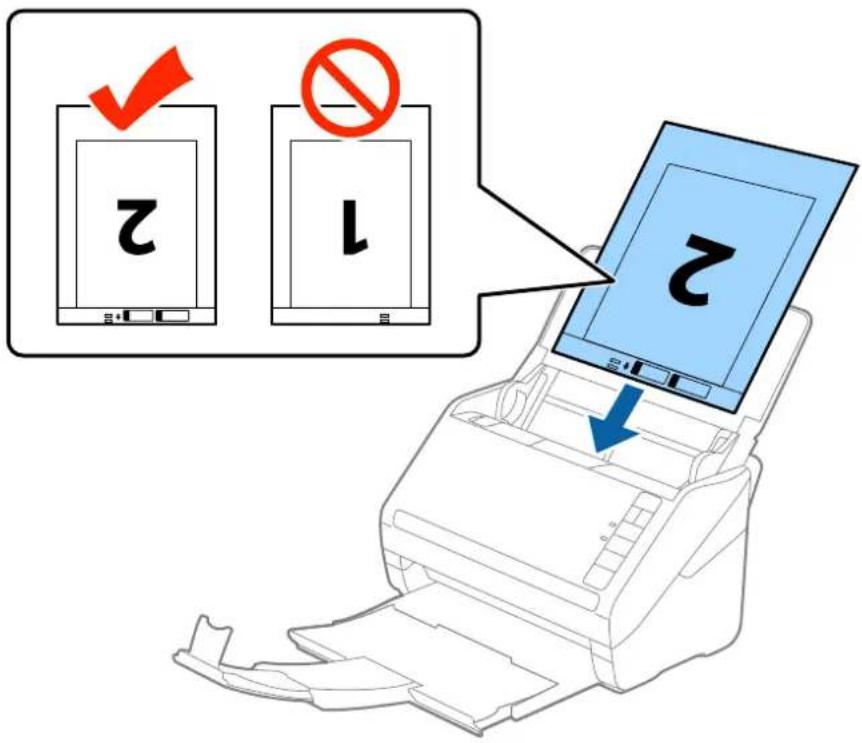
- Load the Carrier Sheet into the input tray with the top edge facing into the ADF. Slide the Carrier Sheet into the ADF until it meets resistance.
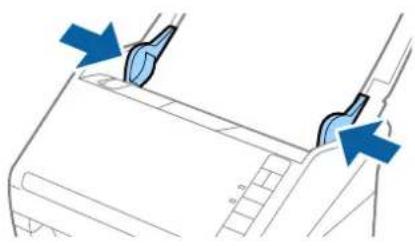
- Slide the edge guides to fit the edge of the Carrier Sheet making sure there are no gaps between the Carrier Sheet and the edge guides. Otherwise, the carrier sheet may be fed skewed.
Note:
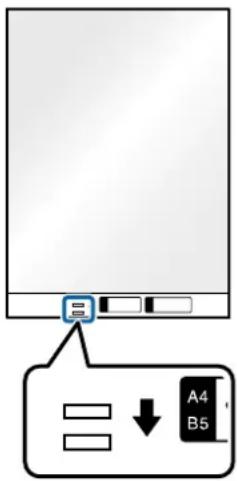
☐ You may need to stop using a Carrier Sheet that is scratched or has been scanned more than 3,000 times. ☐ To scan both sizes and stitch them together, select Double-Sided from Scanning Side and select Left & Right from Stitch Images in Epson Scan 2. See the Epson Scan 2 help for details. ☐ When scanning a Carrier Sheet by selecting Auto Detect as the Document Size setting, the image is automatically scanned by applying Paper Skew in the Correct Document Skew setting. ☐ The leading edge of the original must be placed at the binding part of the Carrier Sheet when scanning an original approximately 297 mm long. Otherwise, the length of the scanned image may be longer than intended as the scanner scans to the end of the Carrier Sheet when you select Auto Detect as the Document Size setting in Epson Scan 2. ☐ Only use the Carrier Sheet designed for your scanner. The Carrier Sheet is automatically recognized by the scanner by detecting two small rectangular holes on the front edge. Keep the holes clean and not covered.
Related Information
→“Carrier Sheet Codes” on page 24 →“Required Settings for Special Originals in Epson Scan 2 Window” on page 79
Irregular Shaped Originals
Specifications of Irregular Shaped Originals
By using the Carrier Sheet sold separately, you can scan originals that are wrinkled, curled, very thin, or irregularly shaped.
| Size Thickness Loading Capacity of the Carrier | Carrier | Sheet |
| Up to A4 0.3 mm (0.012 in.) or less | (excluding the thickness of the Carrier Sheet) | 5 sheets |
Placing Irregular Shaped Originals
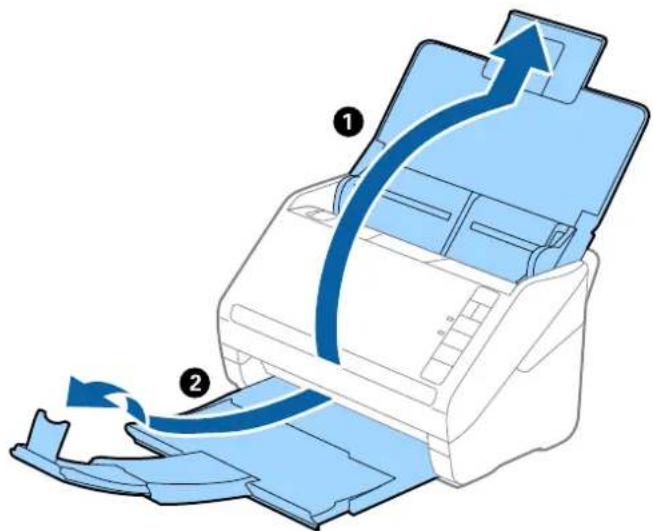
- Open the input tray and extend the input tray extension. Slide out the output tray, extend the output tray extension, and then raise the stopper.
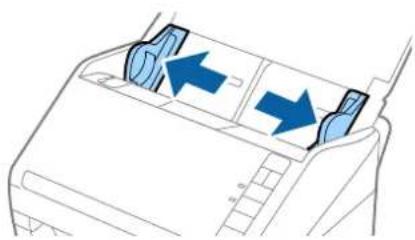
- Slide the edge guides on the input tray all the way out.
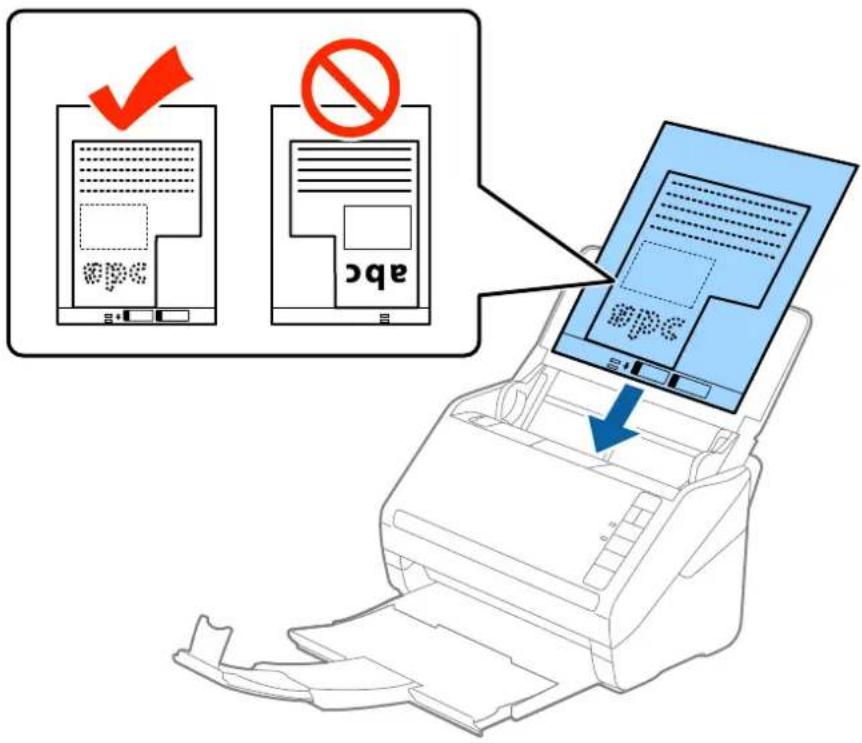
- Place the Carrier Sheet with the illustration on the front edge facing up and place the original in the center of the Carrier Sheet with the side to be scanned facing down.
![graph TD A["Document with 'abc' at top"] --> B["Output Format 1: Document with 'abc' and 'abc' lines"] B --> C["Output Format 2: Document with 'abc' and 'abc' lines"] style A fill:#f9f,stroke:#333 style B fill:#ccf,stroke:#333 style C fill:#cfc,stroke:#333](/content/2026/06/1398547/images/373f6f756e748fe4facfba93d38986cd073bf08e5afe47df2c97c4069b3000d2.jpg)
- Load the Carrier Sheet into the input tray with the top edge facing into the ADF. Slide the Carrier Sheet into the ADF until it meets resistance.
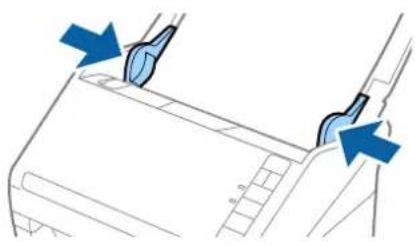
- Slide the edge guides to fit the edge of the Carrier Sheet, making sure there are no gaps between the Carrier Sheet and the edge guides. Otherwise, the carrier sheet may be fed skewed.
Note:
☐ You may need to stop using a Carrier Sheet that is scratched or has been scanned more than 3,000 times. ☐ If you cannot find an appropriate size for the original you want to scan in the Document Size list in Epson Scan 2, select Auto Detect or select Customize to create a custom document size.
When scanning a Carrier Sheet by selecting Auto Detect as the Document Size setting, the image is automatically scanned by applying Paper Skew in the Correct Document Skew setting.
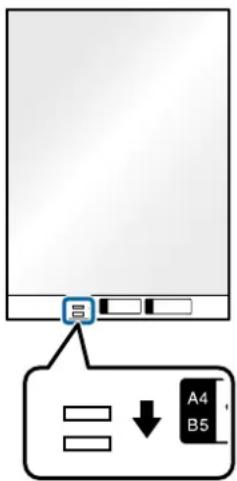
☐ Only use the Carrier Sheet designed for your scanner. The Carrier Sheet is automatically recognized by the scanner by detecting two small rectangular holes on the front edge. Keep the holes clean and not covered.
Related Information
→“Carrier Sheet Codes” on page 24 →“Required Settings for Special Originals in Epson Scan 2 Window” on page 79
Photographs
Specifications of Photographs
By using the Carrier Sheet sold separately, you can scan photographs without worrying about them being damaged.
| Size Thickness Loading Capacity of the Carrier | Carrier | Sheet |
| Up to A4 0.3 mm (0.012 in.) or less | (excluding the thickness of the Carrier Sheet) | 5 sheets |
Placing Photographs
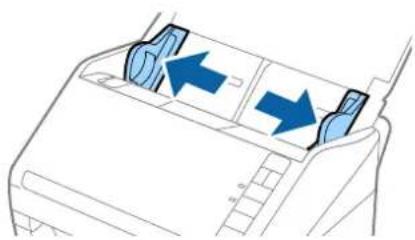
- Open the input tray and extend the input tray extension. Slide out the output tray, extend the output tray extension, and then raise the stopper.

- Slide the edge guides on the input tray all the way out.
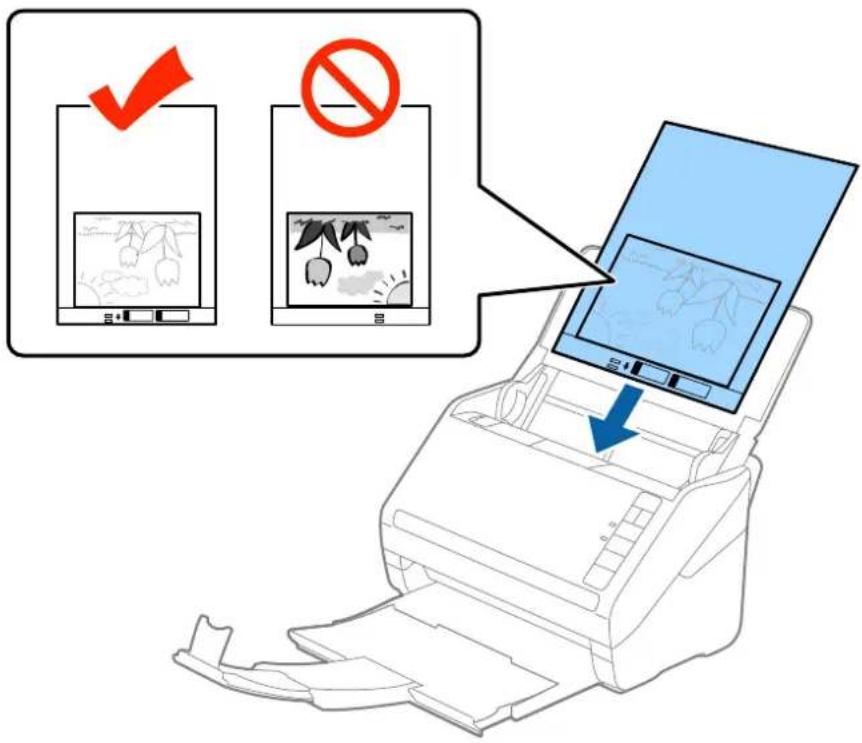
- Place the Carrier Sheet with the illustration on the front edge facing up and place the photo in the center of the Carrier Sheet with the side to be scanned facing down.
![graph TD A["Image: Flower in sun"] --> B["Document: Image with flowers"] B --> C["Document: Document with close-up preview"]](/content/2026/06/1398547/images/484b41bdebfe6fd65caf5de8b33b745f8e992181bf6fefb3968739d3ef0e1c79.jpg)
- Load the Carrier Sheet into the input tray with the top edge facing into the ADF. Slide the Carrier Sheet into the ADF until it meets resistance.
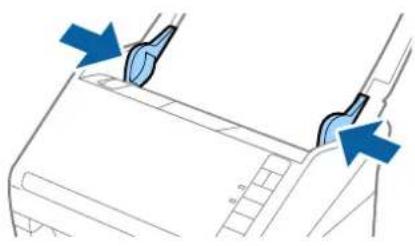
- Slide the edge guides to fit the edge of the Carrier Sheet, making sure there are no gaps between the Carrier Sheet and the edge guides. Otherwise, the carrier sheet may be fed skewed.
Note:
☐ You may need to stop using a Carrier Sheet that is scratched or has been scanned more than 3,000 times. ☐ If you cannot find an appropriate size for the original you want to scan in the Document Size list in Epson Scan 2, select Auto Detect or select Customize to create a custom document size.
When scanning a Carrier Sheet by selecting Auto Detect as the Document Size setting, the image is automatically scanned by applying Paper Skew in the Correct Document Skew setting.
☐ Do not leave photos inside the Carrier Sheet for a long time. ☐ Only use the Carrier Sheet designed for your scanner. The Carrier Sheet is automatically recognized by the scanner by detecting two small rectangular holes on the front edge. Keep the holes clean and not covered.
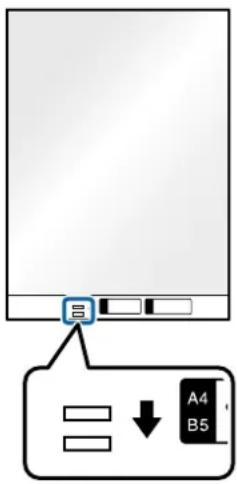
Related Information
→ "Carrier Sheet Codes" on page 24 → "Required Settings for Special Originals in Epson Scan 2 Window" on page 79
Envelopes
Specifications of Envelopes
The specification of envelopes you can load into the scanner.
| Size Measurement Thickness | Loading Capacity | ||
| C6 114×162 mm (4.49×6.38 in.) | (standard size) | 0.38 mm (0.015 in.) or less 5 envelopes | |
| DL 110×220 mm (4.33×8.66 in.) | (standard size) | ||
Placing Envelopes
- Open the input tray and extend the input tray extension. Slide out the output tray, extend the output tray extension, and then raise the stopper.
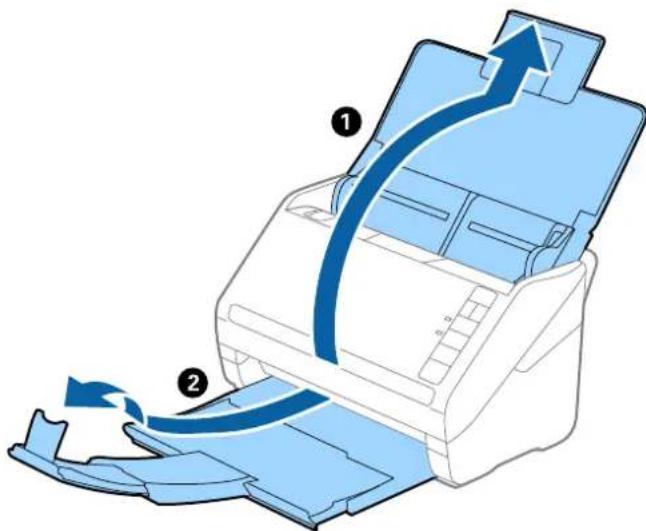
- Slide the edge guides on the input tray all the way out.

- Load the envelopes into the input tray facing down, making sure that the opened edge (flap side) of the envelope is facing to the side. For envelopes with the opened edge (flap side) on the shorter side, you can load the envelope with the opened edge (flap side) facing up.
Slide the envelopes into the ADF until they meet resistance.
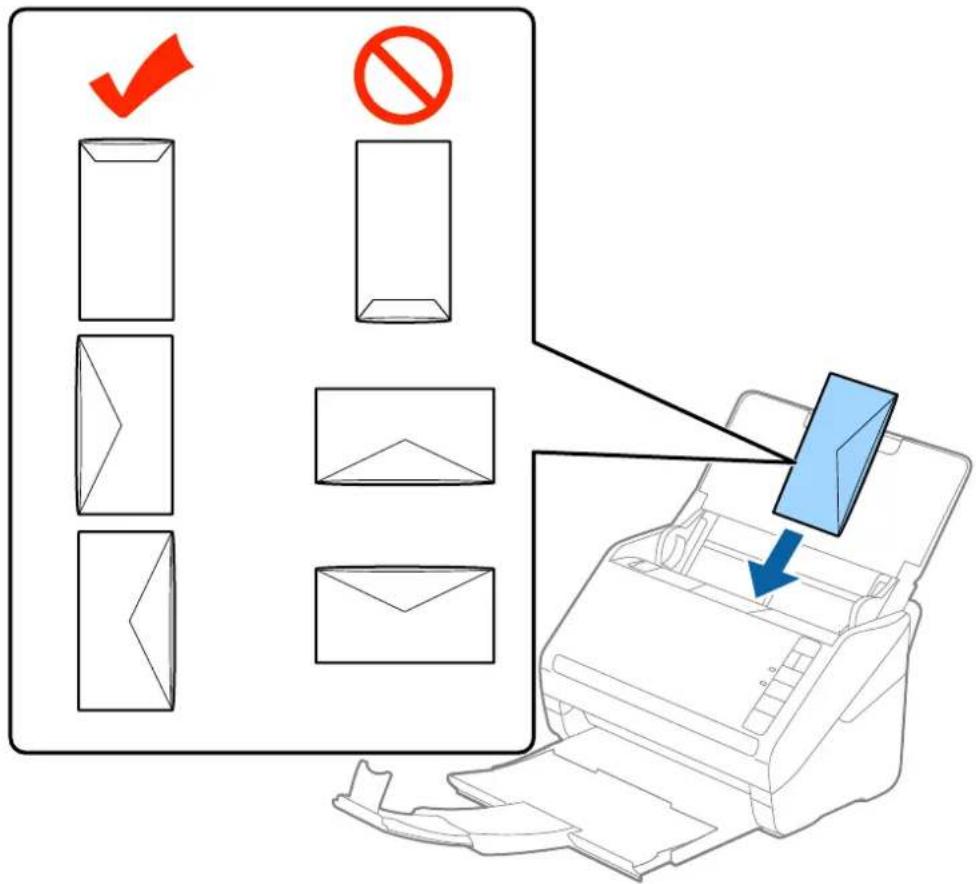

Important:
Do not load envelopes with adhesives on them.
Note:
☐ Envelopes that are not opened by cutting sharply at the flap edge may not be scanned correctly. ☐ Envelopes that have not yet been sealed can be loaded with the flap open and facing up.
- Slide the edge guides to fit the edge of the envelopes making sure there are no gaps between the envelopes and the edge guides. Otherwise, the envelopes may be fed skewed.
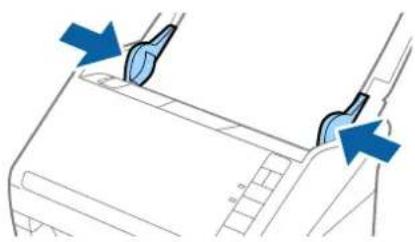
Note:
☐ To scan envelopes, we recommend selecting the appropriate rotation angle or Auto in Rotate on the Main Settings tab in the Epson Scan 2 window before scanning. See the Epson Scan 2 help for details.
☐ To scan envelopes, set the appropriate setting in the Epson Scan 2 window.
When you are using Document Capture Pro, you can open the Epson Scan 2 window by pressing the Detailed Settings button on the Scan Settings screen.
Select Off in Detect Double Feed on the Main Settings tab. See the Epson Scan 2 help for details.
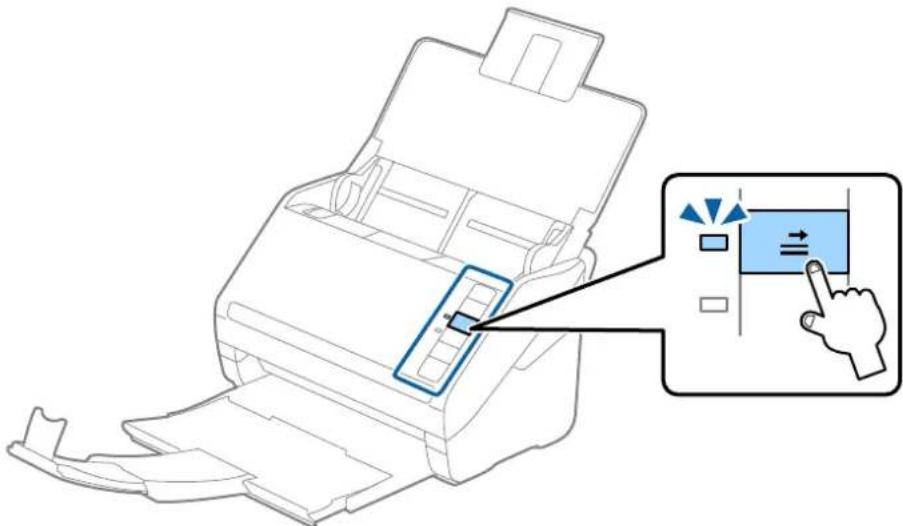
If you forget to disable Detect Double Feed in Epson Scan 2 and a double feed error occurs, remove the envelope from the ADF and then reload it, press the ⟹ (Double Feed Detection Skip) button on the scanner as shown below to disable Detect Double Feed for the next scan, and then scan again. The ⟹ (Double Feed Detection Skip) button only disables Detect Double Feed for one sheet.
Related Information
→ “Required Settings for Special Originals in Epson Scan 2 Window” on page 79
Mixture of Originals
Specifications of Originals that are a Mixture of Different Sizes
You can load a mixture of originals from 50.8 × 50.8 mm (2.0 × 2.0 in.) to A4 (or Letter) size. You can also load a mixture of paper types or thickness.

Important:
☐ When placing and scanning originals that are a mixture of different sizes, originals may be fed askew because not all of the originals are supported by edge guides. ☐ Originals may be jammed or fed askew if you set different types or very different sizes of originals, such as in the following cases. · Thin paper and Thick paper · A4 size paper and card size paper If originals are fed askew, check whether or not the scanned image is available.
Note:
☐ If originals are jammed or are not fed correctly, enabling Slow mode may improve feeding.
Alternatively, you can scan originals of different paper sizes and types by loading them one by one using Automatic Feeding Mode.
Placing a Mixture of Originals at Different Sizes
- Open the input tray and extend the input tray extension. Slide out the output tray, extend the output tray extension, and then raise the stopper.
Note:
If there are any thick originals amongst the originals, to stop the thick originals from bumping into the output tray and falling out, store the output tray and do not use it to stack the ejected originals.
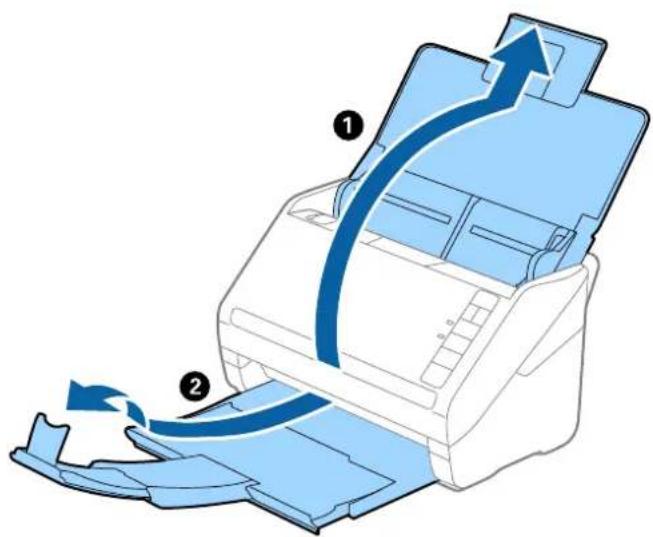
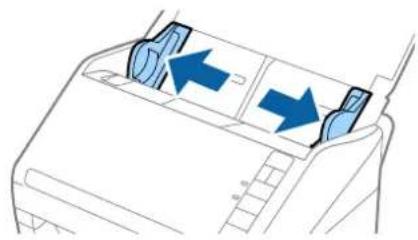
- Slide the edge guides on the input tray all the way out.
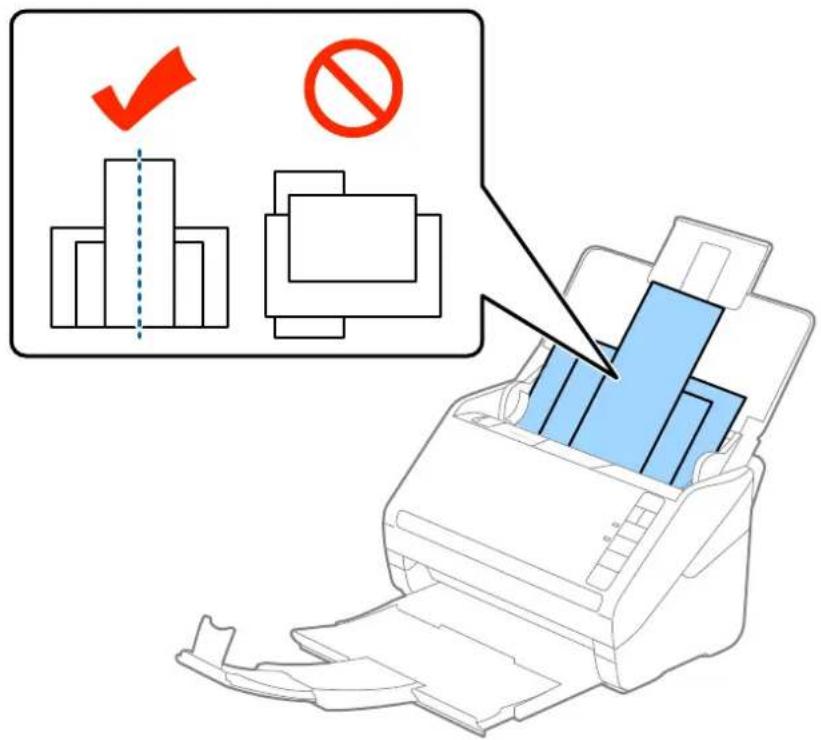
- Load the originals at the center of the input tray in descending order of paper size with the widest at the back and the narrowest at the front.
Note:
☐ Load the originals into the input tray facing down and slightly displace the top edges at an angle facing into the ADF. ☐ Slide the originals into the ADF until they meet resistance. ☐ You can stack the originals up to 8 mm (0.31 in.).
- Slide the edge guides to fit the edges of the widest original.

Related Information
→ “Scanning Different Sizes or Types of Originals One by One (Automatic Feeding Mode)” on page 90
Basic Scanning
Scanning Using a Scanner Button....6
Scanning from a Computer....62
Scanning Using a Scanner Button
You can scan using the button on your scanner.
Note:
☐ Make sure that Epson Scan 2 is installed on your computer and the scanner is connected to your computer correctly. ☐ When Document Capture Pro (Windows) or Document Capture (Mac OS) is installed on your computer, you can assign the job to a button on the scanner and run the job by pressing it.
- Place the original.
- Press the ◊ button.
Note:
See the Document Capture Pro (Windows) or Document Capture (Mac OS) help for details on button assignments.
Related Information
→ “Buttons” on page 20, “Application for Scanning Documents (Document Capture Pro / Document Capture)” on page 22, → “Placing Originals” on page 33, → “Setting a Job” on page 82, → “Assigning a Job to the Scanner Button (Windows)” on page 89
Scanning from a Computer
Scanning Using Document Capture Pro (Windows)
Document Capture Pro allows you to easily and efficiently digitize originals and forms to suit your needs.
The following functions are available with Document Capture Pro.
☐ You can manage and perform a set of operations, such as scanning and saving, as a "job". ☐ You can configure a "job" to save scanned images in various formats (PDF/BMP/JPEG/JPEG2000/TIFF/Multi-TIFF/PNG/DOCX/XLSX/PPTX). ☐ You can sort jobs automatically by inserting dividing paper between the originals or by using barcode information on the originals. ☐ You can output scanning information or items necessary for the scanned content as index data.
☐ You can set multiple destinations. ☐ You can scan using simple operations without having to create a job.
By using these functions, you can digitize paper documents more efficiently, such as scanning a large number of documents or using them over a network.
Note:
☐ For detailed information on how to use Document Capture Pro, refer to the following URL: https://support.epson.net/dcp/
☐ Document Capture Pro does not support Windows Server.
Related Information
→ “Application for Scanning Documents (Document Capture Pro / Document Capture)” on page 22, → “Placing Originals” on page 33, → “Setting a Resolution That Suits the Scanning Purpose” on page 79
What is a Job Scan?
By registering a series of frequently used operations as a job, you can execute these operations by simply selecting the job.
By assigning a job to the scanner's button, you can also execute the job from the control panel.
Performing a Job Scan
This section explains the workflow of scanning using an existing job.
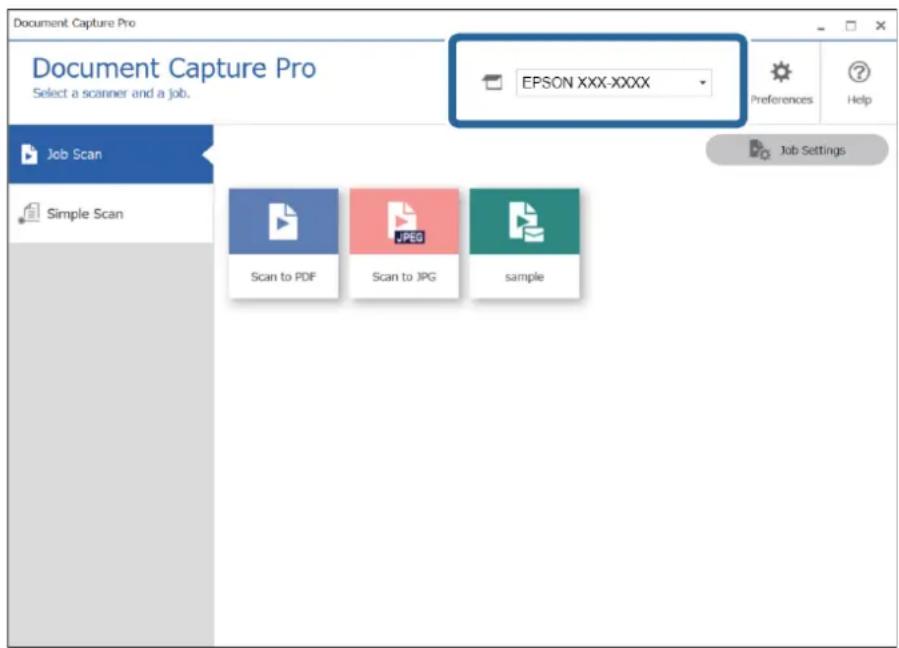
- Select the scanner you want to use from the Document Capture Pro top screen. When you start the software it automatically connects to the last scanner you used.
- Click the Job Scan tab, and then click the icon of the job you want to perform.
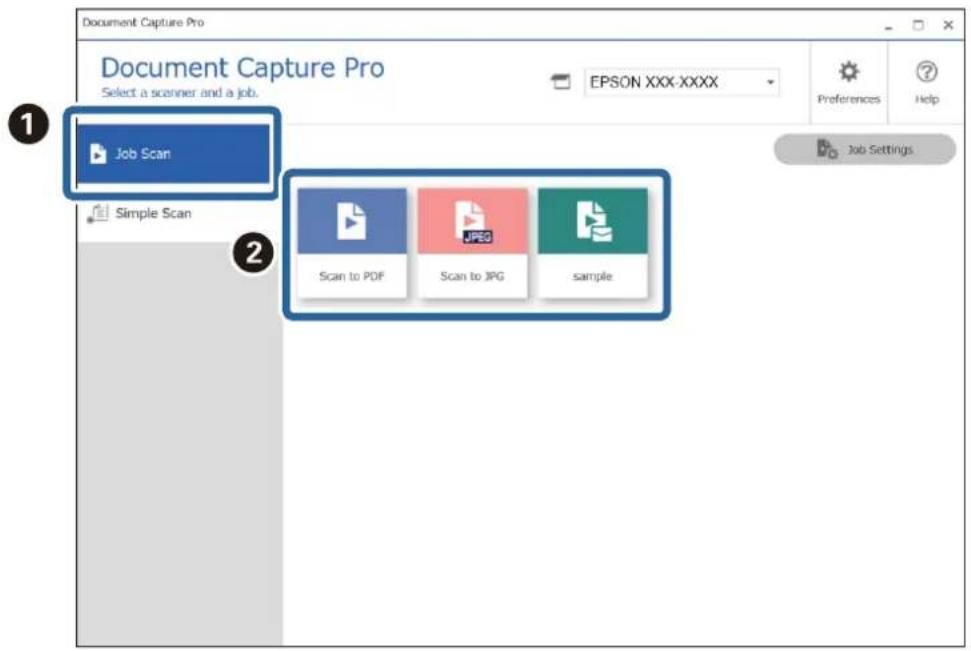
The selected job is performed.
When you perform a job for which Show the preview while scanning has been selected in the Scan Settings, a preview screen is displayed while scanning.
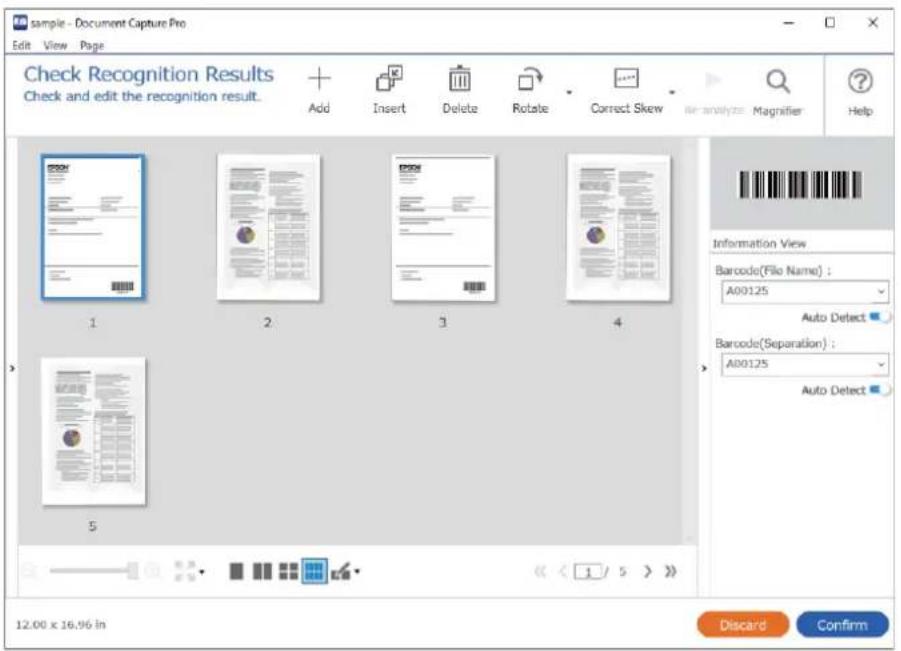
- If you execute a job that contains the following elements in the File Name Settings or Separation Settings from Save Settings, and the elements are detected in the scanned page, the detection area is displayed on the image as a marquee. Correct the recognition results manually if necessary, or change the area and run the recognition again.
OCR
Barcode
Form
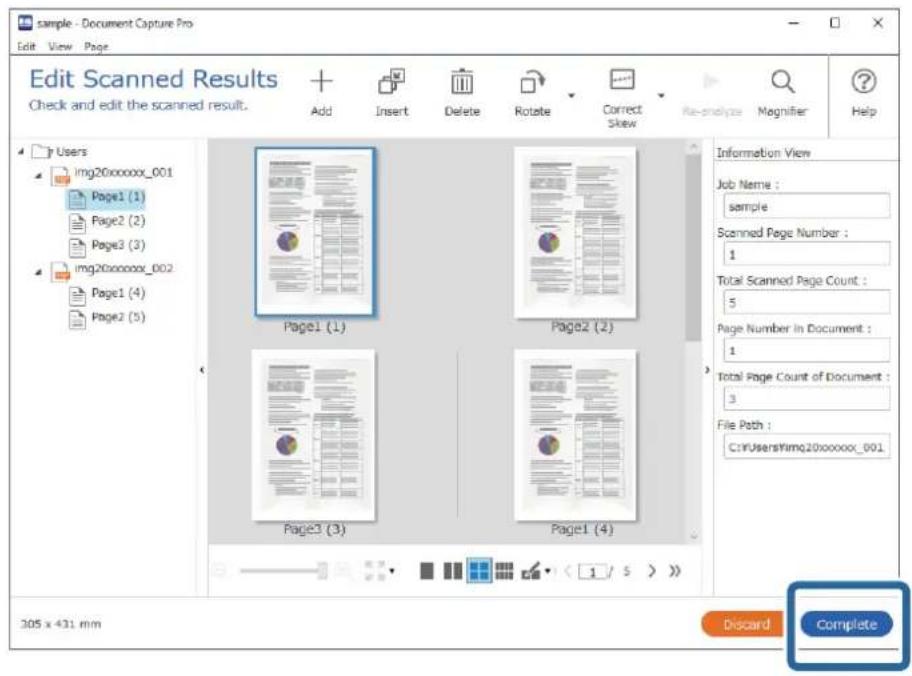
- For jobs for which Show Edit Page dialog before saving has been selected in the Scan Settings, check the scan results on the Edit Scanned Results screen after scanning, and then make edits as necessary.
You can check and edit the following on the Edit Scanned Results screen.
□Results of separation □Scanned images □Index data

- Click Complete to finish performing the Job Scan.
What is a Simple Scan?
You can scan documents without creating a job. Check the results after scanning, and then save or set the destination.
By assigning Simple Scan Settings to the scanner's button, you can also execute the Simple Scan from the control panel.
Performing a Simple Scan
This section explains the workflow of scanning without using a job.
- Select the scanner you want to use from the Document Capture Pro top screen. When you start the software it automatically connects to the last scanner you used.
![Document Capture Pro Select [SCAN] to start, and then select the save destination and save format. EPSON XXX-XXXX Job Scan Simple Scan Document Size: Auto Detect Scan Settings SCAN double-sided SCAN single-sided Start a scan. Make sure you place the originals in the scanner.](/content/2026/06/1398547/images/6c701d7afdcc2d88fc33ce207a039aeccf2691f156a14dea883180f3f63c25a7.jpg)
- Click the Simple Scan tab, select Document Size, and then click the SCAN double-sided or SCAN single-sided icon.
![Document Capture Pro Select [SCAN] to start, and then select the save destination and save format. EPSON XXX-XXXX Preferences Help Job Scan Simple Scan Document Size: Auto Detect Scan Settings 3 SCAN double-sided SCAN single-sided Start a scan. Make sure you place the originals in the scanner. Open…](/content/2026/06/1398547/images/b26d5c4f0781307f36dcf66fd169fa67c72886bf8d595de0f55add823f02039b.jpg)
Note:
Click Scan Settings to set the resolution. You can make more detailed settings from Epson Scan 2.
The image being scanned is displayed.
- Check the scan results on the Edit Scanned Results screen, make edits as necessary, and then click Next.
![Simple Scan - Document Capture Pro Edit View Page Edit Scanned Results Check and edit the scanned results, and then click [Next]. Add Insert Delete Rotate Correct Skew Re-analyze Magnifier Help 1 2 3 4 Discard Next 12.00 x 16.92 In](/content/2026/06/1398547/images/af6ee0a2bfbc612f5f73c8362da2efc72824ccc435231adbf10f71e37d093dc7.jpg)
- Select the destination for the scanned data on the Select Destination screen.
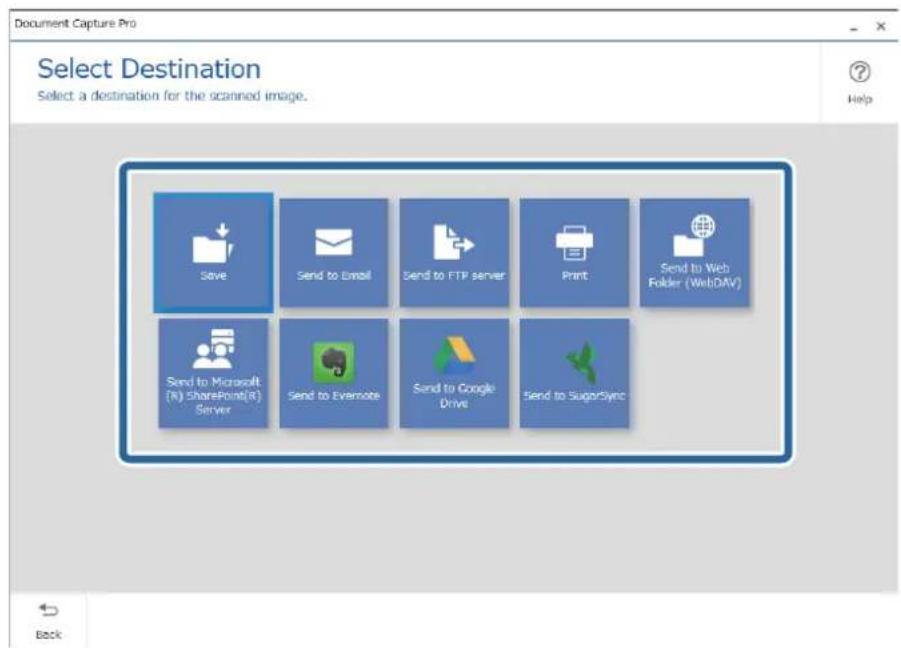
- Set the file you want to save and the save format on the Destination Settings screen. You can also make more detailed settings according to the destination.
Displayed items depend on the destination. The following screen is displayed when Save is selected.
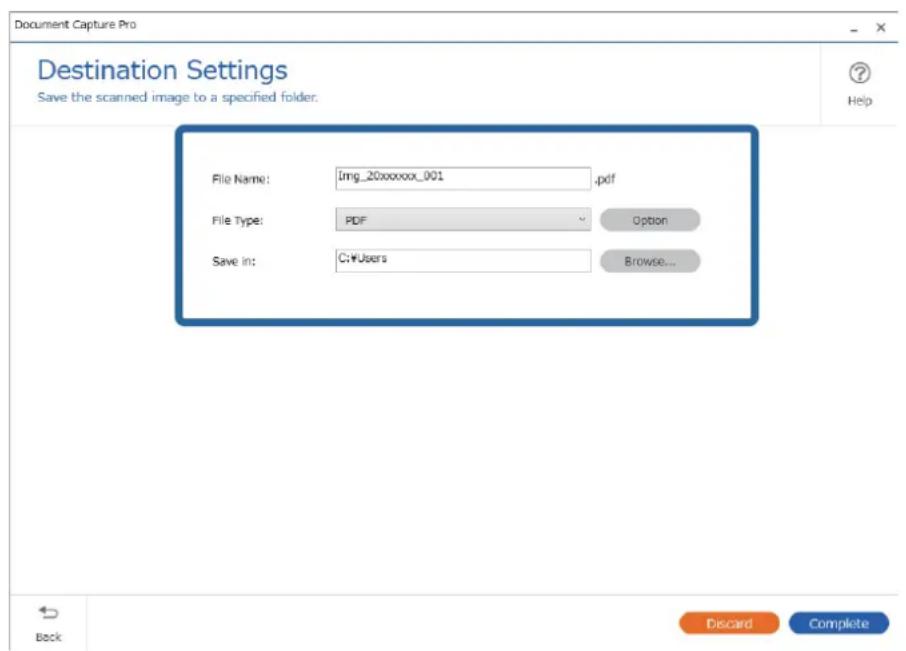
- Click Complete to finish performing the Simple Scan.
Scanning Using Document Capture (Mac OS)
This application allows you to perform various tasks such as saving the image to your computer, sending it by email, printing, and uploading to a server or a cloud service. You can also register scanning settings for a job to simplify scanning operations.
See the Document Capture help for details on the features.
Note:
Do not use the Fast User Switching function while using your scanner.
1. Start Document Capture.
Select Finder > Go > Applications > Epson Software > Document Capture.
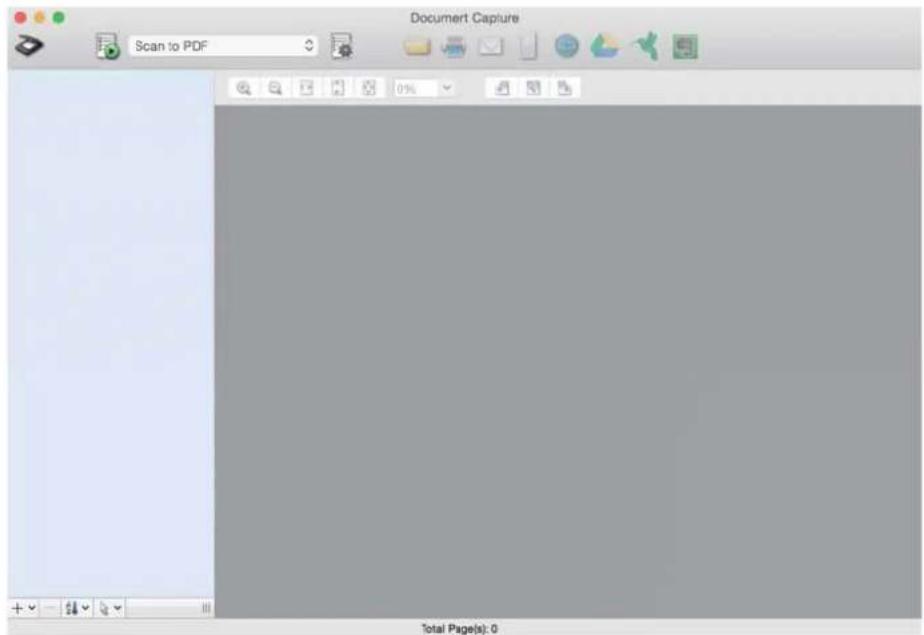
Note:
You may need to select the scanner you want to use from the scanners list.
2. Click
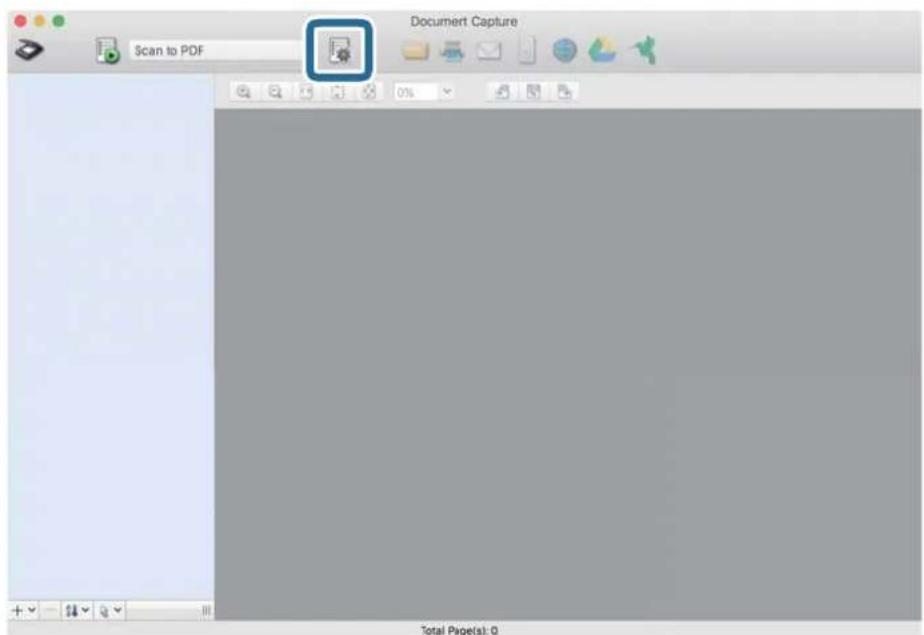
The Job List screen is displayed.
Note:
A preset job is available that allows you to save scanned images as a PDF. When using this job, skip this procedure and go to procedure 10.
3. Click the + icon.
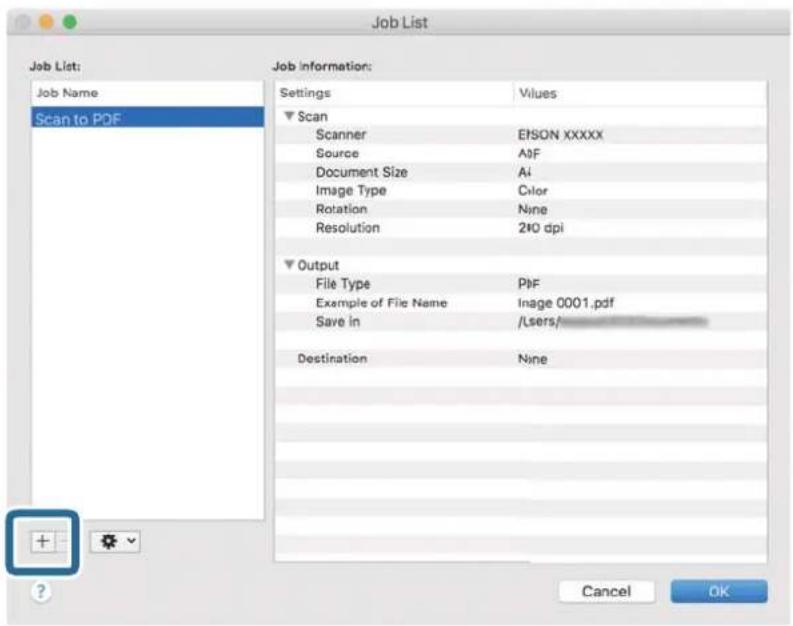
The job setting screen is displayed.
4. Set the Job Name.
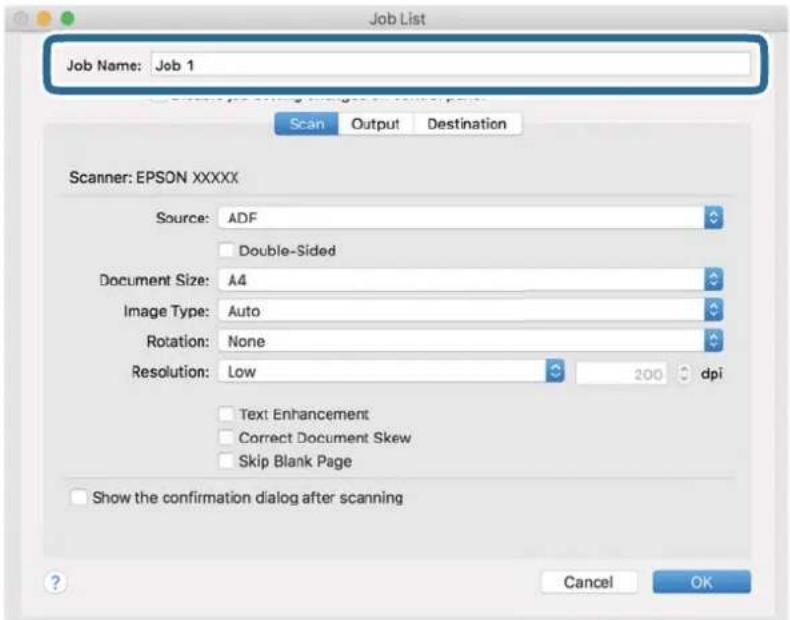
5. Make scanning settings on the Scan tab.

Source: Select the source where the original is placed. Select double-sided to scan both sides of the originals. Document Size: Select the size of the original you placed. Image Type: Select the color you want to use to save the scanned image. Rotation: Select the rotation angle depending on the original you want to scan. Resolution: Select the resolution.
Note:
You can also adjust the image using the following items.
Text Enhancement: Select to make blurred letters in the original clear and sharp. Correct Document Skew: Select to correct the slant of the original. Skip Blank Page: Select to skip blank pages if there are any in the originals.
- Click Output, and then make the output settings.
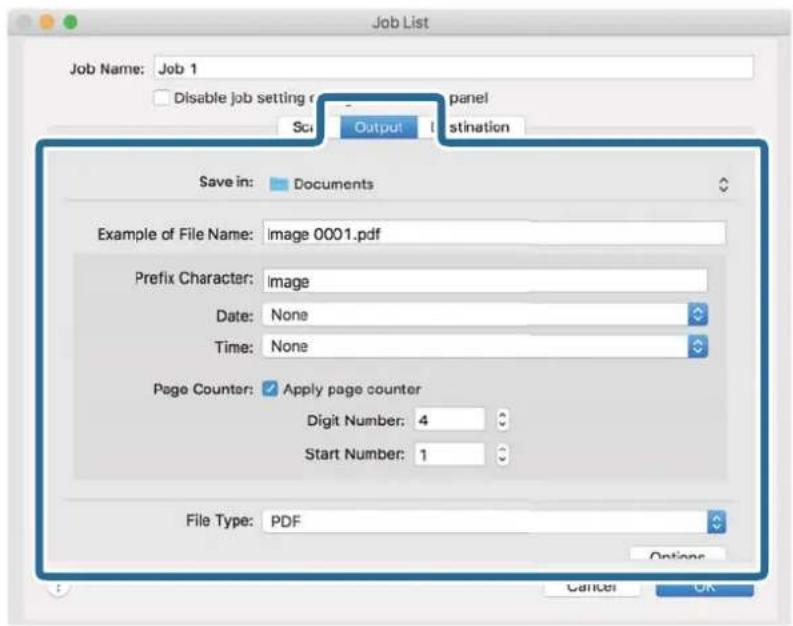
Save in: Select the save folder for the scanned image. Example of File Name: Display an example of the file name for the current settings. Prefix Character: Set a prefix for the file name. Date: Add the date to the file name. Time: Add the time to the file name. Page Counter: Add the page counter to the file name. File Type: Select the save format from the list. Click Options to make detailed settings for the file.
7. Click Destination, and then select the Destination.
Destination setting items are displayed according to the destination you selected. Make detailed settings as necessary. Click the ? (Help) icon for details on each item.
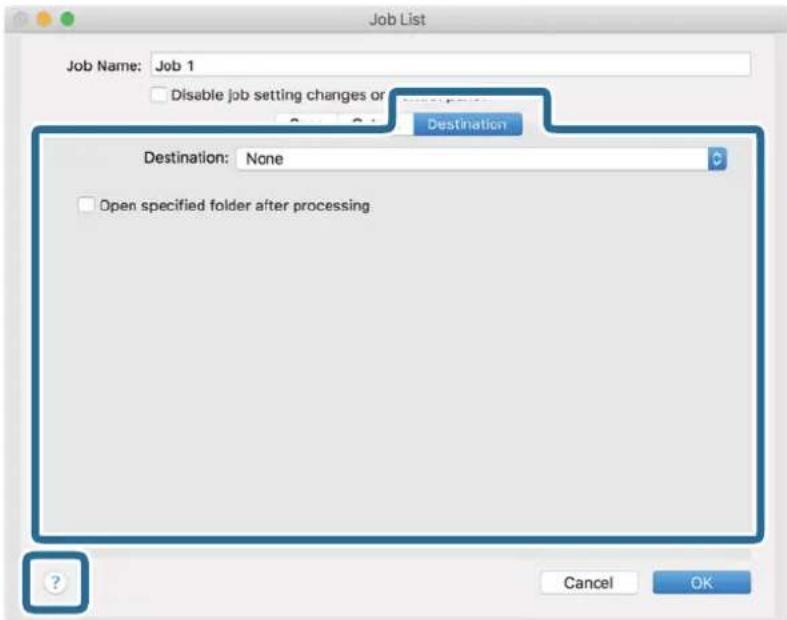
Note:
If you want to upload to a cloud service, you need to set up your account with the cloud service in advance. If you want to use Evernote as the destination, download the Evernote application from the Evernote Corporation Website and install it before using this feature.
- Click OK to close the job settings screen.
- Click OK to close the Job List screen.
- Place the original.
- Select the job from the pull-down list, and then click the icon.
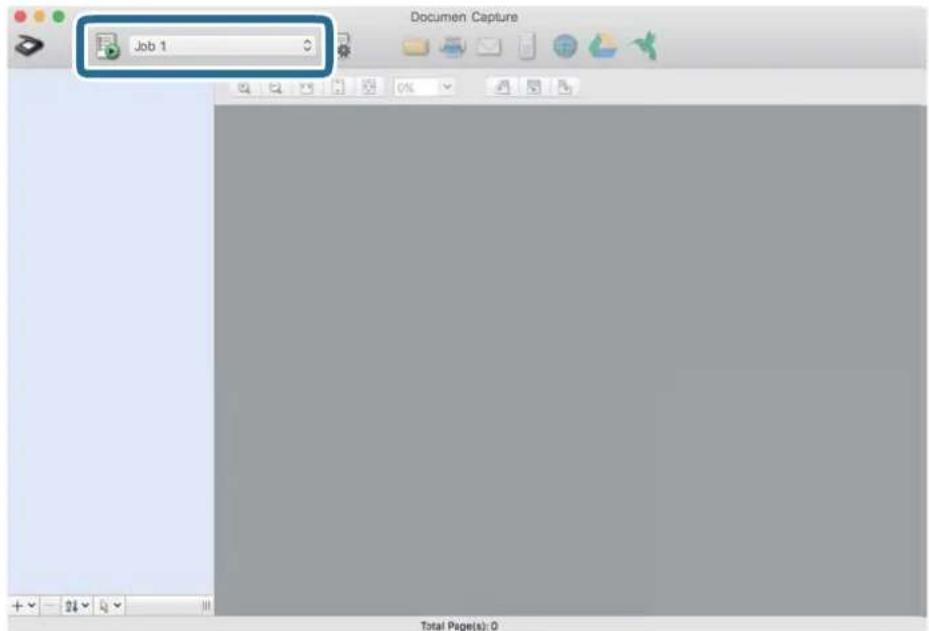
The selected job is performed.
- Follow the on-screen instructions.
The scanned image is saved using the settings you made for the job.
Note:
You can scan the originals and send the scanned image without using the job. Click ▶ and make scanning settings, and then click Preview Scan. Next, click the destination to which you want to send the scanned image.
Related Information
→ “Application for Scanning Documents (Document Capture Pro / Document Capture)” on page 22 → “Placing Originals” on page 33 → “Setting a Resolution That Suits the Scanning Purpose” on page 79
Scanning Using Epson Scan 2
You can scan the originals using detailed settings that are suitable for text documents.
- Place the original.
- Start Epson Scan 2.
Windows 10
Click the start button, and then select EPSON > Epson Scan 2.
Windows 8.1/Windows 8
Enter the application name in the search charm, and then select the displayed icon.
Windows 7/Windows Vista/Windows XP
Click the start button, and then select All Programs or Programs > EPSON > Epson Scan 2 > Epson Scan 2.
Mac OS
Select Go > Applications > Epson Software > Epson Scan 2.
- Make the following settings on the Main Settings tab.
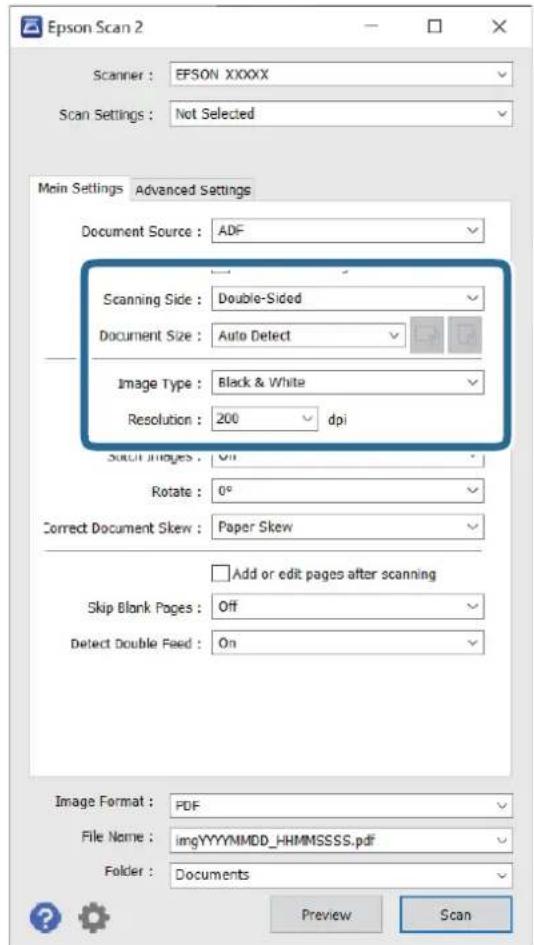
Scanning Side: Select the side of the original you want to scan. Select Double-Sided to scan both sides of the originals.
Document Size: Select the size of the original you placed.

(Original orientation) buttons: Select the set orientation of the original you placed. Depending on the size of the original, this item may be set automatically and cannot be changed.
Image Type: Select the color for saving the scanned image.
Resolution: Select the resolution.
Note:
ADF is set as the Document Source automatically. On the Main Settings tab, you can also make the following settings.
Stitch Images: Select to stitch the images on the front and rear when scanning both sides of the original. Rotate: Select to rotate the original clockwise and scan it. Correct Document Skew: Select to correct the slant of the original. Add or edit pages after scanning: Select to add different originals or edit (rotate, move, and delete) the scanned pages after scanning. Skip Blank Pages: Select to skip blank pages if there are any in the originals. Detect Double Feed: Select to display a warning when multiple originals are fed at the same time.
- Make other scan settings if necessary.
You can preview the scanned image of the first side of the first page of the originals. Load only the first page of your originals into the input tray and click the Preview button. The preview window opens, the previewed image is displayed, and the page is ejected from the scanner.
Replace the ejected page together with the rest of the originals.
On the Advanced Settings tab, you can make image adjustments using detailed settings which are suitable for text documents, such as the following.
Remove Background: Select to remove the background from the originals. Text Enhancement: Select to make blurred letters in the original clear and sharp. Auto Area Segmentation: Select to make letters clear and images smooth when performing black and white scanning for a document that contains images. Dropout: Select to remove the color specified from the scanned image, and then save it in grayscale or black and white. For example, you can erase marks or notes you wrote in the margins with color pen when scanning. Color Enhance: Select to enhance the color specified for the scanned image, and then save it in grayscale or black and white. For example, you can enhance letters or lines that are in light colors.
Note:
Some items may not be available depending on other settings you made.
5. Set the file saving settings.

Image Format: Select the save format from the list.
You can make detailed settings for each save format except BITMAP and PNG. After selecting the save format, select Options from the list.
☐ File Name: Check the save file name displayed.
You can change settings for file name by selecting Settings from the list.
☐ Folder: Select the save folder for the scanned image from the list.
You can select other folder or create a new folder by selecting Select from the list.
6. Click Scan.
Note:
☐ You can also start scanning by pressing the ◆ button on the scanner.
☐ To scan originals that are likely to jam, for example thin paper, enable Slow mode by pressing the ▶ button to slow down the feeding speed.
Pressing the ▶ (Slow Mode) button once slows down the paper feeding speed; press it again to return to normal speed.
The scanned image is saved to the folder you specified.
Related Information
→ “Application for Controlling the Scanner (Epson Scan 2)” on page 23 → “Placing Originals” on page 33 → “Setting a Resolution That Suits the Scanning Purpose” on page 79 → “Setting the Document Protection Feature” on page 132 → “Setting the Glass Surface Stain Detection Feature” on page 131 → “Setting the Operation When a Double-Feed is Detected” on page 133
Required Settings for Special Originals in Epson Scan 2 Window
You need to set certain items on the Main Settings tab in Epson Scan 2 window when scanning special originals. When you are using Document Capture Pro, you can open the window by pressing the Detailed Settings button on the Scan Settings screen.
| Type of Original Required Settings | |
| Envelopes | Select Off in Detect Double Feed. |
| Plastic cards | Select Plastic Card on the Document Size list, or select Off in Detect Double Feed. |
| Carrier Sheet | If you select Auto Detect from the Document Size list, paper skew in the original is automatically corrected even if you select Off in Correct Document Skew.If you select a other size than Auto Detect from the Document Size list, you can only use Contents Skew when using Correct Document Skew.Paper Skew is not applied when this is selected. When you select Paper and Contents Skew, only contents skew is corrected. |
| Large size originals | If the size of the original you want to scan is not on the Document Size list, select Customize to open the Document Size Settings window. Next, create the size manually on the window. |
| Long paper | If the size is not listed on the Document Size list, select Auto Detect (Long Paper) or select Customize to create a custom document size. |
| Laminated cards | To scan transparent areas around the edges, select Customize on the Document Size list to open the Document Size Settings window. Next, select Scan laminated card in the window.Note:The appropriate effect may not be achieved depending on the original. If transparent areas around the edges are not scanned, select Customize from the Document Size list, and then create the size manually. |
Related Information
→“Placing Originals” on page 33
Setting a Resolution That Suits the Scanning Purpose
Advantages and Disadvantages of Increasing the Resolution
Resolution indicates the number of pixels (smallest area of an image) for each inch (25.4 mm), and is measured in dpi (dots per inch). The advantage of increasing the resolution is that the details in the image become fine. The disadvantage is that the file size becomes large.
☐File size becomes large
(When you double the resolution, the file size becomes about four times larger.)
☐Scanning, saving, and reading the image takes a long time ☐Sending and receiving emails or faxes takes a long time ☐The image becomes too large to fit the display or print on the paper
List of Recommended Resolutions to Suit Your Purpose
See the table and set the appropriate resolution for the purpose of your scanned image.
| Purpose Resolution (Reference) | |
| Displaying on a screenSending by email | Up to 200 dpi |
| Using Optical Character Recognition (OCR)Creating a text searchable PDF | 200 to 300 dpi |
| Printing using a printerSending by fax | 200 to 300 dpi |
Advanced Scanning
Setting a Job 82
Scanning Different Sizes or Types of Originals One by One (Automatic Feeding Mode) 90
Various Scanning Settings for Document Capture Pro (for Windows)
Setting a Job
You can register a set of operations, such as Scan-Save-Send, as a "job".
By registering a series of operations in advance as a job using Document Capture Pro (Windows) or Document Capture (Mac OS), you can perform all of the operations by simply selecting the job.
![graph LR A["Laptop with Document Capture PRO"] --> B["Printer"] B --> C["Printer with @, cloud, document"] B --> D["Printer with A, B, C, D"]](/content/2026/06/1398547/images/9f8e98f712ceac8ba951e6e372ef1e2aa2c50f2e5a50c14fe6d0a8250e7f3ea2.jpg)
Creating and Registering a Job (Windows)
Explains how to set a job in Document Capture Pro. See the Document Capture Pro help for details on the features.
https://support.epson.net/dcp/
- Start Document Capture Pro.
- Click Job Settings on the Job Scan screen.
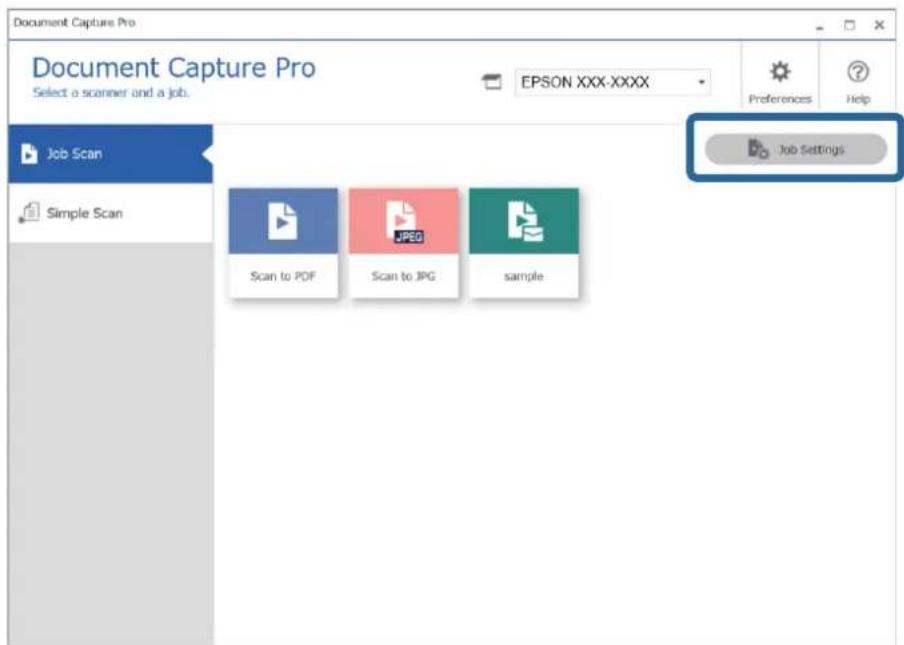
3. Click New Job.
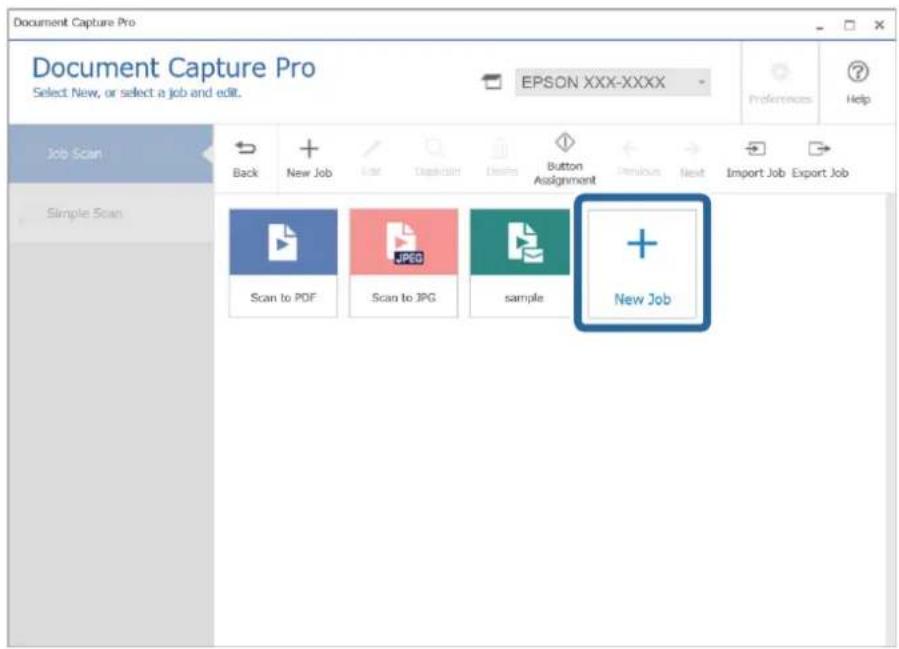
Note:
To create a new job based on another job, click the job you want to use as the base, and then click Duplicate.
The Job Settings window is displayed.
4. Enter a Job Name.
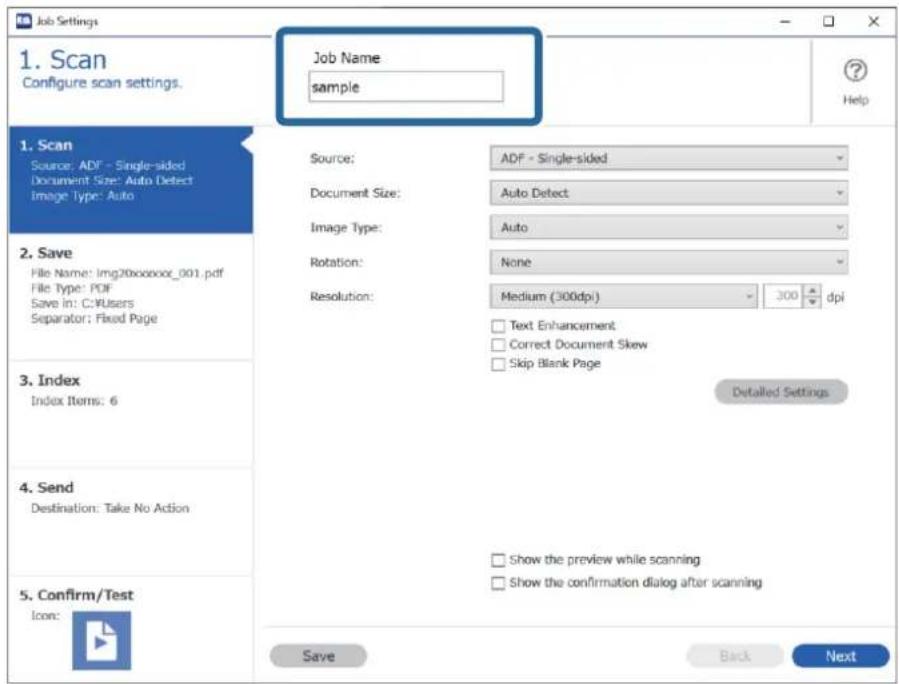
- On the 1. Scan tab, set the scan job operations you want to create.
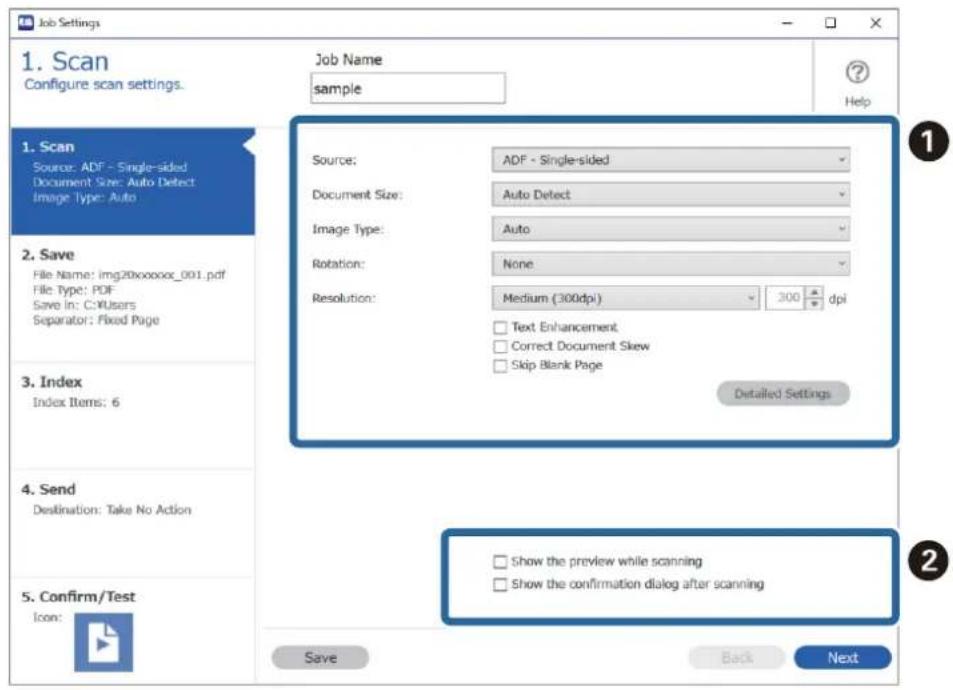
☐ Make basic scanning settings.
To make more advanced settings, click Detailed Settings to open the settings screen. Change the scan operation and click Save to return to the Document Capture Pro screen.
② Change the settings as necessary.
Select Show the preview while scanning to display images while scanning.
Select Show the confirmation dialog after scanning to display a confirmation message asking if you want to continue scanning after completing a scan.
When you have finished making scanning settings, click Next or the 2. Save tab.
- On the 2. Save tab, you can make settings for saving the scan results.
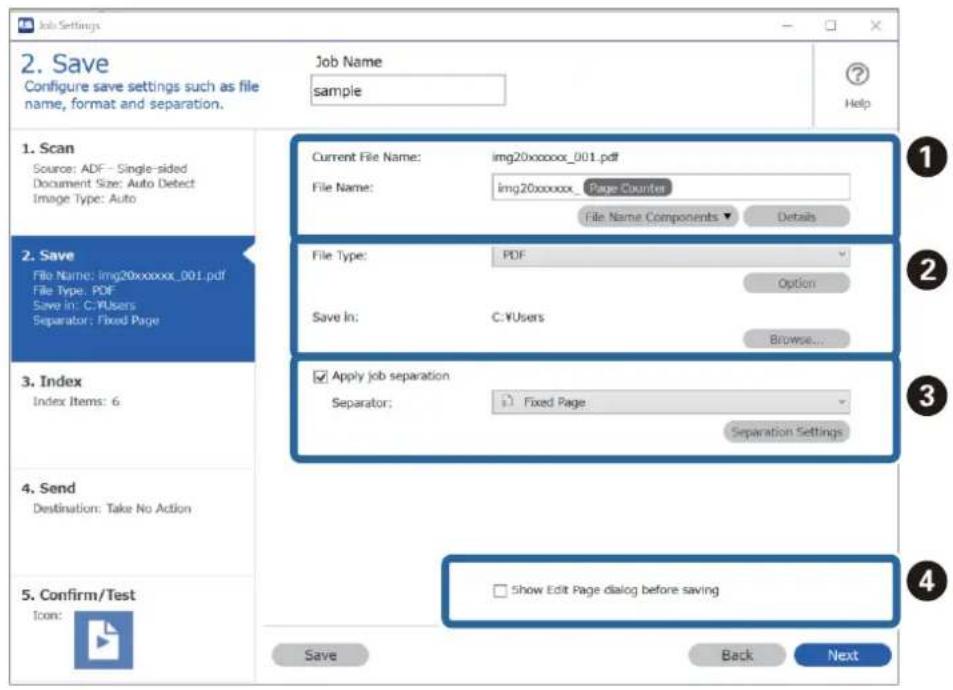
Set the name of the file.
When you select a component you want to use for the file name from File Name Components, it is added to the file name. You can also enter a name directly in File Name.
If you want to add barcodes, OCR, and forms, you need to make settings in advance. Click Detailed Settings.
You can also change the Time Stamp and Page Counter format from Detailed Settings.
② Set the file save format and location.
Option may be enabled depending on the File Type; click to make detailed settings.
③ When you want to separate jobs, select this to choose the separation method, and then select Separation Settings to make detailed settings.
④ Change the settings as necessary.
When you select Show Edit Page dialog before saving, you can make edits on the Edit Scanned Results screen after scanning.
When you have finished making save settings, click Next or the 3. Index tab.
7. You can make index file settings on the 3. Index tab.
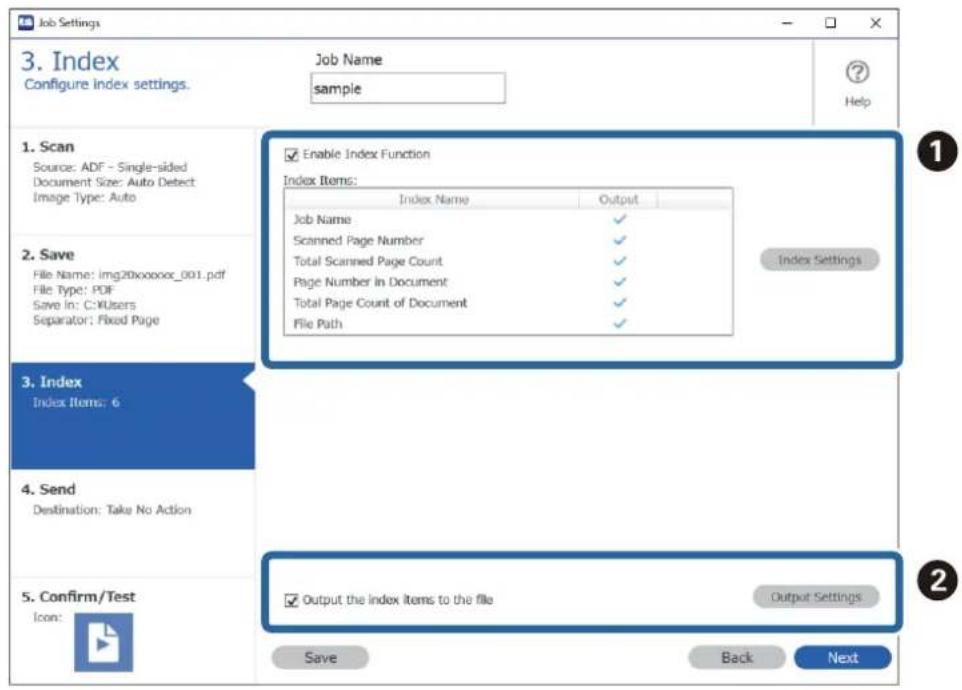
☐ ① When creating an index file, select Enable Index Function.
Click Index Settings and select the items you want to use for the index.
☐ ② Select Output the index items to the file, and then click Output Settings to set the output items and file name used when outputting to a file.
When you have finished making index settings, click Next or the 4. Send tab.
- Set the destination settings on the 4. Send tab.
When Destination is selected, setting items are displayed according to the send destination.

When you have finished making transfer settings, click Next or the 5. Confirm/Test tab.
- Check the settings on the 5. Confirm/Test tab, and then perform a test scan.
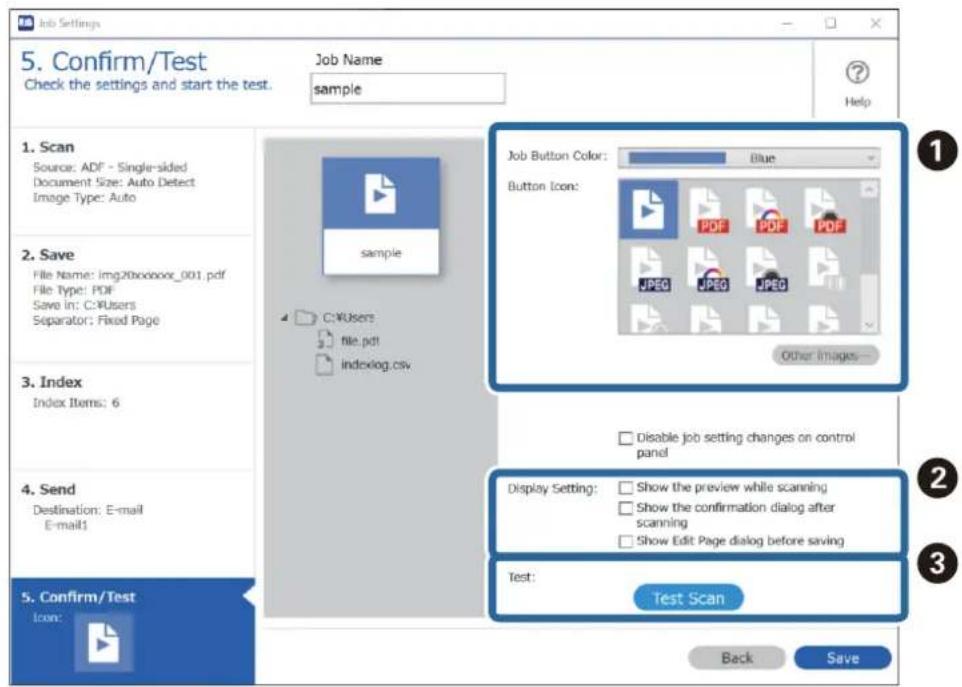
☐ ① Change the job button color or icon. ☐ ② Change the display settings used during and after scanning.
☐ Perform a test scan using the job that is currently set.
- Click Save to finish creating the job.
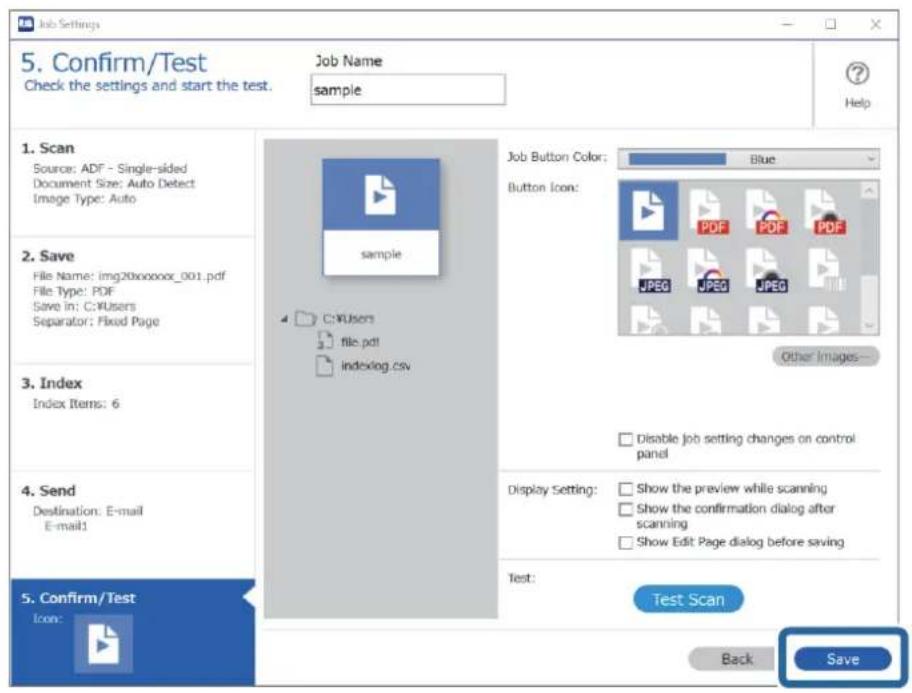
If you go on to create a new job, make edits, duplicate, delete, and so on, continue to make settings. To finish making job settings, click the Back button on the left of the toolbar to return the job screen.
Related Information
→ “Scanning Using a Scanner Button” on page 62
Creating and Registering a Job (Mac OS)
Explains how to set a job in Document Capture. See the Document Capture help for details on the features.
- Start Document Capture.
- Click the icon on the main window.
The Job List window is displayed.
- Click the + icon.
The Job Settings window is displayed.
- Make the job settings on the Job Settings window.
☐ Job Name: Enter the name of the job you want to register.
☐ Scan: Make scan settings such as the size of the originals or the resolution.
☐ Output: Set the saving destination, the saving format, the naming rules of the files, and so on.
☐ Destination: Select the destination of the scanned images. You can send them by email or forward them to an FTP server or Web server.
- Click OK to return to the Job List window. The created job is registered in the Job List.
- Click OK to return to the main window.
Related Information
→“Scanning Using a Scanner Button” on page 62
Assigning a Job to the Scanner Button (Windows)
You can assign a job to the scanner's button, and run the job by pressing the button.
- Start Document Capture Pro.
- Click Job Settings > Button Assignment on the Job Scan screen.
- Click the job name to select the job you want to assign from the pull-down menu.
- Click OK to close the Button Assignment screen.
- Click Back.
Assigning a Job to the Scanner Button (Mac OS)
You can assign a job to the scanner's button, and run the job by pressing the button.
- Start Document Capture.
- Click the (Manage Job) icon on the main window. The Job Management window is displayed.
- Click the ⚙️ icon at the bottom of the screen.
- Click OK on the Job Management window. The job is assigned to the scanner button.
- Click the job name to select the job you want to assign from the pull-down menu.
Scanning Different Sizes or Types of Originals One by One (Automatic Feeding Mode)
You can scan different sizes or types of originals one by one using Automatic Feeding Mode. In this mode, the scanner starts scanning automatically when originals are loaded in the ADF.
When using Document Capture Pro, you can use Automatic Feeding Mode in your job.
- Start Epson Scan 2.
Note:
When you are using Document Capture Pro, you can open the Epson Scan 2 window by pressing the Detailed Settings button on the Scan Settings screen.
- Select Automatic Feeding Mode on the Main Settings tab.

- Make other settings for scanning on the Epson Scan 2 main window.
- Click Scan.
Note:
When using Document Capture Pro, click Save to save the scan settings. When you start scanning, Automatic Feeding Mode will start.
Automatic Feeding Mode starts.
The light on the scanner turns on, and the Automatic Feeding Mode window is displayed on your computer.
![Automatic Feeding Mode Scanner is in Automatic Feeding Mode. Scanning starts when original is placed in the ADF. Load originals after adjusting edge guides. Automatic Feeding Mode ends when you click the [Finish] button or when timeout occurs. Finish](/content/2026/06/1398547/images/a6582b3577bfc36bad80037e817ca183b478056f0993188873aeec3b534d9ff0.jpg)
- Adjust the edge guides, and then place the original in the ADF.
Scanning starts automatically.
- After scanning stops, place the next original in the ADF.
Repeat this procedure until you have scanned all originals.
Note:
If you want to scan originals that are detected as double feeds, for example plastic cards or envelopes, press the ≡ (Double Feed Detection Skip) button before placing the original to skip double feed detection. If you want to scan originals that are likely to jam, for example thin paper, press the ▶ (Slow Mode) button before placing the original to slow down the scanning speed.
- After you have scanned all originals, close Automatic Feeding Mode.
Press the Ⓤ button on the scanner or press Finish on the Automatic Feeding Mode window displayed on your computer.
Note:
You can make timeout settings to finish Automatic Feeding Mode.
Select Settings on the Document Source list to open the Document Source Settings window. Set Automatic Feeding Mode Timeout (seconds) on the window.
The scanned image is saved to the folder you specified.
Related Information
→“Placing Originals” on page 33
Various Scanning Settings for Document Capture Pro (for Windows Only)
Document Capture Pro allows you to easily scan and save documents such as official reports and forms, by using the optimum settings to suit your needs. This section explains how to make settings for jobs that use convenient functions such as sorting.
Note:
This chapter explains the Document Capture Pro feature on Windows. When you using Document Capture on Mac OS, see the software help for details.
Related Information
→“Dividing documents using a specified number of pages” on page 92 →“Dividing documents using blank sheets of paper” on page 95 → "Creating and saving folders using the barcode character information" on page 99 →“Creating two levels of folders using two types of barcode” on page 103 → "Saving files with file names using the barcode character information" on page 107 →“Creating and saving folders using OCR characters” on page 112 →“Saving files with file names using OCR characters” on page 117 →“Creating and saving folders for each form” on page 124
Dividing documents using a specified number of pages
You can divide data based on a specified number of pages scanned, and save in a file or folder.
This section explains the job settings for "Dividing a document every three pages and saving as PDF files".
![graph TD A["1 XXX"] --> D["PDF"] B["2 XXX"] --> D["PDF"] C["3 XXX"] --> D["PDF"] E["4 XXX"] --> F["PDF"] G["5 XXX"] --> F["PDF"] H["6 XXX"] --> F["PDF"] D --> I["001.pdf"] F --> J["002.pdf"] I --> K["1 XXX"] I --> L["2 XXX"] I --> M["3 XXX"] J --> N["4 XXX"] J --> O["5 XXX"] J --> P["6 XXX"]](/content/2026/06/1398547/images/045e5fd243465d2b162540c0d52a1a7ef3b23857c25e39d79a8f4f1ff46929c7.jpg)
- Display the Job Settings screen, and then click the 2. Save tab.
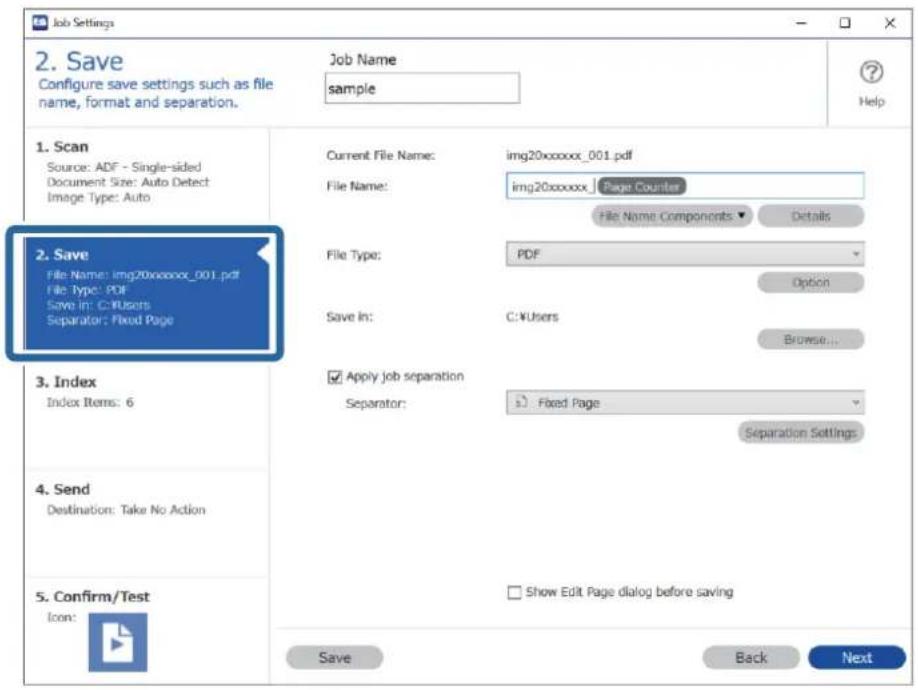
- Set File Type to PDF.
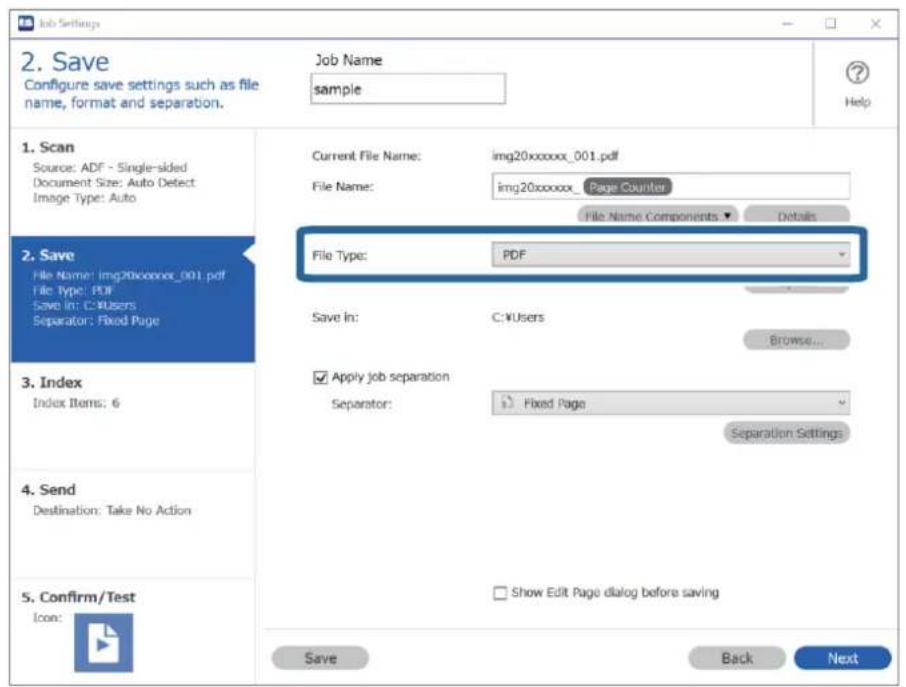
- Select Apply job separation, set Separator to Fixed Page, and then click Separation Settings.
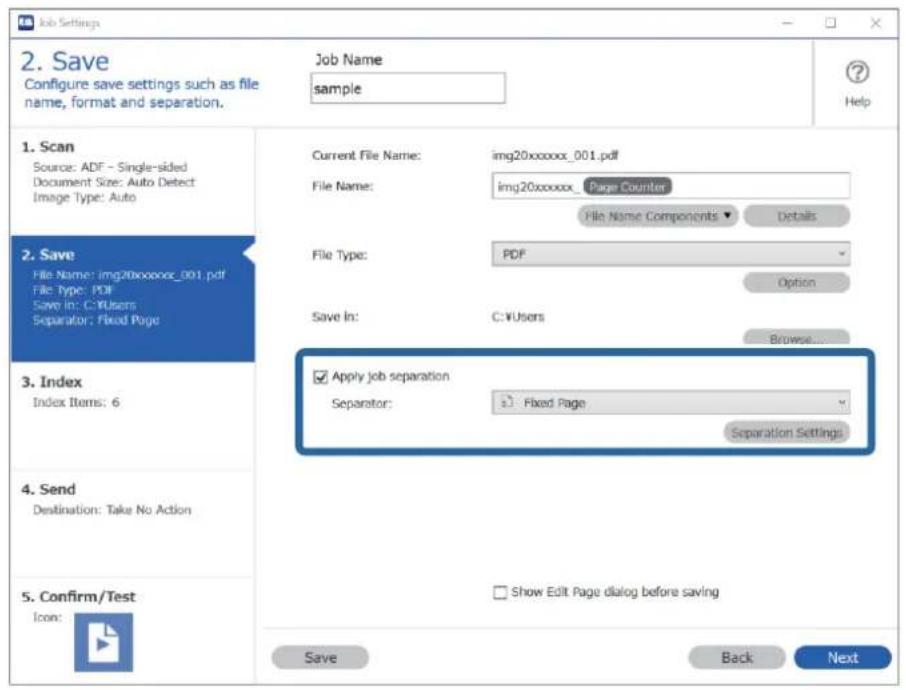
- On the Job Separation Settings screen, set the number of pages at which you want to divide the document. For example, when you specify "3", the document is divided after scanning every three pages.
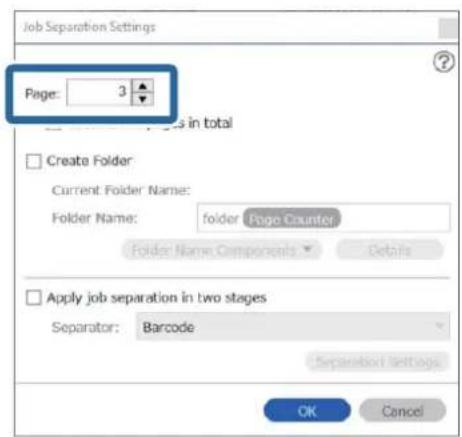
Note:
Since there are no save formats (image files such as JPEGs) that support multiple pages, you cannot create multi-page files. When Create Folder is selected, the document is divided at the page number you specified (number of files), and then saved to a folder.
![graph TD A["1 XXX"] --> B["2 XXX"] B --> C["3 XXX"] C --> D["4 XXX"] D --> E["5 XXX"] E --> F["6 XXX"] subgraph Panel 1 G["文件名: XXX"] H["日期: 0"] I["状态: 0"] end subgraph Panel 2 J["文件名: XXX"] K["日期: 0"] L["状态: 0"] end subgraph Panel 3 M["文件名: XXX"] N["日期: 0"] O["状态: 0"] end subgraph Panel 4 P["文件名: X…](/content/2026/06/1398547/images/c9c33c07028d84a5707a6a2f7e13e399bcc53c38c3f5f630a568412dae1b743d.jpg)
Related Information
→“Placing Originals” on page 33 →“Scanning Using Document Capture Pro (Windows)” on page 62
Dividing documents using blank sheets of paper
By placing blank sheets of paper between the pages of the document being scanned, you can divide the scanned data and save them in separate files or folders. When scanning both sides of a document, if one of the sides is blank, it is also detected as a blank page. After sorting, you can remove any unnecessary pages and then save.
This section explains the job settings for "Dividing a document using blank pages, and saving as PDF files" when a blank page is placed between the third and fourth pieces of paper.
![graph TD A["1 XXX"] --> D["PDF"] B["2 XXX"] --> D["PDF"] C["3 XXX"] --> D["PDF"] E["4 XXX"] --> F["PDF"] G["5 XXX"] --> F["PDF"] D --> H["001.pdf"] F --> I["002.pdf"] H --> J["1 XXX"] H --> K["2 XXX"] H --> L["3 XXX"] I --> M["4 XXX"] I --> N["5 XXX"]](/content/2026/06/1398547/images/9e628871844a513b135a4a620f1aef4e210c23f16899c7158b48097095bdb3cd.jpg)
- Display the Job Settings screen, and then click the 2. Save tab.
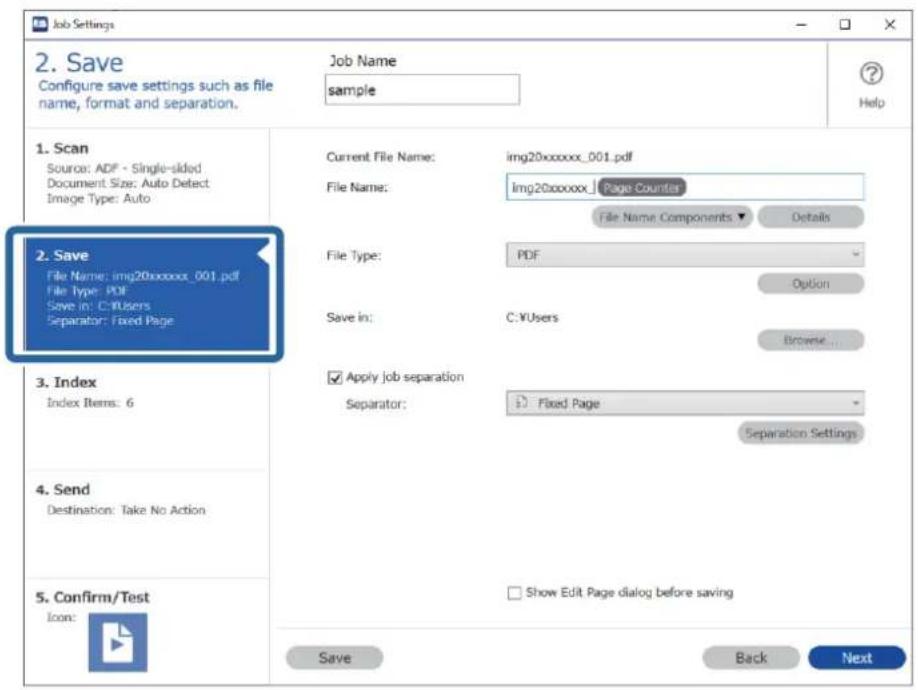
2. Set File Type to PDF.
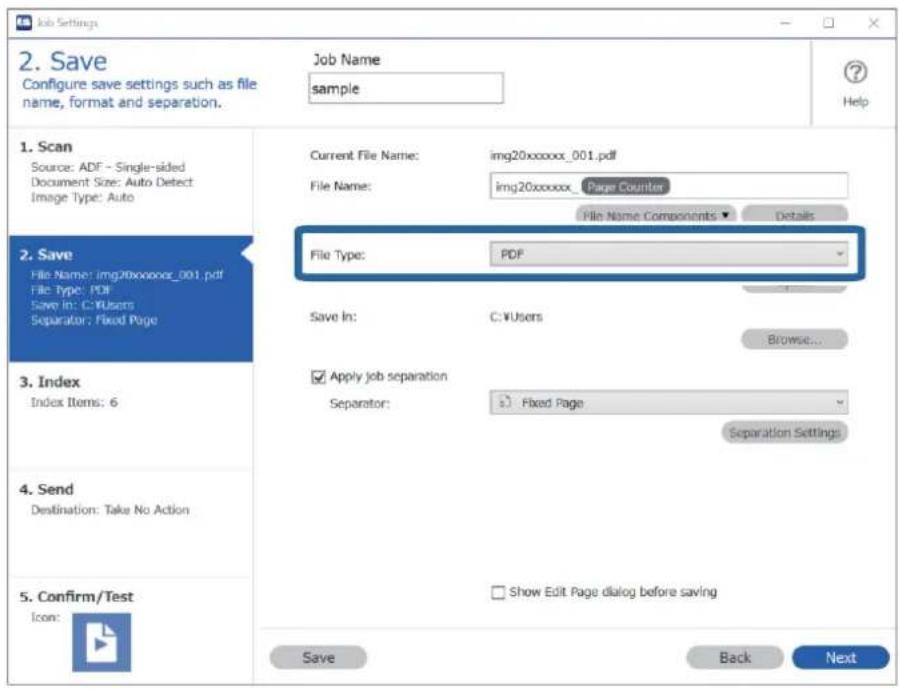
3. Select Apply job separation, set Separator to Blank Page, and then click Separation Settings.
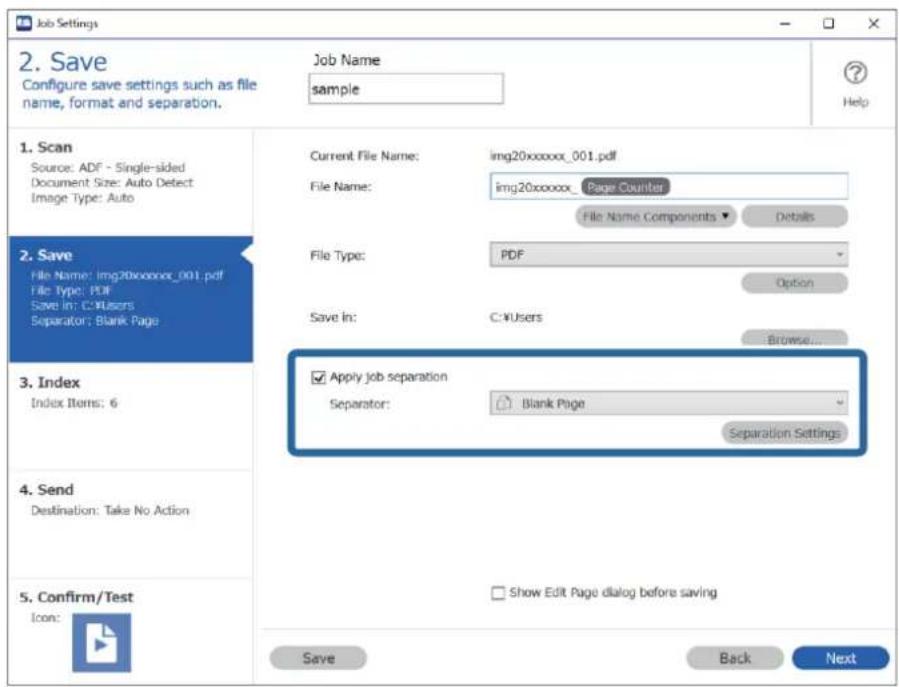
- On the Job Separation Settings screen, select Delete a page for separator.
Blank pages are removed after sorting.
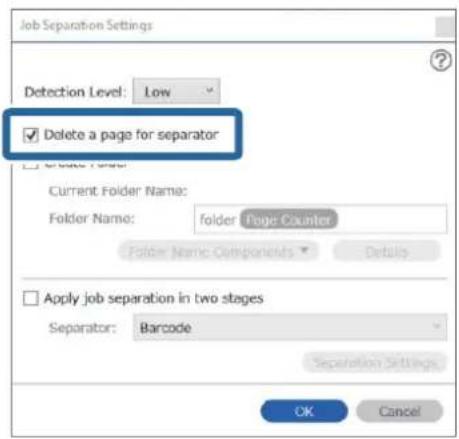
Note:
☐ If you also need to save the blank pages, clear Delete a page for separator. However, the first page of each separated file will be blank.
![graph TD A["1 XXX"] --> D["PDF"] B["2 XXX"] --> D["PDF"] C["3 XXX"] --> D["PDF"] E["4 XXX"] --> F["PDF"] G["5 XXX"] --> F["PDF"] D --> H["001.pdf"] F --> I["002.pdf"] H --> J["1 XXX"] H --> K["2 XXX"] H --> L["3 XXX"] I --> M["4 XXX"] I --> N["5 XXX"]](/content/2026/06/1398547/images/c7bbd2814c20266d11c02f3d6421ec98193ba5992efd0e20c0b36bc26ab8b1d2.jpg)
☐ In Detection Level, you can select the detection level from High, Medium, or Low. When the level is high, light color documents and documents with show through are detected as blank pages.
☐ When the Source is set to Double-sided from Scan Settings, the Include the back page during duplex scanning item is displayed. When this is selected, you can also divide by using the back of a page if it is blank when scanning both sides of a document.
Related Information
→“Placing Originals” on page 33 →“Scanning Using Document Capture Pro (Windows)” on page 62
Creating and saving folders using the barcode character information
Using the barcode information, you can divide files by each page on which a barcode is detected, and you can create and save folders using the text information in the barcode.
This section explains the job settings for "Sorting by barcode, and saving folder names using the text information in the barcode".
![graph TD A["XXXXXXX A00125"] --> B["PDF 001.pdf"] C["XXXXXXX A00125"] --> D["PDF 002.pdf"] E["XXXXXXX B00378"] --> F["PDF 003.pdf"] G["B00378 Folder"] --> H["Yellow Folder"] B --> I["A00125 Folder"] D --> J["A00125 Folder"] F --> K["A00125 Folder"] H --> L["B00378 Folder"]](/content/2026/06/1398547/images/6e9fdc4d32a412b295f33f1251df52dcf2b1eba617d9d735669557e806c2b6d3.jpg)
- Display the Job Settings screen, and then click the 2. Save tab.

- Select Apply job separation, set Separator to Barcode, and then click Separation Settings.
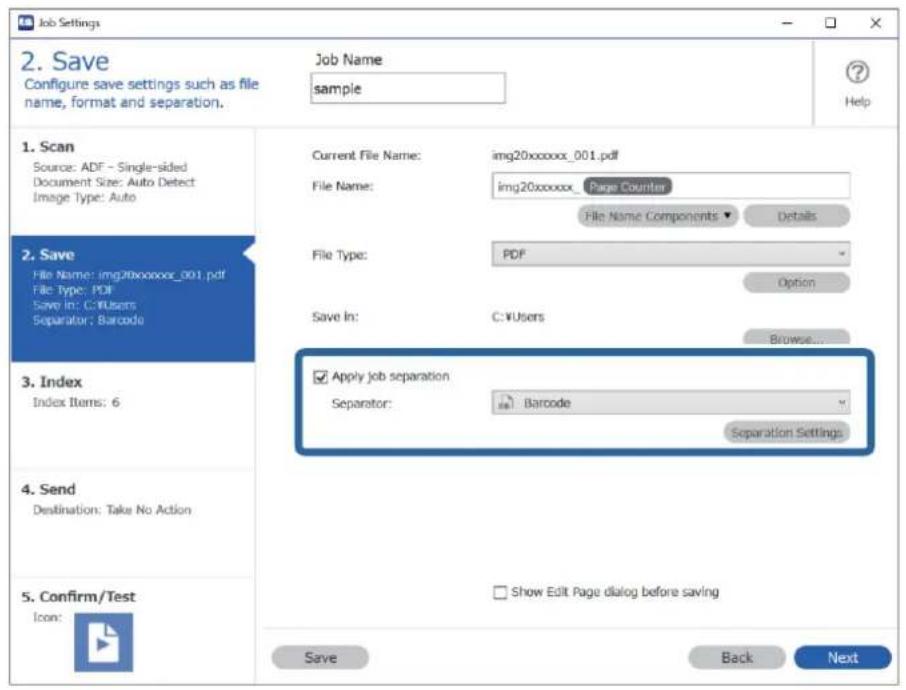
- On the Job Separation Settings screen, select the type of barcode you want to use. To select individual barcode types, clear All Barcode Type.
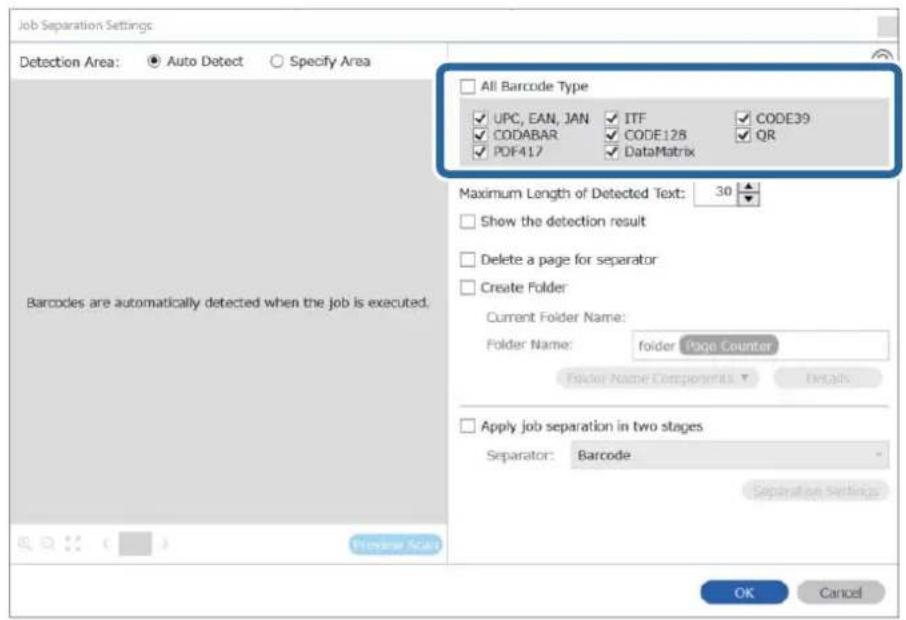
- Check Create Folder, select Barcode from Folder Name Components.

Note:
You can specify the point at which the Folder Name Components will be inserted with your cursor.
You can also drag and drop added items to change the order.
To delete added items, select the added item and delete it using the Delete key on your keyboard.
When using a 2D barcode that has a large number of informational items, make sure you specify the maximum length of text that can be detected in Maximum Length of Detected Text.
If you do not need to save the pages with barcodes, select Delete a page for separator. Pages with barcodes are then deleted before the data is saved.
![graph TD A["Document 1"] --> B["File Mapping"] C["Document 2"] --> D["Data Collection"] E["Document 3"] --> F["Data Output"] G["Document 4"] --> H["Data Collection"] I["Document 5"] --> J["Data Output"] K["Document 6"] --> L["Data Collection"] M["Document 7"] --> N["Data Output"] O["Document 8"] -->…](/content/2026/06/1398547/images/9a132412d6739e0c8499ebab73f3e19246d8b480ee58f8a4967de8763a6f8654.jpg)
Select Show the detection result to check whether or not barcode text has been recognized correctly. On the screen displayed after scanning, you can check the area and text that has been recognized. You can also re-specify the area, and correct the text.
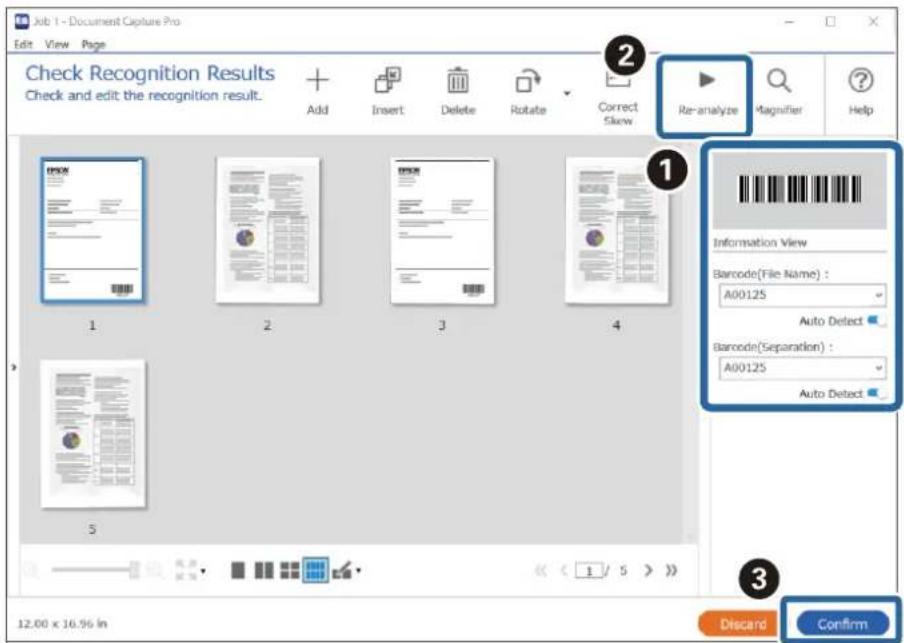
Related Information
→“Placing Originals” on page 33 →“Scanning Using Document Capture Pro (Windows)” on page 62
Creating two levels of folders using two types of barcode
You can create and save two levels of folders in a folder tree using two types of barcode information on the documents.
This section explains the job settings for "Creating a folder using the first barcode information, and then creating a folder at a lower level in the folder tree using different barcode information".
![graph TD A["Step 1: 10200"] --> B["A00125"] C["Step 2: 30300"] --> D["10200"] E["Step 3: 30300"] --> F["30300"] G["Step 4: 50500"] --> H["B00378"] I["Step 5: 70700"] --> J["50500"] K["Step 5: 70700"] --> L["70700"] M["Input"] --> N["Output"]](/content/2026/06/1398547/images/eddba1a2a6f0d59bb160276cf47d21327eb2e85d1047484c0428713bca9903d7.jpg)
- Display the Job Settings screen, and then click the 2. Save tab.
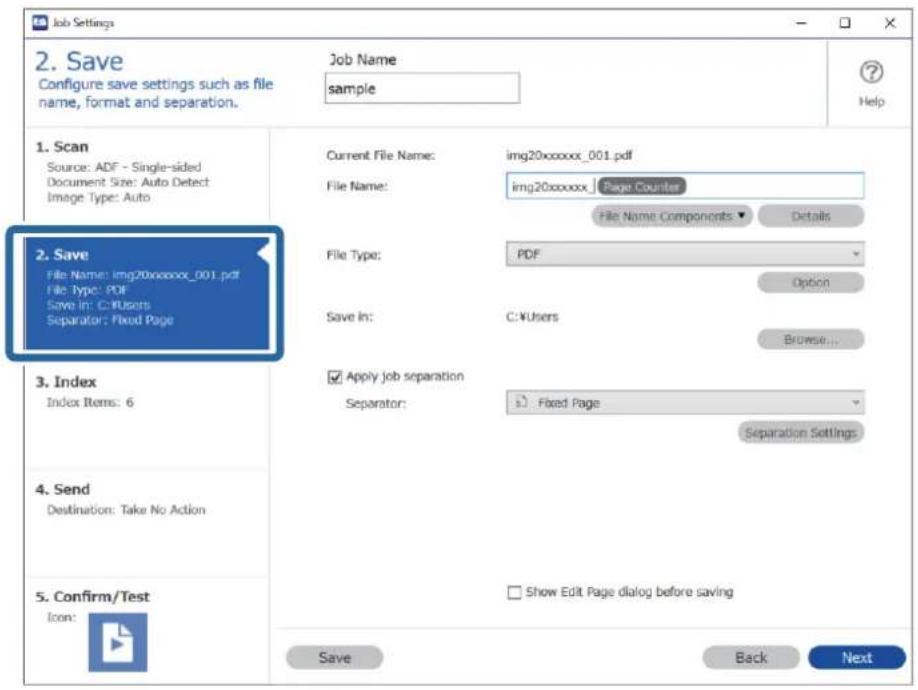
- Select Apply job separation, set Separator to Barcode, and then click Separation Settings.
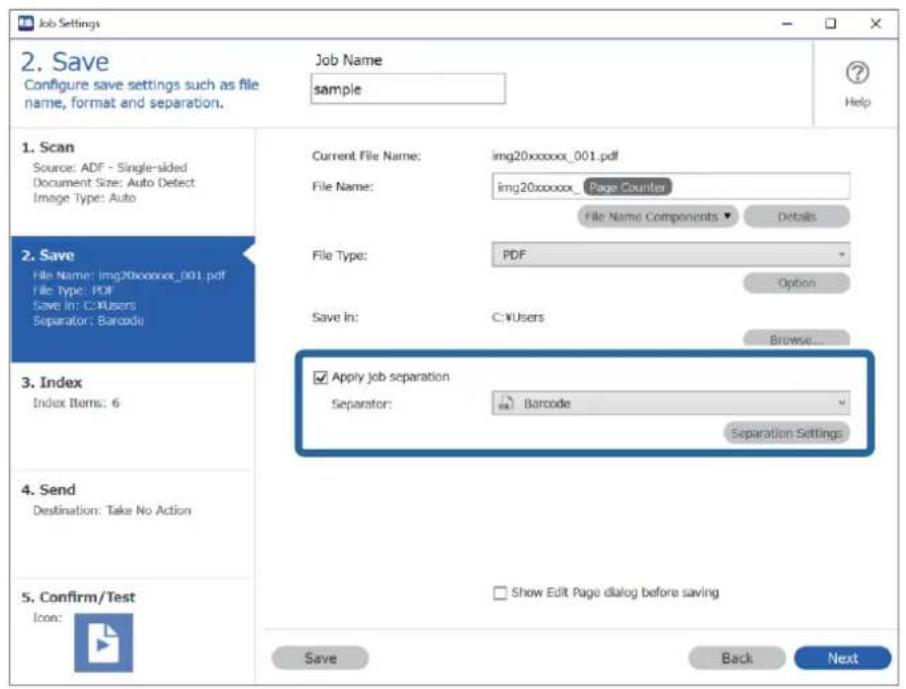
- On the Job Separation Settings screen, select the type of barcode you want to use for the first folder. To select individual barcode types, clear All Barcode Type.
In this example, the QR code has been selected.
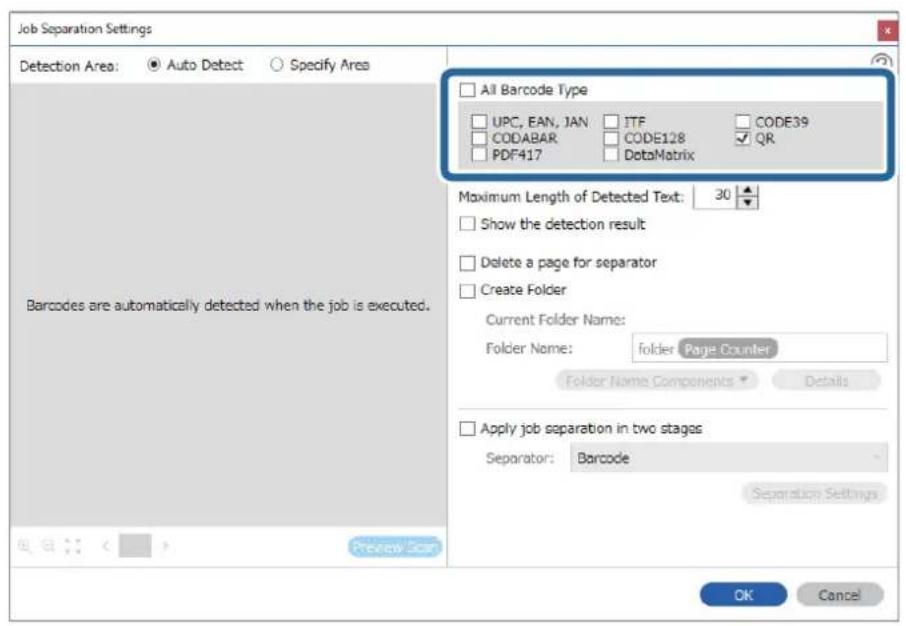
- Check Create Folder, select Barcode from Folder Name Components.
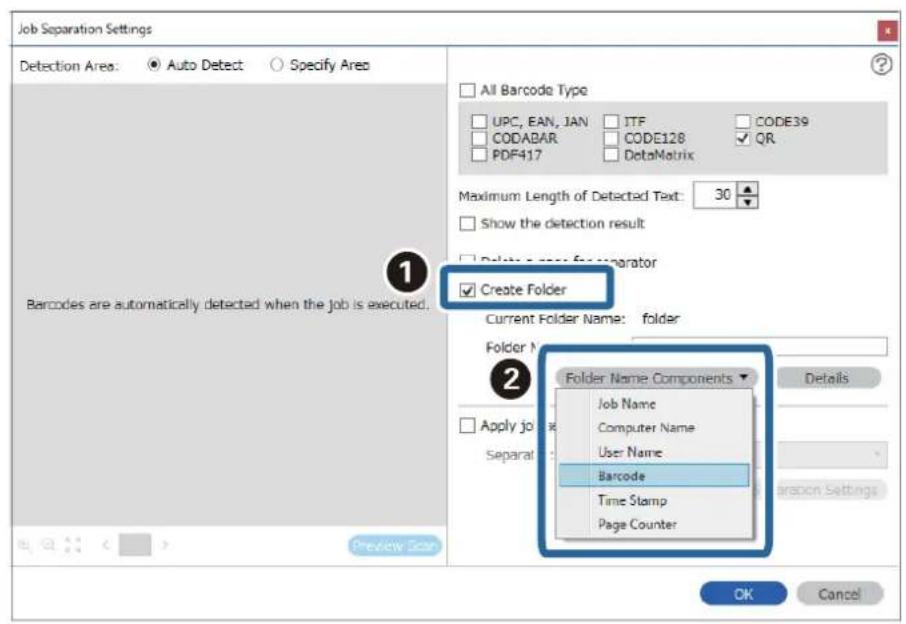
Note:
You can specify the point at which the Folder Name Components will be inserted with your cursor.
You can also drag and drop added items to change the order.
To delete added items, select the added item and delete it using the Delete key on your keyboard.
- Select Apply job separation in two stages, set Separator to Barcode, and then click Separation Settings.

- Additionally, on the Job Separation Settings screen, select the type of barcode you want to use for the second folder, select Create Folder, and then select Barcode from Folder Name Components and add to Folder Name.
To select individual barcode types, clear All Barcode Type.
In this example, CODE128 has been selected.
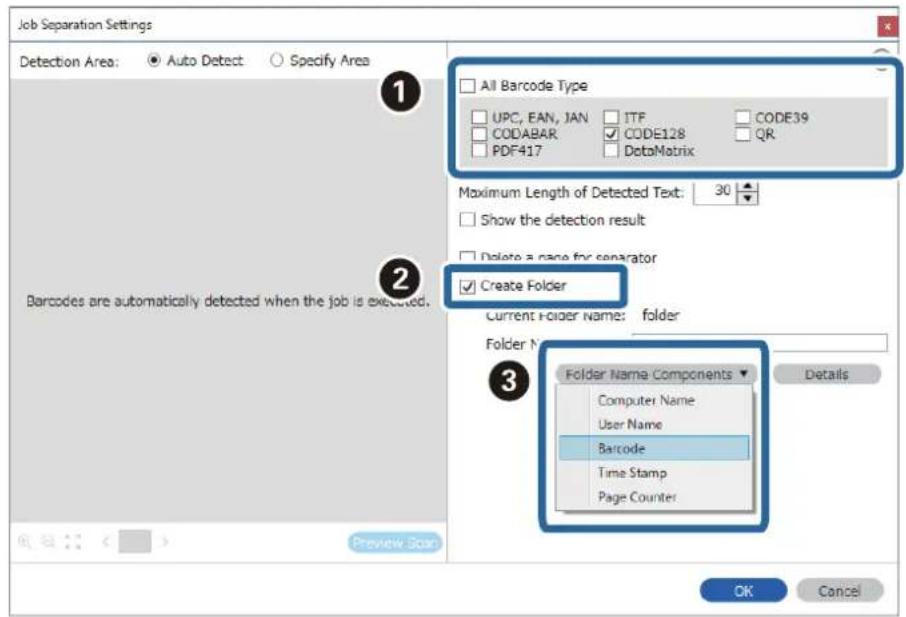
Note:
You can specify the point at which the Folder Name Components will be inserted with your cursor.
You can also drag and drop added items to change the order.
To delete added items, select the added item and delete it using the Delete key on your keyboard.
When using a 2D barcode that has a large number of informational items, make sure you specify the maximum length of text that can be detected in Maximum Length of Detected Text.
Select Show the detection result to check whether or not barcode text has been recognized correctly. On the screen displayed after scanning, you can check the area and text that has been recognized. You can also re-specify the area, and correct the text.
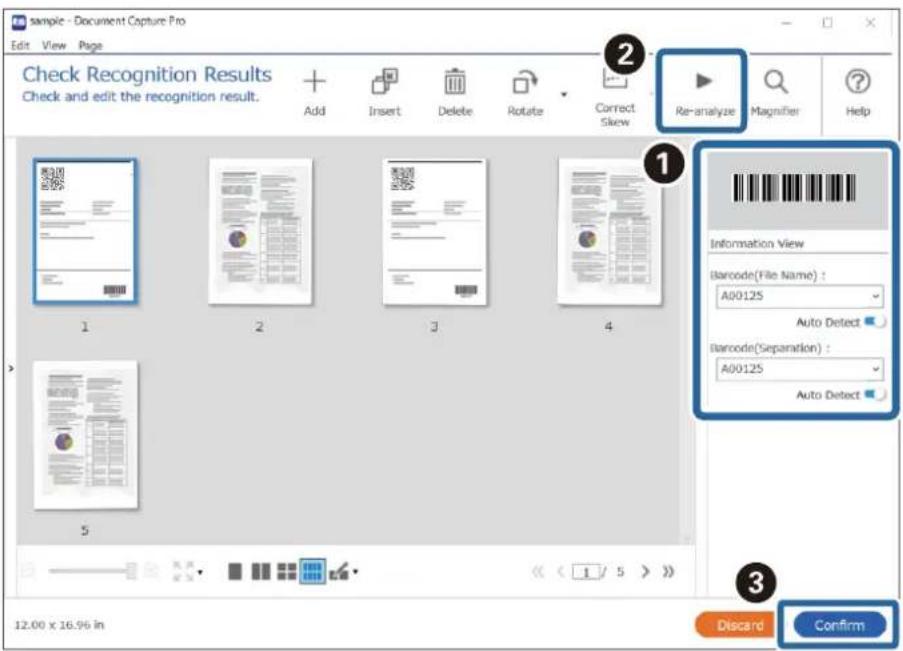
Related Information
→“Placing Originals” on page 33 →“Scanning Using Document Capture Pro (Windows)” on page 62
Saving files with file names using the barcode character information
Using the barcode information, you can divide files by each page on which a barcode is detected, and you can create and save folders using the text information in the barcode.
This section explains the job settings for "Sorting by barcode, and saving files with file names using the text information in the barcode".
![graph TD A["XXXX A"] --> B["A00125"] C["XXXX B"] --> D["B00378"] E["PDF"] --> F["A00125.pdf"] G["PDF"] --> H["B00378.pdf"] style A fill:#f9f,stroke:#333 style C fill:#bbf,stroke:#333 style E fill:#f9f,stroke:#333 style G fill:#bbf,stroke:#333](/content/2026/06/1398547/images/e60fe0c9a8afc083deab3acf4a4797988c4624d81cd4008268f6304e0c7c313f.jpg)
- Display the Job Settings screen, and then click the 2. Save tab.
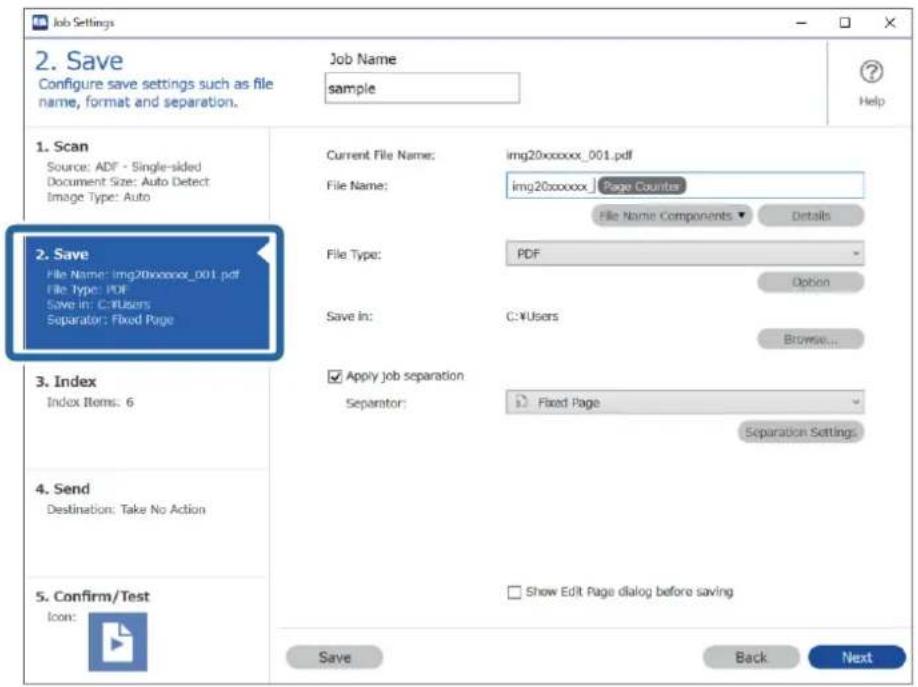
- Select Apply job separation, set Separator to Barcode, and then click Separation Settings.
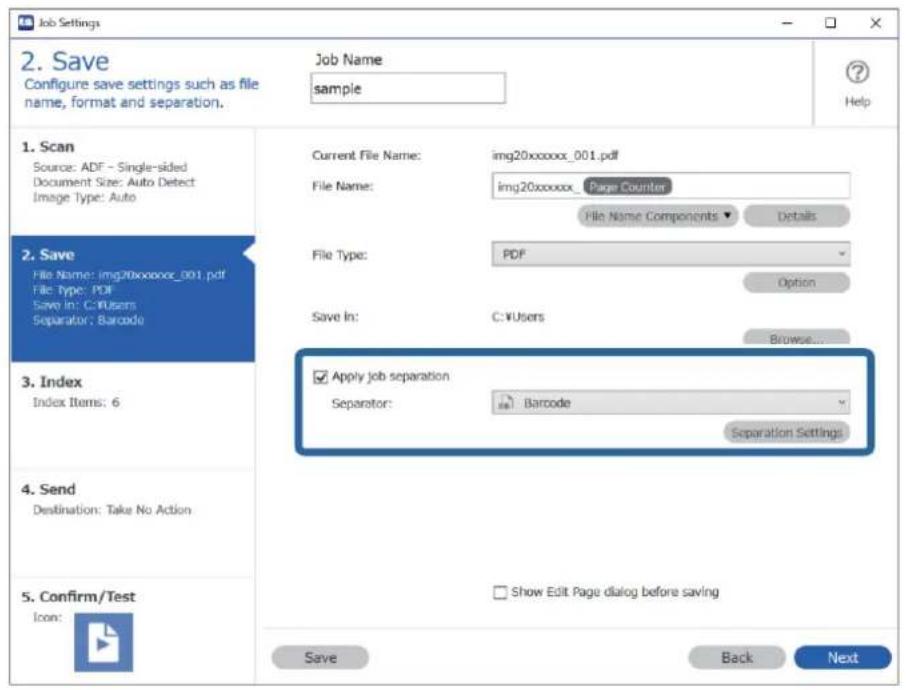
- On the Job Separation Settings screen, select the type of barcode you want to use (placed in the document). Click OK to return to the Job Settings screen.
To select individual barcode types, clear All Barcode Type.
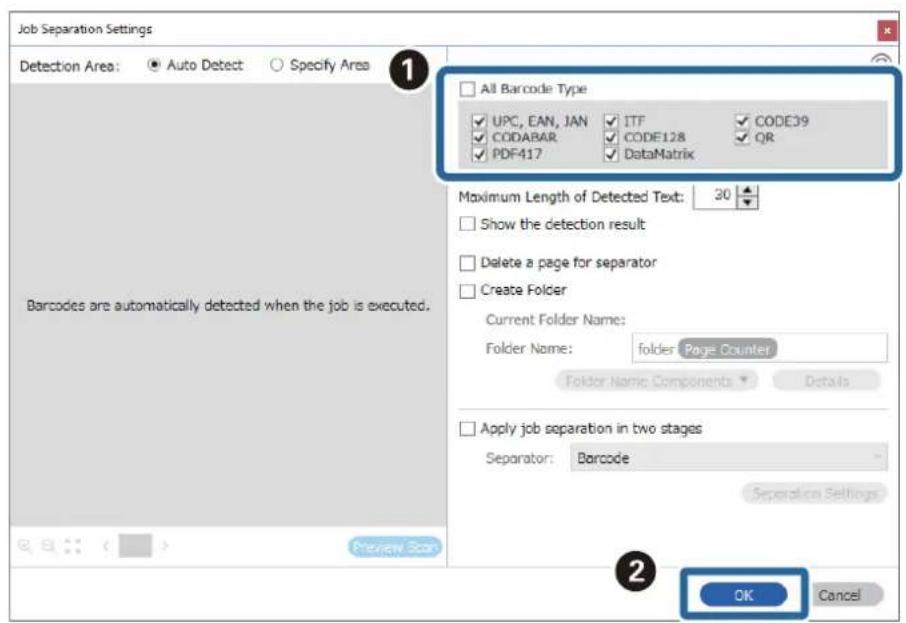
4. Click Details.
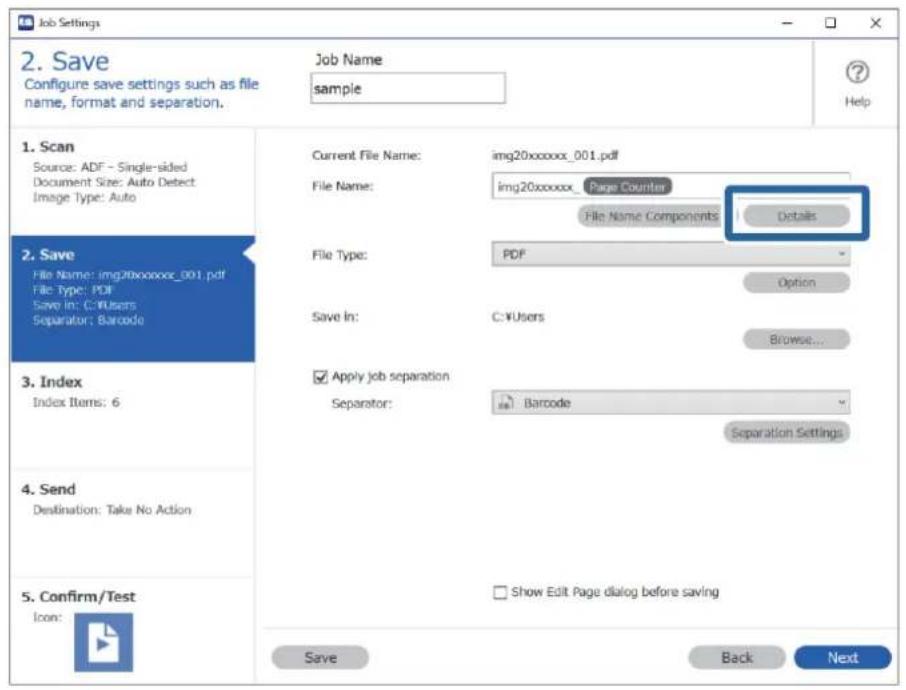
Note:
To select Barcode from File Name Components, make the setting from Details and then select it.
- On the Name Component Settings screen, click Barcode, and then select the barcode type you want to use (which is on the original).
Set the same barcode as set in step 3.
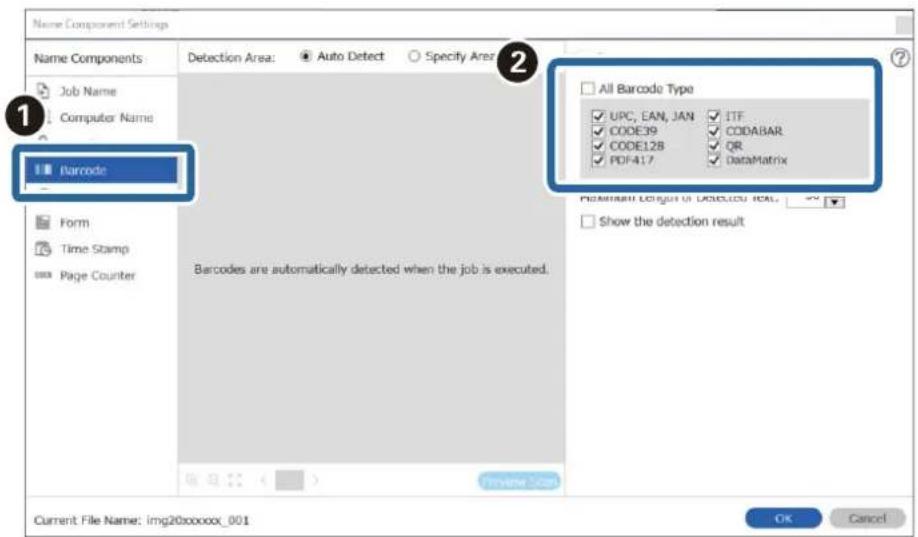
Note:
When using a 2D barcode that has a large number of informational items, make sure you specify the maximum length of text that can be detected in Maximum Length of Detected Text. Select Show the detection result to check whether or not barcode text has been recognized correctly. On the screen displayed after scanning, you can check the area and text that has been recognized. You can also re-specify the area, and correct the text.

6. Select Barcode from File Name Components.
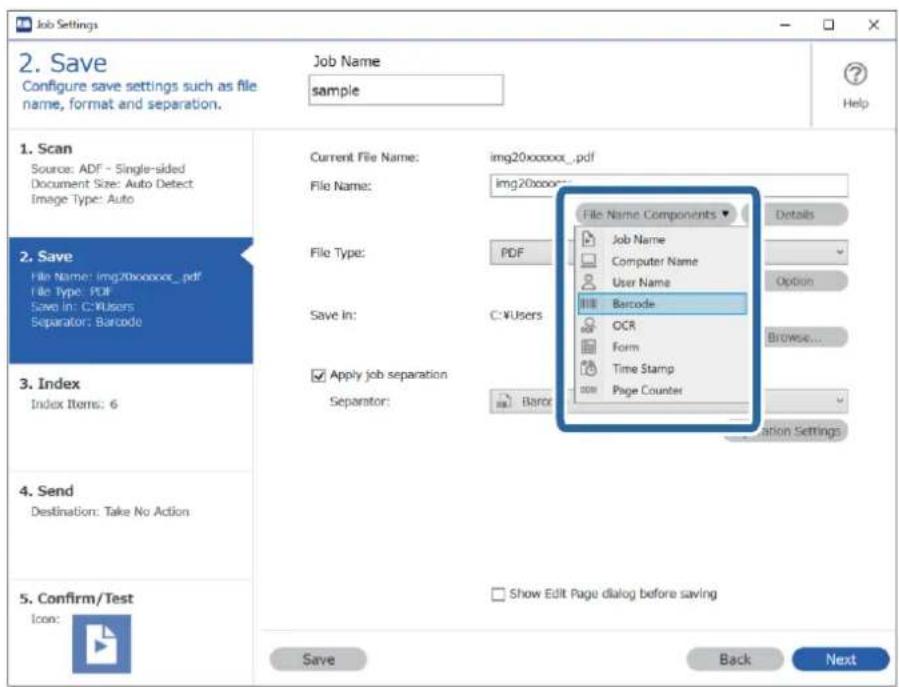
Barcode is added to File Name.
Note:
You can specify the point at which the File Name Components will be inserted with your cursor.
You can also drag and drop added items to change the order.
To delete added items, select the added item and delete it using the Delete key on your keyboard.
Related Information
→“Placing Originals” on page 33
→“Scanning Using Document Capture Pro (Windows)” on page 62
Creating and saving folders using OCR characters
Using OCR (a function for detecting text in scanned images and converting it to readable text), you can divide files by using the text read from a specific area, and then create and save folders using the recognized text.
This section explains the job settings for "Creating and saving folders using the text read in OCR".
![graph TD A["XXX A 2 3"] --> B["A00125"] C["XXX A 5"] --> D["A00125"] E["XXX B 7 8"] --> F["B00378"] G["PDF 001.pdf"] --> H["A00125 Folder"] I["PDF 002.pdf"] --> J["A00125 Folder"] K["PDF 003.pdf"] --> L["B00378 Folder"] M["Yellow Folder"] --> N["Output"]](/content/2026/06/1398547/images/60705eb2fbd212cd66755dd6dafd7a0520e7376526e4212db71b98034eb3bbd3.jpg)
- Display the Job Settings screen, and then click the 2. Save tab.
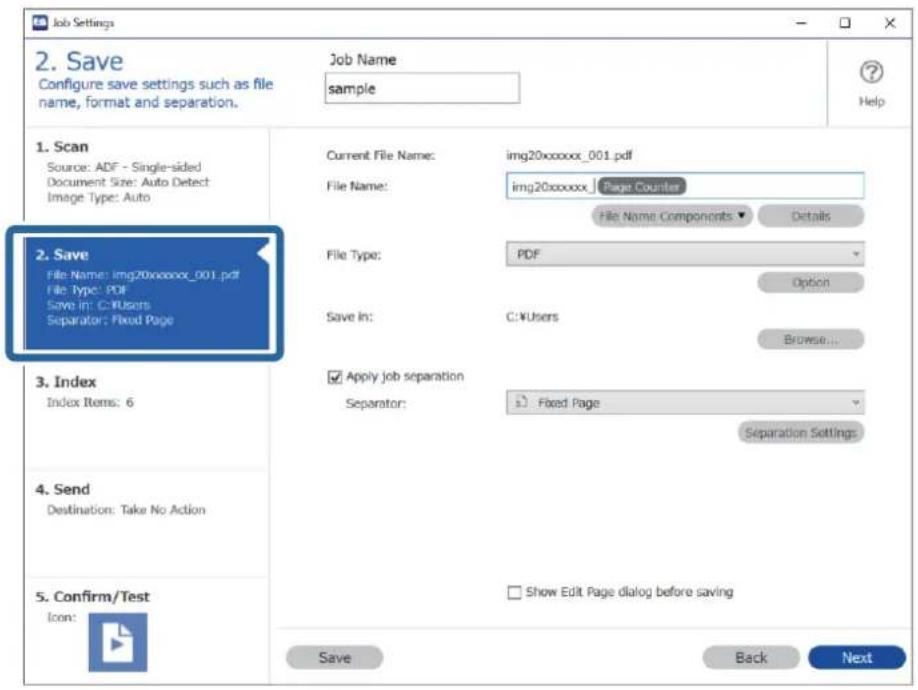
- Select Apply job separation, set Separator to OCR, and then click Separation Settings.
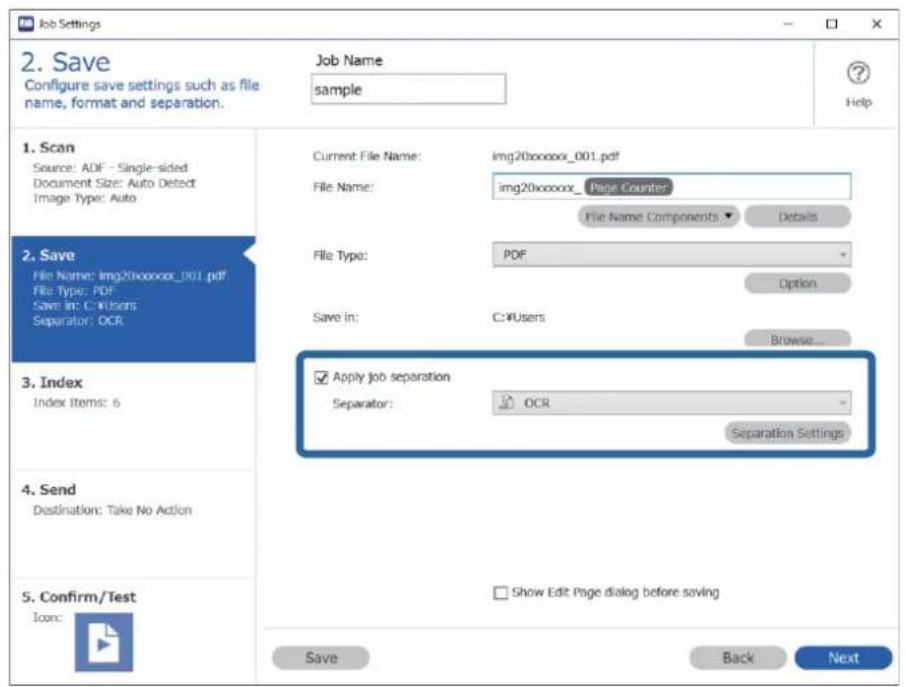
- On the Job Separation Settings screen, select the language of the text being read from Recognition Text. Select Create Folder, and then select OCR from Folder Name Components.
![Job Separation Settings 1 Recognition Text: OCR-A Maximum Length of Detected Text: 30 Show the detection result Select [SCAN] to start, and then specify the detection area. Delete a name for separator Create Folder Current Folder Name: folder Folder Name Components Job Name Computer Name User Name O…](/content/2026/06/1398547/images/54c6436cc88c60de9ad4d3727df8b6817a365c65622bd7a334be10197a294e38.jpg)
OCR is added to Folder Name.
Note:
You can specify the point at which the Folder Name Components will be inserted with your cursor.
You can also drag and drop added items to change the order.
To delete added items, select the added item and delete it using the Delete key on your keyboard.
- To set the OCR text detection area, place the document on the scanner, and then click Preview Scan.
![Job Separation Settings Select [SCAN] to start, and then specify the detection area. Recognition Text: OCR-A Maximum Length of Detected Text: 30 Show the detection result Delete a page for separator Create Folder Current Folder Name: [OCR] Folder Name: OCR Folder Name Components ▼ Details Apply job…](/content/2026/06/1398547/images/850cd3c91179bfbee7f4b934bab705c0f690aa69eb0738fbfc10e748453ca50c.jpg)
5. Click OK on the Scan Settings screen.
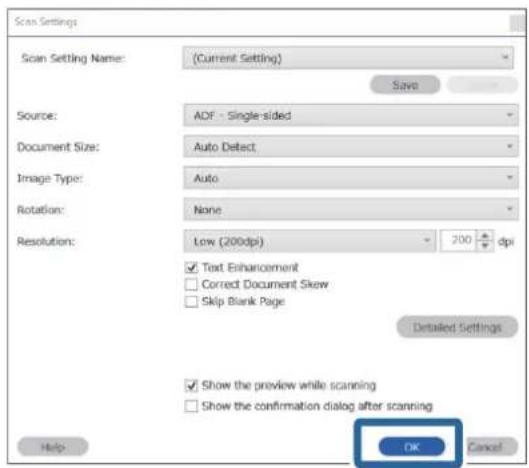
6. In the scanned preview image, specify the text detection area. Click the starting point, and then drag to display a blue border to specify the text detection area.
![Job Separation Settings EPSON FAX Recognition Text: OCR-A Maximum Length of Detected Text: 30 Show the detection result Delete a page for separator Create Folder Current Folder Name: [OCR] Folder Name: OCR Folder Name Components ▼ Details Apply job separation in two stages Separator: Barcode Separat…](/content/2026/06/1398547/images/6a054a89229cd6a5318d5489cfa9191889d39ab2ebcdcd5b90e3f66b057ae4e6.jpg)
Note:
☐ In Maximum Length of Detected Text, you can specify the maximum number of characters used for the folder name from the text detected in the specified area. ☐ If you do not need to save the pages used for sorting, select Delete a page for separator. Unnecessary pages are then deleted before the data is saved.
![graph TD A["XXX A 2 3"] --> B["A00125"] C["XXX A 5"] --> D["A00125"] E["XXX B 7 8"] --> F["B00378"] G["PDF 001.pdf"] --> H["A00125 Folder"] I["PDF 002.pdf"] --> J["A00125 Folder"] K["PDF 003.pdf"] --> L["B00378 Folder"] M["Yellow Folders"] --> N["Folder"]](/content/2026/06/1398547/images/e0bf3b735ce0c24d1732debd60b3324e6ec459ade47695b68ce9890132e17c2b.jpg)
☐ Select Show the detection result to check whether or not text has been read correctly. On the screen displayed after scanning, you can check the area and text that has been recognized. You can also re-specify the area, and correct the text.
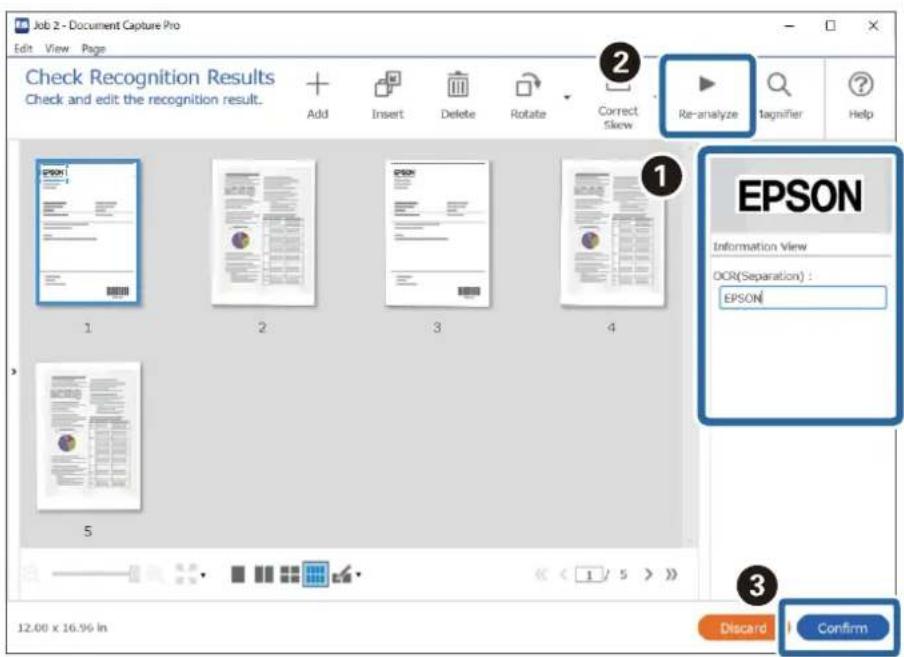
Related Information
→“Placing Originals” on page 33
→“Scanning Using Document Capture Pro (Windows)” on page 62
Saving files with file names using OCR characters
Using OCR (a function for detecting text in scanned images and converting it to readable text), you can read the text from a specific area, and then save files with file names using the recognized text.
This section explains the job settings for "Saving files using the text read in OCR".
![graph TD A["A00125"] --> B["PDF"] B --> C["A00125.pdf"] D["XXX"] --> E["Chart 2"] D --> F["Chart 3"] G["B00378"] --> H["Chart 5"] G --> I["Chart 6"] J["XXX"] --> K["Chart 5"] J --> L["Chart 6"] M["B00378.pdf"] --> N["Chart 5"] M --> O["Chart 6"]](/content/2026/06/1398547/images/a773f06148eac3c1e7a4e805f6fd4538a80cae08aa00c2b97f454ef1702e3002.jpg)
- Display the Job Settings screen, and then click the 2. Save tab.
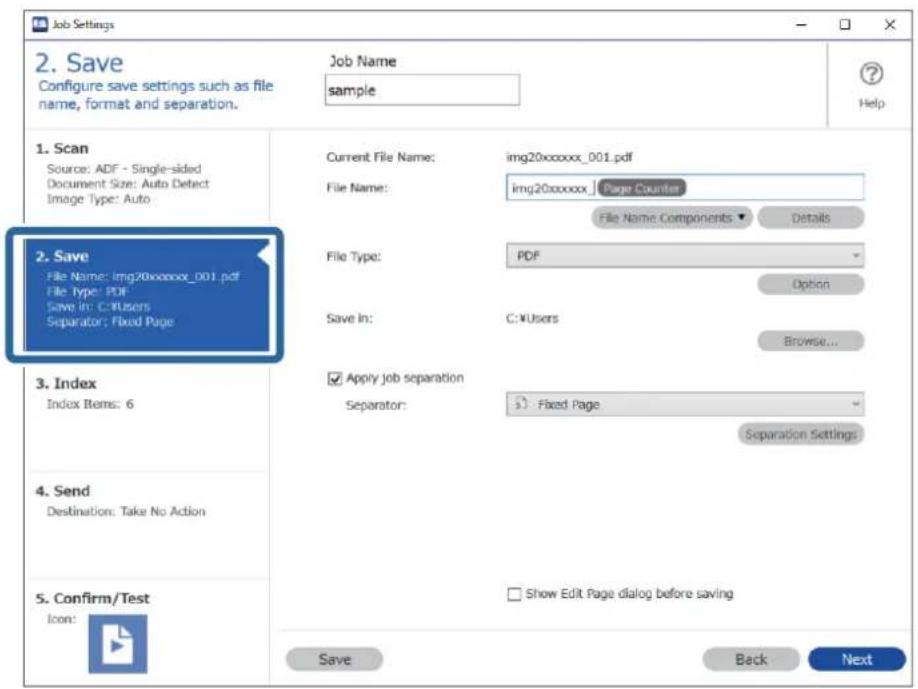
- Select Apply job separation, set Separator to OCR, and then click Separation Settings.
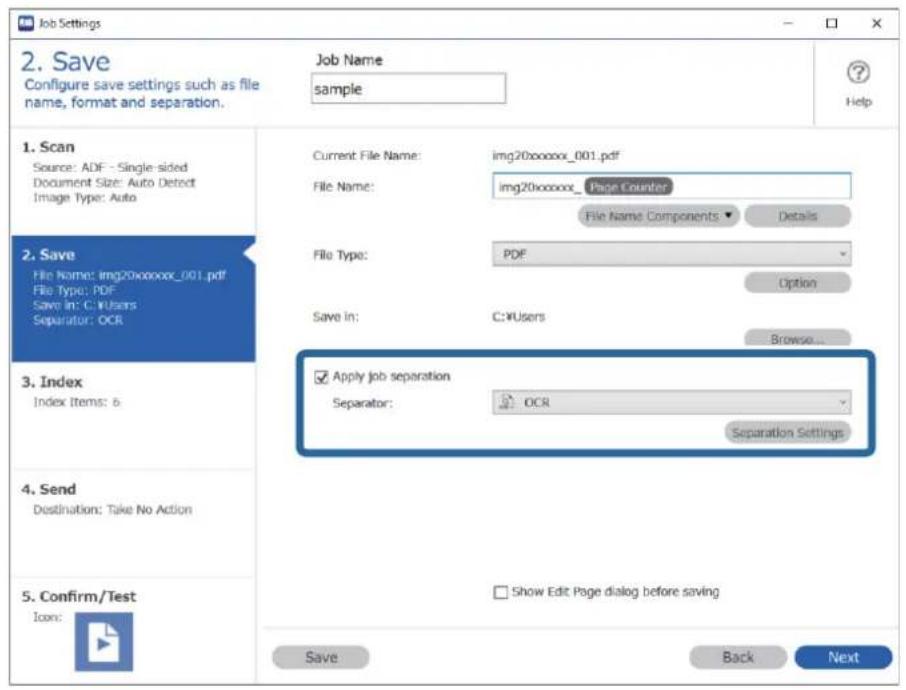
- On the Job Separation Settings screen, select the language of the text being read from Recognition Text.
![Job Separation Settings Recognition Text: OCR-A Maximum Length or Detected Text: 30 Show the detection result Delete a page for separator Create Folder Current Folder Name: [OCR] Folder Name: OCR Folder Name Components ▼ Details Apply job separation in two stages Separator: Barcode OK Cancel Select…](/content/2026/06/1398547/images/a9036987e47dc1691796d21bc956c056af6f0806f1d5f86e20a7e9b549458e71.jpg)
- To set the OCR text detection area, place the document on the scanner, and then click Preview Scan.
![Job Separation Settings Select [SCAN] to start, and then specify the detection area. Recognition Text: OCR-A Maximum Length of Detected Text: 30 Show the detection result Delete a page for separator Create Folder Current Folder Name: [OCR] Folder Name: OCR Folder Name Components ▼ Details Apply job…](/content/2026/06/1398547/images/b8c861ac6be60c5b9f01d343952fa7c23fb5db2d5b6bb548e6d74bdc1dddf328.jpg)
- Click OK on the Scan Settings screen.
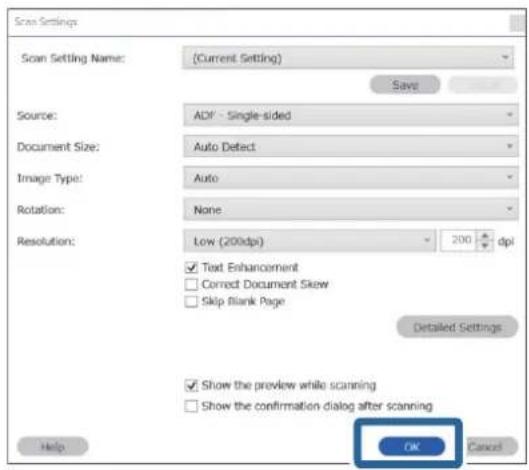
- In the scanned preview image, specify the text detection area. Click the starting point and drag to display an expanding blue border to specify the text detection area. Click OK to return to the Job Settings screen.
![Job Separation Settings EPSON FAX FAX Recognition Text: OCR-A Maximum Length of Detected Text: 30 Show the detection result Delete a page for separator Create Folder Current Folder Name: [OCR] Folder Name: OCR Folder Name Components ▼ Details Apply Job separation in two stages Separator: Barcode Sep…](/content/2026/06/1398547/images/554f93a44927bae5761f2150991ef7ab43f1ee8918e77e0d29d0497f7cf2d39c.jpg)
- Click Details.
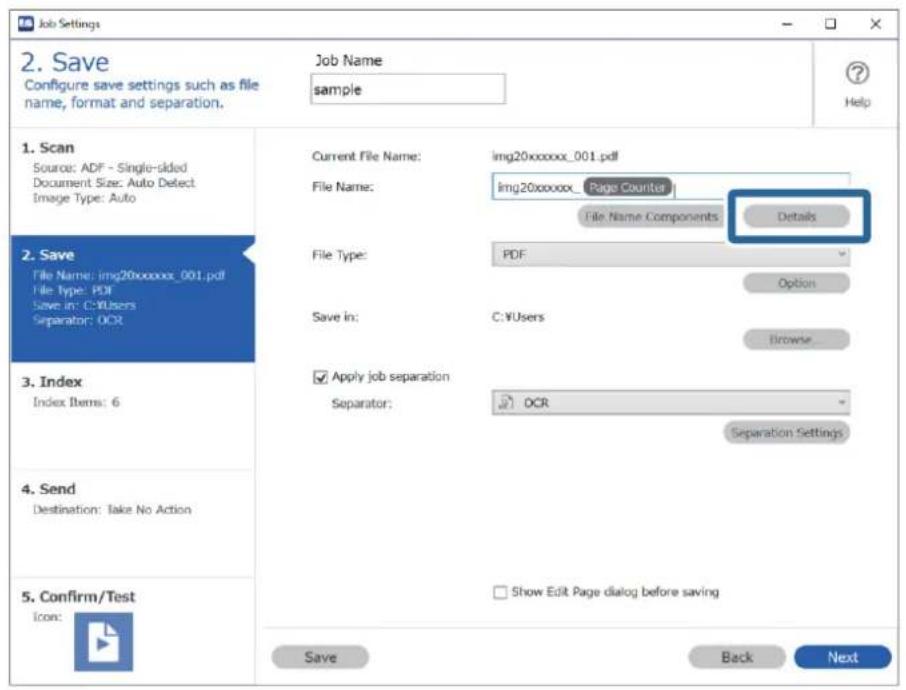
Note:
To select OCR from File Name Components, make the setting from Details and then select it.
- On the Name Component Settings screen, click OCR, and then select the language of the text being read from Recognition Text.
Set the same language for the text as set in step 3.
![Name Component Settings Name Components Job Name Computer Name User Name OCR Time Stamp Page Counter Details: Recognition Text: OCR-A Maximum Length of Detected Text: Show the detection result Select [SCAN] to start, and then specify the detection area. Preview Scan Current File Name: img20xxxxxx_00…](/content/2026/06/1398547/images/3db275501847d52eeffeba9abd0f488a6d2bc8355c9d7b88e8914d2a4c91b355.jpg)
- To set the OCR text detection area, place the document on the scanner, and then click Preview Scan.
![Name Component Settings Name Components Job Name Computer Name User Name Barcode OCR Form Time Stamp Page Counter Select [SCAN] to start, and then specify the detection area. Details: Recognition Text: OCR-A Maximum Length of Detected Text: 30 Show the detection result Preview Scan Current File Name…](/content/2026/06/1398547/images/7aeb2336d891749409d854aa136242d2d0b4a8fe4da389cc27dab57d4c7e4662.jpg)
- Click OK on the Scan Settings screen.
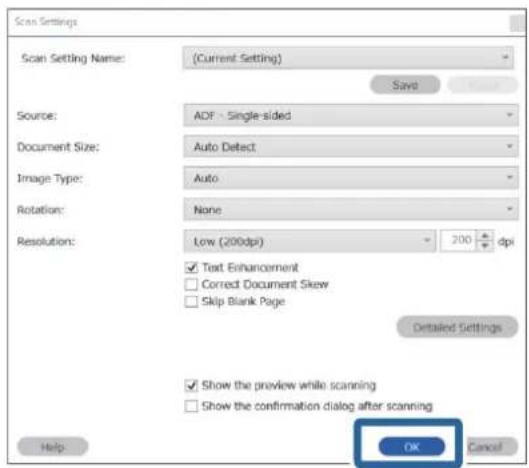
- In the scanned preview image, specify the text detection area. Click the starting point, and then drag to display a blue border to specify the text detection area.
Specify the same area as set in step 5.
![Job Separation Settings EPSON FAX Recognition Text: OCR-A Maximum Length of Detected Text: 30 Show the detection result Delete a page for separator Create Folder Current Folder Name: [OCR] Folder Name: OCR Folder Name Components ▼ Details Apply Job separation in two stages Separator: Barcode Separat…](/content/2026/06/1398547/images/992fe84a2c774cddb3300bd4efbc900d876cdb2a792da7e5de1d9566de22065f.jpg)
Note:
☐ In Maximum Length of Detected Text, you can specify the maximum number of characters used for the file name from the text detected in the specified area. ☐ Select Show the detection result to check whether or not text has been read correctly. On the screen displayed after scanning, you can check the area and text that has been recognized. You can also re-specify the area, and correct the text.
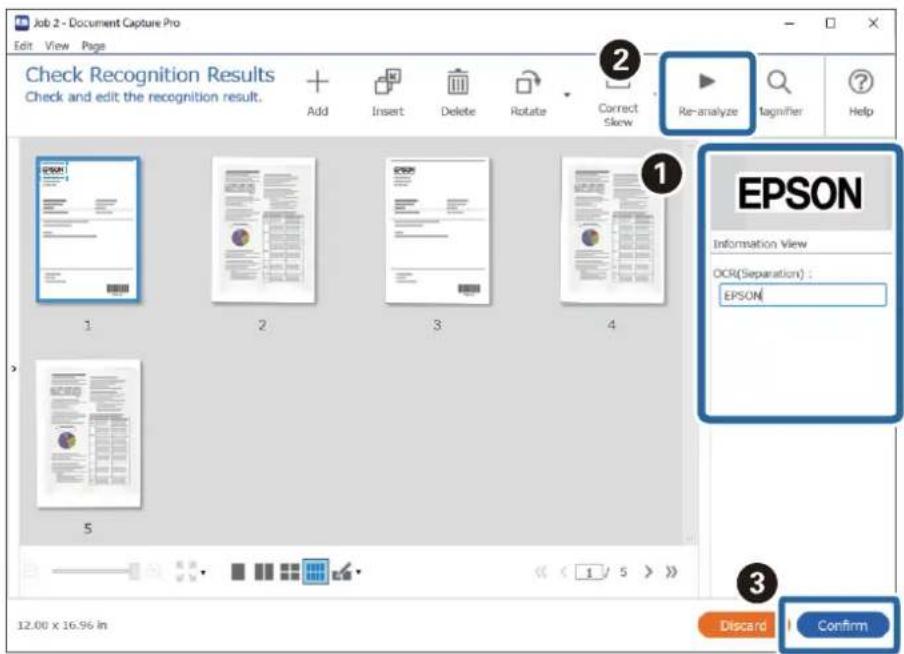
12. Select OCR from File Name Components.
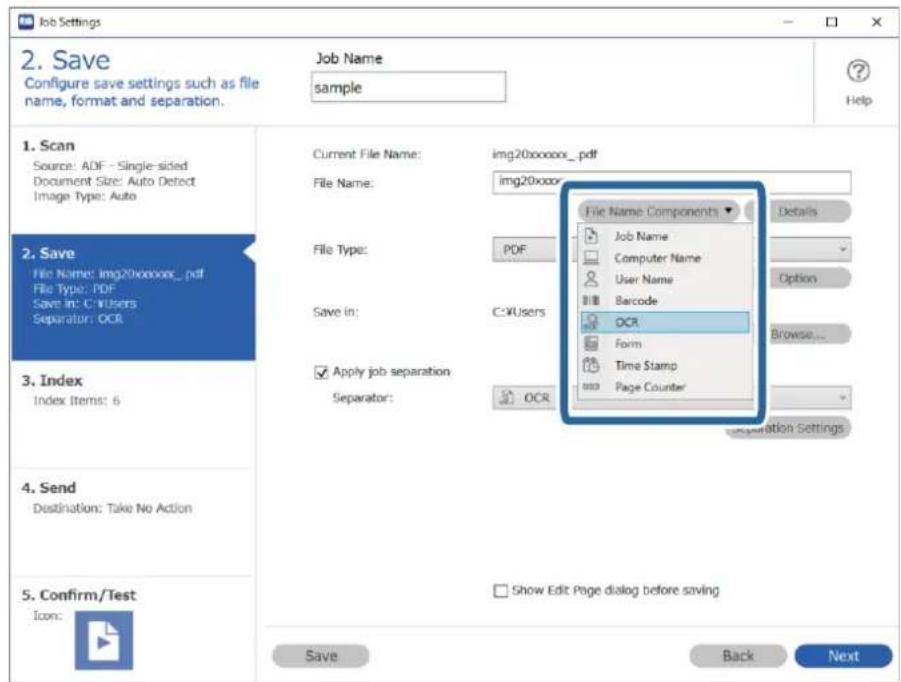
Note:
You can specify the point at which the File Name Components will be inserted with your cursor.
You can also drag and drop added items to change the order.
To delete added items, select the added item and delete it using the Delete key on your keyboard.
Related Information
→“Placing Originals” on page 33
→“Scanning Using Document Capture Pro (Windows)” on page 62
Creating and saving folders for each form
By using registered form information, you can separate scanned data by form type, and create and save folders.
This section explains the job settings for "Separating by form and saving using the form type as the folder name".
![graph TD A["1 AAA\nXXXXXXXXX\XXXXXXXXX"] --> B["2 BBB"] B --> C["3 AAA\nXXXXXXXXX\XXXXXXXXX"] C --> D["4 AAA\nXXXXXXXXX\XXXXXXXXX"] D --> E["5 BBB"] E --> F["6 BBB"] G["AAA"] --> H["1 AAA\nXXXXXXXXX\XXXXXXXXX"] H --> I["3 AAA\nXXXXXXXXX\XXXXXXXXX"] I --> J["4 AAA\nXXXXXXXXX\XXXXXXXXX"] J --> K["BBB"…](/content/2026/06/1398547/images/fdaff6e5d7ca56c9167f71bd304067704d13ea5752a7fa57f17c2351fdfada85.jpg)
- Display the Job Settings screen, and then click the 2. Save tab.
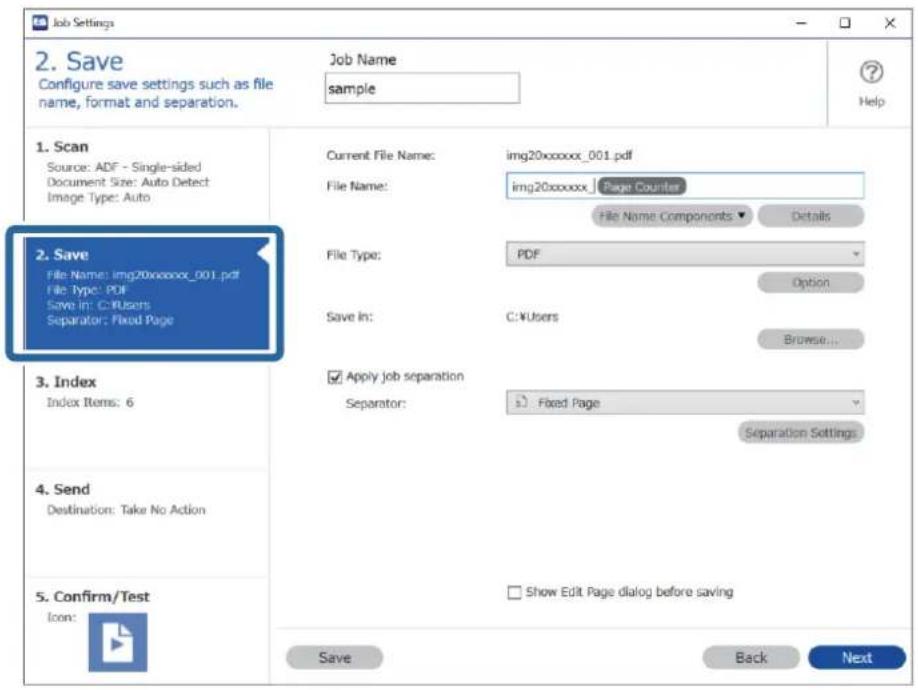
- Select Apply job separation, select Form in Separator, and then click Separation Settings.
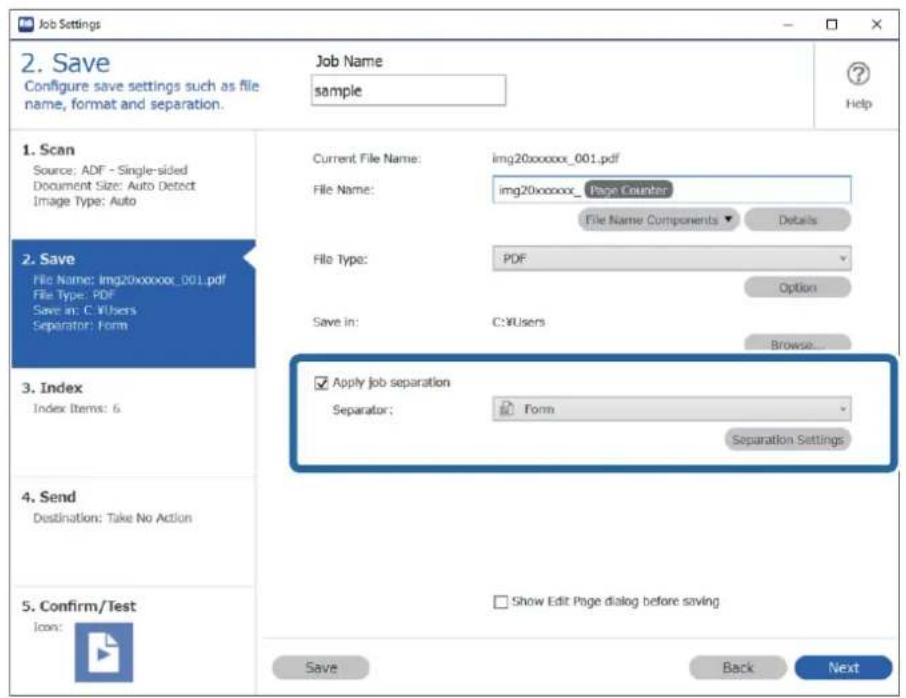
- Click Add on the Job Separation Settings screen.
![Job Separation Settings All Forms Add Edit Delete Matching Level: Standard ✓ Detect Rotated Forms ✓ Save unmatched pages as [Unsorted] Show Confirmation Screen Delete a page for separator Create Folder Current Folder Name: Folder Name: folder Page Counter Folder Name Components Details Apply job sep…](/content/2026/06/1398547/images/2b753f4e98fe0f6d4ffa7ebc23f099c2c9d5f947da3b42c536ed8534835b3455.jpg)
Note:
If you want to use a form for separation that has already been registered, select the form name.
To edit form information that has already been registered, select the form, and then click Edit.
- Place the original of the form you want to register on the scanner, and then click Preview Scan.
![Job Separation Settings All Forms Add Edit Delete Matching Level: Standard ✓ Detect Rotated Forms ✓ Save unmatched pages as [Unsorted] □ Show Confirmation Screen □ Delete a page for separator □ Create Folder Current Folder Name: Folder Name: folder Page Counter Folder Name Components Details Apply j…](/content/2026/06/1398547/images/5592d7f87f015170c1a16bcfef9f326b5456a51a7d71860d09dcd07fb135e674.jpg)
Note:
Only one page of form information is saved even if there are multiple originals.
- Make scan settings on the Scan Settings screen, and then click OK.
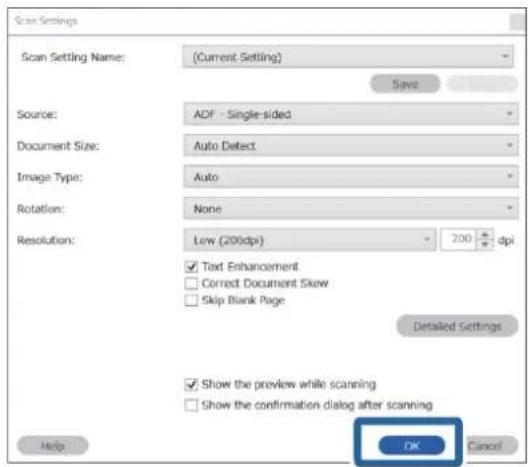
- Enter a name for the form, and then click Register.
![Job Separation Settings. All Forms. Add, Edit, Delete. Matching Level: Standard. Checked: Detect Rotated Forms, Save unmatched pages as [Unsorted]. Show Confirmation Screen. Delete a page for separator. Create Folder. Current Folder Name: folder. Folder Name: folder Page Counter. Folder Name Compone…](/content/2026/06/1398547/images/917bd62fd21bb767137495af830a68a3d42df006155638206def53e760e140bf.jpg)
- Repeat steps 3 to 6 to register all of the form information you want to use for separating.
- Select Create Folder, and then select Form from Folder Name Components.
![Job Separation Settings. All Forms. sample1. Add, Edit, Delete. Matching Level: Standard. Detect Rotated Forms. Save unmatched pages as [unsorted]. Show Confirmation Screen. Delete a page for separator. Create Folder. Current Folder Name: folder. Folder Name Components: Job Name, Computer Name, User…](/content/2026/06/1398547/images/4c3f01708e5048c77ea2e8d66e7b63c726f4b40b550fb11a6a716c0fadbcf2f7.jpg)
Form is added to the Folder Name.
Related Information
→“Placing Originals” on page 33 →“Scanning Using Document Capture Pro (Windows)” on page 62
Useful Features
Setting the Glass Surface Stain Detection Feature....
Setting the Document Protection Feature....
Setting the Operation When a Double-Feed is Detected....
Setting the Glass Surface Stain Detection Feature
Vertical lines may appear in the image due to dust or dirt on the glass surface inside the scanner.
When Detect Glass Dirt is set to On, the scanner detects any stains on the glass surface inside the scanner and displays a notification on your computer screen.
When this notification is displayed, clean the glass surface inside the scanner with the dedicated cleaning kit or a soft cloth.
The default setting is Off.
- Start Epson Scan 2 Utility.
□Windows 10
Click the start button, and then select EPSON - Epson Scan 2 Utility.
□Windows 8.1/Windows 8
Enter the software name in the search charm, and then select the icon displayed.
□Windows 7/Windows Vista/Windows XP
Click the start button, and then select All Programs or Programs - EPSON - Epson Scan 2 - Epson Scan 2 Utility.
□Mac OS
Select Go - Applications - Epson Software - Epson Scan 2 Utility.
- Make the following settings on the Scanner Setting tab.
Set Detect Glass Dirt to On-Low or On-High.
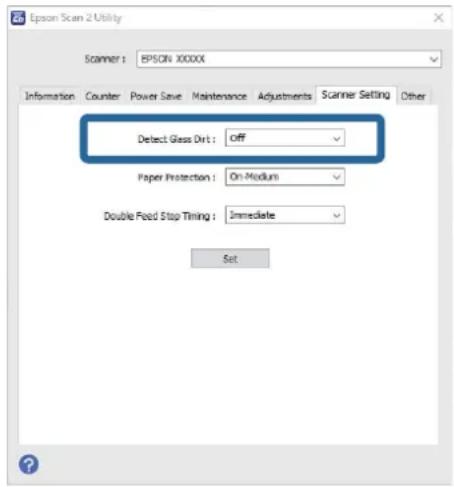
Note:
☐ Some stains may not be detected correctly.
☐If detection does not work correctly, try changing the settings.
If no stains are detected, select On-High. If stains are detected incorrectly, select On-Low or Off.
- Select Set to apply the settings to the scanner.
Related Information
→“Cleaning Inside the Scanner” on page 148 →“Straight Lines Appear when Scanning from ADF” on page 169 →“Glass Dirt Alert Does Not Disappear” on page 169
Setting the Document Protection Feature
To reduce damage to the document, scanning stops immediately when the following conditions are detected.
A paper feed error has occurred
A document is fed at an angle
The default setting is On-Medium.

Important:
This feature does not prevent all documents from being damaged. Paper feed errors may not be detected depending on the paper feeding conditions.
- Start Epson Scan 2 Utility.
Windows 10
Click the start button, and then select EPSON - Epson Scan 2 Utility.
Windows 8.1/Windows 8
Enter the software name in the search charm, and then select the icon displayed.
Windows 7/Windows Vista/Windows XP
Click the start button, and then select All Programs or Programs - EPSON - Epson Scan 2 - Epson Scan 2 Utility.
Mac OS
Select Go - Applications - Epson Software - Epson Scan 2 Utility.
- Make the following settings on the Scanner Setting tab.
Set Paper Protection to On-Low, On-Medium, or On-High.
To enable this feature, select the level of detection you want to use. See the following table for details on each level.
| Level Description | |
| On-Low Lower the sensitivity to detect | the skew of the originals. |
| On-Medium | Detect the skew of the stapled originals and the skew that On-Low could not detect. |
| On-High Increase the sensitivity to detect the skew of the originals. | |
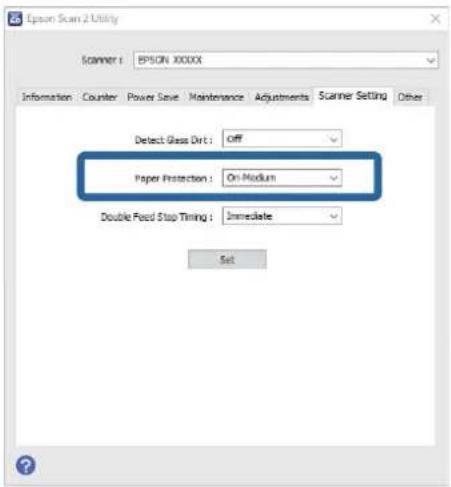
Note:
☐ This feature may not work correctly depending on the document, the paper feeding conditions, and the level set. ☐ When scanning plastic cards and cardboard, select Off to disable this feature. ☐ If false positives occur frequently, try lowering the level. ☐ If the document is an irregular shape or is scanned at an angle, it may be mistakenly detected as a paper feed error. ☐ When inserting multiple documents, make sure that the leading edges of the documents are aligned. If the leading edges of the documents are not aligned, they may be mistakenly detected as a paper feed error even if they are scanned correctly. ☐ Make sure you align the document guides with the document to avoid scanning it at an angle.
- Select Set to apply the settings to the scanner.
Setting the Operation When a Double-Feed is Detected
Set the stop timing when a double-feed of documents is detected.
☐ Immediate: Stops as soon as a double-feed is detected.
☐ After Eject: The documents for which a double-feed is detected are scanned as they are, but scanning of the next document is stopped.
When you are satisfied that there are no problems in the scanned image, you can continue scanning.
The default setting is Immediate.
- Start Epson Scan 2 Utility.
Windows 10
Click the start button, and then select EPSON - Epson Scan 2 Utility.
Windows 8.1/Windows 8
Enter the software name in the search charm, and then select the icon displayed.
Windows 7/Windows Vista/Windows XP
Click the start button, and then select All Programs or Programs - EPSON - Epson Scan 2 - Epson Scan 2 Utility.
Mac OS
Select Go - Applications - Epson Software - Epson Scan 2 Utility.
- Make the following settings on the Scanner Setting tab.
Set Double Feed Stop Timing to Immediate or After Eject.
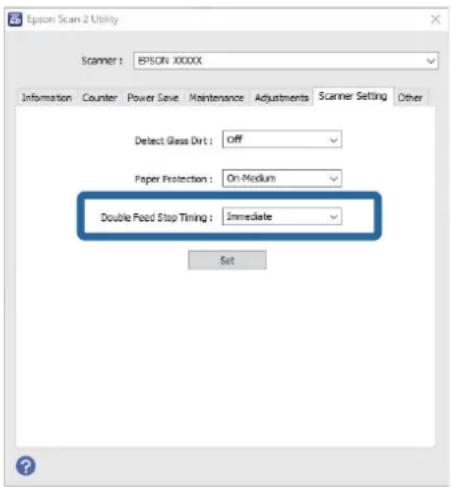
- Select Set to apply the settings to the scanner.
Using the Flatbed Scanner Dock
About the Flatbed Scanner Dock....13
About the Flatbed Scanner Dock
The optional Flatbed Scanner Dock allows you to scan from the scanner glass.
Note:
You need the applicable flatbed scanner to use the Flatbed Scanner Dock.
Part Names and Functions of the Flatbed Scanner Dock
Front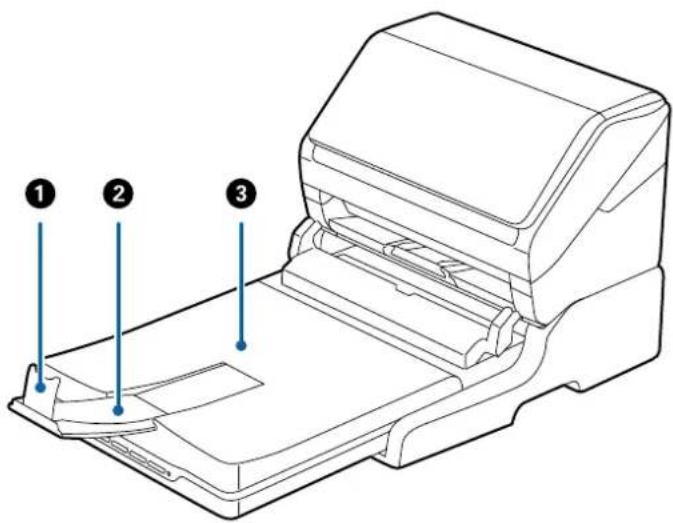
| 1 | Stopper Prevents ejected originals from falling off the output tray extension. Adjust it to the length of the originals. |
| 2 | Output tray extension Holds originals ejected from the sheet feed scanner. Pull out the output tray extension to the length of the originals. |
| 3 | Document cover/Output tray Blocks external light while scanning with the flatbed scanner.Holds originals ejected from the sheet feed scanner. |
Back
| 1 | USB port 1 Connects a USB cable to connect to a computer. |
| 2 | USB port 2 Connects a USB cable to connect to the sheet feed scanner. |
| 3 | DC inlet Connects the AC adapter. |
Scanning from the Scanner Glass
- Close the output tray.
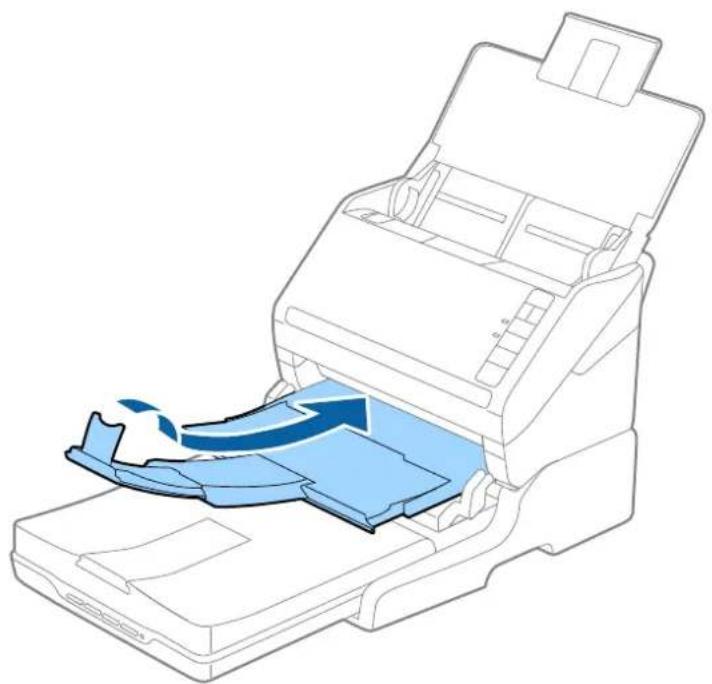
- Open the document cover.
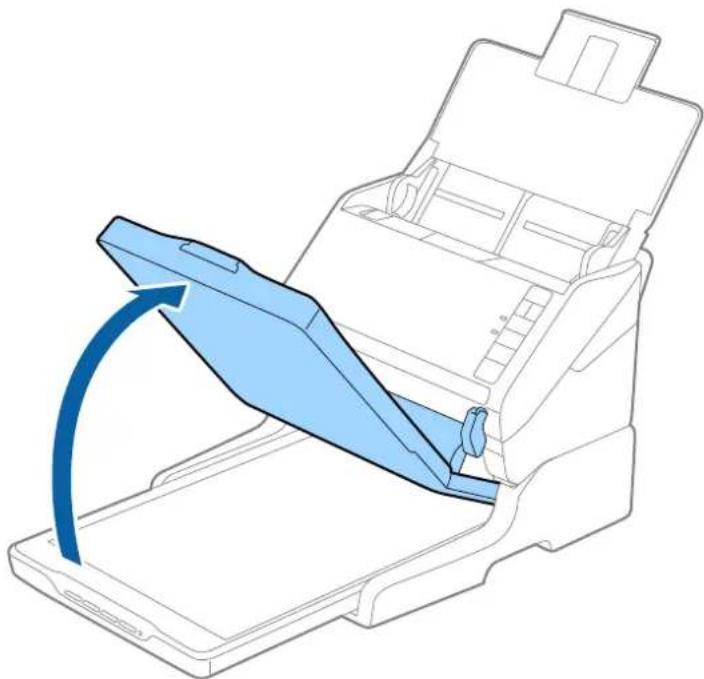
- Place your document or photo face down on the scanner glass, making sure the upper corner of the side you want to scan is against the corner of the scanner next to the arrow mark.
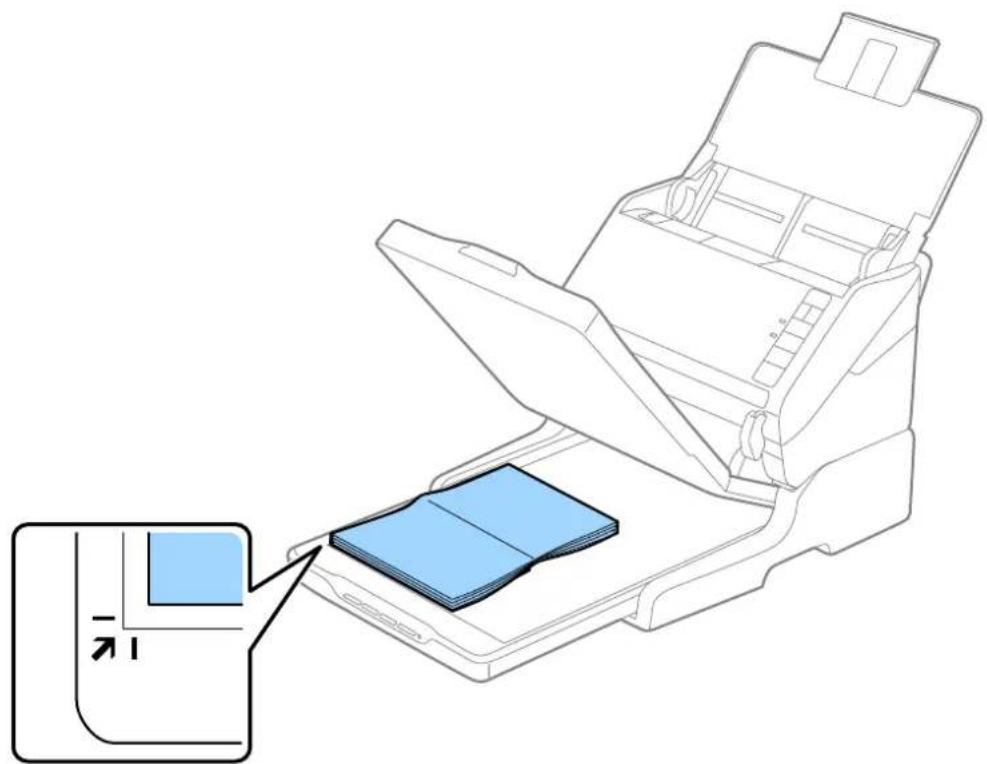
Note:
You can avoid cropping by moving the document about 2.5 mm (0.1 inch) away from the top and side edges indicated by ① and ② in the following figure.
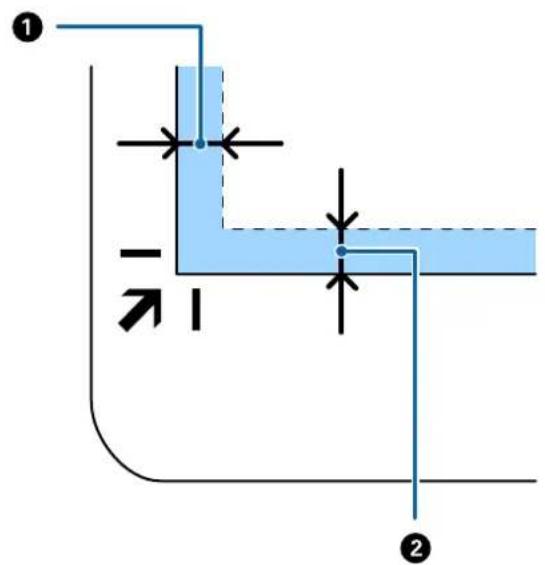
- Close the document cover gently so that your original does not move.
Note:
Always keep the scanner glass clean.
Do not leave originals on the scanner glass for an extended period of time as they may stick.
- Start Document Capture Pro (Windows), Document Capture (Mac OS), or Epson Scan 2.
- Select Scanner Glass from the Document Source list on the scan setting screen.
- Set the other items as necessary and then start scanning.
Notes on Using the Flatbed Scanner Dock
Place the Flatbed Scanner Dock on a horizontal and stable surface.
Notes on Scanning from the ADF
Depending on the length of the originals, operations for the input tray, the output tray, and the stopper vary when scanning from the ADF using the Flatbed Scanner Dock. Do one of the following.
Note:
See the explanation for placing originals regarding other operations except for the input tray, the output tray, and the stopper.
Originals shorter than A5 (210 mm)
Open the input tray. Slide out the output tray, extend the output tray extension, and then raise the stopper.
Note:
Make sure you pull out and extend the output tray extensions so that they are a little bit longer than the length of the original, and raise the stopper so that the ejected originals can be stacked comfortably on the output tray. The stopper can move forward and backward on the central output extension so that you can easily adjust the stopper position to the best position for the originals being scanned.

Originals of A5 (210 mm) or longer up to A4 (297 mm)
Open and extend the input tray, and then raise the stopper of the Flatbed Scanner Dock.
Note:
Make sure you raise and slide the stopper so that it is a little bit longer than the length of the original. This allows the ejected originals to be stacked comfortably on the output tray. The stopper can move forward and backward on the central output extension so that you can easily adjust the stopper position to the best position for the originals being scanned.

Originals longer than A4 (297 mm) to Legal (355.6 mm)
Open and extend the input tray, slide out the output tray extension of the Flatbed Scanner Dock, and then raise the stopper.
Note:
Make sure you pull out and extend the output tray extensions so that they are a little bit longer than the length of the original, and raise the stopper so that the ejected originals can be stacked comfortably on the output tray. The stopper can move forward and backward on the central output extension so that you can easily adjust the stopper position to the best position for the originals being scanned.
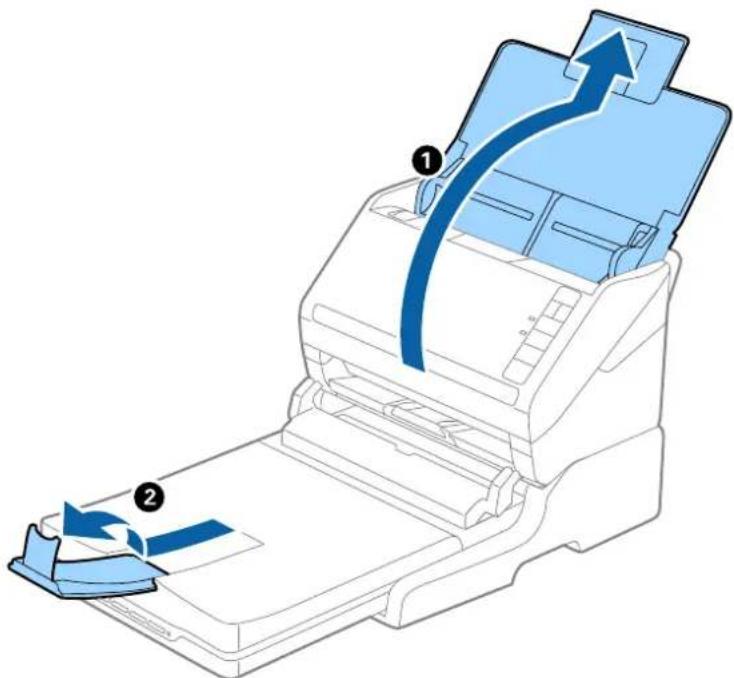
Originals longer than Legal (355.6 mm)
Open the input tray. Do not extend the input tray extension and output tray extensions, and do not raise the stopper.

Maintenance
Cleaning the Flatbed Scanner Dock
To keep your Flatbed Scanner Dock in optimum condition, follow the steps below to clean it periodically.

Important:
Never use alcohol, thinner, or corrosive solvent to clean the Flatbed Scanner Dock. These chemicals can damage the Flatbed Scanner Dock components and the case. Be careful not to spill liquid into the scanner mechanism or electronic components. This could permanently damage the mechanism and circuitry. Do not spray lubricants onto the Flatbed Scanner Dock. Never open the Flatbed Scanner Dock case.
- Press the ⏻ button to turn off the sheet feed scanner.
Note:
There is no power button on the flatbed scanner.
- Unplug the AC adapter, and then disconnect the USB cable that is connected to the computer from the Flatbed Scanner Dock.
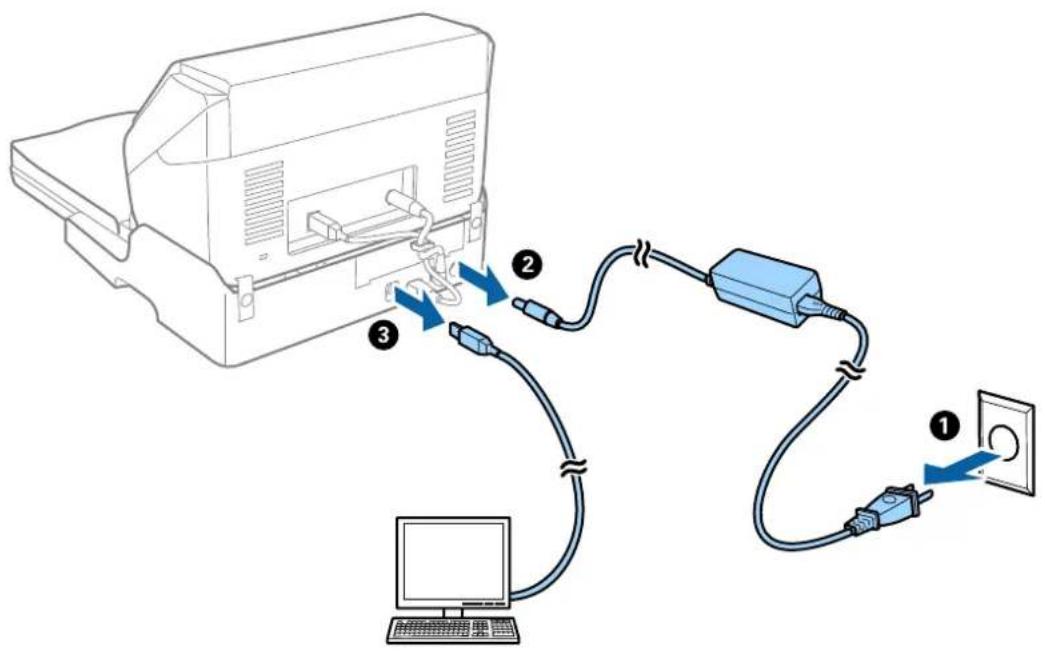
- Wipe off any dirt on the outer case with a soft cloth.
If the case is very dirty, dampen a soft cloth with water and wring it out thoroughly, and then wipe off any remaining stains. Next, use a soft dry cloth to wipe the case.
Transferring and Transporting the Flatbed Scanner Dock

Caution:
When lifting the Flatbed Scanner Dock, place your hands in the positions shown below. If you lift the Flatbed Scanner Dock by holding it in other positions, the Flatbed Scanner Dock may fall or you may trap your fingers when placing the Flatbed Scanner Dock.
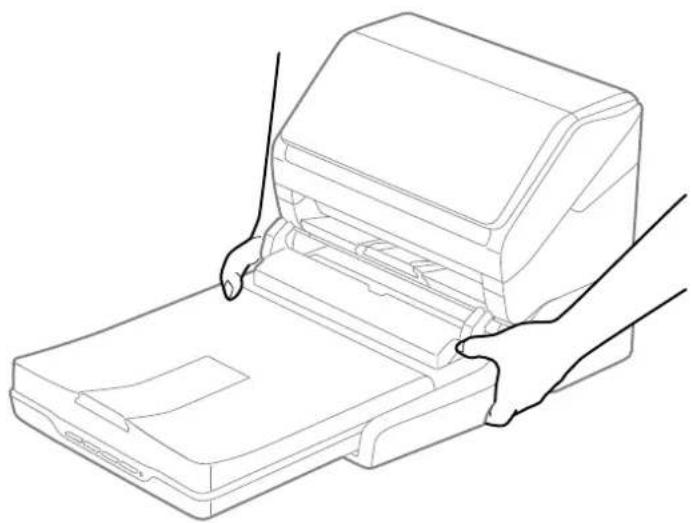
Transporting the Flatbed Scanner Dock a Short Distance
- Press the ⏻ button to turn off the sheet feed scanner.
Note:
There is no power button on the flatbed scanner.
- Unplug the AC adapter, and then disconnect the USB cable that is connected to the computer from the Flatbed Scanner Dock.
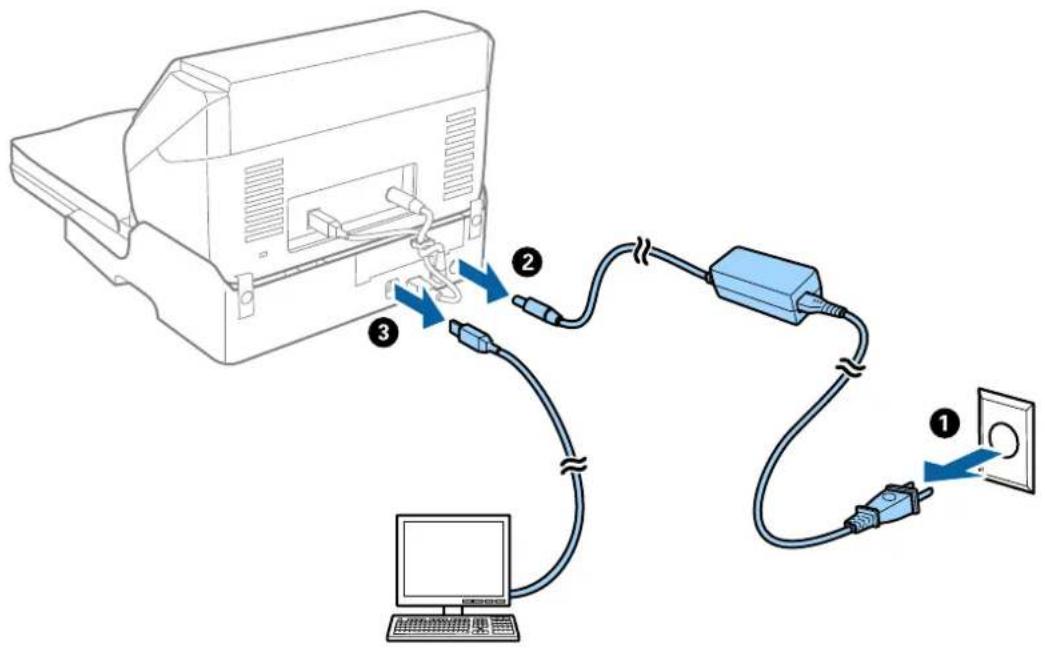
- Do not subject the Flatbed Scanner Dock to vibrations and keep it level while carrying.
Transporting the Flatbed Scanner Dock
Make sure you have the Setup guide with you before you begin the following procedure.
- Press the ⏻ button to turn off the sheet feed scanner.
Note:
There is no power button on the flatbed scanner.
- Perform the setup procedure by reversing the procedure described in the setup guide supplied with the Flatbed Scanner Dock to separate the sheet feed scanner, the flatbed scanner, and the Flatbed Scanner Dock.
- Attach the packing materials that came with the Flatbed Scanner Dock, and then repack it in its original box or a similar box that fits the Flatbed Scanner Dock snugly.
Troubleshooting for the Flatbed Scanner Dock
Uneven Colors, Dirt, Spots, and so on Appear when Scanning from the Scanner Glass
Clean the scanner glass.
Remove any trash or dirt that adheres to the original.
Do not press with too much force on the original or the document cover. If you press with too much force, blurring, smudges, and spots may occur.
Cannot Scan the Correct Area on the Scanner Glass
Make sure the original is placed correctly against the alignment marks. If the edge of the scanned image is missing, move the original slightly away from the edge of the scanner glass.
Binding Margins of a Booklet are Distorted or Blurred
When scanning a booklet on the scanner glass, characters may appear distorted or blurred on the binding margin. If this problem occurs, text is not recognized correctly when you save the scanned image as a Searchable PDF.
To decrease distortion or blurring on the binding margin, gently press down the document cover and hold it down while scanning to flatten the booklet. Make sure you do not move the booklet while scanning.

Important:
Do not press the document cover with too much force. Otherwise, the booklet or the scanner may be damaged.
Offset Appears in the Background of Images
Images on the back of the original may appear in the scanned image.
☐ In Epson Scan 2, select the Advanced Settings tab, and then adjust the Brightness. This feature may not be available depending on the settings on the Main Settings tab > Image Type or other settings on the Advanced Settings tab. ☐ In Epson Scan 2, select the Advanced Settings tab, and then Image Option > Text Enhancement. ☐ When scanning from the scanner glass, place black paper or a desk pad over the original.
Maintenance
Cleaning Outside the Scanner....148
Cleaning Inside the Scanner....14
Replacing the Roller Assembly Kit....1
Energy Saving....160
Transporting the Scanner....161
Updating Applications and Firmware....
Cleaning Outside the Scanner
Wipe off any stains on the outer case with a dry cloth or a cloth dampened with mild detergent and water.

Important:
☐ Never use alcohol, thinner, or any corrosive solvent to clean the scanner. Deformation or discoloration may occur. ☐ Do not let water get inside the product. This could cause a malfunction to occur. ☐ Never open the scanner case.
- Press the ⏻ button to turn off the scanner.
- Unplug the AC adapter from the scanner.
- Clean the outer case with a cloth dampened with mild detergent and water.
Cleaning Inside the Scanner
After using the scanner for a while, paper and room dust on the roller or the glass part inside the scanner may cause paper feed or scanned image quality problems. Clean the inside of the scanner every 5,000 scans.
You can check the latest number of scans in the Epson Scan 2 Utility.
If a surface is stained with a hard-to-remove material, use a genuine Epson cleaning kit to remove stains. Use a small amount of cleaner on the cleaning cloth to remove the stains.

Important:
☐ Never use alcohol, thinner, or any corrosive solvent to clean the scanner. Deformation or discoloration may occur. ☐ Never spray any liquid or lubricant on the scanner. Damage to equipment or circuits may cause abnormal operations. ☐ Never open the scanner case.
- Press the ⏻ button to turn off the scanner.
- Unplug the AC adapter from the scanner.
- Pull the cover open lever and open the scanner cover.
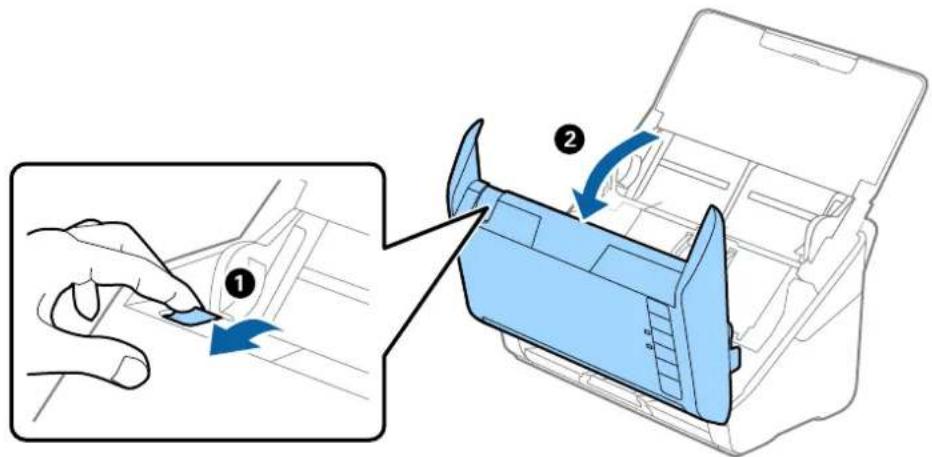
- Wipe off any stains on the plastic roller and glass surface at the bottom inside of the scanner cover using a soft cloth or a genuine Epson cleaning kit.
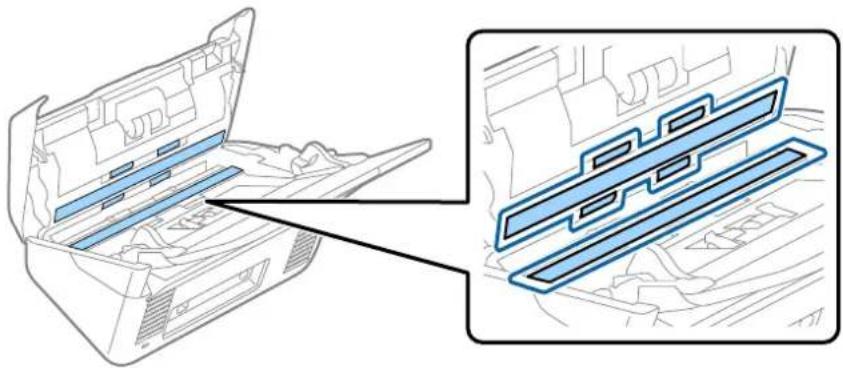

Important:
Do not place too much force on the glass surface. Do not use a brush or a hard tool. Any scratches on the glass may affect the scan quality. Do not spray cleaner directly onto the glass surface.
- Wipe off any stains on the sensors with a cotton swab.


Important:
Do not use liquid such as a cleaner on a cotton swab.
- Open the cover, and then remove the separation roller.
See "Replacing the Roller Assembly Kit" for more details.
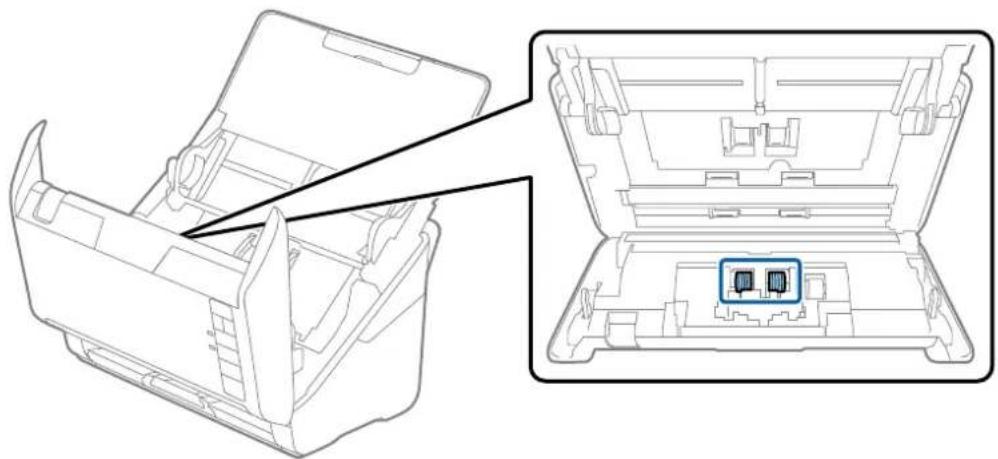
- Wipe off any dust or dirt on the separation roller using a genuine Epson cleaning kit or a soft, moist cloth.
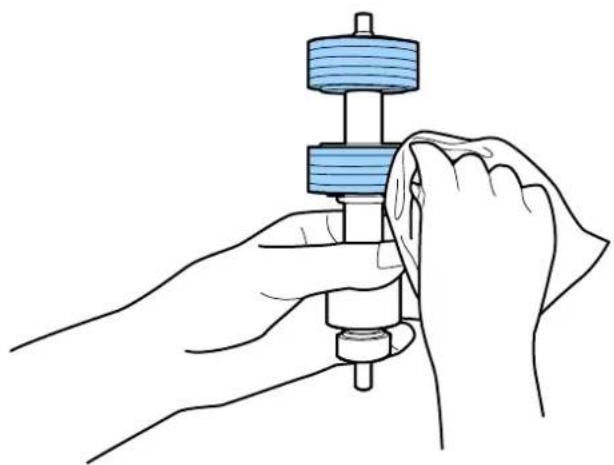

Important:
Use only a genuine Epson cleaning kit or a soft, moist cloth to clean the roller. Using a dry cloth may damage the surface of the roller.
- Open the cover, and then remove the pickup roller.
See "Replacing the Roller Assembly Kit" for more details.
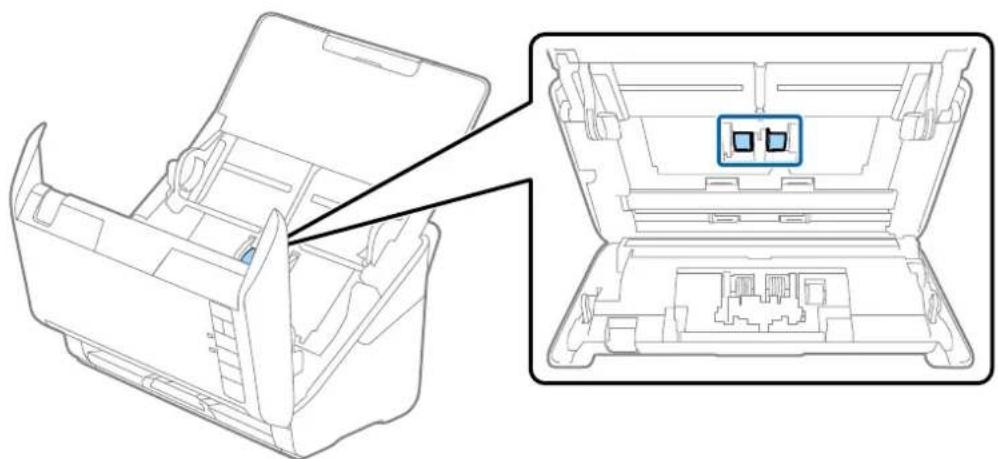
- Wipe off any dust or dirt on the pickup roller using a genuine Epson cleaning kit or a soft, moist cloth.


Important:
Use only a genuine Epson cleaning kit or a soft, moist cloth to clean the roller. Using a dry cloth may damage the surface of the roller.
- Plug in the AC adapter, and then turn on the scanner.
- Hold down the ◇ button for at least two seconds while opening the scanner cover. The rollers on the bottom move momentarily, and then the scanner enters cleaning mode. The rollers rotate a bit each time you press the ◇ button. Press the ◇ button several times to rotate the rollers. Use a genuine Epson cleaning kit or a soft, moist cloth to clean the rollers as they rotate. Repeat this step until the rollers are clean.
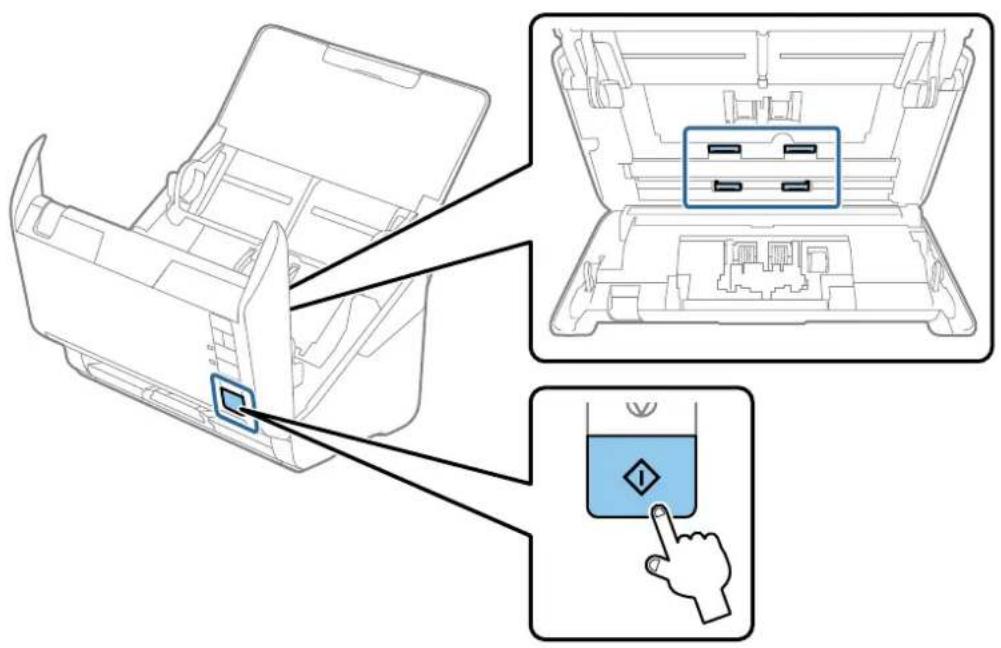

Caution:
Be careful not to get your hands or hair caught in the mechanism when operating the roller. This could cause an injury.
- Close the scanner cover.
The scanner exits cleaning mode.
Related Information
→“Cleaning Kit Codes” on page 25 →“Replacing the Roller Assembly Kit” on page 154
Resetting the Number of Scans After Regular Cleaning
Reset the number of scans using Epson Scan 2 Utility after regular cleaning.
- Turn on the scanner.
- Start Epson Scan 2 Utility.
Windows 10
Click the start button, and then select EPSON > Epson Scan 2 Utility.
Windows 8.1/Windows 8
Start screen > Apps > Epson > Epson Scan 2 Utility.
Windows 7/Windows Vista/Windows XP
Click the start button, and then select All Programs (or Programs) > EPSON > Epson Scan 2 > Epson Scan 2 Utility.
Mac OS
Select Go > Applications > Epson Software > Epson Scan 2 Utility.
- Click the Maintenance tab.
- Click Reset on Regular Cleaning.
Note:
You cannot reset when Regular Cleaning Alert is not selected.
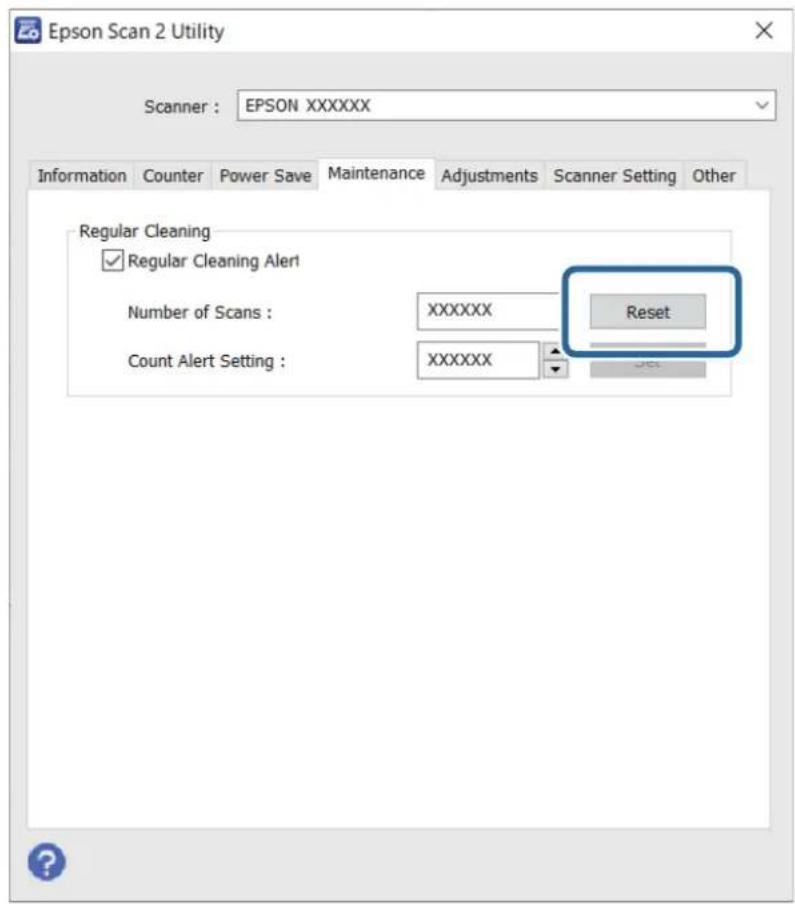
Replacing the Roller Assembly Kit
The roller assembly kit (the pickup roller and the separation roller) needs to be replaced when the number of scans exceeds the life cycle of the rollers. When a replacement message is displayed on your computer screen, follow the steps below to replace it.
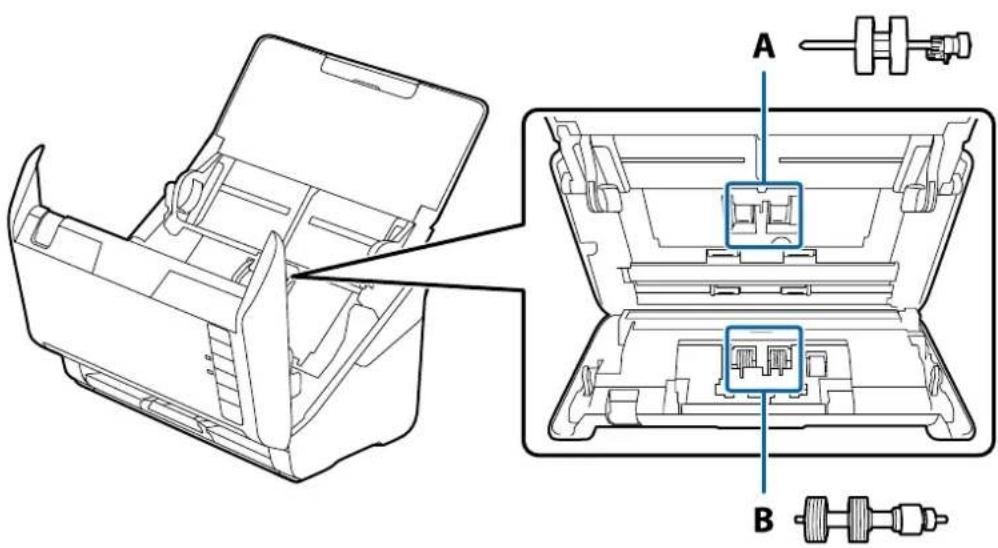
A: pickup roller, B: separation roller
- Press the ⏻ button to turn off the scanner.
- Unplug the AC adapter from the scanner.
- Pull the lever and open the scanner cover.
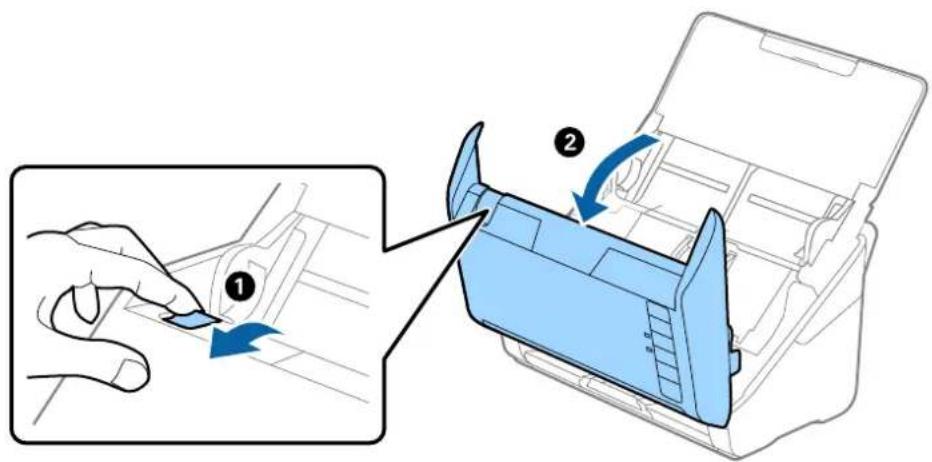
- Open the cover of the pickup roller, and then slide and remove it.
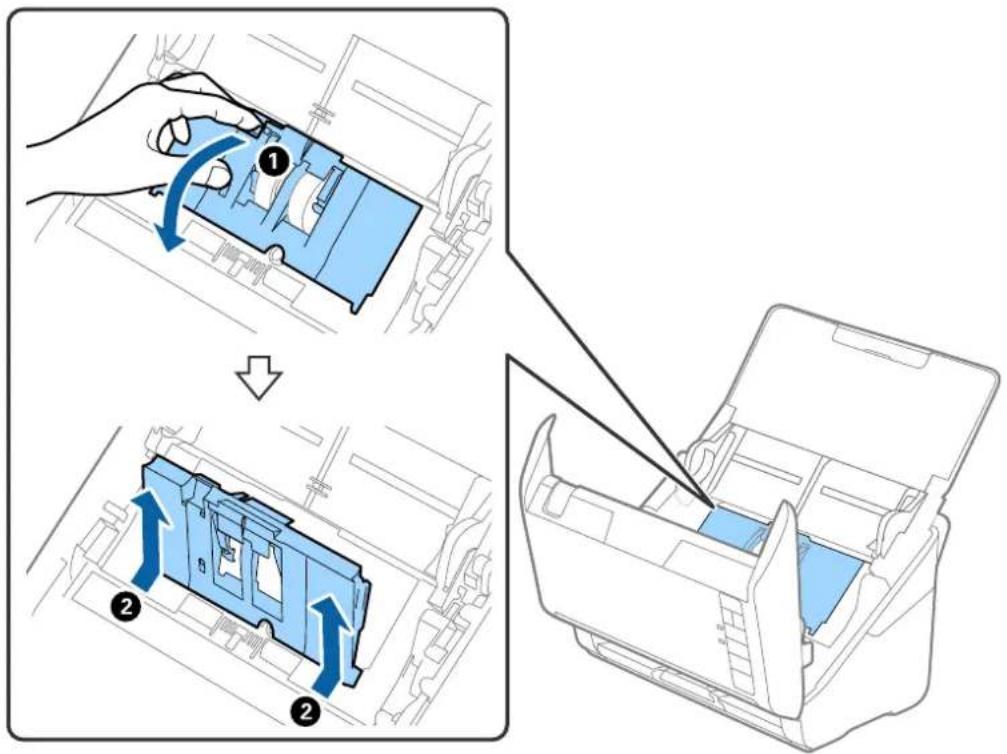
- Pull down the fixture of the roller axis, and then slide and remove the installed pickup rollers.
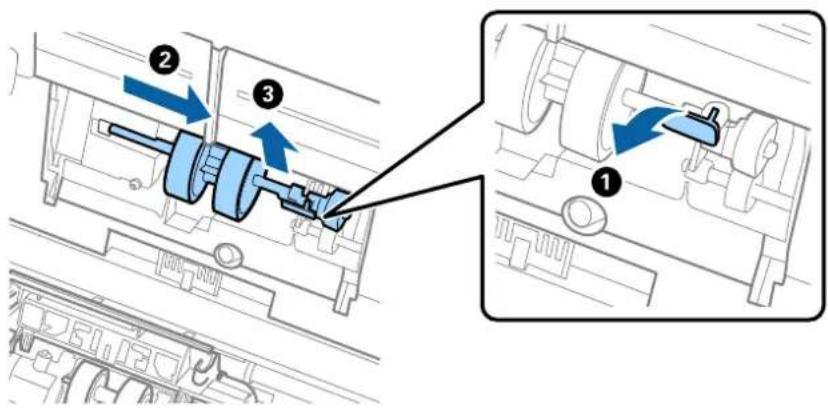

Important:
Do not pull out the pickup roller forcibly. This could damage the inside of the scanner.
- While holding down the fixture, slide the new pickup roller to the left and insert it into the hole in the scanner. Press the fixture to secure it.
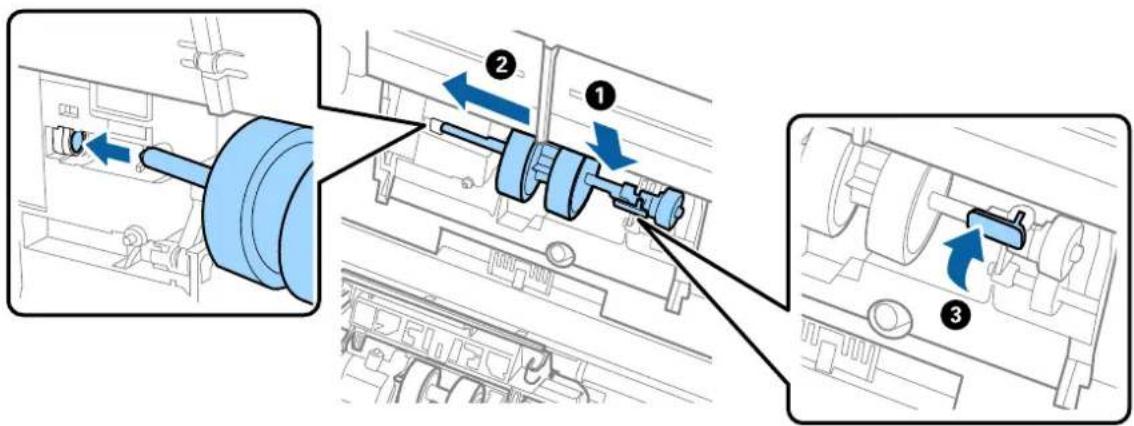
- Put the edge of the cover of the pickup roller into the groove and slide it. Close the cover firmly.
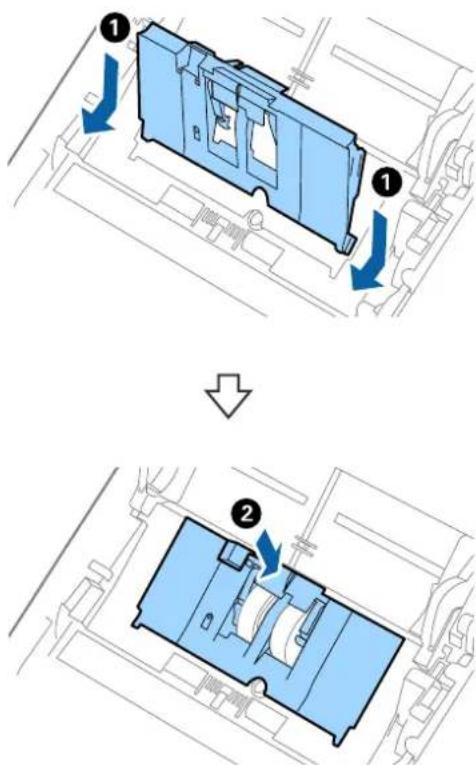

Important:
Make sure the pick up cover is closed correctly. Make sure the pickup rollers are installed correctly if the cover is hard to close. Do not install the cover while it is raised.

- Push the hooks on both ends of the separation roller cover to open the cover.
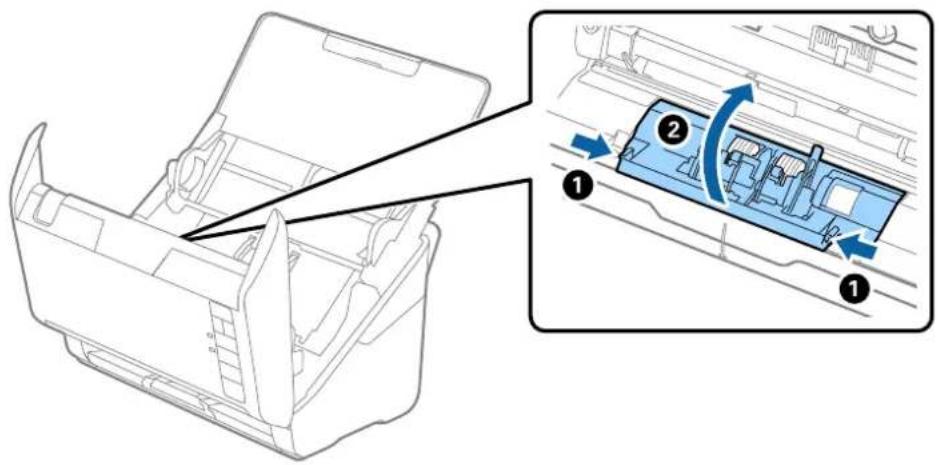
- Lift the left side of the separation roller, then slide and remove the installed separation rollers.
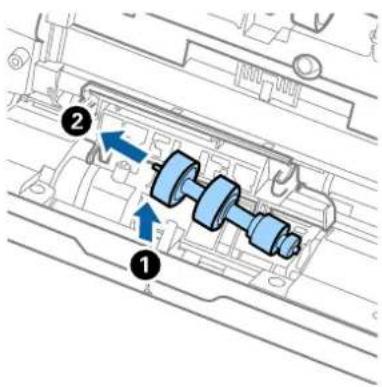
- Insert the new separation roller axis into the hole on the right side, then lower the roller.
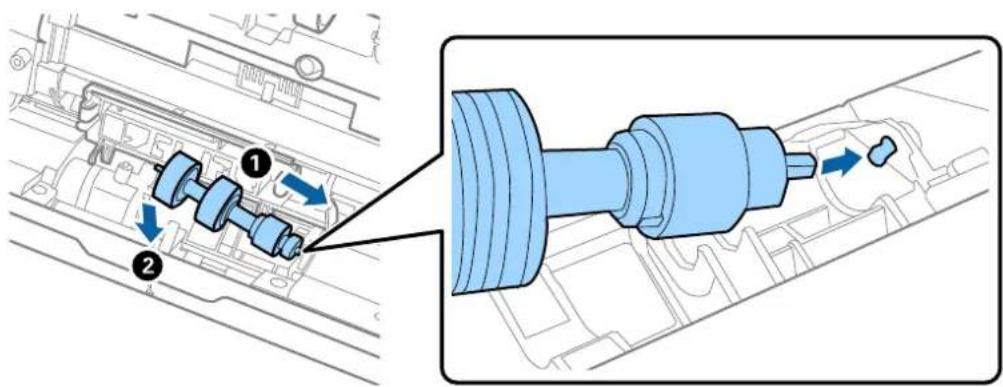
- Close the separation roller cover.

Important:
If the cover is hard to close, make sure the separation rollers are installed correctly.
- Close the scanner cover.
- Plug in the AC adapter, then turn on the scanner.
- Reset the scan number by using Epson Scan 2 Utility.
Note:
Dispose of the pickup roller and the separation roller following the rules and regulations of your local authority. Do not disassemble them.
Related Information
→“Roller Assembly Kit Codes” on page 25
Resetting the Number of Scans After Replacing the Rollers
Reset the number of scans using Epson Scan 2 Utility after replacing the Roller Assembly Kit.
- Turn on the scanner.
- Start Epson Scan 2 Utility.
Windows 10
Click the start button, and then select EPSON > Epson Scan 2 Utility.
Windows 8.1/Windows 8
Start screen > Apps > Epson > Epson Scan 2 Utility.
Windows 7/Windows Vista/Windows XP
Click the start button, and then select All Programs (or Programs) > EPSON > Epson Scan 2 > Epson Scan 2 Utility.
Mac OS
Select Go > Applications > Epson Software > Epson Scan 2 Utility.
- Click the Counter tab.
- Click Reset on Roller Assembly Kit.
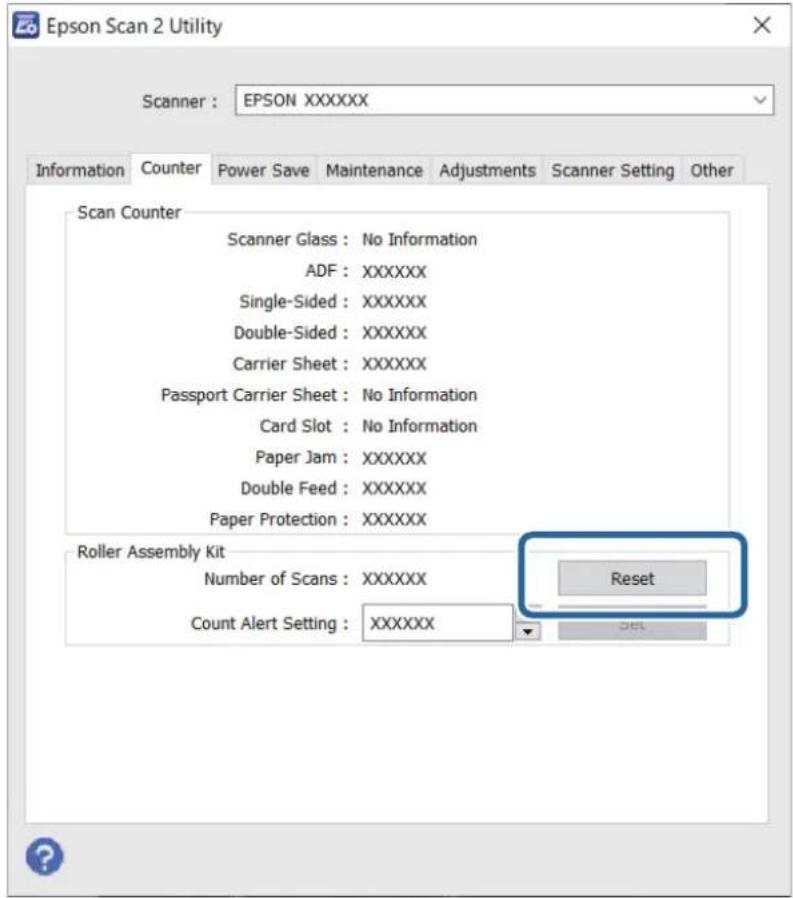
Related Information
→“Replacing the Roller Assembly Kit” on page 154
Energy Saving
You can save energy by using the sleep mode or auto power-off mode when no operations are performed by the scanner. You can set the time period before the scanner enters sleep mode and turns off automatically. Any increase will affect the product's energy efficiency. Consider the environment before making any changes.
- Start Epson Scan 2 Utility.
□Windows 10
Click the start button, and then select EPSON > Epson Scan 2 Utility.
□Windows 8.1/Windows 8
Start screen > Apps > Epson > Epson Scan 2 Utility.
□Windows 7/Windows Vista/Windows XP
Click the start button, and then select All Programs (or Programs) > EPSON > Epson Scan 2 > Epson Scan 2 Utility.
□Mac OS
Select Go > Applications > Epson Software > Epson Scan 2 Utility.
- Click the Power Save tab.
- Set the Sleep Timer (minutes) or Power Off Timer (minutes), and then click Set.
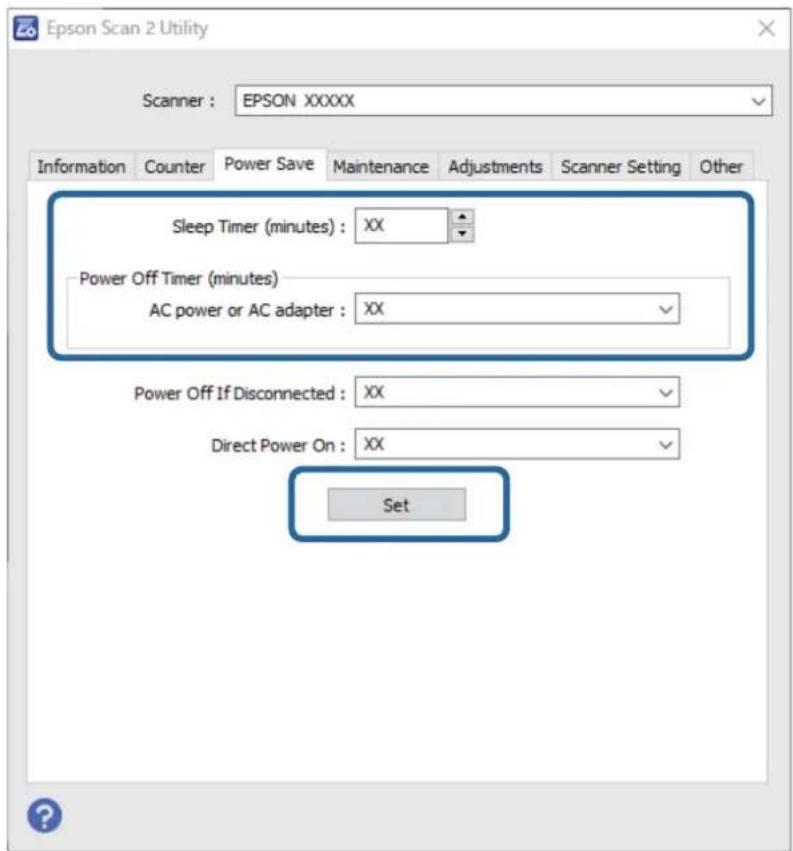
Transporting the Scanner
When you need to transport the scanner to move or for repairs, follow the steps below to pack the scanner.
- Press the ⏻ button to turn off the scanner.
- Unplug the AC adapter from the scanner.
- Remove the USB cable.
- Close the input tray and output tray.
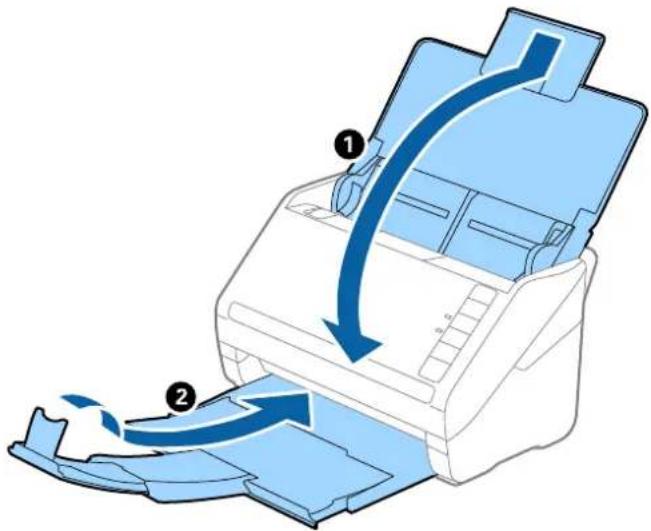

Important:
Make sure you close the output tray securely; otherwise it may be damaged during transport.
- Attach the packing materials that came with the scanner, and then repack the scanner in its original box or a sturdy box.
Updating Applications and Firmware
You may be able to clear certain problems and improve or add functions by updating the applications and the firmware. Make sure you use the latest version of the applications and firmware.

Important:
Do not turn off the computer or the scanner while updating.
- Make sure that the scanner and the computer are connected, and the computer is connected to the internet.
- Start EPSON Software Updater and update the applications or the firmware.
□Windows 10
Click the start button, and then select Epson Software > EPSON Software Updater.
□Windows 8.1/Windows 8
Enter the application name in the search charm, and then select the displayed icon.
Windows 7
Click the start button, and then select All Programs or Programs > Epson Software > EPSON Software Updater.
Mac OS
Select Finder > Go > Applications > Epson Software > EPSON Software Updater.
Note:
If you cannot find the application you want to update in the list, you cannot update using the EPSON Software Updater. Check for the latest versions of the applications on your local Epson website.
http://www.epson.com
Solving Problems
Scanner Problems....164
Problems Starting Scanning....164
Paper Feeding Problems.... 165
Scanned Image Problems....169
Uninstalling and Installing Applications....
Scanner Problems
Scanner Lights Indicate an Error
Check the following if the scanner lights indicate an error.
☐ Make sure there are no originals jammed in the scanner. ☐ When feeding multiple originals, open the ADF cover and remove the originals. Next, close the ADF cover. ☐ Make sure the scanner cover is closed. ☐ Make sure the scanner is connected to your computer properly. ☐ Make sure Epson Scan 2 is installed correctly. ☐ If the firmware update fails and the scanner enters recovery mode, update the firmware again using a USB connection. ☐ Turn off the scanner and turn it on again. If this does not solve the problem, the scanner may be malfunctioning, or the light source in the scanner unit may need to be replaced. Contact your dealer.
Related Information
→ “Error Indicators” on page 22 → “The Original Jams in the Scanner Frequently” on page 167
The Scanner Does Not Turn On
☐ Make sure the AC adapter is securely connected to the scanner and an electrical outlet. ☐ Check that the electrical outlet is working. Plug another device into the electrical outlet and check that you can turn the power on.
Problems Starting Scanning
Cannot Start Scanning from Computer
The Scanner Cannot Connect by USB
The following causes can be considered.
The USB cable is not plugged into the electrical outlet correctly.
Solutions
Connect the USB cable securely to the scanner and the computer.
There is a problem with the USB hub.
Solutions
If you are using a USB hub, try to connect the scanner directly to the computer.
There is a problem with the USB cable or the USB inlet.
Solutions
If the USB cable cannot be recognized, change the port, or change the USB cable.
The scanner is off.
Solutions
Make sure the scanner is turned on.
Also, wait until the status light stops flashing indicating that the scanner is ready to scan.
Cannot Scan Even Though a Connection has been Correctly Established
Required applications are not installed on your computer.
Solutions
Make sure the following applications are installed:
☐ Document Capture Pro (Windows) or Document Capture (Mac OS)
☐ Epson Scan 2
If the applications are not installed, install them again.
Job is not assigned to the scanner button.
Solutions
Check that the job is correctly assigned to the scanner button in Document Capture Pro (Windows) or Document Capture (Mac OS).
If you are using any TWAIN-compliant programs, the correct scanner is not selected as the source setting. (Windows)
Solutions
Make sure that you select the correct scanner from your program's list.
Paper Feeding Problems
Multiple Originals Are Fed (Double Feed)
Check the following when a double feed occurs.
☐ When originals are jammed inside the scanner, open the scanner cover and remove the originals, and then close the scanner cover. ☐ Check the scanned image, and then scan the originals again if necessary.
If multiple originals are fed frequently, try the following.
☐ If you load unsupported originals, the scanner may feed multiple originals at a time.
☐ Clean the rollers inside the scanner.
☐ Reduce the number of originals being placed at a time.
☐ Press the ▶ button to slow down the scanning speed.
Use Automatic Feeding Mode, and scan originals one by one.
When you are using Document Capture Pro, you can open the Epson Scan 2 window by pressing the Detailed Settings button on the Scan Settings screen.
Related Information
→ “Removing Jammed Originals from the Scanner” on page 166 → “Scanning Different Sizes or Types of Originals One by One (Automatic Feeding Mode)” on page 90 → “Cleaning Inside the Scanner” on page 148
Removing Jammed Originals from the Scanner
If an original has jammed inside the scanner, follow these steps to remove it.
- Remove all originals remaining in the input tray.
- Pull the lever and open the scanner cover.

- Carefully remove any originals remaining inside the scanner.
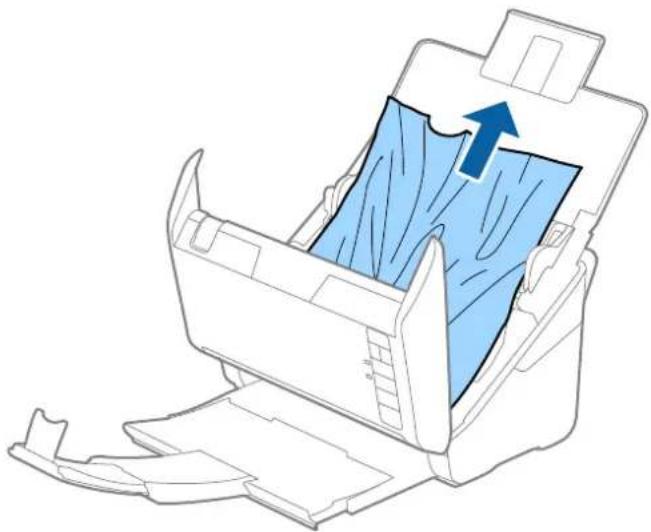
- If you cannot pull originals straight up, carefully pull out any jammed originals from the output tray in the direction of the arrow.
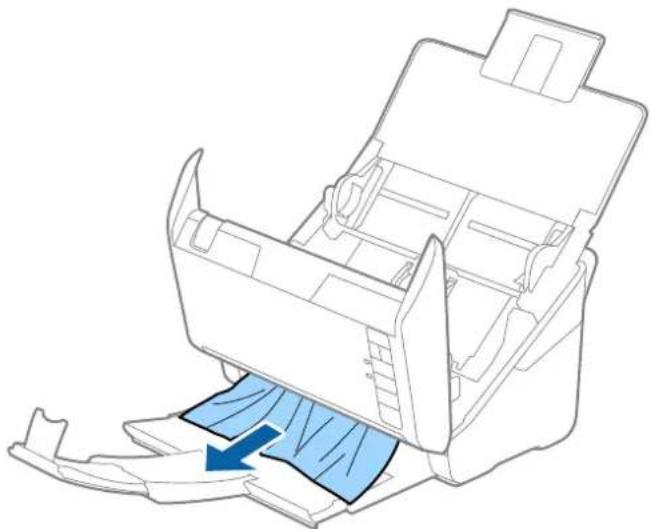

Important:
Make sure there is no paper inside the scanner.
- Close the scanner cover.
The Original Jams in the Scanner Frequently
If the original jams in the scanner frequently, try the following.
Press the ▶ button to slow down the scanning speed.
Clean the rollers inside the scanner.
If the ejected originals get stuck in the output tray, store the output tray and do not use it.
Related Information
→ “Cleaning Inside the Scanner” on page 148
Paper Protection Does Not Work Correctly
Depending on the original and the level you set, this feature may not work correctly.
Select Off to disable the feature when scanning plastic cards or thick paper.
When misdetection occurs frequently, lower the level of this feature.
If your original is damaged, check that this feature is enabled. If it is already enabled, increase the level of protection for the feature.
Related Information
→ “Setting the Document Protection Feature” on page 132
The Originals Get Dirty
Clean the inside of the scanner.
Related Information
→ “Cleaning Inside the Scanner” on page 148
Scanning Speed Slows Down when Scanning Continuously
When scanning continuously using the ADF, scanning slows down to prevent the scanner mechanism from overheating and being damaged. However, you can continue scanning.
To regain normal scanning speed, leave the scanner idle for at least 30 minutes. Scanning speed does not recover even if the power is off.
Scanning Takes a Long Time
☐ The scanning speed may slow down depending on the scanning conditions, such as high resolution, image adjustment features, file format, and so on. Computers with USB 3.0 (SuperSpeed) or USB 2.0 (Hi-Speed) ports can scan faster than those with USB 1.1 ports. If you are using a USB 3.0 or USB 2.0 port with the scanner, make sure it meets the system requirements. - When using security software, exclude the TWAIN.log file from monitoring, or set the TWAIN.log as a read-only file. For more information on your security software's functions, see the help and so on supplied with the software. The TWAIN.log file is saved in the following locations. C:\Users\user name\AppData\Local\Temp
Scanned Image Problems
Straight Lines Appear when Scanning from ADF
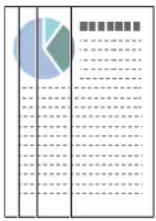
□ Clean the ADF.
Straight lines may appear in the image when trash or dirt gets into the ADF.
☐ Remove any trash or dirt that adheres to the original. ☐ Using Detect Glass Dirt feature, alert message appears when dirt is detected on the scanner glass.
Select Scanner Setting tab and then select On-High or On-Low from Detect Glass Dirt in Epson Scan 2 Utility.
When an alert is displayed, clean the glass surfaces inside your scanner using a genuine Epson cleaning kit or a soft cloth.
Note:
☐ Depending on the dirt, it may not be detected correctly. ☐ If the detection does not work correctly, change the setting.
Select On-High if the dirt is not detected. Select On-Low or Off if the alert is displayed by a misdetection.
Related Information
→“Cleaning Inside the Scanner” on page 148
Glass Dirt Alert Does Not Disappear
If the glass dirt alert screen appears after cleaning the inside of the scanner, check the glass surface again. If there are scratches on the glass, they will be detected as glass dirt.
The glass part will need to be replaced. Contact your local dealer for repair.
Colors Are Uneven in the Scanned Image

If the scanner is subject to strong light such as direct sunlight, the sensor inside the scanner misdetects the light and colors in the scanned image become uneven.
☐ Change the orientation of the scanner so that no strong light is falling on the front of the scanner. ☐ Move the scanner to a location where it will not be subjected to strong light.
Expanding or Contracting the Scanned Image
When expanding or contracting the scanned image, you can adjust the expansion ratio by using the Adjustments feature in Epson Scan 2 Utility. This feature is only available for Windows.
Note:
Epson Scan 2 Utility is one of the applications supplied with the scanner software.
- Start Epson Scan 2 Utility.
□ Windows 10
Click the start button, and then select EPSON > Epson Scan 2 Utility.
Windows 8.1/Windows 8
Enter the application name in the search charm, and then select the displayed icon.
Windows 7
Click the start button, and then select All Programs or Programs > EPSON > Epson Scan 2 > Epson Scan 2 Utility.
- Select the Adjustments tab.
- Use Expansion/Contraction to adjust the expansion ratio for scanned images.
- Click Set to apply the settings to the scanner.
Offset Appears in the Background of Images
Images on the back of the original may appear in the scanned image.
When Auto, Color, or Grayscale is selected as the Image Type:
Check that Remove Background is selected in the Epson Scan 2 window. When you are using Document Capture Pro, you can open the window by pressing the Detailed Settings button on the Scan Settings screen.
Click the Advanced Settings tab > Remove Background.
Check that Text Enhancement is selected.
Document Capture Pro (Windows)/Document Capture (Mac OS X): Click Scan Settings > Text Enhancement.
Epson Scan 2: Click the Advanced Settings tab > Text Enhancement.
When Black & White is selected as the Image Type:
Check that Text Enhancement is selected.
Document Capture Pro (Windows)/Document Capture (Mac OS X): Click Scan Settings > Text Enhancement.
Epson Scan 2: Click the Advanced Settings tab > Text Enhancement.
Depending on the condition of your scanned image, click Settings in the Epson Scan 2 window and try setting a lower level for Edge Enhancement or a higher level for Noise Reduction Level.
Scanned Image or Text is Blurred
You can adjust the appearance of the scanned image or text by increasing the resolution or adjusting the image quality.
Change the resolution, and then scan again.
Set the appropriate resolution for the purpose of your scanned image.
Check that Text Enhancement is selected.
Document Capture Pro (Windows)/Document Capture (Mac OS X): Click Scan Settings > Text Enhancement.
Epson Scan 2: Click the Advanced Settings tab > Text Enhancement.
When Black & White is selected as the Image Type:
Depending on the condition of your scanned image, click Settings in the Epson Scan 2 window and try setting a lower level for Edge Enhancement or a higher level for Noise Reduction Level.
If you are scanning in JPEG format, try changing the compression level.
Document Capture Pro (Windows)/Document Capture (Mac OS X): Click Option on the Save Settings screen, and then change the image quality for JPEG.
Epson Scan 2: Click Image Format > Options, and then change the Image Quality.
List of Recommended Resolutions to Suit Your Purpose
See the table and set the appropriate resolution for the purpose of your scanned image.
| Purpose Resolution (Reference) | |
| Displaying on a screenSending by email | Up to 200 dpi |
| Using Optical Character Recognition (OCR)Creating a text searchable PDF | 200 to 300 dpi |
| Printing using a printerSending by fax | 200 to 300 dpi |
Moiré Patterns (Web-Like Shadows) Appear
If the original is a printed document, moiré patterns (web-like shadows) may appear in the scanned image.
Check that Descreening is selected in the Epson Scan 2 window. When you are using Document Capture Pro, you can open the window by pressing the Detailed Settings button on the Scan Settings screen.
Click the Advanced Settings tab > Descreening.
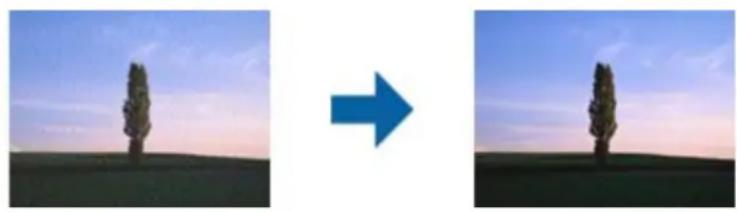
Change the resolution, and then scan again.
The Edge of the Original is Not Scanned when Automatically Detecting the Size of the Original
Depending on the original, the edge of the original may not be scanned when automatically detecting the size of the original.
Adjust Crop Margins for Size "Auto" in the Epson Scan 2 window. When you are using Document Capture Pro, you can open the window by pressing the Detailed Settings button on the Scan Settings screen.
Click the Main Settings tab > Document Size > Settings. On the Document Size Settings screen, adjust Crop Margins for Size "Auto".
Depending on the original, the area of the original may not be detected correctly when using the Auto Detect feature. Select the appropriate size of the original from the Document Size list.
Note:
If the size of the original you want to scan is not on the list, create the size manually in the Epson Scan 2 window. When you are using Document Capture Pro, you can open the window by pressing the Detailed Settings button on the Scan Settings screen.
Click the Main Settings tab > Document Size, and then select Customize.
Character is not Recognized Correctly
Check the following to increase the recognition rate of OCR (Optical Character Recognition).
☐ Check that the original is placed straight. ☐ Use an original with clear text. Text recognition may decline for the following types of originals.
☐ Originals that have been copied a number of times ☐ Originals received by fax (at low resolutions) ☐ Originals on which the letter spacing or line spacing is too small ☐ Originals with ruled lines or underlining over the text ☐ Originals with hand-written text ☐ Originals with creases or wrinkles
☐ Paper type made of thermal paper such as receipts may deteriorate due to age or friction. Scan them as soon as possible.
☐ When saving to Microsoft® Office or Searchable PDF files, check that the correct languages are selected.
Cannot Solve Problems in the Scanned Image
If you have tried all of the solutions and have not solved the problem, initialize the application settings by using Epson Scan 2 Utility.
Note:
Epson Scan 2 Utility is one of the applications supplied with the scanner software.
- Start Epson Scan 2 Utility.
☐ Windows 10
Click the start button, and then select EPSON > Epson Scan 2 Utility.
□Windows 8.1/Windows 8
Enter the application name in the search charm, and then select the displayed icon.
□Windows 7
Click the start button, and then select All Programs or Programs > EPSON > Epson Scan 2 > Epson Scan 2 Utility.
□Mac OS
Select Go > Applications > Epson Software > Epson Scan 2 Utility.
- Select the Other tab.
- Click Reset.
Note:
If initialization does not solve the problem, uninstall and re-install the scanner driver (Epson Scan 2).
Uninstalling and Installing Applications
Uninstalling Your Applications
You may need to uninstall and then reinstall your applications to solve certain problems or if you upgrade your operating system. Log on to your computer as an administrator. Enter the administrator password if the computer prompts you.
Uninstalling Your Applications for Windows
- Quit all running applications.
- Disconnect the scanner from your computer.
- Open the Control Panel:
Windows 10
Right-click the start button or press and hold it, and then select Control Panel.
Windows 8.1/Windows 8 Select Desktop > Settings > Control Panel.
Windows 7 Click the start button and select Control Panel.
- Select Uninstall a program in Programs.
- Select the application you want to uninstall.
- Click Uninstall/Change or Uninstall.
Note: If the User Account Control window is displayed, click Continue.
- Follow the on-screen instructions.
Note: A message may be displayed prompting you to restart your computer. If it is displayed, make sure I want to restart my computer now is selected, and then click Finish.
Uninstalling Your Applications for Mac OS
Note:
Make sure you installed EPSON Software Updater.
- Download the Uninstaller using EPSON Software Updater. Once you have downloaded the Uninstaller, you do not need to download it again each time you uninstall the application.
- Disconnect the scanner from your computer.
- To uninstall the scanner driver, select System Preferences from the Apple menu > Printers & Scanners (or Print & Scan, Print & Fax), and then remove the scanner from the enabled scanner list.
- Quit all running applications.
- Select Go > Applications > Epson Software > Uninstaller.
- Select the application you want to uninstall, and then click Uninstall.

Important:
The Uninstaller removes all drivers for Epson scanners on the computer. If you use multiple Epson scanners and you only want to delete some of the drivers, delete all of them first, and then install the necessary scanner drivers again.
Note:
If you cannot find the application you want to uninstall in the application list, you cannot uninstall using the Uninstaller. In this situation, select Go > Applications > Epson Software, select the application you want to uninstall, and then drag it to the trash icon.
Installing Your Applications
Follow the steps below to install the necessary applications.
Note:
Log on to your computer as an administrator. Enter the administrator password if the computer prompts you. When reinstalling applications, you need to uninstall them first.
- Quit all running applications.
- When installing scanner driver (Epson Scan 2), disconnect the scanner and the computer temporarily.
Note:
Do not connect the scanner and the computer until you are instructed to do so.
- Install the application by following the instructions on the Website below.
Note:
For Windows, you can also use the software disc that came with the scanner.
Technical Specifications
General Scanner Specifications....177
Dimensions and Weight Specifications....
Electrical Specifications....178
Environmental Specifications....1
Flatbed Scanner Dock Specifications....
System Requirements.... 179
General Scanner Specifications
Note:
Specifications are subject to change without notice.
| Scanner type Sheet Feed, one pass duplex color scanner | |
| Photoelectric device CIS | |
| Effective pixels 5,100×9,300 at 600 dpi | 2,550×64,500 at 300 dpi |
| Light source RGB LED | |
| Scanning resolution 600 dpi (main scan) | 600 dpi (sub scan) |
| Output resolution | 50 to 1200 dpi (in 1 dpi increments) *1 |
| Document Size Max: 215.9×6,096 mm (8.5×240 inches)Min: 50.8×50.8 mm (2×2 inches) | |
| Paper input Face-down loading | |
| Paper output Face-down ejection | |
| Paper capacity 50 sheets of paper at 80 g/m 2 | |
| Color Depth Color | ☐30 bits per pixel internal (10 bits per pixel per color internal)☐24 bits per pixel external (8 bits per pixel per color external)Grayscale☐10 bits per pixel internal☐8 bits per pixel externalBlack and white☐10 bits per pixel internal☐1 bit per pixel external |
| Interface SuperSpeed USB | |
*1 You can scan long paper in the following resolutions. ☐1,346.0 mm (53 in.) or less:up to 600 dpi ☐5,461.0 mm (215 in.) or less:up to 300 dpi ☐6,096.0 mm (220 in.) or less:up to 200 dpi
Dimensions and Weight Specifications
| Dimensions * Width: 296 mm | (11.7 inches)Depth: 169 mm (6.7 inches)Height: 176 mm (6.9 inches) |
| Weight Approx. 3.7 kg (8.2 lb) |
* Without protruding parts and the input tray.
Electrical Specifications
Scanner Electrical Specifications
| Rated DC Input Power Supply Voltage DC 24 V |
| Rated DC Input Current 1 A |
| Power Consumption ☐Operating: Approx. 11 W☐Ready mode: Approx. 5.4 W☐Sleep mode : Approx. 1.0 W☐Power off: Approx. 0.1 W |
Note:
For European users, see the following Website for details on power consumption.
http://www.epson.eu/energy-consumption
AC Adapter Electrical Specifications
| Model A461H (AC 100-240 V) | A462E (AC 220-240 V) |
| Rated Input Current 1 A | |
| Rated Frequency Range 50-60 Hz | |
| Rated Output Power Supply Voltage DC 24 V | |
| Rated Output Current 1 A |
Note:
For European users, see the following Website for details on power consumption.
http://www.epson.eu/energy-consumption
Environmental Specifications
| Temperature When operating | 5 to 35 °C (41 to 95 °F) | |
| When stored -25 to 60 °C (-13 to 140 °F) | ||
| Humidity When operating | 15 to 80% (without condensation) | |
| When stored 15 to 85% (without condensation) | ||
| Operating conditions Ordinary office or home conditions. Avoid operating the scanner in direct sunlight, near a strong light source, or in extremely dusty conditions. | ||
Flatbed Scanner Dock Specifications
| Interface Hi-Speed USB | ||
| Rated DC Input Power Supply Voltage DC 24 V | ||
| Dimensions Width: 300 mm (11.8 inches) | Depth: 481 mm (18.9 inches)Height: 245 mm (9.6 inches)Assembled with the Sheet Feed Scanner and the Flatbed Scanner | |
| Weight Approx. 1.1 kg (2.4 lb) | ||
| Temperature When operating | 10 to 35 °C (50 to 95 °F) | |
| When stored -20 to 60 °C (-4 to 140 °F) | ||
| Humidity When operating | 20 to 80% (without condensation) | |
| When stored 20 to 85% (without condensation) | ||
System Requirements
Supported operating systems may vary depending on the application.
| Windows Windows 10 (32-bit, 64-bit) | Windows 8.1 (32-bit, 64-bit)Windows 8 (32-bit, 64-bit)Windows 7 (32-bit, 64-bit) |
| Mac OS*1 *2 | macOS Catalina |
| macOS Mojave | |
| macOS High Sierra | |
| macOS Sierra | |
| OS X El Capitan | |
| OS X Yosemite |
*1 Fast User Switching on Mac OS or later is not supported. *2 The UNIX File System (UFS) for Mac OS is not supported.
Standards and Approvals
Standards and Approvals for European Models....
Standards and Approvals for Australian Models....
Standards and Approvals for U.S. Models....182
Standards and Approvals for European Models
Product and AC adapter
The following models are CE marked and in compliance with all the applicable EU Directives. For further details, visit the following website to access the full declaration of conformities containing reference to the Directives and harmonized standards used to declare conformity.
http://www.epson.eu/conformity
J382D
A461H, A462E
Flatbed Scanner Dock option
The following model is CE marked and in compliance with all the applicable EU Directives. For further details, visit the following website to access the full declaration of conformities containing reference to the Directives and harmonized standards used to declare conformity.
http://www.epson.eu/conformity
J381FBSD
Standards and Approvals for Australian Models
Product
| EMC AS/NZS CISPR32 Class B |
AC adapter (A461H)
| Safety AS/NZS 60950.1 | |
| EMC AS/NZS CISPR32 Class B |
Flatbed Scanner Dock option
| EMC AS/NZS CISPR32 Class B |
Standards and Approvals for U.S. Models
Product
| EMC FCC Part 15 Subpart B Class B | CAN ICES-3 (B)/NMB-3 (B) |
AC adapter (A461H)
| Safety UL60950-1 | CAN/CSA-C22.2 No.60950-1 |
| EMC FCC Part 15 Subpart B Class B | CAN ICES-3 (B)/NMB-3 (B) |
Flatbed Scanner Dock option
| EMC FCC Part 15 Subpart B Class B | CAN/CSA-CEI/IEC CISPR 22 Class B |
Where to Get Help
Technical Support Web Site....185
Contacting Epson Support....185
Technical Support Web Site
If you need further help, visit the Epson support website shown below. Select your country or region and go to the support section of your local Epson website. The latest drivers, FAQs, manuals, or other downloadables are also available from the site.
http://support.epson.net/
http://www.epson.eu/support (Europe)
If your Epson product is not operating properly and you cannot solve the problem, contact Epson support services for assistance.
Contacting Epson Support
Before Contacting Epson
If your Epson product is not operating properly and you cannot solve the problem using the troubleshooting information in your product manuals, contact Epson support services for assistance. If Epson support for your area is not listed below, contact the dealer where you purchased your product.
Epson support will be able to help you much more quickly if you give them the following information:
Product serial number
(The serial number label is usually on the back of the product.)
Product model
Product software version
(Click About, Version Info, or a similar button in the product software.)
Brand and model of your computer
Your computer operating system name and version
Names and versions of the software applications you normally use with your product
Note:
Depending on the product, the dial list data for fax and/or network settings may be stored in the product's memory. Due to breakdown or repair of a product, data and/or settings may be lost. Epson shall not be responsible for the loss of any data, for backing up or recovering data and/or settings even during a warranty period. We recommend that you make your own backup data or take notes.
Help for Users in Europe
Check your Pan-European Warranty Document for information on how to contact Epson support.
Help for Users in Taiwan
Contacts for information, support, and services are:
World Wide Web
http://www.epson.com.tw
Information on product specifications, drivers for download, and product enquiries are available.
Epson HelpDesk
Phone: +886-2-80242008
Our HelpDesk team can help you with the following over the phone:
Sales enquiries and product information, product usage questions or problems, enquiries on repair service and warranty.
Repair service center:
http://www.tekcare.com.tw/branchMap.page
TekCare corporation is an authorized service center for Epson Taiwan Technology & Trading Ltd.
Help for Users in Australia
Epson Australia wishes to provide you with a high level of customer service. In addition to your product manuals, we provide the following sources for obtaining information:
Internet URL
http://www.epson.com.au
Access the Epson Australia World Wide Web pages. Worth taking your modem here for the occasional surf! The site provides a download area for drivers, Epson contact points, new product information and technical support (e-mail).
Epson Helpdesk
Phone: 1300-361-054
Epson Helpdesk is provided as a final backup to make sure our clients have access to advice. Operators on the Helpdesk can aid you in installing, configuring and operating your Epson product. Our Pre-sales Helpdesk staff can provide literature on new Epson products and advise where the nearest dealer or service agent is located. Many types of queries are answered here.
We encourage you to have all the relevant information on hand when you ring. The more information you prepare, the faster we can help solve the problem. This information includes your Epson product manuals, type of computer, operating system, application programs, and any information you feel is required.
Transportation of Product
Epson recommends retaining product packaging for future transportation.
Help for Users in Singapore
Sources of information, support, and services available from Epson Singapore are:
World Wide Web
http://www.epson.com.sg
Information on product specifications, drivers for download, Frequently Asked Questions (FAQ), Sales Enquiries, and Technical Support via e-mail are available.
Epson HelpDesk
Toll Free: 800-120-5564
Our HelpDesk team can help you with the following over the phone:
Sales enquiries and product information
Product usage questions or problem troubleshooting
Enquiries on repair service and warranty
Help for Users in Thailand
Contacts for information, support, and services are:
World Wide Web
http://www.epson.co.th
Information on product specifications, drivers for download, Frequently Asked Questions (FAQ), and e-mail are available.
Epson Call Centre
Phone: 66-2685-9899
Email: support@eth.epson.co.th
Our Call Centre team can help you with the following over the phone:
Sales enquiries and product information
Product usage questions or problems
Enquiries on repair service and warranty
Help for Users in Vietnam
Contacts for information, support, and services are:
Epson Service Center
65 Truong Dinh Street, District 1, Ho Chi Minh City, Vietnam.
Phone (Ho Chi Minh City): 84-8-3823-9239, 84-8-3825-6234
29 Tue Tinh, Quan Hai Ba Trung, Hanoi City, Vietnam
Phone (Hanoi City): 84-4-3978-4785, 84-4-3978-4775
Help for Users in Indonesia
Contacts for information, support, and services are:
World Wide Web
http://www.epson.co.id
Information on product specifications, drivers for download
Frequently Asked Questions (FAQ), Sales Enquiries, questions through e-mail
Epson Hotline
Phone: +62-1500-766
Fax: +62-21-808-66-799
Our Hotline team can help you with the following over the phone or fax:
□ Sales enquiries and product information
□ Technical support
Epson Service Center
| Province Company Name Address Phone | |||
| DKI JAKARTA ESS | JAKARTA MANGGADUA | Ruko Mall Mangga Dua No. 48 JI. Arteri Mangga Dua, Jakarta Utara - DKI JAKARTA | (+6221) 62301104jkt-admin@epson-indonesia.co.id |
| NORTH SUMATERA | ESC MEDAN JI. Bambu | 2 Komplek Graha Niaga Nomor A-4, Medan - North Sumatera | (+6261) 42066090 / 42066091mdn-adm@epson-indonesia.co.id |
| WEST JAWA ESC | BANDUNG JI. Cihampelas | No. 48 A Bandung Jawa Barat 40116 | (+6222) 4207033bdg-admin@epson-indonesia.co.id |
| DI YOGYAKARTA | ESC YOGYAKARTA YAP | Square, Block A No. 6 JI. C Simanjutak Yogyakarta - DIY | (+62274) 581065ygy-admin@epson-indonesia.co.id |
| EAST JAWA ESC | SURABAYA Hitech Mall | Lt. 2 Block A No. 24 JI. Kusuma Bangsa No. 116 - 118 Surabaya - JATIM | (+6231) 5355035sby-admin@epson-indonesia.co.id |
| SOUTH SULAWESI | ESC MAKASSAR | Jl. Cendrawasih NO. 3A, kunjung mae, mariso, MAKASSAR - SULSEL 90125 | (+62411) 8911071mksr-admin@epson-indonesia.co.id |
| WEST KALIMANTAN | ESC PONTIANAK | Komp. A yani Sentra Bisnis G33, JI. Ahmad Yani - Pontianak Kalimantan Barat | (+62561) 735507 / 767049pontianak-admin@epson-indonesia.co.id |
| RIAU | ESC PEKANBARU | Jl. Tuanku Tambusai No.459A Pekanbaru Riau | (+62761) 8524695pkb-admin@epson-indonesia.co.id |
| DKI JAKARTA ESS | JAKARTASUDIRMAN | Wisma Keiai Lt. 1 JI. Jenderal Sudirman Kav.3 Jakarta Pusat - DKI JAKARTA 10220 | (+6221) 5724335ess@epson-indonesia.co.id |
| EAST JAWA ESS | SURABAYA Ruko Surya Inti JI. Jawa No 2-4 Kav. 29Surabaya - Jawa Timur | (+6231) 5014949esssby@epson-indonesia.co.id | |
| BANTEN ESS SERPONG Ruko Mall WTC Matahari No. 953, Serpong-Banten | (+6221) 53167051 / 53167052esstag@epson-indonesia.co.id | ||
| CENTRALJAWA | ESS SEMARANG Komplek Ruko Metro Plaza Block C20 JI. MTHaryono No 970 Semarang - JAWA TENGAH | (+6224) 8313807 / 8417935esssmg@epson-indonesia.co.id | |
| EASTKALIMANTAN | ESC SAMARINDA JI. KH. Wahid Hasyim (M. Yamin) KelurahanSempaja Selatan Kecamatan SamarindaUTARA - SAMARINDA - KALTIM | (+62541) 7272904escsmd@epson-indonesia.co.id | |
| SOUTHSUMATERA | ESC PALEMBANG JI. HM Rasyid Nawawi No. 249 Kelurahan 9Ilir Palembang Sumatera Selatan | (+62711) 311330escplg@epson-indonesia.co.id | |
| EAST JAVA ESC | EMBER JL. Panglima Besar Sudirman Ruko no.1DJember-Jawa Timur (Depan Balai Penelitian& Pengolahan Kakao) | (+62331) 488373 / 486468jmr-admin@epson-indonesia.co.id | |
| NORTHSULAWESI | ESC MANADO Tekno Megamall Lt LG 11 TK 21, KawasanMegamas Boulevard, JI Piere Tendean,Manado - SULUT 95111 | (+62431) 8890996MND-ADMIN@EPSON-INDONESIA.CO.ID | |
For other cities not listed here, call the Hot Line: 08071137766.
Help for Users in Hong Kong
To obtain technical support as well as other after-sales services, users are welcome to contact Epson Hong Kong Limited.
Internet Home Page
http://www.epson.com.hk
Epson Hong Kong has established a local home page in both Chinese and English on the Internet to provide users with the following information:
Product information □ Answers to Frequently Asked Questions (FAQs) ☐ Latest versions of Epson product drivers
Technical Support Hotline
You can also contact our technical staff at the following telephone and fax numbers:
Phone: 852-2827-8911
Fax: 852-2827-4383
Help for Users in Malaysia
Contacts for information, support, and services are:
World Wide Web
http://www.epson.com.my
Information on product specifications, drivers for download, Frequently Asked Questions (FAQ), Sales Enquiries, questions through e-mail
Epson Call Centre
Phone: +60 1800-8-17349
Sales enquiries and product information, Product usage questions or problems, Enquiries on repair services and warranty
Head Office
Phone: 603-56288288
Fax: 603-5628 8388/603-5621 2088
Help for Users in India
Contacts for information, support, and services are:
World Wide Web
http://www.epson.co.in
Information on product specifications, drivers for download, and product inquiries are available.
Helpline
□Service, product information, and ordering consumables (BSNL Lines) Toll-free number: 18004250011 Accessible 9am to 6pm, Monday through Saturday (Except public holidays) □Service (CDMA & Mobile Users) Toll-free number: 186030001600 Accessible 9am to 6pm, Monday through Saturday (Except public holidays)
Help for Users in the Philippines
To obtain technical support as well as other after-sales services, users are welcome to contact the Epson Philippines Corporation at the telephone, fax numbers, and e-mail address below:
World Wide Web
http://www.epson.com.ph
Information on product specifications, drivers for download, Frequently Asked Questions (FAQ), and E-mail inquiries are available.
Epson Philippines Customer Care
Toll Free: (PLDT) 1-800-1069-37766
Toll Free: (Digital) 1-800-3-0037766
Metro Manila: (+632)441-9030
Web Site: https://www.epson.com.ph/contact
E-mail: customercare@epc.epson.som.ph
Accessible 9am to 6pm, Monday through Saturday (Except public holidays)
Our Customer Care team can help you with the following over the phone:
Sales enquiries and product information
Product usage questions or problems
Enquiries on repair service and warranty
Epson Philippines Corporation
Trunk Line: +632-706-2609
Fax: +632-706-2663

- COPYRIGHT
- TRADEMARKS
- CONTENTS
- ABOUT THIS MANUAL
- IMPORTANT INSTRUCTIONS
- PRODUCT FEATURES
- SCANNER BASICS
- SPECIFICATIONS OF ORIGINALS AND PLACING ORIGINALS
- BASIC SCANNING
- ADVANCED SCANNING
- USEFUL FEATURES
- USING THE FLATBED SCANNER DOCK
- MAINTENANCE
- SOLVING PROBLEMS
- TECHNICAL SPECIFICATIONS
- STANDARDS AND APPROVALS
- WHERE TO GET HELP
- INTRODUCTION TO THE MANUALS
- MARKS AND SYMBOLS
- RELATED INFORMATION
- DESCRIPTIONS USED IN THIS MANUAL
- OPERATING SYSTEM REFERENCES
- WINDOWS
- MAC OS
- SAFETY INSTRUCTIONS
- RESTRICTIONS ON COPYING
- NOTE
- PAPER PROTECTION TO REDUCE DAMAGE TO THE ORIGINALS
- NOTIFICATION OF DIRT ON THE SENSOR
- DOUBLE-FEED DETECTION FEATURE WITH SELECTABLE STOP TIMING
- HIGH-QUALITY SCANNING WITH AUTOMATIC DOCUMENT DETECTION
- PART NAMES AND FUNCTIONS
- INSIDE
- BUTTONS AND LIGHTS ON THE CONTROL PANEL
- LIGHTS
- ERROR INDICATORS
- INFORMATION ON APPLICATIONS
- APPLICATION FOR SCANNING DOCUMENTS (DOCUMENT CAPTURE PRO / DOCUMENT CAPTURE)
- STARTING ON WINDOWS
- STARTING ON MAC OS
- APPLICATION FOR CONTROLLING THE SCANNER (EPSON SCAN 2)
- APPLICATION FOR UPDATING SOFTWARE AND FIRMWARE (EPSON SOFTWARE UPDATER)
- SOFTWARE FOR MANAGING DEVICES ON THE NETWORK (EPSON DEVICE ADMIN)
- APPLICATION FOR CREATING DRIVER PACKAGES (EPSONNET SETUPMANAGER)
- OPTION ITEMS AND CONSUMABLES INFORMATION
- CARRIER SHEET CODES
- ROLLER ASSEMBLY KIT CODES
- CLEANING KIT CODES
- FLATBED SCANNER DOCK CODES
- SPECIFICATIONS OF ORIGINALS
- GENERAL SPECIFICATIONS FOR ORIGINALS BEING SCANNED
- SPECIFICATIONS OF STANDARD SIZE ORIGINALS
- SPECIFICATIONS OF LONG PAPER
- SPECIFICATIONS OF PLASTIC CARDS
- SPECIFICATIONS OF LAMINATED CARDS
- SPECIFICATIONS FOR ORIGINALS USING THE CARRIER SHEET
- SPECIFICATIONS OF ENVELOPES
- TYPES OF ORIGINALS THAT REQUIRE ATTENTION
- TYPES OF ORIGINALS THAT MUST NOT BE SCANNED
- PLACING ORIGINALS
- STANDARD SIZE ORIGINALS
- PLACING STANDARD SIZE ORIGINALS
- LONG PAPER
- PLACING LONG PAPER
- PLASTIC CARDS
- PLACING PLASTIC CARDS
- IMPORTANT
- LAMINATED CARDS
- PLACING LAMINATED CARDS
- LARGE SIZE ORIGINALS
- SPECIFICATIONS OF LARGE SIZE ORIGINALS
- PLACING LARGE SIZE ORIGINALS
- IRREGULAR SHAPED ORIGINALS
- SPECIFICATIONS OF IRREGULAR SHAPED ORIGINALS
- PLACING IRREGULAR SHAPED ORIGINALS
- PHOTOGRAPHS
- SPECIFICATIONS OF PHOTOGRAPHS
- PLACING PHOTOGRAPHS
- ENVELOPES
- PLACING ENVELOPES
- MIXTURE OF ORIGINALS
- SPECIFICATIONS OF ORIGINALS THAT ARE A MIXTURE OF DIFFERENT SIZES
- PLACING A MIXTURE OF ORIGINALS AT DIFFERENT SIZES
- SCANNING USING A SCANNER BUTTON
- SCANNING FROM A COMPUTER
- SCANNING USING DOCUMENT CAPTURE PRO (WINDOWS)
- WHAT IS A JOB SCAN
- PERFORMING A JOB SCAN
- FORM
- WHAT IS A SIMPLE SCAN
- PERFORMING A SIMPLE SCAN
- SCANNING USING DOCUMENT CAPTURE (MAC OS)
- START DOCUMENT CAPTURE
- CLICK
- CLICK THE + ICON
- SET THE JOB NAME
- MAKE SCANNING SETTINGS ON THE SCAN TAB
- CLICK DESTINATION, AND THEN SELECT THE DESTINATION
- SCANNING USING EPSON SCAN
- SET THE FILE SAVING SETTINGS
- CLICK SCAN
- REQUIRED SETTINGS FOR SPECIAL ORIGINALS IN EPSON SCAN 2 WINDOW
- SETTING A RESOLUTION THAT SUITS THE SCANNING PURPOSE
- ADVANTAGES AND DISADVANTAGES OF INCREASING THE RESOLUTION
- LIST OF RECOMMENDED RESOLUTIONS TO SUIT YOUR PURPOSE
- SETTING A JOB
- CREATING AND REGISTERING A JOB (WINDOWS)
- CLICK NEW JOB
- ENTER A JOB NAME
- YOU CAN MAKE INDEX FILE SETTINGS ON THE 3. INDEX TAB
- CREATING AND REGISTERING A JOB (MAC OS)
- ASSIGNING A JOB TO THE SCANNER BUTTON (WINDOWS)
- ASSIGNING A JOB TO THE SCANNER BUTTON (MAC OS)
- SCANNING DIFFERENT SIZES OR TYPES OF ORIGINALS ONE BY ONE (AUTOMATIC FEEDING MODE)
- VARIOUS SCANNING SETTINGS FOR DOCUMENT CAPTURE PRO (FOR WINDOWS ONLY)
- DIVIDING DOCUMENTS USING A SPECIFIED NUMBER OF PAGES
- DIVIDING DOCUMENTS USING BLANK SHEETS OF PAPER
- SET FILE TYPE TO PDF
- SELECT APPLY JOB SEPARATION, SET SEPARATOR TO BLANK PAGE, AND THEN CLICK SEPARATION SETTINGS
- CREATING AND SAVING FOLDERS USING THE BARCODE CHARACTER INFORMATION
- CREATING TWO LEVELS OF FOLDERS USING TWO TYPES OF BARCODE
- SAVING FILES WITH FILE NAMES USING THE BARCODE CHARACTER INFORMATION
- CLICK DETAILS
- SELECT BARCODE FROM FILE NAME COMPONENTS
- CREATING AND SAVING FOLDERS USING OCR CHARACTERS
- CLICK OK ON THE SCAN SETTINGS SCREEN
- IN THE SCANNED PREVIEW IMAGE, SPECIFY THE TEXT DETECTION AREA. CLICK THE STARTING POINT, AND THEN DRAG TO DISPLAY A BLUE BORDER TO SPECIFY THE TEXT DETECTION AREA
- SAVING FILES WITH FILE NAMES USING OCR CHARACTERS
- SELECT OCR FROM FILE NAME COMPONENTS
- CREATING AND SAVING FOLDERS FOR EACH FORM
- SETTING THE GLASS SURFACE STAIN DETECTION FEATURE
- SETTING THE DOCUMENT PROTECTION FEATURE
- SETTING THE OPERATION WHEN A DOUBLE-FEED IS DETECTED
- ABOUT THE FLATBED SCANNER DOCK
- PART NAMES AND FUNCTIONS OF THE FLATBED SCANNER DOCK
- SCANNING FROM THE SCANNER GLASS
- NOTES ON USING THE FLATBED SCANNER DOCK
- NOTES ON SCANNING FROM THE ADF
- ORIGINALS SHORTER THAN A5 (210 MM)
- ORIGINALS OF A5 (210 MM) OR LONGER UP TO A4 (297 MM)
- ORIGINALS LONGER THAN A4 (297 MM) TO LEGAL (355.6 MM)
- ORIGINALS LONGER THAN LEGAL (355.6 MM)
- CLEANING THE FLATBED SCANNER DOCK
- TRANSFERRING AND TRANSPORTING THE FLATBED SCANNER DOCK
- CAUTION
- TRANSPORTING THE FLATBED SCANNER DOCK A SHORT DISTANCE
- TRANSPORTING THE FLATBED SCANNER DOCK
- TROUBLESHOOTING FOR THE FLATBED SCANNER DOCK
- UNEVEN COLORS, DIRT, SPOTS, AND SO ON APPEAR WHEN SCANNING FROM THE SCANNER GLASS
- CANNOT SCAN THE CORRECT AREA ON THE SCANNER GLASS
- BINDING MARGINS OF A BOOKLET ARE DISTORTED OR BLURRED
- OFFSET APPEARS IN THE BACKGROUND OF IMAGES
- CLEANING OUTSIDE THE SCANNER
- CLEANING INSIDE THE SCANNER
- RESETTING THE NUMBER OF SCANS AFTER REGULAR CLEANING
- REPLACING THE ROLLER ASSEMBLY KIT
- RESETTING THE NUMBER OF SCANS AFTER REPLACING THE ROLLERS
- ENERGY SAVING
- TRANSPORTING THE SCANNER
- UPDATING APPLICATIONS AND FIRMWARE
- SCANNER PROBLEMS
- SCANNER LIGHTS INDICATE AN ERROR
- THE SCANNER DOES NOT TURN ON
- PROBLEMS STARTING SCANNING
- CANNOT START SCANNING FROM COMPUTER
- THE SCANNER CANNOT CONNECT BY USB
- THE USB CABLE IS NOT PLUGGED INTO THE ELECTRICAL OUTLET CORRECTLY
- SOLUTIONS
- THERE IS A PROBLEM WITH THE USB HUB
- THERE IS A PROBLEM WITH THE USB CABLE OR THE USB INLET
- THE SCANNER IS OFF
- CANNOT SCAN EVEN THOUGH A CONNECTION HAS BEEN CORRECTLY ESTABLISHED
- REQUIRED APPLICATIONS ARE NOT INSTALLED ON YOUR COMPUTER
- JOB IS NOT ASSIGNED TO THE SCANNER BUTTON
- IF YOU ARE USING ANY TWAIN-COMPLIANT PROGRAMS, THE CORRECT SCANNER IS NOT SELECTED AS THE SOURCE SETTING. (WINDOWS)
- PAPER FEEDING PROBLEMS
- MULTIPLE ORIGINALS ARE FED (DOUBLE FEED)
- REMOVING JAMMED ORIGINALS FROM THE SCANNER
- THE ORIGINAL JAMS IN THE SCANNER FREQUENTLY
- PAPER PROTECTION DOES NOT WORK CORRECTLY
- THE ORIGINALS GET DIRTY
- SCANNING SPEED SLOWS DOWN WHEN SCANNING CONTINUOUSLY
- SCANNING TAKES A LONG TIME
- SCANNED IMAGE PROBLEMS
- STRAIGHT LINES APPEAR WHEN SCANNING FROM ADF
- GLASS DIRT ALERT DOES NOT DISAPPEAR
- COLORS ARE UNEVEN IN THE SCANNED IMAGE
- EXPANDING OR CONTRACTING THE SCANNED IMAGE
- SCANNED IMAGE OR TEXT IS BLURRED
- MOIRÉ PATTERNS (WEB-LIKE SHADOWS) APPEAR
- THE EDGE OF THE ORIGINAL IS NOT SCANNED WHEN AUTOMATICALLY DETECTING THE SIZE OF THE ORIGINAL
- CHARACTER IS NOT RECOGNIZED CORRECTLY
- CANNOT SOLVE PROBLEMS IN THE SCANNED IMAGE
- UNINSTALLING AND INSTALLING APPLICATIONS
- UNINSTALLING YOUR APPLICATIONS
- UNINSTALLING YOUR APPLICATIONS FOR WINDOWS
- UNINSTALLING YOUR APPLICATIONS FOR MAC OS
- INSTALLING YOUR APPLICATIONS
- GENERAL SCANNER SPECIFICATIONS
- DIMENSIONS AND WEIGHT SPECIFICATIONS
- ELECTRICAL SPECIFICATIONS
- SCANNER ELECTRICAL SPECIFICATIONS
- AC ADAPTER ELECTRICAL SPECIFICATIONS
- SYSTEM REQUIREMENTS
- STANDARDS AND APPROVALS FOR EUROPEAN MODELS
- PRODUCT AND AC ADAPTER
- FLATBED SCANNER DOCK OPTION
- STANDARDS AND APPROVALS FOR AUSTRALIAN MODELS
- STANDARDS AND APPROVALS FOR U.S. MODELS
- TECHNICAL SUPPORT WEB SITE
- CONTACTING EPSON SUPPORT
- BEFORE CONTACTING EPSON
- HELP FOR USERS IN EUROPE
- HELP FOR USERS IN TAIWAN
- WORLD WIDE WEB
- EPSON HELPDESK
- REPAIR SERVICE CENTER
- HELP FOR USERS IN AUSTRALIA
- INTERNET URL
- TRANSPORTATION OF PRODUCT
- HELP FOR USERS IN SINGAPORE
- HELP FOR USERS IN THAILAND
- EPSON CALL CENTRE
- HELP FOR USERS IN VIETNAM
- EPSON SERVICE CENTER
- HELP FOR USERS IN INDONESIA
- EPSON HOTLINE
- HELP FOR USERS IN HONG KONG
- INTERNET HOME PAGE
- TECHNICAL SUPPORT HOTLINE
- HELP FOR USERS IN MALAYSIA
- HEAD OFFICE
- HELP FOR USERS IN INDIA
- HELPLINE
- HELP FOR USERS IN THE PHILIPPINES
- EPSON PHILIPPINES CUSTOMER CARE
- EPSON PHILIPPINES CORPORATION
Brand : EPSON
Model : DS-530 II
Category : Scanner