
WPNA14A3PWIFI - Washing machine GORENJE - Free user manual and instructions
Find the device manual for free WPNA14A3PWIFI GORENJE in PDF.


| Product Type | Freestanding Washing Machine |
| Model | WPNA14A3PWIFI |
| Brand | Gorenje |
| Capacity (Wash) | 14 kg |
| Energy Efficiency Class | A |
| Maximum Spin Speed | 1400 rpm |
| Dimensions (H x W x D) | 85.0 x 59.5 x 64.0 cm |
| Weight | Approx. 75 kg |
| Voltage / Frequency | 220-240 V / 50 Hz |
| Noise Level (Wash/Spin) | 50 dB / 75 dB |
| Display Type | LED Digital Display |
| WiFi Connectivity | Yes (Gorenje Smart Home compatible) |
| Number of Programs | 15+ (including Cotton, Synthetics, Delicates, Quick, Wool, etc.) |
| Inverter Motor | Yes |
| Self-Cleaning | Yes (Drum Clean + auto-dosing) |
| Steam Function | Yes (Anti-crease and refresh) |
| Child Lock | Yes |
| Delay Start | Up to 24 hours |
| Water Consumption (per cycle) | 50 L (approx.) |
| Annual Energy Consumption | 170 kWh (approx.) |
| Warranty | 2 years (standard) |
Frequently Asked Questions - WPNA14A3PWIFI GORENJE
User questions about WPNA14A3PWIFI GORENJE
0 question about this device. Answer the ones you know or ask your own.
Ask a new question about this device
Download the instructions for your Washing machine in PDF format for free! Find your manual WPNA14A3PWIFI - GORENJE and take your electronic device back in hand. On this page are published all the documents necessary for the use of your device. WPNA14A3PWIFI by GORENJE.
USER MANUAL WPNA14A3PWIFI GORENJE
DETAILED INSTRUCTIONS
FOR USE OF WASHING
MACHINE
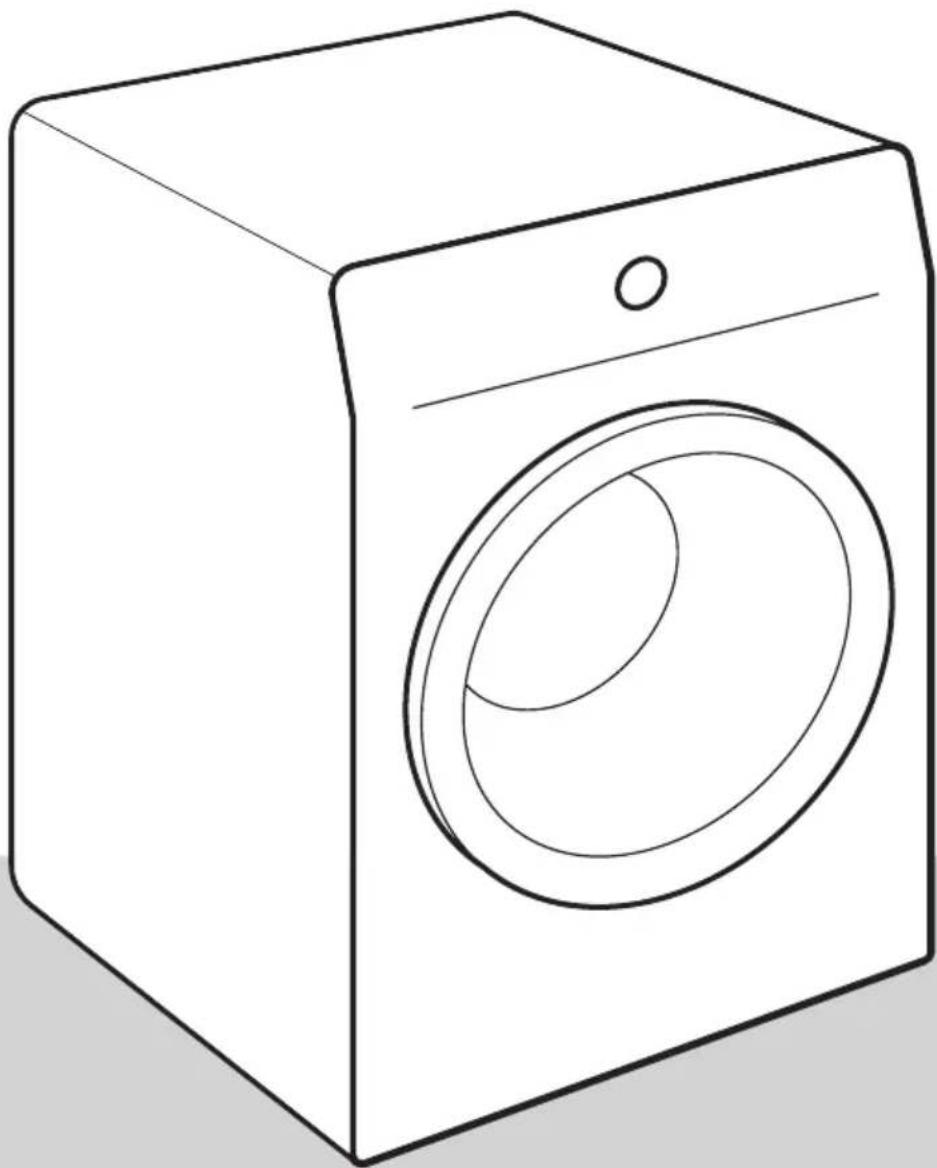
Life is complicated today. Let's make laundry care simple! Your new washing machine uses innovative technology and the latest achievements in laundry care to help you simplify your daily household chores.
The latest technology used in our washing machine ensures the gentlest care for each garment with minimum creasing. At the same time, your washing machine will be easy on the environment, owing to its highly efficient use of power, water, and detergent.
This washing machine is intended solely for household use. Please do not use it for any laundry labelled as not suitable for machine washing.
The following symbols are used throughout the manual and they have the following meanings:

INFORMATION!
Information, advice, tip, or recommendation

WARNING!
Warning - general danger

ELECTRIC SHOCK!
Warning - danger of electric shock

HOT SURFACE!
Warning - danger of hot surface

DANGER OF FIRE!
Warning - danger of fire

It is important that you carefully read the instructions.
Contents
SAFETY PRECAUTIONS 5
Child safety 8 Danger of hot surface 9
Technical data 11
Control unit 12
Removing the blocking rods 14
Moving and transport after installation 15
Selecting the room 15
Adjusting the washing machine feet 16
Positioning the washing machine 17
Connection to water supply 19
Connecting to the power mains 22
WASHING PROCESS, STEP BY STEP (1-7) 27
Step 1: Heed the labels on the laundry 27
Step 2: Preparing the washing process 28
Switching on the washing machine 28
Loading the washing machine 29
Program chart 31
Washing programs with steam 34
AirDry function 34
Remote control of wash using the app 35
Step 4: Choosing the settings 36
Step 5: Selecting additional functions ...... 42
Extra function table 43
Step 6: Starting the washing programme 45
Step 7: End of the washing programme 45
Manual interruption 46
Personal settings 46
AdaptTech 46
Personal settings menu 46
Pause button 46
47
Errors 47
Power supply failure 47
470
48D
49CLEANIN Cleaning the dispenser tray 49
50Cleaning Cleaning the pump filter .... 51
Cleaning the washing machine exterior 52
TROUBLE-SHOOTING 53
What to do ...? 53
Troubleshooting and error table 53
Service 59
RECOMMENDATIONS FOR WASHING AND ECONOMIC USE YOUR WASHING MACHINE 60
PRODUCT INFORMATION 62
Low standby mode 63
DISPOSAL 64

Carefully read the instructions for use before using the washing machine.
Please, do not use the washing machine without reading and understanding these instructions or use first.
These instructions for use of a washing machine are supplied with different types or models of washing machines. Therefore, they may include descriptions of settings or equipment that are not available in your washing machine.
Failure to observe the instructions for use or inappropriate use of the washing machine may result in damage to the laundry or the appliance, or injury to the user. Keep the instruction manual handy, near the washing machine.
This appliance is intended to be used in household and similar applications, such as:
- staff kitchen areas in shops, offices and other working environments;
- farmhouses;
- by clients in hotels, motels and other residential type environments; • bed and breakfast type environments.
The washing machine is not intended for use by persons (including children) with physical or mental impairments, or persons with lacking experience and knowledge. These persons should be instructed about the use of the washing machine by a person responsible for their safety.
WARNING!
The washing machine may only be used with the supplied power cord.
ELECTRIC SHOCK!
To avoid danger, a damaged power cord may only be replaced by the manufacturer, a service technician, or an authorized person.
WARNING!
Do not connect the washing machine to power mains using an external switching device such as a programmer timer, or connect it to power mains that is regularly switched on and off by the power supply provider.
Instructions for use are available on our website at www.gorenje.com.
Follow the instructions for correct installation of the Gorenje washing machine and connection to the water and power mains (see chapter »INSTALLATION AND CONNECTION«).
Connection to water and power supply has to be executed by an adequately trained technician expert.
Any repair and maintenance pertaining to safety or performance should be done by trained experts.
Do not install the washing machine in a room where the temperature can drop below 5°C, as washing machine parts may be damaged in case of water freezing.
The ventilation openings in the base of washing machine must not be obstructed by a carpet.
To connect the washing machine to water supply, make sure to use the supplied water supply hose and gaskets. Water pressure must be between 0.05 and 0.8 MPa (0.5–8 bar).
Always use a new water supply hose to connect the washing machine to water supply; do not reuse an old water supply hose.
The end of the water discharge hoses should reach into a water drain line.
Before the start of the washing cycle, press the door on the indicated spot until it locks into place. The door cannot be opened during washing machine operation.
We recommend removing any impurities from the washing machine drum before the first wash using the Cotton 90°C programme (see PROGRAMME TABLE).
After the washing cycle, close the water tap and pull out the washing machine plug from the power socket.
Only use the washing machine for washing laundry, as described in the instruction manual. The machine is not intended for dry cleaning.
No silver ions are released during the washing programme.
Only use agents for machine washing and care of laundry. We shall not be responsible for any damages or discolouration of gaskets and plastic parts resulting from incorrect use of bleaching or colouring agents.
When descaling, only use descaling agents with added anti-corrosion protection. (Only use non-corrosive descaling agents.) Follow the manufacturer's instructions. Finish the descaling process with several rinse cycles or by running the Drum Clean (Self-cleaning programme) in order to remove any residual acid (e.g. vinegar etc.).

DANGER OF FIRE!
Do not use detergents that contain solvents as this could lead to release of poisonous gases, damage to the washing machine, and risk of fire and explosion.
Child safety

WARNING!
Children of less than 3 years should be kept away unless continuously supervised.
Children should be supervised to ensure that they do not play with the appliance.
Keep the detergent and conditioner out of reach of children.
Activate the child lock. See chapter »CHOOSING THE SETTINGS/Child lock«.
Before closing the washing machine door and running the programme, make sure there is nothing except laundry in the drum (e.g. if a child climbed into the washing machine drum and closed the door from the inside).
The washing machine is made in compliance with all relevant safety standards.
This appliance can be used by children aged from 8 years and above and persons with reduced physical, sensory or mental capabilities or lack of experience and knowledge if they have been given supervision or instruction concerning use of the appliance in a safe way and understand the hazards involved.
Children shall not play with the appliance.
Cleaning and user maintenance shall not be made by children without supervision.
Danger of hot surface

HOT SURFACE!
At higher washing temperatures, the door glass will heat up. Be careful to avoid burns. Make sure children do not play near the door glass.
WASHING MACHINE DESCRIPTION

FRONT
- Touch control unit
- Dryer on/off and program selector knob
- Detergent compartment
- Door
- Rating plate 6. Pump filter

BACK
1. Water supply hose 2. Power cord 3. Water discharge hose 4. Adjustable feet
Technical data
(depending on the model)
The rating plate with basic information about the washing machine is located on the inner side of the washing machine door (see chapter "WASHING MACHINE DESCRIPTION").
| SeeratingplateMaximumload | |||
| 600mm600mm600mm | |||
| 850mm850mm850mm | |||
| 610mm545mm465mm | |||
| 640mm577mm495mm | |||
| 1125mm1062mm980mm | |||
| Xkg(dependingonthemodel)Washingmachineweig | |||
| SeeratingplateRatedvoltage | |||
| SeeratingplateNominalpower | |||
| SeeratingplateConnection | |||
| SeeratingplateWaterpressure | |||
| SeeratingplateCurrent | |||
| SeeratingplateFrequency | |||
Compliance information
| HL3215STGRadioequipmenttypeHLW3215-TG(dependingonthemodel)HLW3215-TG01 | |
| Wi-Fi | |
| 2.4000GHz-2.4835GHzOperatingfrequencyrange | |
| ≤10dBm/MHz(EIRP)(Antennagain<10dBi)Maximumoutputpower | |
| Gain:0dBiMaximumantennagain | |
| Bluetooth | |
| 2.400GHz-2.4835GHzOperatingfrequencyrange | |
| 6dBm(≤10dBm)Carrieroutput | |
| F1DEmissiontype | |
Gorenje states that the equipment described above complies with the 2014/53/EU directive.
Rating plate

Control unit

| WashingmachineON/OFFandPROGRAMSELECTORDIAL.1ToTURNONthewashingmachine,rotatetheprogramselectorknobleftorright.ToTURNOFFthe washing machine, rotate the program selector knob to position OFF ⏻. ToSELECTawashingprogramme, rotatetheknobleftorright. Thesignallightnexttothe selectedprogramlightsup. | |
| TEMP.(WASHINGTEMPERATURE)2Optiontosetwashingtemperature.Whentheapplianceisturnedon,theindicatoronthebuttonlightsup. | |
| 3 | •SPIN(SPINNINGRATE)• 🚙PUMPSTOP•DRAIN-nolightingOptiontosetthespinningrate.Whentheapplianceisturnedon,theindicatoronthebuttonlightsup. |
| DOSEAID2+3Informationonrecommendedamountofpowderandliquiddetergent,accordingtothe selectedsettingsandtheamountPressthepositions2+3andholdthemfor3seconds. | |
| CHILDLOCKsymbollighting4 | |
| FAST(FAST)5Optiontosetashorterwashingprogrammetime.Whentheapplianceisturnedon,theindicatoronthebuttonlightsup. | |
| ChildlockON/OFF3+5Pressthepositions3+5andholdthemfor3seconds. | |
| 6 | LightingoftheSOUNDOFFsymbol 📁× |
| DELAYEND(DELAYEND)7Optiontosetthetimeofwashingprogrammecompletion.Whentheapplianceisturnedon,theindicatoronthebuttonlightsup. | |
| SoundON/OFF5+7Pressthepositions5+7andholdthemfor3seconds. | |
| EXTRAS(ADDITIONALFUNCTIONS)8•STEAM(STEAM)Optiontoactivatethelaundryrefreshfunction; |


| •WATER+(EXTRAWATER)Optiontosetahigherwaterlevel;•ANTICREASE(CREASEPREVENTION)Optiontoactivatethegentlewashfunction.Whentheapplianceisturnedon,theindicatoronthebuttonlightsup. | |
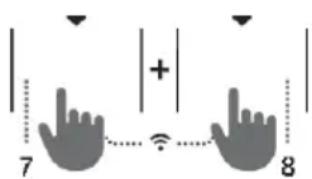
| MENUWi-Ficonnections(CONNECT)(CONNECTION)7+8Pressthepositions7+8andholdthemfor3seconds. | |
| 9 | START/PAUSEBUTTONThebuttonhas4functions:START– starting the washing programme (start the programme with a brief press on thebutton);PAUSE– pause the washing programme (if you briefly press the button again, you can temporarilystopapplianceoperation);ADD CLOTHES– adding clothes into the drum during the washing progress (hold the buttonfor3seconds);SAVINGPERSONAL SETTINGS(holdthebuttonfor5seconds).Whentheapplianceisturnedon,theindicatoronthebuttonlightsup. |
| ThefollowingisdisplayedontheDISPLAYUNIT:10availablefunctions;timeremainingtoprogrammecompletion;informationfortheuser. | |
| 11 | LightingofthesymbolCONNECT(CONNECTION)ThesymbolislitalalltimeswhenREMOTESTART(REMOTESTART)isenabled,evenwhen theapplianceisnotinoperationorisinstandbymode. |
| 12 | LightingofthesymbolREMOTESTARTThesymbolislitalalltimeswhenREMOTESTARTisenabled,evenwhentheapplianceis notinoperationorisinstandbymode. |


INSTALLATION AND CONNECTION

INFORMATION!
Remove all packaging. When removing the packaging, make sure not to damage the appliance with a sharp object.
Removing the blocking rods

WARNING!
Before the first use of the appliance, the transport rod must be removed. A blocked washing machine may be damaged when it is switched on for the first time. Warranty shall be void in cases of such damage!
![graph TD A["Device Opening"] --> B{Mechanical Operation} B -->|Close| C["Close Outer Ring"] B -->|Close Invert| D["Close Inner Ring"] B -->|Close Down| E["Close Down Ring"] B -->|Close Up| F["Close Up Ring"] B -->|Close Down| G["Close Down Ring"] B -->|Close Up/Down| H["Close Down/Down Ring"] style…](/content/2026/06/1397948/images/261741983bd4c557a16d5a21e416e2f2340ed40a0ac56343b545bd1ac5efd6d9.jpg)
1. Move the hoses and undo the screws on the back of the washing machine. Remove the two angular pieces.
2 Slide the angular pieces onto the groove in the blocking rod; before doing so, rotate the right angular piece to the opposite side.
3 Use the angular pieces to rotate the blocking rods by 90° and pull them out.
4 Cover the two holes through which the blocking rods were inserted with plastic plugs, and redo the screws that you undid in step 1. The plastic plugs are supplied in the bag with the washing machine instruction manual.
Moving and transport after installation

INFORMATION!
If you wish to move the washing machine after it has been installed, the angular pieces and at least one blocking rod have to be re-installed to prevent vibration damage to the washing machine during transport (see chapter) INSTALLATION AND CONNECTION / Removing the blocking rods. If you lost the angular pieces and the blocking rods, they can be ordered from the manufacturer.
Selecting the room

INFORMATION!
Floor on which the washing machine is placed must have a concrete base. It should be clean and dry; otherwise, the washing machine may slide. Also, clean the bottom surface of adjustable feet.

INFORMATION!
The washing machine must stand level and stable on a solid base.

INFORMATION!
If the washing machine is placed on an elevated stable base, the washing machine has to be additionally secured against tipping.
Adjusting the washing machine feet
Use a water scale and spanner No. 32 (for feet) and 17 (for the nut). The spanners are not supplied.

1. Level the washing machine in longitudinal and transverse direction by rotating the adjustable feet.
2. After adjusting the height of the feet, firmly tighten the jam nuts (counternuts) using a spanner No. 17, by turning them towards the bottom of the washing machine (see figure).

INFORMATION!
Incorrect levelling of the washing machine with the adjustable legs may cause vibration, appliance sliding across the room, and loud operation. Incorrect levelling of the washing machine is not subject to warranty.

INFORMATION!
Sometimes, unusual or louder noise may appear during appliance operation; these are mostly the result of improper installation.
Positioning the washing machine
If you also have a Gorenje dryer of corresponding (same) dimensions, it can be placed on top of the Gorenje washing machine (in this case, vacuum feet must be used) or next to it (figures 1 and 3).
If your Gorenje washing machine is smaller (minimum depth 545 mm) than your Gorenje dryer, then the dryer support has to be purchased extra (figure 2). The supplied vacuum feet must be used; they are designed to prevent the dryer from slipping.
Additional equipment (dryer support (a), vacuum feet (b) and wall fixing bracket (c)) can be purchased at the service centre.
The surface on which the appliance is placed should be clean and level.
Gorenje washing machine onto which you intend to place the Gorenje dryer should hold the weight of the Gorenje dryer (see chapter »WASHING MACHINE DESCRIPTION/Technical information«).
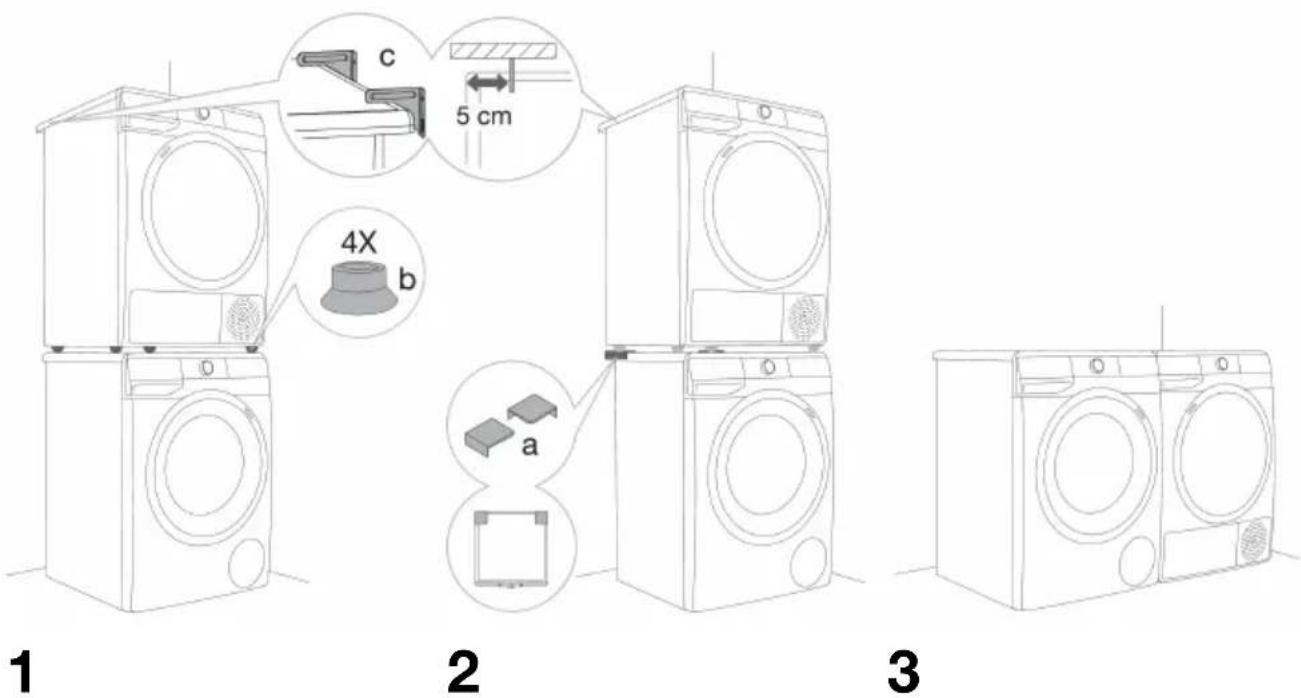
Washing machine installation clearances

1

2

INFORMATION!
The washing machine may not be in contact with a wall or adjacent furniture. For optimum washing machine operation, we recommend observing the clearances from the walls as indicated in the figure. In case of failure to observe the minimum required clearances, safe and correct washing machine operation cannot be ensured. Moreover, overheating can also occur (figures 1 and 2).

INFORMATION!
Installing the washing machine under a countertop is not recommended.
Opening the washing machine door (bird's-eye view)

See chapter »WASHING MACHINE
DESCRIPTION/Technical information«.
a = washing machine depth
b = depth with door open
Connection to water supply
Attach the hose to the water tap by screwing it onto the thread.

A STANDARD CONNECTION
B AQUA-STOP CONNECTION
C TOTAL AQUA-STOP CONNECTION (WITH A FLOAT)

INFORMATION!
For normal washing machine operation, the pressure in the water main should be between 0.05 and 0.8 MPa (0.5–8 bar). Minimum dynamic water pressure can be determined by measuring the waterfall.
In 30 seconds, 1.2 litres of water should flow from a fully open tap.

INFORMATION!
Tighten the water supply hose by hand, firmly enough for the hose to have a good seal (max. 2 Nm). After connecting the hose, the seal must be checked for any leaks. Do not use pliers or similar tools when connecting the hose as this could damage the nut thread.

INFORMATION!
Only use the water supply hose supplied with the appliance. Do not use any used or other hoses.

INFORMATION!
When connecting the water supply hose, make sure to connect it in a way that allows adequate and unobstructed water supply.
AQUA-STOP connection
(depending on the model)
If an internal tube or hose is damaged, a shut-off system is activated that cuts off the water supply to the washing machine. In such case, the control glass (a) will turn red. Replace the water supply hose.

TOTAL AQUA-STOP connection (with a float)
(depending on the model)
If an internal tube or hose is damaged, a shut-off system is activated that cuts off the water supply to the washing machine. In such case, the control glass (a) will turn red. Replace the water supply hose.
If there is water on the bottom of the washing machine, the float (b) will rise and trigger a shut-off system to cut the water supply to the washing machine; washing process is stopped, water supply is shut off, the appliance engages the pump, and signals an error.


Connecting and securing the water discharge hose
Feed the water discharge hose into a washbasin or a bathtub, or connect it directly to a drain (minimum drain connection diameter is 4 cm). The vertical distance from the floor to the end of the discharge hose may be no more than 100 cm and no less than 60 cm. It can be attached in three ways (A, B, C).

A: The discharge hose end may be placed over a washbasin or a bathtub. B: Use a string fed through the opening in the elbow support to attach the hose and prevent it from slipping to the floor.
B: The discharge hose may also be attached directly to the washbasin drain.
C: The discharge hose can also be attached to a wall drain with a trap; such a trap should be properly installed to allow cleaning.
D: The discharge hose has to be attached and affixed to the pin on the back of the washing machine, as shown in the figure.
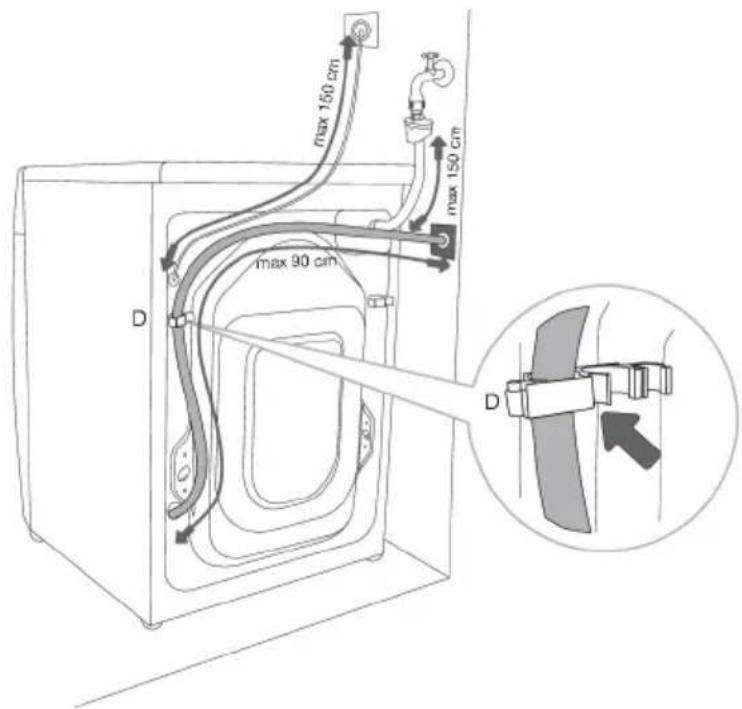

INFORMATION!
If the discharge hose is not correctly attached, safe and correct washing machine operation cannot be ensured.
Connecting to the power mains


ELECTRIC SHOCK!
Before connecting the washing machine to the power mains, wait for at least 2 hours until it reaches room temperature.
Connect the washing machine to a grounded power outlet. After installation, the wall outlet should be freely accessible. The outlet should be fitted with an earth contact (in compliance with the relevant regulations).
Information on your washing machine is indicated on the rating plate (see chapter » WASHING MACHINE DESCRIPTION/Technical information«).

ELECTRIC SHOCK!
We recommend using over-voltage protection to protect the appliance in case of a lightning strike.

WARNING!
The washing machine may not be connected to the power mains using an extension cord.

INFORMATION!
Do not connect the washing machine to an electrical outlet intended for an electric shaver or hair dryer.

INFORMATION!
Any repair and maintenance pertaining to safety or performances should be done by trained experts.
BEFORE USING THE APPLIANCE FOR THE FIRST TIME
Make sure the washing machine is disconnected from the power mains; then, open the door towards you (figures 1 and 2).
Before first use, clean the washing machine drum with a soft moist cotton cloth and water, or use the Cotton 90°C programme. There should be no laundry in the washing machine drum; the drum should be empty (figures 3 and 4).


WARNING!
Do not use any solvents or cleaning agents that could damage the washing machine (please observe the recommendations and warnings provided by the cleaning agent manufacturers).
Connecting the appliance to the ConnectLife application

ConnectLife is a smart home platform that connects people, devices and services. The ConnectLife application includes advanced digital services and care free solutions that allow users to monitor and control appliances, receiving notifications from a smartphone, and updates software (supported features may vary depending on your appliance and the region/country in which you are located).
To connect your smart device, you need a home Wi-Fi network (only 2.4GHz networks are supported) and a smartphone equipped with the application ConnectLife.

To download the ConnectLife application, scan the QR code or search for ConnectLife in your favourite app store.
- Install the ConnectLife application and create an account.
- In the ConnectLife application, go to the "Add device" menu and select the appropriate type of device. Then scan the QR code (it can be found on the nameplate of the appliance; you can also enter the AUID/SN number manually).
- The application then guides you through the entire process of connecting the appliance to your smartphone.
- After a successful connection, the appliance can be operated remotely via a mobile application.
Useful tips for your smart device
Where to find the QR code for the devices required by the app during the installation process?
The QR code can be found on the warranty card and on the rating plate of the appliance.
How to enable Wi-Fi on the device?


Check that the appliance is switched on; the programme selection button can be in any position. Then do the following:
- In the ConnectLife app, open the add device menu.
- Follow the instructions in the application ConnectLife, where you will pair your phone and appliance and add the appliance to your home Wi-Fi network. - Select the type of appliance. - Scan the QR code (it can be found on the warranty card or on the rating plate of the appliance).
- On the appliance:
- Simultaneously press the positions (7+8). A countdown will start 3-2-1 and will appear on the appliance.
- Press the button (8) to switch on Wi-Fi; the display will show
- Press the button (9) START/PAUSE. The display will show [on.
- Press the (9) START/PAUSE button again. A 5-minute countdown will begin on the appliance.
- In the ConnectLife app, instructions will guide you through the process of entering the appropriate data for your appliance to connect to your home network.
How to enable remote start of the appliance?
Move the programme selection button to ConnectLife/REMOTE CONTROL (remote control).
Press the (9) START/PAUSE button (the door must be closed).
How to add a user?

Check that the appliance is switched on; the programme selection button can be in any position. Then do the following:
- In the ConnectLife app, open the add device menu.
- Follow the instructions in the application ConnectLife where you will pair the phone and the appliance. - Select the type of appliance.
- Scan the QR code (it can be found on the warranty card or on the rating plate of the appliance).
- On the appliance:
- Simultaneously press the positions (7+8). A countdown will start 3-2-1 and will appear on the appliance.
- Press the button (8); the display will show.
- Press the button (9) START/PAUSE. A 3-minute countdown will start on the appliance.
- You can then complete and confirm the setting in the app.
How to remove the users (UnPair)?

Check that the appliance is switched on; the program selection button can be in any position. Then do the following:
On the appliance:
- Simultaneously press the positions (7+8). A countdown will start 3-2-1 and will appear on the appliance. • Repeatedly press (8) until the display shows.
- Press the button (9) START/PAUSE. A 1 minute countdown will start on the appliance.

INFORMATION!
This step will remove all active users of the appliance. If you want to operate the appliance remotely again, you will need to repeat the process of adding a user.

Which Wi-Fi router can be used?
Only 2.4GHz networks are supported. During the connection setup, if the ConnectLife app cannot find your local network, proceed as follows:
- your router is operating at the frequency of 2.4GHz,
- your network is hidden, and • your signal is strong enough.
Do you have more questions?
Please visit us at www.connectlife.io or contact us at hello@connectlife.io.
Remotely upgrading the software
Check the software update options in the app ConnectLife.
WASHING PROCESS, STEP BY STEP (1-7)
Step 1: Heed the labels on the laundry
| Normal wash; Sensitive laundry | |||||
| Max.washingtemp. 95°C | Max.washingtemp. 40°C | Handwashonly | |||
| Max.washingtemp. 60°C | Max.washingtemp. 30°C | Donotwash | |||
| Bleaching | |||||
| BleachingnotallowedBleachingincoolwater | |||||
| Dry cleaning | |||||
| PetroleumsolventR11,R113Drycleaningwithallage | |||||
| Drycleaninginkerosene,purealcohol, andR113 | Drycleaningnotallowed | ||||
| Inning | |||||
| Hotironing,max.110°CHotironing,max.200°C | |||||
| IroningnotallowedHotironing,max.150°C | |||||
| Drying | |||||
| HightemperatureDryflat(placeonaflatsurface) | |||||
| LowtemperatureDripdry | |||||
| TumbledryingnotallowedLinedry | |||||
Step 2: Preparing the washing process
- Sort the laundry by type of fabric, colour, soiling, and allowed washing temperature (see PROGRAMME TABLE). 2. Wash the laundry that sheds a lot of fibre or lint separately from other laundry.
- Close the buttons and zippers, tie any ribbons, and turn the pockets inside out; remove any metal clips that could damage the laundry and washing machine interior, or clog the drain.
- Place very sensitive clothes and small items in a special-purpose laundry washing bag. (The special-purpose laundry bag is available as an optional accessory.)

Switching on the washing machine
Use the power cord to connect the washing machine to power mains, and connect the washing machine to water supply.
To turn on the appliance, rotate the program selector knob (1) to any position.
With some models, the washing machine drum is also lit for 5 minutes when the washing machine is switched on (figure 2).
The light in the washing machine drum can also remain lit during appliance operation, if you press the START/PAUSE (9) button, as well as after the washing programme is completed.
(The lamp in the washing machine drum is not suitable for any other use.)
1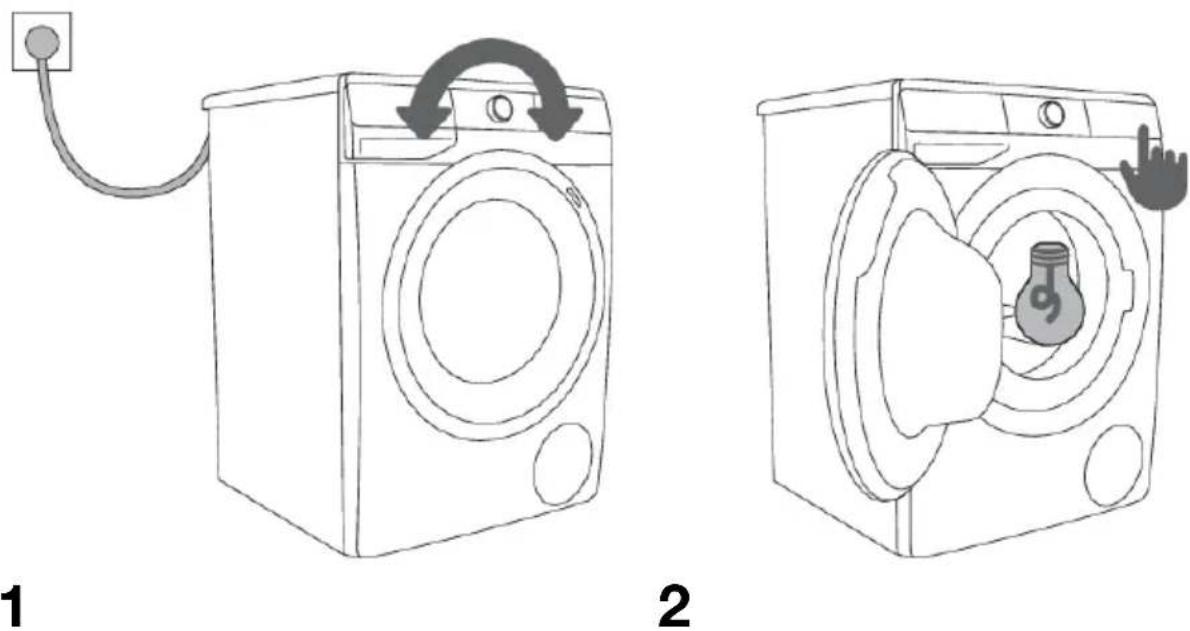
INFORMATION!
The lamp in the washing machine drum may only be replaced by the manufacturer, a service technician or an authorized person.
Loading the washing machine
Open the washing machine door by pulling the handle towards you (figure 1).
Insert the laundry into the drum (after making sure the drum is empty) (figure 2).
Make sure that no garment is stuck between the door and the rubber gasket.
Close the washing machine door (figure 3).
1
2
3
Do not overload the drum! See PROGRAMME TABLE and observe your nominal load as indicated on the rating plate.
If the washing machine drum is too full, the laundry will not be washed as thoroughly.
Step 3: Choosing the washing programme
Choose the programme by rotating the program selector knob (1) to the left or to the right (depending on the type of laundry and how heavily soiled it is). See PROGRAMME TABLE.
The signal light next to the selected programme lights up.
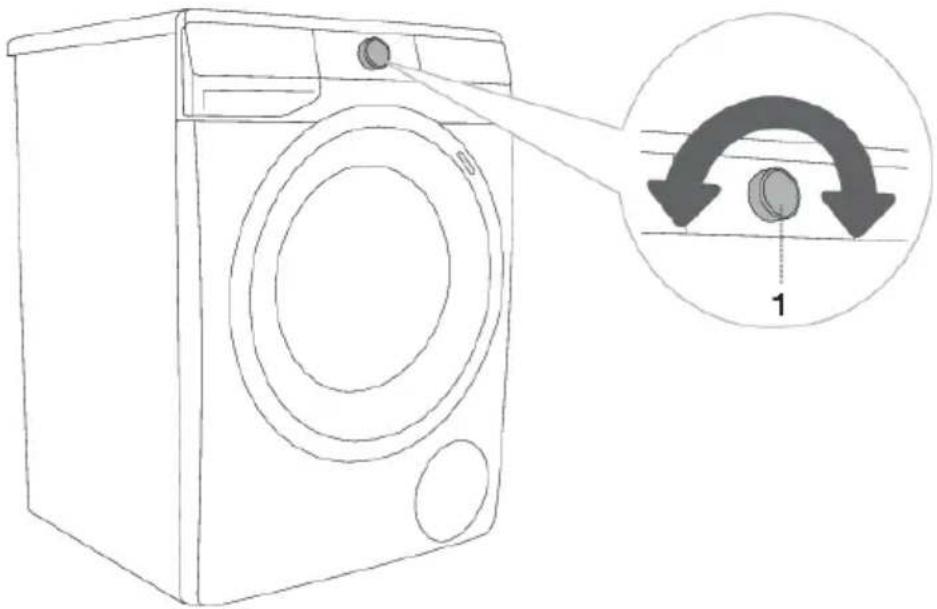

INFORMATION!
During operation, the program selector knob (1) will not rotate automatically.

INFORMATION!
Washing programmes are comprehensive programmes that include all washing stages, including softening and spinning (this does not apply to Partial programmes).

INFORMATION!
Partial programmes are independent programmes. Use them when you feel you don't need the entire washing programme.
Program chart
| Program | Max. load | Max. 3) | Programmedescription | |
 | Cottonwhite (Cottonwhite)40°C-90°C | *MAX | MAX1) | Programmeforwashingwhitecottonlaundry,towels,bedlinen,T-shirts...Thetemperaturecanbesetseparately;therefore,observetheinstructionsindicatedontheclothing.Spinningspeedcanbesettoyourpreference.Programmedurationandamountofwaterwillbeadjustedtotheamountoflaundry.Toreducecreasing,pressthe(8)EXTRAS(EXTRAFUNCTIONS)buttonbeforethestartofthewashingprogramme,andselecttheSTEAMand/orANTICREASE(CREASEPREVENTION)function. |
 | (Colour)cold-60°C | *MAXColdMAX1) | Programmeforcolouredlaundrymadeofcotton.Thetemperaturecanbesetseparately;therefore,observetheinstructionsindicatedontheclothing.Spinningspeedcanbesettoyourpreference.Programmedurationandamountofwaterwillbeadjustedtotheamountoflaundry. | |
| [KK28] | (Mixed laundry/Synthetics)cold-60°C | 3,5kgMix(Synthetic) | Washingprogrammefordelicateclothingmadeofsyntheticandmixedfibresorviscose,andforsimplecareofcotton.Observetheinstructionsindicatedontheclothing. | |
 | (Wool&Handwash)cold-40°C | 8002kg | Velul&Handingprogrammeforwashingwoollens,silk,andclothesthatrequiremanualwashing.Maximumtemperatureis40°C.Thisprogrammehasashortspinningcycle.Topspinningspeedavailableis800rpm. | |
 | *MAXEco40A60) | Washingcycle,whichisabletocleannormallysoiledcottonlaundrydeclaredtobewashableat40°Cor60°C. | ||
 | 40°C | 4kgPowek50X32 | Programmeforsmalleramountsoflightlysoiledlaundry.Thewashingprogrammeincludesintensivetumblingandmaximumspinningrate.Theprogrammelasts59minutes.WhenusingtheFAST(FAST)function,theprogrammelasts32minutes. | |
| (Speed20')30°C | 2,5kgSpeed202) | Quickwashingprogrammeforlaundrythatonlyneedsrefreshing. | ||
| Drumclean (Self-cleaning programme) | 0 kg | Thisprogrammeisusedforcleaningthedrumand removingtheresidueofdetergentandbacteria.Toselecttheprogramme,rotatetheprogram selectorknobtotheleftortotherighttotheDrum clean(Self-cleaningprogramme)position.Other extrafunctionscannotbeselected.hedrumhastobeempty.Donotaddetergent andsoftener!Youcanaddsomedistilled(spirit)vinegar(approx.2dl)orsodiumbicarbonate(1 tablespoon,or15g).Werecommendrunningthe programmeatleastonceamonth.Youcanaddtheagentstothemainwash compartmentortothedrum. | ||
 | (Spinningrate|Drain)(Partial programme) | /Spin|Dmax1) | Usetheprogrammewhenyouonlywishtospin thelaundry.Ifyouwishtoonlydrainthewater fromthewashingmachine,withoutspinning,press the(3)SPINmultipletimes,untilnoindicator(light) ison. | |
 | (Rinse&Softening)(Partial programme) | /Rinse&Softening | Forsoftening,starching,orimpregnatingthe washedlaundry.Itcanalsobeusedasarinse programme,butwithoutaddedsoftener.Itis completedwithanadditionalrinse.YoucanalsochooseWATER+(EXTRAWATER) byselectingtheextrafunction(pressethe (8)EXTRAS(EXTRAFUNCTIONS)buttonbefore thestartofthewashingprogramme). | |
 | Baby (Babyclothes)40°C-90°C | *MAX | MAX1) | Forwashingclothesrequiringspecialcare,such asinfantgarments.Werecommendturningthegarmentsinsideout asthiswillalsothoroughlywashouttheskin scalesorresiduesofskintreatmentproducts.The programmeisacombinationofaprolonged heatingandanextrarinsethatremovesany detergentresidue.Trewashingprogramme includesanautomaticprewashandadditional rinses.Totreatlaundrywithsteam,pressthe(8)EXTRAS(EXTRAFUNCTIONS)buttonandselectthe STEAMfunction. |
 | Shirts (Shirtswith steam)cold-40°C | 3,5kg | 1200 2) | Thisprogramisintendedforwashinggarments madeofcotton,microfibresandsynthetics;for washingcollarsandcuffs.Thewashtakesplace atalowtemperature,withagreateramountof waterandgentletumbling.Presetspinningspeed is800rpm.Totreatlaundrywithsteam,pressthe(8)EXTRAS(EXTRAFUNCTIONS)buttonandselectthe STEAMfunction. |
 | (Sportswear)cold-40°C | 3,5kg | 1200 2) | Sportswearmadeofcotton,microfibresand syntheticfibres,atlowerspinningratesandabrief finalspinningcycle. |
 | Extrahygiene 40°C-90°C | *MAX | MAX1) | Thiswashingprogrammeisusedforwashing cottongarmentsthatrequirespecialcare,such asclothesforpeoplewithhighlysensitiveskinor allergies.Werecommendturningthegarments insideout,asthiswillalsothoroughlywashout theskinandotherresidues.Totreatlaundrywithsteam,pressthe(8)EXTRAS(EXTRAFUNCTIONS)buttonandselectthe STEAMfunction. |
 | Remotecontrol(Remotecontrol) | UsetheRemotecontrolprogrammetoremotely controyourappliance(usingyourphone).You canselectallprogrammesavailableonyour appliance(seechapters»BEFOREUSINGTHE APPLIANCEFORTHEFIRSTTIME/Connecting theappliancetoaWi-Finetwork«and»WASHING PROCESS,STEPBYSTEP(1-7)/Step3:Remote controlofwashusingtheapp«).Youcanalsoselectadditionalprogramsinthe app. | ||
Maximum declared load (MAX) - see rating plate*
Any load (0kg - MAXkg)/
1) Maximum spinning rate (MAX) - see rating plate
2) Depending on the model
cold Cold wash
3) Maximum spinning rate

INFORMATION!
Add powder or liquid detergents according to the manufacturer's instructions, considering the washing temperature, washing programme, how soiled the laundry is, and water hardness.
When excessive foaming occurs in the washing machine or foams spill through the dosing container, the washed laundry must be thoroughly rinsed. Choose a washing programme with a large amount of water without using detergent.

INFORMATION!
Maximum amount of laundry in kg (for the Cotton programme) is indicated on the washing machine rating plate (see chapter »WASHING MACHINE DESCRIPTION / Technical information«).

INFORMATION!
Maximum or nominal load applies to laundry prepared pursuant to the IEC 60456 standard.

INFORMATION!
For better washing effect, we recommend loading the drum to 2/3 when using the cotton programmes.

INFORMATION!
Low water temperature, low mains voltage and different washing loads may affect the washing time; the remaining time displayed is adjusted accordingly during the washing process.
Time optimization during the programme progress
In the early stage of the washing programme, the washing machine uses advanced technology to detect the amount of laundry. After load detection, the washing machine adjusts the programme duration.
Washing programmes with steam
Adding steam during the last washing step loosens the laundry, slightly disinfects it, and eliminates some allergens. After using such a programme, the laundry will be soft, supple, and fresh, and it will require less ironing.
The use of steam (press position 8) also allows omitting or reducing the amount of conditioner.
For a better steam effect on the laundry, we recommend half load.
AirDry function
(depending on the model)
AIRDRY is a function intended for drying the washing machine interior and dispenser without any laundry in the appliance. The purpose of drying is to reduce and prevent the conditions for occurrence of mould and development of microbes that cause unpleasant odours of the washed clothes.
We recommend running this function once per week. The drying procedure takes several hours but uses little electricity.
When the AIRDRY process is completed, water droplets may still be present in the appliance or parts thereof. This is completely normal. Efficiency of appliance interior drying depends on their relative humidity in the room, amount of humidity remaining from the most recent wash, amount of clothes in the most recent wash etc.
AIRDRY function can only be activated using the ConnectLife app on your phone. (See chapter »WASHING PROCESS, STEP BY STEP (1-7) / Step 3: Remote control of wash using the app«.)
Remote control of wash using the app

INFORMATION!
See chapter WASHING PROCESS, STEP BY STEP (1-7) and observe steps 1 and 2.
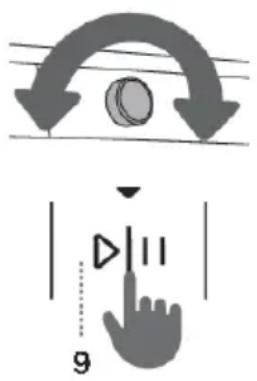
On the appliance:
- Close the washing machine door and close the detergent compartment.
- Rotate the program selector knob to position ConnectLife/REMOTE CONTROL (Remote control) 3. Press the button (9) START/PAUSE. The appliance door will lock, and the REMOTE START (REMOTE START) remote control indicator will light up.
Remote control is available for the next 24 hours, even when the appliance enters standby mode. The door is locked during this time, so it cannot be opened. Remote control can be cancelled by pressing (9) START/PAUSE.
Continue operating the appliance in the ConnectLife app, where you can choose from several options (selection, launch, and monitoring and stopping of the programme, amongst other additional settings)

INFORMATION!
The washing process can be controlled/monitored from the app.

INFORMATION!
Washing machine operation can be paused or stopped by choosing STOP/ADD CLOTHES/PAUSE ...
Some options can be implemented remotely in full, and some require your physical presence, such as adding laundry during a washing cycle (ADD CLOTHES).

INFORMATION!
You can also control your appliance from your phone if you are not connected to the same Wi-Fi network as your appliance (the phone only needs an active internet connection). This means you can also control your appliance when you are away from home.

INFORMATION!
You can operate the appliance with multiple devices. You can also control and monitor the operation of the appliance with any phone connected to the appliance, regardless of which user has initiated the washing cycle. The appliance can be connected to/controlled simultaneously with several ConnectLife user accounts.

INFORMATION!
After you have started the appliance from your phone, a person located next to the appliance can take over and manually turn off or control the appliance; the app will notify you in such case. In such case, controlling the appliance remotely from your phone is no longer possible. If you wish to control the appliance from your phone again, all required steps must be repeated.
Step 4: Choosing the settings
Most programmes feature basic settings, but these settings can be changed.
Adjust the settings by passing the relevant function button (before pressing the (9) START/PAUSE button). Functions that cannot be changed with the selected washing programme are partly lit.
Certain settings cannot be selected with some programmes. Such settings will not be lit, and the button will flash when pressed (see FUNCTION TABLE).
Description of function indicators for selected washing programme:
- lit (Basic/preset setting);
- dimmed (Functions that can be adjusted) and
- unlit (functions that cannot be selected).
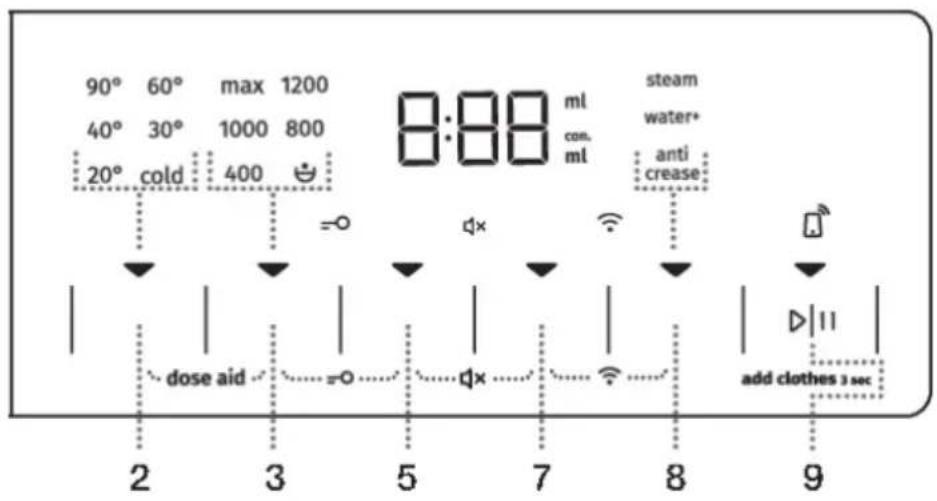

Changing the temperature for these selected programs.
Each program has a preset temperature that can be changed by passing the position (2) TEMP. (WASHING TEMPERATURE).
The selected temperature is lit.

SPIN (SPINNING RATE/PUMP STOP/DRAIN)
To adjust the spinning rate. Every program (except for Drum Clean (self-cleaning program)) has a preset spinning rate that can be adjusted by passing on position (3) SPIN (SPINNING RATE/PUMP STOP/DRAIN).
If you select the Drain function without spinning, then no indicator (light) will be lit on the display unit. Washing time will be accordingly shorter.
If you select "Pump stop", the symbol will appear on the display unit.
Select the "Pump stop" function when you wish the laundry to stay soaked in the water from the last rinse cycle in order to prevent it from creasing when you are unable to take it from the washing machine immediately after the washing program is complete. You may set the desired spinning rate. To continue the program, press the (9) START/PAUSE button that is lit. Water will be drained (pumped out) and the final spin cycle will be run.
5

FAST (FAST)
When the FAST (FAST) function is activated, the washing program will be carried out with a shorter washing duration. There are two available choices (depending on the selected washing program).
If you choose the FAST (FAST) function, the function indicator (light) will turn from a partly lit to fully lit symbol, and the total program time on the display unit will be adjusted accordingly.
To further shorten the washing program, press the button (5) FAST (FAST) again.
If you press the button once again, the setting is reset back to default.
First press - FAST (FAST) Second press - SUPERFAST (SUPERFAST) Third press - DEFAULT (DEFAULT)
We recommend a half-load for the Cotton programme.
7

DELAY END (DELAYEND)
Press the position (7) DELAY END (DELAYEND) to delay the programme completion time by up to 24 hours.
Settings procedure:
- Select the desired programme and extra functions.
- Press the position (7) DELAY END (DELAYEND) to activate the function.
- Repeatedly press this position to set the desired programme completion time (with 30-minute increments up to 6 hours, and 1-hour increments thereafter, up to 24 hours.)
- To activate the function, press the (9) START/PAUSE button.
Washing machine starts counting down this time. When the countdown reaches the programmed duration (e.g. 2:30), the washing programme starts automatically.
To cancel or change the delayed end of the washing programme, rotate the programme selector knob (1) to position OFF for at least two seconds.
To quickly cancel the programme completion delay, press the position (7) DELAY END (DELAYEND) and hold it for 3 seconds. The washing programme will resume.
Example of function setting:
It is now 9 PM, and you wish the washing programme to be completed at 6 AM the next morning, then set the DELAY END (DELAYEND) time to 9 hours.

INFORMATION!
Some settings cannot be selected with certain programmes. Such functions will not be lit on the display unit, and when the corresponding button is pressed, an acoustic signal will be emitted and the light on the button will flash (see FUNCTION TABLE).

INFORMATION!
Activate/deactivate the functions by pressing the desired function (before pressing the (9) START/PAUSE button). An indicator will light up next to the selected functions.

INFORMATION!
If you have set the DELAY END (DELAYING THE END OF THE WASHING PROGRAM) function and you are using liquid detergent, we do not recommend setting a program without a pre-wash.
Settings using a combination of two buttons pressed simultaneously


DOSEAID
With the DOSEAID function, the washing machine will recommend the optimum amount of powder or liquid detergent according to the selected settings.
Recommended amount of powder or liquid detergent dependence:
- Water hardness (the following settings are available: soft, medium, hard. Default setting is the medium level, but the user may adjust it. See chapter »INTERRUPTIONS AND CHANGING THE PROGRAMME/Personal settings menu).« For correct functioning of the DOSEAID function, we recommend setting the correct water hardness level.
- Selected washing programme and
- Amount of laundry (load) - the washing machine measures the laundry load every time you use the DOSEAID function.
In order for the DOSEAID feature to function correctly, the STEP 2 (preparing the laundry, switching on, and loading the washing machine) and STEP 3 (selecting the washing programme) have to be carried out first.
- Activate the function by simultaneously pressing positions (2) TEMP. (WASHING TEMPERATURE) and (3) SPIN (SPINNING RATE/PUMP STOP/DRAIN) and holding them for at least 3 seconds. Countdown timer is displayed on the display unit. Indicator (light) lights up when the function is activated.

- Press the (9) START/PAUSE button. The washing machine will start measuring the amount of laundry in the drum.
The measuring process is indicated by alternating flashing of the indicator lights on the display unit.
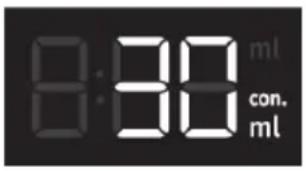
- Based on the measured amount of laundry in the drum and other settings, the recommended amount of concentrated/non-concentrated powder or liquid detergent will be displayed alternately on the display unit.

INFORMATION!
To determine whether your powder or liquid detergent is concentrated or not, check the packaging of your detergent.
INFORMATION!
To re-check the amount of concentrated or non-concentrated powder or liquid detergent, simultaneously press the (2) TEMP. (WASHING TEMPERATURE) and (3) SPIN (SPINNING RATE/PUMP STOP/DRAIN) buttons once again.

4. Add the recommended amount of powder or liquid detergent into the dosing tank. For guidance, observe the detergent amount/level indication in the washing detergent compartment (see chapter »RECOMMENDATIONS FOR WASHING AND ECONOMIC USE YOUR WASHING MACHINE«).
To start the washing programme, press the (9) START/PAUSE button.

CHILD LOCK
To ensure safety. Turn it on by simultaneously pressing (3) SPIN (SPINNING RATE/PUMP STOP/DRAIN) and (5) FAST (FAST) for at least 3 seconds. The display will show the time countdown. The selection is confirmed by an acoustic signal and by the activation of the indicator lamp (the symbol will light up (4)). You can also deactivate the child lock using the same procedure. As long as the child lock is activated, you cannot change the programme, settings or additional functions.
Child lock remains active even after the washing machine is switched off. For safety reasons, the child lock does not prevent the washing machine from being switched off by turning the washing programme selector button (1) to the position OFF. If, when the child lock is activated, the button is turned to the position OFF, the washing programme goes into pause mode. You can resume the programme by changing the position of the button and pressing (9) START/PAUSE. To select a new programme, you need to turn off the child lock.
▷|||

SOUND OFF
To turn off the sounds, simultaneously press the positions (5) FAST and (7) DELAY END and hold them for at least 3 seconds.
The selection will be confirmed by an acoustic signal and by an indicator light (the symbol (6) will be lit).
To turn the sound back on, hold (5) and (7) for at least 3 seconds. If you turn off the sound, there will be no acoustic warning at the end of the washing programme.
Wi-Fi MENU
The Wi-Fi menu is used for connecting the appliance and for remote control.
Rotate the program selector knob (1) to any position, except position OFF.
For 3 seconds, simultaneously press the positions (7) DELAY END (DELAYING THE END OF THE WASHING PROGRAM) and (8) EXTRAS (EXTRA FUNCTIONS). You have now entered the setup menu for Wi-Fi.
You can take one step back by simultaneously pressing the positions (7) and (8) and holding them for 3 seconds.
By passing (8) EXTRAS (EXTRA FUNCTIONS) you can select the available functions. By passing (9) START/PAUSE, you confirm your selection.
Available settings:
• OFF – On/Off/mining appliance connectivity of foron. - Con – the appliance is ready for connecting to a Wi-Fi network for 5 minutes. - PAr – the appliance can be connected to the ConnectLife app for 3 minutes. The function will only be active if you have already connected the appliance to your Wi-Fi network. - UnP – Remove (unpair) all users.

INFORMATION!
When the washing machine is switched off, all extra functions return to their basic or custom settings, except for the acoustic signal setting.
Step 5: Selecting additional functions

INFORMATION!
Activate/deactivate the functions by passing the desired function (before pressing the (9) START/PAUSE button).
Some settings cannot be selected with certain programmes. Such functions will not be lit on the display unit, and when the corresponding button is pressed, an acoustic signal will be emitted and the light on the button will flash (see FUNCTION TABLE). The functions (indicator lights below them) that are available will be dimly (partially) lit.

EXTRAS (EXTRA FUNCTIONS)
Press the (8) EXTRAS (EXTRA FUNCTIONS) button once or multiple times to choose between the eight different functions (depending on the selected washing programme):
- First press: ANTICREASE (CREASE PREVENTION);
- Second press: WATER+ (EXTRA WATER); • Third press: STEAM (STEAM);
- Fourth to eighth press: different combinations of these three functions.

ANTICREASE (CREASE PREVENTION)
To prevent creasing, select the ANTICREASE (CREASE PREVENTION) function. Gentle tumbling will continue after the end of the washing programme.
This function is recommended for delicate laundry.
AC will appear on the display unit (10).
A function can be deactivated at any time by pressing the (9) START/PAUSE button or by rotating the program selector knob to position OFF.

WATER+ (EXTRA WATER)
Use this function to wash with a larger amount of water on some programmes.

STEAM (STEAM)
Adding a 20-minute steam cycle at the end of the program will soften and disinfect your garments, and reduce or do away with the need for ironing and using softener/conditioner for your laundry.
Extra functions table
| Programmes | FAST | SUPERFAST | DELAYEND | DOSEAID | PREWASH * | ANTICREASE | WATER+ | STEAM | SPIN | RINSE&HOLD | |
| Cottonwhite(Cottonwhite)40°C-90°C | ············ | ||||||||||
| Colour(Colour)cold-60°C | ·········· | ||||||||||
| Mix|Synthetics(Mixedlaundry/Synthetics)cold-60°C | ·········· | ||||||||||
| Wool&Hand(Wool&Hand)cold-40°C | ········ | ||||||||||
| Eco40-60 | • | • | • | • | |||||||
| Power59'32'40°C | ········ | ||||||||||
| Speed20'(Speed20')30°C | ······ | ||||||||||
| Drumclean(Self-cleaningprogramme) | • | • | |||||||||
| Spin|Drain(Spinningrate|Drain)(Partialprogramme) | • | • | |||||||||
| Rinse&Softening(Rinse&Softening)(Partialprogramme) | ······ | ||||||||||
| Baby(Babyclothes)40°C-90°C | ········ | ||||||||||
| Shirts(Shirtswithsteam)cold-40°C | ········ | ||||||||||
| Programmes | FAST | SUPERFAST | DELAYEND | DOSEAD | PREWASH * | ANTICREASE | WATER+ | STEAM | SPIN | RINSE&HOLD | |
 | Sports(Sportswear)cold-40°C | ...... | |||||||||
 | Extrahygiene 40°C-90°C | ...... | |||||||||
Additional functions can be used:
* PREWASH function can only be activated using the ConnectLife app on your phone. (See chapter »WASHING PROCESS, STEP BY STEP (1-7) / Step 3: Remote control of wash using the app«.)
Step 6: Starting the washing programme
Press the (9) START/PAUSE button.
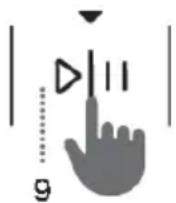
TIME REMAINING TO PROGRAMME COMPLETION or DELAY END time (if set) will appear on the display.
Symbols will be lit on the selected functions.
After pressing the (9) START/PAUSE button, the spinning rate (except in the case of the Drum clean (Self-cleaning programme) and SPIN (SPINNING RATE/PUMP STOP/DRAIN)), the Child lock and the Sound off functions can be adjusted/changed, while other settings cannot be changed.

INFORMATION!
If the TIME REMAINING UNTIL PROGRAMME COMPLETION flashes three times on the display unit, and there is an audible signal, this means that the washing machine door is open or not closed tightly. Close the washing machine door and press the (9) START/PAUSE button again to resume the washing programme.
Step 7: End of the washing programme
The washing machine will indicate the end of the washing programme with an acoustic signal and will appear on the display until the washing machine switches into low standby mode or switches off. After 5 minutes, the sign will no longer be displayed.


- Open the washing machine door.
- Take the laundry from the drum.
- Wipe the rubber door gasket and the door glass. 4. Close the door! 5. Shut off the water supply tap.
- Switch off the washing machine (rotate the program selector knob (1) to the OFF position).
- Unplug the power cord from the outlet.
INTERRUPTIONS AND CHANGING THE PROGRAMME
Manual interruption
To stop and cancel a washing programme, rotate the program selector knob (1) to the OFF position. Signal lights will flash on the display. At the same time, the washing machine pumps the water out of the washing machine drum. When the water is pumped out, the washing machine door will be unlocked. If the water in the washing machine is hot, the washing machine will automatically cool it and pump/drain it out.
Personal settings
Basic or default settings for each washing programme can also be changed. When you select the washing programme and additional functions, the combination can be stored by pressing the (9) START/PAUSE button and holding it for 5 seconds (the time is counted down on the display unit). The sign »SAVED« (»saved«) will appear on the display.
The programme will remain stored until it is changed using the same procedure.
Personal settings can also be reset to factory settings in the user menu.
AdaptTech
When a washing programme setting is used three times in a row, this setting is stored as default and will always be suggested when you select that washing programme – this is called the ADAPTTECH function. If you manually store these settings of a washing programme, the ADAPTTECH function on this washing programme is deactivated.
Personal settings menu
To turn on the washing machine, rotate the program selector knob (1) to any position. Simultaneously press the (2) TEMP. (WASHING TEMPERATURE) and (5) FAST (FAST) positions to open the Personal Settings Menu. The lights in the upper row of the display unit will light up, and number 1 will appear to indicate the setting function. Rotate the program selector knob (1) to the left or to the right to choose the function to change. Number 1 indicates sound settings, 2 indicates water hardness setting (DOSE AID), and number 3 indicates resetting of Personal programme settings to factory defaults. If the desired settings are not selected in 20 seconds, the programme will automatically return to main menu.
Press the (3) SPIN (SPINNING RATE/PUMP STOP/DRAIN) position to confirm the desired functions and their settings; press the (2) TEMP. (WASHING TEMPERATURE) position to go back one step.
Acoustic signal volume can be set at four levels (0 means the sound is off; 1 means that the button sound is activated; 2 means low volume, and 3 means high volume). Choose the volume level by rotating the program selector knob (1) to the left or to the right. The lowest setting means that the acoustic signal is switched off.
Pause button
The washing programme can always be stopped by pressing the (9) START/PAUSE button. The washing programme is temporarily paused when the time remaining until programme completion is flashing on the display unit. If there is no water in the drum and the water temperature is not too high, then the door will unlock after a certain period of time, and it can be opened. To resume the washing programme, first close the door and then press the (9) START/PAUSE button.
Adding/removing laundry during washing machine operation
After a certain period of time, the washing machine door can be opened if the water level and temperature are below a predefined threshold.
If the conditions below are met, then the electronic door lock is released and the washing machine door can be opened; will appear on the display unit:
- Water temperature in the drum has to be suitable.
- Water level in the drum has to be below a certain value.
In order to add or remove laundry from the washing machine during programme operation, proceed as follows:
- Press the (9) START/PAUSE button and hold it for 3 seconds.
- If all conditions for release of the electronic door lock are met, then you can open the washing machine door and add or remove laundry from the drum. 3. Close the washing machine door!
- Press the (9) START/PAUSE button.
The washing programme will resume.

INFORMATION!
If you add a considerable amount of laundry during the wash, the laundry could be washed less effectively, since the washing machine initially sensed a lower weight of the load of laundry and added a smaller amount of water. An insufficient amount of water relative to the amount of laundry could also cause damage to the laundry (rubbing of dry laundry), and the washing time can be longer.

INFORMATION!
Washing time will resume from the point at which the washing programme was interrupted.
Errors
In case of an error or fault, the programme will be interrupted.
An acoustic signal will warn about such occurrence (see TROUBLESHOOTING AND ERROR TABLE), and the error will be indicated on the display unit (E:XX).
Power supply failure
In case of a power supply failure, the washing programme is interrupted. When power supply is restored, the washing programme is resumed from the point at which it was interrupted. Upon completion of the washing cycle, /w alternate on the display unit. This informs the user about power supply failure and the effect on the execution of the washing programme.
Washing time will resume from the point at which the washing programme was interrupted.
Opening the door (pause/cancel/change programme)
The washing machine door can be opened if the water level in the machine is low enough and if the water temperature is not excessively high.

INFORMATION!
If the washing machine is not connected to the power mains or in case of a power supply failure during the programme execution, then the washing machine cannot be opened. In such case, the washing machine has to be properly connected, or service technicians should be contacted.
Displaying the number of completed wash cycles
(depending on the model)
If you disconnect the appliance from the power supply, wait for 10 seconds, and then reconnect the power cord, information on the number of completed wash cycles is displayed on the display unit for 3 seconds. After 3 seconds, the appliance switches to standby mode.
CLEANING AND MAINTENANCE

ELECTRIC SHOCK!
Before cleaning, unplug the washing machine from the power mains.
Cleaning the dispenser tray

INFORMATION!
The dispenser tray should be cleaned at least twice per month.

1 To remove the dispenser tray from the housing, press the small tab.
2 Clean the dispenser tray under running water using a brush, and dry it. Also, remove any detergent residue from the bottom of the housing.
3 If required, remove and clean the plug cap.
4 Clean the plug cap under running water and replace it.

INFORMATION!
Do not wash the detergent compartment in the dishwasher!
Cleaning the water supply hose, detergent dispenser housing, and rubber door gasket
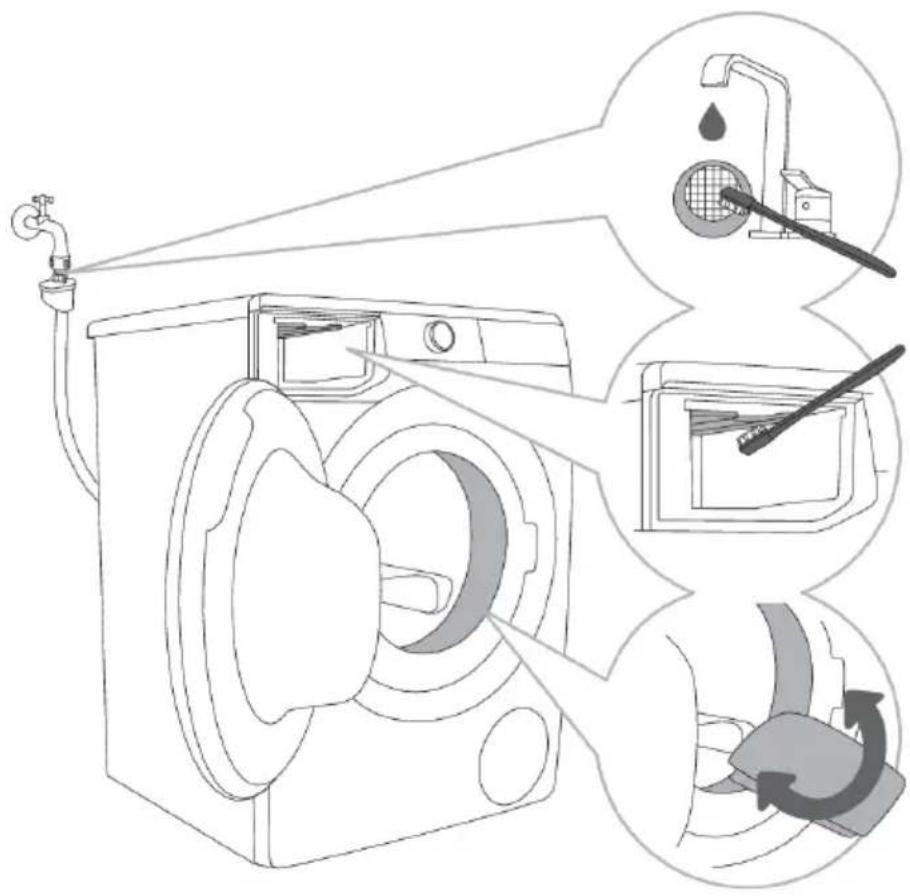
1 Clean the net filter often under running water.
2 Use a brush to clean the entire washing machine rinsing section, especially the nozzles on the upper side of the rinsing chamber.
3 After every wash, wipe the rubber door seal to extend its useful life.
Cleaning the pump filter

INFORMATION!
During cleaning, some water may be spilled. It is therefore recommended to place an absorbent cloth on the floor.

1. Open the pump filter cap using a suitable tool (flat screwdriver or similar tool).
2. Pull out the water outlet funnel before cleaning the pump filter. Rotate the pump filter slowly in the counter-clockwise direction. Pull out and remove the pump filter to allow the water to slowly drain.
3. Clean the pump filter thoroughly under running water.
4, 5. Remove all objects and impurities from the filter housing and the impeller. Replace the pump filter as shown in the figure and fasten it by rotating in the clockwise direction. For a good seal, the filter gasket surfaces should be clean.

INFORMATION!
The pump filter must be occasionally cleaned, especially after washing very fleecy, woolly, or very old laundry.
Cleaning the washing machine exterior

ELECTRIC SHOCK!
Always disconnect the washing machine from the power mains before cleaning.
Clean the washing machine exterior and display unit using a soft damp cotton cloth and water.

WARNING!
Do not use any solvents or cleaning agents that could damage the washing machine (please observe the recommendations and warnings provided by the cleaning agent manufacturers).

INFORMATION!
Do not clean the washing machine with a jet of water!

TROUBLE-SHOOTING
What to do...?
The washing machine shall automatically control the operation of particular functions during the washing cycle. If any irregularity is identified, this will be indicated by reporting (E:XX) on the display. The washing machine will report the error until it is switched off. Disturbances from the environment (e.g. the power grid) may result in various error reports (see TROUBLESHOOTING TABLE).
In such case:
- Switch off the washing machine and wait for a few seconds.
- Switch on the washing machine and repeat the washing programme.
- Most errors during operation can be resolved by the user (see TROUBLESHOOTING TABLE).
- If the error occurs again, call an authorized service unit.
- Repairs may only be carried out by an adequately trained person.
Troubleshooting and error table
Errors indicated on the display unit may include the following:
| Problem/Error | andproblemdescription | Whattodo?Indicationonthedisplayunit |
 | Incorrectsettings | Restarttheprogram;iftheerrorreoccurs,call aservicetechnician. |
 | Temperaturesensorerror | Inletwatertoocold.Repeatthewashing program.Ifthewashingmachinereportsthiserror again,callaservicetechnician. |
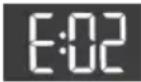 | Doorlockerror | Makesurethewashingmachinedooris closed.Ifyouhearanacousticsignalafterpressing the(9)START/PAUSEbutton,itmeansthat thedoorofthewashingmachineisnotclosed.Closethewashingmachinedoor.Unplugthepowercordfromtheoutlet;then, plugthepowercordbackintotheoutletand switchonthewashingmachine.Iftheerrorreoccurs,callaservicetechnician. |
 | Checkthefollowing:Waterfillingerror•isthewaterinletvalveopen,•isthefilteronthewaterinlethoseclean,•isthewatersupplyhosedeformed (clipped,cloggedetc.),•isthepressureinthewatermains between0.05and0.8MPa(0.5-8bar)Then,pressthe(9)START/PAUSEbutton toresumetheprogramme.Iftheerrorreoccurs,callaservicetechnician. | |
 | Waterheatingerror | Restarttheprogram;iftheerrorreoccurs,call aservicetechnician. |
 | Checkthefollowing:Waterdrainingerror•isthepumpfilterclean,•isthedrainhoseclogged,•isthedrainclogged,•ifthedischargehoseplacedisplaced belowthemaximumandabovethe minimumheight(seechapter »INSTALLATIONANDCONNECTION/ Connectingandsecuringthewater dischargehose«);then,pressthe(9)START/PAUSEbutton again.Iftheerrorreoccurs,callaservicetechnician. | |
| Excessiveamountof detergent | Toomuchdetergentmaycauseexcessive foaminginthedrum.SeedescriptionforFd | |
 | Waterleakdetectedinthe washingmachinearea | Turnoffthewashingmachineandturnitback on.Inspecttheexterioroftheappliance.Ifyoudo notobserveanyleaks,youcancontinueto usethewashingmachine. |
 | Waterlevelsensorerror | Unplugthepowercordfromtheoutlet;then, plugthepowercordbackintotheoutlet and switchonthewashingmachine.Venttheappliance.Dothisbydrainingand cleaningthewashingmachinefilterand cleaningthewall-mountedtrap.Iftheerrorreoccurs,callaservicetechnician. |
 | Wateroverflow | Ifthereiswaterinthedrumthatexceedsa certainlevel,andanerrorisreportedonthe displayunit,thewashingprogramwillbe interruptedandwaterwillbepumpedoutof thewashingmachine.Restarttheprogram;iftheerrorreoccurs,callaservicetechnician.Ifthereiswaterinthedrumthatexceedsa certainlevel,andanerrorisreportedonthe displayunit,whilethewashingmachine continuestoaddwater,closethewatertap andcallaservicetechnician. |
| Excessiveamountof detergent | Toomuchdetergentmaycauseexcessive foaminginthedrum.Seedescriptionfor.Fd | |
  | Motorcontrolerror | Manuallyredistributethelaundry(stuckor tangledlaundry)andrepeatthewashing programme.Doorisclosed,butitcannotbelocked.ErrorwhilelockingtlSwitchoffthewashingmachine.Switchitbackonandrestartthewashingprogram.Iftheerrorreoccurs,callaservicetechnician. |
 | doorTurnoffthewashingmachine | Doorisclosed,butitcannotbeunlocked.Errorwhileunlockthenturnitbackon.Iftheerrorreoccurs,callaservicetechnician.Toopenthedor,seechapter»INTERRUPTIONSANDCHANGINGTHEPROGRAMME/Openingthedor(Pause/Cancel/ChangeProgramme)«. |
 | ||
 | Electronicscommunicationfailureinthewashingmachine | Unplugthepowercordfromtheoutlet;then,plugthepowercordbackintotheoutletandswitchonthewashingmachine.Iftheerrorreoccurs,callaservicetechnician. |
 | ||
 | Warningfromthesystemfordetectingextendedwashingmachinevoltagefluctuation-180V>U>260V | Aprolongeddropofvoltagedobelow180V,orvoltageinexcessof260Vwasdetected,whichcanaffectthewashingmachineoperation.Checkthepowersupplynetworktowhichyourwashingmachineisconnected. |
 | Warningfromthesystemfordetectingincorrectpowermainsfrequency(50/60Hz) | Whenthewashingmachinewasswitchedon,thesystemdetectedincorrectsupplypowerfrequency,whichcouldaffectwashingmachinefunctionality.Anyproblemsonthepowernetworkshouldbecheckedandcorrected. |
 | Appliancecannotbeconnectedtothenetwork. | Theerroronlyaffectstheoptiontoremotelycontrol(Remotecontrol)yourwashingprogramme.itdoesnotaffectthewashingprocessonotherprogrammes.Callaservicetechnician. |
Warnings/information for the user, which can be indicated on the display unit, may include the following:
| Information | Errorcauseanddescription,whattodo?Indicationonth | ||
 | ANTICREASE(CREASE PREVENTION)functionthat youhaveselectedasapart ofthewashingprogrammeis activatedandinprogress | TocancelorstoptheANTICREASE(CREASE PREVENTION)function,rotatetheprogram selectorknob(1)topositionOFF. ⏻ | |
 | Waterdrainsystemalert Displayofwarning. [FF | Alertaboutreducedwaterflowinthepumping stage.Checkthefollowing:•isthepumpfilterclean, | |
| Information | Errorcauseanddescription,whattodo?Indica | |
| •isthedrainhoseclogged,•isthedrainclogged,•ifthedischargehoseplacedisplaced belowthemaximumandabovethe minimumheight(seechapter »INSTALLATIONAND CONNECTION/Connectingandsecuring thewaterdischargehose«). | ||
 | Systemwarningtorunthe Drumclean(Self-cleaning programme)Afterthewashingprogramme iscomplete,thesignsanEnd willalternateonthedisplay unit. | WerecommendrunningtheDrumclean (Self-cleaningprogramme). |
 | Warningbythesystemfor detectingexcessivefoaming duringthewashing programme | Incaseofexcessivefoaminginthewashing machineorleakoffoamthroughthedetergent dispensertray,thewashedlaundryhastobe rinsedthoroughlywithalargeamountof water.Chooseawashingprogramme,butdo notaddanydetergent.•Werecommendchoosingthe Rinse&Softeningprogramme.•Decreasetheamountofdetergentadded. |
 | Powersupplyfailurewarning (»PF«/PowerFailure) | Thesystemdetectedapowersupplyfailure duringthewashingprogrammeprogress, whichaffectedfunctionalexecutionofthe washingprogramme.Checkthepowersupplynetworktowwhich yourwashingmachineisconnected. |
 | Powersupplyfailurewarning (»PF/End«) | Uponcompletionofthewashingcycle, and will alternateonthedisplayunit.This informstheuseraboutapowersupplyfailure andontheeffectontheexecutionofthe washingprogramme.Thewashingprogram continueswhereitwasinterruptedandthen endssuccessfully. |
 | Warning-U:Lo (voltagebelow180V) | Aprolongeddropofvoltagetobelow180V wasdetected,whichcanaffectthewashing machineoperation.Checkthepowersupplynetworktowwhich yourwashingmachineisconnected. |
| Information | Errorcauseanddescription,whattodo?Indicationonth | |
| Unresponsivedisplayunitand allbuttons | Unplugthepowercordfromtheoutlet.Check ifthesupplyvoltageissuitableforthewashing machine(220-240V);then,plugthepower cordbackintotheoutletandswitchonthe washingmachine. | |
 | Warning-U:Hi (voltageover260V) | Aprolongedvoltagesurgetoover260Vwas detected,whichcanaffectthewashing machineoperation.Checkthepowersupplynetworktowhich yourwashingmachineisconnected. |
 | Washingmachinestanding by,readytoresumethewashingprogrammeThetimeremaininguntil programmecompletionis alternatelylitandoffonthe displayunit. | Toresumethewashingprogramme,pressthe (9)START/PAUSEbutton. |
 | Preparationforunlockingthe doorSignallightswillflashonthe displayunit.Waterhastobedrained | Waitfortheprocesstofinish.Ifnoerrorsare shownaftertheprocess,anewcyclecanberun.Waitforthedoortounlock. |
| Theappliancecannotbe controlledremotely | Applianceremotecontrolisnotactivatedor enabled.CheckiftheWi-Fisymbolontheappliance islit,andsettheprogramselectorknob(1)topositionREMOTECONTROL(ConnectLife)(Remotecontrol). | |
| connecttotheWi-FinetworkCheckwhether2.4GHznetworkisactivated onyourrouterandwhethertheWi-Fisignal attheapplianceisstrongenough. | TheappliancecannotfindyourWi-Finetwork.Theapplianceis strongenough. |

INFORMATION!
Noise and vibration – make sure the appliance is levelled using the adjustable legs and that the jam nuts are securely tightened.
Unevenly distributed laundry or lumps of laundry in the washing machine drum can cause problems such as vibration and noisy operation. The washing machine detects such problems and the UKS* (*stability control system) will be activated.
Smaller loads (e.g., one towel, one sweater, one bathrobe, etc.) or clothes made of materials with special geometrical properties are virtually impossible to distribute evenly across the washing machine drum (slippers, large items, etc.). This results in several attempts to redistribute the laundry, which in turn leads to longer programme duration. In extreme cases of unfavourable conditions, the programme can be completed without the spinning cycle.
The UKS* (*stability control system) allows stable operation and longer washing machine useful life.
If the problem persists despite observing the advice above, call an authorized service technician.
Service
Before calling a service technician
When you contact a service centre, please state your washing machine's type (1), code/ID (2), model number (3), and serial number (4).
Washing machine type, code, model, and serial number can be found on the rating (type) plate on the inner side of the washing machine door.


WARNING!
In case of a failure, only use approved spare parts by authorized manufacturers.

WARNING!
Repair or any warranty claim resulting from incorrect connection or use of the washing machine shall not be covered by the warranty. In such cases, the costs of repair shall be charged to the user.

INFORMATION!
The warranty does not cover consumables, minor deviations in colour, increased noise that results from appliance age and which does not affect the functionality of the appliance, and aesthetic defects on components, which do not affect the functionality and safety of the appliance.

INFORMATION!
The warranty does not cover errors or failures resulting from disturbances from the environment (lightning strike, power grid failures, natural disasters, etc.).
Additional equipment and accessories for maintenance can be viewed on our website at: www.gorenje.com
RECOMMENDATIONS FOR WASHING AND ECONOMIC USE OF YOUR WASHING MACHINE
Wash new coloured garments separately the first time.
Wash heavily soiled laundry in smaller amounts, with more powder detergent or with a pre-wash cycle.
Apply a special stain remover on stubborn stains before the wash.
With slightly soiled laundry, we recommend a programme without a pre-wash cycle, use of shorter programmes (e.g. FAST) and a lower washing temperature.
If you often wash laundry at low temperatures and with liquid detergents, bacteria may spawn which can cause odour in the washing machine. To prevent such odour, we recommend occasionally running the Drumclean (Self-cleaning programme) (see PROGRAMME TABLE).
We recommend avoiding washing very small amounts of laundry as this will lead to excessive use of energy and poorer washing machine performance.
Loosen any folded laundry before putting it into the drum. Only use detergents for machine washing.
If water hardness exceeds 14°dH, water softener should be used. Heater damage resulting from incorrect use of water softeners shall not be covered by the warranty. Check the information on water hardness with your local water supply company or authority.
Use of chlorine-based bleaches is not recommended as they can damage the heater.
Do not add hardened lumps of powder detergent into the detergent dispenser as this may clog the piping in the washing machine.
When using thick liquid laundry care products, we recommend diluting them with water to prevent clogging the dispenser tray drain. Liquid detergents are intended for washing programmes without a pre-wash cycle.
At higher spinning rates, there will be less residual moisture in the laundry. As a result, drying in a tumble dryer will be more economical and faster.
| Waterhardness | Hardnesslevels | |||
| p.p.m.°fH(°F)mmol/l | ||||
| <150<15<1,5<8,41-s | ||||
| 2 – normal | 8,4–14 | 1,5–2,5 | 15–25 | 150–250 |
| >250>25>2,5>143-h | ||||

INFORMATION!
Check the information on water hardness with your local water supply company or authority.

1 A separator/dividertab is supplied with the washing machine, which allows adding liquid detergent to the main wash compartment
(left compartment).
2 Powder and liquid detergent level indicator
3 When using powder detergent, the separator/dividertab should be lifted.
4 When using liquid detergent, the separator/dividertab should be lowered.
| Symbolsofdetergentdispensercompartments | |
| prewash | |
| mainwash | |
| softening | |

INFORMATION!
We recommend adding powder detergent immediately before the washing cycle. If you add it sooner, make sure the detergent compartment in the dispenser tray is completely dry before adding the powder detergent: otherwise, the powder detergent may cake before the start of the washing process.

INFORMATION!
Pour the conditioner into the dispenser tray, into the compartment with the symbol. Observe the recommendation on the conditioner packaging.

INFORMATION!
Do not fill the conditioner compartment over the max. indication (maximum indicated level). Otherwise, the conditioner will be added to the laundry too soon, leading to poorer washing effect.
PRODUCT INFORMATION
PRODUCT INFORMATION SHEET According to EU-Regulation No. 2019/2014
(depending on the model)
| Supplier'snameortrademark: | ||||
| Supplier'sadress( b): | ||||
| Modelidentifier: | ||||
| Generalproductparameters: | ||||
| ValueParameterValueParamet | ||||
| Ratedcapacity( a)(kg) | x,x | |||
| W (a) | a)x,x[A/B/C/D/E/F/G]( °)Energyeffic | |||
| Washingefficiencyindex (a) | x,xxx | Rinsingeffectiveness(g/kg) (a) | x,x | |
| Energyconsumptionin kWhercycle,forthe'eco 40-60'programme.Actual energyconsumptionwill dependonhowthe applianceisused. | x,xxx | Waterconsumptioninlitre percycle,basedonthe 'eco40-60'programme. Actualwaterconsumption willdependonhowthe applianceisusedandon thehardnessofthewater. | x | |
| Maximumtemperature insidethetreatedtextile( a) (°C) | Rated capacity | x | Remainingmoisture content(a)(%) | x,x |
| xHalf | ||||
| xQuarter | ||||
| Spinspeed( a)(rpm) | Rated capacity | x | Spin-dryingefficiencyclass (a) | [A/B/C/D/E/F/G]( °) |
| xHalf | ||||
| xQuarter | ||||
| Programmeduration( a) (h:min) | Rated capacity | x:xx | Type | [built-in/free standing] |
| x:xxHalf | ||||
| x:xxQ | ||||
| Airborneacousticalnoise emissionsinthespinning phase( a)(dB(A)re1pW) | x | Airborneacousticalnoise emissionsclass( a) (spinningphase) | [A/B/C/D]( °) | |
| x,xxStandbymode(W) | ||||
| Delaystart(W) (ifapplicable) | x,xx | Networkedstandby(W) (ifapplicable) | x,xx | |
| Minimumdurationoftheguaranteeofferedbythesupplier( b): | ||||
| Thisproducthasbeendesignedtorelease silverionsduringthewashingcycle | [YES/NO] | |||
Additional information:
Weblink to the supplier's website, where the information from point 9 of Annex II to Commission Regulation (EU) 2019/2023 (a) (b) is found:
(a) For the "eco 40-60" programme. (b) Changes to these items shall not be considered relevant for the purposes of paragraph 4 of Article 4 of Regulation (EU) 2017/1369. (c) If the product database automatically generates the definitive content of this cell, the supplier shall not enter these data.
Low standby mode
If you do not run any program or choose any settings after switching on the washing machine (program selector knob (1)), the display unit will be switched off after 5 minutes and switched to stand-by mode in order to save energy.
The display unit can be reactivated by rotating the program selector knob (1). If you do not do anything for 5 minutes after the end of a programme, the display unit will be switched off to save power.
| <0,5Po=weightedpowerwhenoff[W] | |
| <0,5PI=weightedpowerwheninstand | |
| 5,00TI=standbytime[min] |

INFORMATION!
Appliance with a wireless connection uses less than 2 W of electric energy in standby mode.
DISPOSAL

Packaging is made of environmentally friendly materials that can be recycled, disposed of, or destroyed without any hazard to the environment. To this end, packaging materials are labelled appropriately.
The symbol on the product or its packaging indicates that the product should not be treated as normal household waste. Take the product to an authorized collection centre for waste electric and electronic equipment processing.
When disposing of the appliance at the end of its useful life, remove all power cords, and destroy the door latch and switch to prevent the door from locking or latching (child safety).
Correct disposal of the product will help prevent any negative effects on the environment and health of people, which could occur in case of incorrect product removal. For detailed information on removal and processing of the product, please contact the relevant municipal body in charge of waste management, your waste disposal service, or the store where you bought the product.
GORENJE gospodinjski aparati, d.o.o. Address: Partizanska 12, 3320 Velenje, Slovenia Phone: +386 (0) 3 899 1000 Fax: +386 (0) 3 899 2800 www.gorenje.com
- DETAILED INSTRUCTIONS
- INFORMATION
- WARNING
- ELECTRIC SHOCK
- HOT SURFACE
- DANGER OF FIRE
- CONTENTS
- SAFETY PRECAUTIONS
- WASHING PROCESS, STEP BY STEP (1-7)
- THIS APPLIANCE IS INTENDED TO BE USED IN HOUSEHOLD AND SIMILAR APPLICATIONS, SUCH AS
- DO NOT INSTALL THE WASHING MACHINE IN A ROOM WHERE THE TEMPERATURE CAN DROP BELOW 5°C, AS WASHING MACHINE PARTS MAY BE DAMAGED IN CASE OF WATER FREEZING
- CHILD SAFETY
- ACTIVATE THE CHILD LOCK. SEE CHAPTER »CHOOSING THE SETTINGS/CHILD LOCK
- THE WASHING MACHINE IS MADE IN COMPLIANCE WITH ALL RELEVANT SAFETY STANDARDS
- DANGER OF HOT SURFACE
- WASHING MACHINE DESCRIPTION
- FRONT
- BACK
- TECHNICAL DATA
- RATING PLATE
- CONTROL UNIT
- INSTALLATION AND CONNECTION
- REMOVING THE BLOCKING RODS
- MOVING AND TRANSPORT AFTER INSTALLATION
- SELECTING THE ROOM
- ADJUSTING THE WASHING MACHINE FEET
- POSITIONING THE WASHING MACHINE
- WASHING MACHINE INSTALLATION CLEARANCES
- OPENING THE WASHING MACHINE DOOR (BIRD'S-EYE VIEW)
- CONNECTION TO WATER SUPPLY
- AQUA-STOP CONNECTION
- TOTAL AQUA-STOP CONNECTION (WITH A FLOAT)
- CONNECTING AND SECURING THE WATER DISCHARGE HOSE
- CONNECTING TO THE POWER MAINS
- BEFORE USING THE APPLIANCE FOR THE FIRST TIME
- CONNECTING THE APPLIANCE TO THE CONNECTLIFE APPLICATION
- USEFUL TIPS FOR YOUR SMART DEVICE
- WHERE TO FIND THE QR CODE FOR THE DEVICES REQUIRED BY THE APP DURING THE INSTALLATION PROCESS
- HOW TO ENABLE WI-FI ON THE DEVICE
- HOW TO ENABLE REMOTE START OF THE APPLIANCE
- HOW TO ADD A USER
- HOW TO REMOVE THE USERS (UNPAIR)
- WHICH WI-FI ROUTER CAN BE USED
- DO YOU HAVE MORE QUESTIONS
- REMOTELY UPGRADING THE SOFTWARE
- STEP 2: PREPARING THE WASHING PROCESS
- SWITCHING ON THE WASHING MACHINE
- LOADING THE WASHING MACHINE
- STEP 3: CHOOSING THE WASHING PROGRAMME
- TIME OPTIMIZATION DURING THE PROGRAMME PROGRESS
- WASHING PROGRAMMES WITH STEAM
- AIRDRY FUNCTION
- REMOTE CONTROL OF WASH USING THE APP
- ON THE APPLIANCE
- STEP 4: CHOOSING THE SETTINGS
- SPIN (SPINNING RATE/PUMP STOP/DRAIN)
- FAST (FAST)
- DELAY END (DELAYEND)
- SETTINGS USING A COMBINATION OF TWO BUTTONS PRESSED SIMULTANEOUSLY
- DOSEAID
- CHILD LOCK
- SOUND OFF
- WI-FI MENU
- AVAILABLE SETTINGS
- STEP 5: SELECTING ADDITIONAL FUNCTIONS
- EXTRAS (EXTRA FUNCTIONS)
- ANTICREASE (CREASE PREVENTION)
- WATER+ (EXTRA WATER)
- STEAM (STEAM)
- STEP 6: STARTING THE WASHING PROGRAMME
- STEP 7: END OF THE WASHING PROGRAMME
- INTERRUPTIONS AND CHANGING THE PROGRAMME
- MANUAL INTERRUPTION
- PERSONAL SETTINGS
- ADAPTTECH
- PERSONAL SETTINGS MENU
- PAUSE BUTTON
- ADDING/REMOVING LAUNDRY DURING WASHING MACHINE OPERATION
- ERRORS
- POWER SUPPLY FAILURE
- OPENING THE DOOR (PAUSE/CANCEL/CHANGE PROGRAMME)
- DISPLAYING THE NUMBER OF COMPLETED WASH CYCLES
- CLEANING AND MAINTENANCE
- CLEANING THE DISPENSER TRAY
- CLEANING THE WATER SUPPLY HOSE, DETERGENT DISPENSER HOUSING, AND RUBBER DOOR GASKET
- CLEANING THE PUMP FILTER
- CLEANING THE WASHING MACHINE EXTERIOR
- TROUBLE-SHOOTING
- WHAT TO DO
- TROUBLESHOOTING AND ERROR TABLE
- SERVICE
- BEFORE CALLING A SERVICE TECHNICIAN
- RECOMMENDATIONS FOR WASHING AND ECONOMIC USE OF YOUR WASHING MACHINE
- PRODUCT INFORMATION
- ADDITIONAL INFORMATION
- LOW STANDBY MODE
- DISPOSAL
Brand : GORENJE
Model : WPNA14A3PWIFI
Category : Washing machine