
SSTME 600 B1 - Food Processor SILVERCREST - Free user manual and instructions
Find the device manual for free SSTME 600 B1 SILVERCREST in PDF.


| Product type | Multifunction food processor |
| Brand | SilverCrest |
| Model | SSTME 600 B1 |
| Power | 600 W |
| Bowl capacity | 3.5 L (main bowl) |
| Speeds | 6 speeds + pulse function |
| Dimensions (L x W x H) | 30 x 25 x 38 cm |
| Weight | 5.2 kg |
| Bowl material | Stainless steel |
| Included accessories | Whisk, dough hook, immersion blender, chopper, grater/slicer (reversible disc) |
| Functions | Blend, knead, whisk, chop, grate, slice |
| Safety | Bowl safety lock, automatic overload stop, non-slip base |
| Cleaning | Bowl and accessories dishwasher safe, wipe base with a damp cloth |
| Maintenance | Store dry, do not immerse motor unit |
| Spare parts and repairability | Available via SilverCrest customer service (Lidl), repairability index 6.7/10 |
| Color | White and silver |
| Power cord | Length 1.2 m |
| Standby power consumption | < 0.5 W |
| Warranty | 3 years |
Frequently Asked Questions - SSTME 600 B1 SILVERCREST
User questions about SSTME 600 B1 SILVERCREST
0 question about this device. Answer the ones you know or ask your own.
Ask a new question about this device
Download the instructions for your Food Processor in PDF format for free! Find your manual SSTME 600 B1 - SILVERCREST and take your electronic device back in hand. On this page are published all the documents necessary for the use of your device. SSTME 600 B1 by SILVERCREST.
USER MANUAL SSTME 600 B1 SILVERCREST

BLENDER / STANDMIXER / BLENDER SSTME 600 B1
GB IE
BLENDER
Operating instructions
FR BE
BLENDER
Mode d'emploi
CZ
STOLNÍ MIXÉR
Návod k obsluze
SK
MIXÉR
Návod na obsluhu
DK
BLENDER
Before reading, unfold the page containing the illustrations and familiarise yourself with all functions of the device.
DE AT CH
GB/IE Operating instructions Page 1
Description of the appliance .... 3
Technical data 3
Safety instructions 4
Unpacking 6
Setting up 6
Operation 7
Fitting and filling the blender 7
Selecting the speed setting 8
Filling while in use 9
Removing the blender 9
Useful tips 9
Recipes....10
Banana shake 10
Vanilla shake 10
Cappuccino shake 10
Tropical mix 11
Nut nougat shake 11
Carrot shake 11
Blackcurrant mix 11
Hawaii shake 12
Fruity pineapple and strawberry mix 12
Andalusian cold soup (gazpacho) 12
Cleaning 13
Cleaning the blender 13
Cleaning the motor block 15
Storage 15
Disposal....16
Kompernass Handels GmbH warranty....17
Service 18
Importer 18
Introduction
Congratulations on the purchase of your new appliance.
You have selected a high-quality product. These operating instructions are a part of this product. They contain important information on safety, usage and disposal. Before using the product, familiarise yourself with all operating and safety instructions. Use the product only as described and only for the specified areas of application. In addition, pass these documents on, together with the product, to any future owner.
Intended use
This appliance is intended exclusively for ...
■ mixing, puréeing and stirring foods as well as crushing ice cubes, ■ use exclusively in normal domestic amounts and only for private use in a domestic environment in dry rooms.
This appliance is not intended for ...
■ chopping herbs, onions, meat and hard food components such as nuts, pits, large seeds or stalks, ■ making nut puree, ■ the processing of materials that are not foodstuffs, ■ commercial or industrial use, ■ for use in damp environments or outdoors, ■ processing hot/boiling liquids.
Use only the accessories and spare parts that are specified for this appliance. Other parts may not be adequately suitable or safe!
Package contents
After unpacking, check to ensure all items are available. The package contains:
● Motor block, with power cable and plug - Blender • Lid - Measuring cap - Operating instructions
Description of the appliance
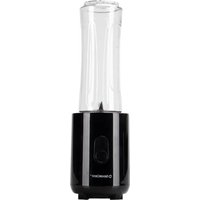
① Measuring cap, ② Lid, ③ Blender, ④ Cutting blades, ⑤ Switch, ⑥ Motor block, ⑦ Cable retainer, ⑧ Scale, ⑨ Rubber lid seal
Technical data
| Nominal voltage | 220 - 240 V ~ (alternating current),50 - 60 Hz |
| Nominal power consumption 600 W | |
| Storage capacity approx. 2.28 litres | |
| Max. capacity 1.75 litres | |
| Protection Class | II / ☐ (double insulation) |
| CO time 3 minutes | |
 | All of the parts of this appliance that come into contact with food are food-safe. |
The CO time (continuous operation time) is the amount of time an appliance can be operated without the motor overheating and becoming damaged. When the specified CO time has been reached, the appliance must be switched off until the motor has cooled down to room temperature.
Safety instructions

▶ Ensure that the appliance, the power cable and the power plug are never immersed in water or other liquids. ▶ Use the appliance only in dry rooms; never use it outdoors or in damp environments. ▶ Ensure that the power cable never becomes wet or damp during operation. Route the power cable in such a way that it cannot become trapped or damaged in any way. ▶ To avoid potential risks, if the appliance power cable is damaged, it must be replaced by the manufacturer, its customer service or by a qualified technician. ▶ Always remove the plug from the power socket after use. Switching off the appliance is not sufficient because the appliance receives power as long as the power plug is connected to the socket. ▶ Check to ensure that the appliance is in a serviceable condition before use. The appliance may not be used if it shows signs of damage, especially to the motor block or the blender attachment. - Remove the plug from the socket immediately if you notice unexpected smells or noises coming from the appliance while it is in use or if there is an evident malfunction.

WARNING! RISK OF INJURY!
▶ NEVER insert your hand or fingers into the blender, especially when it is in use. The cutting blades are extremely sharp! ▶ DO NOT remove the lid when the appliance is in operation. ▶ To ensure you can react immediately in the event of danger, never leave the appliance running unattended.
⚠ WARNING! RISK OF INJURY!
- Do not insert cutlery items or mixing tools into the blender while the appliance is in use. There is a considerable risk of injury if these come into contact with the swiftly rotating cutting blades!
▶ Children should be supervised to ensure that they do not play with the appliance.
▶ Never use the appliance for purposes other than those described in these instructions.
▶ Risk of injury if appliance is misused.
- The appliance should always be disconnected from the mains when not supervised and before assembly, disassembly or cleaning.
▶ This appliance is not to be used by children.
The appliance and its mains cable must be kept away from children.
This appliance can be used by persons with reduced physical, sensory or mental capabilities or lack of experience and knowledge if they have been given supervision or instruction concerning safe use of the appliance, and if they are aware of the potential risks.
▶ Do not allow children to play with the appliance.
▶ Be careful when handling the appliance. The cutting blades are extremely sharp!
▶ Take care when emptying the blender! The cutting blades are extremely sharp!
▶ Take care when cleaning the appliance! The cutting blades are extremely sharp!
- Switch the appliance off and disconnect the plug from the power supply before changing accessories or getting hold of parts that move during operation.
⚠ WARNING! RISK OF INJURY!
▶ Always make sure that the blender is switched off before removing the jug from the motor block! ▶ Use the blender only with the supplied motor block!
CAUTION! MATERIAL DAMAGE!
- Do not use the appliance in direct sunlight or near any heat-generating appliances. ▶ NEVER fill the blender with boiling liquids or other foods! Allow these to cool to a lukewarm temperature. ▶ NEVER operate the appliance when it is empty, i.e. without ingredients in the blender attachment.
Unpacking
■ Remove all packaging materials or protective films from the appliance. Retain the packaging, so that you can store the appliance safely or send it by post, e.g. if it needs to be repaired. ■ Before using the appliance, check that it is free of damage; check also that the power cable and plug as well as all accessories and appliance parts are undamaged. ■ Clean all components carefully before using the appliance for the first time (see "Cleaning").
Setting up
Once all components have been cleaned as described in the section "Cleaning":
Position the appliance so that
- the mains cable passes through the recess at the rear of the appliance,
- the power plug is immediately accessible, so that it can be quickly withdrawn in the event of danger,
- it is stable and not liable to slip, and so that the sucker feet can attach firmly and the appliance cannot tip over due to vibration,
- the mains cable is not in the working area and thus does not present a risk of being inadvertently snagged and tipping the appliance over.
Operation
WARNING!
The motor switches off automatically as soon as the blender ③ is removed from the motor block ⑥ or the lid ② is opened. In such cases it may be easy to forget that the machine is still switched on. The motor will then start unexpectedly as soon as the blender attachment ③ is fitted or the lid ② is closed again:
Therefore:
- Do not insert the power plug into the wall socket until the blender ③ is filled and mounted with its lid fitted and closed.
- Before fitting the blender, always check to see that the appliance is switched off or that the power plug has been removed.
- Switch the appliance off first, pull the plug out and wait until the motor has come to a standstill before removing the blender ③ or opening the lid ②.
Fitting and filling the blender
1) Rotate the blender ③ anticlockwise until the arrow ▼ under the blender handle is located above the 🔒 position. Remove the blender ③ from the motor block ⑥ in a vertical, upward motion. 2) Remove the lid ② by rotating it anticlockwise towards position 📋 (see Fig 1) until you can pull it upwards. 3) Fill the blender ③ to at least to the lowest line of the scale ⑧ and at most to the MAX mark. For optimum results, we recommend the following maximum filling quantities:
| Food | Max. filling quantity | Recommended level | Recommended processing time |
| Liquids 1750 ml 1-3 60 sec. | |||
| Yoghurt-based drinks 1250 ml 2-5 90 sec. | |||
| Milkshakes/ smoothies | 1250 ml 2-5 60-90 sec. | ||
| Pancake mix 1250 ml 3-5 90 sec. | |||
| Baby food 750 ml | 5 | 3 min. | |
| Mayonnaise | 2 eggs250 ml oil | 3-5 | 90-120 sec. |
| Vegetable soup | 1500 ml 3-5 | 3 min. | |
| Ice cubes | 250 ml(approx. 14-15 pieces) | P | 12x |
4) Press the lid ② firmly down onto the blender ③. Close the lid ② by turning it clockwise to position 🔒 until it audibly engages (see Fig. 2). Ensure that the pouring spout on the blender ③ is closed. The motor cannot start until the lid ② is fitted flush.


Fig. 1 Fig. 2
5) Press the measuring cap ① into the lid as far as the stop.
6) Place the filled and closed blender ③ on the motor block ⑥. To do this, use the recesses on the motor block ⑥ and ensure that the arrow ▼ on the blender is pointing to the 🔒 symbol while doing so. Turn the blender ③ clockwise to position 🔒 until it audibly engages. The motor cannot start until the blender ③ is fitted flush.
Selecting the speed setting
Once the blender ③ is filled and sitting completely closed on the motor block ⑥, you can switch on the appliance.
Set the switch ⑤ to ...
Level 1-3
for liquids or soft foodstuffs, for mixing, blending and stirring
Level 3-5
for more solid foods or for chopping
for short, powerful impulse operation, e.g. for crushing ice cubes or when cleaning. To prevent overloading the motor, the switch ⑤ does not lock in this position. Therefore, hold the switch ⑤ in this position for short periods only.
NOTE
▶ Fill the blender ③ with a maximum of 250 ml of ice cubes. Otherwise, the ice cubes will not be crushed optimally.
Filling while in use
WARNING!
If you want to add additional foods during operation, use only the measuring cap ① provided for this purpose. Do NOT open the lid ②.
Do not insert cutlery items or mixing tools into the blender ③ while the appliance is in use. There is a considerable risk of injury if these come into contact with the swiftly rotating cutting blades ④!
To add more food while the appliance is in use, ...
1) Remove the measuring cap ① from the lid ②. 2) Add the ingredients. 3) Press the measuring cap ① back into the lid.
Removing the blender
Once you have finished processing the food in the attachment:
1) Always start by setting switch ⑤ to the off position ("0") and pulling out the mains plug. 2) Wait until the motor has come to a complete standstill before lifting the blender ③ off the motor block ⑥. Rotate the blender ③ anticlockwise until the arrow ▼ under the blender handle is located above the 🔒 position. Remove the blender ③ from the motor block ⑥ in a vertical, upward motion.
Useful tips
■ To achieve the best results when puréeing firm ingredients, add small amounts one after the other into the blender ③ rather than a single large portion. ■ When processing firm ingredients, cut them into small pieces (2 - 3 cm). ■ Add at least 50 ml of liquid when pureeing fruit or vegetables.
■ Add thicker ingredients (such as yoghurt) into the blender ③ first. If any of ingredients are not picked up during mixing, remove the blender ③ from the motor block ⑥, remove the lid ② and stir the ingredients with a suitable implement, such as a spoon. Replace the blender ③ back on the motor block ⑥ with the lid ② closed and continue mixing.
■ When mixing liquid ingredients, start off with a small amount of liquid. Gradually add more liquids to the mixture through the measuring cap. ■ The appliance can be stabilised by placing your hand on top of the closed blender during operation. For stirring solid or very thick liquid foods, it can be useful to use level P to prevent the cutting blades ④ from blocking.
NOTE
▶ Do not use the appliance to grind crystals of cooking salt, refined sugar or white sugar. For example, to make powdered sugar.
Recipes
Banana shake
- 2 bananas
- approx. 2 tbsp. sugar (depending on the ripeness of the bananas and personal taste)
• 1/2 | milk
- 1 dash of lemon juice
Peel the bananas and liquidise them at level 2. Gradually add the milk, then the sugar and the lemon juice. Keep mixing everything until you have a smooth and uniform liquid. Serve the shake chilled.
Vanilla shake
• 1/4 l milk - 250 g vanilla ice cream - 125 g ice cubes - 1 1/2 tsp. sugar
Crush the ice cubes using level P. Place the remaining ingredients into the mixer. Mix everything at Level 2 until the liquid has a smooth consistency.
Cappuccino shake
- 65 ml cold espresso (or a very strong coffee)
- 65 ml milk
- 15 g sugar
- 65 g vanilla ice cream
- 100 g ice cubes
Crush the ice cubes using level P. Add the espresso, milk and sugar. Mix everything together at level 2 until the sugar has dissolved. Finally, add the vanilla ice cream and then briefly mix everything together at level 1.
Tropical mix
- 125 ml pineapple juice
- 60 ml papaya juice
- 50 ml orange juice
- ½ small tin of peaches with juice
- 125 g ice cubes
Crush the ice cubes using level P. Place all ingredients into the mixer and blend them together at level 3.
Nut nougat shake
• ½ | milk - 200 g nut nougat spread - 1 scoop of vanilla ice cream - 50 ml cream
Add all the ingredients to the blender and mix at level 3 until everything is evenly blended together.
Carrot shake
- 300 ml apple juice
- 500 ml carrot juice
- 4 tbsp. cooking oil (wheatgerm oil or rapeseed oil)
- 4 tbsp. of lemon juice
- Powdered ginger
- Pepper
Add the apple juice, cooking oil and lemon juice into the blender and mix everything together at level 2. Then add the carrot juice and mix everything together at level 2. To finish, add the powdered ginger and pepper to taste.
Blackcurrant mix
- 2 tsp. honey
- 2 bananas • 1/4 l buttermilk • 1/4 l blackcurrant juice
Place all ingredients into the mixer and blend them together at level 3.
Hawaii shake
- 4 bananas
- 1/4 l pineapple juice • 1/2 l milk
- 2 tbsp. honey • 1/4 l rum
Peel the bananas and liquidise them at level 2. Then add the other ingredients and mix everything together at level 1.
Fruity pineapple and strawberry mix
- 250 ml pineapple juice
- 200 g strawberries
- 300 ml apple juice
- 4 ice cubes
Wash the strawberries and remove the green parts. Crush the ice cubes using level P. Liquidise them at level 2. Then add the other ingredients and mix everything together at level 1.
Andalusian cold soup (gazpacho)
- 1/2 cucumber
- 1 large tomato
- 1 green pepper
- 1/2 onion
- 1 garlic clove
- 1/2 white bread roll
- 1/2 tsp. salt ● 1 tsp. red wine vinegar • 1 tbsp. olive oil
Cut the vegetables into pieces approx. 2 cm in size. Start by adding the first the tomatoes and then the cucumber to the blender. Liquidise them at level 3. Add the remaining ingredients and then liquidise/blend them all together at level 3 until a smooth soup is created. Serve the soup with bread.
NOTE
These recipes are provided subject to change. All ingredients and preparation information are guiding values. Adapt these recipe suggestions based on your personal experience.
NOTE
In cases of lactose intolerance, we recommend you use a lactose-free milk. Keep in mind, however, that lactose-free milk is a little sweeter.
Cleaning

Before starting to clean the blender and its components:
▶ Ensure that the motor is switched off and the power plug removed from the socket.

Do not immerse the motor block 6 in water or other liquids. This could result in you receiving a fatal electric shock and cause damage to the appliance.
▶ Never open the housing of the appliance. Otherwise, there is a risk of a fatal electric shock.

WARNING! RISK OF INJURY!
▶ Never insert your hand or fingers into the blender ③, especially while it is in use. The cutting blades ④ are extremely sharp!
CAUTION! PROPERTY DAMAGE!
▶ Do not use solvents or abrasive cleaners on the plastic surfaces, they could be damaged by them.
Cleaning the blender
To prevent injuring yourself on the cutting blades ④, clean the blender ③ only with a long-handled washing-up brush.
- Clean the measuring cap ① and the lid ② in mild soap solution. Ensure that the rubber seal ⑨ is correctly fitted before using the lid ② again.
NOTE

You can also clean the lid ②, the measuring cap ① and the blender ③ with the cutting blade ④ in your dishwasher. If possible, place all the parts in the upper basket of the dishwasher and make sure that they are not jammed in place.
If you clean the appliance directly after use, you can usually achieve sufficiently hygienic cleaning results by using the following alternatives: Fill the blender ③ with 750 ml of water and add a couple of drops of mild washing up liquid. Close the lid ② and fit the blender ③ onto the motor block ⑥. Insert the mains plug into the socket and activate the pulse function a few times so that the cutting blades ④ plough through the water at maximum speed. Afterwards, rinse the blender ③ with plenty of clean water to remove any washing up liquid residues.
■ To remove stubborn dirt, you can remove the attachment with the cutting blades ④ from the blender jug ③:

Fig. 3
1) Remove the blender ③ from the motor block ⑥. For better stability, remove the lid ② by turning it anticlockwise towards the position 📋 (see fig 1) until you can pull it off upwards. 2) Turn the appliance upside down and turn the attachment Ⓐ with the cutting blades ④ anticlockwise so that it can be detached from the blender jug ③ (see fig. 3).
WARNING! RISK OF INJURY!
▶ Handle the cutting blades ④ with extreme caution. They are very sharp. 3) Clean both parts thoroughly in a mild soap solution.
NOTE
If necessary, you can remove the sealing ring B from the attachment A with the cutting blades 4. Pull the sealing ring B out of the attachment A and clean it in a mild soap solution. Then rinse off the sealing ring B in fresh water.
NOTE

You can also clean the blender jug ③ and the attachment A with the cutting blades ④ in your dishwasher.
4) Dry all parts thoroughly before reassembling them.
5) Replace the attachment A with the cutting blades 4 onto the blender jug 3 and turn it clockwise. Make sure the sealing ring B is inserted correctly.
Cleaning the motor block
1) Clean the surfaces with a damp cloth. If necessary, apply a mild washing-up liquid to the cloth. Afterwards, wipe off with a cloth moistened only with water to ensure that no detergent remains on the appliance. Then dry the surfaces thoroughly. 2) When cleaning, always check that the contact switch in the fitting for the blender ③ is not blocked by soiling residues. If you cannot dislodge any blockages with the corner of a piece of paper, make contact with Customer Services. Do not use any hard objects, these could damage the contact switch. 3) Remove any possible residues on the underside of the motor block ⑥ with a dry cloth or a stiff-bristled brush only. Ensure that nothing can get in through the ventilation openings of the appliance.
Storage
1) If you do not intend to use the blender for an extended period, clean it thoroughly (see chapter "Cleaning"). 2) Wrap the power cable around the cable retainer ⑦ on the base of the motor block ⑥. 3) Store the blender in a cool and dry location.
Disposal

Do not dispose of the appliance in your normal domestic waste. This product is subject to the provisions of European Directive 2012/19/EU.
Dispose of the appliance via an approved waste disposal company or your municipal waste disposal facility. Please comply with all applicable regulations. Please contact your waste disposal facility if you are in any doubt.

Your local community or municipal authorities can provide information on how to dispose of the worn-out product.

The product is recyclable, subject to extended producer responsibility and is collected separately.

Note the labelling on the packaging and separate the packaging material components for disposal if necessary. The packaging material is labelled with abbreviations (a) and numbers (b) with the following meanings:
1-7: Plastics, 20-22: Paper and cardboard, 80-98: Composites.

The packaging is made from environmentally friendly material and can be disposed of at your local recycling plant.
This appliance has a 3-year warranty valid from the date of purchase. If this product has any faults, you, the buyer, have certain statutory rights. Your statutory rights are not restricted in any way by the warranty described below.
Warranty conditions
The warranty period starts on the date of purchase. Please keep your receipt in a safe place. This will be required as proof of purchase.
If any material or manufacturing fault occurs within three years of the date of purchase of the product, we will either repair or replace the product for you or refund the purchase price (at our discretion). This warranty service requires that you present the defective appliance and the proof of purchase (receipt) within the three-year warranty period, along with a brief written description of the fault and of when it occurred.
If the defect is covered by the warranty, your product will either be repaired or replaced by us. The repair or replacement of a product does not signify the beginning of a new warranty period.
Warranty period and statutory claims for defects
The warranty period is not prolonged by repairs effected under the warranty. This also applies to replaced and repaired components. Any damage and defects present at the time of purchase must be reported immediately after unpacking. Repairs carried out after expiry of the warranty period shall be subject to a fee.
Scope of the warranty
This appliance has been manufactured in accordance with strict quality guidelines and inspected meticulously prior to delivery.
The warranty covers material faults or production faults. The warranty does not extend to product parts subject to normal wear and tear or to fragile parts which could be considered as consumable parts such as switches, batteries or parts made of glass.
The warranty does not apply if the product has been damaged, improperly used or improperly maintained. The directions in the operating instructions for the product regarding proper use of the product are to be strictly followed. Uses and actions that are discouraged in the operating instructions or which are warned against must be avoided.
This product is intended solely for private use and not for commercial purposes. The warranty shall be deemed void in cases of misuse or improper handling, use of force and modifications / repairs which have not been carried out by one of our authorised Service centres.
Warranty claim procedure
To ensure quick processing of your case, please observe the following instructions:
■ Please have the till receipt and the item number (e.g. IAN 123456_7890) available as proof of purchase.
■ You will find the item number on the type plate on the product, an engraving on the product, on the front page of the operating instructions (below left) or on the sticker on the rear or bottom of the product.
If functional or other defects occur, please contact the service department listed either by telephone or by e-mail.
■ You can return a defective product to us free of charge to the service address that will be provided to you. Ensure that you enclose the proof of purchase (till receipt) and information about what the defect is and when it occurred.

You can download these instructions along with many other manuals, product videos and installation software at www.lidl-service.com.
This QR code will take you directly to the Lidl service page (www.lidl-service.com) where you can open your operating instructions by entering the item number (IAN) 359632_2101.
Service
GB Service Great Britain
Tel.: 0800 404 7657
E-Mail: kompernass@lidl.co.uk
IE Service Ireland
Tel.: 1890 930 034
(0.08 EUR / min., (peak))
(0.06 EUR / min., (off peak))
E-Mail: kompernass@lidl.ie
IAN 359632_2101
Importer
Please note that the following address is not the service address. Please use the service address provided in the operating instructions.
KOMPERNASS HANDELS GMBH
BURGSTRASSE 21
44867 BOCHUM
GERMANY
www.kompernass.com
Table of Contents
Introduction 20

Fig. 1 Fig. 2
KOMPERNASS HANDELS GMBH
BURGSTRASSE 21
44867 BOCHUM
GERMANY
www.kompernass.com
Table of Contents
Introduction 38

Fig. 1 Fig. 2
KOMPERNASS HANDELS GMBH
BURGSTRASSE 21
44867 BOCHUM
GERMANY
www.kompernass.com
Table of contents
Introduction....60
WARNING! RISK OF INJURY!
⚠ WARNING! RISK OF INJURY!
⚠ WARNING! RISK OF INJURY!
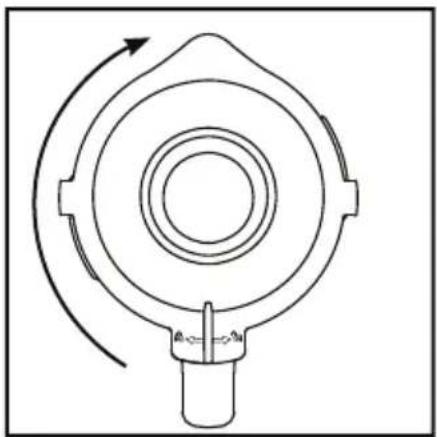
Fig. 1 Fig. 2
WARNING! RISK OF INJURY!
⚠ WARNING! RISK OF INJURY!
KOMPERNASS HANDELS GMBH
BURGSTRASSE 21
44867 BOCHUM
GERMANY
www.kompernass.com
Contents
Introduction....78
Intended use 78
Package contents 78
Device description 79
Fig. 1 Fig. 2

KOMPERNASS HANDELS GMBH
BURGSTRASSE 21
44867 BOCHUM
GERMANY
www.kompernass.com
Table of contents
Introduction....96

Fig. 1 Fig. 2
KOMPERNASS HANDELS GMBH
BURGSTRASSE 21
44867 BOCHUM
GERMANY
www.kompernass.com
Table of contents
Introduction....1 1 4
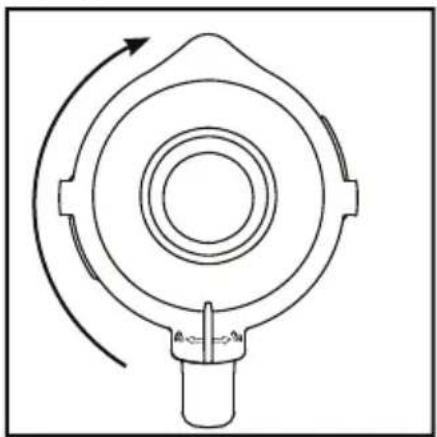
Fig. 1 Fig. 2
5) Press the filling lid ① all the way into the opening in the cover.
6) Place the filled and closed blending attachment ③ onto the motor block ⑥. To do this, use the recesses on the motor block ⑥ and make sure that the arrow ▼ on the blending attachment points to the symbol 📄. Turn the blending attachment ③ clockwise to the position 🔒 until it audibly clicks into place. The motor can only be started when the blending attachment ③ is fitted so that it is flush.
KOMPERNASS HANDELS GMBH
BURGSTRASSE 21
44867 BOCHUM
GERMANY
www.kompernass.com
Index
Introduction....132
Intended use 132
Scope of delivery .... 1 3 2

Fig. 1 Fig. 2
KOMPERNASS HANDELS GMBH
BURGSTRASSE 21
44867 BOCHUM
GERMANY
www.kompernass.com
Table of contents
Introduction....150
Correct use 150
Package contents....150
Description of the blender....151
Technical data 151

Fig. 1 Fig. 2
5) Press the filler cap ① until it clicks into place in the opening.
KOMPERNASS HANDELS GMBH
BURGSTRASSE 21
44867 BOCHUM
GERMANY
www.kompernass.com

KOMPERNASS HANDELS GMBH
BURGSTRASSE 21
44867 BOCHUM
GERMANY
www.kompernass.com
Last Information Update · Stand der Informationen · Version des informations · Stand van de informatie Stav informaci · Stan informacji · Stav informacií · Estado de las informaciones · Tilstand af information: 04 / 2021 · Ident.-No.: SSTME600B1-042021-1



- BLENDER / STANDMIXER / BLENDER SSTME 600 B
- BLENDER
- STOLNÍ MIXÉR
- MIXÉR
- DE AT CH
- GB/IE OPERATING INSTRUCTIONS PAGE
- INTRODUCTION
- INTENDED USE
- PACKAGE CONTENTS
- DESCRIPTION OF THE APPLIANCE
- SAFETY INSTRUCTIONS
- WARNING! RISK OF INJURY
- ⚠ WARNING! RISK OF INJURY
- CAUTION! MATERIAL DAMAGE
- UNPACKING
- SETTING UP
- OPERATION
- WARNING
- FITTING AND FILLING THE BLENDER
- SELECTING THE SPEED SETTING
- NOTE
- FILLING WHILE IN USE
- REMOVING THE BLENDER
- USEFUL TIPS
- RECIPES
- BANANA SHAKE
- VANILLA SHAKE
- CAPPUCCINO SHAKE
- TROPICAL MIX
- NUT NOUGAT SHAKE
- CARROT SHAKE
- BLACKCURRANT MIX
- HAWAII SHAKE
- FRUITY PINEAPPLE AND STRAWBERRY MIX
- ANDALUSIAN COLD SOUP (GAZPACHO)
- CLEANING
- CAUTION! PROPERTY DAMAGE
- CLEANING THE BLENDER
- CLEANING THE MOTOR BLOCK
- STORAGE
- DISPOSAL
- WARRANTY CONDITIONS
- WARRANTY PERIOD AND STATUTORY CLAIMS FOR DEFECTS
- SCOPE OF THE WARRANTY
- WARRANTY CLAIM PROCEDURE
- SERVICE
- IMPORTER
- TABLE OF CONTENTS
- CONTENTS
- INDEX
Brand : SILVERCREST
Model : SSTME 600 B1
Category : Food Processor