
RapidReceipt RR-600W - Scanner EPSON - Free user manual and instructions
Find the device manual for free RapidReceipt RR-600W EPSON in PDF.


| Product Type | Document Scanner |
| Brand | Epson |
| Model | RapidReceipt RR-600W |
| Scanner Type | Desktop, ADF (Automatic Document Feeder) |
| Maximum Scan Size | 11.7 x 17.7 inches (A3) |
| Optical Resolution | 600 dpi |
| Color Depth | 48-bit internal, 24-bit external |
| ADF Capacity | 100 sheets (80 g/m²) |
| Scan Speed (Simplex) | Up to 60 ppm (200 dpi, A4) |
| Scan Speed (Duplex) | Up to 120 ipm (200 dpi, A4) |
| Connectivity | USB 3.0, Wi-Fi (802.11 b/g/n), Ethernet |
| Dimensions (W x D x H) | 11.6 x 9.0 x 8.7 inches (296 x 228 x 220 mm) |
| Weight | 12.1 lbs (5.5 kg) |
| Power Source | AC 100-240V, 50/60Hz |
| Power Consumption | Operating: 24W, Standby: 6W, Sleep: 0.5W |
| Supported Operating Systems | Windows, macOS, iOS, Android |
| Bundled Software | Epson ScanSmart, Epson Document Capture Pro, TWAIN Driver |
| Maintenance | Clean the ADF rollers and glass stripe regularly. Use a soft lint-free cloth with mild detergent. |
| Safety | Do not expose to water. Use only the supplied AC adapter. Keep away from children. |
| Spare Parts & Repairability | Replacement ADF roller kit available. Contact Epson for repair services. Designed for durability with moderate repairability. |
| General Information | Designed for home offices and small businesses. Supports scanning to email, cloud, and network folders. |
Frequently Asked Questions - RapidReceipt RR-600W EPSON
User questions about RapidReceipt RR-600W EPSON
0 question about this device. Answer the ones you know or ask your own.
Ask a new question about this device
Download the instructions for your Scanner in PDF format for free! Find your manual RapidReceipt RR-600W - EPSON and take your electronic device back in hand. On this page are published all the documents necessary for the use of your device. RapidReceipt RR-600W by EPSON.
USER MANUAL RapidReceipt RR-600W EPSON
ES-580W/RR-600W User's Guide
Contents
ES-580W/RR-600W User's Guide 9
Scanner Basics.... 10
Using the Control Panel 10
Control Panel Buttons and Lights 11
LCD Screen 11
Status Icon Information.... 12
Navigating the LCD Screen 13
Entering Characters on the LCD Screen 13
Viewing Animations 14
Adjusting the Screen Brightness 16
Adjusting Control Panel Sounds.... 16
Selecting the Date and Time 17
Changing LCD Screen Language 17
Changing the Keyboard Layout.... 18
Adjusting the Operation Time Out Setting 18
Preventing PC Connection via USB 18
Setting Direct Power On 19
Customizing the Control Panel Display 19
Registering Presets 19
Customizing the Home Screen 21
Changing Regular Cleaning Alert Settings 24
Changing Roller Replacement Alert Settings 25
Setting User Access Restrictions (Access Control) 25
Setting Up Epson Connect Services 27
Scanner Parts Locations 27
Scanner Parts.... 28
User Replaceable Epson Scanner Parts 30
Using Power Saving Settings 31
Changing the Sleep Timer Settings 31
Changing the Power Off Timer Settings 31
Using the Epson Smart Panel Mobile App.... 32
Loading Originals 33
Loading Originals in the Input Tray 33
Loading Multiple Sizes of Originals in the Input Tray 41
Original Document Specifications.... 44
Loading Plastic and Laminated Cards in the Input Tray 47
Plastic and Laminated Card Specifications 51
Loading Special Originals.... 52
Special Original Specifications 59
Wi-Fi Networking 61
Network Security Recommendations 61
Connecting to an Existing Wi-Fi Network 62
Selecting Wireless Network Settings from the Control Panel....63
Direct Wi-Fi Mode (AP Mode) Setup
Connecting to a Mobile Device
Setting Up Wireless Scanning from a Smart Device Using Epson Smart Panel
Wi-Fi Protected Setup (WPS)
Using WPS to Connect to a Network
Using WPS PIN Mode to Connect to a Network
Setting Up Network Scanning
Determining the Scanner's IP Address
Disabling Wi-Fi Features
Scanning
Starting a Scan
Starting a Scan Using the Product Control Panel
Scanning to a Network Folder
Scanning to an Email
Scanning to the Cloud
Scanning to an External USB Device 77
Setting Up a WSD Port (Windows 7) 78
Scanning Using WSD - Windows 79
Scanning Using Presets 79
Starting a Scan from a Smart Device 80
Scanning a Document in Epson ScanSmart.... 80
Saving a Scan 83
Attaching a Scan to Email....84
Sending a Scan to a Cloud Service 85
Printing a Scan 86
Saving a Scan as a Microsoft Office Format File 88
Selecting Epson ScanSmart Settings.... 89
Changing the Epson Product.... 89
Changing the Scan Settings 90
Changing the File Name Settings 93
Changing the Save Settings 94
Save Settings.... 96
Customizing Action Icons 98
Scanning Using Invoice/Receipt Manager.... 99
Starting a Free Trial.... 100
Hiding the Receipt Manager Trial Icons 103
Activating Receipt Manager.... 104
Scanning Receipts and Using Receipt Manager 108
Exporting Invoices or Receipts to QuickBooks Online....111
Exporting Invoices or Receipts to QuickBooks Desktop....112
Saving or Exporting Receipts to Quicken 113
Saving Receipt Data as a TurboTax File 114
Saving Invoice or Receipt Data as a CSV File 115
Scanning Invoices or Receipts as an Image File....115
Selecting Invoice/Receipt Manager Settings.... 116
Exporting or Importing the Invoice/Receipt Database 116
Changing Column Settings.... 117
Changing Currency and Language Settings.... 118
Importing Categories from QuickBooks or Quicken.... 120
Scan Resolution Guidelines 122
Cleaning and Transporting Your Scanner.... 124
Cleaning Your Scanner 124
Cleaning Inside Your Scanner.... 124
Checking the Scanner Roller Counter 134
Replacing the Scanner Rollers.... 136
Resetting the Scanner Roller Counter 142
Transporting Your Scanner 142
Solving Problems 145
Product Status Messages 145
Solving Scanning Problems 147
Scanner Does Not Turn On or Turns Off Unexpectedly....147
Scanner Button Does Not Work as Expected 147
Scanning Software Does Not Operate Correctly 148
Original Feeds Incorrectly in Scanner 149
Original Jams in Scanner 150
Paper Protection Does Not Work Correctly 152
Scanning is Slow 153
Cannot Send Scans to a Cloud Service.... 153
Cannot Send Scans to an Email 154
Solving Network Scanning Problems 154
Cannot Scan Over a Network 154
Scanner Cannot Connect to a Wireless Router 155
Solving Scanned Image Quality Problems 156
Back of Original Image Appears in Scanned Image....157
Scanned Characters are Blurry 157
Characters are not recognized during conversion to editable text (OCR)....158
Ripple Patterns Appear in an Image 158
Spots or Lines Appear in All Scanned Images 159
Scanned Image is Cropped 159
Resetting the Epson Scan 2 Settings 160
Solving Invoice/Receipt Manager Problems.... 160
Cannot Access an Accounting Service 160
Cannot Import Invoice/Receipt Database 161
License Key is Disabled.... 161
Uninstall Your Scanner Software.... 161
Uninstalling Scanner Software - Windows 161
Uninstalling Scanner Software - Mac.... 162
Where to Get Help (U.S. and Canada) 163
Where to Get Help (Latin America).... 164
Technical Specifications 166
Windows System Requirements 166
Mac System Requirements 166
General Specifications 167
Dimension Specifications 168
Electrical Specifications 168
Environmental Specifications 169
Network Interface Specifications 170
Safety and Approvals Specifications 171
Notices 174
Important Safety Instructions.... 174
Restrictions on Copying 177
Default Delay Times for Power Management for Epson Products....177
Binding Arbitration and Class Waiver 178
Trademarks 181
Copyright Notice.... 181
libTIFF Software Acknowledgment 182
A Note Concerning Responsible Use of Copyrighted Materials....182
Copyright Attribution 183
ES-580W/RR-600W User's Guide
Welcome to the ES-580W/RR-600W User's Guide.
For a printable PDF copy of this guide, click here.
Note: Availability of products in this guide varies by country.
Note: The illustrations in this guide show the ES-580W, but the instructions are the same for the RR-600W unless otherwise noted.
If you have not already done so, you can download the Epson ScanSmart software for use with your scanner. Visit epson.com/support (U.S.), epson.ca/support (Canada), or latin.epson.com/support (Caribbean) and select your product. Then select the software on the Downloads tab.
Scanner Basics
See the sections to learn about the basic features of your scanner.
Using the Control Panel
Adjusting the Screen Brightness
Adjusting Control Panel Sounds
Selecting the Date and Time
Changing LCD Screen Language
Changing the Keyboard Layout
Adjusting the Operation Time Out Setting
Preventing PC Connection via USB
Setting Direct Power On
Customizing the Control Panel Display
Changing Regular Cleaning Alert Settings
Changing Roller Replacement Alert Settings
Setting User Access Restrictions (Access Control)
Setting Up Epson Connect Services
Scanner Parts Locations
User Replaceable Epson Scanner Parts
Using Power Saving Settings
Using the Epson Smart Panel Mobile App
Using the Control Panel
See the sections to learn about the control panel and select control panel settings.
Control Panel Buttons and Lights
LCD Screen
Status Icon Information
Navigating the LCD Screen
Entering Characters on the LCD Screen
Viewing Animations
Parent topic: Scanner Basics
Control Panel Buttons and Lights
1 power button and the power light
2 LCD screen
Parent topic: Using the Control Panel
LCD Screen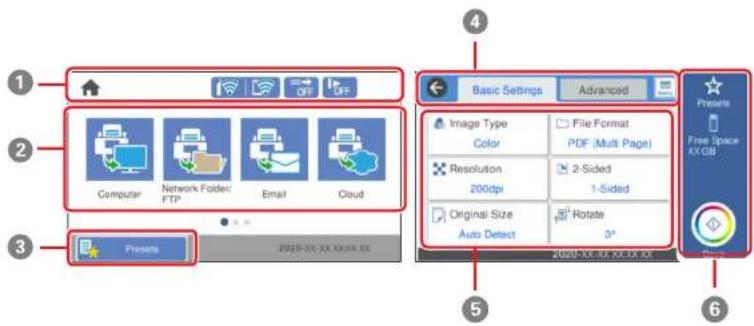
1 Displays various status information; select an icon to check its status or adjust its settings
2 Menu options
3 Displays the presets list; load your presets and register new presets
4 Select a tab to view different options and settings
5 Setting options
6 Select to perform an action
Parent topic: Using the Control Panel
Status Icon Information
Your product displays status icons on the LCD screen for certain product status conditions.
| IconsDescription | |
| Displaysthehomescreen. | |
| Returnstothehomescreen. | |
| Displaysthenetworkconnectionstatus;selecttheicontosetuporchangeyournetwork connection.Theproductisnotconnectedtoawirelessnetwork.TheproductissearchingforanSSIDorexperiencingawirelessnetworkconnection issue.Theproductisconnectedtoawirelessnetwork;thenumberofbarsindicates the connection'ssignalstrength.Wi-FiDirectisnotenabled.Wi-FiDirectisenabled. | |
| TheDFDSFunction(DoubleFeedDetectionSkipFunction)isenabledordisabled.Select theicontochangethesetting.Thisfunctionskipsdoublefeeddetectiononceandcontinuesscanning.EnableDFDS Functiontoscanoriginals(plasticcardsorenvelopes)thataredetectedasdoublefeeds. | |
| TheSlowfunctionisenabledordisabled.Selecttheicontochangethesetting.Thisfunctionslowsdownthescanningspeed.Enablethisfunctiontoscanoriginals(such asthinpaper)thatarelikelytojam. | |
| Displaysthepreviousscreen. | |
| Indicatesthatthesettingshavebeenchangedfromtheuserdefaultorthefactorydefault. | |
| Displaysadditionalinformationorinstructions;selecttheicontodisplaytheinformation. | |
| Thereisaproblemwiththeindicatedsetting;selecttheiconforinformationonresolving theproblem. | |
Parent topic: Using the Control Panel
Navigating the LCD Screen
Follow these guidelines to navigate and use the menus on the LCD screen.

Tap or press the screen to select an item or icon

Flick the screen to scroll swiftly

Slide your finger across the screen to move items
To change a setting, tap anywhere on the setting.
To enter a value in a field, tap the field to display the on-screen keyboard.
Parent topic: Using the Control Panel
Entering Characters on the LCD Screen
Follow these guidelines to enter characters for passwords and other settings.
On-screen keyboard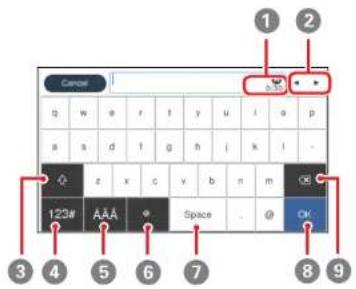
1 Displays the character count
2 Moves the cursor left or right
3 Switches between uppercase and lowercase characters
4 Switches between characters and numbers or symbols
5 Switches the character type
6 Displays a list of common domain names to choose from
7 Enters a space
8 Select when you are finished
9 Deletes the previous character
Parent topic: Using the Control Panel
Viewing Animations
You can view animations on the LCD screen to help guide you through a procedure or to troubleshoot a problem.
- Select Help on the home screen.
You see a screen like this:

- Select Troubleshooting if you are experiencing a problem, or How To to view instructions on common procedures.
- Select a topic from the list of available topics and follow the on-screen instructions.
While viewing the topics, you may see screens like this:
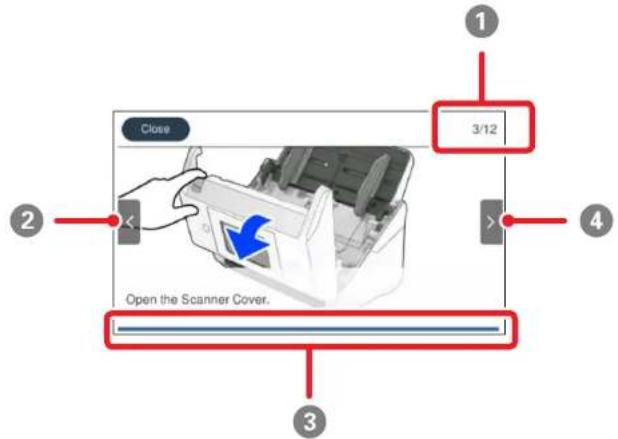
1 Displays the current step number and the total number of steps. 2 Select the left arrow to view the previous step. 3 Indicates your overall progress through the animation. 4 Select the right arrow to view the next step.
Parent topic: Using the Control Panel
Adjusting the Screen Brightness
You can adjust the brightness of the LCD screen.
- Select Home, if necessary.
- Select Settings > Basic Settings.
- Select LCD Brightness.
- Select the - or + icon to decrease or increase the brightness.
- Select OK to exit.
- Select the return home icon to return to the home screen.
Parent topic: Scanner Basics
Adjusting Control Panel Sounds
You can adjust the sound level heard when you press buttons on the control panel.
- Select home, if necessary.
- Select Settings > Basic Settings. 3. Select Sounds. 4. Do one of the following:
- To mute all control panel sounds, turn the Button Press setting off.
- To adjust the sound level for scanner errors, select Error Notice and tap the icons to select the desired level.
5. Select OK to exit.
- Select the return home icon to return to the home screen.
Parent topic: Scanner Basics
Selecting the Date and Time
Select the current date, time, and daylight saving phase in your area, and choose your preferred date and time format.
- Select home, if necessary.
- Select Settings > Basic Settings.
- Select Date/Time Settings.
- Select Daylight Saving Time.
- Select the setting that applies to your area:
- Winter: it is winter or your region does not use Daylight Saving Time (DST)
- Summer: it is spring or summer and your region uses Daylight Saving Time (DST)
Note: If your region uses Daylight Saving Time (DST), you must change this setting to match the season. When you change from Winter to Summer, your product automatically sets its clock ahead one hour. When you change from Summer to Winter, it sets its clock back one hour.
- Select Date/Time.
- Select the date format you want to use.
- Use the numeric keypad to enter the current date, then select OK.
- Select the time format you want to use.
- Use the numeric keypad to enter the current time, then select OK.
- Select Time Difference.
- Use the + and - buttons to enter the time difference between your time zone and UTC (Coordinated Universal Time), then select OK.
- Select the home icon to return to the home screen.
Parent topic: Scanner Basics
Changing LCD Screen Language
You can change the language used on the LCD screen.
- Select home, if necessary.
- Select Settings > Basic Settings.
- Scroll down and select Language.
- Select a language.
- Select the return home icon to return to the home screen.
Parent topic: Scanner Basics
Changing the Keyboard Layout
You can change the layout of the keyboard on the control panel.
- Select home, if necessary.
- Select Settings > Basic Settings.
- Select Keyboard.
- Select the layout you want to use.
- Select the return home icon to return to the home screen.
Parent topic: Scanner Basics
Adjusting the Operation Time Out Setting
The Operation Time Out setting causes the LCD screen to return to the Home screen after a few minutes of inactivity. This feature is enabled by default, but you can turn it off.
- Select home, if necessary.
- Select Settings > Basic Settings.
- Scroll down and select Operation Time Out.
- Tap the setting to toggle it On or Off (On is the default). 6. Select OK to exit.
- Select the return home icon to return to the home screen.
- If you want to increase or decrease the number of minutes, select Time and tap the + and - icons to set the desired number.
Parent topic: Scanner Basics
Preventing PC Connection via USB
You can disable access to your product from a USB-connected computer. This restricts non-network access to the product.
- Select home, if necessary.
- Select Settings > Basic Settings.
- Scroll down and select PC Connection via USB.
- Select Disable.
- Select Yes to restart the printer.
Parent topic: Scanner Basics
Setting Direct Power On
You can turn on the scanner directly when the scanner is connected to the power source, without pressing the power button.
Note: This setting can be locked by an administrator. If you cannot access or change this setting, contact your administrator for assistance.
- Select Home, if necessary.
- Select Settings > Basic Settings.
- Scroll down and select Direct Power On.
- Select On.
- Select the return home icon to return to the home screen.
Parent topic: Scanner Basics
Customizing the Control Panel Display
You can register up to 48 frequently used scanning settings as presets and add the icon of the registered preset to the home screen. See the sections to learn about how to customize the control panel display.
Registering Presets
Customizing the Home Screen
Parent topic: Scanner Basics
Registering Presets
You can register up to 48 frequently used scanning settings as presets.
Note: To register presets using Web Config, select Presets on the Scan tab and follow the instructions on the screen.
- Select home, if necessary.
- Select Presets.
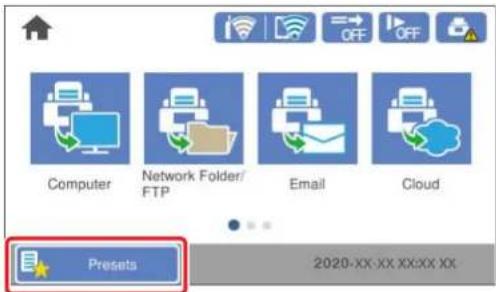
3. Select a + icon.
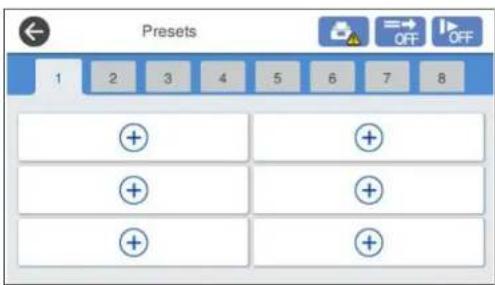
- Select the scanning option you want to register as a preset.
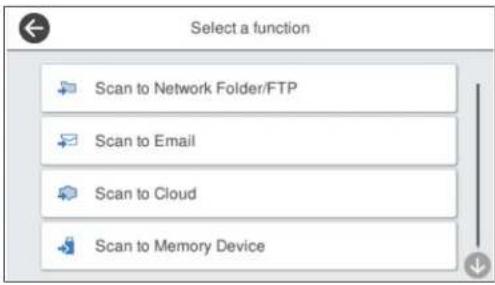
Note: For some scanning options, it is best to configure the destination information (such as email contacts or network folders) before registering the preset. You can still configure the destination information while registering the preset, but if it is configured beforehand, you can simply make your selections from the existing list.
- Tap the Register icon to register the preset.
6. Enter the following settings:
• Name: Enter a name for the preset. - Set Icon: Select an icon and background color for the preset. - Quick Send Setting: Select On to start scanning immediately when the preset is selected. - Contents: Change scan settings as necessary.
- Select OK to save the preset settings.
- Select the return home icon to return to the home screen.
Parent topic: Customizing the Control Panel Display
Customizing the Home Screen
You can use the Edit Home option to customize the layout and appearance of the home screen and add icons to the presets.
Note: This setting can be locked by an administrator. If you cannot access or change this setting, contact your administrator for assistance.
- Select Home, if necessary.
- Select Settings > Edit Home. 3. Choose from the following:
- Select Layout to change the layout of the home screen.
Select Line to display the icons in a horizontal line across the home screen.
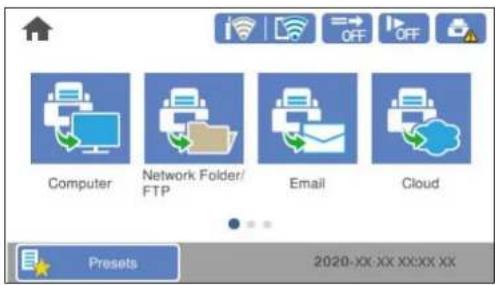
Select Matrix to display the icons in a matrix on the home screen.

- Select Add Icon and choose Function to display icons for the default scanner functions, or Presets to select a preset icon to display on the home screen.
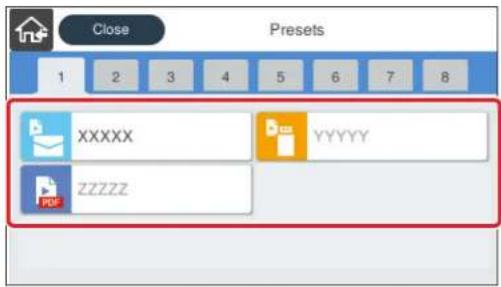
- Select Remove Icon and select the preset you want to remove from the home screen.
- Select Move Icon to reorder presets on the home screen. Select the icon you want to move, and then select the icon that is occupying the space you want to move the new icon to. The icons switch positions.
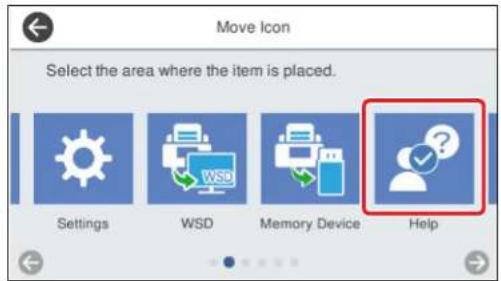
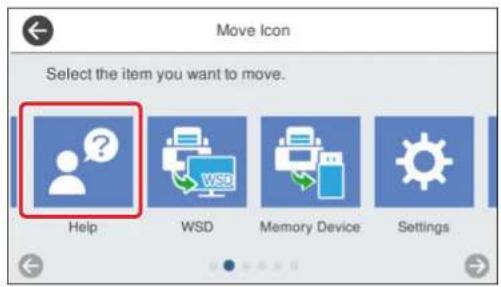
- When you are finished customizing the home screen, select the return home icon to return to the home screen and view your changes.
Parent topic: Customizing the Control Panel Display
Changing Regular Cleaning Alert Settings
You can set an alert to appear to remind you to perform regular cleaning after a certain number of scans.
Note: This setting can be locked by an administrator. If you cannot access or change this setting, contact your administrator for assistance.
- Select Home, if necessary.
- Scroll down and select Regular Cleaning Alert Settings. 3. Do the following:
- Set the Warning Alert Setting to On to receive a notification when it is time to clean inside the scanner.
- On the Count Alert Setting screen, use the + and - icons to change the number of scans before the notification appears.
- Select OK to exit.
- Select the return home icon to return to the home screen.
Parent topic: Scanner Basics
Changing Roller Replacement Alert Settings
You can set an alert to appear to remind you to replace the roller after a certain number of scans.
Note: This setting can be locked by an administrator. If you cannot access or change this setting, contact your administrator for assistance.
- Select Home, if necessary.
- Select Settings > Roller Replacement Alert Setting.
- Select Count Alert Setting.
- Use the + and - icons to change the number of scans (1,000 to 200,000) before the notification appears. 5. Select OK to exit.
- Select the return home icon to return to the home screen.
Parent topic: Scanner Basics
Setting User Access Restrictions (Access Control)
You can set an administrator password to lock the following settings and prevent them from being changed:
Note: You should set an administrator password and keep it in a safe place. You must know the administrator password in order to change or delete it. If you forget the password or inadvertently set it, the product will need to be sent to Epson for service.
- Sleep Timer
- Power Off Timer
- Date/Time Settings
• Language
• Operation Time Out
• PC Connection via USB
- DirectPowerOn
- DoubleFeedStopTiming
• PaperProtection
- DetectGlassDirt
• UltrasonicDoubleFeedDetection
• AutomaticFeedingModeTimeout
• EditHome
- UserSettings
• NetworkSettings
- WebServiceSettings
• SystemAdministration
• RegularCleaningAlertSettings
• RollerReplacementAlertSettings
• NumberofScansAfterReplacingRoller
• NumberofScansAfterRegularCleaning
Note: If your system has an administrator, contact your administrator before enabling restricted access.
- Select Home, if necessary.
- Select Settings.
- Select System Administration.
- Select Admin Settings.
- Select Lock Setting > On.
Note: An Admin Password needs to be registered to access Lock Setting.
To disable access restriction, select Settings > System Administration > Admin Settings > Lock Setting > Off.
Parent topic: Scanner Basics
Setting Up Epson Connect Services
If you did not activate your product's email address for use with Epson Connect when you set up your product, you can activate it using the product control panel.
- Select Home, if necessary.
- SelectSettings.
- SelectWebServiceSettings.
- SelectEpsonConnectServices.
- SelectRegistration.
- Follow the instructions on the screen to activate your product's email address.
Parent topic: Scanner Basics
Scanner Parts Locations
See these sections to identify the parts on your scanner.
Scanner Parts
Parent topic: Scanner Basics
Scanner Parts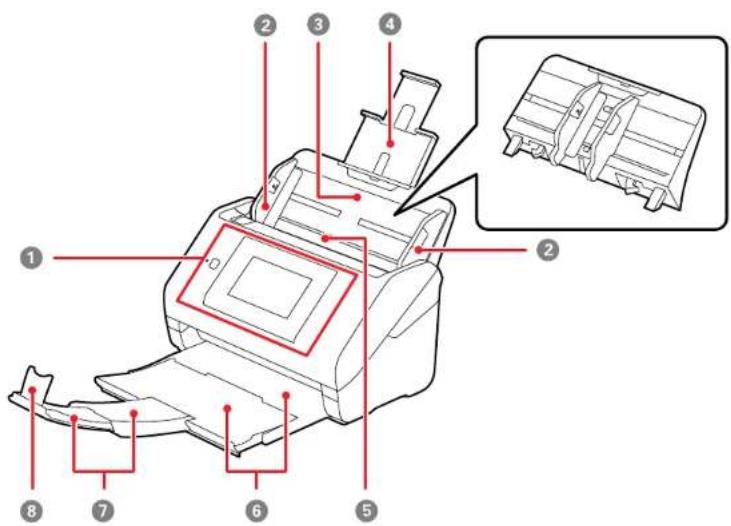
1 Control panel
2 Edge guides
3 Input tray
4 Input tray extension
5 ADF (Automatic Document Feeder)
6 Output tray
7 Output tray extensions
8 Stopper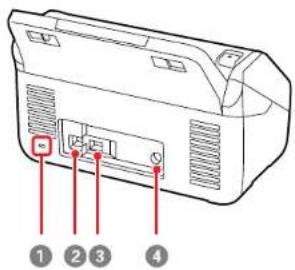
1 Kensington security slot
2 USB 3.0 port (Type B for computer)
3 External USB port (Type A for external USB device)
4 Power inlet

1 Scanner cover 2 Pickup rollers 3 Separation rollers
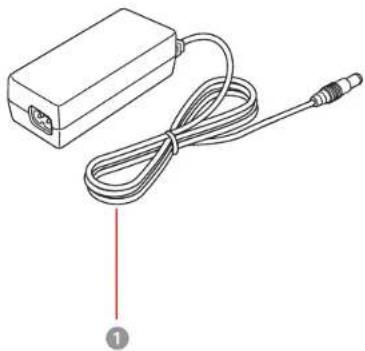
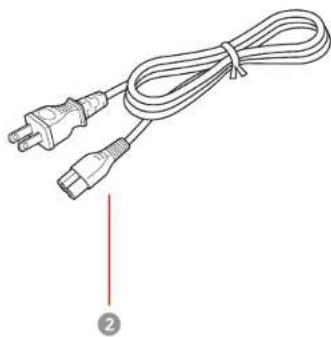
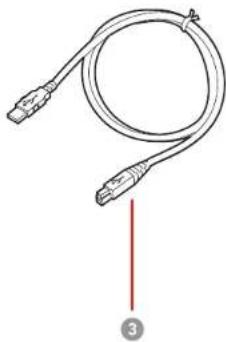
1 AC adapter 2 Power cord 3 USB 3.0 cable
Parent topic: Scanner Parts Locations
User Replaceable Epson Scanner Parts
U.S. and Canada: You can purchase optional accessories and replacement parts at epson.com (U.S. sales) or epson.ca (Canadian sales). You can also purchase accessories from an Epson authorized reseller. To find the nearest one, call 800-GO-EPSON (800-463-7766) in the U.S. or 800-807-7766 in Canada.
Latin America: You can purchase optional accessories and replacement parts from an Epson authorized reseller. To find the nearest reseller, go to latin.epson.com. Or you can contact your nearest sales office as described in "Where to Get Help".
Note: Availability of accessories varies by country.
| PartPartnumber | |
| Carriersheet(5)B12B819051 | |
| RollerassemblykitB12B819671 | |
| CleaningkitB12B819291 |
Parent topic: Scanner Basics
Using Power Saving Settings
Your scanner enters sleep mode automatically and turns off the LCD screen if it is not used for a period of time. You can make the time period shorter to save energy and resources.
Changing the Sleep Timer Settings
Changing the Power Off Timer Settings
Parent topic: Scanner Basics
Changing the Sleep Timer Settings
You can adjust the time period before your product enters sleep mode and turns off the LCD screen.
- Select home, if necessary.
- Select Settings > Basic Settings.
- Select Sleep Timer.
- Select the + and - icons to increase or decrease the number of minutes.
Note: You can also press the minutes field and use the displayed numeric keypad to enter the number of minutes.
5. Select OK to exit.
- Select the return home icon to return to the home screen.
Parent topic: Using Power Saving Settings
Changing the Power Off Timer Settings
You can have the product turn off automatically if it is not used for a specified period of time.
- Select home, if necessary.
- Select Settings > Basic Settings.
- Select Power Off Timer.
- Select a time period between 30 minutes and 12h (12 hours).
- Select the return home icon to return to the home screen.
Parent topic: Using Power Saving Settings
Using the Epson Smart Panel Mobile App
Use this free Apple and Android app to scan with networked Epson products.
Note: For the RR-600W, receipts scanned on the mobile app must be imported into the Scan Smart Accounting Edition software on the connected PC or Mac for data extraction. See the link below.
Note: Epson Smart Panel does not support scanning with a carrier sheet or scanning for originals that are 15.5 inches (393.8 mm) or longer.
- Connect your product to your wireless network. See the link below.
- Visit epson.com/connect (U.S), epson.ca/connect (Canada), or latin.epson.com/connect (Caribbean) to learn more about Epson Smart Panel and check the compatibility of your mobile device.
- Download Epson Smart Panel from the Apple App Store or Google Play.
- Connect your mobile device to the same wireless network as your product. 5. Open Epson Smart Panel and select your Epson product, if necessary. Now you are ready to scan with your mobile device and your Epson product.
Parent topic: Scanner Basics
Related tasks
Setting Up Network Scanning
Starting a Scan from a Smart Device
Exporting or Importing the Invoice/Receipt Database
Loading Originals
Follow the instructions here to load your originals into the scanner.
Loading Originals in the Input Tray
Loading Plastic and Laminated Cards in the Input Tray
Loading Special Originals
Loading Originals in the Input Tray
You can load originals that meet the document specifications in the input tray.
Caution: Do not load photos, or valuable original documents or artwork, directly into the input tray. This may wrinkle or damage the original. Load these originals using an optional carrier sheet.
Note: Photos scanned using a document scanner may not have the same color depth as the original. Use a flatbed photo scanner to achieve the best color reproduction of photos.
The steps below describe loading originals of the same size. To load originals of multiple sizes at once, see the link at the end of these steps.
- Pull up the input tray extension.
- Pull out the output tray and its extension, and open the stopper.
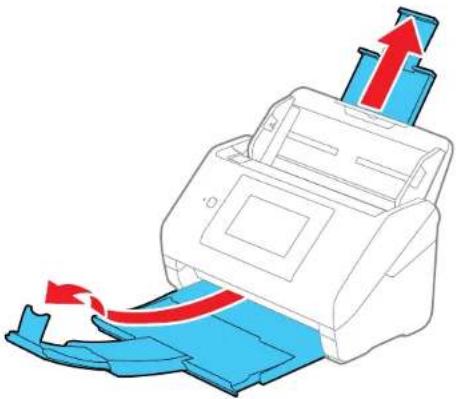
Note: If you are loading an original that is 15.5 inches (393.8 mm) or longer, do not pull out the input or output tray extensions and do not open the stopper.
3. Slide the input tray edge guides all the way out.

- If you are loading a multi-page original, align your stack of originals.
Note: If you are loading an original that is 15.5 inches (393.8 mm) or longer, load only one sheet at a time.

- Stack the originals with the printed side facing down and slide the stack so the leading edge is at an angle as shown.

- Load standard originals into the input tray printed sides down and top edge first, and guide them in until they meet resistance.

- If you are loading paper business cards, load up to 30 cards (printed side down and long edge first) into the input tray horizontally, and slide them in until they meet resistance.

- If you are loading hole-punched originals, load them with the holes facing down to the sides shown. The holes must be within 1.2 inches (30 mm) of the edge of the originals.

7. Slide the edge guides against the edges of the original.
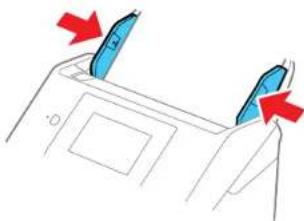
Note: If you are scanning originals that are 15.5 inches (393.8 mm) or longer, support the original as it enters into and ejects from the scanner as shown and use the following resolutions:
• 15.5 to 53 inches (393.8 to 1346.2 mm): 600 dpi or less
• 53 to 215 inches (1346.2 to 5461 mm): 300 dpi or less
• 215 to 240 inches (5461 to 6096 mm): 200 dpi or less
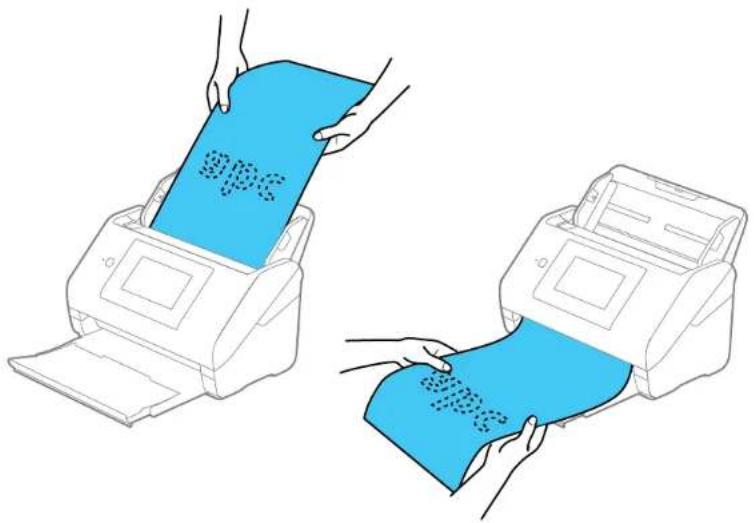
- If necessary during scanning, adjust the position of the stopper on the output tray extension to fit the ejected originals.
Note: If thicker paper does not eject properly or falls from the output tray, push in the output tray and allow the originals to eject freely onto the surface below the scanner. If the scanned images are affected by the originals ejecting below the scanner, try placing the scanner on the edge of a table where the ejected originals can drop freely.
If scanning thin or wrinkled paper causes paper jams or double feeds, slow down the feeding speed by selecting Settings > Scanner Settings > Slow > On on the LCD screen.
If a paper feed error is detected, the Paper Protection feature stops the scanning process automatically to reduce damage to the original. To change the Paper Protection detection level, select Settings > Scanner Settings > Paper Protection on the LCD screen and select the desired level.
Note: The Paper Protection feature does not prevent all documents from being damaged. Paper feed errors may not be detected depending on the paper feeding conditions.
Loading Multiple Sizes of Originals in the Input Tray Original Document Specifications
Parent topic: Loading Originals
Related references
Original Document Specifications Special Original Specifications Plastic and Laminated Card Specifications User Replaceable Epson Scanner Parts
Related topics
Scanning
Loading Multiple Sizes of Originals in the Input Tray
You can load originals of different sizes, paper types, and thicknesses at one time in the input tray. Just make sure they meet the original document specifications.
Caution: Do not load photos, or valuable original documents or artwork, directly into the input tray. This may wrinkle or damage the original. Load these originals using an optional carrier sheet.
Note: Photos scanned using a document scanner may not have the same color depth as the original. Use a flatbed photo scanner to achieve the best color reproduction of photos.
- Pull up the input tray extension.
- Pull out the output tray and its extension, and open the stopper.

Note: If you are loading originals that are 15.5 inches (393.8 mm) or longer, do not pull out the input or output tray extensions and do not open the stopper.
3. Slide the input tray edge guides all the way out.
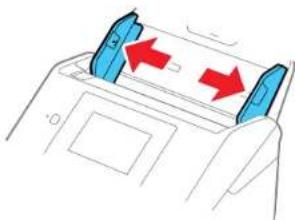
- Load the originals in the center of the input tray in descending order of paper size, with the widest at the back and the narrowest at the front. Slide them in until they meet resistance. Make sure the printed sides are face down and the top edges are slightly angled in the input tray.
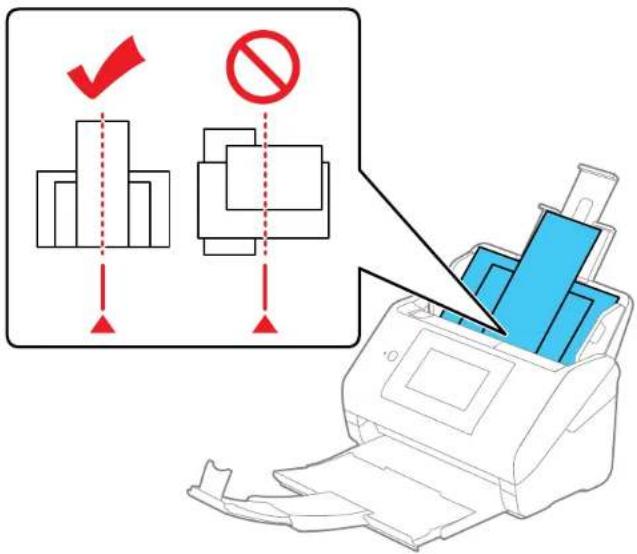
5. Slide the edge guides against the edges of the widest original.
- If necessary during scanning, adjust the position of the stopper on the output tray extension to fit the ejected originals.
Note: If thicker paper does not eject properly or falls from the output tray, push in the output tray and allow the originals to eject freely onto the surface below the scanner. If the scanned images are affected by the originals ejecting below the scanner, try placing the scanner on the edge of a table where the ejected originals can drop freely.
If scanning thin or wrinkled paper causes paper jams or double feeds, slow down the feeding speed by selecting Settings > Scanner Settings > Slow > On on the LCD screen.
If a paper feed error is detected, the Paper Protection feature stops the scanning process automatically to reduce damage to the original. To change the Paper Protection detection level, select Settings > Scanner Settings > Paper Protection on the LCD screen and select the desired level.
Note: The Paper Protection feature does not prevent all documents from being damaged. Paper feed errors may not be detected depending on the paper feeding conditions.
You can also scan originals of multiple sizes by loading them one by one using the Automatic Feeding Mode setting in Epson Scan 2.
Parent topic: Loading Originals in the Input Tray
Related topics
Scanning
Original Document Specifications
You can load original documents that meet these specifications in your scanner.
| PapertypePapersizeP | PaperweightLoadingcapacity | ||
| Plainpaper | Letter(8.5×11inches[216×279mm]) | 7to110lb(27to413g/m2) | 21lb(80g/m2):100 sheets |
| Finepaper | |||
| Recycledpaper | A4(8.3×11.7inches[210×297mm]) | 24lb(90g/m2):86sheets | |
| 28lb(104g/m2):74 sheets | |||
| A5(5.8×8.2inches[148×210mm]) | 34lb(127g/m2):62 sheets | ||
| A6(4.1×5.8inches[105×148mm]) | 42lb(157g/m2):50 sheets | ||
| B5(7.2×10.1inches[182×257mm]) | 56lb(209g/m2):38 sheets | ||
| B6(5×7.2inches[128×182mm]) | 68lb(256g/m2):30 sheets | ||
| A8(2.1×2.9inches[52×74mm]) | 34to110lb(127to413g/m2) | 110lb(413g/m2):18 sheetsLoadingcapacitymay varydependingonthe papertype. | |
| Width:2.0to8.5inches(50.8 to215.9mm)Height:15.5to240inches(393.8to6096mm) | 13to35lb(50to130g/m2) | 1sheet | |
| Plainpaper | Legal(8.5×14inches[216×356mm]) | 7to110lb(27to413g/m2) | 21lb(80g/m2):80sheets |
| Finepaper | 24lb(90g/m2):69sheets | ||
| Recycledpaper | 28lb(104g/m2):59 sheets | ||
| 34lb(127g/m2):50 sheets | |||
| 42lb(157g/m2):40 sheets | |||
| 56lb(209g/m2):30 sheets | |||
| 68lb(256g/m2):24 sheets | |||
| 110lb(413g/m2):14 sheets | |||
| Loadingcapacitymay varydependingonthe papertype. | |||
| PaperbusinesscardsBusinesscardsUpto56lb | (210g/m2) | 30cardsloaded horizontally | |
Note: You can load originals of different sizes, paper types, and thicknesses up to this size: Letter (8.5 × 11 inches [216 × 279 mm]).
The following types of originals may not be successfully scanned or may require special attention:
• Originals with uneven surfaces, such as embossed documents or letterhead
• Originals with wrinkles or fold lines
• Perforated originals
• Originals with labels or stickers
• Carbonless paper
• Curled originals
• Coated paper
Note: Lightly wrinkled paper may scan better if you slow down the feeding speed during scanning or smooth out the wrinkles before loading. Use a carrier sheet to scan delicate originals or originals that are easily wrinkled. To scan originals that are incorrectly detected as double feeds, select Settings > Scanner Settings > DFDS Function on the LCD screen and set it to On to disable the Detect Double Feed setting for the next scan, or set the Detect Double Feed setting to Off on the Main Settings tab in the Epson Scan 2 window.
Caution: Do not load the following types of originals directly in the scanner, or they may be damaged or may damage the scanner:
• Photos • Originals that are bound • Passports • Thermal paper • Fabric or other non-paper originals • Originals containing staples or paper clips • Originals with wet ink or glue • Ripped originals • Heavily wrinkled or curled originals • Originals with holes on the bottom of them • Transparencies • Originals with carbon paper backing • Originals with sticky notes attached • Glossy originals
Note: Photos scanned using a document scanner may not have the same color depth as the original. Use a flatbed photo scanner to achieve the best color reproduction of photos.
Parent topic: Loading Originals in the Input Tray
Loading Plastic and Laminated Cards in the Input Tray
You can load plastic and laminated cards that meet the card specifications in the input tray.
- Pull out the output tray and open the stopper. Do not pull out the extensions.
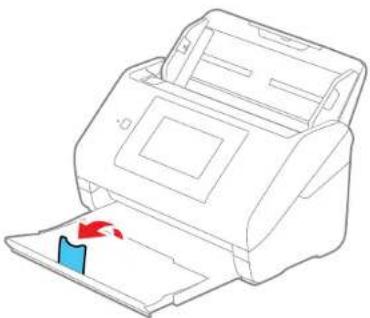
2. Slide the input tray edge guides all the way out.
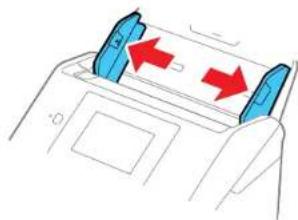
- Load plastic or laminated cards (printed side down and long edge first) into the input tray horizontally, and slide them in until they meet resistance.
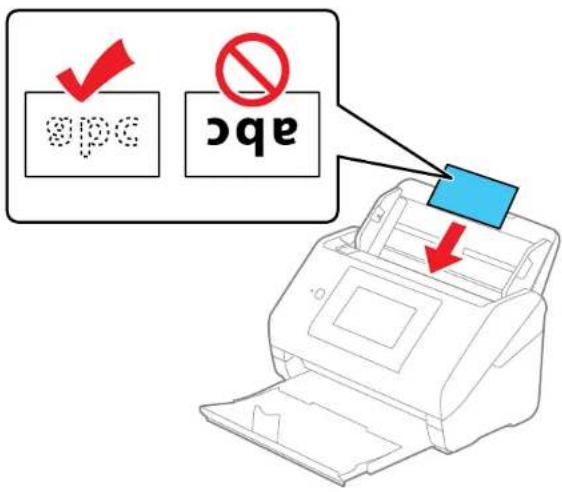
Note: Do not load plastic cards vertically.
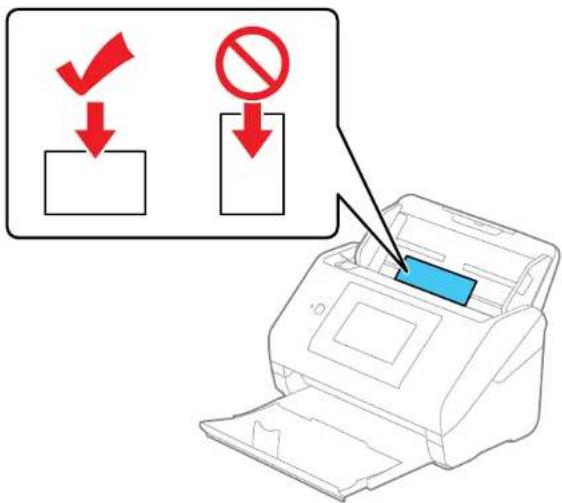
4. Slide the edge guides against the edges of the card.
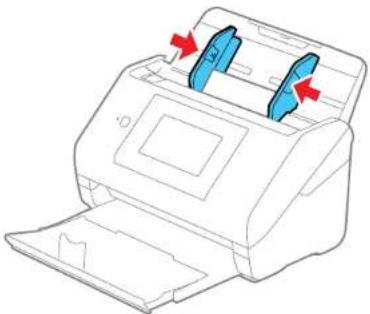
- Turn off the Detect Double Feed setting on the Main Settings tab in Epson Scan 2 when scanning the cards.
Note: If you do not disable the Detect Double Feed setting and a double feed error occurs, remove the plastic or laminated card from the input tray and reload it. Select Settings > Scanner Settings > DFDS Function on the LCD screen and set it to On to disable the Detect Double Feed setting for the next scan. The DFDS Function setting only disables the Detect Double Feed setting for one scan.
Plastic and Laminated Card Specifications
Parent topic: Loading Originals
Related references
Plastic and Laminated Card Specifications
Related topics
Scanning
Plastic and Laminated Card Specifications
You can load original plastic and laminated cards that meet these specifications in your scanner.
| PapertypePapersizePaperthicknessLoadingcapacity | |||
| Plasticcards, embossed(ISO7810 ID-1compliant) | 2.1×3.3inches (54×85.6mm) | 0.05inch(1.24mm) maximum | 1card(horizontal) |
| Plasticcards,standard (ISO7810ID-1 compliant) | 0.04inch(1.1mm) maximum | 5cards(horizontal) | |
| Laminatedcards4.7×5.9 inches(120 ×150mm)orsmaller | 0.03inch(0.8mm) maximum | 1card | |
Note: Plastic cards with glossy surfaces may not scan properly.
Parent topic: Loading Plastic and Laminated Cards in the Input Tray
Loading Special Originals
You can load photos or large, thick, or folded originals in the input tray using one or more carrier sheets. You can also load envelopes. Make sure the originals meet the specifications for special originals before loading them.
- Pull up the input tray extension.
- Pull out the output tray and its extension, and open the stopper.
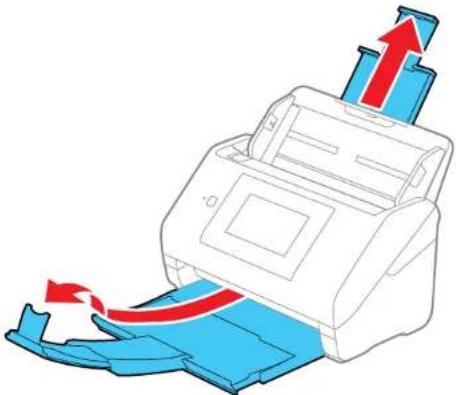
Note: If you are loading originals that are 15.5 inches (393.8 mm) or longer, do not pull out the input or output tray extensions and do not open the stopper.
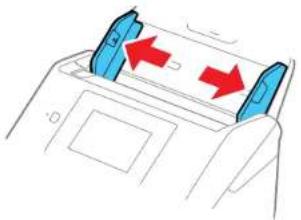
3. Slide the input tray edge guides all the way out.
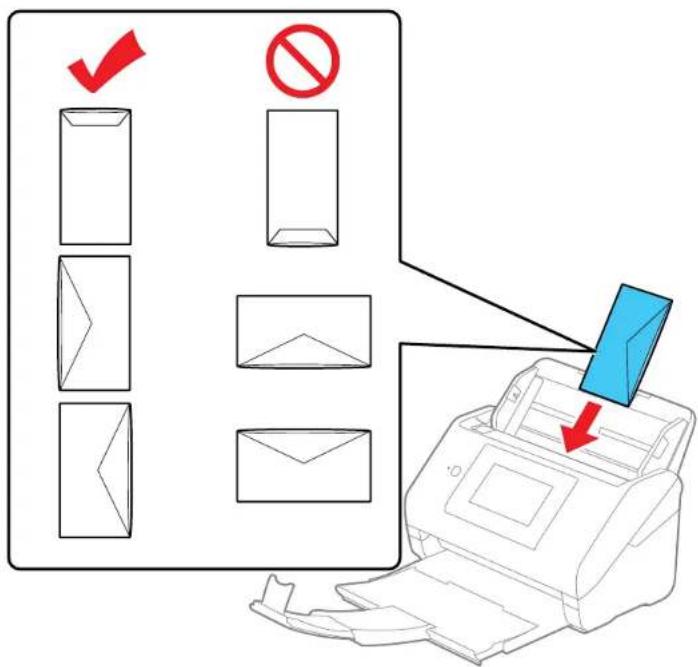
- Load envelopes vertically in the input tray with the printed side down and the flap facing as shown. Slide in the envelopes until they meet resistance. Skip to step 7.
5. Do one of the following to load photos, or folded or irregularly shaped originals using a carrier sheet:
Note: Use only the carrier sheet designed for your scanner. The carrier sheet is automatically recognized by the scanner by the two small rectangular holes on the front edge, as shown. Keep the
holes clean and not covered. Do not load a carrier sheet that has scratches on it or one that has been scanned more than 3,000 times.

- For a Letter- or A4-size or larger original, fold it as shown and place it in the center of an optional carrier sheet. Make sure the illustration on the front edge of the carrier sheet is facing up.
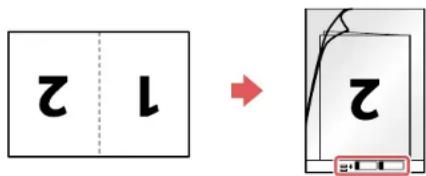
To scan both sides and stitch them together, set the appropriate setting in Epson Scan 2.
- For a photo or an irregularly shaped original, load it in the center of an optional carrier sheet with the printed side face down. Make sure the illustration on the front edge of the carrier sheet is facing up. If you are loading originals that are 11.7 inches (297 mm) or shorter, place the leading
edge of the original against the binding of the carrier sheet, as shown. Otherwise, the scanner may not detect the correct length of the original.
![graph TD A["Document with 'abc' at top"] --> B["Conversion to template with file path"] B --> C["Output: File Path, Paste to template"]](/content/2026/06/1389693/images/6d61ac1ad4aa2cfb647d07c0087acacb10c33a3ae8848a64da73e16af27f5634.jpg)
Note: Photos scanned using a document scanner may not have the same color depth as the original. Use a flatbed photo scanner to achieve the best color reproduction of photos.
- Load the carrier sheet in the input tray as shown until it meets resistance.
Folded original
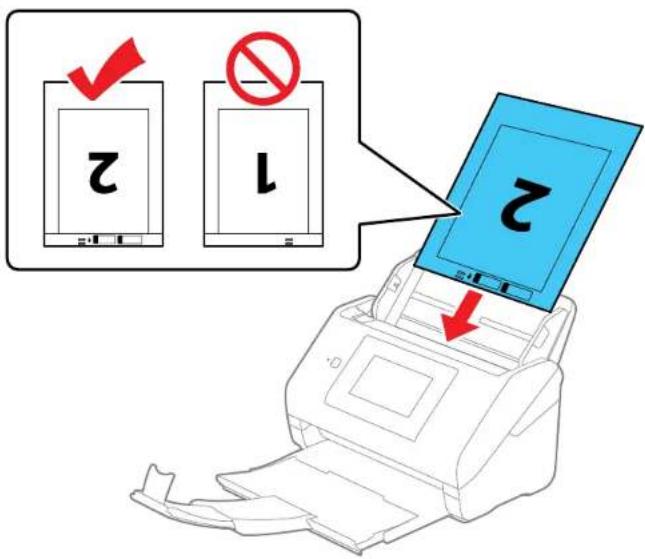
Photo or irregularly shaped original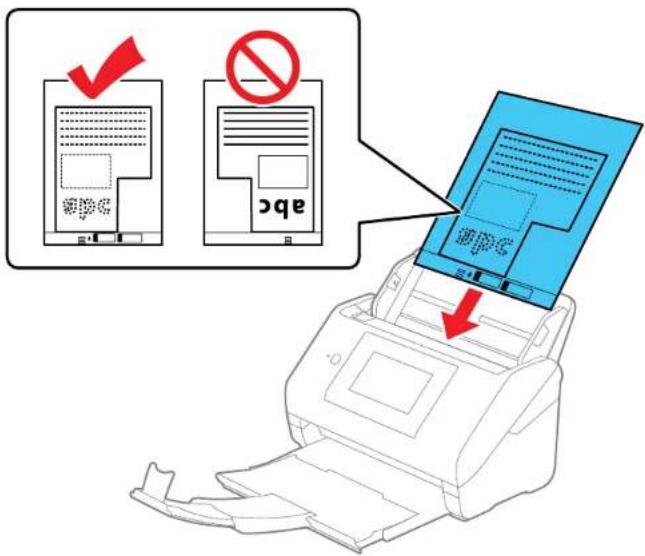
7. Slide the edge guides against the edges of the envelope or carrier sheet.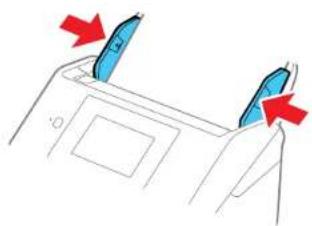
- Turn off the Detect Double Feed setting on the Main Settings tab in Epson Scan 2 when scanning special originals.
Note: If the Document Size setting on the Main Settings tab in Epson Scan 2 is set to Auto Detect, Paper Skew is automatically selected as the Correct Document Skew setting.
- If necessary during scanning, adjust the position of the stopper on the output tray extension to fit the ejected originals.
Note: If thicker paper does not eject properly or falls from the output tray, push in the output tray and allow the originals to eject freely onto the surface below the scanner. If the scanned images are affected by the originals ejecting below the scanner, try placing the scanner on the edge of a table where the ejected originals can drop freely.
Special Original Specifications
Parent topic: Loading Originals
Related references
Special Original Specifications
User Replaceable Epson Scanner Parts
Related topics
Scanning
Special Original Specifications
You can load photos, envelopes, or large, thick, or folded originals that meet these specifications in your scanner.
Note: Photos scanned using a document scanner may not have the same color depth as the original. Use a flatbed photo scanner to achieve the best color reproduction of photos.
| PapertypePapersizeP | aperthicknessLoadingcapacity | ||
| Largeoriginals(plain paper,finepaper,or recycledpaper)(loadonlyinacarriersheet) | Uptothissize:A3(11.7×16.5 inches[297×420mm])B4(13.9×9.84inches [353×250mm])Legal(8.5×14inches [216×356mm]);onlyload abovesizesiffoldedinhalfCustomsizesupto17inches (431.8mm)wideand11.7 inches(297mm)long; originalswiderthan8.5inches (215.9mm)mustbefoldedin half | 0.012inch(0.3mm) maximum(excludingthe thicknessofthecarriersheet) | 10carriersheets |
| Photos(loadonlyinacarriersheet) | Uptothissize:A4(8.3×11.7 inches[210×297mm]) | 0.012inch(0.3mm) maximum(excludingthe thicknessofthecarriersheet) | 10carriersheets |
| Envelopes4.49×6.38inches(114 ×162mm)4.33×8.66inches(110 ×220mm) | 0.015inch(0.38mm) maximum | 10envelopes | |
| Irregularlyshaped originals(loadonlyinacarriersheet) | Uptothissize:A4(8.3×11.7 inches[210×297mm]) | 0.012inch(0.3mm) maximum(excludingthe thicknessofthecarriersheet) | 10carriersheets |
Parent topic: Loading Special Originals
Wi-Fi Networking
See the sections to use your scanner over a Wi-Fi network.
Network Security Recommendations
Connecting to an Existing Wi-Fi Network
Direct Wi-Fi Mode (AP Mode) Setup
Wi-Fi Protected Setup (WPS)
Setting Up Network Scanning
Disabling Wi-Fi Features
Network Security Recommendations
To help deter unauthorized access to your product over a network, you should protect your network environment using appropriate security measures.
Security measures such as these can help deter threats such as loss of user data, use of telephone and fax lines, and other intrusions:
- Connect your product only to a network protected by a firewall.
Connecting your product directly to the Internet may leave it vulnerable to security threats. Instead, connect it to a router or other network connection protected by a firewall. Your router may already have a firewall set up by your Internet service provider; check with your ISP for confirmation. For best results, set up and use a private IP address for your network connection.
- Change the default administrator password on your product.
If your product has an option to set an administrator password, change the default administrator password to deter access by unauthorized users to personal data stored on your product, such as IDs, passwords, and contact lists.
Parent topic: Wi-Fi Networking
Connecting to an Existing Wi-Fi Network
You can set up your scanner to communicate with your computer using a wireless router. The wireless router can be connected to your computer over a wireless or wired network.
![graph TD ①[①] --> ②[②] ② --> ③[③] ② --> ④[④] ② --> ⑤[⑤] ⑤ --> ⑥[⑥] ⑥ --> ⑦[⑦] ⑦ --> ⑧[⑧]](/content/2026/06/1389693/images/78aaa13ec2141546ee6492096af85a83adb903f41ef05c954d9a9624133d61a9.jpg)
1 Epson scanner
2 Wireless router
3 Computer with a wireless interface
4 Computer
5 Internet
6 Ethernet cable (used only for wired connection to the wireless router)
Selecting Wireless Network Settings from the Control Panel
Parent topic: Wi-Fi Networking
Selecting Wireless Network Settings from the Control Panel
You can select or change wireless network settings using your product control panel.
To install your product on a wireless network, follow the instructions on the Start Here sheet and install the necessary software by downloading it from the Epson website. The installer program guides you through network setup.
- Select Home, if necessary.
2. Press the icon
3. Select Router
- Select Start Setup or Change Settings.
- Select Wi-Fi Setup Wizard.
- Select the name of your wireless network or select Enter Manually to enter the name manually. Use the displayed keypad to enter your network name.
- Select the Password field and enter your wireless password using the displayed keypad.
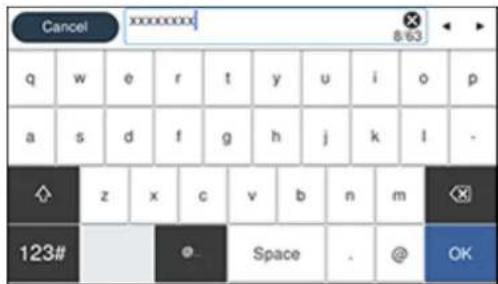
Note: The network name and password are case sensitive. Be sure to correctly enter uppercase and lowercase letters, and numeric special characters.
• To move the cursor, press the left or right arrows.
• To change the case of letters, press.

• To delete the previous character, press. • To enter numbers and symbols, press 123#. • To enter a space, press Space.
- Select OK when you finish entering your password.
- Confirm the displayed network settings and select Start Setup to save them.
- Select the return home icon to return to the home screen.
You see the icon on the LCD screen and should be able to connect to your product directly from your computer or device, and then scan. If you are scanning from a computer, make sure you installed the network software.
Note: If you don't see the icon, you may have selected the wrong network name or entered the password incorrectly. Repeat these steps to try again.
Parent topic: Connecting to an Existing Wi-Fi Network
Related tasks
Setting Up Network Scanning
Related topics
Using the Control Panel
Direct Wi-Fi Mode (AP Mode) Setup
You can set up your scanner to communicate directly with your computer or another device without requiring a wireless router. If your product is not already connected to a wireless network, it enters access point mode and the scanner itself acts as the network access point for up to 4 devices.
![graph TD A["Printer"] -->|Wireless Signal| B["Device 1"] A -->|Wireless Signal| C["Device 2"] A -->|Wireless Signal| D["Device 3"] A -->|Wireless Signal| E["Device 4"] A -->|Wireless Signal| F["Device 5"]](/content/2026/06/1389693/images/dde57287dced88e7d00259c53557548180e109020c9cfa002752c55718b20889.jpg)
1 Epson scanner
2 Computer with a wireless interface
3 Other wireless devices
Note: Devices directly connected to the scanner cannot communicate with each other through the scanner.
Connecting to a Mobile Device
Setting Up Wireless Scanning from a Smart Device Using Epson Smart Panel
Parent topic: Wi-Fi Networking
Related tasks
Selecting Wireless Network Settings from the Control Panel
Connecting to a Mobile Device
You can connect a mobile device directly to the printer without a wireless router or access point.
Note: Make sure the Epson Smart Panel app is installed on your mobile device before connecting to the printer.
- Select home, if necessary. 2. Press the icon
- Select Wi-Fi Direct.
- Select Start Setup.
- Select your scanner in the Epson Smart Panel app to complete Wi-Fi Direct setup.
- Select Complete.
- Select the return home icon to return to the home screen.
Parent topic: Direct Wi-Fi Mode (AP Mode) Setup
Setting Up Wireless Scanning from a Smart Device Using Epson Smart Panel
You can use the Epson Smart Panel app to connect your Epson product to a wireless network or connect your smart device directly to the product. Epson Smart Panel is available on iOS and Android devices.
Make sure you have the following:
• A device that is connected to a wireless network
• The Epson Smart Panel app installed on the device
• The wireless network name (SSID) and password
- Make sure the product is turned on and is ready to scan.
Note: You must perform initial setup before setting up wireless scanning.
- Open the Epson Smart Panel app on your device.
3. Do one of the following:
- If the app automatically recognizes the product, follow the on-screen instructions to set up the wireless connection.
- If the app does not automatically recognize the product, select the + icon and continue with the next step.
- On the next screen, select Connect to a New Product.
- Select your product from the list.
Note: If your product is not listed, move closer to the product and try again. If the product is still not shown, connect your scanner to the wireless network again and then select Connect to Existing Product in the Epson Smart Panel app and follow the on-screen instructions. See the link below for wireless setup instructions.
- Select Next to select the current wireless network.
Note: If you want to connect the product to a different wireless network, select Change another Wi-Fi SSID.
7. Enter the password for the wireless network and select OK.
The app starts configuring the product.
Your product is now connected to a wireless network and set up for use with the Epson Smart Panel app.
Parent topic: Direct Wi-Fi Mode (AP Mode) Setup
Related tasks
Using the Epson Smart Panel Mobile App
Starting a Scan from a Smart Device
Wi-Fi Protected Setup (WPS)
If your network uses a WPS-enabled wireless router, you can quickly connect your scanner to the network using Wi-Fi Protected Setup (WPS).
Note: To check if your router is WPS-enabled, look for a button labeled WPS on your router. If there is no hardware button, there may be a WPS setting in the software for the device. Check your network product documentation for details.
Using WPS to Connect to a Network
Using WPS PIN Mode to Connect to a Network
Parent topic: Wi-Fi Networking
Using WPS to Connect to a Network
If you have a WPS-enabled wireless router, you can use Wi-Fi Protected Setup (WPS) to connect your scanner to the network.
- Select home, if necessary.
2. Press the icon.
3. Select Router.
- Select Start Setup or Change Settings.
- Select Push Button Setup (WPS).
- Follow the instructions on the LCD screen to complete WPS setup.
Note: Make sure you press Start Setup within two minutes of activating WPS on your router.
- Select the return home icon to return to the home screen.
The Wi-Fi icon displayed on the LCD screen indicates your wireless connection status. If the product is not connected to the network, repeat the steps to try again.
Parent topic: Wi-Fi Protected Setup (WPS)
Related tasks
Setting Up Network Scanning
Using WPS PIN Mode to Connect to a Network
If you have a WPS-enabled wireless router that supports PIN mode, you can use Wi-Fi Protected Setup (WPS) PIN mode to connect your scanner to the network.
- Select home, if necessary.
2. Press the icon.
3. Select Router
- 5. Select Start Setup or Change Settings.
5. Select Others.
6. Select PIN Code Setup (WPS). 7. Follow the instructions on the LCD screen to complete WPS setup.
Note: Make sure you press Start Setup within two minutes of activating WPS on your router.
- Select the return home icon to return to the home screen.
The Wi-Fi icon displayed on the LCD screen indicates your wireless connection status. If the product is not connected to the network, repeat these steps to try again.
Parent topic: Wi-Fi Protected Setup (WPS)
Related tasks
Setting Up Network Scanning
Setting Up Network Scanning
You can set up network scanning to your scanner through a direct connection to your scanner.
First, manually configure your scanner to connect to your network. Then follow the instructions here to set up your computer for network scanning using the Epson Scan 2 Utility. Your scanner must be turned on and connected to the network.
Note: Make a note of the IP address or host name of the scanner so you can enter it in these steps.
- Do one of the following to start the Epson Scan 2 Utility:
- Windows 10: Click 📋 > EPSON > Epson Scan 2 Utility.
- Windows 8.x: Navigate to the Apps screen and select Epson Scan 2 Utility.
- Windows 7: Click > All Programs > EPSON > Epson Scan 2 > Epson Scan 2 Utility. • Mac: Open the Applications folder, click Epson Software, and click Epson Scan 2 Utility.
- Select Settings from the Scanner drop-down list.
You see a screen like this:

Note: If you see an Enable Editing button (Windows) or the lock icon (Mac), click it so that you can modify the scanner settings.
- Select your scanner and click Add.
You see a screen like this:
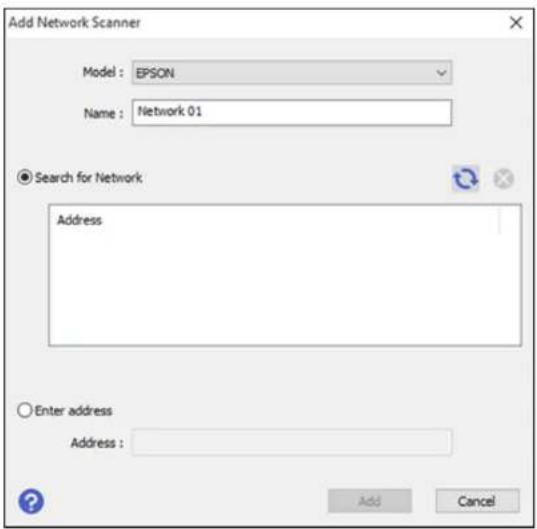
4. Do one of the following:
- Under Search for Network, select the IP address of your Epson scanner and click Add.
- Select the Enter address setting, type in the IP address or host name of your Epson scanner, and click Add.
5. Click OK to check the connection.
You see a confirmation message.
6. Click OK to save your settings and close the Epson Scan 2 Utility.
Determining the Scanner's IP Address
Parent topic: Wi-Fi Networking
Related tasks
Selecting Wireless Network Settings from the Control Panel
Determining the Scanner's IP Address
Determining the Scanner's IP Address
If you have multiple scanners on your network, you need to know the IP address of the scanner when setting up network scanning.
- Do one of the following to start EpsonNet Config:
- Windows 10: Click > EpsonNet > EpsonNet Config.
- Windows 8.x: Navigate to the Apps screen and select EpsonNet Config.
- Windows 7: Click Start, and select All Programs. Select EpsonNet > EpsonNet Config > EpsonNetConfig.
- Mac: Open the Applications folder and select Epson Software > EpsonNet > EpsonNet Config > EpsonNetConfig.
- Locate your scanner in the list and write down the IP address.
Parent topic: Setting Up Network Scanning
Disabling Wi-Fi Features
You may need to disable your product's Wi-Fi features if you change your network connection type or need to solve a problem with your network connection.
- Select Home, if necessary. 2. Press the icon. 3. Select Router.
- Select Change Settings. 5. Select Others. 6. Select Disable Wi-Fi.
- Select Start Setup to disable Wi-Fi.
- When finished, select the return home icon to return to the home screen.
Parent topic: Wi-Fi Networking
Scanning
You can scan your originals and save them as digital files.
Starting a Scan
Starting a Scan from a Smart Device
Scanning a Document in Epson ScanSmart
Selecting Epson ScanSmart Settings
Scanning Using Invoice/Receipt Manager
Selecting Invoice/Receipt Manager Settings
Scan Resolution Guidelines
Starting a Scan
After placing your originals on your product for scanning, start scanning using one of these methods.
Starting a Scan Using the Product Control Panel
Scanning to a Network Folder
Scanning to an Email
Scanning to the Cloud
Scanning to an External USB Device
Setting Up a WSD Port (Windows 7)
Scanning Using WSD - Windows
Scanning Using Presets
Parent topic: Scanning
Starting a Scan Using the Product Control Panel
You can scan an image to a variety of destinations using your product's control panel.
Your product automatically selects default scan settings, but you can view or change them as necessary. If you are scanning to a computer, you can change the default scan settings using the Event Manager utility on the computer.
- Make sure you installed the product software and connected the product to your computer or network.
Note: Restart your computer after installing the product software to enable scanning from the control panel. Also make sure the Event Manager program is not being blocked by your firewall or security software.
- Place your original on the product for scanning.
- Select Home, if necessary.
- Select Computer.
- If you see a message about installing the Epson Scan Smart software, select OK.
- Select the computer to which you want to save the scanned images.
- Select either 1-sided or 2-sided as the scanning option.

- Tap the icon and select the desired scanner settings.
- Select the start icon to start scanning.
Epson ScanSmart opens and your product scans your original and saves the scanned file to your computer.
Note: Click Help in Epson ScanSmart for detailed information.
Parent topic: Starting a Scan
Related topics
Loading Originals
Scanning to a Network Folder
You can save the scanned image to a specified folder on a network.
Note: Before scanning, make sure you set a network folder or FTP server, and check that the Date/Time and Time Difference settings are correct.
- Place your original on the product for transcanning.
- Select home, if necessary.
- Select Network Folder/FTP
- Enter a folder location. 5. Do one of the following:
- To select frequently used addresses, tap the icons displayed on the screen.
- To enter the folder path directly, select Keyboard > Communication Mode, and enter the folder path in the Location (Required) field. Select other options, as necessary. • To select a contact from the contacts list, select Contacts, select a contact, and then select
Close. You can tap the icon to create a new contact, or search for a folder from the contacts list. Enter the search keyword into the box at the top of the screen.
- Select the Scan Settings tab, and select the desired settings.
Note: Tap the icon if you want to save your settings as a preset.

- Tap the icon and check the scanner's settings or make changes, if necessary.
- Select the start icon to start scanning.
Epson ScanSmart opens and your product scans your original and saves the scanned file to the designated folder.
Note: Click Help in Epson ScanSmart for detailed information.
Parent topic: Starting a Scan
Scanning to an Email
You can send the scanned image by email directly from the scanner.
Note: Before scanning, make sure you configure the email server, and check that the Date/Time and Time Difference settings are correct.
- Place your original on the product for scanning.
- Select Home, if necessary. 3. Select Email.
- Enter a folder location.
5. Do one of the following:
- To select frequently used addresses, tap the icons displayed on the screen.
- To enter the folder path directly, select Keyboard, enter an email address, and select OK. • To select a contact from the contacts list, select Contacts, select a contact or group, and then
select Close. You can tap the icon to create a new contact, or search for a contact in the contacts list. Enter the search keyword into the box at the top of the screen.
- To select a recently used contact, select History, select a contact, and then select Close.
Note: The number of recipients you selected is displayed on the right side of the screen. You can send emails to up to 10 contacts and groups. If groups are included in the contacts list, you can select up to 200 individual addresses in total, taking addresses within the groups into account. Select the address box at the top of the screen to display the list of selected addresses.
6. Select the Scan Settings tab, and select the desired settings.
Note: Tap the icon if you want to save your settings as a preset.

- Tap the icon and check the scanner's settings or make changes, if necessary.
- Select the start icon to start scanning.
Parent topic: Starting a Scan
Scanning to the Cloud
You can use the control panel to send your scanned files to a destination that you have registered with Epson Connect.
Note: Make sure to set up your product using Epson Connect before using this feature.
- Place your original on the product for transcanning.
- Select home, if necessary. 3. Select Cloud.
Note: You must register your product with Epson Connect to select a destination.
4. Select Cloud.
- Tap the + icon at the top of the screen to select a destination.
- Change any of the displayed settings in the Basic Settings tab as necessary.
- Select the Advanced tab to view and change additional scan settings, if necessary.
Note: Tap the icon if you want to save your settings as a preset.

- Tap the icon and check the scanner's settings or make changes, if necessary.
- Select the start icon to start scanning.
Your product scans your original and saves the scanned file to the selected destination.
Parent topic: Starting a Scan
Scanning to an External USB Device
You can save the scanned image to an external USB device.
- Place your original on the product for scanning.
- Select home, if necessary.
- Insert a memory device into the scanner's external interface USB port.
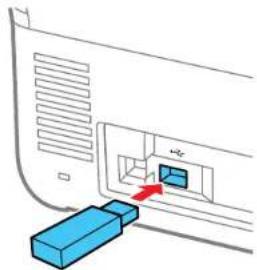
Note: Your USB device must meet the following maximum capacity specification: 2 TB (formatted in FAT, FAT32, or exFAT). Devices with security settings (such as password or encryption), or those requiring a dedicated driver cannot be used.
- Select Memory Device.
- Change any of the displayed settings on the Basic Settings tab as necessary.
- Select the Advanced tab to view and change additional scan settings, if necessary.
Note: Tap the icon if you want to save your settings as a preset.

- Tap the icon and check the scanner's settings or make changes, if necessary.
- Select the start icon to start scanning.
Your product scans your original and saves the scanned file to the external USB device.
Parent topic: Starting a Scan
Setting Up a WSD Port (Windows 7)
You can scan to a networked Windows computer using WSD (Web Services for Devices). You must first set up a WSD port on your Windows 7 system (the port is set up automatically on Windows 10 and Windows 8.x).
Before you set up a WSD port, make sure you installed your product software, and connected your product and computer to the same network.
- Turn on your product.
- Click and select Computer.
- On the left side of the window, select Network.
- Locate your product on the Network screen, right-click it, and select Install.
- When you see the User Account Control screen, click Continue.
Note: If you see an Uninstall screen, click Uninstall and repeat these steps as necessary.
- When you see the message "Your device is ready to use" in the Windows task bar, click the message.
- On the Driver Software Installation screen, make sure your product is listed as Ready to use. Then click Close.
- Click and select Devices and Printers.
- Make sure that an icon appears for your product's name on the network.
When you use WSD, select your product name to scan over the network.
Parent topic: Starting a Scan
Scanning Using WSD - Windows
You can scan originals to a computer from the product control panel using WSD (Web Services for Devices) for network scanning in Windows.
Note: To use this feature on Windows 7, you must first set up WSD on the computer. See Windows help for instructions.
- Make sure you installed the product software and connected the product to your computer or network.
- Place your original on the product for scanning.
- Select Home, if necessary.
- Select WSD.
- Select a computer.
- Select the start icon to start scanning.
Your product scans your original and saves the scanned file to your computer.
Parent topic: Starting a Scan
Scanning Using Presets
You can select a registered preset and use it to scan images.
- Select home, if necessary.
2. Do one of the following:
- Select Presets on the home screen, and select a setting from the list.
- Select the icon on the scan settings screen, and select a preset from the list.
- If you added the preset icon to the home screen, select the icon.
- If you see the loading confirmations screen, select Close.
Note: If you enabled the Quick Send Setting for the selected preset, loading is skipped and scanning starts immediately.
- Verify the settings for the selected preset and select Start to start scanning.
Parent topic: Starting a Scan
Related tasks
Registering Presets
Starting a Scan from a Smart Device
You can use the Epson Smart Panel app to scan from a network scanner to an iOS or Android device over a direct Wi-Fi connection.
Note: Epson Smart Panel does not support scanning with a carrier sheet or scanning for originals that are 15.5 inches (393.8 mm) or longer.
- Download the Epson Smart Panel app from your device's app store or from Epson's website. See the link below.
- Place your original on the product for scanning.
- Open the Epson Smart Panel app and select a scan menu on the home screen.
- Follow the on-screen instructions to scan and save your original.
Parent topic: Scanning
Related tasks
Using the Epson Smart Panel Mobile App
Scanning a Document in Epson ScanSmart
You can scan and review documents in Epson ScanSmart.
Note: The images show Windows screens for the ES-580W; Mac screens and those for the RR-600W model may be slightly different. Depending on your product model and software version, not all options may be available.
- Load your original into the scanner.
- Start the scan by doing one of the following:
- Press the start button on the scanner. Epson ScanSmart automatically opens on your computer and the scan job begins. (The default is double-sided scanning.)
Note: You can change the scanning button default in the Settings menu.
- Open Epson ScanSmart on your computer. Do one of the following:
- Windows 10: Click > Epson Software > Epson ScanSmart.
- Windows 8.x: Navigate to the Apps screen and select Epson ScanSmart.
- Windows 7: Click 📋, and select All Programs. Select Epson Software > Epson ScanSmart.
- Mac: Open the Applications folder, open the Epson Software folder, and select Epson ScanSmart.
You see a screen like this:
![Epson ScanSmart Select a [SCAN] option, or [Manage Invoices/Receipts] to start. Click (Settings) to adjust scanner settings. Scanner: EPSON Change Scan double-sided Start double-sided scanning. Make sure you place the originals in the scanner. Scan single-sided Start single-sided scanning. Make sure…](/content/2026/06/1389693/images/88c64dea607fed443f01313a5dee922ae677461077ba7a0656e3d535bd268551.jpg)
Note: Trial software offer not available for all models in all regions.
- Select a scan option.
The scan job begins and your original feeds through the scanner. When scanning is complete, you see a screen like this:
![Review Scans Review, edit, join version: from click [read] Create Back Info To be available in the following sections: • Review Scans is a key for this review. • Edit the view of the main page. • Add to the content of the main page. • Add to the content of the main page. • Add to the content of the…](/content/2026/06/1389693/images/f23b24cab52833c1a8ded9dd0c3a5b18783a5a7a39bcb84b7218142089c426a7.jpg)
- You can review, edit, or reorder the scanned images as follows:
- Select Scan to scan more originals.
- Select Delete to delete selected scanned images.
- Select Rotate Right to rotate each scanned image.
- Select Crop to crop the selected image.
- Select Stitch Images to combine two selected images into one image.
- If you scanned double-sided, select On or Off for Include back sides if you want to keep or discard the back sides of scanned images.
- Select Skip this screen next time if you do not want to preview images each time.
- When you are finished reviewing the scanned images, click Next.
You see a screen like this:
![Select Action Select the action for the scanned image. Click [Customize] to rearrange the options. Save Attach to Email Send to Google Drive Send to Dropbox Send to Firefox Manage Invoices/Receipts Print Send to Web Send to Excel® Send to PowerPoint® Send to CoreSmart® OK Cancel](/content/2026/06/1389693/images/f02f83a426f646cacc3e09995ce3ea60df465acc64e81d1f18c0005f11fde288.jpg)
- Select an option to save, send, or print the scanned images. See the links below.
Saving a Scan
Attaching a Scan to Email
Sending a Scan to a Cloud Service
Printing a Scan
Saving a Scan as a Microsoft Office Format File
Parent topic: Scanning
Related tasks
Customizing Action Icons
Related topics
Loading Originals
Saving a Scan
You can save a scanned image to your computer in a variety of formats.
- Make sure your originals are scanned and reviewed. See the link below.
- In the Select Action window, click Save.
You see a screen like this:
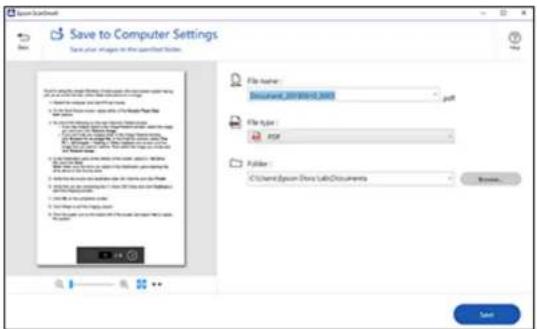
- Change the settings as follows:
- The document type and scan date for the filename are automatically detected. You can change them as necessary.
- You can save the scanned image in a variety of formats. If you select Searchable PDF as the File type setting, you can select the OCR (Optical Character Recognition) language.
- Select the folder on your computer in which to save the file.
4. Click Save.
Parent topic: Scanning a Document in Epson ScanSmart
Attaching a Scan to Email
You can attach a scanned image to an email as a file attachment.
Note: Your email app and account settings should be configured before scanning. You must install a MAPI-type email program such as Outlook Express, Windows Live Mail, Entourage, or Mac Mail. Attach to Email only supports 32-bit MAPI-compatible email apps. Web-based email services such as Gmail are not supported. If you see an error message, your email app may not be compatible and you will need to save the scans and manually attach the file to an email.
- Make sure your originals are scanned and reviewed. See the link below.
- In the Select Action window, click Attach to Email.
You see a screen like this: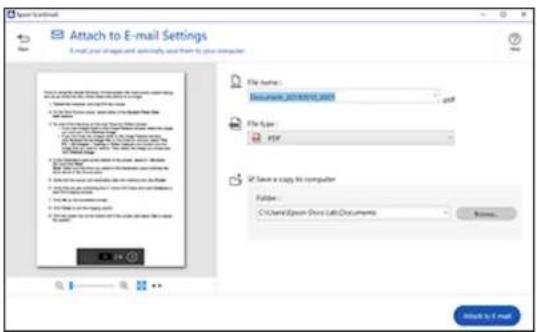
- Change the settings as follows:
- The document type and scan date for the filename are automatically detected. You can change them as necessary.
- You can save the scanned image in a variety of formats. If you select Searchable PDF as the File type setting, you can select the OCR (Optical Character Recognition) language.
- If you also want to save a copy of the scanned image to your computer, make sure the checkbox is selected and select the folder on your computer in which to save the file.
4. Click Attach to E-mail.
Your email program opens with the file attached to a new email.
Parent topic: Scanning a Document in Epson ScanSmart
Sending a Scan to a Cloud Service
You can upload scanned images to a cloud service.
- Make sure your originals are scanned and reviewed. See the link below.
- In the Select Action window, click one of the cloud services end options.
You see a screen like this:
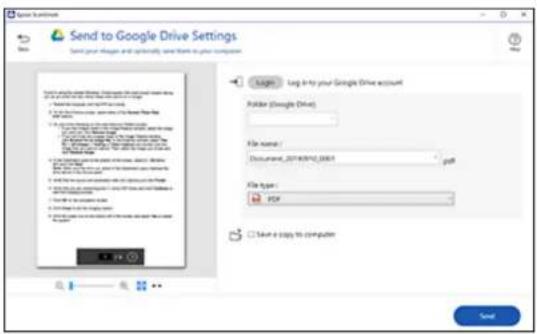
Note: You may need to allow Epson Scan Smart access to your account. The first time you login, you may be prompted to enter an authentication code.
- Change the settings as follows:
- Select the folder in your account where you want to send the document.
- The document type and scan date for the filename are automatically detected. You can change them as necessary.
- You can save the scanned image in a variety of formats. If you select Searchable PDF as the File type setting, you can select the OCR (Optical Character Recognition) language.
- If you also want to save a copy of the scanned image to your computer, click the checkbox.
5. Click Send.
Parent topic: Scanning a Document in Epson Scan Smart
Printing a Scan
You can print your scanned image and save the scanned file to your computer.
Note: Printing scanned images is available only with Epson printers. If you do not have an Epson printer, save the file and print it from an application that can open the file.
- Make sure your originals are scanned and reviewed. See the link below.
- In the Select Action window, click Print.
You see a screen like this:
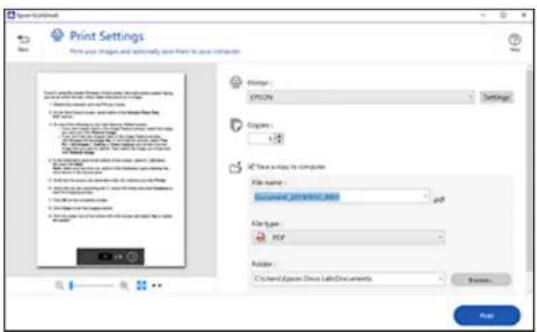
- Change the settings as follows:
- Select the Epson printer and change the print settings, if necessary.
- Select the number of copies you want to print.
- If you also want to save a copy of the scanned image to your computer, click the checkbox.
- The document type and scan date for the filename are automatically detected. You can change them as necessary.
- You can save the scanned image in a variety of formats. If you select Searchable PDF as the File type setting, you can select the OCR (Optical Character Recognition) language.
- Select the folder on your computer in which to save the file.
4. Click Print.
Parent topic: Scanning a Document in Epson ScanSmart
Saving a Scan as a Microsoft Office Format File
You can save your scans in one of the following editable Microsoft Office file formats: Microsoft Word (.docx), Microsoft Excel (.xlsx), or Microsoft PowerPoint (.pptx).
Note: The Save to PowerPoint option is only available for Windows.
- Make sure your originals are scanned and reviewed. See the link below.
- In the Select Action window, click one of these save-to options.
Note: A first-time prompt may appear asking you to download a Microsoft Office plug-in. Click Yes and follow any on-screen instructions.
You see a screen like this:
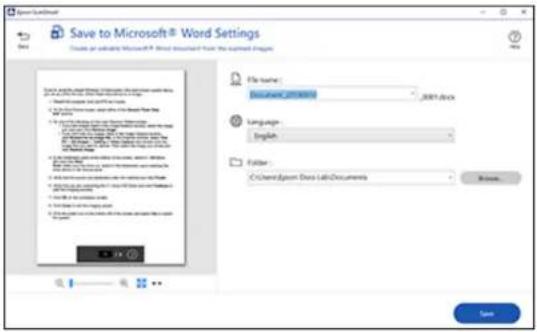
- Change the settings as follows:
- The document type and scan date for the filename are automatically detected. You can change them as necessary.
- Select the OCR language (the default is English).
- Select the folder on your computer in which to save the file.
4. Click Save.
Parent topic: Scanning a Document in Epson ScanSmart
Related topics
Loading Originals
Selecting Epson Scan Smart Settings
After starting Epson Scan Smart, you can change various scanning settings.
Changing the Epson Product
Changing the Scan Settings
Changing the File Name Settings
Changing the Save Settings
Customizing Action Icons
Parent topic: Scanning
Changing the Epson Product
If you are using more than one Epson product with Epson Scan Smart, you can change the product that you are using with your computer.
Note: A product connected to your computer via USB takes priority over a product with a Wi-Fi connection.
- On the main screen, click Change.
You see a screen like this:
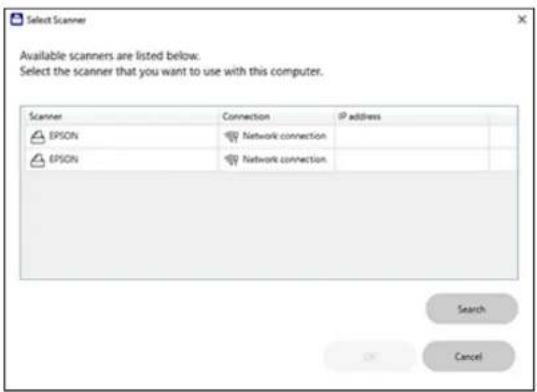
- Select the Epson product you want to use with your computer and click OK.
Parent topic: Selecting Epson Scan Smart Settings
Changing the Scan Settings
You can change detailed scan settings such as the resolution, document size, and more.
- Click the Settings button.
You see a screen like this: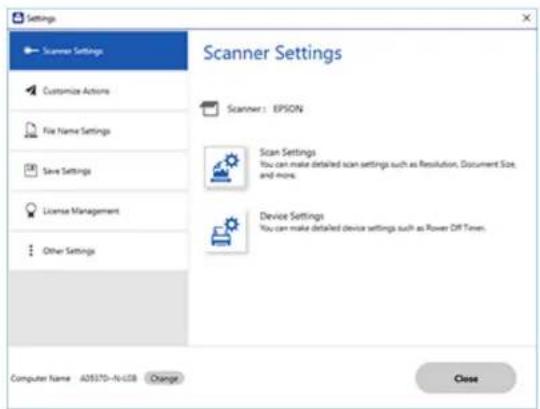
- On the Scanner Settings tab, click Scan Settings.
You see a screen like this:
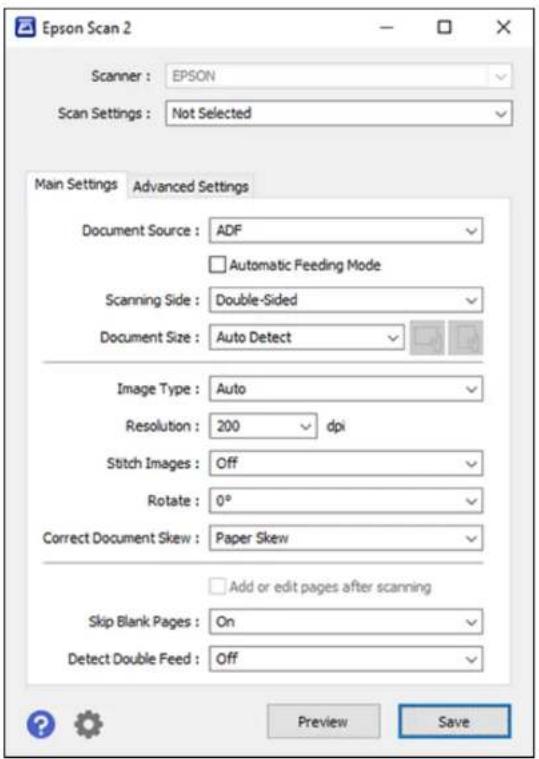
- Change the settings as necessary and click Save.
Parent topic: Selecting Epson Scan Smart Settings
Changing the File Name Settings
You can change the default file naming method for your scans.
- Click the Settings button.
You see a screen like this:
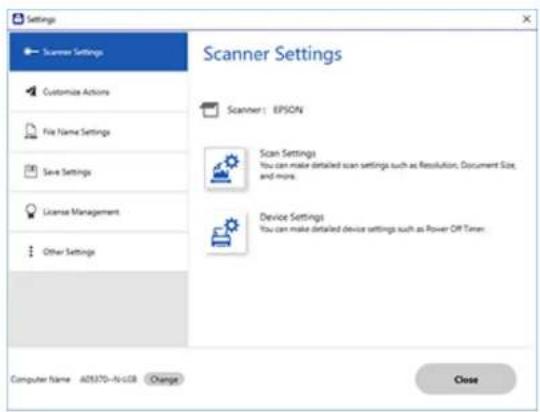
- Click the File Name Settings tab.
You see a screen like this:
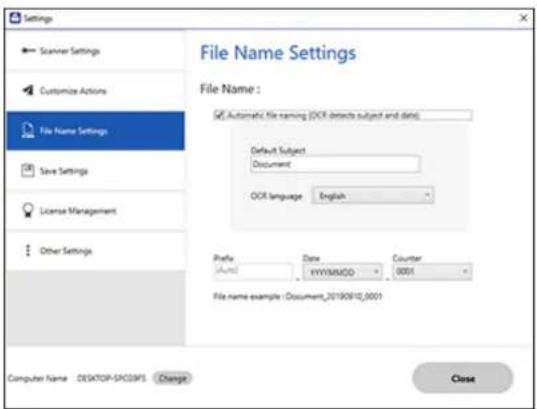
- Change the settings as necessary:
- Make sure the Automatic file naming checkbox is selected if you want OCR to automatically detect the subject and date and add them to the filename. You can enter a default filename that will be used if OCR cannot detect the subject.
- Select the OCR language (the default language is English).
- Select the date format.
4. Click Close.
Parent topic: Selecting Epson ScanSmart Settings
Changing the Save Settings
You can change the file type options for saving your scans.
- Click the Settings button.
You see a screen like this:
- Click the Save Settings tab.
You see a screen like this:

- Click Options for a file format and change the settings as necessary.
Note: If you want the fold to open after the file is saved, click the checkbox.
4. Click Close.
Save Settings
Parent topic: Selecting Epson Scan Smart Settings
Save Settings
You can change the settings for how scanned images are saved as PDFs or JPEGs.
PDF Options
| SettingOptionsDescription | ||
| GeneralGeneratePDF/AFileCreatesaPDFthatconformsto | PDF/A-1standards | |
| CreatefilewithallpagesSavesallpagesasonefile | ||
| CompressionLevelSelectsthecompressionlevelforcolororgrayscaleimages | ||
| SecurityOpenFilePasswordSetapasswordtoopenthefile | ||
| ProtectPropertySettingsSetsapasswordtoprotectfilepropertiesandallowsforrestrictionsonfileeditingandprinting | ||
JPEG Options
| SettingOptionsDescription | ||
| ImageQualityOptions—Setsacompressionlevelbymovinga | sliderorenteringavalue.Filesizeincreaseswhenhighresolutionisselected. | |
| Encoding(Windowsonly)StandardImagesloadfromtoptobottominawebbrowser.Ittakeslongertoloadtheentireimage. | ||
| EmbedlCCProfile(Windowsonly) | —AllowsyoutoaddlCCprofilestotheimage | |
TIFF Options
| SettingOptionsDescription | ||
| ByteOrderWindows | Macintosh | Specifiestheoperatingsystemformat inwhichthescannedimageissaved |
| Compression(Windowsonly)—Specifiesthecompressionformatand levelforColor/GrayscaleandB&W images.Filesizeincreaseswithhigher quality. | ||
| EmbedICCProfile(Windows only) | —Allowsyoutoadd|CCprofile | stothe image |
Parent topic: Changing the Save Settings
Customizing Action Icons
You can customize how the scan action icons are displayed on the Select Actions screen.
Note: You can also customize them by clicking the Customize icon on the Select Action screen.
1. Click the Settings button.
You see a screen like this:

2. Click the Customize Actions tab.
You see a screen like this:

3. Choose which action icons to display by selecting or deselecting each checkbox. Click the arrow icons to move the icons up or down in the display order you want.
4. Click Close.
Parent topic: Selecting Epson Scan Smart Settings
Scanning Using Invoice/Receipt Manager
See these sections to activate Invoice/Receipt Manager and start scanning invoices and receipts (RR-600W).
Note: Receipt Manager availability varies by model and region.
Starting a Free Trial
Activating Receipt Manager
Scanning Receipts and Using Receipt Manager
Parent topic: Scanning
Starting a Free Trial
You can start a 30-day free trial of Receipt Manager.
Note: Trial offer not available for all models in all regions.
Note: The images show Windows screens for the ES-580W; Mac screens and those for the RR-600W model may be slightly different. Depending on your product model and software version, not all options may be available.
- Click the Manage Invoices/Receipts icon on the main Epson ScanSmart screen.
![Epson ScanSmart Select a [SCAN] option, or [Manage Invoices/Receipts] to start. Click (Settings) to adjust scanner settings. Scanner: EPSON Change SCAN double-sided SCAN single-sided Start double-sided scanning. Make sure you place the originals in the scanner. Start single-sided scanning. Make sure…](/content/2026/06/1389693/images/f37acae8debd10cea0d9206b57b5f05675bc506c0e2588a4b0e51f6abe1d5b85.jpg)
2. Click Start Trial.
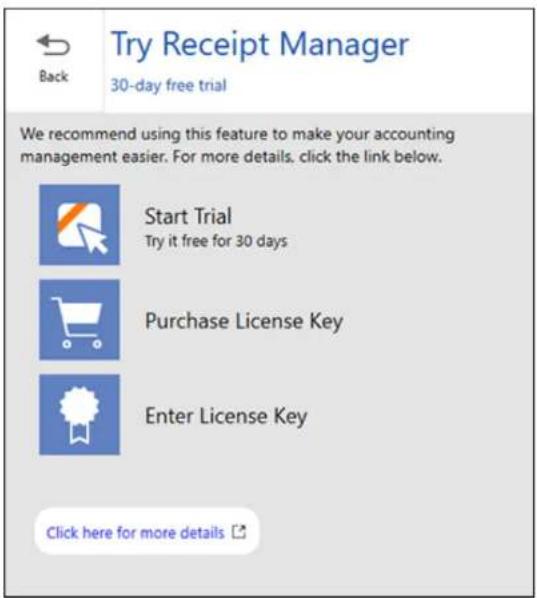
Note: If you are ready to purchase a license key now, click Purchase License Key. The Epson support page opens in your web browser. When you receive the license key, click Enter License Key and enter it on the screen that appears, then click Activate. You can also click the link below for instructions on activating Receipt Manager from the Settings menu.
- Make sure the scanner and serial number listed match your product and click OK.
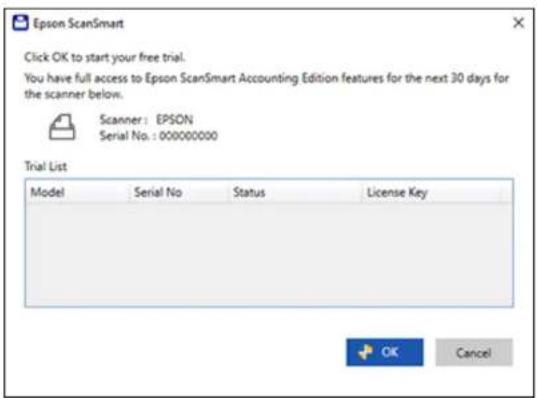
- Receipt Manager opens and you can begin using its features.
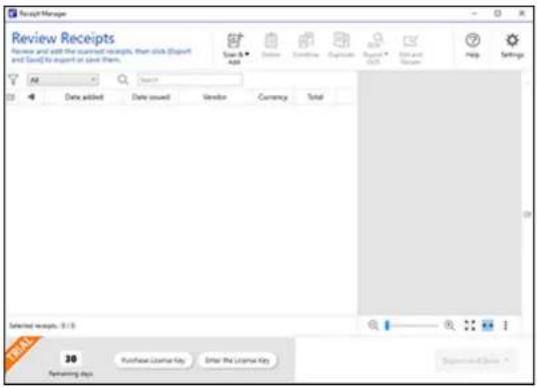
When the 30-day trial expires, you can purchase a license key to continue using Receipt Manager features.
Hiding the Receipt Manager Trial Icons
Parent topic: Scanning Using Invoice/Receipt Manager
Hiding the Receipt Manager Trial Icons
You can hide the Receipt Manager trial icons from the Epson ScanSmart screens.

- Click the Settings button in Epson ScanSmart.
You see a screen like this:
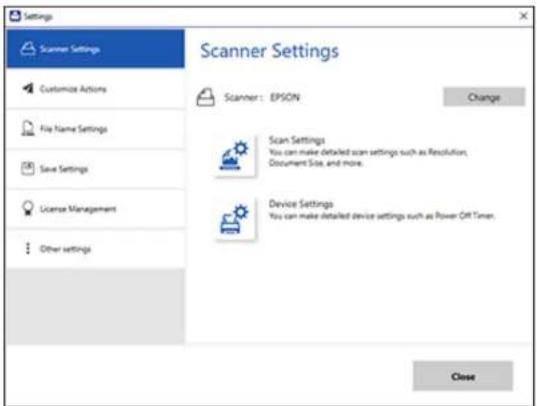
- Click the Other Settings tab.
You see a screen like this:
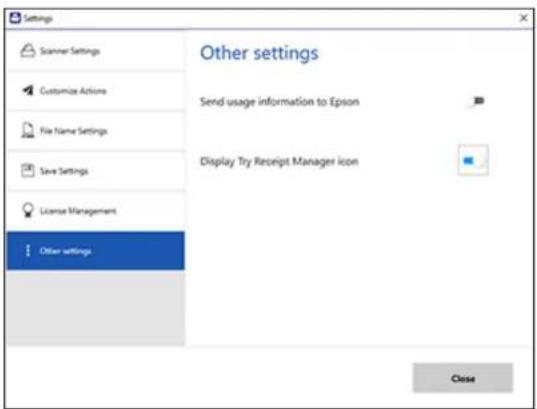
- Click the Display Try Receipt Manager icon toggle button to hide or display the trial icon on the main Epson Scan Smart screen.
Note: You can also hide or display the trial icon from the Select Action screen on the Customize Actions tab.
4. Click Close.
Parent topic: Starting a Free Trial
Activating Receipt Manager
You can purchase a license key to activate Receipt Manager.
Note: The license key can only activate one scanner.
Note: Entering a license key is not required for all models in all regions.
- Click the Settings button.
You see a screen like this:
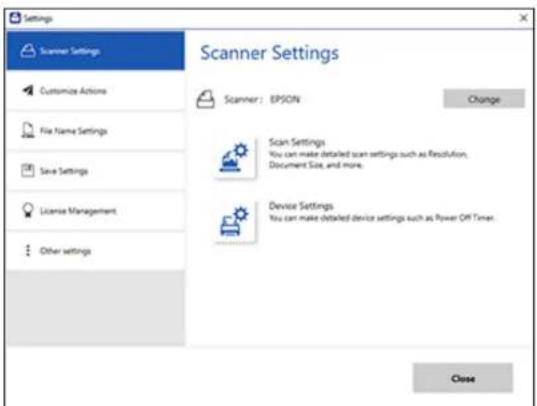
- Click the License Management tab.
You see a screen like this:

- To purchase a new license key, click Purchase License Key.
The Epson support page opens in your web browser where you can purchase the license key. If you already have a license key, go to step 4.
- Make sure the scanner you want to activate the license key for is displayed at the top of the screen. Click Change if you want to select a different scanner.
5. Click Enter License Key.
You see a screen like this:
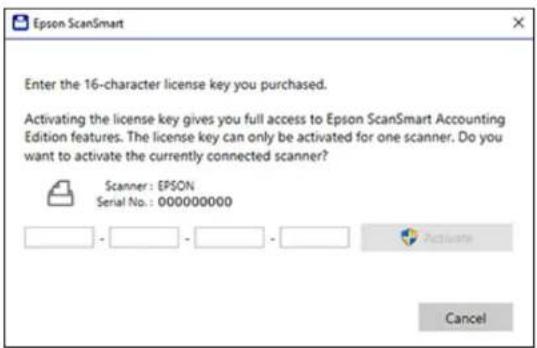
6. Enter the license key you purchased and click Activate. 7. Click Yes on the next screen (Windows only). 8. When you see a message indicating that activation was successful, click OK.
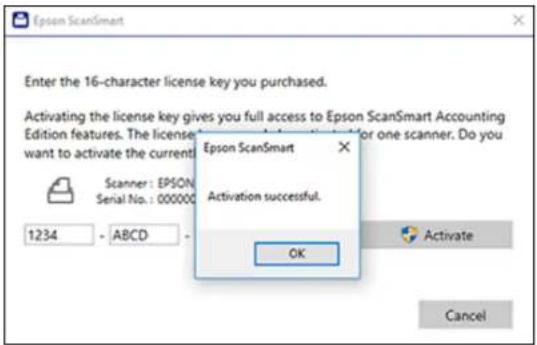
The activated scanner and license key appear in the License Management List.
Parent topic: Scanning Using Invoice/Receipt Manager
Scanning Receipts and Using Receipt Manager
You can scan receipts and manage the data in Receipt Manager.
- Load your original receipts into the scanner.
- Select home, if necessary.
- Select Computer and press start.
Epson ScanSmart automatically opens on your computer and the scan job begins. The receipts feed through the scanner. When scanning is complete, you see a screen like this:
![Review Scans Show how to add and add some from the book [book] Save Make Right Save Edit Image View Help Search Test Test saved: 1 Stop this screen next time. Next](/content/2026/06/1389693/images/cbb86a328e9dfcb6856407028c2e5c330fbd829c8ba955fc4ef9a94fea37307c.jpg)
- You can review or reorder the scanned images as follows:
- Select + Scan to scan more receipts.
- Select Delete to delete selected scanned images.
- Select Rotate Right to rotate scanned images.
- Select Crop to crop the selected image.
- Select Stitch Images to combine two selected images into one image.
- When you are finished reviewing the scanned images, click Next.
You see a screen like this:
6. Click Manage Invoices/Receipts.
You see a screen like this:![Review Receipts/Receipts Review and with the signed instructions clarifies that click Export and [Send] to export or send them. Add Delete Customize Replicate Readout OK Show Help Settings Date sum 11/05/2008 9:11 AMD CNT 1211 Green Street New Style, 42 12.17% 12.36% 12.57% 12.78% 12.99% 13.10% 13.2…](/content/2026/06/1389693/images/b938130ce119df3816aaee536f333ecf6d6e22f8a22e4ddb6236111d3cedb0bb.jpg)
Note: You can also click Manage Invoices/Receipts from the main Epson ScanSmart screen to begin scanning receipts.
Note: If you are using the trial version of Receipt Manager, you must click Continue Trial each time you click Manage Receipts.
- In the Edit window, review the receipt data against the scanned image and make sure it is correct. You can also choose the following options:
- Select Scan & Add to scan more receipts.
- Select Delete to delete selected scanned images. Make sure the blue checkbox in the receipt list is selected for the receipts you want to delete.
- Select Combine to combine receipt data. Make sure the blue checkboxes in the receipt list are selected for the receipts you want to combine.
Note: You cannot separate receipts once they are combined. You must delete and re-scan them if you need to separate them.
- Select Duplicate to duplicate receipts. You can only duplicate one receipt at a time. Make sure the receipt you want to duplicate is selected.
- Select Repeat OCR and select a language if the data fields were not populated.
Note: Some fields may need to be entered manually.
- When you are finished reviewing the data for the first receipt, click Mark Reviewed.
The next receipt appears and you can review the data. Repeat for each receipt.
Note: Make sure the blue checkboxes in the receipt list are selected for the receipts you want to export or save.
- When you have finished reviewing data for all receipts, click Export and Save.
You see a screen like this:
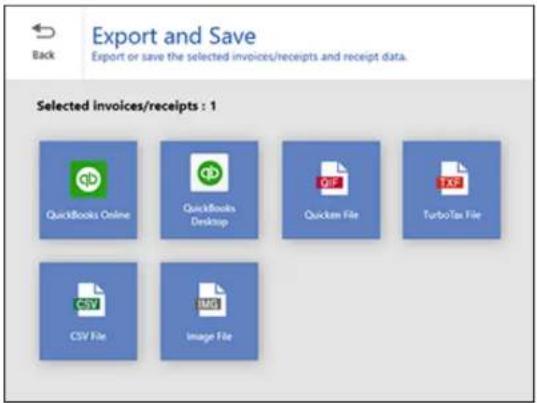
- Select an option. See the links below.
Exporting Invoices or Receipts to QuickBooks Online
Exporting Invoices or Receipts to QuickBooks Desktop
Saving or Exporting Receipts to Quicken
Saving Receipt Data as a TurboTax File
Saving Invoice or Receipt Data as a CSV File
Scanning Invoices or Receipts as an Image File
Parent topic: Scanning Using Invoice/Receipt Manager
Related references
Characters are not Recognized During Conversion to Editable Text (OCR)
Exporting Invoices or Receipts to QuickBooks Online
You can export invoice or receipt data to QuickBooks Online.
Note: Make sure you have a current QuickBooks account and your login information is available.
- Make sure your invoices or receipts are scanned and reviewed. See the link below.
- In the Export and Save window, click QuickBooks Online.
You see a screen like this:
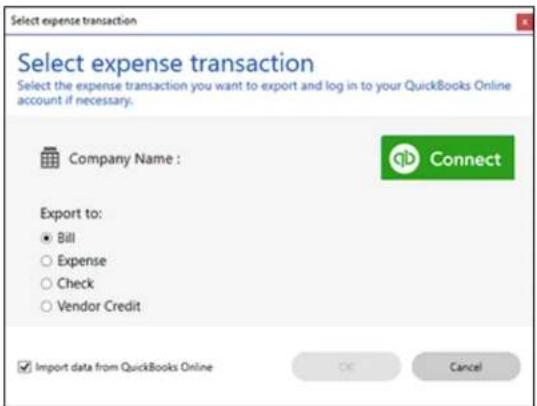
- Click Connect and enter your QuickBooks Online information.
- Select the expense transaction you want to export the data to and click OK.
Note: If you want to import data such as vendors, categories, or payment methods from QuickBooks Online into Invoice/Receipt Manager, select the checkbox.
The invoice or receipt data is exported to QuickBooks Online.
Parent topic: Scanning Receipts and Using Receipt Manager
Exporting Invoices or Receipts to QuickBooks Desktop
You can export invoice or receipt data to QuickBooks Desktop (Windows only).
Note: Make sure the QuickBooks Desktop software is installed and opened on your computer.
- Make sure your invoices or receipts are scanned and reviewed. See the link below.
- In the Export and Save window, click QuickBooks Desktop.
You see a screen like this:

- Click Browse and select the QBW company file that you want to export the data to.
Note: The QBW company file must already be created.
- Select the expense transaction you want to export the data to and click OK.
Note: If you want to import data such as vendors or payment methods from QuickBooks Desktop into Invoice/Receipt Manager, select the checkbox.
The invoice or receipt data is exported to QuickBooks Desktop.
Parent topic: Scanning Receipts and Using Receipt Manager
Saving or Exporting Receipts to Quicken
You can save receipt data as a QIF file or export it for use in Quicken.
Note: Invoice data cannot be saved or exported in Quicken.
- Make sure your receipts are scanned and reviewed. See the link below.
- In the Export and Save window, click Quicken File.
You see a screen like this:
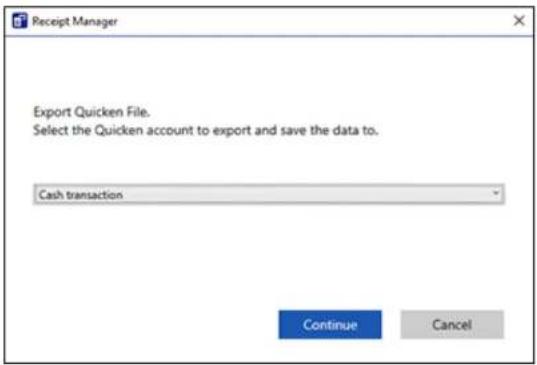
3. Do one of the following:
- Select Cash transaction and click Continue to save the receipt data as a QIF file.
- Select Select the Quicken account and click Continue to export the receipt data to a QIF file previously saved on your computer.
The scanned receipt data is saved or exported.
Parent topic: Scanning Receipts and Using Receipt Manager
Saving Receipt Data as a TurboTax File
You can save receipt data as a TurboTax file.
Note: Invoice data cannot be saved or exported in TurboTax.
- Make sure your receipts are scanned and reviewed. See the link below.
Note: The tax category needs to be selected for each receipt to be recognized by TurboTax.
- In the Export and Save window, click TurboTax File.
- Save the file as a TXF file to your computer.
Parent topic: Scanning Receipts and Using Receipt Manager
Saving Invoice or Receipt Data as a CSV File
You can save invoice or receipt data as a CSV file to use in a spreadsheet program such as Microsoft Excel.
- Make sure your invoices or receipts are scanned and reviewed. See the link below. 2. In the Export and Save window, click CSV File. 3. Choose the folder on your computer where you want to save the CSV file and click Save.
Parent topic: Scanning Receipts and Using Receipt Manager
Scanning Invoices or Receipts as an Image File
You can save scanned invoices or receipts as an image file.
- Make sure your invoices or receipts are scanned and reviewed. See the link below.
- In the Export and Save window, click Image File.
You see a screen like this:
- Review the filename fields, select the file type (JPEG or PDF), select the destination folder, and click Save.
Parent topic: Scanning Receipts and Using Receipt Manager
Selecting Invoice/Receipt Manager Settings
After starting Invoice/Receipt Manager, you can export or import the database and change various settings.
Exporting or Importing the Invoice/Receipt Database
Changing Column Settings
Changing Currency and Language Settings
Importing Categories from QuickBooks or Quicken
Parent topic: Scanning
Exporting or Importing the Invoice/Receipt Database
You can export or import the invoice/receipt database. This is useful if you change computers.
Note: Make sure each computer has the same version of Epson ScanSmart installed.
- Click the Settings button in Invoice/Receipt Manager.
You see a screen like this:
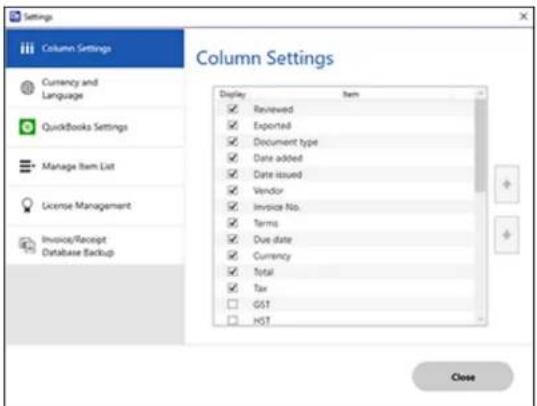
2. Select the Invoice/Receipt Database Backup tab.
You see a screen like this:

3. Choose one of these options:
- Click Export to export the invoice/receipt database. A file is created that can be saved to a folder on your computer.
- Click Import to import an invoice/receipt database. Choose the file that was created when you exported the database. The current database is overwritten.
4. Click Close.
Parent topic: Selecting Invoice/Receipt Manager Settings
Related tasks
Scanning Receipts and Using Receipt Manager
Changing Column Settings
You can choose which columns are displayed in the receipt list.
- Click the Settings button in Invoice/Receipt Manager.
You see a screen like this:
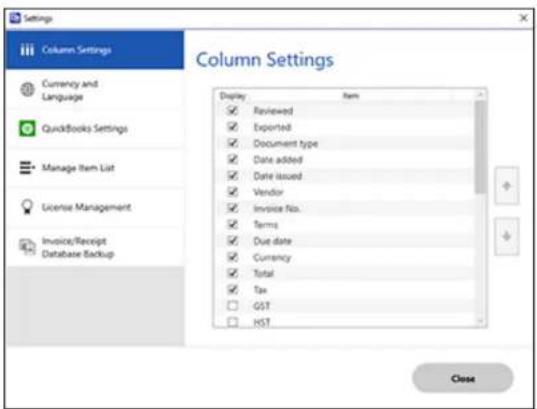
2. Choose which columns to display by selecting or deselecting each checkbox. Click the arrow icons to move the items up or down in the display order you want. 3. Click Close.
Parent topic: Selecting Invoice/Receipt Manager Settings
Related tasks
Scanning Receipts and Using Receipt Manager
Changing Currency and Language Settings
You can change the currency and OCR language for data in Invoice/Receipt Manager.
- Click the Settings button in Invoice/Receipt Manager.
You see a screen like this:
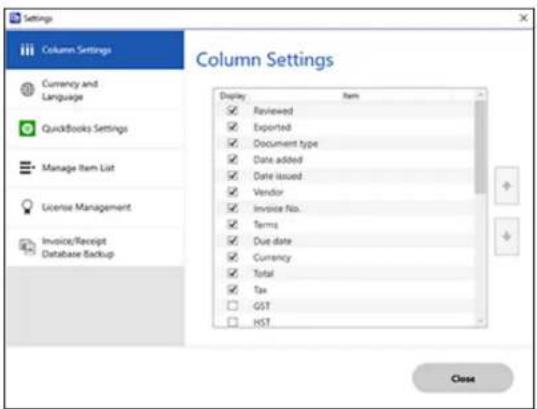
- Click the Currency and Language tab.
You see a screen like this:
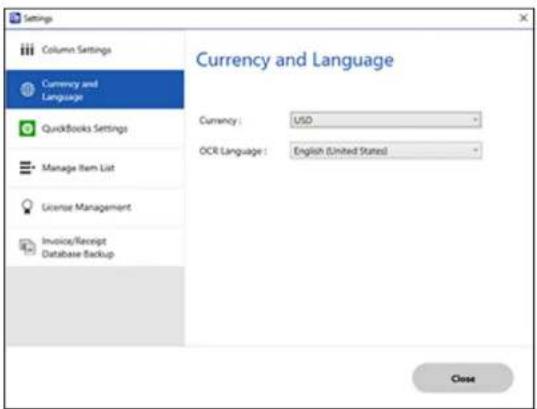
- Select a currency type and OCR language. 4. Click Close.
Parent topic: Selecting Invoice/Receipt Manager Settings
Related tasks
Scanning Receipts and Using Receipt Manager
Importing Categories from QuickBooks or Quicken
You can import categories from QuickBooks Online, QuickBooks Desktop, or QuickBooks to use in Invoice/Receipt Manager.
- Click the Settings button in Invoice/Receipt Manager.
You see a screen like this:

- Click the Manage Item List tab.
You see a screen like this:
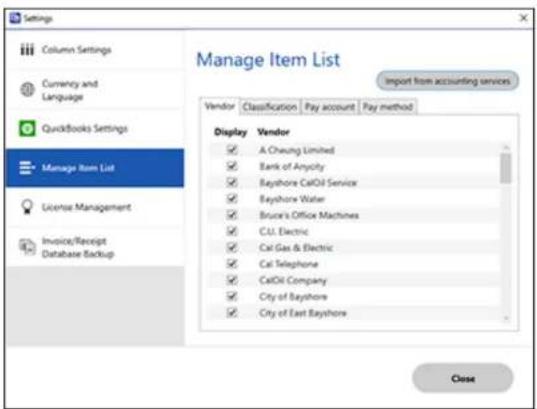
- Click Import from accounting services.
- Select one of the import options and follow the on-screen instructions.
- Click the checkboxes for the categories that you want to be displayed in the Invoice/Receipt Manager Edit window and click Close.
Note: Imported items depend on these selected accounting services.
Parent topic: Selecting Invoice/Receipt Manager Settings
Related tasks
Scanning Receipts and Using Receipt Manager
Scan Resolution Guidelines
The resolution setting in your scanning software, measured in dpi (dots per inch), controls the amount of detail captured in your scans. Increasing the resolution raises the amount of detail captured, but comes with the following disadvantages:
• Larger file sizes
- It takes longer to scan your originals, send/receive your scans by email or fax, and to print your scans. The image may become too large to fit on your display or print on paper.
If you plan to enlarge a scanned image and print it at a larger size, you may need to increase the resolution from the default resolution set by the software. Follow these guidelines to determine the resolution setting you need:
- You will scan the image at its original size but enlarge it later in an image-editing program.
Increase the resolution setting in your scanning software. Increase the resolution by the same amount you will increase the image size to retain high image quality. For example, if the resolution is 300 dpi (dots per inch) and you will double the image size later, change the resolution setting to 600 dpi.
- You will scan the image at 100% or smaller size.
Select the resolution setting based on how you will use the scanned image:
- Email/view on a computer screen/post on the web: 96 to 200 dpi
- Print/fax/convert to editable text (OCR)/create searchable PDF: 200 to 300 dpi
Parent topic: Scanning
Cleaning and Transporting Your Scanner
See these sections if you need to clean or transport your scanner.
Cleaning Your Scanner
Cleaning Inside Your Scanner
Checking the Scanner Roller Counter
Replacing the Scanner Rollers
Transporting Your Scanner
Cleaning Your Scanner
To keep your product working at its best, you should clean it several times a year.
Caution: Do not use a hard brush, alcohol, or paint thinner to clean the product or you may damage it. Do not use oil or other lubricants inside the product or let water get inside it. Do not open the product's outer case.
- Turn off the scanner and unplug the AC adapter.
- Disconnect any connected cables.
- Clean the outer case with a soft, dry cloth. Do not use liquid or chemical cleansers.
Note: If the outer case still requires additional cleaning, use a slightly damp cloth to wipe the outer case. Then wipe the case with a soft, dry cloth.
- Clean the LCD screen with a soft, dry cloth.
Parent topic: Cleaning and Transporting Your Scanner
Cleaning Inside Your Scanner
Clean your scanner regularly to make sure that no dust builds up upon the glass scanning surfaces. Dust can cause spots or lines in your scanned images. Clean the inside of the scanner every 5,000 scans. You can check the latest number of scans using the Epson Scan 2 Utility.
Caution: Do not use a hard brush, alcohol, or paint thinner to clean the product or you may damage it. Do not use oil or other lubricants inside the product or let water get inside it.
- Turn off the scanner and unplug the AC adapter. 2. Disconnect any connected cables.
- Pull down on the cover open lever and open the scanner cover.

4. Use a genuine Epson cleaning kit or a soft, moist cloth to wipe off any dust or dirt on the glass scanning surfaces and the rollers inside the scanner cover. If the glass surface is stained with grease or some other hard-to-remove material, use a genuine Epson cleaning kit to remove stains. Use a small amount of cleaner on the cleaning cloth to remove the stains. Wipe off all remaining liquid.
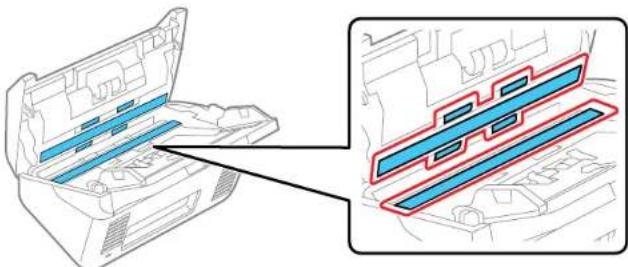
Caution: Do not spray glass cleaner directly on the scanning surfaces. Be careful not to place too much force on the glass.
- Use a cotton swab to wipe off any dust or dirt on the sensors shown here.

Caution: Do not use liquid or glass cleaner on the cotton swab.
- Locate the separation roller.
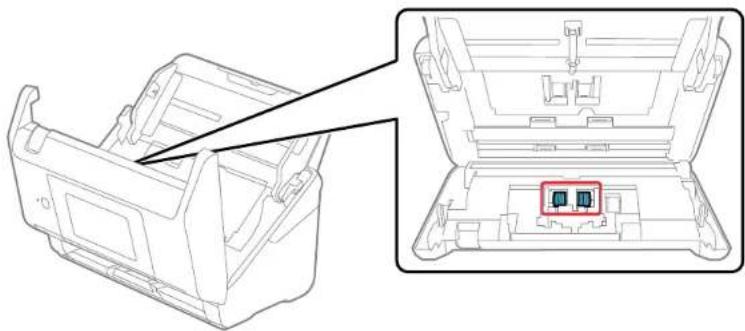
- Squeeze the tabs on the sides of the separation roller cover and open the cover.
Caution: Be careful not to apply too much force when opening the cover.
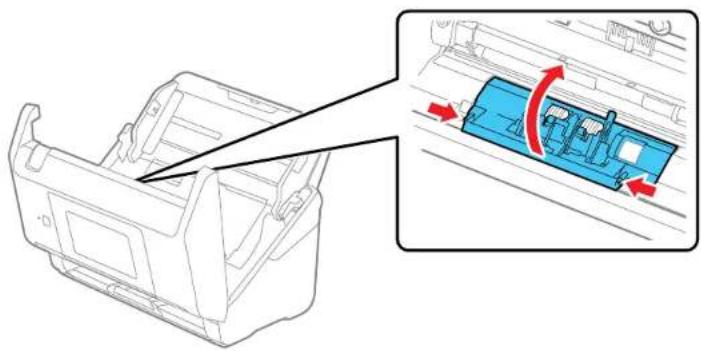
8. Slide the separation roller to the left and remove it.
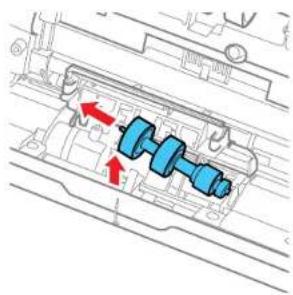
9. Wipe off any dust or dirt on the separation roller using a genuine Epson cleaning kit or a soft, moist cloth.
Caution: Use only a genuine Epson cleaning kit or soft, moist cloth to clean the roller; using a dry cloth may damage the surface of the roller.
- To replace the separation roller, insert the end of the roller into the hole on the right side and lower the other end of the roller into place.
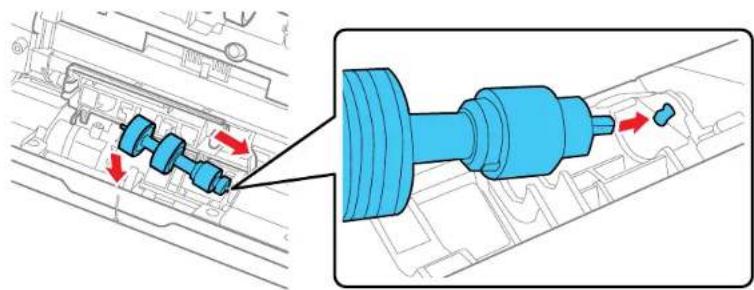
- Close the separation roller cover until you hear it click into place.
Note: If you are not able to close the cover, the roller is not installed correctly. Remove the roller and reinstall it, then try to close the cover again.
- Locate the pickup roller.
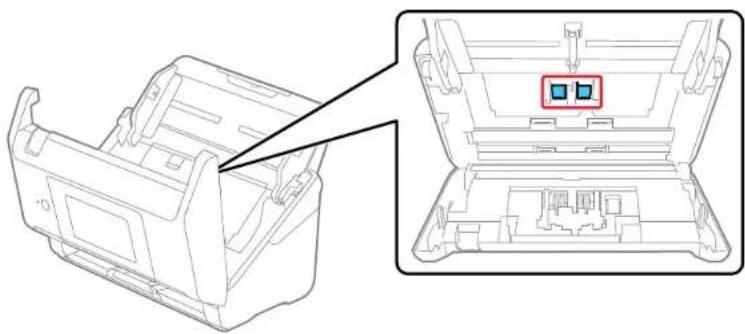
- Press down on the pickup roller cover latch and pull up the cover to remove it.
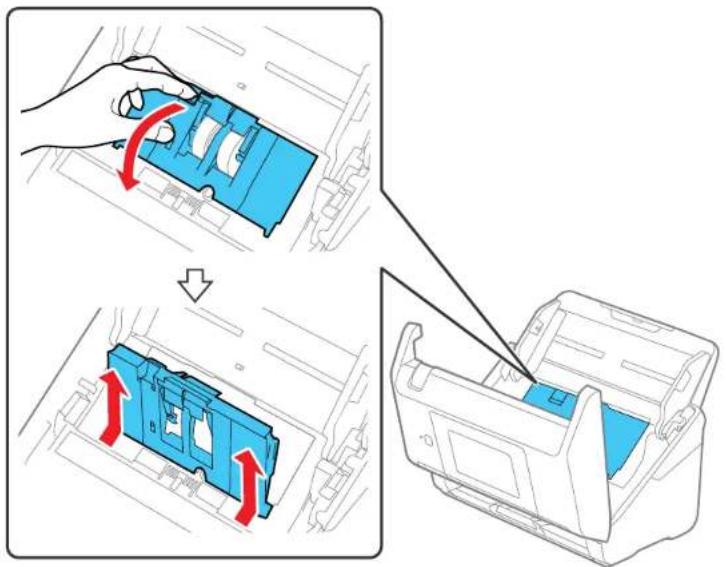
- Pull down the tab on the pickup roller and slide the roller to the right to remove it.
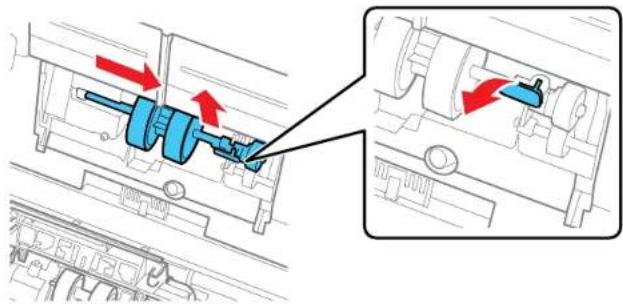
15. Wipe off any dust or dirt on the pickup roller using a genuine Epson cleaning kit or a soft, moist cloth.
Caution: Use only a genuine Epson cleaning kit or soft, moist cloth to clean the roller; using a dry cloth may damage the surface of the roller.
- To replace the pickup roller, align the notches on the roller unit and slide it to the left. Press up on the tab to secure the roller.
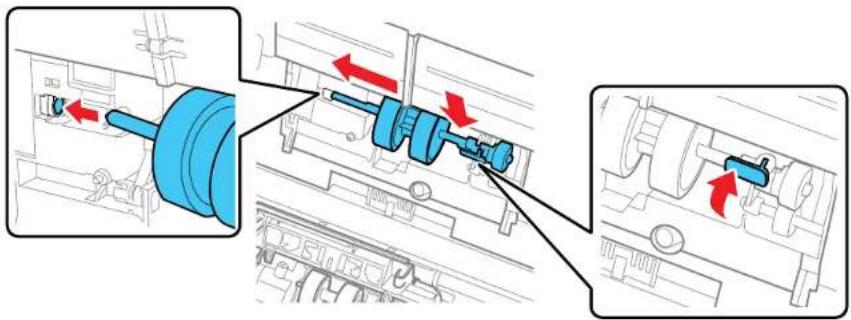
- Align the bottom edge of the pickup roller cover into the notches as shown and press it down until it clicks into place.
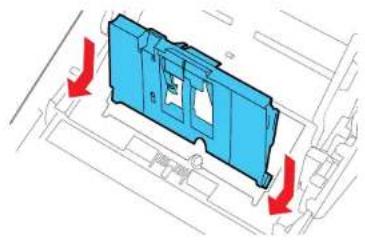

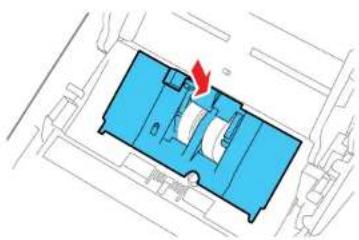
Note: If you are not able to close the cover, the roller is not installed correctly. Remove the roller unit and reinstall it, then try to close the cover again.
- Close the scanner cover.
- Plug in the AC adapter and press the power button to turn on the scanner.
- Select Home, if necessary, and select Scanner Maintenance.
21. Select Roller Cleaning.
- Pull down on the cover open lever and open the scanner cover.
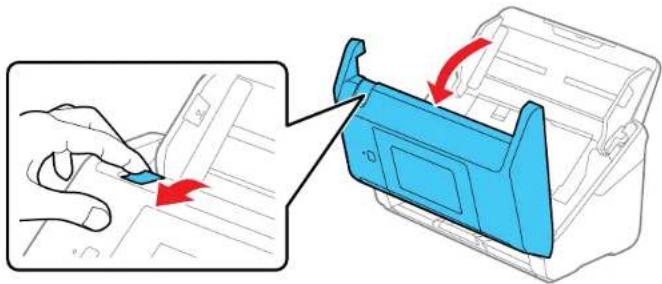
The scanner enters roller cleaning mode.
- Slowly rotate the rollers shown here by tapping anywhere on the LCD screen. Use a genuine Epson cleaning kit or a soft, moist cloth to wipe off any dust or dirt on the rollers as they rotate. Repeat this step until the rollers are clean.

Caution: Be careful not to get your hands or hair caught in the rollers as they rotate.
- Close the scanner cover.
Parent topic: Cleaning and Transporting Your Scanner
Related references
User Replaceable Epson Scanner Parts
Checking the Scanner Roller Counter
Check the scanner roller counter to determine when your rollers need to be replaced. When you replace the scanner rollers, reset the scanner roller counter so you know when you may need to replace the rollers again.
Note: To check the scanner roller counter from the scanner's control panel, select home, if necessary, and select Scanner Maintenance > Roller Replacement.
- Make sure the scanner is turned on and connected to your computer. 2. Do one of the following to open the Epson Scan 2 Utility:
- Windows 10: Click and select EPSON > Epson Scan 2 Utility.
- Windows 8.x: Navigate to the Apps screen and select Epson Scan 2 Utility.
- Windows 7: Click > All Programs > EPSON > Epson Scan 2 Utility. • Mac: Open the Applications folder, click Epson Software, and click Epson Scan 2 Utility.
- If the number in the Number of Scans field exceeds the number displayed as the Life Cycle of the rollers, it is time to replace the rollers. 5. Close the Epson Scan 2 Utility.
Parent topic: Cleaning and Transporting Your Scanner
Related tasks
Changing Roller Replacement Alert Settings
Replacing the Scanner Rollers
Replace the scanner rollers when the number of scans exceeds the life cycle of the rollers. Check the scanner roller counter to see when you need to replace the rollers.
Note: Frequent use of textured media may cause premature wear on the rollers. If frequent paper jams occur before the lifecycle of the rollers is exceeded, try cleaning the rollers. In some cases, the rollers may need to be replaced before the number of scans exceed the lifecycle of the rollers.
- Turn off the scanner.
- Unplug the AC adapter.
- Disconnect any connected cables.
- Pull down on the cover open lever and open the scanner cover.
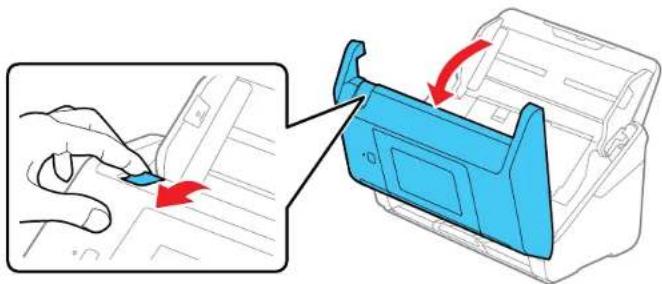
- Press down on the pickup roller cover latch and pull up the cover to remove it.
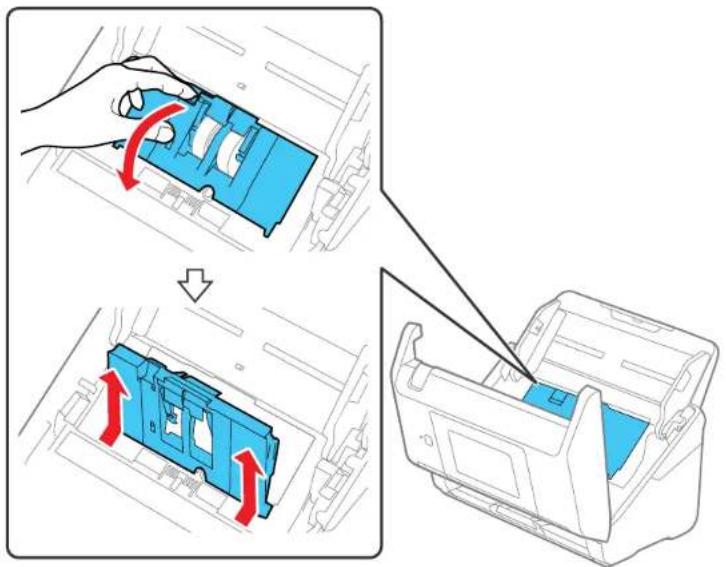
- Pull down the tab on the pickup roller and slide the roller to the right to remove it.
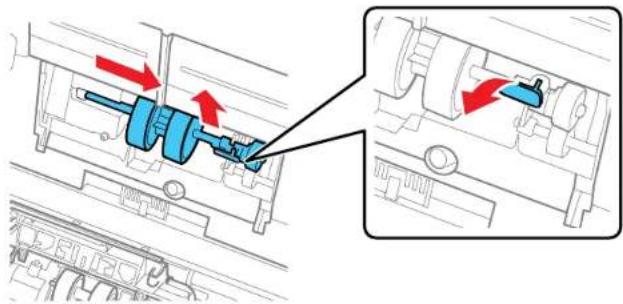
Note: Do not use force to pull out the pickup roller; doing so may damage the inside of the scanner.
- To install the new pickup roller, align the notches on the roller unit and slide it to the left. Press on the tab to secure the roller.
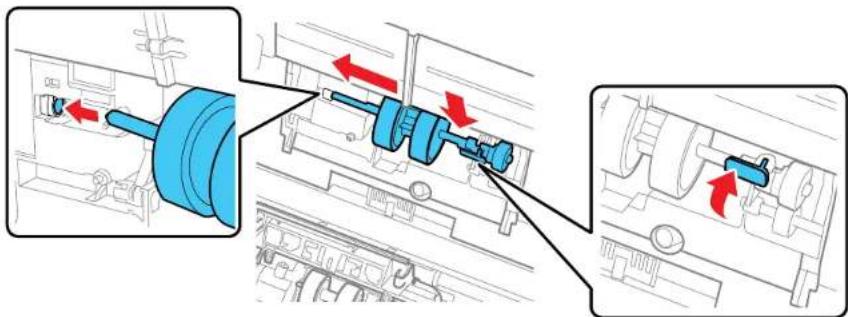
- Align the bottom edge of the pickup roller cover into the notches as shown and press it down until it clicks into place.
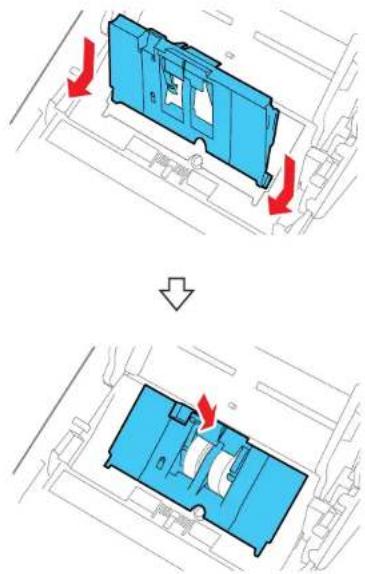
Note: If you are not able to close the cover, the pickup roller is not installed correctly. Remove the roller unit and reinstall it, then try to close the cover again.
- Squeeze the tabs on the sides of the separation roller cover and open the cover.
Caution: Be careful not to apply too much force when opening the cover.
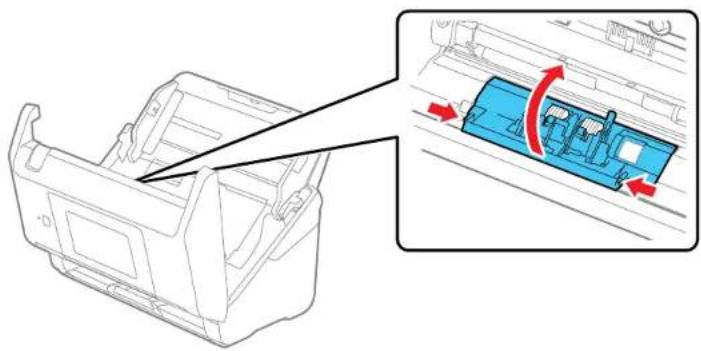
10. Slide the separation roller to the left and remove it.
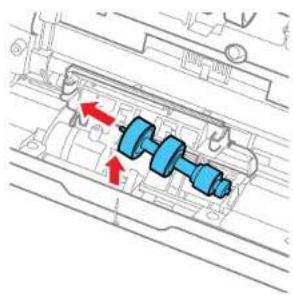
- To install a new separation roller, insert the end of the roller into the hole on the right side and lower the other end of the roller into place.
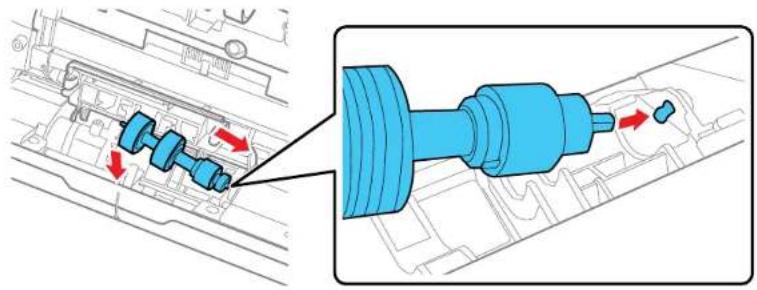
- Close the separation roller cover until you hear it click into place.
Note: If you are not able to close the cover, the roller is not installed correctly. Remove the roller and reinstall it, then try to close the cover again.
13. Close the scanner cover.
- Connect any disconnected cables.
15. Plug in the AC adapter and turn on the scanner.
- Reset the roller counter.
Note: Make sure to dispose of the pickup roller and the separation roller following the rules and regulations of your local authority. Do not disassemble them.
Resetting the Scanner Roller Counter
Parent topic: Cleaning and Transporting Your Scanner
Related references
User Replaceable Epson Scanner Parts
Related tasks
Checking the Scanner Roller Counter
Resetting the Scanner Roller Counter
Changing Roller Replacement Alert Settings
Resetting the Scanner Roller Counter
When you replace the scanner rollers, reset the scanner roller counters so you know when you may need to replace the rollers again.
- Select home, if necessary. 2. Do one of the following:
- Select Scanner Maintenance > Roller Replacement > Reset the Number of Scans > Number of Scans After Replacing Roller > Yes.
- Select Settings > Device Settings > Reset the Number of Scans > Number of Scans After Replacing Roller > Yes.
Note: You can also reset the roller counter from your computer using the Epson Scan2 Utility. Select the Counter tab and click Reset.
Parent topic: Replacing the Scanner Rollers
Related tasks
Checking the Scanner Roller Counter
Changing Roller Replacement Alert Settings
Transporting Your Scanner
If you need to ship your product, transport it a long distance, or store it for an extended period, prepare it for transportation as described here.
- Turn off the scanner and unplug the AC adapter.
- Disconnect any connected cables.
- Close the input tray extension and the output tray.
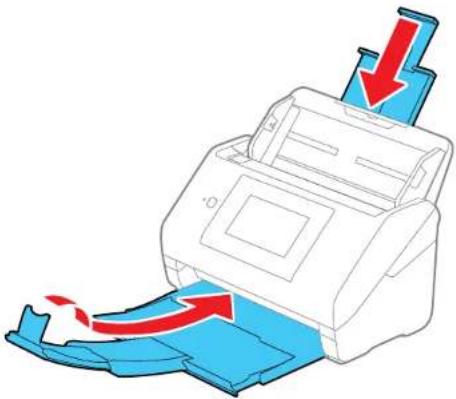
Note: Make sure the output tray is securely closed.
4. Push apart the latches on the back of the input tray and lift the input tray off of the scanner.
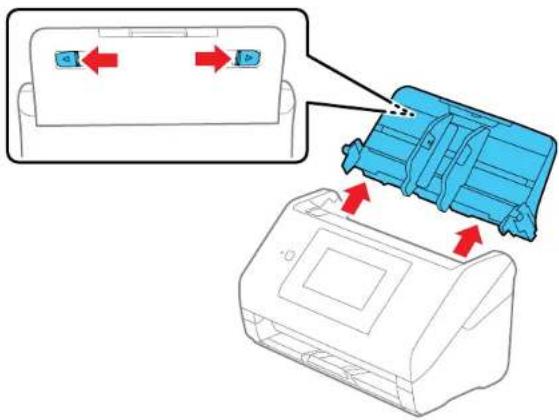
- Place the scanner in its original packing materials, if possible, or use equivalent materials with cushioning around the product.
Parent topic: Cleaning and Transporting Your Scanner
Solving Problems
Check these sections for solutions to problems you may have using your product.
Product Status Messages
Solving Scanning Problems
Solving Network Scanning Problems
Solving Scanned Image Quality Problems
Resetting the Epson Scan 2 Settings
Solving Invoice/Receipt Manager Problems
Uninstall Your Scanner Software
Where to Get Help (U.S. and Canada)
Where to Get Help (Latin America)
Product Status Messages
You can often diagnose problems with your product by checking the messages on its LCD screen. You can also select the help icon to see help information and how-to instructions on the screen.
| LCDscreenmessageCondition/solution | |
| InstalltheEpson ScanSmartsoftwareon thecomputertousethis feature. Seeyour documentationformore details. | EpsonScanSmartdidnotlaunch.MakesureEpsonScanSmartisinstalled correctlyandcorrectscannerisselected.IfEpsonScanSmartisnot installed,downloadthesoftwarefromtheEpsonwebsiteandinstalliton yourcomputer. |
| Checkthefollowingifa computerisnotfound.-Connectionbetween the scannerandthecomputer (USBornetwork)-Installationofthe necessarysoftware-Powersupplytothe computer-Firewalland securitysoftwaresettings-SearchagainSeeyour documentationformore details. | Makesurethescannerisconnectedcorrectlyandthelatestversionof EpsonScanSmartisinstalledonyourcomputer.MakesuretheAC adapterissecurelyconnectedtothescannerandaworkingelectrical outlet.CheckthefirewallsettingsforEpsonsoftware. |
| ThecombinationofIP addressandthesubnet maskisinvalid.Seeyour documentationformore details. | Thereisaproblemwiththenetworkconnectiontoyourproduct.Checkthe solutionsinthisguide. |
| RecoveryModeAfirmwareupdatehasfailed.ConnectyourproductusingaUSBcableand tryupdatingthefirmwareagain.Ifyoustillreceivethiserrormessage, contactEpsonforsupport. | |
Parent topic: Solving Problems
Related references
Where to Get Help (U.S. and Canada)
Where to Get Help (Latin America)
Related tasks
Replacing the Scanner Rollers
Setting User Access Restrictions (Access Control)
Changing Regular Cleaning Alert Settings
Changing Roller Replacement Alert Settings
Cleaning Inside Your Scanner
Related topics
Loading Originals
Solving Scanning Problems
Check these solutions if you have problems scanning with your product.
Scanner Does Not Turn On or Turns Off Unexpectedly
Scanner Button Does Not Work as Expected
Scanning Software Does Not Operate Correctly
Original Feeds Incorrectly in Scanner
Original Jams in Scanner
Paper Protection Does Not Work Correctly
Scanning is Slow
Cannot Send Scans to a Cloud Service
Cannot Send Scans to an Email
Parent topic: Solving Problems
Scanner Does Not Turn On or Turns Off Unexpectedly
If the scanner does not turn on or if it turns off unexpectedly, try these solutions:
- Make sure the AC adapter is securely connected to the scanner and to a working electrical outlet.
- If the scanner turns off unexpectedly, you may need to adjust the Sleep Timer and Power Off Timer settings on the control panel.
Parent topic: Solving Scanning Problems
Related tasks
Changing the Sleep Timer Settings
Changing the Power Off Timer Settings
Scanner Button Does Not Work as Expected
If the scanner button does not start the correct program or perform the correct action, try these solutions:
- If you installed the Epson ScanSmart software, pressing the start button on your scanner starts Epson ScanSmart, over a USB or wireless connection. For instructions on scanning with Epson ScanSmart, see the help information in Epson ScanSmart.
- Make sure your scanner is turned on and any interface cables are securely connected at both ends.
- Check that the correct scanner is selected using the Epson Scan 2 Utility.
- In Windows, be sure that the scanner is listed under Imaging Devices in the Device Manager.
- Make sure you have assigned the correct job to the scanner button and change it, if necessary.
- Check the status of the lights and make sure the scanner is ready to scan.
- If you are connecting your scanner over a network, make sure the Wi-Fi connection is working correctly. Try turning the wireless router off and make sure the outer cable is securely connected.
- If you are connecting your scanner via USB, use only the USB cable that came with the scanner. Make sure it is connected directly to your computer and not to a USB hub.
- For Wi-Fi scanning, confirm that your scanner is paired with your computer. Open Epson ScanSmart, click Change and select the scanner you want to use.
- Make sure your scanner is not connected to another computer via USB. A USB connection takes priority over a Wi-Fi connection.
- Make sure Epson ScanSmart and Epson Scan 2 are installed correctly. Reinstall the software, if necessary.
Parent topic: Solving Scanning Problems
Scanning Software Does Not Operate Correctly
If your scanning software does not operate correctly, try these solutions:
- Make sure your computer has adequate memory and meets the system requirements for your operating system.
- Make sure your computer is not running in a power-saving mode, such as sleep or standby. If so, wake your system and restart your scanning software. • Make sure the scanner is turned on.
- Make sure the connection between the scanner and your computer is secure. • If you upgraded your operating system but did not reinstall your scanning software, try reinstalling it. • In Windows, be sure that the scanner is listed under Imaging Devices in the Device Manager.
- Make sure the scanning software is installed.
- Use the USB cable that came with the scanner.
- Connect the scanner directly to the computer. The scanner may not work properly when connected through a USB hub.
- If you are using a TWAIN-compliant program, make sure that the correct product is selected as the Scanner or Sources setting.
- Make sure the PC Connection via USB setting is not disabled on the control panel.
- Check that the Wi-Fi connection is working correctly. Try turning the wireless router off and on.
- If your scanner is connected to one computer via USB and another computer will have wireless connection, pressing the start button on the scanner will save the scanned image to the computer connected via USB.
- Make sure another computer is not connected to the scanner using a USB cable. A USB connection takes priority over a Wi-Fi connection. If another computer is connected by USB, disconnect it.
- If you are using a Mac computer, make sure you select the network that has priority on it.
Parent topic: Solving Scanning Problems
Related concepts
Uninstall Your Scanner Software
Related references
Windows System Requirements
Mac System Requirements
Original Feeds Incorrectly in Scanner
If you have problems feeding originals in your scanner, try these solutions:
- If multiple pages feed at once, try the following:
- Remove the originals, fan the edges to separate the sheets, if necessary, and reload them.
- Load fewer originals at a time.
- Load only originals that meet the specifications for your scanner.
- Clean inside the scanner and replace the roller assembly kit, if necessary.
- Check the pickup rollers and clean, if necessary.
- Select the scanner control panel to slow down the scanning speed.
- Use Automatic Feeding Mode in Epson Scan 2 and scan originals one at a time.
- Use the optional carrier sheet for thin, folded, or irregularly shaped originals.
Parent topic: Solving Scanning Problems
Related references
Original Document Specifications
Plastic and Laminated Card Specifications
Special Original Specifications
User Replaceable Epson Scanner Parts
Related tasks
Cleaning Inside Your Scanner
Related topics
Loading Originals
Original Jams in Scanner
If an original has jammed inside the scanner, follow these steps:
Note: Epson Smart Panel does not support scanning originals more than 15.5 inches (398.3 mm) in length.
- Turn off your scanner.
- Remove all originals from the input tray.
- Pull down the cover open lever and open the scanner cover.
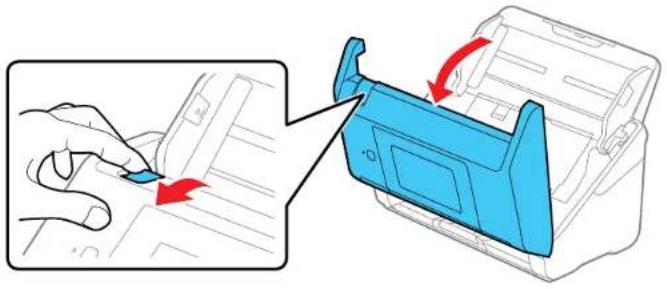
- Gently pull out any jammed originals from inside the scanner.
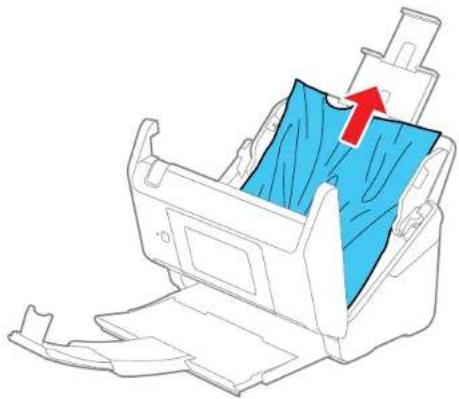
- Gently pull out any jammed originals from the output tray.

6. Close the scanner cover. 7. Carefully follow the loading instructions when you load originals.
If originals jam in the scanner frequently, try the following:
- Select on the scanner control panel to slow down the scanning speed.
• Turn off the Detect Double Feed setting. - Clean inside the scanner and clean the rollers. - Close the output tray and let the originals fall freely onto the surface below the scanner. - If the roller counter is nearing end of life, replace the roller assembly kit.
Parent topic: Solving Scanning Problems
Related references
Original Document Specifications
Plastic and Laminated Card Specifications
Special Original Specifications
Where to Get Help (U.S. and Canada)
Where to Get Help (Latin America)
Related tasks
Cleaning Inside Your Scanner
Related topics
Loading Originals
Paper Protection Does Not Work Correctly
To reduce damage to the original, the Paper Protection feature immediately stops scanning if a paper feed error is detected. If the Paper Protection feature does not work correctly, try these solutions:
- If your scanned original is damaged, make sure that the Paper Protection feature is enabled. Increase the detection level, if necessary.
- If misdetection occurs frequently, lower the Paper Protection detection level.
- Set the Paper Protection feature to Off on the LCD screen (Settings > Scanner Settings > Paper Protection > Off) when scanning plastic cards and thick originals.
- When scanning multiple originals, make sure that the leading edges of the documents are aligned. If the leading edges of the documents are not aligned, they may be mistakenly detected as a paper feed error even if they are scanned correctly.
- Make sure you align the edge guides with the original to avoid scanning at an angle.
Parent topic: Solving Scanning Problems
Scanning is Slow
If scanning becomes slow, try these solutions:
- Scan your original at a lower resolution, if possible.
- Make sure your system meets the requirements for your operating system. If you are scanning a high-resolution image, you may need more than the minimum requirements. If necessary, increase your system's memory or reduce the resolution.
- The scanning speed may be reduced depending on the image adjustment features in Epson Scan 2.
- If scanning becomes slower after scanning continuously with the ADF for a long time, the scanner may have automatically slowed down to protect the scanner mechanism from overheating or becoming damaged. Let the scanner rest with the power on for 30 minutes, then try scanning again.
- Make sure the slow mode setting is turned off on the scanner control panel.
- If you are running virus protection or other security software, exclude the TWAIN.log files from monitoring or set the TWAIN.log files as read-only. See your virus protection or security software instructions for details. The TWAIN.log file is saved in C:\Users\ (username)\ AppData\ Local\ Temp.
Note: You may need to unhide system folders to view files in that location.
- If you are scanning over a network, factors such as interference, network traffic, or weak signal strength may affect your scanning speed.
- Computers with USB 3.0 (SuperSpeed) or USB 2.0 (Hi-Speed) ports can scan faster than those with USB 1.1 ports. If you are using a USB 3.0 or 2.0 port with the scanner, make sure it meets the system requirements.
Parent topic: Solving Scanning Problems
Related references
Windows System Requirements
Mac System Requirements
Cannot Send Scans to a Cloud Service
If you cannot send a scan to a cloud service, try these solutions:
- Make sure your computer is connected to the internet.
- Make sure the login information you entered for the cloud service is correct.
- Make sure the cloud service is not down for system maintenance. Check the cloud service website for more information.
Parent topic: Solving Scanning Problems
Cannot Send Scans to an Email
If you cannot send a scan to an email address, try these solutions:
- Make sure the destination email address is working. • Make sure the email server settings are correct.
- Contact the email server administrator to make sure the server is running.
Parent topic: Solving Scanning Problems
Solving Network Scanning Problems
Check these solutions if you have problems scanning over a network.
Cannot Scan Over a Network
Scanner Cannot Connect to a Wireless Router
Parent topic: Solving Problems
Cannot Scan Over a Network
If you have problems scanning over a network, try these solutions:
- Check the scanner's control panel for error messages. If you have the notification email set when the events occur, you can promptly learn the status.
- Make sure the computer and scanner are connected to the same network (or network subnet/VLAN).
- Move the scanner and computer or smart device closer to the access point. • If you cannot scan from the start button on the scanner, make sure you restarted your computer after installing the scanning software. Also start Epson Scan2 before scanning with the start button.
- If you installed the Epson ScanSmart software, pressing the start button on your scanner starts Epson ScanSmart instead, via a USB or wireless connection. For instructions on scanning with Epson ScanSmart, see the help information in Epson ScanSmart.
- If you are scanning a large original at high resolution, a network communication error may occur. Try scanning again at lower resolution.
• If network communication was interrupted while starting Epson Scan2 or Epson ScanSmart, exit Epson Scan2 or Epson ScanSmart, wait a few seconds, and restart the program. If Epson Scan2 or Epson ScanSmart cannot restart, turn off your scanner, turn it back on, and try starting Epson Scan2 or Epson ScanSmart again. - Check the network connection setting in the Epson Scan2 Utility. - You may need to disable the firewall and any anti-virus software on your wireless router or access point. • If you see the message "Network product is not available: currently being used by user", there may be a communication error between the scanner and computer. Restart the scanner. - Epson Scan2 does not support networks that use only IPv6. Use Epson Scan2 on a network that supports IPv4. • If the Firewall function is active, the scanner may not be discovered by the Epson Scan2 Utility. Open the Epson Scan2 Utility, enter the IP address for your scanner, and click Add. - If the scanner and computer cannot communicate and are connected to the same network (subnet or VLAN), check if your router uses the privacy separator and disable it, if necessary. Follow the instructions in your router documentation to disable the privacy separator.
Parent topic: Solving Network Scanning Problems
Related topics
Wi-Fi Networking
Scanner Cannot Connect to a Wireless Router
If your scanner has trouble finding or connecting to a wireless router, try these solutions:
• If you are connecting the scanner via Wi-Fi Protected Setup (WPS), make sure you activate WPS on your scanner within 2 minutes of activating WPS discovery mode on the router by pressing the WPS button or enabling the WPS setting in your router firmware. - Make sure to place your scanner within contact range of your router. Avoid placing your scanner near a microwave oven, 2.4GHz cordless phone, or large metal object, such as a filing cabinet. - Verify that your router is operating correctly by connecting to it from your computer or another device. - You may need to temporarily disable your firewall and any anti-virus software on your wireless router. Then try scanning again. You can also unblock your scanner driver or network address in your firewall or anti-virus software. - Check to see if access restrictions, such as MAC address filtering, are set on the router. If access restrictions are set, add your scanner's MAC address to your router's address list. To obtain your
scanner's MAC address, check the label on the back or bottom of your scanner. Then follow the instructions in your router documentation to add the address to the list.
- If your router does not broadcast its network name (SSID), follow the instructions that came with your scanner to enter your wireless network name manually.
- If your router has security enabled, determine the kind of security it is using and any required password or passphrase for connection. Then make sure to enter the exact WEP key or WPA passphrase correctly.
- Check if your computer is restricting the available wireless channels. If so, verify that your wireless access point is using one of the usable channels and can get a usable channel, if necessary.
- The scanner may not be able to communicate with a computer with both Ethernet and Wi-Fi adapters enabled. Disable all network interfaces except for the interface connected to the scanner.
- Enable the DHCP function on the access point or router.
- Check that the scanner's IP address is set correctly. • Make sure Epson ScanSmart is installed.
- If you cannot start scanning from a smart device, make sure the scanner and smart device are connected correctly. Use the Epson Smart Panel to check the connection status for the smart device and the scanner.
Parent topic: Solving Network Scanning Problems
Related topics
Wi-Fi Networking
Solving Scanned Image Quality Problems
Check these sections if a scanned image on your computer screen has a quality problem.
Note: For solutions when using the Epson ScanSmart software, see the Epson ScanSmart help utility.
Back of Original Image Appears in Scanned Image
Scanned Characters are Blurry
Characters are not Recognized During Conversion to Editable Text (OCR)
Ripple Patterns Appear in an Image
Spots or Lines Appear in All Scanned Images
Scanned Image is Cropped
Parent topic: Solving Problems
Back of Original Image Appears in Scanned Image
If an image from the back of a thin original appears in your scanned image, make sure you selected the correct Image Type setting for your original and select the Text Enhancement setting in Epson Scan 2. You can also select the Remove Background setting in Epson Scan 2.
Note: If you select Color as the Image Type setting, you can change the level from Standard to High to remove more of the background.
If the image is still visible, you can also try setting a lower level for Edge Enhancement or a higher level for Noise Reduction.
Parent topic: Solving Scanned Image Quality Problems
Related tasks
Scanning a Document in Epson Scan Smart
Changing the Scan Settings
Scanned characters are blurry
If characters in your scanned images are blurry, try these solutions:
- Make sure you do not move the scanner or original while scanning.
- Operate the scanner on a flat, stable surface.
- Adjust these Epson Scan 2 settings (if available) and try scanning again:
- Select the Text Enhancement setting.
- If the Image Type setting is Black & White, adjust the Threshold setting or change the Edge Enhancement and Noise Reduction Level settings.
- Increase the Resolution setting.
- Set the Image Type to Grayscale.
- If you are scanning in JPEG format, change the compression level. Click Options in the Image Format menu and change the Image Quality setting.
Parent topic: Solving Scanned Image Quality Problems
Related tasks
Scanning a Document in Epson ScanSmart
Changing the Scan Settings
Characters are not Recognized During Conversion to Editable Text (OCR)
If characters in your scanned images are not recognized during OCR conversion, try these solutions:
Make sure your original is loaded straight on your product.
Use an original with clear text.
Adjust these Epson Scan 2 settings (if available) and try scanning again:
Select the correct Image Type setting.
Select or adjust the Text Enhancement setting.
If the Image Type is set to Black & White, adjust the Threshold setting.
Set the Image Type to Grayscale.
Set the scanning resolution between 200 and 600 dpi.
If the original document is in landscape mode, set the Rotate setting to Auto in Epson Scan 2.
If you are using OCR software, check the manual for any additional adjustments.
Scan thermal paper receipts as soon as possible. They may deteriorate due to age or friction.
When saving to Microsoft Office or Searchable PDF files, check that the correct languages are selected. Check the language in each save setting window.
Parent topic: Solving Scanned Image Quality Problems
Related tasks
Scanning a Document in Epson ScanSmart
Changing the Scan Settings
Ripple Patterns Appear in an Image
You may see a ripple pattern (called moiré) in scanned images of printed documents. This is caused by interference from differing pitches in the scanner's screen and your original's halftone screen. To reduce this effect, adjust these Epson Scan settings (if available) and try scanning again:
- Select the Descreening setting.
- Select a lower Resolution setting.
Parent topic: Solving Scanned Image Quality Problems
Related tasks
Scanning a Document in Epson ScanSmart
Spots or Lines Appear in All Scanned Images
If spots or lines appear in all your scanned images, try the following solutions:
- Clean the rollers and glass scanning surfaces inside your scanner using a genuine Epson cleaning kit or a soft, moist cloth.
- Remove any dirt from your original.
- Enable the Detect Glass Dirt setting in the Epson Scan 2 Utility.
Note: If glass dirt detection does not work correctly, adjust the setting. If the glass dirt alert screen appears after cleaning the inside of the scanner, check the glass surface again (scratches on the glass may be detected as glass dirt).
Parent topic: Solving Scanned Image Quality Problems
Related tasks
Cleaning Inside Your Scanner
Scanned Image is Cropped
If the edges of a scanned image are cropped, try the following solutions:
- Select Auto Detect as the Document Size setting in Epson Scan 2.
- If the document size is not detected correctly using the Auto Detect setting, select the size of your original from the Document Size list.
Note: If the size you want to scan is not on the list, select Customize to create it manually (Windows only).
- In Epson Scan 2, select the Main Settings tab. Select Document Size > Settings and adjust the cropping area shown in the Crop Margins for Size "Auto" setting.
- In Epson Scan 2, select the Advanced Settings tab. Make sure the Edge Fill setting is set to None.
Parent topic: Solving Scanned Image Quality Problems
Related tasks
Scanning a Document in Epson Scan Smart
Resetting the Epson Scan 2 Settings
If you continue to experience image quality problems after trying all possible solutions, you may need to reset the Epson Scan 2 settings using the Epson Scan 2 Utility.
- Do one of the following to start the Epson Scan 2 Utility:
- Windows 10: Click > EPSON > Epson Scan 2 Utility.
- Windows 8.x: Navigate to the Apps screen and select Epson Scan 2 Utility.
- Windows 7: Click Start, and select All Programs. Select EPSON > Epson Scan 2 > Epson Scan 2 Utility.
- Mac: Open the Applications folder, open the Epson Software folder, and select Epson Scan 2 Utility.
2. Click the Other tab.
- Click Reset and confirm your choice.
Note: If resetting the Epson Scan 2 settings does not solve your problem, uninstall your scanner software and re-install it.
Parent topic: Solving Problems
Related concepts
Uninstall Your Scanner Software
Solving Invoice/Receipt Manager Problems
Check the solutions in these sections if you have problems scanning using Invoice/Receipt Manager.
Cannot Access an Accounting Service
Cannot Import Invoice/Receipt Database
License Key is Disabled
Parent topic: Solving Problems
Cannot Access an Accounting Service
If you cannot access an accounting service, try these solutions:
- Make sure the login information you entered for the accounting service is correct.
- Make sure the accounting service is not down for system maintenance. Check the accounting service website for more information.
- Make sure the desktop accounting service and its company file are opened on your computer. Parent topic: Solving Invoice/Receipt Manager Problems
Cannot Import Invoice/Receipt Database
If you cannot import an invoice/receipt database, make sure the Epson Scan Smart software version installed on your computer is up to date. Run Epson Software Updater or visit the Epson support website for your product.
Parent topic: Solving Invoice/Receipt Manager Problems
License Key is Disabled
If you have problems entering a license key, try these solutions:
- Make sure the license key is valid and correctly entered.
- The license key is only available for one scanner. Make sure you selected the correct scanner.
• If you need to replace your scanner under warranty, Epson can issue you a new license key. Contact Epson Support if you have trouble with the new license key.
Parent topic: Solving Invoice/Receipt Manager Problems
Related tasks
Changing the Epson Product
Uninstall Your Scanner Software
If you have a problem that requires you to install and reinstall your software, follow the instructions for your operating system.
Uninstalling Scanner Software - Windows
Uninstalling Scanner Software - Mac
Parent topic: Solving Problems
Uninstalling Scanner Software - Windows
You can uninstall and then re-install your scanner software to solve certain problems.
- Exit all applications currently running on your computer.
- Turn off the scanner.
- Disconnect any interface cables.
- Do the following to uninstall each of your scanning software programs and follow any on-screen instructions:
- Windows 10: Click and select (Settings) > Apps > Apps & features. Select the scanner software program and click Uninstall.
- Windows 8.x: Navigate to the Apps screen and select Control Panel > Programs > Programs and Features. Select the scanner software program and click Uninstall/Change.
- Windows 7: Open the Windows Control Panel utility. Select Programs and Features. (In Classic view, select Programs and click Uninstall a program.) Select the scanner software program and click Uninstall/Change.
5. Restart your computer, then see the Start Here sheet to re-install your software.
Note: If you find that re-installing your scanner software does not solve a problem, contact Epson.
Parent topic: Uninstall Your Scanner Software
Uninstalling Scanner Software - Mac
In most cases, you do not need to uninstall your scanner software before re-installing it. However, you can download the Uninstaller utility from the Epson support website to uninstall your scanner software as described here.
- To download the Uninstaller utility, visit epson.com/support (U.S.), epson.ca/support (Canada), or latin.epson.com/support (Caribbean) and select your product.
- Follow the instructions on the screen to install the Uninstaller utility.
- Quit all applications currently running on your Mac.
- Double-click the Uninstaller icon.
- In the Epson Uninstaller screen, select the checkbox for each software program you want to uninstall. 6. Click Uninstall. 7. Follow the on-screen instructions to uninstall the software.
- To reinstall your scanner software, see the Start Here sheet for instructions.
Note: If you find that re-installing your scanner software does not solve a problem, contact Epson.
Parent topic: Uninstall Your Scanner Software
Where to Get Help (U.S. and Canada)
If you need to contact Epson for technical support, use the following support options.
Internet Support
Visit Epson's support website at epson.com/support (U.S.) or epson.ca/support (Canada) and select your product for solutions to common problems with your product. You can download utilities and documentation, get FAQs and troubleshooting advice, or e-mail Epson with your questions.
Speak to a Support Representative
Before you call Epson for support, please have the following information ready:
• Product name
• Product serial number (located on a label on the product)
Proof of purchase (such as a store receipt) and date of purchase
Computer configuration
Description of the problem
Then call:
• U.S.: (562) 276-4382, 6 AM to 8 PM, Pacific Time, Monday through Friday, and 7 AM to 4 PM, Pacific Time, Saturday
• Canada: (905) 709-3839, 6 AM to 8 PM, Pacific Time, Monday through Friday, and 7 AM to 4 PM, Pacific Time, Saturday
Days and hours of support are subject to change without notice. Toll or long distance charges may apply.
Note: For help using any other software on your system, see the documentation for that software for technical support.
Purchase Supplies and Accessories
You can purchase genuine Epson accessories at epson.com (U.S. sales) or epson.ca (Canadian sales). You can also purchase accessories from an Epson authorized reseller. To find the nearest one, call 800-GO-EPSON (800-463-7766) in the U.S. or 800-807-7766 in Canada.
Parent topic: Solving Problems
Where to Get Help (Latin America)
If you need to contact Epson for technical support, use the following support options.
Internet Support
Visit Epson's support website at latin.epson.com/support and select your product for solutions to common problems with your product. You can download utilities and documentation, get FAQs and troubleshooting advice, or e-mail Epson with your questions.
Speak to a Support Representative
Before you call Epson for support, please have the following information ready:
- Product name • Product serial number (located on a label on the product) • Proof of purchase (such as a store receipt) and date of purchase • Computer configuration • Description of the problem
Then call:
| CountryTelephone | |
| Argentina(5411)5167-0300 | 0800-288-37766 |
| Bolivia*800-100-116 | |
| BrazilStatecapitalsandmetropolitanareas:3004-6627 | Otherareas:0800-377-6627/0800-EPSONBR |
| Chile(562)2484-3400 | |
| ColombiaBogota:(571)592-2200 | Othercities:018000-915235 |
| CostaRica800-377-6627 | |
| Ecuador*1-800-000-044 | |
| ElSalvador*800-6570 | |
| Guatemala*1-800-835-0358 | |
| MexicoMexicoCity:(5255)1323-2052 | Othercities:01-800-087-1080 |
| Nicaragua*00-1-800-226-0368 | |
| Panama*00-800-052-1376 | |
| Paraguay009-800-521-0019 | |
| PeruLima:(511)418-0210 | Othercities:0800-10-126 |
| Uruguay00040-5210067 | |
| Venezuela(58212)240-1111 |
*Contact your local phone company to call the first letter from a mobile phone.
If your country does not appear in the list, contact the sales office in the nearest country. Toll or long distance charges may apply.
Note: For help using any other software on your system, see the documentation for that software for technical support.
Purchase Supplies and Accessories
You can purchase genuine Epson accessories from an Epson authorized reseller. To find the nearest reseller, visit latin.epson.com or call your nearest Epson sales office.
Parent topic: Solving Problems
Technical Specifications
These sections list the technical specifications for your scanner.
Note: Epson offers a recycling program for end of life Epson products. Please go to this site (U.S) or this site (Canada) for information on how to return your Epson products for proper disposal.
Windows System Requirements Mac System Requirements General Specifications Dimension Specifications Electrical Specifications Environmental Specifications Network Interface Specifications Safety and Approvals Specifications
Windows System Requirements
To use your product and its software, your computer should use one of these Microsoft operating systems:
- Windows 10
- Windows 8.x
- Windows 7
Note: For the latest product software available for your operating system, visit the Epson support site at epson.com/support (U.S.), epson.ca/support (Canada), or latin.epson.com/support (Caribbean), select your product, and select Downloads.
Parent topic: Technical Specifications
Mac System Requirements
To use your product and its software, your Mac should use one of these operating systems:
• macOS 11.x
• macOS 10.15.x
• macOS 10.14.x
• macOS 10.13.x
• macOS 10.12.x
- OS X 10.11.x
Note: The UNIX File System (UFS) for OS X and Fast User Switching on OS X is not supported.
For the latest product software available for your operating system, visit the Epson support site at epson.com/support (U.S.), epson.ca/support (Canada), or latin.epson.com/support (Caribbean), select your product, and select Downloads.
Parent topic: Technical Specifications
General Specifications
Scanner type: Sheet feed, one-pass duplex, color
Photoelectric device: CIS
Effective pixels: 5100 × 9300 pixels at 600 dpi
2550 × 64,500 pixels at 300 dpi
Document size: Maximum: 8.5 × 240 inches (215.9 × 6096 mm)
Minimum: 2 × 2 inches (50.8 × 50.8 mm)
Paper input: Face down loading
Paper output: Face down ejection
Paper capacity: 100 sheets of paper at 21 lb (80 g/m
2 weight
Scanning resolution: 600 dpi (main scan)
600 dpi (sub scan)
Output resolution: 50 to 1200 dpi in 1 dpi increments
53 inches (1346.0 mm) or less: up to 600 dpi
215 inches (5461.0 mm) or less: up to 300 dpi
240 inches (6096.0 mm) or less: up to 200 dpi
Color Depth Color:
30 bits per pixel internal (10 bits per pixel per color)
24 bits per pixel external (8 bits per pixel per color)
Grayscale:
10 bits per pixel internal
8 bits per pixel external
Black-and-white:
10 bits per pixel internal
1 bit per pixel external
Interface: SuperSpeed USB 3.0 (backward-compatible with USB 1.1)
IEEE 802.11b/g/n
LightsourceRGBLED
Parent topic: Technical Specifications
Dimension Specifications
Height: 6.6 inches (167 mm)
Width: 11.7 inches (296 mm)
Depth: 6.7 inches (169 mm)
Weight: 8.2 lb (3.7 kg)
Note: Dimensions do not include projecting parts.
Parent topic: Technical Specifications
Electrical Specifications
Scanner
Note: Check the label on the scanner and the AC adapter for voltage information. Power consumption varies depending on operating conditions or whether an option is installed.
Rated DC input power supply voltage: DC24V
Rated DC input current: 1A
Power consumption: Operating: 13W (approximate)
Ready mode: 6.7 W (approximate)
Sleep mode: 1.0 W (approximate)
Power off mode: 0.1 W (approximate)
Wi-Fi Connection:
Operating: 13 W (approximate)
Ready mode: 6.9 W (approximate)
Sleep mode: 1.4 W (approximate)
Power off mode: 0.1 W (approximate)
AC Adapter
AC adapter model: 100 to 240 V model: A461H
Rated input current: 1 A
Rated frequency range: 50 to 60 Hz
Rated output power supply voltage: DC 24 V
Rated output current: 1 A
Parent topic: Technical Specifications
Environmental Specifications
Temperature Operating: 41 to 95°F (5 to 35°C)
Storage: -13 to 140°F (-25 to 60°C)
Humidity Operating: 15 to 80% RH
(non-condensing) Storage: 15 to 85% RH
Operating conditions: Ordinary office or home conditions
Note: Avoid operating the scanner in direct sunlight, near a strong light source, or in extremely dusty conditions.
Parent topic: Technical Specifications
Network Interface Specifications
Wi-Fi
Standards: IEEE 802.11a/b/g/n/ac; IEEE 802.11n available only on the 20 MHz channel
Frequency ranges: IEEE 802.11b/g/n: 2.4 GHz
IEEE 802.11a/n/ac: 5 GHz
Wi-Fi channels 2.4 GHz:
1/2/3/4/5/6/7/8/9/10/11
5GHz:
W52(36/40/44/48)
W53(52/56/60/64)
W56(100/104/108/112/116/132/136/140)
W58(149/153/157/161/165)
Connection modes: Infrastructure mode
Wi-Fi Direct (Simple AP); not supported for IEEE 802.11b
Note: Infrastructure and Wi-Fi Direct modes can be used simultaneously.
Maximum radio frequency power transmitted
20 dBm (EIRP)
Wireless security protocols: WEP (64/128 bit)
WPA2-PSK (AES); complies with WPA2 standards with support for
WPA/WPA2 Personal
WPA3-SAE (AES)
WPA2/WPA3-Enterprise; WPA2 compliant with support for
WPA/WPA2 Enterprise
Note: Wi-Fi Direct supports only WPA2-PSK (AES).
Security Protocol
SSL/TLS HTTPS (Server/Client)
SMTPS (Client)
STARTTLS
SNMPv3
MIB accessing
SNMPv3
Authentication/Encryption
Parent topic: Technical Specifications
Safety and Approvals Specifications
Scanner
United States EMC: FCC part 15 Subpart B class B
Canada EMC: CAN ICES-3 (B)/NMB-3 (B)
AC Adapter (A461H)
United States Safety: UL60950-1
EMC: FCC part 15 Subpart B class B
Canada Safety: CAN/CSA C22.2 No. 60950-1
EMC: CAN ICES-3(B)/NMB-3(B)
This equipment contains the following wireless module:
• Manufacturer: Seiko Epson Corporation.
• Type: J26H005
This product conforms to Part 15 of the FCC Rules and RSS-210 of the IC Rules. Epson cannot accept responsibility for any failure to satisfy the protection requirements resulting from a non-recommended modification of the product. Operation is subject to the following two conditions: (1) this device may not cause harmful interference, and (2) this device must accept any interference received, including interference that may cause undesired operation of the device.
To prevent radio interference to the licensed service, this device is intended to be operated indoors and away from windows to provide maximum shielding. Equipment (or its transmit antenna) that is installed outdoors is subject to licensing.
This equipment complies with FCC/IC radiation exposure limits set forth for an uncontrolled environment and meets the FCC radio frequency (RF) Exposure Guidelines in Supplement C to OET65 and RSS-102 of the IC radio frequency (RF) Exposure rules. This equipment should be installed and operated so that the radiator is kept at least 7.9 inches (20 cm) or more away from a person's body (excluding extremities: hands, wrists, feet and ankles).
Notice for Mexico
Operation is subject to the following two conditions: (1) this device may not cause harmful interference, and (2) this device must accept any interference received, including interference that may cause undesired operation of the device.
Product model: J382C (ES-580W)
Brand: EPSON
IFTCertificationNumber:RCPEPJ219-2102
Notice for Paraguay
Imported by:
Fastrax, S.A.
Address: 3-3-5 Owa, Suwa-shi, Nagano-Ken 392-8502, Japan
Parent topic: Technical Specifications
Notices
Check these sections for important notices about your scanner.
Note: Epson offers a recycling program for end of life Epson products. Please go to this site (U.S) or this site (Canada) for information on how to return your Epson products for proper disposal.
Important Safety Instructions
Restrictions on Copying
Default Delay Times for Power Management for Epson Products
Binding Arbitration and Class Waiver
Trademarks
Copyright Notice
Important Safety Instructions
Follow these safety instructions when setting up and using the scanner:
- Read all these instructions, and follow all warnings and instructions marked on the scanner.
- Place the scanner close enough to the computer for the interface cable to reach it easily.
- Do not use with wet hands.
- When connecting this product to a computer or other device with a cable, ensure the correct orientation of the connectors. Each connector has only one correct orientation. Inserting a connector in the wrong orientation may damage both devices connected by the cable.
- Do not insert objects into any opening as they may touch dangerous voltage points or short out parts. Beware of electrical shock hazards.
- Place the product on a flat, stable surface that extends beyond the base of the product in all directions. If you place the product by the wall, leave at least 3.9 inches (10 cm) between the back of the product and the wall.
- After replacing consumable parts, dispose of them correctly following the rules of your local authority. Do not disassemble them.
- Do not place or store the scanner outdoors, in a car, near excessive dirt or dust, water, heat sources, or in locations subject to shocks, vibrations, condensation, high temperature or humidity, direct sunlight, strong light sources, or rapid changes in temperature or humidity.
- Never disassemble, modify, or attempt to repair the scanner or a scanner option by yourself except as specifically explained in this guide.
Caution: Radio waves from this product may adversely affect the operation of medical equipment, airplanes, or automatically controlled devices, such as pacemakers, automatic doors, or fire alarms. When using this product near such devices or inside a medical facility, follow the directions from authorized staff members at the facility, and follow all posted warnings and directions on the device to avoid causing an accident.
AC Adapter
- Do not place or store the AC adapter outdoors, in a car, near excessive dirt or dust, water, heat sources, or in locations subject to shocks, vibrations, condensation, high temperature or humidity, direct sunlight, strong light sources, or rapid changes in temperature or humidity.
- Place the scanner and the AC adapter near an electrical outlet where the adapter can be easily unplugged.
The AC power cord should be placed to avoid abrasions, cuts, fraying, crimping, and kinking.
Do not place objects on top of the AC power cord and do not allow the AC adapter or the power cord to be stepped on or run over. Be particularly careful to keep the AC power cord straight at the end and at the point where it enters the AC adapter.
Use only the AC adapter that comes with your scanner. Using any other adapter could cause fire, electrical shock, or injury.
Use only the power cord that comes with your scanner. Use of another cord may cause fires or shock. Do not use the cord with any other equipment.
The AC adapter is designed for use with the scanner with which it was included. Do not attempt to use it with other electronic devices unless specified.
Use only the type of power source indicated on the AC adapter's label, and always supply power directly from a standard domestic electrical outlet with the AC adapter that meets the relevant local safety standards.
Avoid using outlets on the same circuit as photocopiers or air control systems that regularly switch on and off.
If you use an extension cord with the scanner, make sure the total ampere rating of the devices plugged into the extension cord does not exceed the cord's ampere rating. Also, make sure the total ampere rating of all devices plugged into the wall outlet does not exceed the wall outlet's ampere rating.
- Never disassemble, modify, or attempt to repair the AC adapter by yourself except as specifically explained in the scanner's guides.
- If damage occurs to the plug, replace the cord set or consult a qualified electrician. If there are fuses in the plug, make sure you replace them with fuses of the correct size and rating.
- Unplug the scanner and the AC adapter, and refer servicing to qualified service personnel under the following conditions: The AC adapter or plug is damaged; liquid has entered the scanner or the AC adapter; the scanner or the AC adapter has been dropped or the case has been damaged; the scanner or the AC adapter does not operate normally or exhibits a distinct change in performance. (Do not adjust controls that are not covered by the operating instructions.)
- Unplug the scanner and the AC adapter before cleaning. Clean with a damp cloth only. Do not use liquid or aerosol cleaners.
- If you are not going to use the scanner for a long period, be sure to unplug the AC adapter from the electrical outlet.
USB
The USB cable is designed for use with the product with which it was included. Do not attempt to use it with other electrical devices unless specified. The USB cable should be placed to avoid abrasions, cuts, fraying, crimping, and kinking. Do not place objects on top of the USB cable and do not allow the cable to be stepped on or run over. Be particularly careful to keep the USB cable straight at the end. If you are not going to use the product for a long period, unplug the USB cable from the computer. Unplug the scanner and the USB cable, and refer servicing to qualified service personnel under the following conditions: Liquid has entered the scanner; the scanner has been dropped or the case has been damaged; the scanner does not operate normally or exhibits a distinct change in performance. (Do not adjust controls that are not covered by the operating instructions.)
LCD Screen
• The LCD screen may have uneven brightness or a few small bright or dark spots. This is normal and does not indicate damage.
• Use only a dry, soft cloth to clean the LCD screen. Do not use liquid or chemical cleansers.
- If the LCD screen is damaged, contact Epson. If the liquid crystal solution gets on your hands, wash them thoroughly with soap and water. If the liquid crystal solution gets into your eyes, flush them immediately with water. If discomfort or vision problems remain after a thorough flushing, see a doctor immediately.
- Do not press too hard on the LCD screen or subject it to heavy impacts.
- Do not use a pointy or sharp object, such as a pen or your fingernail, to operate the LCD screen.
- If the LCD screen chips or cracks, don't touch or attempt to remove the broken pieces; contact Epson for support.
- Do not subject your product to sudden changes in temperature or humidity; this may cause condensation to develop inside the LCD screen and degrade its performance.
Parent topic: Notices
Restrictions on Copying
Observe the following restrictions to ensure responsible and legal use of your scanner.
Copying of the following items is prohibited by law:
• Bank bills, coins, government-issued marketable securities, government bond securities, and municipal securities - Unused postage stamps, pre-stamped postcards, and other official postal items bearing valid postage • Government-issued revenue stamps, and securities issued according to legal procedure Exercise caution when copying the following items: - Private marketable securities (stock certificates, negotiable notes, checks, etc.), monthly passes, concession tickets, etc. • Passports, driver's licenses, warrants of fitness, road passes, food stamps, tickets, etc.
Note: Copying these items may also be prohibited by law.
Restriction on disassembling and decompiling
You may not disassemble, decompile, or otherwise attempt to derive the source code of any software included with this product.
Default Delay Times for Power Management for Epson Products
This product will enter sleep mode after a period of nonuse. This is to ensure that the product meets Energy Star standards of energy efficiency. More energy savings can be achieved by setting the time to sleep to a shorter interval.
Binding Arbitration and Class Waiver
1. DISPUTES, BINDING INDIVIDUAL ARBITRATION, AND WAIVER OF CLASS ACTIONS AND CLASS ARBITRATIONS
1.1 Disputes. The terms of this Section 1 shall apply to all Disputes between you and Epson. The term "Dispute" is meant to have the broadest meaning permissible under law and includes any dispute, claim, controversy or action between you and Epson arising out of or relating to this Agreement, Epson branded products (hardware and including any related software), or other transaction involving you and Epson, whether in contract, warranty, misrepresentation, fraud, tort, intentional tort, statute, regulation, ordinance, or any other legal or equitable basis. "DISPUTE" DOES NOT INCLUDE IP CLAIMS, or more specifically, a claim or cause of action for (a) trademark infringement or dilution, (b) patent infringement, (c) copyright infringement or misuse, or (d) trade secret misappropriation (an "IP Claim"). You and Epson also agree, notwithstanding Section 1.6, that court, not an arbitrator, may decide if a claim or cause of action is for an IP claim.
1.2 Binding Arbitration. You and Epson agree that all Disputes shall be resolved by binding arbitration according to this Agreement. ARBITRATION MEANS THAT YOU WAIVE YOUR RIGHT TO A JUDGE OR JURY IN A COURT PROCEEDING AND YOUR GROUNDS FOR APPEAL ARE LIMITED.
Pursuant to this Agreement, binding arbitration shall be administered by JAMS, a nationally recognized arbitration authority, pursuant to its code of procedure then in effect for consumer related disputes, but excluding any rule that permits joinder or class actions in arbitration (for more detail on procedure, see Section 1.6 below). You and Epson understand and agree that (a) the Federal Arbitration Act (9 U.S.C. §1, et seq.) governs the interpretation and enforcement of this Section 1, (b) this Agreement memorializes a transaction in interstate commerce, and (c) this Section 1 shall survive termination of this Agreement.
1.3 Pre-Arbitration Steps and Notice. Before submitting a claim for arbitration, you and Epson agree to try, for sixty (60) days, to resolve any Dispute informally. If Epson and you do not reach an agreement to resolve the Dispute within the sixty (60) days, you or Epson may commence an arbitration. Notice to Epson must be addressed to: Epson America, Inc., ATTN: Legal Department, 3131 Katella Ave., Los Alamitos, CA 90720 (the "Epson Address"). The Dispute Notice to you will be sent to the most recent address Epson has in its records for you. For this reason, it is important to notify us if your address changes by emailing us at EALegal@ea.epson.com or writing us at the Epson Address above. Notice of the Dispute shall include the sender's name, address and contact information, the fact giving rise to the Dispute, and the relief requested (the "Dispute Notice"). Following receipt of the Dispute Notice, Epson and you agree to act in good faith to resolve the Dispute before commencing arbitration.
1.4 Small Claims Court. Notwithstanding the foregoing, you may bring an individual action in the small claims court of your state or municipality if the action is within that court's jurisdiction and pending only in that court.
1.5 WAIVER OF CLASS ACTIONS AND CLASS ARBITRATIONS. YOU AND EPSON AGREE THAT EACH PARTY MAY BRING DISPUTES AGAINST THE OTHER PARTY ONLY IN AN INDIVIDUAL CAPACITY, AND NOT AS A PLAINTIFF OR CLASS MEMBER IN ANY CLASS OR REPRESENTATIVE PROCEEDING, INCLUDING WITHOUT LIMITATION FEDERAL OR STATE CLASS ACTIONS, OR CLASS ARBITRATIONS. CLASS ACTION LAWSUITS, CLASS-WIDE ARBITRATIONS, PRIVATE ATTORNEY-GENERAL ACTIONS, AND ANY OTHER PROCEEDING WHERE SOMEONE ACTS IN A REPRESENTATIVE CAPACITY ARE NOT ALLOWED. ACCORDINGLY, UNDER THE ARBITRATION PROCEDURE OUTLINED IN THIS SECTION, AN ARBITRATOR SHALL NOT COMBINE OR CONSOLIDATE MORE THAN ONE PARTY'S CLAIMS WITHOUT THE WRITTEN CONSENT OF ALL AFFECTED PARTIES TO AN ARBITRATION PROCEEDING.
1.6 Arbitration Procedure. If you or Epson commences arbitration, the arbitration shall be governed by the rules of JAMS that are in effect when the arbitration is filed, excluding any rule that permits arbitration on a class or representative basis (the "JAMS Rules"), available at http://www.jamsadr.com or by calling 1-800-352-5267, and under the rules set forth in this Agreement. All Disputes shall be resolved by a single neutral arbitrator, and both parties shall have a reasonable opportunity to participate in the selection of the arbitrator. The arbitrator is bound by the terms of this Agreement. The arbitrator, and not any federal, state, or local court or agency, shall have exclusive authority to resolve all disputes arising out of or relating to the interpretation, applicability, enforceability, or formation of this Agreement, including any claim that all or any part of this Agreement is void or voidable. Notwithstanding this broad delegation of authority to the arbitrator, a court may determine the limited question of whether a claim or cause of action is for an IP Claim, which is excluded from the definition of "Disputes" in Section 1.1 above. The arbitrator shall be empowered to grant whatever relief would be available in a court under law or in equity. The arbitrator may award you the same damages as a court could, and may award declaratory or injunctive relief only in favor of the individual party seeking relief and only to the extent necessary to provide relief warranted by that party's individual claim. In some instances, the cost of arbitration can exceed the cost of litigation and the right to discovery may be limited in arbitration compared to court. The arbitrator's award is binding and may be entered as a judgment in any court of competent jurisdiction.
You may choose to engage in arbitration hearings by telephone. Arbitration hearings not conducted by telephone shall take place in a location reasonably accessible from your primary residence, or in Orange County, California, at your option.
a) Initiation of Arbitration Proceeding. If either you or Epson decides to arbitrate a Dispute, both parties agree to the following procedure:
(i) Write a Demand for Arbitration. The demand must include a description of the Dispute and the amount of damages sought to be recovered. You can find a copy of a Demand for Arbitration at http://www.jamsadr.com ("Demand for Arbitration").
(ii) Send three copies of the Demand for Arbitration, plus the appropriate filing fee, to: JAMS, 500 North State College Blvd., Suite 600 Orange, CA 92868, U.S.A.
(iii) Send one copy of the Demand for Arbitration to the other party (same address as the Dispute Notice), or otherwise agreed by the parties.
b) Hearing Format. During the arbitration, the amount of any settlement offer made shall not be disclosed to the arbitrator until after the arbitrator determines the amount, if any, to which you or Epson is entitled. The discovery or exchange of non-privileged information relevant to the Dispute may be allowed during the arbitration.
c) Arbitration Fees. Epson shall pay, or (if applicable) reimburse you for all JAMS filing and arbitration fees for any arbitration commenced (by you or Epson) pursuant to the provisions of this Agreement.
d) Award in Your Favor. For Disputes in which you or Epson seeks 75,000 or less in damages, exclusive of attorney's fees and costs, if the arbitrator's decision results in an award to you in an amount greater than Epson's last written offer, if any, to settle the Dispute, Epson will: (i) pay you1,000 or the amount of the award, whichever is greater; (ii) pay twice the amount of your reasonable attorney's fees, if any; and (iii) reimburse you for any expenses (including expert witness fees and costs) that your attorney reasonably accrues for investigating, preparing, and pursuing the Dispute in arbitration. Except as agreed upon by you and Epson in writing, the arbitrator shall determine the amount of fees, costs, and expenses to be paid by Epson pursuant to this Section 1.6(d).
e) Attorney's Fees. Epson will not seek its attorney's fees and expenses for any arbitration commenced involving a Dispute under this Agreement. Your right to attorney's fees and expenses under Section 1.6(d) above does not limit your right to attorney's fees and expenses under applicable law; notwithstanding the foregoing, the arbitrator may not award duplicative awards of attorney's fees and expenses.
1.7 Opt-out. You may elect to opt-out (exclude yourself) from the final, binding, individual arbitration procedure and waiver of class and representative proceedings specified in this Agreement by sending a written letter to the Epson Address within thirty (30) days of your assent to this Agreement (including without limitation the purchase, download, installation of the Software or other applicable use of Epson Hardware, products and services) that specifies (i) your name, (ii) your mailing address, and (iii) your request to be excluded from the final, binding individual arbitration procedure and waiver of class and representative proceedings specified in this Section 1. In the event that you opt-out consistent with the procedure set forth above, all other terms shall continue to apply, including the requirement to provide notice prior to litigation.
1.8 Amendments to Section 1. Notwithstanding any provision in this Agreement to the contrary, you and Epson agree that if Epson makes any future amendments to the dispute resolution procedure and class action waiver provisions (other than a change to Epson's address) in this Agreement, Epson will obtain your affirmative assent to the applicable amendment. If you do not affirmatively assent to the applicable amendment, you are agreeing that you will arbitrate any Dispute between the parties in accordance with the language of this Section 1 (or resolve disputes as provided for in Section 1.7, if you timely elected to opt-out when you first assented to this Agreement).
1.9 Severability. If any provision in this Section 1 is found to be unenforceable, that provision shall be severed with the remainder of this Agreement remaining in full force and effect. The foregoing shall not apply to the prohibition against class or representative actions as provided in Section 1.5. This means that if Section 1.5 is found to be unenforceable, the entire Section 1 (but only Section 1) shall be null and void.
Trademarks
EPSON® and EpsonSmartPanel® are registered trademarks and EPSON Exceed Your Vision is a registered logomark of Seiko Epson Corporation.
Windows is a registered trademark of Microsoft Corporation in the United States and/or other countries.
Apple, App Store, Mac, macOS, and OS X are trademarks of Apple Inc., registered in the U.S. and other countries.
Google® is a registered trademark and Android™ and Google Play™ are trademarks of Google LLC.
General Notice: Other product names used herein are for identification purposes only and may be trademarks of their respective owners. Epson disclaims any and all rights in those marks.
EPSON®
EXCEED YOUR VISION
Copyright Notice
All rights reserved. No part of this publication may be reproduced, stored in a retrieval system, or transmitted in any form or by any means, electronic, mechanical, photocopying, recording, or otherwise, without the prior written permission of Seiko Epson Corporation. The information contained herein is designed only for use with this Epson product. Epson is not responsible for any use of this information as applied to other products.
Neither Seiko Epson Corporation nor its affiliates shall be liable to the purchaser of this product or third parties for damages, losses, costs, or expenses incurred by purchaser or third parties as a result of: accident, misuse, or abuse of this product or unauthorized modifications, repairs, or alteration to this product, or (excluding the U.S.) failure to strictly comply with Seiko Epson Corporation's operating and maintenance instructions.
Seiko Epson Corporation shall not be liable for any damages or problems arising from the use of any options or any consumable products other than those designated as Original Epson Products or Epson Approved Products by Seiko Epson Corporation.
Seiko Epson Corporation shall not be held liable for any damage resulting from electromagnetic interference that occurs from the use of any interface cables other than those designated as Epson Approved Products by Seiko Epson Corporation.
This information is subject to change without notice.
libTIFF Software Acknowledgment
A Note Concerning Responsible Use of Copyrighted Materials
Copyright Attribution
Parent topic: Notices
libTIFF Software Acknowledgment
Copyright © 1988-1997 Sam Leffler
Copyright © 1991-1997 Silicon Graphics, Inc.
Permission to use, copy, modify, distribute, and sell this software and its documentation for any purpose is hereby granted without fee, provided that (i) the above copyright notices and this permission notice appear in all copies of the software and related documentation, and (ii) the names of Sam Leffler and Silicon Graphics may not be used in any advertising or publicity relating to the software without the specific, prior written permission of Sam Leffler and Silicon Graphics.
THE SOFTWARE IS PROVIDED "AS-IS" AND WITHOUT WARRANTY OF ANY KIND, EXPRESS, IMPLIED OR OTHERWISE, INCLUDING WITHOUT LIMITATION, ANY WARRANTY OF MERCHANTABILITY OR FITNESS FOR A PARTICULAR PURPOSE.
IN NO EVENT SHALL SAM LEFFLER OR SILICON GRAPHICS BE LIABLE FOR ANY SPECIAL, INCIDENTAL, INDIRECT OR CONSEQUENTIAL DAMAGES OF ANY KIND, OR ANY DAMAGES WHATSOEVER RESULTING FROM LOSS OF USE, DATA OR PROFITS, WHETHER OR NOT ADVISED OF THE POSSIBILITY OF DAMAGE, AND ON ANY THEORY OF LIABILITY, ARISING OUT OF OR IN CONNECTION WITH THE USE OR PERFORMANCE OF THIS SOFTWARE.
Parent topic: Copyright Notice
A Note Concerning Responsible Use of Copyrighted Materials
Epson encourages each user to be responsible and respectful of the copyright laws when using any Epson product. While some countries' laws permit limited copying or reuse of copyrighted material in certain circumstances, those circumstances may not be as broad as some people assume. Contact your legal advisor for any questions regarding copyright law.
Parent topic: Copyright Notice
Copyright Attribution
©2020 Epson America, Inc.
12/20
CPD-59134
Parent topic: Copyright Notice

- ES-580W/RR-600W USER'S GUIDE
- CONTENTS
- LOADING ORIGINALS
- WI-FI NETWORKING
- SCANNING
- SCANNER BASICS
- USING THE CONTROL PANEL
- STATUS ICON INFORMATION
- NAVIGATING THE LCD SCREEN
- ENTERING CHARACTERS ON THE LCD SCREEN
- VIEWING ANIMATIONS
- ADJUSTING THE SCREEN BRIGHTNESS
- ADJUSTING CONTROL PANEL SOUNDS
- SELECTING THE DATE AND TIME
- CHANGING LCD SCREEN LANGUAGE
- CHANGING THE KEYBOARD LAYOUT
- ADJUSTING THE OPERATION TIME OUT SETTING
- PREVENTING PC CONNECTION VIA USB
- SETTING DIRECT POWER ON
- CUSTOMIZING THE CONTROL PANEL DISPLAY
- REGISTERING PRESETS
- CUSTOMIZING THE HOME SCREEN
- CHANGING REGULAR CLEANING ALERT SETTINGS
- CHANGING ROLLER REPLACEMENT ALERT SETTINGS
- SETTING USER ACCESS RESTRICTIONS (ACCESS CONTROL)
- SETTING UP EPSON CONNECT SERVICES
- SCANNER PARTS LOCATIONS
- USER REPLACEABLE EPSON SCANNER PARTS
- USING POWER SAVING SETTINGS
- CHANGING THE SLEEP TIMER SETTINGS
- CHANGING THE POWER OFF TIMER SETTINGS
- USING THE EPSON SMART PANEL MOBILE APP
- LOADING ORIGINALS IN THE INPUT TRAY
- RELATED REFERENCES
- RELATED TOPICS
- LOADING MULTIPLE SIZES OF ORIGINALS IN THE INPUT TRAY
- ORIGINAL DOCUMENT SPECIFICATIONS
- LOADING PLASTIC AND LAMINATED CARDS IN THE INPUT TRAY
- PLASTIC AND LAMINATED CARD SPECIFICATIONS
- LOADING SPECIAL ORIGINALS
- SPECIAL ORIGINAL SPECIFICATIONS
- NETWORK SECURITY RECOMMENDATIONS
- CONNECT YOUR PRODUCT ONLY TO A NETWORK PROTECTED BY A FIREWALL
- CHANGE THE DEFAULT ADMINISTRATOR PASSWORD ON YOUR PRODUCT
- CONNECTING TO AN EXISTING WI-FI NETWORK
- SELECTING WIRELESS NETWORK SETTINGS FROM THE CONTROL PANEL
- DIRECT WI-FI MODE (AP MODE) SETUP
- RELATED TASKS
- CONNECTING TO A MOBILE DEVICE
- SETTING UP WIRELESS SCANNING FROM A SMART DEVICE USING EPSON SMART PANEL
- WI-FI PROTECTED SETUP (WPS)
- USING WPS TO CONNECT TO A NETWORK
- USING WPS PIN MODE TO CONNECT TO A NETWORK
- SETTING UP NETWORK SCANNING
- DETERMINING THE SCANNER'S IP ADDRESS
- DISABLING WI-FI FEATURES
- STARTING A SCAN
- STARTING A SCAN USING THE PRODUCT CONTROL PANEL
- SCANNING TO A NETWORK FOLDER
- SCANNING TO AN EMAIL
- DO ONE OF THE FOLLOWING
- SELECT THE SCAN SETTINGS TAB, AND SELECT THE DESIRED SETTINGS
- SCANNING TO THE CLOUD
- SCANNING TO AN EXTERNAL USB DEVICE
- SETTING UP A WSD PORT (WINDOWS 7)
- SCANNING USING WSD - WINDOWS
- SCANNING USING PRESETS
- STARTING A SCAN FROM A SMART DEVICE
- SCANNING A DOCUMENT IN EPSON SCANSMART
- SAVING A SCAN
- ATTACHING A SCAN TO EMAIL
- SENDING A SCAN TO A CLOUD SERVICE
- PRINTING A SCAN
- SAVING A SCAN AS A MICROSOFT OFFICE FORMAT FILE
- SELECTING EPSON SCAN SMART SETTINGS
- CHANGING THE EPSON PRODUCT
- CHANGING THE SCAN SETTINGS
- CHANGING THE FILE NAME SETTINGS
- CHANGING THE SAVE SETTINGS
- SAVE SETTINGS
- CUSTOMIZING ACTION ICONS
- CLICK THE SETTINGS BUTTON
- CLICK THE CUSTOMIZE ACTIONS TAB
- SCANNING USING INVOICE/RECEIPT MANAGER
- STARTING A FREE TRIAL
- CLICK START TRIAL
- HIDING THE RECEIPT MANAGER TRIAL ICONS
- ACTIVATING RECEIPT MANAGER
- SCANNING RECEIPTS AND USING RECEIPT MANAGER
- CLICK MANAGE INVOICES/RECEIPTS
- EXPORTING INVOICES OR RECEIPTS TO QUICKBOOKS DESKTOP
- SAVING OR EXPORTING RECEIPTS TO QUICKEN
- SAVING RECEIPT DATA AS A TURBOTAX FILE
- SAVING INVOICE OR RECEIPT DATA AS A CSV FILE
- SCANNING INVOICES OR RECEIPTS AS AN IMAGE FILE
- SELECTING INVOICE/RECEIPT MANAGER SETTINGS
- EXPORTING OR IMPORTING THE INVOICE/RECEIPT DATABASE
- SELECT THE INVOICE/RECEIPT DATABASE BACKUP TAB
- CHOOSE ONE OF THESE OPTIONS
- CLICK CLOSE
- CHANGING COLUMN SETTINGS
- CHANGING CURRENCY AND LANGUAGE SETTINGS
- IMPORTING CATEGORIES FROM QUICKBOOKS OR QUICKEN
- SCAN RESOLUTION GUIDELINES
- CLEANING AND TRANSPORTING YOUR SCANNER
- CLEANING YOUR SCANNER
- CLEANING INSIDE YOUR SCANNER
- CHECKING THE SCANNER ROLLER COUNTER
- REPLACING THE SCANNER ROLLERS
- RESETTING THE SCANNER ROLLER COUNTER
- TRANSPORTING YOUR SCANNER
- SOLVING PROBLEMS
- PRODUCT STATUS MESSAGES
- SOLVING SCANNING PROBLEMS
- SCANNER DOES NOT TURN ON OR TURNS OFF UNEXPECTEDLY
- SCANNER BUTTON DOES NOT WORK AS EXPECTED
- SCANNING SOFTWARE DOES NOT OPERATE CORRECTLY
- RELATED CONCEPTS
- ORIGINAL FEEDS INCORRECTLY IN SCANNER
- ORIGINAL JAMS IN SCANNER
- PAPER PROTECTION DOES NOT WORK CORRECTLY
- SCANNING IS SLOW
- CANNOT SEND SCANS TO A CLOUD SERVICE
- CANNOT SEND SCANS TO AN EMAIL
- SOLVING NETWORK SCANNING PROBLEMS
- CANNOT SCAN OVER A NETWORK
- SCANNER CANNOT CONNECT TO A WIRELESS ROUTER
- SOLVING SCANNED IMAGE QUALITY PROBLEMS
- BACK OF ORIGINAL IMAGE APPEARS IN SCANNED IMAGE
- SCANNED CHARACTERS ARE BLURRY
- CHARACTERS ARE NOT RECOGNIZED DURING CONVERSION TO EDITABLE TEXT (OCR)
- RIPPLE PATTERNS APPEAR IN AN IMAGE
- SPOTS OR LINES APPEAR IN ALL SCANNED IMAGES
- SCANNED IMAGE IS CROPPED
- RESETTING THE EPSON SCAN 2 SETTINGS
- SOLVING INVOICE/RECEIPT MANAGER PROBLEMS
- CANNOT ACCESS AN ACCOUNTING SERVICE
- CANNOT IMPORT INVOICE/RECEIPT DATABASE
- LICENSE KEY IS DISABLED
- UNINSTALL YOUR SCANNER SOFTWARE
- UNINSTALLING SCANNER SOFTWARE - WINDOWS
- UNINSTALLING SCANNER SOFTWARE - MAC
- WHERE TO GET HELP (U.S. AND CANADA)
- INTERNET SUPPORT
- SPEAK TO A SUPPORT REPRESENTATIVE
- PURCHASE SUPPLIES AND ACCESSORIES
- WHERE TO GET HELP (LATIN AMERICA)
- TECHNICAL SPECIFICATIONS
- WINDOWS SYSTEM REQUIREMENTS
- MAC SYSTEM REQUIREMENTS
- GENERAL SPECIFICATIONS
- DIMENSION SPECIFICATIONS
- ELECTRICAL SPECIFICATIONS
- AC ADAPTER
- ENVIRONMENTAL SPECIFICATIONS
- NETWORK INTERFACE SPECIFICATIONS
- SECURITY PROTOCOL
- SAFETY AND APPROVALS SPECIFICATIONS
- NOTICE FOR MEXICO
- NOTICE FOR PARAGUAY
- NOTICES
- IMPORTANT SAFETY INSTRUCTIONS
- USB
- LCD SCREEN
- RESTRICTIONS ON COPYING
- RESTRICTION ON DISASSEMBLING AND DECOMPILING
- DEFAULT DELAY TIMES FOR POWER MANAGEMENT FOR EPSON PRODUCTS
- BINDING ARBITRATION AND CLASS WAIVER
- DISPUTES, BINDING INDIVIDUAL ARBITRATION, AND WAIVER OF CLASS ACTIONS AND CLASS ARBITRATIONS
- TRADEMARKS
- EPSON®
- COPYRIGHT NOTICE
- LIBTIFF SOFTWARE ACKNOWLEDGMENT
- A NOTE CONCERNING RESPONSIBLE USE OF COPYRIGHTED MATERIALS
- COPYRIGHT ATTRIBUTION
Brand : EPSON
Model : RapidReceipt RR-600W
Category : Scanner