
Perfection V750 - Scanner EPSON - Free user manual and instructions
Find the device manual for free Perfection V750 EPSON in PDF.


| Product Type | Flatbed scanner with film scanning capability |
| Brand | Epson |
| Model | Perfection V750 |
| Scanning Technology | CCD (Charge-Coupled Device) |
| Optical Resolution | 6400 x 9600 dpi |
| Color Depth | 48-bit input, 48-bit output |
| Film Scanning | 35mm, 120/220, 4x5, 5x7, and 8x10 film formats |
| Maximum Document Size | 216 x 297 mm (8.5 x 11.7 inches) |
| Dimensions (W x D x H) | 503 x 308 x 152 mm |
| Weight | 9.5 kg |
| Power Supply | AC adapter (100-240V, 50/60 Hz) |
| Power Consumption | Operating: 30W, Standby: 5W |
| Interface | USB 2.0 High Speed |
| Main Functions | Scanning documents, photos, film, and slides; image editing via bundled software |
| Supported Operating Systems | Windows 2000/XP/Vista/7/8/10, Mac OS X 10.2.8 to 10.7 |
| Maintenance | Clean glass platen with a soft lint-free cloth; avoid dust and direct sunlight |
| Safety Precautions | Use only the supplied AC adapter; unplug during cleaning; do not insert objects into the scanner |
| Spare Parts | Optional replacement lamp; contact Epson support for other parts |
| Repairability | Professional service recommended; user replaceable lamp only |
| General Information | High-end scanner for photographers and professionals; includes film holders and image correction software |
Frequently Asked Questions - Perfection V750 EPSON
User questions about Perfection V750 EPSON
0 question about this device. Answer the ones you know or ask your own.
Ask a new question about this device
Download the instructions for your Scanner in PDF format for free! Find your manual Perfection V750 - EPSON and take your electronic device back in hand. On this page are published all the documents necessary for the use of your device. Perfection V750 by EPSON.
USER MANUAL Perfection V750 EPSON
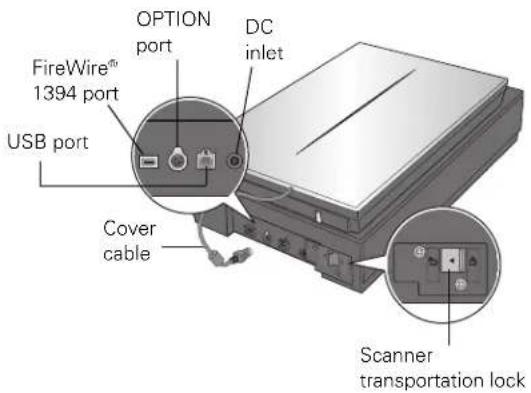

Note: The Epson Perfection V750 Pro also includes a fluid mount tray.
Scanner Specifications
General
Scanner type: Flatbed color
Photoelectric device: Color CCD line sensor
Effective pixels: 40,800 × 56,160 pixels (4800 dpi)
37,760 × 62,336 pixels (6400 dpi)
Document size: Documents or photos:
8.5 × 11.7 inches (216 × 297 mm)
US letter or A4 size
Film or slides:
8 × 10 inches (203.2 × 254 mm),
four 35mm film strips (6 frames each),
twelve 35mm slides, two medium
format (6 × 20 cm film frame), or two
4 × 5 inch film frames
Scanning resolution 4800 dpi (main scan)
6400 dpi (main scan)
9600 dpi with Micro Step (sub scan)
Output resolution 50 to 12800 dpi in 1 dpi increments
Scanning speed V700 Photo: approximately 12.3 msec
per line at 4800 dpi
V750 Pro: approximately 11.8 msec per
line at 4800 dpi
Approximately 3.1 msec per line at 600 dpi
Image data 16 bits per pixel per color internal
Light source White cold cathode fluorescent lamp IR LED
Mechanical
Dimensions Width: 19.8 inches (503 mm)
Depth: 12.1 inches (308 mm)
Height: 6 inches (152.5 mm)
Weight: approximately 14.5 lb (6.6 kg)
Electrical
Note:
Check the label on the AC adapter or on the back of the scanner for voltage information.
Scanner
Input voltage: DC 24 to 26.4 V
Rated voltage: DC 24 V
Rated current: 1.4 A
Power consumption: 32 W operating
20 W stand-by mode
3.8 W sleep mode
AC Adapter
Rated input voltage: AC 100 to 120 V
Rated input current: 0.8 A
Rated frequency 50 to 60 Hz
Rated output voltage DC 24.0 to 26.4 V
Rated output current 1.4 A
Environmental
Temperature Operating 41 to 95 °F (5 to 35 °C)
Storage -13 to 140 °F (-25 to 60 °C)
Humidity Operating 10 to 80%, without condensation
Storage 10 to 85%, without condensation
Operating conditions Ordinary office or home
conditions.
Avoid operating the scanner in direct sunlight, near a strong light source, or in extremely dusty conditions.
Interfaces
USB Interface
Interface type Universal Serial Bus Specification Revision 2.0
Electrical standard Full Speed mode (12 Mbits per second) and Hi-Speed mode (480 Mbits per second) of Universal Serial Bus
Specification Revision 2.0.
Connector type: One Type B port
FireWire Interface
Interface type: IEEE Std 1394a-2000
Electrical standard: ANSI X3T10 Serial Bus Protocol 2 Revision 4L (SBP-2)
Connector type: One 6-pin port
Standards and Approvals
Scanner
EMC: FCC Part 15 Subpart B Class B
CAN/CSA-CEI/IEC CISPR 22 Class B
AC Adapter
Safety: UL60950-1
CAN/CSA-22.2 No. 60950-1-03
EMC: FCC Part 15 Subpart B Class B
CAN/CSA-CEI/IEC
CISPR22 Class B
Scanning a Document or Photo
Before scanning a document, remember to respect the rights of copyright owners. Do not scan published text or images without first checking their copyright status.
Caution: Do not place heavy objects on the document table glass and do not press the glass with too much force.
- Open the scanner cover.
Make sure the document mat is installed inside the cover. If it is not installed, see "Replacing the Document Mat" on page 9 for instructions.
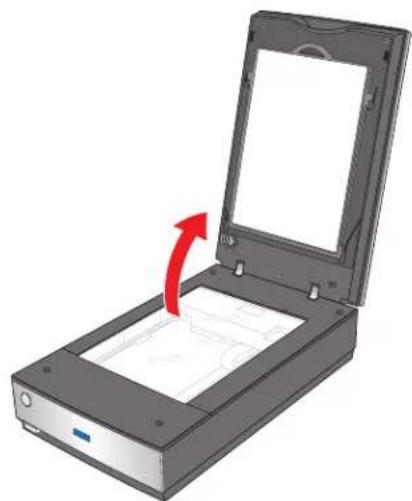
- Place your document or photo on the document table, face down on the glass. Make sure the top of the document or photo is against the upper right corner of the document table.
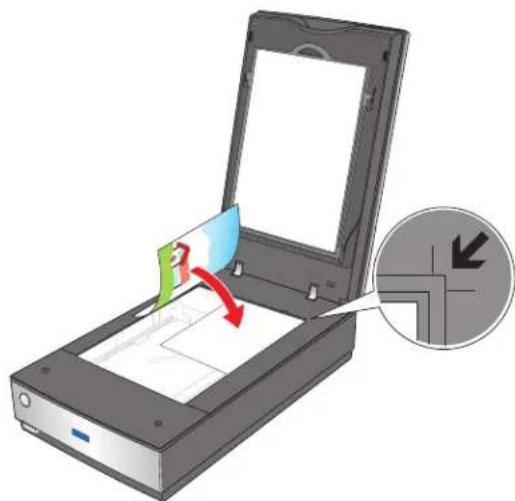
- If you are scanning multiple photos at once, position each photo at least 0.8 inches (20 mm) apart from the others.
Note: If you are scanning large or thick documents, you can remove the scanner cover. See "Placing Large or Thick Documents" below for instructions.
- Close the scanner cover gently so that your original does not move.

Note: Always keep the document table clean. Do not leave photos on the document table for an extended period of time as they may stick to the glass.
Placing Large or Thick Documents
When you scan a large or thick document, you can remove the scanner cover.
- Turn off the scanner using its power button.
- Disconnect the cover cable.

- Open the scanner cover.
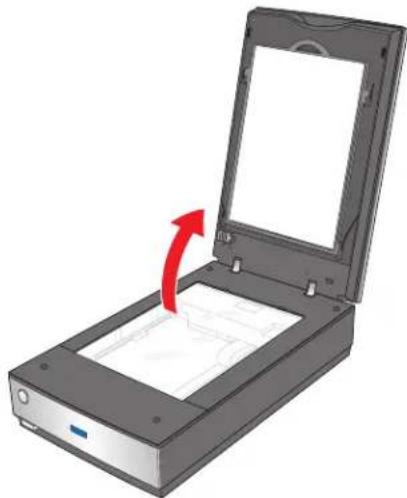
- Lift the scanner cover straight up and off the scanner.
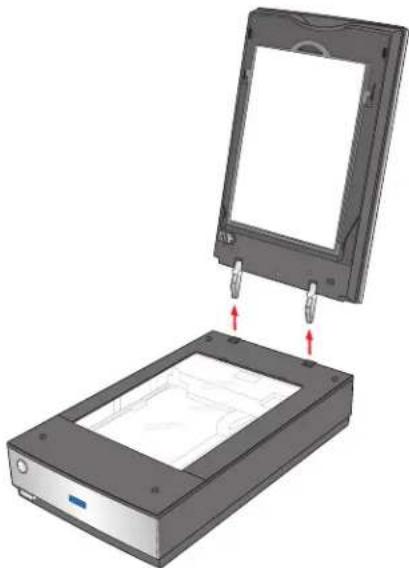
- Turn on the scanner using its power button.
Note: When scanning without the scanner cover, gently press down on your document to flatten it.
- When you are finished scanning, replace the scanner cover in the reverse order that you removed it.
Scanning Film and Slides
Removing the Document Mat
To scan film strips or slides, you need to remove the document mat from the scanner cover. This uncovers the transparency unit so your scanner can use it to scan your film or slides.
- Make sure the cover cable is connected to the scanner's OPTION port.
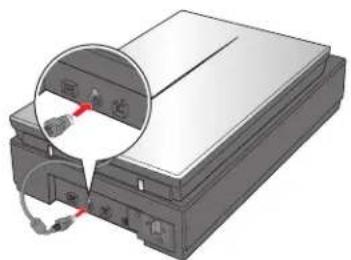
Note: Before connecting or disconnecting the cover cable, turn off the scanner using its power button.
- Open the scanner cover and gently slide up the document mat to remove it. Also make sure the transparency unit transportation lock is unlocked.
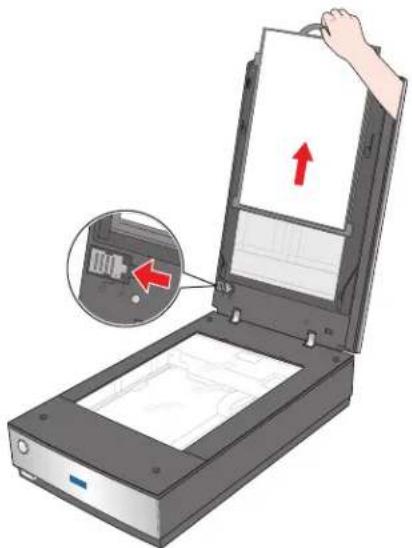
- Use a soft cloth to wipe the transparency unit window and the document table before placing your film or slides.

To place film or slides for scanning, see the sections below.
Placing Film in the Holder
Placing 35mm Film Strips
- Remove the film strip cover(s) on the film holder.
- Slide up to four film strips all the way into the film holder with the shiny base side facing down. Your images and any wording on the film strips should appear backwards on the side that faces up, as shown by the illustration on the film holder.
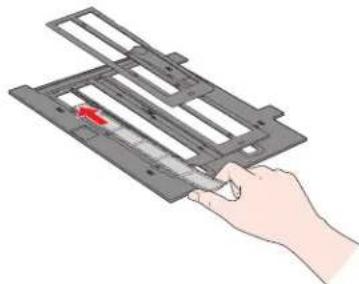
Note: Hold the edge of the film gently or use gloves to touch the film; otherwise you may damage the film. Make sure the white stickers on the back of the film holder and the areas around them are not scratched, dusty, or covered in any way. If the areas are obscured, the scanner may have trouble recognizing your film in Full Auto Mode. Do not cover any of the tiny holes in the film holder or the scanner may have trouble recognizing which film holder you are using.
- Place the cover(s) over the film and press them down until they click. Then press down on all the edges of the covers to secure them.
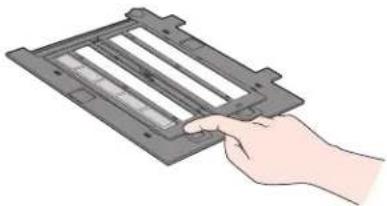
- Place the film holder on the document table so that it is aligned with the upper right corner and the pins are seated in the holes on the scanner.
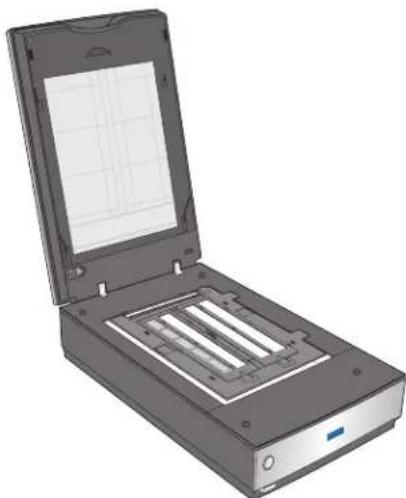
- Make sure you removed the document mat. See "Removing the Document Mat" on page 4.
- Close the scanner cover.
When you are finished scanning film, be sure to replace the document mat before scanning documents or photos. See "Replacing the Document Mat" on page 9.
Placing Medium Format Film
- Open the cover on the medium format film holder.
- Slide up to two medium format film images into the film holder with the shiny base side facing down. Your images and any wording on the film should appear backwards on
the side that faces up, as shown by the illustration on the film holder. Make sure the entire image frame is positioned in the film holder opening.
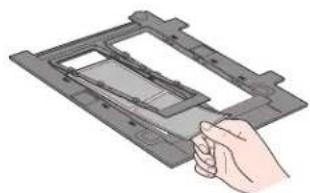
Note: Hold the edge of the film gently or use gloves to touch the film; otherwise you may damage the film. Make sure the white stickers on the back of the film holder and the areas around them are not scratched, dusty, or covered in any way. If the areas are obscured, the scanner may have trouble recognizing your film in Full Auto Mode. Do not cover any of the tiny holes in the film holder or the scanner may have trouble recognizing which film holder you are using.
- Close the cover over the film and press it down until it clicks. Then press down on all the edges of the cover to secure it.
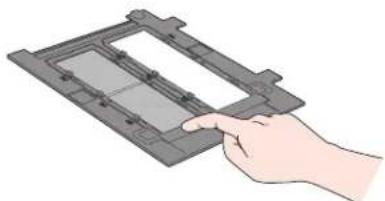
- Place the film holder on the document table so that it is aligned with the upper right corner and the pins are seated in the holes on the scanner.
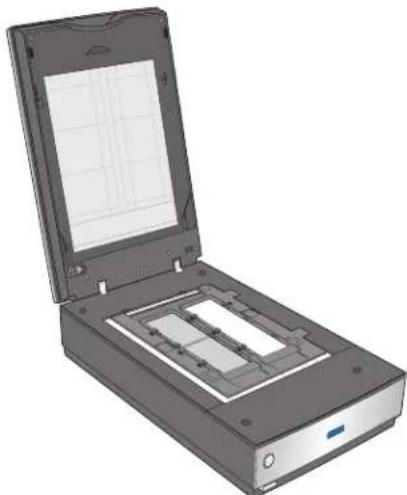
- Make sure you removed the document mat. See "Removing the Document Mat" on page 4.
6 - Epson Perfection V700 Photo/V750 Pro 12/05
- Close the scanner cover.
Note: You cannot use Full Auto Mode to scan medium format film.
When you are finished scanning film, be sure to replace the document mat before scanning documents or photos. See "Replacing the Document Mat" on page 9.
Placing 4 × 5 inch Film
- Open the covers on the 4 × 5 inch film holder.
- Place the film into the film holder with the shiny base side facing down. Your images and any wording on the film should appear backwards on the side that faces up, as shown by the illustration on the film holder. Make sure the entire image frame is positioned in the film holder opening.
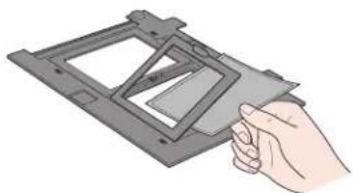
Note: Hold the edge of the film gently or use gloves to touch the film; otherwise you may damage the film. Make sure the white stickers on the back of the film holder and the areas around them are not scratched, dusty, or covered in any way. If the areas are obscured, the scanner may have trouble recognizing your film in Full Auto Mode. Do not cover any of the tiny holes in the film holder or the scanner may have trouble recognizing which film holder you are using.
- Close the cover over the film and press it down until it clicks. Then press down on all the edges of the cover to secure it.
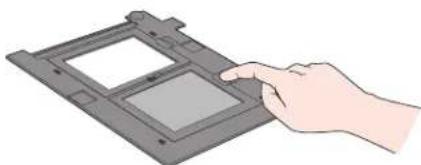
- Place the film holder on the document table so that it is aligned with the upper right corner and the pins are seated in the holes on the scanner.
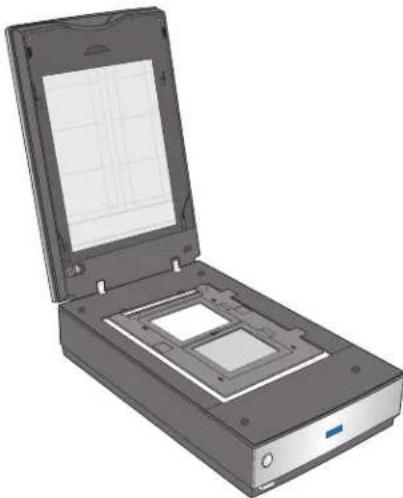
- Make sure you removed the document mat. See "Removing the Document Mat" on page 4.
- Close the scanner cover.
Note: You cannot use Full Auto Mode to scan 4 × 5 inch film.
When you are finished scanning film, be sure to replace the document mat before scanning documents or photos. See "Replacing the Document Mat" on page 9.
Placing Slides in the Holder
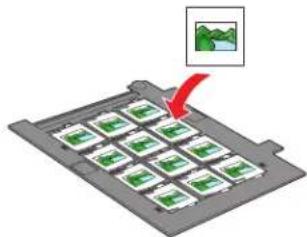
You can scan up to twelve 35mm slides at a time using the slide holder.
Note: Make sure the white stickers on the back on the film holder and the areas around them are not scratched, dusty, or covered in any way. If the areas are obscured, the scanner may have trouble recognizing your slides in Full Auto Mode. Do not cover any of the tiny holes in the film holder or the scanner may have trouble recognizing which film holder you are using.
- Place up to twelve slides in the 35mm slide holder with the shiny base side facing down. Your image should appear backwards on the side that faces up, as shown by the illustration on the film holder. The top of your images should face the open end of the film holder as shown below.
- Place the film holder on the document table so that it is aligned with the upper right corner and the pins are seated in the holes of the scanner.
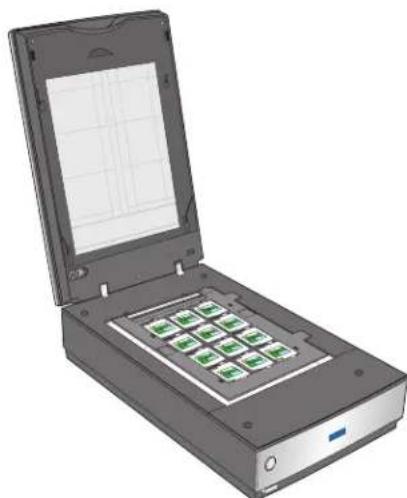
- Make sure you removed the document mat. See "Removing the Document Mat" on page 4.
- Close the scanner cover.
When you are finished scanning slides, be sure to replace the document mat before scanning documents or photos. See "Replacing the Document Mat" on page 9.
Placing Film in the Film Area Guide
You can scan film that cannot be placed in the film holders (up to 8 × 10 inch film) using the film area guide in Professional Mode. When scanning film using the film area guide, always select Film (with Film Area Guide) as the Document Type.
Note: You cannot use DIGITAL ICE Technology when scanning film with the film area guide. When scanning using the film area guide, striped (newton) rings may appear in your scanned images.
- Make sure the tab on the long edge of the film area guide is on the left side.
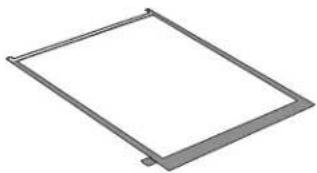
- Fold the tab along the perforated lines as shown.
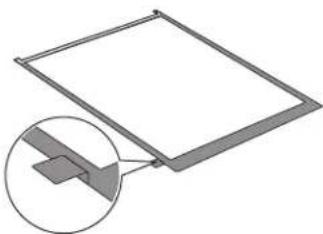
- Place the film area guide on the document table with the tab facing the left side of the scanner.
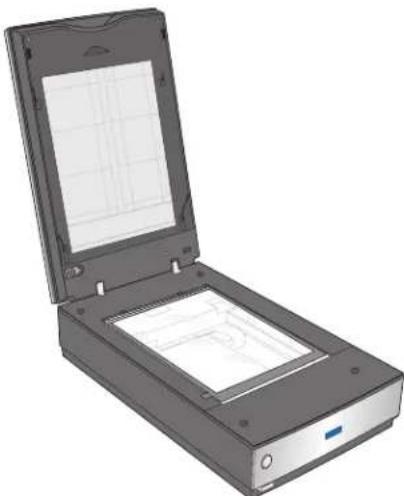
- Place the film in the film area guide (up to 8 × 10 inch film) with the shiny base side facing down. Your images and any wording on the film should appear backwards on the side that faces up. Make sure the entire image frame is positioned in the film area guide opening.

Note: Leave the part of the film area guide shown below uncovered or colors in your scans will be affected.

- Make sure you removed the document mat. See "Removing the Document Mat" on page 4.
- Close the scanner cover.
Note: You cannot use Full Auto Mode or Home Mode when scanning film with the film area guide.
When you are finished scanning film, be sure to replace the document mat before scanning documents or photos. See "Replacing the Document Mat" on page 9.
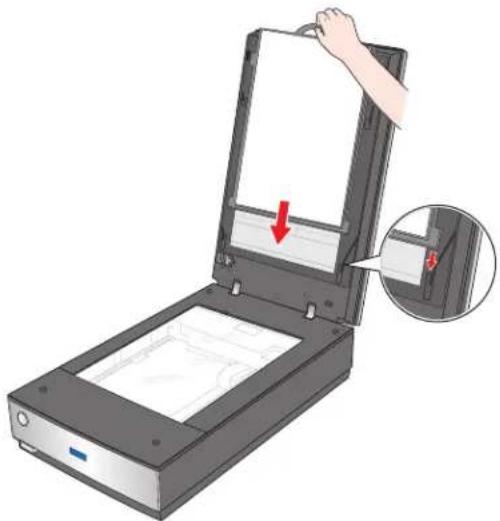
Replacing the Document Mat
Replace the document mat by sliding it into the notches in the scanner cover. Make sure the white surface faces outwards.
Scanning and Restoring Photos
Using the Color Restoration feature in EPSON Scan, you can transform old, faded, or badly exposed photos into ones with true-to-life color. You can restore printed photos, negative film, or slides automatically as you scan them.
You can use Color Restoration in EPSON Scan's Full Auto, Home, or Professional Mode. For detailed steps, see the on-screen User's Guide.
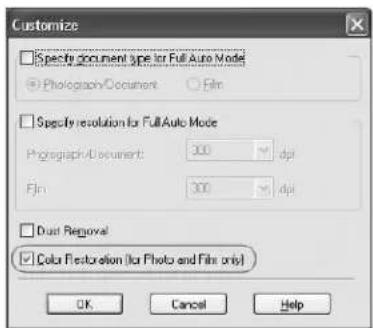
Full Auto Mode
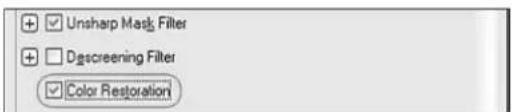
Home and Professional Mode
Removing Dust and Scratch Marks From Film or Slides
Using the Dust Removal feature in EPSON Scan's Full Auto or Professional Mode, you can virtually "clean" the dust marks from film or slides as you scan them.

Your scanner and its EPSON Scan software are equipped with the Digital ICE™ and Digital ICE Lite™ features that remove stubborn dust or scratch marks from color film or slides.
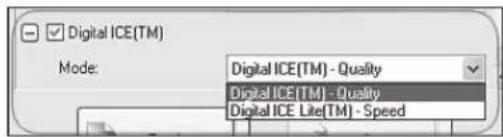
DIGITAL ICE will not harm image details while Dust Removal may degrade the image. However, it takes longer to scan using DIGITAL ICE.
For detailed steps on using these features, see the on-screen User's Guide.
Reading the Scanner Light
If an error occurs, the scanner stops operating and the scanner light flashes red. This indicates one of the following problems:
☐ The scanner is not connected to your computer properly or your software is not fully installed. See the Start Here sheet that came with your scanner for instructions on installing the scanner software and connecting the scanner to your computer. ☐ The scanner and/or the transparency unit transportation lock is locked. Slide the lock to the unlock position. ☐ The scanner cover cable is not connected to the scanner's OPTION port. Connect the cable to the port.
After trying these solutions, turn off the scanner using its power button, then turn it back on.
If the scanner light is still flashing:
☐ The scanner may be malfunctioning. ☐ The scanner lamp may need to be replaced. ☐ The connected optional equipment may be malfunctioning.
Contact Epson. See the on-screen User's Guide for details.
Transporting the Scanner
Before transporting the scanner for a long distance or storing it for an extended period of time, you need to lock the scanner's carriage and transparency unit to prevent damage.
- Plug in the scanner, turn on the scanner using its power button, and wait until the carriage moves to the home position (near the cover hinge). While the scanner light is green, turn off the scanner using its power button.
- Open the scanner cover and slide the transparency unit transportation lock to the locked position. Then close the scanner cover.

- Disconnect the scanner's interface cable from your computer.
- Disconnect the scanner's cover cable.
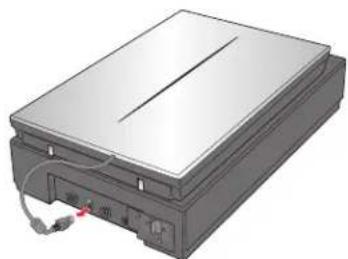
- On the back of the scanner, slide the transportation lock to the locked position to secure the scanner carriage.
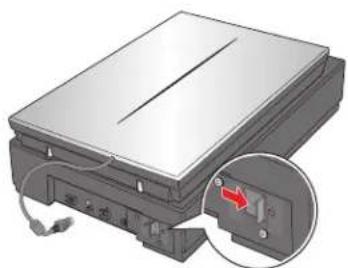
- Attach the protective materials that came with the scanner, then repack the scanner in its original box or a similar box that fits the scanner snugly.
Related Documentation
CPD-21124 Epson Perfection V700 Photo/V750 Pro Start Here sheet
CPD-21125 Epson Perfection V700 Photo/V750 Pro Notices booklet
CPD-21126 Epson Perfection V700 Photo/V750 Pro Scanner Software CD-ROM
— Epson Perfection V700 Photo/V750 Pro User's Guide (HTML on CD-ROM)
CPD-21127 Epson Perfection V750 Pro Using Your Epson Fluid Mount Accessory booklet

- SCANNER SPECIFICATIONS
- GENERAL
- MECHANICAL
- ELECTRICAL
- NOTE
- SCANNER
- AC ADAPTER
- ENVIRONMENTAL
- INTERFACES
- USB INTERFACE
- FIREWIRE INTERFACE
- STANDARDS AND APPROVALS
- SCANNING A DOCUMENT OR PHOTO
- PLACING LARGE OR THICK DOCUMENTS
- SCANNING FILM AND SLIDES
- REMOVING THE DOCUMENT MAT
- PLACING FILM IN THE HOLDER
- PLACING 35MM FILM STRIPS
- PLACING MEDIUM FORMAT FILM
- PLACING 4 × 5 INCH FILM
- PLACING SLIDES IN THE HOLDER
- PLACING FILM IN THE FILM AREA GUIDE
- REPLACING THE DOCUMENT MAT
- SCANNING AND RESTORING PHOTOS
- REMOVING DUST AND SCRATCH MARKS FROM FILM OR SLIDES
- READING THE SCANNER LIGHT
- TRANSPORTING THE SCANNER
- RELATED DOCUMENTATION
Brand : EPSON
Model : Perfection V750
Category : Scanner