
AC0950 - Air purifier PHILIPS - Free user manual and instructions
Find the device manual for free AC0950 PHILIPS in PDF.


| Product Type | Air Purifier |
| Model | AC0950 |
| Brand | Philips |
| Dimensions (mm) | 250 x 250 x 367 (Height x Width x Depth) |
| Weight (kg) | 2.8 |
| Power Input (V/Hz) | 220-240 V, 50 Hz |
| Power Consumption (W) | 25 |
| Coverage Area (m²) | Up to 49 |
| Airflow Rate (m³/h) | 190 |
| Filtration System | Pre-filter, Activated Carbon, True HEPA |
| HEPA Filter Type | NanoProtect HEPA (FY0193) |
| Filter Replacement Indicator | Yes |
| Fan Speeds | 4 (Sleep, Speed 1, Speed 2, Turbo) |
| Air Quality Sensor | Yes (PM2.5) |
| Auto Mode | Yes |
| Silent Mode / Sleep Mode | Yes |
| Timer (hours) | 1-12 |
| Control Type | Touch buttons + Remote control |
| Display | Color ring with PM2.5 value |
| Noise Level (dB) | 17 - 46 |
| Maintenance | Clean pre-filter every 2 weeks; replace HEPA filter every 12 months |
| Safety Features | Child lock, auto shut-off (timer), tip-over protection |
| Spare Parts | Replacement filter FY0193, remote control |
| Repairability | Filter replacement by user; other repairs by authorized service |
Frequently Asked Questions - AC0950 PHILIPS
User questions about AC0950 PHILIPS
0 question about this device. Answer the ones you know or ask your own.
Ask a new question about this device
Download the instructions for your Air purifier in PDF format for free! Find your manual AC0950 - PHILIPS and take your electronic device back in hand. On this page are published all the documents necessary for the use of your device. AC0950 by PHILIPS.
USER MANUAL AC0950 PHILIPS
-1
1_
-1
1
-1
-1
1_
1
-1
1_
-1
1
English 6
Bahasa Melayu 26
繁體中文 47
66 العربية
6 English
Important
Read this user manual carefully before you use the appliance, and save it for future reference.
To ensure the best performance, kindly suggest the firmware of your purifier is upgraded to the latest version. You can do this upgrade via the Air+ app.
Danger
- Do not clean the appliance with water, any other liquid, or a (flammable) detergent, nor let them enter the appliance, to avoid electric shock and/or a fire hazard.
- Do not spray any flammable materials such as insecticides or fragrance around the appliance.
Warning
- Check if the voltage indicated on the appliance corresponds to the local power voltage before you connect the appliance.
- If the power cord is damaged, you must have it replaced by Philips, a service center authorized by Philips, or similarly qualified persons in order to avoid a hazard.
- Do not use the appliance if the adaptor, the power cord, or the appliance itself is damaged.
- Only to be used together with the adaptor provided with the appliance.
- This appliance can be used by children aged from 8 years and above and persons with reduced physical, sensory or mental capabilities or lack of experience and knowledge if they have been given supervision or instruction concerning use of the appliance in a safe way and understand the hazards involved.
- Children shall not play with the appliance.
- Cleaning and maintenance shall not be made by children without supervision.
- Do not block the air inlet and outlet, e.g. by placing items on the air outlet or in front of the air inlet.
- Make sure that foreign objects do not fall into the appliance through the air outlet.
- Standard WiFi interface based on 802.11b/g/n/ax at 2.4GHz with a maximum output power of 64mW EIRP.
- Bluetooth version 5.2 (LE) at frequency 2.4GHz with RF output less than 10mW EIRP.
- We recommend people who are allergic to dust, pollen, pets or mold, not to replace filters by themselves or to take protective measures, such as mask and gloves.
Caution
- We recommend people who are allergic to dust, pollen, pets or mold, not to replace filters by themselves or to take protective measures, such as mask and gloves. This appliance is not a substitute for proper ventilation, regular vacuum cleaning, or use of an extractor hood or fan while cooking.
- Always place and use the appliance on a dry, stable, level, and horizontal surface.
- Leave at least 20cm free space around the appliance and leave at least 30cm free space above the appliance.
- Do not sit or stand on the appliance. Do not place anything on top of the appliance.
- Do not place the appliance directly below an air conditioner to prevent condensation from dripping onto the appliance.
- Only use the original Philips filters specially intended for this appliance. Do not use any other filters.
- Combustion of the filter may cause irreversible human hazard and/or jeopardize other lives. Do not use the filter as fuel or for similar purpose.
- Avoid knocking against the appliance (the air inlet and outlet in particular) with hard objects.
- Do not insert your fingers or objects into the air outlet or the air inlet to prevent physical injury or malfunctioning of the appliance.
- Do not use this appliance when you have used indoor smoke-type insect repellents or in places with oily residues, burning incense, or chemical fumes.
- Do not use the appliance near gas appliances, heating devices or fireplaces.
- Always unplug the appliance when you want to move, clean appliance, replace the filter or carry out other maintenance.
- The appliance is only intended for household use under normal operating conditions.
- Do not use the appliance in wet surroundings or in surroundings with high ambient temperatures, such as the bathroom, or in a room with major temperature changes.
- The appliance does not remove carbon monoxide (CO) or radon (Rn). It cannot be used as a safety device in case of accidents with combustion processes and hazardous chemicals.
Electromagnetic fields (EMF)
This appliance complies with the applicable standards and regulations regarding exposure to electromagnetic fields.
Recycling
Do not throw away the product with the normal household waste at the end of its life, but hand it in at an official collection point for recycling. By doing this, you help to preserve the environment.
Follow your country's rules for the separate collection of electrical and electronic products. Correct disposal helps prevent negative consequences for the environment and human health.
The filter units are non-washable and non-recyclable, dispose of used filter units in accordance with local regulations.
Your air purifier
Congratulations on your purchase, and welcome to Philips!
8 English
To fully benefit from the support that Philips offers, register your product at www.philips.com/support.
Product overview

A Control panel D Filter (FY0910)
B Air outlet E Base
C Air quality sensor F Adapter (KA2401A-2401000BS)
Controls overview

Control buttons:
| Power on/off button Light on/off button | ||
| Mode switch button | ||
| Long press the button(s) for 3 seconds: | ||
| Child lock Wi-Fi reset | ||
| Filter reset | ||
| Display panel: | ||
| Auto mode Medium mode | ||
| Sleep mode Turbo mode | ||
| WiFi indicator Child lock indicator | ||
| Filter cleaning alert Filter replacement alert | ||
Getting started
Installing the filter
Remove all packaging of the filter before use.
Note: Make sure the air purifier is unplugged from the electrical outlet before installing the filter.
10 English

1 Turn the appliance upside down and place it on a soft cloth.

2 Rotate the base anti-clockwise to remove it from the appliance. Pull the filter out from the appliance.

3 Remove all packaging materials of the air purification filter.

4 Put the filter back into the appliance. Reattach the base and rotate it clockwise to fasten the base.
Connecting power
CAUTION: Risk of electric shock! When you unplug the adaptrt, always pull the plug from the socket. Never pull the cord.

Connect the power adapter to:
- First, the power adapter on the appliance.
- Then, the wall outlet.
Understanding Wi-Fi indicator
Wi-Fi icon status Wi-Fi connection status
Blink in orange Connecting to the smart phone
Stable in orange Connected to the smart phone
Blink in white Connecting to the server
Stable in white Connected to the server
Off Wi-Fi function disabled or device lights are off
Wi-Fi connection

Setting up the Wi-Fi connection for the first time
1 Download and install the Philips "Air+" app from the App Store or Google Play.

2 Put the plug of the air purifier in the power socket and press the power button to turn on the air purifier.
- The Wi-Fi indicator 📋 blinks orange for the first time.
12 English

![graph TD A["Mobile Device"] --> B["Wireless Signal"] B --> C["Wireless Signal"] C --> D["Server"] D --> E["Green Checkmark"]](/content/2026/06/1388102/images/2d962ea2bb3acd13a0cd9afa6f54e18a5cc67d98ede10244989154bf28a26a62.jpg)
3 Make sure that your smart phone or tablet is successfully connected to your Wi-Fi network.
Note:
Enable Bluetooth feature on your smart phone to ensure the smooth pairing.
Please ensure your smartphone is connected to a 2.4GHz (home) Wi-Fi network instead of a 5GHz Wi-Fi network or public Wi-Fi. For a successful pairing, we suggest turning off your mobile data before initiating the pairing process.
4 Launch the Philips "Air+" app and click on "Add a device" or press the "+" button on the screen. Follow the on-screen instructions to connect the air purifier to your network.
- After a successful connection, the Wi-Fi indicator remains steady in white.
Note:
This instruction is only valid when the air purifier is being set up for the first time. If the network has changed or the setup needs to be performed again.
If you want to connect more than one air purifier to your smart phone or tablet, you can add the purifier in the app on additional smart phones without doing the Wi-Fi connection reset on the device.
Make sure that the distance between your smart phone or tablet and the air purifier is less than 10m without any obstructions.

Reset the Wi-Fi connection
1 Put the plug of the air purifier in the power socket and press to turn on the air purifier.

2 Long press and button at the same time for 3 seconds until you hear a beep.
- The air purifier goes to pairing mode.
- The Wi-Fi indicator 📋links orange.
3 Follow the steps 3-4 in "Setting up the Wi-Fi connection for the first time" section.
Using the air purifier
Understanding the air quality light
The air quality light automatically goes on when the air purifier is switched on, and lights up all colors in sequence. After approximately 30 seconds, the particle sensor selects the color that corresponds to the surrounding air quality of airborne particles.
The color of the air quality light is determined by the PM2.5 reading.
PM2.5
AeraSense sensing technology accurately detects and quickly responds to even the slightest particle change in the air. It provides you with reassurance with real-time PM2.5 feedback.
Most of the indoor air pollutants fall under PM2.5 – which refers to airborne particle pollutants smaller than 2.5 micrometers. Common indoor sources of fine particles are tobacco smoke, cooking, burning candles. Some airborne bacteria and the smallest mold spores, pet allergen and dust mite allergen particles also fall under PM2.5.
PM2.5 level Air quality color Air quality level
| ≤35 Blue Good |
| 36-75 Blue-purple Fair |
| 76-115 Purple-red Poor |
| >115 Red Very poor |
Turning on and off
Note:
For optimum purification performance, close doors and windows.
Keep curtains away from the air inlet or air outlet.
1 Put the adapter of the air purifier into the power socket.

English

2 Press the power button to switch on the air purifier.
- The air purifier beeps.
- The displays on the screen during warming up. Then the air purifier shows the PM2.5 level after measuring the air quality.
- The air purifier operates in the Auto mode with PM2.5 displayed on the screen.
3 Press the power button again to switch off the air purifier.
Note: If the air purifier stays connected to the electrical outlet after turning OFF, the air purifier will operate under the previous settings when turned ON again.
Changing the mode setting

You can choose the Auto mode, the Medium mode, the Turbo mode, or the Sleep mode by pressing the mode switch button.
Auto mode ( A).The air purifier automatically adjusts the fan speed in accordance with the ambient air quality.

Medium mode ( ) In the Medium mode, the air purifier operates on a medium speed.

Turbo mode ( ☑): The air purifier operates on the highest speed.

Sleep mode ( ): The air purifier operates quietly at a low speed. After 3 seconds, the display lights turn off.
Using the light on/off function
You can press the button to turn on, dim or turn off all lights and the control panel.

- The control panel is turned on.

- The control panel is dimmed.

- The control panel is turned off.
Setting the child lock

1 Press the button for 3 seconds to activate the child lock. - The displays on the screen.
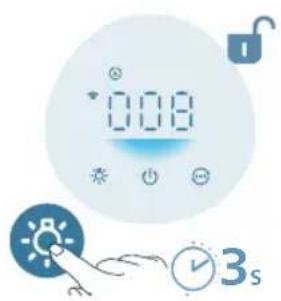
2 Press the button for 3 seconds again to deactivate the child lock. - The disappears from the screen.
Cleaning and maintenance
Note:
Always unplug the appliance before you clean it.
Never immerse the appliance in water or any other liquid.
Never use abrasive, aggressive, or flammable cleaning agents such as bleach or alcohol to clean any part of the appliance.
Never use any liquids (including water) to clean the filter.
Do not attempt to clean the air quality sensor with a vacuum cleaner.
Cleaning schedule
Frequency Cleaning method
When necessary Wipe the plastic part of the appliance with a soft, dry cloth
Clean the air outlet cover
Every two months Clean the particle sensor with a dry cotton swab

displays on the screen Clean the surface of the filter
Cleaning the body of the air purifier
Regularly clean the inside and outside of the air purifier to prevent dust from collecting.
1 Use a soft, dry cloth to clean both the interior and exterior of the air purifier.
2 The air outlet can also be cleaned with a dry, soft cloth.
Cleaning the particle sensor
Clean the air quality sensor every 2 months for optimal functioning of the appliance.
If the air purifier is used in a dusty environment, it may need to be cleaned more often.
If the humidity level in the room is very high, condensation may develop on the particle sensor and the air quality light may indicate a more poor air quality even though the air quality is actually good. If this occurs, clean the air quality sensor.

1 Switch off the air purifier and unplug from the power socket.

2 Open the air quality sensor cover.

3 Clean the particle sensor with a damp cotton swab.
4 Dry all parts thoroughly with a dry cotton swab.
5 Close the air quality sensor.

Cleaning the surface of the filter

When the filter cleaning alert displays on the screen, clean the surface of the filters with a vacuum cleaner.
Note: We recommend people who are allergic to dust, pollen, pets or mold, not to replace filters by themselves or to take protective measures, such as wearing a mask and gloves.

1 Switch off the air purifier and unplug from the power socket.

2 Turn the appliance upside down and place it on a soft cloth.

3 Rotate the base anti-clockwise to remove it from the appliance. Pull the filter out from the appliance.

4 Clean the surface of the filters with a vacuum cleaner.

5 Put the filter back into the appliance. Reattach the base and rotate it clockwise to fasten the base.
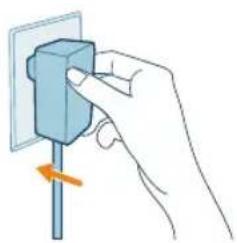
6 Put the adapter of the air purifier in the power socket.
7 Press the button to switch on the appliance.


8 Press and hold the and button for 3 seconds to reset the filter cleaning time.
- You can also reset the filter cleaning time via the Air+ app.
- After the reset is successful, the filter cleaning alert disappears from the screen.

9 Wash your hands thoroughly after cleaning the filters.
Replacing the filter
Understanding the healthy air protect lock
This air purifier is equipped with a filter replacement indicator to make sure that the air purification filter is in optimal condition when the air purifier is operating. When the filter needs to be replaced, the filter replacement alert lights up red. If the filter is not replaced in time, the air purifier will stop operating and automatically lock to protect the air quality in the room. Replace the filter as soon as possible.
Replacing the filter
Note:
The filter is not washable or reusable.
Always turn off the air purifier and unplug from the electrical outlet before replacing the filter.
When the filter replacement alert displays on the screen, replace the filter (FY0910).
Note: We recommend people who are allergic to dust, pollen, pets or mold, not to replace filters by themselves or to take protective measures, such as wearing a mask and gloves.


1 Switch off the air purifier and unplug from the power socket.
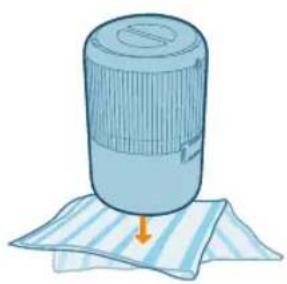
2 Turn the appliance upside down and place it on a soft cloth.

3 Rotate the base anti-clockwise to remove it from the appliance. Pull the filter out from the appliance. Discard the used filter.

4 Remove all packaging materials of the new filter.

5 Put the new filter into the appliance. Reattach the base and rotate it clockwise to fasten the base.

6 Put the adapter of the air purifier in the power socket.
22 English
7 Press the button to switch on the appliance.


8 Press and hold the and button for 3 seconds to reset the filter lifetime counter.
- You can also reset the filter cleaning time via the Air+ app.
- After the reset is successful, the filter replacement alert disappears from the screen.

9 Wash your hands thoroughly after replacing the filter.
Note: Do not smell the filter as it has collected pollutants from the air.
Filter reset
You can replace the filters even before filter replacement alert (☐) displays on the screen. After replacing filters, you need to reset the filter lifetime counter manually.
1 Press the button to turn off the appliance. Unplug the appliance.


2 Make sure the appliance is completely unplugged, and then put the power adapter in the power socket.

3 Within 15 seconds after power on, press and hold the and button for 3 seconds to reset the filter lifetime counter.
Storage
1 Turn off the air purifier and unplug from the power socket.
2 Clean the air purifier and the surface of the filter (see Chapter "Cleaning and Maintenance").
3 Let all parts air dry thoroughly before storing.
4 Wrap the filter in air tight plastic bags.
5 Store the air purifier, filter in a cool, dry location.
6 Always thoroughly wash hands after handling filter.
Troubleshooting
This chapter summarizes the most common problems you could encounter with the appliance. If you are unable to solve the problem with the information below, contact the Consumer Care Center in your country.
Problem Possible solution
| The appliance does not work properly. The filter replacement alert is on but you have not replaced the corresponding filter. As a result, the appliance is now locked. In this case, replace the filter and reset the filter lifetime counter. | |
| The airflow that comes out of the air outlet is significantly weaker than before. | The surface of the filter is dirty. Clean the surface of the filter (see Chapter 'Cleaning and maintenance'). |
| The air quality does not improve, even though the appliance has been operating for a long time. | Check if the packing material is removed from the filter. |
| Make sure that the filter (FY0910) is properly installed. | |
24 English
| Room size is large or the outdoor air quality is poor.For optimum purification performance, please close the doors and windows when operating the air purifier. | |
| There are indoor pollution resources. For instances, smoking, cooking, incense. | |
| Filters reach the end of life. Replace the filter with a new one. | |
| The appliance produces a strange smell. The first few times you use the appliance, it may produce a plastic smell. This is normal. However, if the appliance produces a burnt smell even if removing the filter, contact your Philips dealer or an authorized Philips service center. The filter may produce smell after being used for a while because of the absorption of indoor gases. It's recommended that you put the filter in a well-ventilated place for a couple of hours to reduce the smell. | |
| The appliance is extra loud. It's normal if the appliance runs at the Turbo mode. | |
| In Auto mode, the appliance will run in higher speed when the air quality is poor. When using the appliance in a bedroom at night, choose the Sleep mode. | |
| If there is abnormal sound, contact the Consumer Care Center in your country. | |
| The appliance still indicates that I need to replace filter, but I already did. | Perhaps you did not reset the filter lifetime counter. Switch on the appliance. Then touch and hold the and simultaneously for 3 seconds. |
| Error code "E1" displays on the screen. The motor has malfunctions. Contact the Consumer Care Center in your country. | |
| The Wi-Fi setup is not successful. Please ensure your smart phone is connected to a 2.4GHz (home) Wi-Fi network instead of a 5GHz Wi-Fi network or public Wi-Fi. For a successful pairing, we suggest turning off your mobile data before initiating the pairing process. | |
| Ensure to enable the following permissions: "Location", "Storage", "Bluetooth", and "Local Network" on your smart phone. After a successful Wi-Fi setup, you can change permission settings as desired. | |
| Please verify that you have entered the correct Wi-Fi password. The password is case-sensitive, has a limit of 63 characters. Special symbols are not accepted. | |
| Ensure the network name of your home Wi-Fi is correct. The network name is case-sensitive. | |
| If you are using a VPN on your smart phone, please turn it off before starting the pairing process. | |
| If your router has a whitelist set up to block pairing, please disable the whitelist to ensure successful connection. | |
Please ensure that both your device and smart phone are within 10 meters of the router.
| Ensure the app has been updated to the latest version. | |
| To ensure a strong Wi-Fi connection, avoid placing your device near other electronic devices, bright light sources, or signal stations that may cause interference. If you experience connectivity issues, move the device away from these sources and attempt to reconnect it to the Wi-Fi network. | |
| Consult the help section in the app for extensive and up-to-date troubleshooting tips. |
Warranty and support
Versuni offers a two-year warranty after purchase on this product. This warranty is not valid if a defect is due to incorrect use or poor maintenance. Our warranty does not affect your rights under law as a consumer. For more information or for invoking the warranty, please visit our website www.philips.com/support.
Order parts or accessories
If you have to replace a part or want to purchase an additional part, go to your Philips dealer or visit www.philips.com/support.
If you have problems obtaining the parts, please contact the Philips Consumer Care Center in your country.
Penting
A Panel kawalan D Penapis (FY0910)
Butang kawalan:
| Butang kuasa hidup/mati Butang lampu hidup/mati | |
| Butang suis mod | |
| Tekan lama butang selama 3 saat:Kunci keselamatan kanak-kanak Tetap semulaiWi-Fi | |
| Tetap semula penapis | |
| Panel paparan:Mod auto Mod sederhana | |
| Mod tidur Mod turbo | |
| Penunjuk Wi-Fi Penanda kunci keselamatan kanak-kanak | |
| Amaran pembersihan penapis Amaran penggantian penapis |
Bermula
Memasang penapis
Tetapkan semula sambungan Wi-Fi

2 Buka penutup sensor kualiti udara.

5 Tutup sensor kualiti udara.

控制按鈕:
1 將產品倒置並放置在軟布上。

3 移除空氣淨化濾網的所有包裝物料。

連接電源變壓器至:
- 首先,連接至產品上的電源變壓器。
- 然後,連接至牆上的電源插座。
了解 Wi-Fi 指示燈
重設 Wi-Fi 連接

2 輕按按鈕開啟本空氣清新機。
- 控制面板開啟。

- 控制面板變暗。

- 控制面板關閉。
設定兒童安全鎖

2 打開空氣質素感應器護蓋。

5 關閉空氣質素感應器。
清潔濾網表面

2 將產品倒置並放置在軟布上。

4 使用吸塵機清潔濾網表面。

6 將空氣清新機的變壓器插入電源插座。
7 按按鈕開啟本產品。


9 清潔濾網後,必須徹底洗淨雙手。
更換濾網
了解清新空氣保護鎖


4 拆去新的濾網上的所有包裝物料。

6 將空氣清新機的變壓器插入電源插座。
7 按按鈕開啟本產品。


9 更換濾網後,必須徹底洗淨雙手。


- قماش ناعمة قماش
لف SPR من الجهاز.
لتر تنقية الهواء.3.

ع إشارة صوتية.

هاز تنقية الهواء.


عرجودة الهواء.

منquentرطب.

منquent جاف.

عرجودة الهواء.5
تنظيف سطح الفلتر


عن مأخذ الطاقة.
- قماشن ناعمة
الف SPR من الجهاز.
العربية 79

مكنسة كهربائية. 4.

الساعة لᵗثبيتها.5.

في مأخذ الطاقة.
[Non-Text]
letشفيل الجهاز.


ت تنظيف الفلتر.8
د تنظيف الفلاتر.9
استبidal الفلتر

عن مأخذ الطاقة.
العربية 81
- قماش ناعمة


(
letشفيل الجهاز 7.


، استهلاك الفلتر.


PHILIPS and the Philips Shield Emblem are registered trademarks of Koninklijke Philips N.V. and are used under license.
This product has been manufactured by and is sold under the responsibility of Versuni Holding B.V., and Versuni Holding B.V. is the warrantor in relation to this product.
2024 © Versuni Holding B.V.
- 6 ENGLISH
- IMPORTANT
- DANGER
- WARNING
- CAUTION
- ELECTROMAGNETIC FIELDS (EMF)
- RECYCLING
- YOUR AIR PURIFIER
- 8 ENGLISH
- PRODUCT OVERVIEW
- CONTROLS OVERVIEW
- GETTING STARTED
- INSTALLING THE FILTER
- 10 ENGLISH
- CONNECTING POWER
- UNDERSTANDING WI-FI INDICATOR
- WI-FI ICON STATUS WI-FI CONNECTION STATUS
- WI-FI CONNECTION
- SETTING UP THE WI-FI CONNECTION FOR THE FIRST TIME
- 12 ENGLISH
- RESET THE WI-FI CONNECTION
- USING THE AIR PURIFIER
- UNDERSTANDING THE AIR QUALITY LIGHT
- PM2.5
- TURNING ON AND OFF
- ENGLISH
- CHANGING THE MODE SETTING
- USING THE LIGHT ON/OFF FUNCTION
- SETTING THE CHILD LOCK
- CLEANING AND MAINTENANCE
- CLEANING SCHEDULE
- FREQUENCY CLEANING METHOD
- CLEANING THE BODY OF THE AIR PURIFIER
- CLEANING THE PARTICLE SENSOR
- CLEANING THE SURFACE OF THE FILTER
- REPLACING THE FILTER
- UNDERSTANDING THE HEALTHY AIR PROTECT LOCK
- 22 ENGLISH
- FILTER RESET
- STORAGE
- TROUBLESHOOTING
- WARRANTY AND SUPPORT
- ORDER PARTS OR ACCESSORIES
- PENTING
- BERMULA
- MEMASANG PENAPIS
- TETAPKAN SEMULA SAMBUNGAN WI-FI
- 了解 WI-FI 指示燈
- 重設 WI-FI 連接
- 設定兒童安全鎖
- 清潔濾網表面
- 更換濾網
- 了解清新空氣保護鎖
- تنظيف سطح الفلتر
- استبIDAL الفلتر
Brand : PHILIPS
Model : AC0950
Category : Air purifier