
W WC51201 - Refrigerator WHIRLPOOL - Free user manual and instructions
Find the device manual for free W WC51201 WHIRLPOOL in PDF.


| Product type | Refrigerator |
| Brand | Whirlpool |
| Model | W WC51201 |
| Height (cm) | 180 |
| Width (cm) | 60 |
| Depth (cm) | 65 |
| Net weight (kg) | 60 |
| Power supply | 220-240 V, 50 Hz |
| Energy class | E (old scale) |
| Annual consumption (kWh) | 250 |
| Gross capacity refrigerator (L) | 250 |
| Gross capacity freezer (L) | 70 |
| Noise level (dB) | 39 |
| Cooling type | Ventilated (No Frost) |
| Defrosting | Automatic |
| Main functions | Refrigeration, freezing, LED lighting, glass shelves |
| Maintenance and cleaning | Clean the interior with soapy water; do not use abrasive products |
| Safety | Child lock (depending on model), door open alarm |
| Spare parts and repairability | Repairability index: 7.2/10; available parts (motor, thermostat, seals) |
| Warranty | 2 years |
Frequently Asked Questions - W WC51201 WHIRLPOOL
User questions about W WC51201 WHIRLPOOL
0 question about this device. Answer the ones you know or ask your own.
Ask a new question about this device
Download the instructions for your Refrigerator in PDF format for free! Find your manual W WC51201 - WHIRLPOOL and take your electronic device back in hand. On this page are published all the documents necessary for the use of your device. W WC51201 by WHIRLPOOL.
USER MANUAL W WC51201 WHIRLPOOL


STANDARD
STORAGE
Location and power connection
Technical information
Product Description, 23
Interior Parts
Control Panel
Using the Wine Cellar, 24-25
Bottle ageing compartment
Manual temperature control
Taking out the wooden shelves
Table of ideal wine temperatures
Stocking the wine bottles, 26
How to stock the bottles
Maintenance and troubleshooting, 27
Care and Maintenance
Troubleshooting
Assistance, 28
SAFETY INSTRUCTIONS
IMPORTANT to be read and observed
Before using the appliance, read these safety instructions. Keep them nearby for future reference.
These instructions and the appliance itself provide important safety warnings, to be observed at all times. The manufacturer declines any liability for failure to observe these safety instructions, for inappropriate use of the appliance or incorrect setting of controls.
⚠️ Very young children (0-3 years) should be kept away from the appliance. Young children (3-8 years) should be kept away from the appliance unless continuously supervised.
Children from 8 years old and above and persons with reduced physical, sensory or mental capabilities or lack of experience and knowledge can use this appliance only if they are supervised or have been given instructions on safe use and understand the hazards involved. Children must not play with the appliance. Cleaning and user maintenance must not be carried out by children without supervision. Children aged from 3 to 8 years are allowed to load and unload refrigerating appliances.
PERMITTED USE
⚠️ CAUTION: The appliance is not intended to be operated by means of an external switching device, such as a timer, or separate remote controlled system. This appliance is intended to be used in household and similar applications such as: staff kitchen areas in shops, offices and other working environments; farm houses; by clients in hotels, motels, bed & breakfast and other residential environments. This appliance is not for professional use. Do not use the appliance outdoors. ⚠️ The bulb used inside the appliance is specifically designed for domestic appliances and is not suitable for general
room lighting within the home (EC Regulation 244/2009).
The appliance is designed for operation in places where the ambient temperature comes within the following ranges, according to the climatic class given on the rating plate. The appliance may not work properly if it is left for a long time at a temperature outside the specified range.
Climatic Class Amb. T. (°C)
SN: From 10 to 32 °C
ST: From 16 to 38 °C;
N: From 16 to 32 °C
T: From 16 to 43 °C
This appliance does not contain CFCs. The refrigerant circuit contains R600a (HC). Appliances with Isobutane (R600a): isobutane is a natural gas without environmental impact, but is flammable. Therefore, make sure the refrigerant circuit pipes are not damaged, especially when emptying the refrigerant circuit.
⚠ WARNING: Do not damage the appliance refrigerant circuit pipes. ⚠ WARNING: Keep ventilation openings, in the appliance enclosure or in the built-in structure, clear of obstruction. ⚠ WARNING: Do not use mechanical, electric or chemical means other than those recommended by the Manufacturer to speed up the defrost process. ⚠ WARNING: Do not use or place electrical devices inside the appliance compartments if they are not of the type expressly authorised by the Manufacturer. ⚠ WARNING: Ice makers and/or water dispensers not directly connected to the water supply must be filled with potable water only. ⚠ Do not store explosive substances such as aerosol cans and do not place
or use gasoline or other flammable materials in or near the appliance.
Do not swallow the contents (non-toxic) of the ice packs (provided with some models). Do not eat ice cubes or ice lollies immediately after taking them out of the freezer since they may cause cold burns.
Do not store glass containers with liquids in the freezer compartment since they may break. Do not obstruct the fan (if included) with food items. After placing the food check that the door of compartments closes properly, especially the freezer door.
⚠️ Damaged gaskets must be replaced as soon as possible.
This appliance is intended to be used exclusively for the storage of wine in the wine storage compartment, for storing fresh food in the drawer in refrigerator mode and for storing frozen food, freezing fresh food and making ice cubes in the drawer in freezer mode. Always store bottles without their packaging and not inside crates or boxes. The capacity of the wine storage compartment is indicated in the chapter describing the stocking of wine bottles.
⚠️ Avoid storing unwrapped food in direct contact with internal surfaces of the refrigerator or freezer compartments. Appliances could have special compartments (Fresh Food Compartment, Zero Degree Box,...).
Unless differently specified in the specific booklet of product, they can be removed, maintaining equivalent performances.
⚠️ C-Pentane is used as blowing agent in the insulation foam and it is a flammable gas.
The most appropriate part of the drawer where specific types of food are to be stored, taking into account different temperature distribution in different compartments in the appliance, are as follows:
- Refrigerator mode:
1) Upper area of the refrigerator compartment - temperature zone: Store tropical fruit, cans, drinks, eggs, sauces, pickles, butter, jam
2) Middle area of the refrigerator compartment - cool zone: Store cheese, milk, dairy food, deli food, yoghurt
3) Lower area of the refrigerator compartment
- coldest zone: Store cold cuts, desserts, meat and fish, cheesecake, fresh pasta, sour cream, pesto/salsa, home-cooked food, pastry cream, pudding and cream cheese
4) The bottom of the refrigerator compartment:
Store vegetables and fruits (excluding tropical fruits)
- Freezer mode:
Purchased frozen food has the storage expiration date stated on the packaging. This date takes into account the type of food being stored and therefore this date should be respected. Fresh food should be stored for the following time periods: 1-3 months for cheese, shellfish, ice cream, ham/sausage, milk, fresh liquids; 4 months for steak or chops (beef, lamb, pork); 6 months for butter or margarine, poultry (chicken, turkey);
8-12 months for fruits (except citrus), roast meat (beef, pork, lamb), vegetables. Expiration dates on the packaging of foods must be respected. To avoid food contamination, please observe the following:
a significant increase of the temperature in the compartments of the appliance.
- Regularly clean surfaces that may come into contact with food and accessible drainage systems.
– Clean water tanks if they have not been used for 48 h; flush the water system connected to a water supply if water has not been drawn for 5 days.
- Store raw meat and fish in suitable containers in the refrigerator, so that it does not come into contact with or drip onto other food.
- Two-star frozen food compartments are suitable for storing pre-frozen food, storing or making ice cream and ice cubes.
- Do not freeze fresh food in one, two or three-star compartments.
- If the refrigerating appliance is left empty for long periods, switch it off, defrost, clean, dry, and leave the door open to prevent mould from developing inside the appliance.
INSTALLATION
⚠️ The appliance must be handled and installed by two or more persons - risk of injury. Use protective gloves to unpack and install - risk of cuts.
⚠️ Installation, including water supply (if any), electrical connections, and repairs must be carried out by a qualified technician. Do not repair or replace any part of the appliance unless specifically stated in the user manual. Keep children away from the installation site. After unpacking the appliance, make sure that it has not been damaged during transport. In the event of problems, contact the dealer or your nearest Aftersales Service. Once installed, packaging waste (plastic, styrofoam parts, etc.) must be stored out of reach of children - risk of suffocation. The appliance must be disconnected from the power supply before any installation operation - risk of electric shock. During installation, make sure the appliance does not damage the power cable - risk of fire or electric shock. Only activate the appliance when the installation has been completed.
⚠️ Be careful not to damage the floors (e.g., parquet) when moving the appliance. Install the appliance on a floor or support strong enough to take its weight and in a place suitable for its size and use. Make sure the appliance is not near a heat source and that the four
feet are stable and resting on the floor, adjusting them as required, and check that the appliance is perfectly level using a spirit level. Wait at least two hours before switching the appliance on, to ensure that the refrigerant circuit is fully efficient.
⚠ WARNING: When positioning the appliance, ensure the supply cord is not trapped or damaged. WARNING: To avoid a hazard due to instability, positioning or fixing of the appliance must be done in accordance with the manufacturer's instructions. It is forbidden to place the refrigerator in such a way that the metal hose of a gas stove, metal gas or water pipes, or electrical wires are in contact with the refrigerator's back wall (condenser coil). ⚠️ To guarantee adequate ventilation, leave a space on both sides and above the appliance. The distance between the rear of the appliance and the wall behind it should be 50mm, to avoid access to hot surfaces. A reduction of this space will increase the energy consumption of the product.
ELECTRICAL WARNINGS
It must be possible to disconnect the appliance from the power supply by unplugging it if the plug is accessible, or by a multi-pole switch installed upstream of the socket in accordance with the wiring rules. The appliance must be earthed in conformity with national electrical safety standards. Do not use extension leads, multiple sockets, or adapters. The electrical components must not be accessible to the user after installation. Do not use the appliance when you are wet or barefoot. Do not operate this appliance if it has a damaged power cable or plug, if it is not working properly, or if it has been damaged or dropped. If the supply cord is damaged, it must be replaced with an identical one by the manufacturer, its service agent, or similarly qualified persons in order to avoid a hazard - risk of electric shock.
WARNING: Do not locate multiple portable socket-outlets or portable power supplies at the rear of the appliance.
CLEANING AND MAINTENANCE
WARNING: Ensure that the appliance is switched off and disconnected from the power supply before performing any maintenance operation; never use steam cleaning equipment - risk of electric shock.
Do not use abrasive or harsh cleaners such as window sprays, scouring cleansers, flammable fluids, cleaning waxes, concentrated detergents, bleaches, or cleansers containing petroleum products on plastic parts, interior and door liners, or gaskets. Do not use paper towels, scouring pads, or other harsh cleaning tools.
DISPOSAL OF PACKAGING MATERIALS
The packaging material is 100% recyclable and is marked with the recycle symbol. The various parts of the packaging must therefore be disposed of responsibly and in full compliance with local authority regulations governing waste disposal.
DISPOSAL OF HOUSEHOLD APPLIANCES
This appliance is manufactured with recyclable or reusable materials. Dispose of it in accordance with local waste disposal regulations. For further information on the treatment, recovery, and recycling of household electrical appliances, contact your local authority, the collection service for household waste, or the store where you purchased the appliance. This appliance is marked in compliance with European Directive 2012/19/EU, Waste Electrical and Electronic Equipment (WEEE). By ensuring this product is disposed of correctly, you will help prevent negative consequences for the environment and human health. The symbol on the product or on the accompanying documentation indicates that it should not be treated as domestic waste but must be taken to an appropriate collection centre for the recycling of electrical and electronic equipment.
ENERGY SAVING TIPS
To guarantee adequate ventilation, follow the installation instructions. Insufficient ventilation at the back of the product increases energy consumption and decreases cooling efficiency. Frequent door opening might cause an increase in energy consumption. The internal temperature of the appliance and the energy consumption may also be affected by the ambient temperature, as well as the location of the appliance. Temperature setting should take these factors into consideration. Reduce door opening to a minimum. When thawing frozen food, place it in the refrigerator. The low temperature of the frozen products cools the food in the refrigerator. Allow warm food and drinks to cool down before placing them in the appliance.
Positioning of the shelves in the refrigerator has no impact on the efficient usage of energy. Food should be placed on the shelves in such a way to ensure proper air circulation (food should not touch each other, and distance between food and the rear wall should be kept).
You can increase storage capacity of frozen food by removing baskets and, if present, the Stop Frost shelf. Do not worry about noises coming from the compressor, which are normal operation noises.
Installation
Positioning and connection
Unpacking
- Carefully remove the protections and the adhesives, open the door, and make sure all the components are present.
- Take out the power supply cable.
Positioning
- Position the device in a well-ventilated area, not damp and free (avoid cabinets with closed walls).
- Keep the device away from heat sources.
- Make sure the minimum distances between the device and the walls of the room where it is placed are kept, in order to ensure perfect ventilation of the device.
See figure.

Wiring connection
After transport, stand the device vertically, and wait for at least 3 hours before connecting it to the wiring system. Before putting the plug into the power socket, make sure that:
• the socket is earthed and complies with legal regulations; - the socket can handle the maximum power load of the machine, as indicated on the Data Sheet table or on the feature plate at the bottom right (see Description of the device); - the power supply voltage falls within the range indicated on the Data Sheet table or on the feature plate at the bottom right (see Description of the device); - the power socket is compatible with the plug of the device. Otherwise, replace the socket or the plug; do not use extensions or multiple sockets.


Product Description
Interior Parts
Control Panel
Using the wine cellar
Bottle ageing compartment
The ageing compartment's main function is to guarantee that your wines are preserved in optimal conditions.
The temperature has been set at the factory to a temperature that is considered excellent in most cases and is 15°C in the upper compartment.
Wine has a complex nature and derives from a long and slow process. To best express its attributes, very specific conditions are necessary. All wines are preserved at the same temperature, but, depending on their different characteristics, wines are served and tasted at very different temperatures (see the Table of ideal wine temperatures).
Therefore, just as for manufacturers' wine cellars, for your new appliance, the absolute temperature value is not important for preserving your wine. Rather, the constant temperature over time is important. Wine preservation is ideal at any temperature, as long as that temperature does not vary.
Manual temperature control
When you plug in your wine cellar, the display shows the temperature inside the cellar: it has been set to reach 15°C and become steady on it.
Should you need to adjust it, follow the instructions below:
1. When you plug in your wine cellar, the display shows the temperature that has been set. 2. Press the + button for one second (see the Control Panel). The temperature will begin to blink. 3. Press the + or - buttons until you reach the desired temperature. 4. Wait 5 seconds for the temperature to stop blinking. 5. Wait until the wine cellar reaches its temperature before you place the wine bottles inside.
The inside light does not go on (or it goes off temporarily) when the inside temperature goes over 24°C. This allows you to reach the pre-set temperature more quickly.
Taking out the wooden shelves
WARNING: The wooden shelves are not sliding.
Do not take them out when loaded with bottles, to prevent the risk of the bottles breaking.
You can take the shelves out for cleaning only when they are not loaded with any bottles.
Table of ideal wine temperatures
This table indicates the approximate temperatures at which wine should be served. Should one of your wines need to be served at a temperature that is greater than the temperature inside your wine cellar, we suggest that you leave it out for the time that is necessary before you serve it.
| Amarone 17°C Dry and Sweet Sparkling Wines | 6°C | ||
| Barbaresco 17°C | Verdicchio di Matelica e dei Castelli di Jesi | 8°C | |
| Barolo 17°C | White wines from Trentino Alto Adige | 11°C | |
| Beaujolais 13°C Franciacorta White Wines | |||
| White liquered Bordeaux 6°C Dry aromatic white wines 10°C | |||
| Dry White Bordeaux 8°C | Dry, young, and fruity white wines | 8°C | |
| Red Bordeaux 17°C | White wines from Friuli Venezia Giulia | 11°C | |
| White Bourgogne 11°C Rodano wines 15°C | |||
| Red Bourgogne 18°C Dry white wines from the Loire 10°C | |||
| Brunello | 17°C Lique red wines from the Loire 7°C | ||
| Champagne | 6°C Red wines from the Loire 14°C | ||
| Chianti Classico | 16°C | Liquered Passito wines | 8-18°C |
| Languedoc-Roussillon | 13°C Rosè | Wines, New Wines 12°C | |
| Passito di Pantelleria | 6°C | Light red wines with mild tannic | 14°C |
| Rosé Provence | 12°C | Red, rather tannic wines with medium structure | 16°C |
Stocking the wine bottles
Standard 24-bottle stock
The 24-bottle stock (for standard, mixed, and renana bottles) is recommended for wines that need to be visible and easily removed.
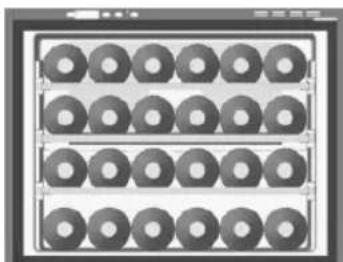
STANDARD
24 Bottles (100% lying down)
3 shelves
Position each bottle into the slots on the 3 wooden shelves. 6 bottles can be placed on the bottom of the wine cellar.
We suggest you place the Renana bottles onto the lower shelf and the bottom of the wine cellar because they have been specially designed to hold larger bottles.
! The wooden shelf can safely hold up to 22 bottles

Champagne bottle stock
Champagne bottles are larger than standard bottles. They must be placed onto the base of the wine cellar, which can hold up to 5.
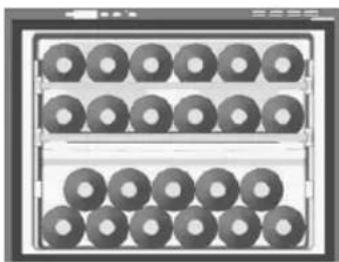
If you want to stock more than 5 Champagne bottles in your wine cellar, remove the 3rd shelf and stock the bottles in two rows (placing the bottles in the second row between those on the bottom row). This will hold up to 9 bottles.
Some stocking configurations

PRESERVATION
28 Bottles (100% lying down)
Maintenance and troubleshooting
Care and maintenance
Disconnecting the wine cellar
During cleaning and maintenance, it is imperative that you unplug the wine cellar.
Troubleshooting
If you notice that your wine cellar is not working properly, check the following list before you call your Service Centre.
| Problem Possible causes/solutions | |
| The compressor does not work • The plug is not pl | plugged into the wall-outlet or not enough to make contact. Or, there could be a power failure in your home.• The wall-outlet is not in working order. Plug the wine cellar into another wall-outlet to check. |
| The compressor never stops • Contact the Service | Centre |
! Any work that is done to the wine cellar should be performed by your authorized local Service Centre. ! Short term faults, such as power failure, will not compromise the wines. It is only when working faults are left unsettled for a long time that the wine may suffer.
! The appliance was designed and manufactured in compliance with international safety standards. The following warnings are provided for safety reasons and must be read carefully.
This appliance complies with the following Community Directives:
CE
- Low Voltage Directive (LVD) 2014/35/EU
- The Electromagnetic compatibility (EMC) Directive 2014/30/EU
- RAEE Directive 2012/30/EU
Disposal

- Observe local environmental standards when disposing packaging material for recycling purposes.
- Directive 2012/19/EU on Waste Electrical and Electronic Equipment (WEEE 2 Directive), requires that old household electrical appliances must not be disposed of in the normal unsorted municipal waste stream. Old appliances must be collected separately in order to optimise the recovery and recycling of the materials they contain and reduce the impact on human health and the environment. The crossed out “wheeled bin” symbol on the product reminds you of your obligation, that when you dispose of the appliance it must be separately collected.
Consumers should contact their local authority or retailer for information concerning the correct disposal of their old appliance.
Assistance
Before calling for Assistance:
- Check if the malfunction can be solved on your own (see Troubleshooting).
- If after all the checks, the appliance still does not operate or the problem persists, call the nearest Service Centre
Communicating:
- type of malfunction • appliance model (Mod.)
- serial number (S/N)
This information can be found on the data plate located on the bottom left side of the refrigerator compartment.

EXAMPLE OF LABEL
Never call on unauthorized technicians and always refuse spare parts which are not originals.
USER GUIDE
IT Italiano, 4
EN English, 17
FR Français, 29
ES Español, 42
DE Deutsch, 55
RU Русский, 68
KZ Казакша, 81
NL Nederlands, 94
PT Português, 107
Table of contents
STANDARD
CONSERVATION
STANDARD
CONSERVATION
Power connection
Product description
Interior parts
Control panel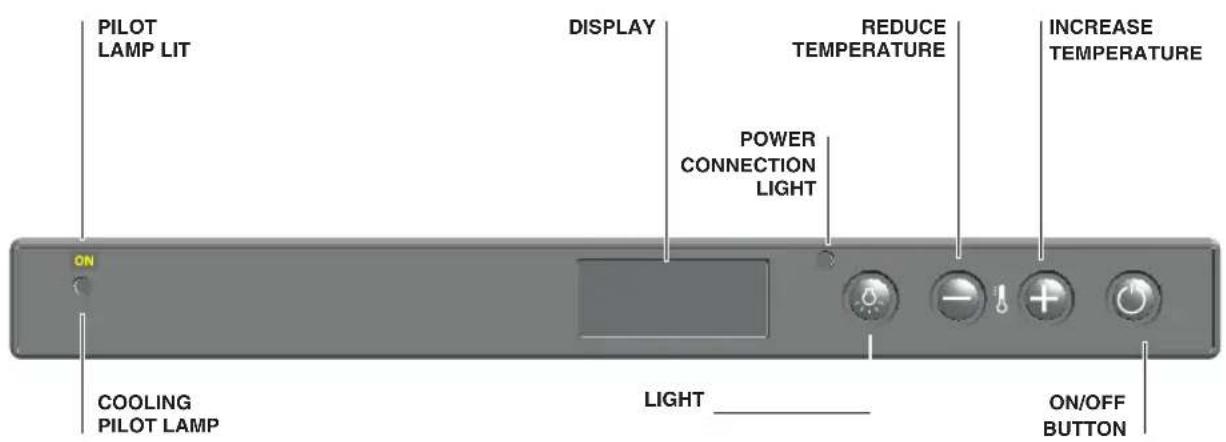
STANDARD
CONSERVATION
Appliance description
STANDARD SCHEME
CONSERVATION
Wiring connection
Product description
Interior parts
Control panel
Using the wine cellar
STANDARD
PRESERVING
Connection
Product description
Internal parts
Control panel
STANDARD
PRESERVING
Removing the wooden shelves
How to store the bottles
Wiring connection
Removing the wooden shelves
STANDARD
24 bottles (lying down at 100%)
3 shelves
Place each bottle in the grooves of the 3 wooden shelves. 6 bottles can be placed on the bottom of the wine cellar.
Champagne bottle stock
PRESERVATION
28 bottles (lying down at 100%)
- STANDARD
- STORAGE
- PRODUCT DESCRIPTION
- USING THE WINE CELLAR
- STOCKING THE WINE BOTTLES
- MAINTENANCE AND TROUBLESHOOTING
- SAFETY INSTRUCTIONS
- IMPORTANT TO BE READ AND OBSERVED
- PERMITTED USE
- CLIMATIC CLASS AMB. T. (°C)
- INSTALLATION
- ELECTRICAL WARNINGS
- CLEANING AND MAINTENANCE
- DISPOSAL OF PACKAGING MATERIALS
- DISPOSAL OF HOUSEHOLD APPLIANCES
- ENERGY SAVING TIPS
- POSITIONING AND CONNECTION
- UNPACKING
- POSITIONING
- WIRING CONNECTION
- BOTTLE AGEING COMPARTMENT
- MANUAL TEMPERATURE CONTROL
- TAKING OUT THE WOODEN SHELVES
- TABLE OF IDEAL WINE TEMPERATURES
- STANDARD 24-BOTTLE STOCK
- CHAMPAGNE BOTTLE STOCK
- SOME STOCKING CONFIGURATIONS
- CARE AND MAINTENANCE
- DISCONNECTING THE WINE CELLAR
- TROUBLESHOOTING
- CE
- DISPOSAL
- ASSISTANCE
- BEFORE CALLING FOR ASSISTANCE
- COMMUNICATING
- USER GUIDE
- TABLE OF CONTENTS
- CONSERVATION
- POWER CONNECTION
- APPLIANCE DESCRIPTION
- STANDARD SCHEME
- CONNECTION
- PRESERVING
- REMOVING THE WOODEN SHELVES
Brand : WHIRLPOOL
Model : W WC51201
Category : Refrigerator