
CX2550 - Air conditioner PHILIPS - Free user manual and instructions
Find the device manual for free CX2550 PHILIPS in PDF.


| Product Type | Portable Air Conditioner |
| Model | CX2550 |
| Brand | Philips |
| Cooling Capacity | 9000 BTU/h |
| Power Supply | 220-240 V ~ 50 Hz |
| Power Consumption (Cooling) | 900 W |
| Energy Efficiency Class | A |
| Airflow Volume | 300 m³/h |
| Noise Level | 52 dB(A) |
| Dimensions (W x D x H) | 35 x 45 x 70 cm |
| Weight | 28 kg |
| Refrigerant | R32 |
| Timer | 24-hour programmable timer |
| Remote Control | Yes, included |
| Filter Type | Washable mesh filter |
| Air Purification | Integrated PM2.5 filter |
| Cooling Modes | Cool, Fan, Dry, Auto |
| Fan Speeds | 3 speeds |
| Swing Function | Vertical auto swing |
| Installation | Window kit included |
| Maintenance | Clean filter every 2 weeks |
| Safety Features | Overheat protection, auto shut-off |
| Spare Parts Availability | Filters and remote available via Philips service |
Frequently Asked Questions - CX2550 PHILIPS
User questions about CX2550 PHILIPS
0 question about this device. Answer the ones you know or ask your own.
Ask a new question about this device
Download the instructions for your Air conditioner in PDF format for free! Find your manual CX2550 - PHILIPS and take your electronic device back in hand. On this page are published all the documents necessary for the use of your device. CX2550 by PHILIPS.
USER MANUAL CX2550 PHILIPS
natural_image
Modern office fan with a metallic stand and circular fan blade, no visible text or symbols.English 4
Bahasa Melayu 13
23 العربية
Important
Read this user manual carefully before you use the appliance, and save it for future reference.
Danger
- Do not let any liquid or flammable detergent enter the appliance, to avoid electric shock and/or a fire hazard.
Warning
- This appliance can be used by children aged from 8 years and above and persons with reduced physical, sensory or mental capabilities or lack of experience and knowledge if they have been given supervision or instruction concerning use of the appliance in a safe way and understand the hazards involved.
- Children of less than 3 years should be kept away unless continuously supervised.
- Children shall not play with the appliance.
- Cleaning and maintenance shall not be made by children without supervision.
- Take care that curtains or other objects are not sucked into the fan during operation.
- Do not insert fingers, sticks or other objects into the machine, in order to avoid electric shocks physical injury or fire.
- Do not use the appliance near gas appliances, fireplaces.
- Do not spray any flammable materials such as insecticides or fragrance around the appliance.
- If the power cord is damaged, you must have it replaced by Philips, a service center authorized by Philips, or similarly qualified persons in order to avoid a hazard.
Caution
- Always place and use the appliance on a dry, stable, and horizontal surface.
- Do not use the appliance in surroundings with high humidity such as the bathroom, toilet, kitchen, swimming pool, or any outdoor environment.
- Always unplug the appliance when you want to move, clean appliance, or carry out other maintenance. After assembly, do not remove the guards during use or cleaning.
- The appliance is only intended for household use under normal operating conditions.
- Keep product away from fire and do not expose them to direct sunlight or high temperatures.
- Keep long hair away from working appliance, to avoid hair get tangled in appliance.
Electromagnetic fields (EMF)
This appliance complies with the applicable standards and regulations regarding exposure to electromagnetic fields.
Recycling
Do not throw away the product with the normal household waste at the end of its life, but hand it in at an official collection point for recycling. By doing this, you help to preserve the environment.
Follow your country's rules for the separate collection of electrical and electronic products. Correct disposal helps prevent negative consequences for the environment and human health.
Your pedestal fan
Product overview

B Lower pillar F Fan blade
C Base G Spinner
D Rear grill H Front grill
Controls overview

Getting started
Installing the fan

natural_image
Diagram showing a rod being inserted into a container with an arrow indicating rotation (no text or symbols present)Remove all packaging of the fan before first use.
Make sure all components of the fan are correctly installed and fastened.
1 Insert the lower pillar into the base, and turn it clockwise until it is secured and fixed in the position.

natural_image
Diagram of a medical or laboratory device with an inset showing a mechanical component being inserted (no text or symbols present)2 Align the upper pillar with the lower pillar and securely fasten it by turning it clockwise.

3 Rotate the spinner in a clockwise direction to detach it from the motor.

natural_image
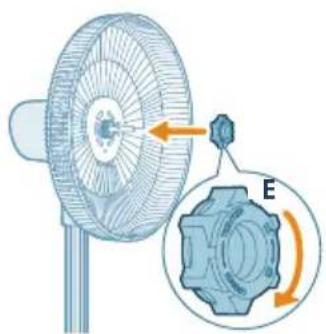
Diagram of a mechanical device with a gear and directional arrows indicating rotation (no text or symbols)4 Turn the plastic nut counterclockwise to detach it from the motor.

natural_image
Diagram of a fan with internal components and directional arrows indicating motion (no text or symbols)5 Secure the rear grill to the motor by aligning the mounting hole on the rear grill with the bolt on the motor.

natural_image
Illustration of a desktop fan with a gear mechanism showing rotational direction (no text or symbols)6 Turn the plastic nut clockwise to secure the rear grill.

natural_image
Diagram of a turbine fan assembly with internal blades and a separate fan blade (no text or labels)7 Install the fan blade as indicated in the illustration.

8 Rotate the spinner in a counterclockwise direction to secure the fan blade.

natural_image
Technical illustration of a mechanical component with an inset showing a cutaway view (no text or symbols)9 Secure the top buckle first and then use your hands to connect the front grill to the rear grill.

10 Align the bottom buckle on the grill and use a screw driver to securely fasten the rear and front grill together.
Using your pedestal fan
Turning on and off

natural_image
Illustration of a fan with a power outlet and cable, showing no text or symbols1 Put the plug in the power socket.

natural_image
Illustration of a megaphone emitting a light beam with a power button, accompanied by a hand interacting with it (no text or symbols present)2 Press the Button to switch on the fan. The appliance beeps once.

natural_image
Illustration of a fan with a power button and a hand pressing it (no text or symbols)3 Press the button again to switch off the fan.
Changing the fan speed

- You can choose the fan speed 1, fan speed 2, fan speed 3, sleep mode or the natural wind mode by pressing the 📧 button.
Manual speed (1, 2, 3): In manual mode, the fan operates on speed 1, speed 2 or speed 3.

Sleep mode (Q) Experience a cool and peaceful night's sleep with the Sleep mode. This mode gradually decreases the fan speed to the lowest setting over 30 minutes, helping you fall asleep naturally while also conserving energy.

Natural breeze mode ( ) Adjusts fan speeds up and down to mimic the natural movement of air and bring the refreshing feeling of an outdoor breeze into the room.
Using the timer function

Press the Ⓑ button repeatedly to choose from 1, 2, 3, 4, 8, or 12 hours, when the fan is on or off. Once the timer ends, the fan will either stop or start operating automatically.
After the set timer has ended:
When the fan is off
- The fan will be turned on automatically.
When the fan is on
- The fan will be off automatically.
Oscillation
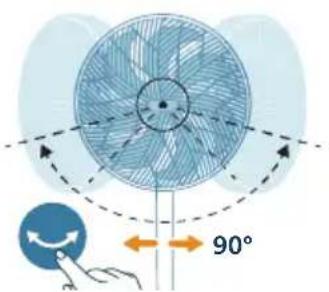
Horizontal oscillation
Press the button on the appliance activate the oscillation feature in your fan. The fan can oscillate horizontally up to 90 degrees.

Vertical oscillation
You can manually adjust the fan to oscillate up to 30 degrees vertically.
Cleaning and maintenance
Always unplug the appliance before you clean it.
Never immerse the appliance in water or any other liquid.
Never use abrasive, aggressive, or flammable cleaning agents such as bleach or alcohol to clean any part of the appliance.
Regularly clean the outside of the fan to prevent dust from collecting.
- Use a soft, dry cloth to clean both the exterior of the appliance and the air outlet.

natural_image
Illustration of hands cleaning a circular object with a handle (no text or symbols)Storage
1 Turn off the appliance and unplug from the power socket.
2 Clean the appliance.
3 Store the appliance in a cool, dry location.
4 Always thoroughly wash hands after cleaning.
Troubleshooting
This chapter summarizes the most common problems you could encounter with the appliance. If you are unable to solve the problem with the information below, contact the Consumer Care Center in your country.
Problem Possible solution
| My fan fails to turn on or off. If the appliance can't be turned on, please ensure the power plug is plugged in properly or try another power socket. |
| If the appliance still doesn't work, contact the Consumer Care Center in your country. |
| My fan is not producing sufficient amount of air or very weak. | Ensure the appliance is set to the highest fan speed for maximum air circulation. Allow the appliance to fully circulate the air throughout the room, this may take few minutes. |
| Ensure all the air inlet and outlet grilles are unobstructed. | |
| The fan produces a strange/burnt smell. The first few times you use the appliance, it may produce a plastic smell. This is normal on new appliance. However, if the appliance produces a burnt smell, turn off the appliance and unplug immediately, then contact the Consumer Care Center in your country. | |
| My fan is too loud. The higher the fan speed setting of the appliance, the louder the noise will be. Set to lower fan speed, the noise will be reduced. | |
| If anything drops into air outlet, it may also cause abnormal loud sound.Immediately turn off appliance, and get the foregin objects out of the appliance. | |
| If there is abnormal sound, contact the Consumer Care Center in your country. | |
| My appliance is loud at Sleep mode. To optimize cooling performance in the Sleep mode, your fan runs at a higher fan speed for the first 30 minutes, gradually decreasing to a lower fan speed. The noise reduces accordingly. You could also choose the lowest fan speed for consistent airflow and lower sound level. | |
| The fan base is wobbly or vibrating. Check if the appliance is placed on the flat floor or surface. | |
| Check if any foreign objects beneath the appliance. | |
| Check if the base of the appliance is properly assembled, | |
| Check the chapter "Installing the fan". | |
Warranty and support
Versuni offers a two-year warranty after purchase on this product. This warranty is not valid if a defect is due to incorrect use or poor maintenance. Our warranty does not affect your rights under law as a consumer. For more information or for invoking the warranty, please visit our website www.philips.com/support.
Penting
A Motor&tiang atas E Nat plastik
B Tiang bawah F Bilah kipas
C Tapak G Pemutar
D Gril belakang H Gril depan
natural_image
Diagram showing a rod being inserted into a container with an arrow indicating rotation (no text or symbols present)
natural_image
Diagram of a medical or laboratory device with an inset showing a mechanical component being inserted (no text or symbols present)natural_image
Diagram of a mechanical device with a gear and directional arrows indicating motion (no text or symbols)natural_image
Diagram of a fan assembly with directional arrows indicating components (no text or labels)natural_image
Illustration of a fan with a gear mechanism showing rotational direction (no text or symbols)natural_image
Diagram of a turbine fan assembly with a propeller and rotor blades (no text or labels)natural_image
Technical illustration of a mechanical component with an inset showing a cutaway view (no text or symbols)natural_image
Illustration of a fan with a power outlet and cable, showing no text or symbolsnatural_image
Illustration of a fan emitting a light beam with a power button, no text or symbols presentnatural_image
Illustration of a fan with a power button connected to a hand (no text or symbols)natural_image
Illustration of hands cleaning a circular object with a handle (no text or symbols)- ماعة

- حرك

natural_image
Diagram of a mechanical device with a gear and directional arrows indicating rotation (no text or symbols)- حرك

natural_image
Diagram of a fan assembly with directional arrows indicating components (no text or symbols)5 على
المحرك.
natural_image
Illustration of a fan with internal components and a gear mechanism diagram showing rotational motion (no text or symbols)- لفي

natural_image
Diagram of a turbine fan assembly with a propeller blade and rotor blades (no text or labels)- مورة

- accounting

natural_image
Technical illustration of a mechanical component with cross-sectional view and magnified detail (no text or symbols)- حلفي

10=معنا
ياحلكام.

natural_image
Illustration of a fan with a power outlet and a separate stand emitting smoke, showing no text or symbols.natural_image
Illustration of a megaphone emitting light with a power button, no text or symbols present
natural_image
Illustration of a hand pressing a button on a fan-shaped device (no text or symbols)

(
- حدة
(
- وحة
تغيير سرعة المروحة
natural_image
Illustration of a hand cleaning a circular object with a handle (no text or symbols)PHILIPS and the Philips Shield Emblem are registered trademarks of Koninklijke Philips N.V. and are used under license.
This product has been manufactured by and is sold under the responsibility of Versuni Holding B.V., and Versuni Holding B.V. is the warrantor in relation to this product.
2024 © Versuni Holding B.V.

- Important
- Danger
- Warning
- Caution
- Electromagnetic fields (EMF)
- Recycling
- Your pedestal fan
- Product overview
- Controls overview
- Getting started
- Installing the fan
- Using your pedestal fan
- Turning on and off
- Changing the fan speed
- Using the timer function
- When the fan is off
- When the fan is on
- Oscillation
- Horizontal oscillation
- Vertical oscillation
- Cleaning and maintenance
- Storage
- Troubleshooting
- Warranty and support
- Penting
- تغيير سرعة المروحة
Brand : PHILIPS
Model : CX2550
Category : Air conditioner