
L1530 - Monitor HP - Free user manual and instructions
Find the device manual for free L1530 HP in PDF.


| Product Type | 15-inch TFT LCD Monitor |
| Model | HP L1530 |
| Display Size | 15 inches (38.1 cm) diagonal |
| Native Resolution | 1024 x 768 (XGA) |
| Contrast Ratio | 400:1 (typical) |
| Brightness | 250 cd/m² (typical) |
| Response Time | 16 ms (typical) |
| Viewing Angle (H/V) | 140° / 120° (typical) |
| Input Connector | VGA (D-Sub) |
| Power Source | External AC/DC adapter (100-240 VAC, 50/60 Hz) |
| Power Consumption (Max) | 30 W |
| Power Consumption (Sleep) | < 2 W |
| Dimensions (W x H x D) | 13.5 x 13.9 x 7.7 inches (344 x 353 x 196 mm) |
| Weight (approx.) | 6.6 lbs (3.0 kg) |
| VESA Mount Compatible | Yes (75 x 75 mm) |
| Main Features | On-screen display (OSD) controls, anti-glare coating, tilt adjustment |
| Maintenance & Cleaning | Wipe with soft dry cloth; avoid liquid cleaners; unplug before cleaning |
| Safety | Compliant with cUL, CE, FCC; use only HP supplied adapter |
| Spare Parts & Repairability | Authorized service only; no user-serviceable parts inside |
| General Information | Manufacturer: Hewlett-Packard; Manual available in PDF |
Frequently Asked Questions - L1530 HP
User questions about L1530 HP
0 question about this device. Answer the ones you know or ask your own.
Ask a new question about this device
Download the instructions for your Monitor in PDF format for free! Find your manual L1530 - HP and take your electronic device back in hand. On this page are published all the documents necessary for the use of your device. L1530 by HP.
USER MANUAL L1530 HP
L1530 and L1730 Flat Panel Monitors
Document Part Number: 335576-B21
July 2003
This guide provides information on setting up the monitor, installing drivers, using the on-screen display menu, troubleshooting and technical specifications.
© 2003 Hewlett-Packard Development Company, L.P.
HP, Hewlett Packard, and the Hewlett-Packard logo are trademarks of Hewlett-Packard Company in the U.S. and other countries.
Adobe, Acrobat, and Acrobat Reader are trademarks or registered trademarks of Adobe Systems Incorporated.
All other product names mentioned herein may be trademarks of their respective companies.
Hewlett-Packard Company shall not be liable for technical or editorial errors or omissions contained herein or for incidental or consequential damages in connection with the furnishing, performance, or use of this material. The information in this document is provided “as is” without warranty of any kind, including, but not limited to, the implied warranties of merchantability and fitness for a particular purpose, and is subject to change without notice. The warranties for HP products are set forth in the express limited warranty statements accompanying such products. Nothing herein should be construed as constituting an additional warranty.
This document contains proprietary information that is protected by copyright. No part of this document may be photocopied, reproduced, or translated to another language without the prior written consent of Hewlett-Packard Company.

WARNING: Text set off in this manner indicates that failure to follow directions could result in bodily harm or loss of life.

CAUTION: Text set off in this manner indicates that failure to follow directions could result in damage to equipment or loss of information.
User's Guide
L1530 and L1730 Flat Panel Monitors
First Edition (July 2003)
Document Part Number: 335576-B21
Contents
1 Product Features
2 Safety and Maintenance Guidelines
Important Safety Information.... 2–1
Maintenance Guidelines.... 2–2
Cleaning the Monitor.... 2-4
Shipping the Monitor.... 2-4
3 Setting Up the Monitor
Connecting the Monitor.... 3-1
Adjusting the Monitor 3-4
Changing the Viewing Position.... 3–5
Removing the Monitor Base.... 3-7
Mounting the Monitor.... 3–9
4 Operating the Monitor
Installing the Information Files 4–1
Front Panel Components 4-2
Adjusting Monitor Settings.... 4-3
Using the On-Screen Display.... 4-4
Adjusting Screen Quality.... 4–7
Optimizing Analog Conversion.... 4–7
Identifying Monitor Conditions.... 4–8
Sleep Timer Mode.... 4–9
A Troubleshooting
Solving Common Problems...... A-1
Using the Worldwide Web...... A-3
Preparing to call Technical Support ...... A–3
B Technical Specifications
Entering User Modes ...... B-4
Energy Saver Feature...... B-5
C Agency Regulatory Notices
Federal Communications Commission Notice...... C-1
Modifications...... C-1
Cables...... C-2
Declaration of Conformity for Products Marked with FCC Logo, United States Only...... C-2
Canadian Notice...... C-3
Avis Canadien...... C-3
European Notice...... C-3
Japanese Notice...... C-3
Korean Notice...... C-4
EPA Energy Star Compliance...... C-4
Power Cord Set Requirements...... C-4
Recycling Information...... C-5
D LCD Monitor Quality and Pixel Policy
LCD Monitor Quality and Pixel Policy
Product Features
The Flat Panel Display has an active matrix, thin-film transistor (TFT), liquid crystal display (LCD). The monitor features include:
L1530 Model
15-inch (38.1 cm) viewable area display.
1024 x 768 resolution, plus full-screen support for lower resolutions.
Wide viewing angle to allow viewing from a sitting or standing position, or moving side-to-side.
Tilt and swivel adjustment capabilities.
Removable pedestal and VESA 75mm and 100mm mounting holes for flexible mounting solutions.
Plug and play capability if supported by your system.
On-screen Display (OSD) adjustments in the following seven different languages: English, French, German, Italian, Spanish, Simplified Chinese, and Japanese for ease of set-up and screen optimization.
Software and Reference Library CD includes an information file (INF), Image color Matching File (ICM), and product documentation.
Energy Saver feature for Energy Star Compliance.
Security lock slot.
AssetControl.
Speakers on the front panel.
Compliant with the following regulated specifications:
EPA ENERGY STAR
European Union CD Directives
Swedish MPR II 1990
Swedish TCO Display Requirements
L1730 Model
17-inch (43.18 cm) viewable area display.
1280 x 1024 native resolution, plus full-screen support for lower resolutions.
Wide viewing angle to allow viewing from a sitting or standing position, or moving side-to-side.
Tilt and swivel adjustment capabilities.
Removable pedestal and VESA 75mm and 100mm mounting holes for flexible mounting solutions.
Plug and play capability if supported by your system.
On-screen Display (OSD) adjustments in the following seven different languages: English, French, German, Italian, Spanish, Simplified Chinese, and Japanese for ease of set-up and screen optimization.
Software and Reference Library CD includes an information file (INF), Image color Matching File (ICM), and product documentation.
Energy Saver feature for Energy Star Compliance.
AssetControl.
Speakers on the front panel.
Compliant with the following regulated specifications:
EPA ENERGY STAR
European Union CD Directives
Swedish MPR II 1990
Swedish TCO Display Requirements
Safety and Maintenance Guidelines
Important Safety Information
A power cord is included with your monitor. If another cord is used, use only a power source and connection appropriate for this monitor. For information on the correct power cord set to use with your monitor, refer to the “Power Cord Set Requirements” section in Appendix C.

WARNING: To reduce the risk of electric shock or damage to your equipment, do not disable the power cord grounding feature. This equipment is designed to be connected to a grounded (earthed) power outlet that is easily accessible to the operator. The grounding plug is an important safety feature.

WARNING: For your safety, be sure that the power outlet you plug the power cord into is easily accessible and located as close to the equipment as possible. When you need to disconnect the power to the equipment, unplug the power cord from the power outlet by grasping the plug firmly. Never pull on the cord.

CAUTION: For the protection of your monitor, as well as your computer, connect all power cords for your computer and its peripheral devices (such as a monitor, printer, scanner) to some form of surge protection device such as a power strip or Uninterruptible Power Supply (UPS). Not all power strips provide surge protection; the power strips must be specifically labeled as having this ability. Use a power strip whose manufacturer offers a Damage Replacement Policy so you can replace your equipment if surge protection fails.
Maintenance Guidelines
To enhance the performance and extend the life of your monitor:
Do not open your monitor cabinet or attempt to service this product yourself. Adjust only those controls that are covered in the operating instructions. If your monitor is not operating properly or has been dropped or damaged, contact your HP authorized dealer, reseller, or service provider.
Use only a power source and connection appropriate for this monitor, as indicated on the label/back plate of the monitor.
Be sure the total ampere rating of the products connected to the outlet does not exceed the current rating of the products connected to the cord does not exceed the rating of the cord. Look on the power label to determine the ampere rating (AMPS or A) for each device.
Install your monitor near an outlet that you can easily reach. Disconnect the monitor by grasping the plug firmly and pulling it from the outlet. Never disconnect the monitor by pulling the cord.
Turn your monitor off when not in use. You can substantially increase the life expectancy of your monitor by using a screen saver program and turning off the monitor when not in use.
Unplug your monitor from the wall outlet before cleaning. Do not use liquid cleaners or aerosal cleaners. Use a damp cloth for cleaning. If the screen requires additional cleaning, use an antistatic screen cleaner.

CAUTION: Do not use benzene, thinner, ammonia, or any other volatile substances to clean your monitor or the screen. These chemicals may damage the cabinet finish as well as the screen.
Slots and openings in the cabinet are provided for ventilation. These openings must not be locked or covered. Never push object of any kind into cabinet slots or other openings.
Do not drop your monitor or place it on an unstable surface.
Do not allow anything to rest on the power cord. Do not walk on the cord.
Keep the monitor in a well-ventilated area, away from excessive heat or moisture.
When removing the monitor base, you must lay the monitor face down on a soft are to prevent it from getting scratched, defaced, or broken.
Cleaning the Monitor
To clean the monitor, follow these steps:
- Turn off the monitor and the computer.
- Dust the monitor by wiping the screen and the cabinet with a soft, clean cloth.
If the screen requires additional cleaning, use a clean cloth dampened with isopropyl alcohol.

CAUTION: Do not use benzene, thinner, ammonia, or any volatile substance to clean the monitor screen or cabinet. These chemicals may damage the monitor. Never use water to clean an LCD screen.
Shipping the Monitor
Keep the original packing box in a storage area. You may need it later if you move or ship your monitor.
Setting Up the Monitor
To set up the monitor, ensure that the power is turned off to the monitor, computer system, and other attached devices, then follow the steps below.
Connecting the Monitor
The monitor has two video signal connectors on the rear panel: one analog (VGA) and one digital (DVI-D). This allows you to connect the monitor to up to two computers at the same time. When two computers are connected, you will need to set the Video Input Select on the on-screen display (OSD) menu to specify which monitor input has priority. Refer to chapter 4, “Operating the Monitor” for OSD menu settings.
- Place the monitor in a convenient, well-ventilated location near your computer.
- Connect the monitor signal cable into the correct video connector (VGA or DVI-D) on the back of the monitor and into the corresponding video connector on the rear panel of the computer.

Your computer must have a DVI-compatible graphics card installed for use with the DVI-D cable. When connecting the DVI-D signal cable to the DVI connector on the monitor, connect the other end of the DVI-D cable to the DVI connector on the computer.
- Connect one end of the power cable to the back of the monitor, and the other end to an electrical wall outlet.

WARNING: To reduce the risk of electrical shock or damage to your equipment:
Do not disable the cord grounding plug. The grounding plug is an important safety feature.
Plug the power cord into a grounded (earthed) electrical outlet that is easily accessible at all times.
Disconnect power from the monitor by unplugging the power cord from the electrical outlet.
Do not place anything on power cords or cables. Arrange them so that no one may accidentally step on or trip on them. Do not pull on a cord or cable. When unplugging from an electrical outlet, grasp the cord by the plug.
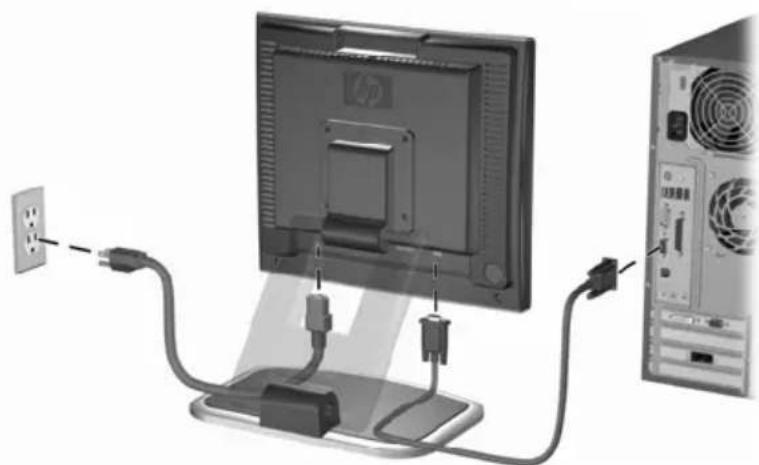
Connecting the VGA Signal and Power Cable

Connecting the DVI-D Signal Cable
- Turn on the power source for both the computer and the monitor.

CAUTION: Burn-in image damage may occur on monitors that display the same static image on screen for a prolonged period of time. To avoid burn-in image damage on your monitor screen, you should always activate a screen saver application or turn off the monitor when it is not in use for a prolonged period of time. Image retention is a condition that may occur on all LCD screens.
- If your monitor includes a PC Comm Station, refer to the documentation included with the accessory for instructions on attaching it to your monitor.
Adjusting the Monitor
The monitor is attached to an adjustable pedestal that allows you to position the monitor screen for the best viewing in your particular environment.
- Grasp the sides of the monitor screen and gently but firmly tilt the top of the screen forward or backward as needed for your comfort.

CAUTION: The maximum forward tilt is 5 degrees. The maximum backward tilt is 25 degrees for operation and 90 degrees for packing only.

Tilting the Monitor
- While still holding the screen sides, move the screen up or down to the appropriate height within the range of the pedestal arm.
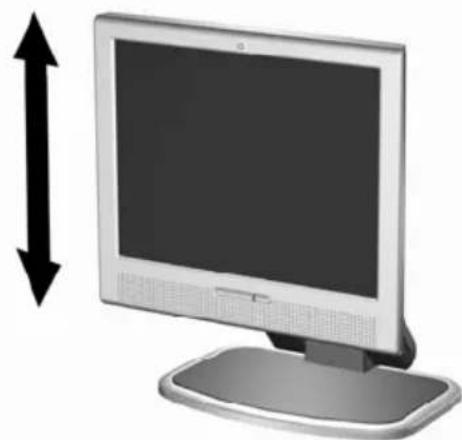
Adjusting the Monitor Height
- Grasp the sides of the monitor screen and swivel the screen left or right (45 degrees) as needed.
Changing the Viewing Position
You can rotate the monitor's viewing position to either a landscape or portrait position.

To rotate the display, you will need to install the Pivot software, which is contained on the CD-ROM included with your monitor. When the CD menu launches, select “Install Pivot Software” and follow the on-screen instructions.
- Tilt the lower part of the monitor upwards.
- Rotate the monitor clockwise until the monitor controls are on the left side.
- Firmly push the lower part of the monitor downwards to secure it to the new position.

Rotating the Monitor Screen
Removing the Monitor Base
You can remove the monitor base to mount the monitor on a wall, a swing arm, or other mounting fixture. Read the caution and warning statements below before beginning the procedure.

CAUTION: Before beginning to disassemble the monitor, be sure the monitor is turned off and the power and signal cables are both disconnected. If your monitor has a connected audio cable, disconnect it.

WARNING: Do not remove the base from the monitor while the monitor is in the upright position. Lay the front bezel down on a soft area to prevent it from getting scratched, defaced, or broken. Before removing the monitor from the base, ensure that the base is set to the maximum base extension. Attempting to remove the monitor from the base while upright in the minimum base extension may result in injury to the user.
- Disconnect and remove the signal and power cables from the back of the monitor.
- Remove the four screws as shown in the following illustration.

Removing the Monitor Base

CAUTION: Ensure that the bottom of the monitor base is positioned over a table or desktop before removing the base from the monitor.
- Remove the monitor base from the monitor.
Mounting the Monitor
- Remove the monitor base. Refer to “Removing the Monitor Base” steps in the previous section.
After the base is removed from the monitor, four threaded mounting holes are exposed on the monitor back panel to be used for mounting purposes. These mounting holes are spaced 75 or 100 mm apart and are compliant with the Video Electronics Standards Association (VESA) standard for mounting flat panel displays.

- Mount the monitor to a swing arm or other mounting fixture by following the instructions included with the mounting fixture to be used.
Operating the Monitor
Installing the Information Files
The CD-ROM included with this monitor contains two information files to be installed onto your computer; an .INF file and an .ICM file.
The .INF file defines monitor resources and provides specifications used by most operating systems to install support software for certain hardware devices. The .INF file ensures monitor compatibility and optimization with your computer's graphics adapter. INF files are also downloadable by clicking: http://www.hp.com/go/support and selecting the desired monitor.
The .ICM file provides color matching consistency from monitor screen to printer and is activated from within graphics programs that have this feature.
To install these files on your computer, insert the Software and Reference Library CD in your computer CD-ROM drive. When the CD menu launches, select “Install INF and ICM Files” and follow the on-screen instructions.
Front Panel Components

L1530 and L1730 Monitor Components
| No. | Control | Function |
| 1 | Speakers Audio feature for music, alarms, etc. (multimedia models only) | |
| 2 | Menu button Launches the On-Screen Display (OSD) menu and selects functions. | |
| 3 | (Minus button) | When OSD is inactive, press to auto-adjust the screen image.When OSD is active, press to navigate in reverse through the OSD and adjust OSD scale settings. |
| 4 | Volume Control Controls the volume level of the monitor speakers. | |
| 5 | + (Plus button) | When the OSD is active, press to navigate through the OSD and adjust OSD scale settings.When the OSD is inactive, press to select VGA or DVI input. |
| 6 | Power LED Fully powered = Green. Sleep mode = Amber. Sleep Timer mode = Flashing Amber. | |
| 7 | Power Switch Powers the monitor on and off. | |
Adjusting Monitor Settings
Use the On-Screen Display (OSD) to adjust the screen image based on your viewing preferences. To access the OSD, do the following:
- If the monitor is not already on, press the Power switch to turn on the monitor.
- To access the OSD Menu, press the Menu button on the monitor's front panel.

- To navigate through the OSD Menu, press the + (Plus) button on the monitor's front panel to scroll up, or the – (Minus) button to scroll in reverse.
- To select an item from the OSD Menu, use the + or - buttons to scroll to and highlight your selection, then press the Menu button to select that function.
- Adjust the item using the + or - buttons on the front panel to adjust the scale.
- After adjusting the function, select Save and Return, or Cancel if you don't want to save the setting, then select Exit from the Main Menu.

If the buttons remain untouched for 10 seconds while displaying a menu, new adjustments will be discarded and the settings will revert to previous settings and exit the menu.
Using the On-Screen Display
There are two On-Screen Display menus available; one for basic adjustments, and one for advanced adjustments.
To access the Basic OSD Menu, press the menu button on the monitor's front panel.
Basic OSD Menu Levels
| Menu Level 1 | Menu Level 2 | |
| Brightness | Adjustment | Scale |
| Contrast | Adjustment | Scale |
| Auto Adjustment |
Basic OSD Menu Levels
| Menu Level 1 | Menu Level 2 |
| Advanced Menu | |
| Exit |
To access the Advanced OSD Menu, press the menu button again, or select Advanced Menu from the Basic OSD Menu.

After selecting the Advanced Menu from the Basic Menu, the Advanced Menu remains the default OSD on subsequent power-ups of the monitor until the Basic Menu is selected or Factory Reset is applied.
The Advanced OSD Menu has up to three sublevels and can be viewed in one of seven available languages. The following table provides the menus and their functions at each level:
Advanced OSD Menu Levels
| Level 1 | Level 2 | Level 3 | Factory Reset | |
| Brightness | Adjustment | Scale | Y | |
| Contrast | Adjustment | Scale | Y | |
| Image Control | Auto Adjustment | “Adjusting” Message Y | ||
| Horizontal | Position | Adjustment Scale | ||
| Vertical | Position | Adjustment Scale | ||
| Clock | Adjustment | Scale | Y | |
| Clock Phase | Adjustment Scale | Y | ||
| Cancel | ||||
| Save and Return | ||||
| Color | 9300 K | |||
| sRGB-6500 | K | Y | ||
| Advanced OSD Menu Levels (Continued) | |||
| Level 1 | Level 2 | Level 3 | Factory Reset |
| Custom Color Custom Color Adjustment | |||
| Cancel | |||
| Save and Return | |||
| Language | Deutsch | ||
| English | N | ||
| Espanol | |||
| Francais | |||
| Italiano | |||
| Simplified | Chinese | ||
| Japanese | |||
| Cancel | |||
| Save and Return | |||
| Management | Power Saver | On / Off Selection N | |
| Power On Recall | On / Off Selection N | ||
| Mode Display | On / Off Selection N | ||
| Sleep Timer | Timer Menu | ||
| Video Input Select | VGA/DVI Selection | ||
| Basic | Menu | ||
| Cancel | |||
| Save and Return | |||
| OSD Control | Horizontal OSD Position | Adjustment Scale Y | |
| Vertical Position | Adjustment Scale Y | ||
| OSD | Timeout | Adjustment Scale Y | |
| OSD Transparency | Adjustment Scale | ||
| Cancel | |||
| Save and Return | |||
| Factory Reset | Yes | ||
| No | |||
| Exit | |||
Adjusting Screen Quality
Allow the monitor to warm up for 20 minutes before performing the following procedures.
The Auto-adjustment feature automatically fine-tunes the image quality each time a new video mode is displayed. If additional image quality improvement is desired, run the Auto-Adjust software on the CD and press the – (Minus) button on the monitor front panel to manually activate the Auto-Adjustment function.
For more precise adjustments, run the Auto-Adjust software on the CD, and use the Clock and Phase controls of the monitor to fine-tune the image.
Optimizing Analog Conversion
This monitor contains advanced circuitry that allows the flat panel screen to function like a standard monitor. Two controls in the on-screen display can be adjusted to improve image performance: Clock and Clock Phase. Use these controls only when the auto-adjust function does not provide a satisfactory image.

The Clock must first be set correctly since the Clock Phase settings are dependent on the main Clock setting.
Clock—Increase/decrease the value to minimize any vertical bars or stripes visible on the screen background.
Clock Phase—Increase/decrease the value to minimize video distortion or video jitter.

When using the controls, you will obtain the best results by using the Auto-Adjustment pattern application provided on the CD-ROM.

When adjusting the Clock and Clock Phase values, if the monitor images become distorted, continue adjusting the values until the distortion disappears. To restore the factory settings, select Yes from the Factory Reset menu in the on-screen display.
Identifying Monitor Conditions
Special messages will appear on the monitor screen when identifying the following monitor conditions:
Input Signal Out of Range— Indicates the monitor does not support the input signal because the resolution and/or refresh rate are set higher than the monitor supports. For 15" monitors, set the resolution and refresh rate to 1024 x 768 at 60 Hz. For 17" monitors, set the resolution and refresh rate to 1280 x 1024 at 60 Hz. Restart your computer for the new settings to take effect.
Going to Sleep— Indicates the screen display is entering a sleep mode.
Check Video Cable— Indicates the video cable is not properly connected to the computer.
OSD Lock—The OSD can be enabled or disabled by pressing and holding the Menu button on the front panel for 10 seconds. If the OSD is locked, the warning message “OSD Lock” displays for five seconds.
If the OSD is locked, press and hold the Menu button for 10 seconds to unlock the OSD.
If the OSD is unlocked, press and hold the Menu button for 10 seconds to lock the OSD.
Sleep Timer Mode
The Sleep Timer mode is an energy-saving feature that enables you to set a time for the monitor to power on and off at the same time every day. This also extends the life of the backlight bulbs in the monitor. The Sleep Timer has five settings:
Set Current Time
Set Sleep Time
Set On Time
Timer: On/Off
Sleep Now
To set the timer:
- Press the Menu button on the monitor front panel to display the Advanced Menu.
- Scroll down and highlight Management.
- Press the Menu button to select Management.
- Scroll down and highlight and select Sleep Timer > Set Current Time.

You must set the current local time before you reset the time for Sleep Time or On Time. Note that the time is displayed in a 24-hour clock format. For example, 1:15 p.m. displays as 13 hours 15 minutes.
- Press the Menu button once to enter the adjustment mode for hours.
- Press the - (Minus) or + (Plus) buttons to adjust the hour.
- Press the Menu button again to enter the time for minutes.
- Press the - (Minus) or + (Plus) buttons to adjust the minutes.
- Press the Menu button to lock in the time chosen.
- After setting the current time, the highlight automatically skips to Set Sleep Time hours. Repeat steps 6 through 9 to set Sleep Time.
- If you do not want to set Sleep Time, press the Menu button twice, then select Save and Return to exit the menu.
- After setting Sleep Time, the highlight automatically skips to Set On Time hours. Repeat steps 6 through 9 to set On Time.
- Set the Timer mode to On to activate the Sleep Timer settings.
The fifth selection, Sleep Now, turns the monitor backlights off immediately and stays in sleep mode until the next On Time activates or a monitor button is pressed.
Troubleshooting
Solving Common Problems
The following table lists possible problems, the possible cause of each problem, and the recommended solutions.
| Problem | Possible Cause | Solution |
| Screen is blank. | Power cord is disconnected. | Connect the power cord. |
| Power switch is turned off. | Turn on the power. | |
| Video cable is improperly connected. | Connect the video cable properly. Refer to Chapter 3, Setting Up the Monitor, for more information. | |
| Screen blanking utility is active. | Depress any key on the keyboard or move the mouse to inactivate the screen blanking utility. | |
| Image appears blurred, brightness and contrast are indistinct, or too dark. | too low. | Press the Minus button on the monitor front panel to auto-adjust the screen. If that doesn't work, press the Menu button to open the Basic OSD Menu, and adjust the brightness and contrast scales as needed. |
| Image is not centered. | Position may need adjustment. | When OSD is inactive, press (minus button) to auto-adjust the screen image.Press the Menu button to access the Advanced OSD menu. Select Image Control/Horizontal Position or Vertical Position to adjust the horizontal or vertical position of the image. |
| "Check Video Cable" is displayed on screen. | Monitor video cable is disconnected. | Connect the 15-pin monitor video cable to the VGA connector on the computer. Be sure that the computer power is off while connecting the video cable. |
| "Input Signal Out of Range" is displayed on screen. | Video resolution and/or refresh rate are set higher than what your monitor supports. | Restart your computer and enter Windows Safe Mode by pressing the F6 Function key when the computer starts to boot up. Change your settings to a supported setting. Restart your computer so that the new settings take effect. |
Using the Worldwide Web
Before contacting customer services, refer to the support Web site at: http://www.hp.com/go/support
Preparing to call Technical Support
If you cannot solve a problem using the troubleshooting tips in this section, you may need to call technical support. Have the following information available when you call:
The monitor
Monitor model number (on front and back panel)
Serial number for the monitor (on back panel)
Purchase date on invoice
Conditions under which the problem occurred
Error messages received
Hardware configuration (found on Windows Control Panel)
Hardware and software you are using
Technical Specifications
L1530 Model
| 15-inch Flat Panel Monitor | ||
| Display | 15.0 in. | 38.1 cm |
| Type | TFT LCD | |
| Viewable Image Size 15.0-inch diagonal 38.1 cm | ||
| Maximum Weight (Unpacked) | 9.9 lb. 4.5 kg (unpacked) | |
| Dimensions (includes pedestal) | ||
| Height (adjustable) | 12.13 to 14.69 in. | 308 to 373 mm |
| Depth | 10 in. | 254mm |
| Width | 13.82 in. | 351 mm |
| Preferred Mode 1024 x 768 (60 Hz) | ||
| Text Mode 720 x 400 | ||
| Dot Pitch 0.297 (H) x 0.297 (W) mm | ||
| Horizontal Frequency 30 to 63 kHz | ||
| Vertical Refresh Rate 56 to 76 Hz | ||
| Environmental Requirements | ||
| Temperature: | ||
| Operating Temperature | 41 to 95° F | 5 to 35° C |
| Non-operating Temperature | -4 to 140° F | -20 to +60° C |
| 15-inch Flat Panel Monitor (Continued) | ||
| Relative Humidity 20 to 80% | ||
| Altitude: | ||
| Operating | 0 to 12,000 ft. | 0 to 3657.6 m |
| Non-operating | 0 to 40,000 ft. | 0 to 12192 m |
| Power Source 100 – 240 VAC, 50 – 60 Hz | ||
| Power Consumption <40 watts typical | ||
| Input Terminals 15-pin D-type connector with cable included.DVI-D connector with DVI-D cable included | ||
| Tilt Stand | ||
| Maximum tilt angle range (Tilt range may vary depending on height adjustment) | -5 to 90°+(25° for operation)(90° for packing only) | |
| Maximum Height adjustment range (Height adjustment may vary depending on tilt angle adjustment) | 2.56 in. | 65 mm |
| Security Lock Monitor cabinet is provided with a slot allowing the use of a security lock device. | ||
L1730 Model
| 17-inch Flat Panel Monitor | ||
| Display | 17.0 in. | 43.18 cm |
| Type | TFT LCD | |
| Viewable Image Size 17.0-inch diagonal 43.18 cm | ||
| Maximum Weight (Unpacked) | 15.43 lb. 7 kg (unpacked) | |
| Dimensions (include pedestal) | ||
| Height (adjustable) | 13.94 to 16.46 in. | 354 to 418 mm |
| Depth | 9.65 in. | 245 mm |
| Width | 15 in. | 381 mm |
| Preferred Mode 1280 x 1024 (60 Hz) | ||
| Text Mode 720 x 400 | ||
| Dot Pitch 0.264 (H) x 0.264 (W) mm | ||
| Horizontal Frequency 30 to 83 kHz | ||
| Vertical Refresh Rate 56 to 76 Hz | ||
| Environmental Requirements | ||
| Temperature: | ||
| Operating Temperature | 41 to 95° F | 5 to 35° C |
| Non-operating Temperature | -4 to 140° F | -20 to +60° C |
| Relative Humidity 20 to 80% | ||
| Altitude: | ||
| Operating | 0 to 12,000 ft. | 0 to 3657.6 m |
| Non-operating | 0 to 40,000 ft. | 0 to 12192 m |
| Power Source 100 – 240 VAC, 50 – 60 Hz | ||
L1730 Model
| 17-inch Flat Panel Monitor (Continued) | |
| Power Consumption <50 watts typical | |
| Input Terminal | 15-pin D-type connector with cable included.DVI-D connector with DVI-D cable included |
| Tilt Stand | |
| Maximum tilt angle range (Tilt range may vary depending on height adjustment) | -5 to 90°+(25° for operation)(90° for packing only) |
| Maximum Height adjustment range | 2.56 in. 65 mm |
| Security Lock Monitor cabinet is provided with a slot allowing the use of a security lock device. | |
Entering User Modes
The video controller signal may occasionally call for a mode that is not preset if:
You are not using a standard graphics adapter.
You are not using a preset mode.
If this occurs, you may need to readjust the parameters of the monitor screen by using the on-screen display. Your changes can be made to any or all of these modes and saved in memory. The monitor automatically stores the new setting, then recognizes the new mode just as it does a preset mode. In addition to the 15 factory preset modes, there are 15 additional user modes that can be entered and stored.
Energy Saver Feature
When the monitor is in its normal operating mode, the Power light is green.
The monitor also supports a reduced power state. The reduced power state is entered into if the monitor detects the absence of either the horizontal sync signal and/or the vertical sync signal. Upon detecting the absence of these signals, the monitor screen blanks, the backlight turns off, and the Power light turns amber. When the monitor is in the reduced power state, the monitor utilizes less than 2 watts of power. There is a brief warm up period before the monitor returns to its normal operating mode.
Refer to your computer manual for instructions on setting energy saver features (sometimes called power management features).

The above energy saver feature only works when connected to computers that have energy saver features.
By selecting settings in the monitor's Energy Saver utility, you can also program the monitor to enter into the reduced power state at a predetermined time. When the monitor's Energy Saver utility causes the monitor to enter the reduced power state, the power light blinks amber.
Agency Regulatory Notices
Federal Communications Commission Notice
This equipment has been tested and found to comply with the limits for a Class B digital device, pursuant to Part 15 of the FCC Rules. These limits are designed to provide reasonable protection against harmful interference in a residential installation. This equipment generates, uses, and can radiate radio frequency energy and, if not installed and used in accordance with the instructions, may cause harmful interference to radio communications. However, there is no guarantee that interference will not occur in a particular installation. If this equipment does cause harmful interference to radio or television reception, which can be determined by turning the equipment off and on, the user is encouraged to try to correct the interference by one or more of the following measures:
Reorient or relocate the receiving antenna.
Increase the separation between the equipment and the receiver.
Connect the equipment into an outlet on a circuit different from that to which the receiver is connected.
Consult the dealer or an experienced radio or television technician for help.
Modifications
The FCC requires the user to be notified that any changes or modifications made to this device that are not expressly approved by Hewlett Packard Company may void the user's authority to operate the equipment.
Cables
Connections to this device must be made with shielded cables with metallic RFI/EMI connector hoods to maintain compliance with FCC Rules and Regulations.
Declaration of Conformity for Products Marked with FCC Logo, United States Only
This device complies with Part 15 of the FCC Rules. Operation is subject to the following two conditions: (1) this device may not cause harmful interference, and (2) this device must accept any interference received, including interference that may cause undesired operation.
For questions regarding your product, contact:
Hewlett Packard Company
P. O. Box 692000, Mail Stop 530113
Houston, Texas 77269-2000
Or, call
1-800-652-6672
For questions regarding this FCC declaration, contact:
Hewlett Packard Company
P. O. Box 692000, Mail Stop 510101
Houston, Texas 77269-2000
Or, call
(281) 514-3333
To identify this product, refer to the Part, Series, or Model number found on the product.
Canadian Notice
This Class B digital apparatus meets all requirements of the Canadian Interference-Causing Equipment Regulations.
Avis Canadien
Products with the CE Marking comply with both the EMC Directive (89/336/EEC) and the Low Voltage Directive (73/23/EEC) issued by the Commission of the European Community.
Compliance with these directives implies conformity to the following European Norms (in brackets are the equivalent international standards):
EN55022 (CISPR 22) - Electromagnetic Interference
EN55024 (IEC61000-4-2,3,4,5,6,8,11) - Electromagnetic Immunity
EN61000-3-2 (IEC61000-3-2) - Power Line Harmonics
EN61000-3-3 (IEC61000-3-3) - Power Line Flicker
EN60950 (IEC950) - Product Safety
Japanese Notice
EPA Energy Star Compliance
Monitors that are marked with the Energy Star Logo meet the requirements of the EPA Energy Star program. As an Energy Star Partner, Hewlett Packard Company has determined that this product meets the Energy Star guidelines for energy efficiency. Specific details on using the Energy Saving features can be found in the energy saver or power management section of the computer manual.
Power Cord Set Requirements
The monitor power supply is provided with Automatic Line Switching (ALS). This feature allows the monitor to operate on input voltages between 100-120V or 200-240V.
The power cord set (flexible cord or wall plug) received with the monitor meets the requirements for use in the country where you purchased the equipment.
If you need to obtain a power cord for a different country, you should purchase a power cord that is approved for use in that country.
The power cord must be rated for the product and for the voltage and current marked on the product's electrical ratings label. The voltage and current rating of the cord should be greater than the voltage and current rating marked on the product. In addition, the cross-sectional area of the wire must be a minimum of 0.75 mm² or 18AWG, and the length of the cord must be between 6 feet (1.8 m) and 12 feet (3.6 m). If you have questions about the type of power cord to use, contact your HP authorized service provider.
A power cord should be routed so that it is not likely to be walked on or pinched by items placed upon it or against it. Particular attention should be paid to the plug, electrical outlet, and the point where the cord exits from the product.
Recycling Information
For information on the HP recycling program, refer to the HP Web site at:
http://www.hp.com/hpinfo/globalcitizenship/environment/recycle/hardware.html
LCD Monitor Quality and Pixel Policy
The TFT monitor uses high-precision technology, manufactured according to HP standards, to guarantee trouble-free performance. Nevertheless, the display may have cosmetic imperfections that appear as small bright or dark spots. This is common to all LCD displays used in products supplied by all vendors and is not specific to the HP LCD. These imperfections are caused by one or more defective pixels or sub-pixels.
A pixel consists of one red, one green, and one blue subpixel.
A defective whole pixel is always turned on (a bright spot on a dark background), or it is always off (a dark spot on a bright background). The first is the more visible of the two.
A defective sub-pixel (dot defect) is less visible than a defective whole pixel and is small and only visible on a specific background.
The HP display does not have more than:
3 bright dots.
5 dark dots.
5 total bright and dark dots.
No more than two adjacent (less than 2.5 mm edge-to-edge) defective pixels.
To locate defective pixels, the monitor should be viewed under normal operating conditions, in normal operating mode at a supported resolution and refresh rate, from a distance of approximately 50 cm (16 in.).
HP expects that, over time, the industry will continue to improve its ability to produce LCDs with fewer cosmetic imperfections and HP will adjust guidelines as improvements are made.


- JULY
- USER'S GUIDE
- CONTENTS
- PRODUCT FEATURES
- SAFETY AND MAINTENANCE GUIDELINES
- SETTING UP THE MONITOR
- OPERATING THE MONITOR
- A TROUBLESHOOTING
- B TECHNICAL SPECIFICATIONS
- C AGENCY REGULATORY NOTICES
- LCD MONITOR QUALITY AND PIXEL POLICY
- L1530 MODEL
- L1730 MODEL
- IMPORTANT SAFETY INFORMATION
- MAINTENANCE GUIDELINES
- CLEANING THE MONITOR
- SHIPPING THE MONITOR
- CONNECTING THE MONITOR
- ADJUSTING THE MONITOR
- CHANGING THE VIEWING POSITION
- REMOVING THE MONITOR BASE
- MOUNTING THE MONITOR
- INSTALLING THE INFORMATION FILES
- FRONT PANEL COMPONENTS
- ADJUSTING MONITOR SETTINGS
- USING THE ON-SCREEN DISPLAY
- ADJUSTING SCREEN QUALITY
- OPTIMIZING ANALOG CONVERSION
- IDENTIFYING MONITOR CONDITIONS
- SLEEP TIMER MODE
- TROUBLESHOOTING
- SOLVING COMMON PROBLEMS
- USING THE WORLDWIDE WEB
- PREPARING TO CALL TECHNICAL SUPPORT
- TECHNICAL SPECIFICATIONS
- ENTERING USER MODES
- ENERGY SAVER FEATURE
- AGENCY REGULATORY NOTICES
- FEDERAL COMMUNICATIONS COMMISSION NOTICE
- MODIFICATIONS
- CABLES
- DECLARATION OF CONFORMITY FOR PRODUCTS MARKED WITH FCC LOGO, UNITED STATES ONLY
- CANADIAN NOTICE
- AVIS CANADIEN
- JAPANESE NOTICE
- EPA ENERGY STAR COMPLIANCE
- POWER CORD SET REQUIREMENTS
- RECYCLING INFORMATION
Brand : HP
Model : L1530
Category : Monitor