
iPod Nano 7th generation - Mp3 player APPLE - Free user manual and instructions
Find the device manual for free iPod Nano 7th generation APPLE in PDF.


| Product Type | MP3 Player |
| Brand | Apple |
| Model | iPod Nano 7th Generation |
| Storage Capacity | 16 GB |
| Display | 2.5-inch Multi-Touch Display |
| Dimensions | 77.2 x 51.8 x 6.2 mm |
| Weight | 44 g |
| Battery | Built-in Rechargeable Lithium-Ion, up to 30 hours audio playback |
| Charging | via USB to Lightning Cable |
| Connectivity | Bluetooth 4.0, Lightning Connector, 3.5mm Headphone Jack |
| Audio Playback | Up to 30 hours |
| Supported Audio Formats | AAC, MP3, WAV, Apple Lossless, AIFF |
| Supported Video Formats | H.264, MPEG-4 |
| FM Radio | Yes, with live pause |
| Fitness Features | Built-in Pedometer, Nike+ Integration |
| Operating System | iPod OS (iOS-based) |
| Materials | Aluminum and Glass |
| Cleaning Instructions | Use a soft, slightly damp, lint-free cloth. Avoid moisture in openings. |
| Safety Warnings | Keep away from extreme temperatures, do not disassemble, use only Apple accessories. |
| Repairability | Battery not user-replaceable; repairs by Apple authorized service providers. |
Frequently Asked Questions - iPod Nano 7th generation APPLE
User questions about iPod Nano 7th generation APPLE
0 question about this device. Answer the ones you know or ask your own.
Ask a new question about this device
Download the instructions for your Mp3 player in PDF format for free! Find your manual iPod Nano 7th generation - APPLE and take your electronic device back in hand. On this page are published all the documents necessary for the use of your device. iPod Nano 7th generation by APPLE.
USER MANUAL iPod Nano 7th generation APPLE
Chapter 1: iPod nano at a Glance
iPod nano overview
Accessories
The Home screen
Status icons
Chapter 2: Getting Started
Setting up iPod nano
Chapter 3: Basics
Using Multi-Touch
Setting preferences
Connecting and disconnecting iPod nano
About the battery
Setting up iTunes syncing
Chapter 4: Music and Other Audio
Playing music
20 Playing podcasts, audiobooks, and iTunes U collections
22 Creating playlists on iPod nano
25 Controlling the volume
27 Chapter 5: Videos
27 Adding videos to iPod nano
27 Watching videos on iPod nano
28 Watching rented movies
29 Chapter 6: FM Radio
29 Listening to FM radio
30 Pausing live radio
31 Finding local stations and setting favorites
32 Tagging songs for review and purchase
32 Setting your radio region
34 Chapter 7: Fitness
34 Setting Fitness preferences
35 Counting steps
36 Creating workouts with music
37 Calibrating iPod nano
38 Viewing and managing fitness data
39 Chapter 8: Photos
39 Viewing photos on iPod nano
41 Syncing photos
43 Chapter 9: Clock
43 Customizing the clock
44 Using the stopwatch
44 Using the timer
46 Chapter 10: Voice Memos
46 Recording voice memos
46 Listening to recordings
47 Managing recordings
48 Chapter 11: Accessibility
48 Universal Access features
49 Using VoiceOver
50 Setting Mono Audio
51 Inverting the screen colors
51 Quickly activating accessibility features
52 Chapter 12: EarPods and Bluetooth accessories
52 Using the Apple EarPods
53 Using the Apple EarPods with Remote and Mic
54 Connecting to Bluetooth accessories
55 Switching between audio output devices
56 Chapter 13: Tips and Troubleshooting
56 General suggestions
60 Updating and restoring iPod software
61 Chapter 14: Safety and Handling
Important safety information
Important handling information
Chapter 15: Learning More, Service, and Support
Regulatory Compliance Information
iPod nano at a Glance
1
iPod nano overview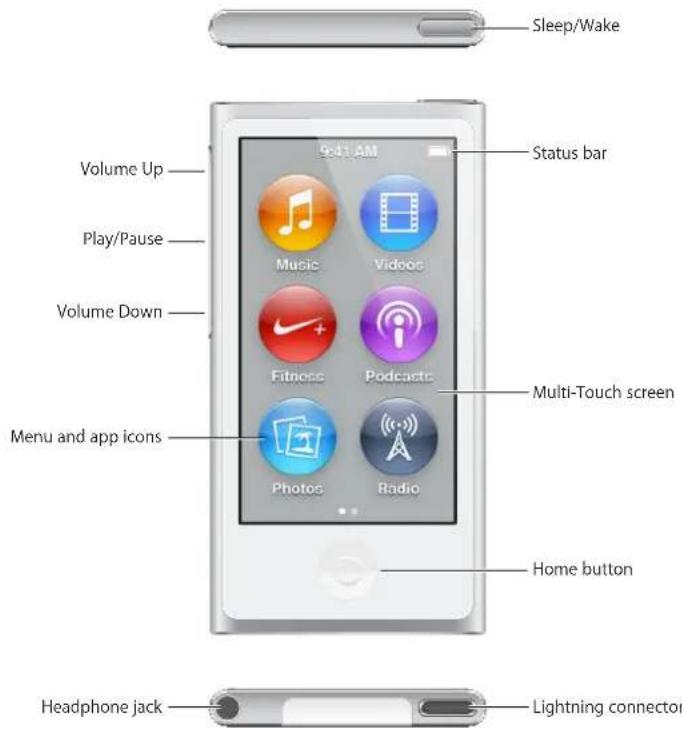
To Do this
| Turn the screen on or off while you listen to music or other audio | Press the Sleep/Wake button. |
| Turn iPod nano off completely, or to turn it back on | Hold down the Sleep/Wake button for a few seconds. |
| Adjust the volume while listening to songs or other media | Press the Volume Up or Volume Down button.These buttons also control the volume for alerts and other sounds. |
| Play or pause audio Press the Play/Pause button. | |
| Skip to the next audio track Press the Play/Pause button twice. | |
| Skip to the previous audio track Press the Play/Pause button three times. | |
| Return to the Home screen Press the Home button. | |
Accessories
The following accessories come with iPod nano:
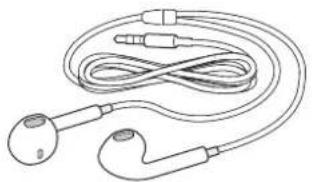
Apple EarPods
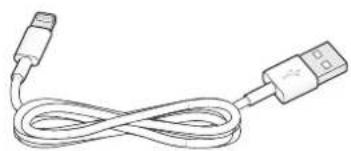
Lightning to USB Cable
Use the Lightning to USB Cable to connect iPod nano to your computer, sync content, and charge the battery. You can also use the cable with the Apple USB Power Adapter (sold separately).
Use the Apple EarPods to listen to music, audiobooks, and podcasts. The EarPods also double as an antenna for listening to radio broadcasts.
For information about using accessories with iPod nano, including optional headsets and Bluetooth® devices, see Chapter 12, EarPods and Bluetooth accessories, on page 52.
The Home screen
When you turn on iPod nano, you see the Home screen. Tap an icon on the Home screen to open it, then use gestures to navigate (see Using Multi-Touch on page 9).
You'll see these Home screen icons when you first turn on iPod nano:

Music Provides quick access to your music and other audio content organized by playlists, artists, songs, and more.

Videos Provides quick access to your movies and videos, organized by type.

Fitness Opens the Fitness feature, where you can count your steps for walks or runs and track time, distance, pace, and calories burned for workouts.

Podcasts Lists the podcasts synced from your iTunes library.

Photos Displays the photos synced from your computer.

Radio Opens the FM radio tuner, if EarPods or headphones are connected to iPod nano.
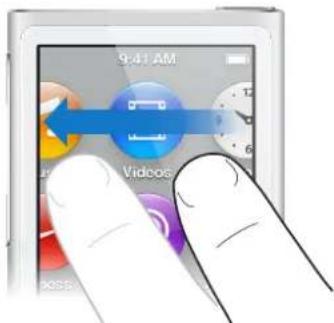
Swipe left to see these additional icons on a second screen:

Clock Opens the clock, stopwatch, and timer.

Settings Opens settings for iPod nano and many of its features.

Audiobooks Lists audiobooks synced from your iTunes library (it doesn't appear if you have no audiobooks).

iTunes U Lists iTunes U collections synced from your iTunes library (it doesn't appear if you have no collections).

Voice Memos Opens the controls for recording and managing voice memos. It's visible only if a microphone is connected to iPod nano, or if there are voice memo recordings on iPod nano.
Status icons
The icons in the status bar at the top of the screen give information about iPod nano:
| Bluetooth is turned on but not paired or connected with a Bluetooth device, or the paired device is out of range or turned off. | |
| or | Bluetooth is turned on and connected with a Bluetooth device. The color depends on the color of the status bar. |
| The radio is playing. | |
| A song, podcast, audiobook, or iTunes U episode is playing. | |
| A song, podcast, audiobook, iTunes U episode, or radio broadcast is paused. | |
| Steps are being counted. | |
| Shows the battery level or charging status. |
Getting Started
2

WARNING: To avoid injury, read Important safety information on page 61 before using iPod nano.
Setting up iPod nano
To get started, set up iPod nano using iTunes on your computer. During setup, you create an iTunes Store account or use an existing account. (The iTunes Store may not be available in all countries or regions.) iTunes also displays and records the serial number of your iPod nano when it's connected, in case you need it.
Set up iPod nano:
1. Download and install the latest version of iTunes from www.itunes.com/download. You need iTunes 10.7 or later. 2. Connect iPod nano to a high-power USB 2.0 port or USB 3.0 port on your Mac or PC, using the cable that came with iPod nano.
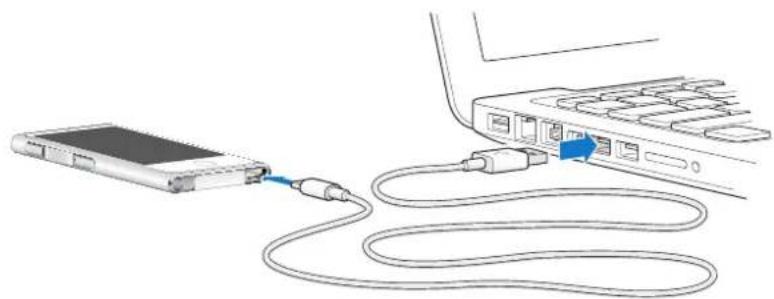
3. Follow the onscreen instructions in iTunes to register iPod nano and sync iPod nano with songs from your iTunes library.
If you need help using the iPod nano Setup Assistant, see Setting up iTunes syncing on page 15.
When iPod nano is syncing with your computer, iPod nano shows "Sync in Progress." When syncing is complete, iTunes shows "iPod sync is complete."
4. For best results, the first time you use iPod nano, let it charge for about three hours or until the battery icon shows that the battery is fully charged.
If iPod nano is connected to the USB port, the battery will not charge if the computer is turned off or asleep.
You can disconnect iPod nano before the battery is fully charged, and you can sync while the battery charges. For more information, see About the battery on page 13.
5 Disconnect the cable from iPod nano when you finish.
Don't disconnect iPod nano if you see the "Connected" or "Synchronizing" message. To avoid damaging files on iPod nano, eject iPod nano before disconnecting the cable if you see one of these messages.
For more information about safely disconnecting iPod nano, see Disconnecting iPod nano from your computer on page 13.
Basics
3
You control iPod nano with quick gestures on the Multi-Touch screen, with buttons on the top and side of iPod nano, and with controls on compatible accessories. You can customize iPod nano with preference settings, and sync with your computer using iTunes. Learn how to properly connect and disconnect iPod nano, and how to charge the battery and conserve battery power.
Using Multi-Touch
The Multi-Touch screen and simple finger gestures make it easy to use iPod nano.
Tap and double-tap
Tap an icon to open it, or to select an item in a menu or list. You can tap a photo twice quickly to zoom in, then double-tap again to quickly zoom out. When watching a video, double-tap to change how the video fits the screen.

Swipe
Swipe sideways to move to the next or previous screen.
Flick
Flick your finger quickly up or down to scroll rapidly. You can wait for scrolling to stop, or touch anywhere on the screen to stop it immediately. Touching the screen won't choose or activate anything.
In some lists, such as Playlists, you can flick down to show editing controls at the top.

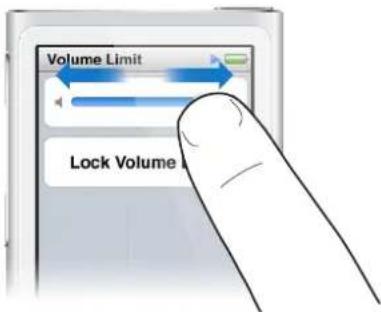
Drag
Drag over scrubber bars or sliders to move their controls.
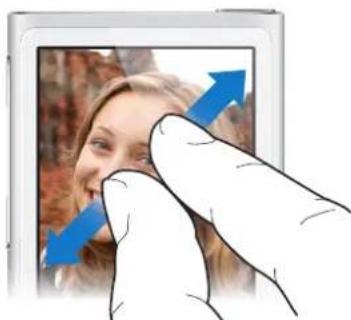
Zoom in or out
When viewing photos, you can zoom in or out gradually. Pinch your fingers apart to make the photo grow larger, or pinch your fingers together to make the photo smaller. You can also double-tap to zoom to the maximum size, then double-tap again to zoom all the way out.
Here are more ways to control iPod nano using gestures and the iPod nano buttons:
| Turn iPod nano off completely, or turn it on again | Hold down the Sleep/Wake button for several seconds to turn iPod nano off completely. Any audio that's playing is turned off. To turn iPod nano back on after turning it off this way, hold down the Sleep/Wake button for a few seconds. |
| Wake iPod nano from sleep Press the Sleep/Wake button. | |
| Turn off the screen Press the Sleep/Wake button. Music or other audio that's playing continues to play. | |
| Turn on the backlight Tap the screen if the backlight is dimmed. | |
| Reset iPod nano (if it isn't responding) | Press and hold the Sleep/Wake button and the Home button for six seconds, until the screen goes dark. The Apple logo appears after a few seconds, and then the Home screen. |
| Choose an item Tap the item. | |
| Go to the previous screen Swipe right. | |
| Go to the next screen (if available) | Swipe left. |
| Go to the top of a list Tap the status bar at the top of the screen. | |
| See all of a song, artist, or album name | Swipe lightly across the name. |
| Go directly to the Home screen Press the Home button ○. | |
| Go directly to the Now Playing screen | Press the Home button twice. |
Setting preferences
You can customize the iPod nano screen, change how you view the date and time, turn on Bluetooth, and set other preferences in Settings. Settings is also where you set your preferences for enjoying music, videos, photos, and radio.
Open Settings for iPod nano:
■ Swipe left on the Home screen, then tap Settings.
Getting information about iPod nano
You can get these details about your iPod nano in Settings > General > About:
• Capacity and amount of space available • Number of songs, photos, and videos on iPod nano • Serial number, model, and software version • Bluetooth address • Copyright, regulatory, and legal information
General settings
Tap Settings > General to see these preferences:
| Brightness Adjust the screen brightness. Set a lower brightness to use less battery power. |
| Wallpaper Set the background image for the Home screen. Tap a pattern to see how it looks onscreen, then tap Cancel or Set. |
| Date & Time Set the date, time, and time zone. Change the time display to a 24-hour clock. Show the clock on waking. Choose a clock face (see Customizing the clock on page 43). |
| Language Set the language for iPod nano. |
| Accessibility Turn on VoiceOver and mono audio. Invert the screen colors. Set a shortcut for switching accessibility features on and off.For information about accessibility features, see Universal Access features on page 48. |
Music settings
Tap Settings > Music to set these preferences:
| Shake to Shuffle Turn off or on the ability to give iPod nano a quick shake to skip to a random song. | |
| Sound Check Automatically adjust the volume of songs, so they play at the same relative volume level. | |
| EQ Choose an equalizer setting. | |
| Volume Limit Set a maximum volume limit on iPod nano, and assign a passcode to prevent the setting from being changed without your knowledge. | |
| Audio Crossfade Automatically fade out at the end and fade in at the beginning of each song. | |
| Group Compilations | Group together songs from compilations. Compilations are shown as subcategories under Artists and specific Genres, in Music. |
Settings for videos, photos, and radio
You can set preferences in Settings for how you watch videos, listen to radio, and view photos.
For more information, see:
• Chapter 5, Videos, on page 27. • Chapter 6, FM Radio, on page 29. • Chapter 8, Photos, on page 39.
Resetting preferences
You can reset iPod nano to its default settings without affecting your synced content.
Reset all settings:
1 On the Home screen, tap Settings. 2 Tap Reset Settings. 3 Tap Reset, or tap Cancel if you change your mind. 4 Tap your language, then tap Done.
Connecting and disconnecting iPod nano
You connect iPod nano to your computer to sync files and charge the iPod nano battery. You can sync songs and charge the battery at the same time.
Important: The battery doesn't charge while your computer is in sleep or standby mode.
Connecting iPod nano to your computer
iTunes syncs songs on iPod nano automatically when you connect it to your computer, unless you select other sync settings in iTunes.
Connect iPod nano to your computer:
Connect the included Lightning to USB Cable to a USB 3.0 port or a high-power USB 2.0 port on your computer. Connect the other end to iPod nano.
The USB port on most keyboards doesn't provide enough power to charge iPod nano.
Disconnecting iPod nano from your computer
If the backlight is off, press the Sleep/Wake button to turn on the backlight, so you can see if it's safe to disconnect.
Disconnect iPod nano:
Wait until you see the Home screen, or a message that says it's OK to disconnect, then disconnect the cable from iPod nano.
Don't disconnect iPod nano if you see the "Connected" or "Synchronizing" message. To avoid damaging files on iPod nano, you must eject iPod nano before disconnecting when you see these messages.
Eject iPod nano:
In iTunes, choose Controls > Eject Disk, or click the Eject button next to iPod nano. If you're using a Mac, you can drag the iPod nano icon on the desktop to the Trash. If you're using a Windows PC, you can eject iPod nano in My Computer, or by clicking the Safely Remove Hardware icon in the Windows system tray, then selecting iPod nano.
If you accidentally disconnect iPod nano without ejecting it, reconnect iPod nano to your computer and sync again.
About the battery
WARNING: For important safety information about the battery and charging iPod nano, see Important safety information on page 61.
iPod nano has an internal, non-user-replaceable battery. For best results, the first time you use iPod nano, let it charge for about three hours or until the battery icon shows that the battery is fully charged.
The iPod nano battery is 80-percent charged in about one and a half hours, and fully charged in about three hours. If you charge iPod nano while adding files, playing music, listening to the radio, or viewing a slideshow, it might take longer.
Charging the battery
You can charge the iPod nano battery by connecting iPod nano to your computer, or by using the Apple USB Adapter (available separately).
Charge the battery using your computer:
- Connect iPod nano to a USB 3.0 port or high-powered USB 2.0 port on your computer. The computer must be turned on and not in sleep.
Important: If a "Connect to Power" message appears on the iPod nano screen, the battery needs to be charged before iPod nano can communicate with your computer. See If iPod nano displays a "Connect to Power" message on page 57.
If you want to charge iPod nano when you're away from your computer, you can purchase the Apple USB Power Adapter.
Charge the battery using the Apple USB Power Adapter:
1 Connect the Lightning to USB Cable to the Apple USB Power Adapter. 2 Connect the other end of the Lightning to USB Cable to iPod nano. 3 Plug the Apple USB Power Adapter into a working electrical outlet.
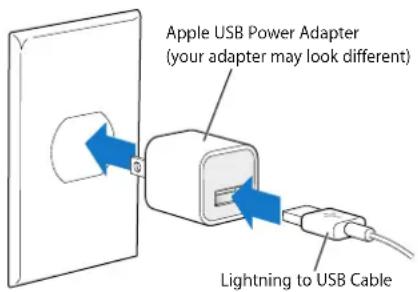
WARNING: Make sure the power adapter is fully assembled before plugging it into an electrical outlet.
Understanding battery states
When iPod nano isn't connected to a power source, a battery icon in the upper-right corner of the iPod nano screen shows approximately how much charge is left.
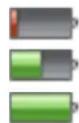
Battery less than 20% charged
Battery about halfway charged
Battery fully charged
When iPod nano is connected to a power source, the battery icon changes to show that the battery is charging or fully charged. You can disconnect and use iPod nano before it's fully charged.

Battery charging (lightning bolt)
Battery fully charged (plug)
Note: Rechargeable batteries have a limited number of charge cycles and might eventually need to be replaced by an Apple Authorized Service Provider. Battery life and number of charge cycles vary by use and settings. For information, go to www.apple.com/batteries.
Conserving power
iPod nano intelligently manages battery life while you listen. To save power, the iPod nano screen dims if you don't touch it for twenty seconds, and then turns off. To turn the screen on or off again, press the Sleep/Wake button.
When there's no activity on iPod nano (no audio or video is playing and no motion is detected if steps are being counted), it turns off automatically. To turn iPod nano back on when it turns off this way, press the Sleep/Wake button.
You can also turn off iPod nano completely by holding down the Sleep/Wake button for a few seconds. When you turn iPod nano off this way, hold down the Sleep/Wake button for a few seconds to turn it back on.
Turning iPod nano off:
- Stops music or other audio that's playing
- Clears paused radio
- Stops a slideshow if one is playing
- Stops playing video if one is playing
- Saves a voice memo if one is being recorded
- Stops counting steps
- Stops and saves Nike+ workout data
While iPod nano is turned off, you won't hear any alarm if a timer expires. When you turn iPod nano on again, alarms that haven't expired will occur as scheduled.
If you're not connected to or using a Bluetooth device, turn off Bluetooth in Settings > Bluetooth to conserve power.
Setting up iTunes syncing
iTunes is the free software application you use to sync music, audiobooks, podcasts, photos, videos, and iTunes U collections between your computer and iPod nano, and to send workouts to the Nike+ website. You need iTunes 10.7 or later to use iPod nano features.
You can preview and download content from the iTunes Store (available in selected countries) to iTunes on your computer. To learn about iTunes and the iTunes Store, open iTunes and choose Help > iTunes Help.
Syncing automatically
When you connect iPod nano to your computer, iPod nano is automatically updated to match the items in your iTunes library. When the update is done, a message in iTunes says “iPod update is complete,” and a bar at the bottom of the iTunes window displays how much disk space is used by different types of content. You can sync iPod nano automatically with only one computer at a time.
Important: The first time you connect iPod nano to a computer that it's not synced with, a message asks if you want to sync songs automatically. If you accept, all songs, audiobooks, and other content are erased from iPod nano and replaced with songs and other items from that computer.
You can prevent iPod nano from syncing when you connect it to a computer other than the one you usually sync with.
Turn off automatic syncing for iPod nano:
1 Connect iPod nano to your computer, then open iTunes. 2 In the iTunes Summary pane, deselect "Open iTunes when this iPod is connected." 3 Click Apply.
If you turn off automatic syncing, you can still sync by clicking the Sync button.
Managing iPod nano manually
If you manage iPod nano manually, you can add content from multiple computers to iPod nano without erasing items already on iPod nano.
Setting iPod nano to manually manage music turns off the automatic sync options in the Music, Podcasts, iTunes U, and Photos panes. You can't manually manage some and automatically sync others at the same time.
Note: Genius Mixes don't work if you manually manage content. You can still manually sync Genius playlists to iPod nano, and create Genius playlists on the iPod after a manual sync of Genius content. See Playing Genius Mixes on page 24.
Set iTunes to manage content manually:
1. Open iTunes Preferences (in the menu under iTunes), then click Devices. 2. Select "Prevent iPods, iPhones, and iPads from syncing automatically," then click OK. 3. In the iTunes window, select iPod nano, then click Summary. 4. In the Options section, select "Manually manage music and videos." 5. Click Apply.
When you manually manage content on iPod nano, you must always eject iPod nano from iTunes before you disconnect it. See Disconnecting iPod nano from your computer on page 13. You can reset iPod nano to sync automatically at any time—deselect "Manually manage music," then click Apply. You may need to reselect your sync options.
Transferring purchased content to another computer
Content that you purchase in iTunes on one computer can be transferred from iPod nano to an iTunes library on another computer. The other computer must be authorized to play content from your iTunes Store account.
Transfer purchased content to another computer:
1. Open iTunes on the other computer and choose Store > Authorize This Computer. 2. Connect iPod nano to the newly authorized computer. 3. In iTunes, choose File > "Transfer Purchases from iPod."
Music and Other Audio
4
iPod nano makes it easy to find and listen to songs, podcasts, and iTunes U programs. You can repeat songs, fast-forward, shuffle, and create playlists using the Multi-Touch screen. You can play a Genius Mix—songs from your library that go great together—or create a Genius playlist based on a favorite song.
WARNING: For important information about avoiding hearing loss, see Chapter 14, Safety and Handling, on page 61.
Playing music
While a song plays, its album artwork is displayed on the Now Playing screen, and a Play ▶ or Pause icon appears in the status bar at the top of other screens. You can browse music on iPod nano and change settings while you listen to music or other audio content.
Note: iPod nano must be ejected from your computer in order to play songs and other audio.
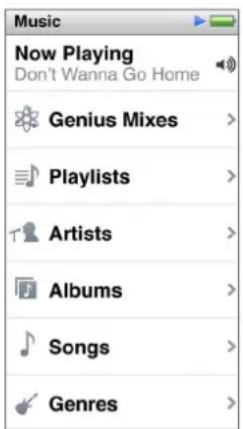
Play a song:
Do any of the following:
- Tap Music on the Home screen, tap a category (Playlists, Albums, or another grouping), then tap a song.
- Press the Play/Pause button (between the volume buttons) to play a random song. If a song is paused, the paused song resumes playing. Give iPod nano a quick shake to play shuffled songs.
If you turn off iPod nano while music or other audio is playing (by pressing and holding the Sleep/Wake button), the track is paused. When you turn iPod nano back on, tap ▶ or press the Play/Pause button to resume playback.
Find songs in your music library:
Do any of the following:
- Flick to scroll quickly through song and album lists, then tap the menu bar to return to the top of the list.
- Swipe lightly across a title from right to left to see all of the text (the title scrolls so you can read all of it).
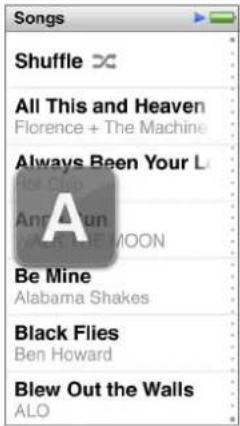
- Drag your finger down an index list to show a large letter superimposed over the list. When you reach the letter you want, lift your finger.
Controlling playback for songs
You can control playback using song controls on the Now Playing screen, the Play/Pause button (between the volume buttons on iPod nano), the buttons on Apple EarPods with Remote and Mic (available separately), and other compatible audio equipment.
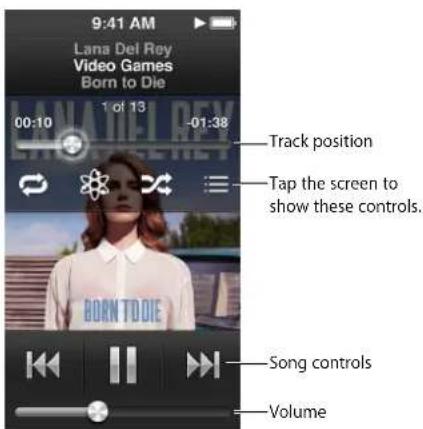
Here's what you can do with the iPod nano song controls and buttons:
| Pause a song Tap , press the Play/Pause button (between the volume buttons), or disconnect your EarPods. | |
| Play a paused song Tap | ▶, or press the Play/Pause button (between the volume buttons). |
| Start a song over Tap . | ◀◀ |
| Play the previous song Tap twice. | ◀◀ |
| Skip to the next song Tap , or press the Play/Pause button (between the volume buttons) twice. | |
| Fast-forward or rewind a song Press and holdor | |
| Repeat songs | Tap the Now Playing screen, then tap 🎨. Tap again for more options: = Repeat all songs in the current album or list.= Repeat only the current song over and over. |
| Create a Genius playlist | Play a song, tap the Now Playing screen, then tap 🎨. |
| Shuffle songs | Tap the Now Playing screen, then tap 🎨.If “Shake to Shuffle” is turned on in Settings, give iPod nano a quick shake. |
| Skip to any point in a song | Drag the playhead along the track position control. Slide your finger down to slow the rate for greater precision. The farther down you slide your finger, the smaller the increments. |
| Rate songs Tap the Now Playing screen, tap at the top of the screen. | ≡, then drag your finger across the dots |
| See songs from an album Tap the Now Playing screen, then tap Albums list. | ≡, or tap the album in the |
| Change where audio is routed | Tap the audio routing icon next to the volume control, then tap the device where you want audio to play. |
Shuffling songs
You can play songs, albums, or playlists in random order, and set iPod nano to shuffle songs when you give it a quick shake.
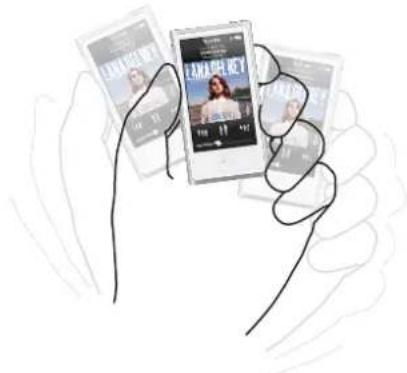
Here are ways to shuffle your music:
| Shuffle and play all your songs | Tap Shuffle at the top of the Songs list. iPod nano begins playing songs from your iPod nano music library in random order, skipping audiobooks, podcasts, and iTunes U collections. |
| Shuffle songs from the Now Playing screen | Tap the screen, then tap 📄. |
| Use “Shake to Shuffle” When the screen is on, you can give iPod nano a quick shake to skip to a random song. If the screen is off, press the Sleep/Wake button before you shake. “Shake to Shuffle” is on by default, but you can turn it off in Settings > Music. | |
Playing podcasts, audiobooks, and iTunes U collections
Podcasts are free, downloadable shows available in the iTunes Store. Podcasts are organized by shows, episodes within shows, and chapters within episodes. If you stop playing a podcast and return to it later, the podcast begins playing where you left off.
Audiobooks are available for purchase and download from the iTunes Store. When you listen to audiobooks purchased from the iTunes Store or audible.com, you can adjust the playback speed to be faster or slower than normal. You only see an Audiobooks icon on the Home screen if you synced audiobooks from your iTunes Library.
iTunes U is a part of the iTunes Store featuring free lectures, language lessons, and more, which you can download and enjoy on iPod nano. iTunes U content is organized by collections, items within collections, authors, and providers. You only see an iTunes U icon on the Home screen if you synced iTunes U content from your iTunes Library.
Find podcasts, audiobooks, and iTunes U Collections:
- On the Home screen, tap Podcasts (or Audiobooks, or iTunes U), then tap a show or title.
Podcasts, Audiobooks, and iTunes U are also listed in Music.
Podcast shows and iTunes U collections appear in chronological order, so you can play them in the order in which they were released. A blue dot marks unplayed shows and episodes. When you finish listening to a podcast episode or iTunes U program, the next unplayed or partially played episode begins automatically.
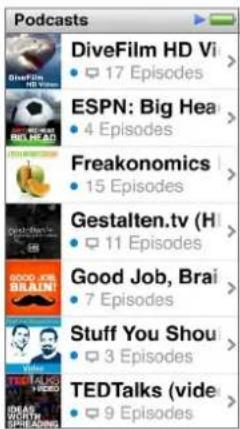
For more information about downloading and listening to podcasts, open iTunes and choose Help > iTunes Help. Then search for "podcasts."
Controlling playback for podcasts, audiobooks, and iTunes U collections
The controls for podcasts, audiobooks, and iTunes U collections are slightly different than the controls for songs.
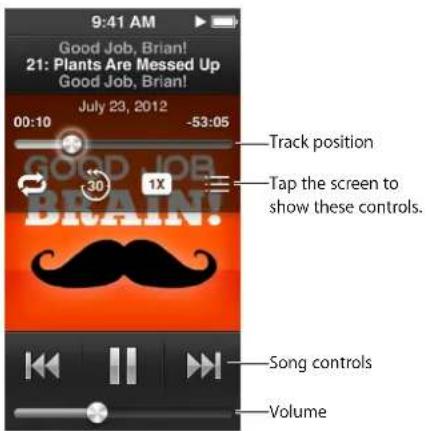
Here are ways to use the onscreen controls and iPod nano buttons for controlling podcast, iTunes U, and audiobook playback:
| Pause Tap, disconnect your EarPods, or press the Play/Pause button (between the volume buttons). | |
| Resume a paused program Tap | ▶, or press the Play/Pause button (between the volume buttons). |
| Start over Tap. | |
| Play the previous episode or chapter | Tap at the start of the episode or chapter, or tap twice during playback. |
| Play the next episode or chapter Tap | ▶, or press the Play/Pause button (between the volume buttons) twice. |
| Skip to any point in a podcast, audiobook, or iTunes U collection | Drag the playhead along the track position control. Slide your finger down to slow the rate for greater precision. The farther down you slide your finger, the smaller the increments. |
| Play back the last 30 seconds | Tap the Now Playing screen, then tap 📋. |
| Set the playback speed | Tap the Now Playing screen, then tap 📋. Tap again to change the speed. 📋 = Play at double speed. 📋 = Play at normal speed. 📋 = Play at half speed. |
| See episodes or chapters for podcasts, iTunes U, or audiobooks | Tap the Now Playing screen, then tap :≡ . |
| See information about podcasts, iTunes U, or audiobooks | Tap the Now Playing screen. |
Creating playlists on iPod nano
You can create your own playlists of songs, podcasts, and audiobooks; or use Genius to create Genius playlists, even when iPod nano isn't connected to your computer. Playlists you create on iPod nano are synced back to iTunes the next time you connect.

Creating and editing playlists
You can create and edit your own playlists on iPod nano.
Create a playlist:
1 On the Home screen, tap Music > Playlists. 2 Flick down, then tap Add. 3 Tap a category (Songs, Albums, Podcasts, and so on), then tap the items you want to add.
Don't tap Done until you've added everything you want to include in the playlist.
4 Swipe left to continue adding content.
You can add content from any category. For example, you can mix podcasts with songs in a single playlist.
5 When you finish, tap Done.
The new playlist is named New Playlist 1 (or New Playlist 2, and so on). The next time you sync, you can change the title in iTunes. When you sync again, the playlist title on iPod nano is updated.
Remove items from a playlist:
1 On the Home screen, tap Music > Playlists, then tap the playlist you want to edit. 2 Flick down, then tap Edit. 3 Tap ➤ next to the item you want to delete, then tap Delete when it appears on the right. 4 When you finish, tap Done.
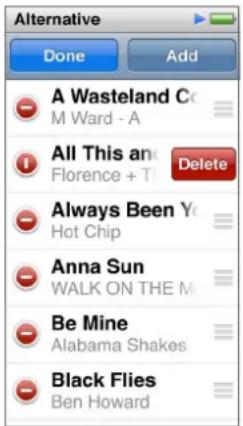
Delete a playlist:
1 On the Home screen, tap Music > Playlists. 2 Flick down, then tap Edit. 3 Tap ➕ next to the playlist you want to delete, then tap Delete when it appears next to the playlist. If you tapped the wrong playlist, tap the one you want to remove. 4 Tap Delete, or tap Cancel if you change your mind. 5 When you finish, flick up, then tap Done (or swipe right to return to the Home screen if you cancel).
Creating a Smart Playlist based on song ratings
You can assign a rating to a song (from zero to five stars) to indicate how much you like it. The ratings you assign to songs on iPod nano are transferred to iTunes when you sync. You can use song ratings to help you create Smart Playlists automatically in iTunes.
Rate a song:
1 While the song is playing, tap the Now Playing screen. 2 Tap ≡. 3 Tap or drag over the ratings bullets at the top of the screen (★★·) to assign the number of stars.
Creating Genius playlists
A Genius playlist is a collection of songs that go with a song you choose from your library. You can create Genius playlists on iPod nano, and sync Genius playlists you create with iTunes.
Genius is a free service, but you need an iTunes Store account to use it. To learn how to set up Genius in iTunes, open iTunes and choose Help > iTunes Help.
Create a Genius playlist on iPod nano:
1 Play a song, then tap the Now Playing screen.
2 Tap
The new playlist appears. You see a message if:
- You didn't turn Genius on in iTunes.
- Genius doesn't recognize the song you select.
- Genius recognizes the song, but there aren't at least ten similar songs in your library.
3 Flick up or down to see the songs in the playlist.
4 Tap Save.
The playlist is saved with the artist name and song title of the song you used to make the playlist.
If you refresh a saved playlist, the new playlist replaces the previous one, and you can't recover the previous playlist.
Genius playlists saved on iPod nano are synced back to iTunes when you connect iPod nano to your computer.
Playing Genius Mixes
iTunes automatically creates Genius Mixes that contain songs from your library that go great together. Genius Mixes provide a different listening experience each time you play one.
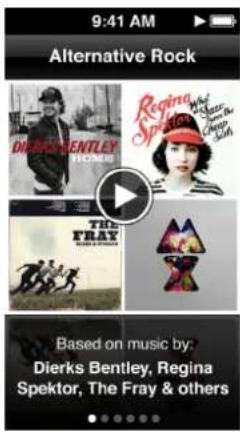
Play a Genius Mix:
1 On the Home screen, tap Music > Genius Mixes. 2 Swipe left or right to browse the Genius Mixes. The dots at the bottom of the screen indicate how many Genius Mixes are on iPod nano. 3 Tap ▶ on the Genius Mix you want to play.
Controlling the volume
WARNING: For important information about avoiding hearing loss, see Chapter 14, Safety and Handling, on page 61.
The volume buttons are on the side of iPod nano. Press Volume Up or Volume Down to adjust the volume as you listen.
You can set equalizer presets on iPod nano in Settings > Music. If you assigned an equalizer preset to a song in iTunes and the iPod nano equalizer is set to Off, the song plays using the iTunes setting.
The following sections describe other adjustments you can make to limit the maximum volume and enhance audio quality.
Setting the maximum volume limit
You can set a limit for the maximum volume on iPod nano, and assign a passcode to prevent the setting from being changed without your knowledge. Accessories that connect using the Lightning connector don't support volume limits.
Set the maximum volume limit for iPod nano:
1 On the Home screen, tap Settings > Music > Volume Limit.
The volume control shows the maximum volume limit.
2 Drag the slider left to lower the maximum volume limit, or right to raise the limit.
Note: In some countries, you can limit the maximum headset volume to the EU recommended level. Tap Settings > Music, then tap the switch in the EU Volume Limit section to turn it on.
Require a passcode to change the volume limit:
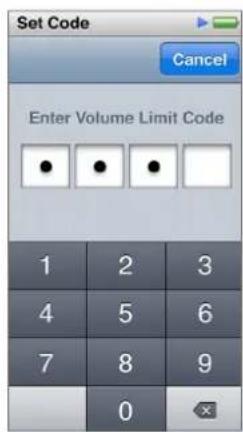
1 After setting the maximum volume, tap Lock Volume Limit.
2 In the screen that appears, tap a four-digit passcode.
If you tap a number by mistake, tap then tap the number you intended.
You can keep tapping to erase all numbers and return to the Volume Limit screen without setting a passcode.
3 When you're prompted to reenter the passcode, tap the numbers again.
Remove the volume limit:
1 On the Home screen, tap Settings > Music > Volume Limit. 2 Drag the slider all the way to the right.
If you set a passcode, tap Unlock Volume Limit first, enter your passcode, then drag the slider.
If you forget the passcode, you can restore iPod nano. See Updating and restoring iPod software on page 60.
Playing songs at the same volume level
The volume of songs and other audio may vary depending on how the audio was recorded or encoded. The volume level may also vary if you use different earphones or headphones.
You can set iTunes to automatically adjust the volume of songs, so they play at the same relative volume level. Then you can set iPod nano to use the same iTunes volume settings.
Set songs to play at the same volume level:
1 In iTunes, choose iTunes > Preferences if you're using a Mac, or choose Edit > Preferences if you're using a Windows PC. 2 Click Playback and select Sound Check, then click OK. 3 On the iPod nano Home screen, tap Settings. 4 Tap Music. 5 Tap OFF next to Sound Check to turn it on.
If you haven't turned on Sound Check in iTunes, setting it on iPod nano has no effect.
If you assigned an equalizer preset to a song in iTunes and the iPod nano equalizer is set to Off, the song plays using the iTunes setting. You can set equalizer presets on iPod nano in Settings > Music.
Videos
5
You can watch movies, music videos, video podcasts, iTunes U programs, and TV shows from iTunes on iPod nano. You can also convert movies you make in iMovie to watch on iPod nano.
WARNING: For important information about avoiding hearing loss, see Chapter 14, Safety and Handling, on page 61.
Adding videos to iPod nano
You add videos to iPod nano using iTunes in much the same way as you add songs. For information about syncing with iTunes, see Setting up iTunes syncing on page 15.
In addition to iTunes videos, you can add other types of videos to iPod nano. For example, you can add videos you created in iMovie on a Mac or videos you downloaded from the Internet. If you see a message that the video can't play on iPod nano, you may be able to convert the video (see iTunes Help).
iPod nano supports SD (Standard Definition) videos. HD videos will not sync to iPod nano.
Watching videos on iPod nano
Movies, TV shows, music videos, and other videos you add to iPod nano appear in the Videos menu, organized by type.
Watch a video on iPod nano:
Tap Video on the Home screen, then tap a video in the menu.
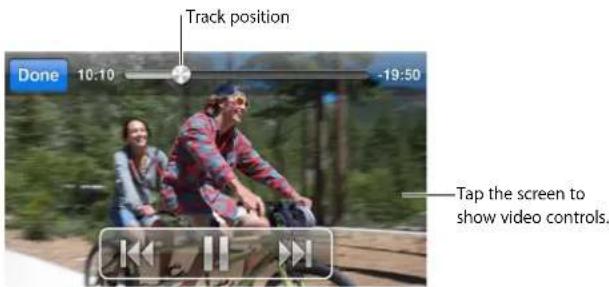
Here are ways to control video playback:
Show or hide the playback controls
While a video is playing, tap the screen.
Pause or resume playback: Tap
or ▶ or press the Play/Pause button (between the volume buttons).
| Start over from the beginning | If the video contains chapters, drag the playhead along the track position control all the way to the left. If there are no chapters, tap K .If you're less than 5 seconds into a video in a video playlist, the previous video in the playlist opens. Otherwise, the video list opens. |
| Skip to the previous video or movie chapter | Tap K twice. |
| Skip to the next video or movie chapter | Tap K or press the Play/Pause button (between the volume buttons) twice. |
| Fast-forward or rewind a video Press and hold K or K | |
| Skip to any point in a video | Drag the playhead along the track position control. Slide your finger down to slow the scrub rate for greater precision. The farther down you slide your finger, the smaller the increments. |
| Skip to the next chapter Tap | K , or press the Play/Pause button (between the volume buttons) twice. (Not always available.) |
| Skip to the previous chapter Tap | K twice. (Not always available.) |
| Skip to a specific chapter Tap , then choose a chapter. (Not always available.) | |
If a Bluetooth icon appears on the right side of the video controls, you can listen to the movie using Bluetooth headphones or speakers. See Connecting to Bluetooth accessories on page 54 for more information.
You can turn captions and subtitles on or off, and choose where videos begin playing when you pause them, in Settings > Video.
Watching rented movies
You can purchase or rent movies on iTunes, then sync them to iPod nano (rented movies may not be available in all areas). Movies with chapters have additional controls that let you choose a specific chapter to watch.
Important: You can view a rented movie on only one device at a time. So, for example, if you rent a movie from the iTunes Store and add it to iPod nano, you can only view it on iPod nano. If you transfer the movie back to iTunes, you can only watch it there and not on iPod nano. Be aware of the rental expiration date.
Watch a rented movie:
1 On the Home screen, tap Videos, then tap Rentals. 2 Tap OK in the dialog.
You have 24 hours to finish watching a rented movie once you begin watching it. If you don't think you can finish the movie in 24 hours, tap Cancel.
You can pause the movie and resume watching later. The time remaining in the rental period appears below the movie name in the Videos menu.
3 When you finish watching the movie, tap Done. 4 Flick down, then tap Edit at the top of the screen. 5 Tap ➕ next to the movie title in the Rentals menu, then tap Delete.
For movies with subtitles or closed captioning, you set the language in iTunes. See iTunes Help for more information.
FM Radio
6
You can listen to FM radio on iPod nano and set your favorite stations so you can find them quickly. With Live Pause, you can pause the live broadcast, then resume listening up to 15 minutes later. The Live Pause controls let you move back and forth through paused content so you can find just what you want to listen to. For radio stations that support it, you can also tag songs you like, then preview and purchase them on the iTunes Store.
WARNING: For important information about avoiding hearing loss, see Chapter 14, Safety and Handling, on page 61.
Listening to FM radio
iPod nano uses the earphone or headphone cord as an antenna, so you must connect EarPods or headphones to iPod nano to receive a radio signal. For better reception, make sure the cord isn't tangled or coiled.
Important: Radio frequencies shown in this chapter are for illustration purposes only, and are not available in all areas.
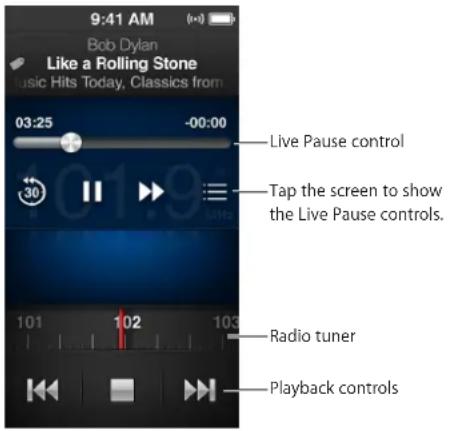
Listen to the radio:
1 Connect EarPods or headphones to iPod nano. 2 Tap Radio on the Home screen, then tap
If the station supports RDS (Radio Data System), the song title, artist name, and station information appear in the display.
Here are ways to use the radio controls:
| Pause and resume live radio Press the Play/Pause button (between the volume buttons). When you press the button again, playback resumes at the point where you paused. Tap the Now Playing screen to see Live Pause controls for more options, and to catch up to the live broadcast (see Pausing live radio on page 30). | |
| Tune to an FM station manually Swipe the radio tuner. | |
| Seek the next tunable FM station Tapor press the Play/Pause button (between the volume buttons) twice. | |
| Scan FM stations Touch and hold | or until the screen shows “Scanning.” Tap the screen to stop scanning. |
| Save an FM station as a favorite | Tune in to the station, then tap ★. The changes to . ★Favorite stations are marked on the radio tuner with a yellow triangle. |
| Remove an FM station from favorites | Tune in to the station, then tap ★. |
| Tag a song on the radio | Tap ● on the Now Playing screen. Tagging is available only through supported radio stations. |
| Turn off the radio Tap | ■, or disconnect the EarPods or headphones. |
Pausing live radio
You can pause a radio broadcast and resume playing it from the same point up to 15 minutes later.
When Live Pause is turned on in Settings (it's turned on by default), you can pause a live broadcast for up to 15 minutes. When the 15 minute limit is reached, the earlier recording is cleared as the recording continues.
Paused radio is cleared automatically if:
- You change stations.
- You turn off iPod nano.
- You play other media content or record a voice memo.
- The battery is very low and needs to be charged.
- You pause the radio for 15 minutes without resuming play.
The Live Pause controls give you more options for listening to paused radio, and provide access to the Radio menu.
Show the Live Pause controls:
■ While the radio is playing, tap the Radio screen.
A control shows where the broadcast was paused. The progress bar continues to fill up, displaying the time that's passed since you paused.
Here are ways to control playback of paused radio:
| Start listening at the point where you paused | Tap ▶ or press the Play/Pause button (between the volume buttons). |
| Skip back by 30-second increments | Tap 😊. |
| Skip forward by 30-second increments | Tap ➡️ |
| Skip forward by approximately 10-second increments | Touch and hold ➡️ |
| Move forward or backward through paused content | Drag the control along the Live Pause control. |
| Catch up to the live broadcast Drag the control all the way to the right. | |
| Open the Radio menu Tap | ≡. The Radio menu is where you can find local stations, set favorite stations, tag songs, and see a list of recent songs. |
Live Pause uses some battery power. You can turn off Live Pause to conserve the battery.
Turn off Live Pause:
- On the Home screen, tap Settings > Radio > ON.
Finding local stations and setting favorites
You can use the Radio controls to find stations by browsing, seeking, scanning, saving your favorites, or tuning to them directly. You can also use the Radio menu to find local stations.

Find local stations:
1 Tap the Now Playing screen, then tap : 2 Tap Local Stations.
iPod nano scans the available frequencies and lists the local stations.
3 Tap ▶ next to a station to listen to the station without leaving the menu, or tap the station to tune to that station and return to the radio controls. 4 When you finish, tap to return to the radio controls.
If you want to update the list, tap Refresh.
Remove stations from Favorites:
1 With the radio playing, tap the Now Playing screen. 2 Tap ≡, then tap Favorites. 3 Flick down to show the Edit button, then tap it. 4 Tap ➕ next to the station, then tap Delete. 5 Tap Clear All to clear the entire list. 6 When you finish, tap Done.
Tagging songs for review and purchase
If a radio station supports tagging, you can tag a song you hear, then preview and purchase it later in the iTunes Store. Songs that can be tagged are marked with a tag icon on the Now Playing screen.
Tag a song:
Tap on the Now Playing screen.
Your tagged songs appear in the Radio menu under Tagged Songs. The next time you sync iPod nano to iTunes, your tagged songs are synced and removed from iPod nano. They appear in iTunes, where you can preview and purchase them on the iTunes Store.
Note: This feature may not be available with all radio stations.
If the radio station doesn't support tagging, you can also see a list of songs you listened to recently. Later, you can use this information to find and purchase the song.
See recent songs:
1 With the radio playing, tap the Now Playing screen. 2 Tap ≡, then tap Recent Songs.
The listing shows the song title, artist name, and the radio station where you heard the song.
Setting your radio region
iPod nano can be used in many countries to receive FM radio signals. It comes with five preset signal ranges, identified by region: The Americas, Asia, Australia, Europe, and Japan.
Select a radio region:
1 On the Home screen, tap Settings. 2 Tap Radio, then tap Radio Regions. 3 Tap your region.
A check appears next to the region you select.
Region settings are determined by international radio standards, not by actual geographic region. If you live in a country not listed in the Radio Regions menu, choose a region that best matches the radio frequency specifications in your country.
Important: iPod nano is intended for the reception of public broadcasts only. Listening to transmissions that are not intended for the public is illegal in some countries and violators may be prosecuted. Check and obey the laws and regulations in the areas where you use iPod nano.
The following table specifies the radio frequency range of each region in the Radio Regions menu, along with the increments between stations (indicated by a ± sign).
Radio Region Radio Frequency Specifications
| Americas 87.5–107.9 MHz/ ± 200 kHz |
| Asia 87.5–108.0 MHz/ ± 100 kHz |
| Australia 87.5–107.9 MHz/ ± 200 kHz |
| Europe 87.5–108.0 MHz/ ± 100 kHz |
| Japan 76.0–90.0 MHz/ ± 100 kHz |
Fitness
iPod nano comes with built-in features to help you make the most of your fitness routines. Set a daily step goal with the built-in pedometer, create Run workouts set to your favorite music, and use iTunes to upload workout data to the Nike+ website. You can use a Bluetooth LE (low energy) heart rate monitor to track your heart rate on iPod nano as you exercise.
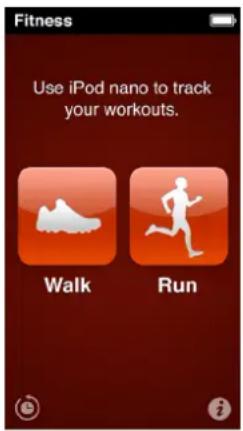
Setting Fitness preferences
For more accurate workout data, set your height and weight in iPod nano. You should update your weight in iPod nano whenever it changes. If you use a different measurement system than the default in iPod nano, you can change the units of measure and distance.
If a song or playlist motivates you, make it your PowerSong before you start your workout.
To make these settings, tap i on the Fitness screen:
| Set height Tap Personal Info, tap Height, then flick the dials to set your weight. | |
| Set weight Tap Personal Info, tap Weight, then flick the dials to set your height. | |
| Set how units of measure or displayed | Tap “Units of Measure,” then tap English or Metric. |
| Show distances in miles or kilometers | Tap Distances, then tap Miles or Kilometers. |
| Set a PowerSong Tap Run, tap PowerSong, then choose a song or playlist. | |
| Change the voice for spoken feedback | Tap Run, tap Spoken Feedback, then choose an option. |
| Pair a Bluetooth heart rate monitor | Tap Nike + iPod Sport Kit, tap Heart Rate Monitor, tap OFF, then tap Link. |
Counting steps
Set a Daily Step Goal, then let iPod nano count your steps while you walk and track your progress and calories burned over time. iPod nano counts steps in the background, so you can listen to music or use iPod nano for other things at the same time. Starting at midnight, any steps you take are automatically tracked for the day.
The Walk icon appears in the status bar while steps are being counted.
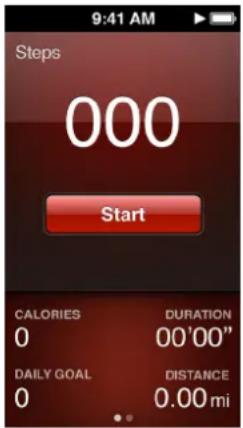
Use iPod nano to count steps for a walk:
■ On the Home screen, tap Fitness > Walk > Start.
Carry iPod nano near your waistband for better accuracy. iPod nano counts steps whether you walk or run.
Set a Daily Step Goal:
1 On the Home screen, tap Fitness. 2 Tap i, then tap Walk. 3 Tap OFF next to Daily Step Goal. 4 Flick the dial to set the desired number of steps, then tap Done.
Counting won't begin until you start it in Fitness.
5 Press the Home button, then tap Fitness. 6 Tap Walk, then tap Start.
Steps you take during a Run workout aren't counted toward your Daily Step Goal.
View your step totals:
1 On the Home screen, tap Fitness. 2 Tap Walk.
The first Walk screen shows these statistics:
- Calories burned
- Total time iPod nano has been tracking your steps
- Your daily goal, if you set one
- Distance covered
3 Swipe left to see step counts for the day, week, month, and total overall.
Note: Calories burned are estimates, and actual calories may vary. For more information, consult your physician.
You can see more detail about your walks and workouts in History (see Viewing and managing fitness data on page 38).
Creating workouts with music
You can create workouts on iPod nano to reach fitness goals of distance, time, or calories burned. Then add the music, podcast, audiobook, or radio station that gets you moving. iPod nano keeps a record of all your workout data, which you can upload to the Nike+ website if you wish.
While you're working out, iPod nano gives spoken feedback when you pause or resume your workout.
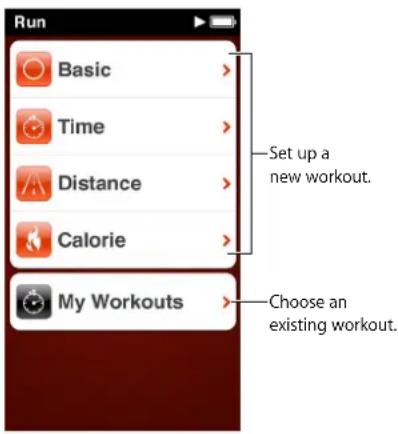
Set up a Run workout:
1 On the Home screen, tap Fitness. 2 Tap Run, then tap one of the workout types (Basic, Time, Distance, or Calorie). 3 Tap a preset goal, or tap Custom.
If you choose Custom, use the controls to set the time, distance, or calories, then tap Done.
4 Choose the audio content you want to listen to during your workout. 5 Tap Start Workout.
Carry iPod nano near your waist for better accuracy. You can run or walk during your workout and iPod nano will calculate the distance you traveled. If you set a Daily Step Goal, steps taken during a Run workout won't count toward your Daily Step Goal total.
Workouts you create on iPod nano are saved so you can use them again.
Use a saved workout:
1 On the Home screen, tap Fitness, then tap Run. 2 Tap Run, then tap My Workouts. 3 Tap a saved workout, then tap Start Workout.
Controlling iPod nano during a workout
You can use the iPod nano controls to pause and resume your workout, change songs, hear spoken feedback, or switch to a PowerSong for extra motivation.
The table below describes how to control iPod nano during a workout:
| Pause a workout Press the Play/Pause button (between the volume buttons). Tap the screen, then tap 📄 (if the screen is dark, press the Sleep/Wake button first). |
| Resume a paused workout Press the Play/Pause button (between the volume buttons), or tap the screen, then tap Resume (if the screen is dark, press the Sleep/Wake button first. |
| Choose a different song Press the Play/Pause button (between the volume buttons) twice, or tap the screen, tap 📄, tap Change Music, then make a selection (if the screen is dark, press the Sleep/Wake button first). |
| Play your PowerSong Tap PowerSong (if the screen is dark, press the Sleep/Wake button first). Set your PowerSong before you start the workout. |
| End a workout Tap the screen (if the screen is dark, press the Sleep/Wake button first), tap 📄, then tap End Workout. |
| Hear spoken feedback Stop your workout. iPod nano speaks your workout statistics for quick reference. If you're using Apple EarPods that have a remote, you can press and hold the center button to hear current statistics such as pace, distance, and calories burned as you're working out. |
If you use compatible headphones with a remote or controls, see the product's documentation for information about using its controls with iPod nano.
Calibrating iPod nano
For more accurate workout statistics, make sure your height and weight are set accurately and calibrate iPod nano more than one time. Each time you calibrate iPod nano, its accuracy improves.
Calibrate iPod nano:
1 On the Home screen, tap Fitness > Run. 2 Tap a workout type (see Creating workouts with music on page 36). 3 Walk or run for at least one-quarter mile (0.4 kilometers). 4 End your workout, then tap Calibrate.
The Calibrate button appears at the bottom of the workout summary if the workout qualified for calibration. You may need to flick up to see it.
You can calibrate or recalibrate any time the Calibrate button appears at the bottom of a workout summary. If you want to start over, you can reset calibration.
Reset calibration:
1 On the Home screen, tap Fitness. 2 Tap i, then tap Reset Calibration. 3 Tap Walk Calibration or Run Calibration.
Choose the option that best reflects which pace you want to recalibrate. For example, if you mostly walked during calibration, choose that option.
4 Tap the Reset Calibration button, or tap Cancel if you change your mind. 5 Start a Run or Walk workout, then tap the Calibrate button when it appears.
To set or change your height or weight, see Setting Fitness preferences on page 34.
Viewing and managing fitness data
iPod nano tracks a range of exercise statistics so you can monitor progress on your fitness goals. You can also use iTunes to upload your steps and other workout information to the Nike+ website, where you can set a goal, challenge your friends, and track your progress.
View your exercise history:
1 On the Home screen, tap Fitness. 2 Tap ⏻, then tap an option:
- Personal Bests lists best times for runs of different distances, from one kilometer to a marathon.
- Workout Totals shows the total number of workouts tracked, and gives the greatest distance run, total distance run, total time, and total calories burned.
- Date listings at the bottom give all your walk and workout totals by date. Walks and workouts are grouped by type, so you can find them easily.
Clear workout data from iPod nano:
1 On the Home screen, tap Fitness, then tap History. 2 Tap the month you want to clear. 3 Flick down, then tap Clear.
A dialog asks if you want to clear the workout history for the month.
4 Tap Delete All, or tap Cancel if you change your mind.
You can use iTunes to upload your steps and other workout information to the Nike+ website. You need a Nike+ account, which you can set up the first time you sync workout data in iTunes.
Upload your steps or workout information to Nike+ :
1 Connect iPod nano to your computer and open iTunes. 2 Click Send in the dialog that appears, then follow the onscreen instructions to set up your Nike+ account.
Once you set up your account, a Nike + iPod pane appears in the iTunes window.
3 Click Nike + iPod, then select "Automatically send workout data to nikeplus.com" if it isn't selected already. 4 Click Apply.
To view and share your information on the Nike website, click the "Visit nikeplus.com" button in the Nike + iPod pane when iPod nano is connected to your computer, or go to www.nikeplus.com and log in to your account.
Photos
8
iPod nano lets you carry photos with you, so you can share them with your family, friends, and associates.
Viewing photos on iPod nano
You can view photos on iPod nano individually, or as a slideshow.

Viewing individual photos
Your photos are grouped into albums for easy browsing on iPod nano. If you use iPhoto, you can also sync Events and Faces, and then view photos this way. When you view individual photos, you can zoom in or out and move a zoomed photo around to display a particular part of the image.
View photos on iPod nano:
1 On the Home screen, tap Photos. 2 Tap an album or other group of photos (flick to see all the albums). 3 Flick up or down to see thumbnail images of your photos. Tap a thumbnail to view the full-size image. 4 Swipe left or right to scroll through all the photos in the album. 5 Tap a photo to see controls, then tap 📄 to return to the thumbnail view.
Here are ways you can view and manipulate your photos:
| Quickly find a photo in the thumbnail view | Flick up or down. |
| View a photo thumbnail at full size | Tap the photo thumbnail. |
| See the next or previous photo in an album | Tap the photo in the album, swipe left or right across the photo, then tap ➔ or ←. |
| Quickly enlarge or reduce a photo | Double-tap the full size photo to zoom in. Double-tap again to zoom out. If you use Faces in iPhoto, double-tapping zooms in on the subject's face. |
| Enlarge or reduce a photo | Pinch with two fingers. Spread fingers apart to zoom gradually, and bring fingers together to reduce the size. |
| View a different part of a zoomed photo (pan the photo) | Drag the photo on the screen with one finger. |
| Return to the album thumbnail view | Tap 📄. |
| View the album as a slideshow Tap a photo in the album, then tap slideshow soundtrack. | ►. If music is playing, it becomes the |
| Pause and resume a slideshow Tap the screen to pause, then tap ➔ to resume. | |
| Change slideshow settings | On the Home screen, tap Settings, then tap Photos. Tap the settings you want to change.You can set the slideshow speed, shuffle photos, or have the slideshow repeat. |
Viewing slideshows on iPod nano
You can view photos on iPod nano in a slideshow with transitions. Set slideshow options in Settings > Photos.
View a slideshow on iPod nano:
1 On the Home screen, tap Photos. 2 Tap an album, or tap All Photos. 3 Tap the photo you want to begin with, then tap it again to show the controls.
If you tap a photo you don't want, tap 📋 to return to the album thumbnail view. Swiping right takes you back one photo at a time.
4 Tap▶ to start the slideshow.
If you want a soundtrack for the slideshow, start playing a song or playlist before you start the slideshow.
While viewing the slideshow, you can tap the screen to pause the slideshow, then tap to resume. To exit, tap to return to the album.
Syncing photos
You can sync photos from your computer to iPod nano using iTunes, or manually add photos from a folder on your computer. Photos are optimized for viewing on iPod nano, but you can also add full resolution photos.
Adding photos from your computer
You can sync photos with iPod nano using iTunes on your computer. Adding photos to iPod nano the first time might take some time, depending on the number of photos.
Sync photos from your iPhoto library:
1 Connect iPod nano to your computer and open iTunes. 2 Select iPod nano in iTunes, then click Photos. 3 Select "Sync Photos from," then choose iPhoto from the pop-up menu. 4 Select whether you want to include all of your photos, or only selected ones.
If you choose the second option, click the pop-up menu to make further refinements. Then select the Albums, Events, and Faces to sync.
5 Click Apply.
Each time you connect iPod nano to your computer, photos are synced automatically.
Add photos from a folder on your hard disk to iPod nano:
1 Add photos to a folder on your computer. If you want images to appear in separate photo albums on iPod nano, create folders within the main image folder and drag images to the new folders. 2 Connect iPod nano to your computer and open iTunes. 3 Select iPod nano in iTunes, then click Photos. 4 Select "Sync Photos from." 5 Choose "Choose Folder ..." from the pop-up menu, then select the image folder. 6 Select either "All folders" or "Selected folders." If you choose the second option, select the folders that you want to sync.
7 Click Apply.
When you add photos to iPod nano, iTunes optimizes the photos for viewing. Full-resolution image files aren't transferred by default. Adding full-resolution image files is useful if you want to move them from one computer to another, but it isn't necessary for viewing the images on iPod nano.
Add full-resolution image files to iPod nano:
1 Connect iPod nano to your computer and open iTunes. 2 Select iPod nano in iTunes, then click Photos. 3 Select "Include full-resolution photos." 4 Click Apply.
iTunes copies the full-resolution versions of the photos to the Photos folder on iPod nano. To retrieve them, see the following section, Copying photos from iPod nano to a computer.
Copying photos from iPod nano to a computer
If you add full-resolution photos from your computer to iPod nano, they're stored in a Photos folder on iPod nano. You can connect iPod nano to a computer and add these photos to the computer.
Add photos from iPod nano to a computer:
1. Connect iPod nano to your computer and open iTunes. 2. Select iPod nano in iTunes, then click Summary. 3. In the Options section, select "Enable disk use."
4. Click Apply.
When you use iPod nano as an external disk, the iPod nano disk icon appears on the desktop (Mac), or as the next available drive letter in Windows Explorer (Windows PC).
5. Drag image files from the Photos folder on iPod nano to the desktop or to a photo editing application on the computer.
You can also use a photo editing application, such as iPhoto, to add photos stored in the Photos folder on iPod nano. See the documentation that came with the application for more information.
Be sure to deselect "Enable disk use" when you're finished, and click Apply. When iPod nano is used as an external disk, you must eject iPod nano before you disconnect it from your computer. For more information, see Disconnecting iPod nano from your computer on page 13.
Removing photos from iPod nano
You can change sync settings to remove all photos from iPod nano, including full resolution images, or to delete selected photos.
Delete all photos from iPod nano:
1. Connect iPod nano to your computer and open iTunes. 2. Select iPod nano in iTunes, then click Photos. 3. Select "Sync photos from."
The checkbox is already selected, and clicking it again deselects it. A dialog appears asking for verification.
4. Click Remove Photos in the dialog that appears, then click Apply.
No photos are removed until you click Apply. If you change your mind, select Sync Photos again.
Delete selected photos:
1 Connect iPod nano to your computer and open iTunes. 2 Select iPod nano in iTunes, then click Photos.
3 Select the button next to "Selected albums, events, and faces, and automatically include," then select an option from the pop-up menu.
4 Deselect the items you want to remove from iPod nano, then click Apply.
Clock
9
You can use the clock on iPod nano as a stopwatch, as a timer, and to show the time for multiple time zones.
Customizing the clock
You can choose different clock faces for iPod nano and change how the time is displayed. For example, you can use 24-hour clock notation, or choose whether to show the clock when the iPod nano screen turns on. If you choose the world clock, you can show the time in two additional time zones.

Change the clock face:
Do one of the following:
Tap Settings > General > Date & Time > Clock Face, tap one of the choices, then tap Set. - On the Home screen, tap Clock, tap the clock face, then tap the left or right arrows that appear. Stop when you see the one you want, and it becomes the default clock face until you change it.
If you set the clock face to the world clock, you need to set the time zones.
Set a world clock time zone:
1 Choose the world clock face using one of the methods described above. 2 On the Home screen, tap Settings > General > Date & Time > World Clock.
If iPod nano is set to any other clock face, World Clock doesn't appear in Date & Time preferences.
Tap a location in World Clocks, then tap the city closest to the location you want to show.
Here are some more ways to change how you view time on iPod nano:
| Set the time, date, and time zone On the Home screen, tap Settings > General > Date & Time. | |
| Show time with a 24-hour clock | On the Home screen, tap Settings > General > Date & Time, then tap next to 24 Hour Clock to turn it on. |
| Show the clock face when iPod nano wakes from sleep | Tap Settings > General > Date & Time, then tap next to Time On Wake to turn it on. |
Using the stopwatch
iPod nano has a stopwatch for timing events and tracking intervals, such as laps. You can play music or other audio while you use the stopwatch.
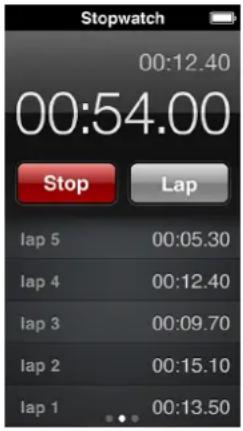
Use the stopwatch:
1. On the Home screen, tap Clock. 2. Swipe left to see the stopwatch controls. 3. Tap Start.
• To record laps, tap Lap after each lap. • To pause the stopwatch, tap Stop. Then tap Start to resume.
4. Tap Stop when you finish.
iPod nano shows the last session's lap statistics on the screen. Be sure to note lap times before you start a new session. Tapping Reset deletes the information.
Using the timer
Use the countdown timer on iPod nano to set an alarm, or to set a sleep timer that turns off iPod nano automatically. The timer continues to run while iPod nano is turned off, but you won't hear the alarm sound.
Set the timer:
1. On the Home screen, tap Clock. 2. Swipe left twice to see the timer controls.
3. Flick to set the hours and minutes until the alarm goes off, then tap When Timer Ends.

4. Tap an alert sound, then tap Set. 5. Tap Start when you're ready to start the timer.
Cancel the timer:
1 On the Home screen, tap Clock. 2 Swipe to see the timer controls. 3 Tap Cancel.
You can set a sleep timer to turn off iPod nano automatically after playing music or other content for a specified period of time.
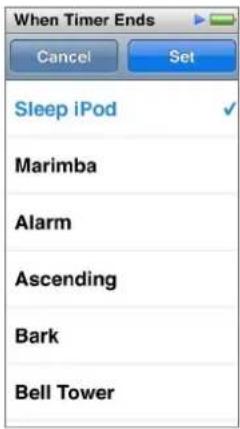
Set the sleep timer:
1 On the Home screen, tap Clock. 2 Swipe left twice to see the timer controls. 3 Flick to set the hours and minutes, then tap When Timer Ends. 4 Tap Sleep iPod, then tap Set. 5 Tap Start when you're ready.
Voice Memos
10
You can record and listen to voice memos on iPod nano, label them, then sync them to iTunes. The Voice Memos icon appears on the Home screen when a microphone is connected or when there are voice recordings on iPod nano.
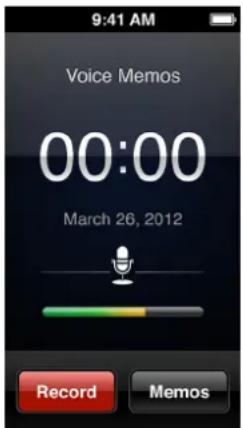
Recording voice memos
You can use the optional Apple EarPods with Remote and Mic, or a supported third-party accessory, to record voice memos on iPod nano.
Record a voice memo:
1 Connect a compatible microphone, then tap Voice Memos on the Home screen. 2 Tap Record, then begin speaking.
You can tap Pause, then tap Resume as many times as you like during the recording.
3 When you're finished, tap Stop.
The elapsed time displays on the screen while you record. If you press the Home button or leave the Voice Memos screen, the recording stops automatically.
Listening to recordings
You can play back recordings without connecting a microphone. The controls for voice memo playback are similar to those for listening to other audio on iPod nano.
Listen to a recording:
1 On the Home screen, tap Voice Memos. 2 Tap Memos, then tap a recording.
The recording begins playing automatically.
3 Tap to pause playback.
Tap the screen to see additional playback controls.
Here are more ways to control playback:
| Pause Tap, disconnect your EarPods, or press the Play/Pause button (between the volume buttons). | |
| Resume a paused recording Tap | ▶, or press the Play/Pause button (between the volume buttons). |
| Start the recording over Tap. | |
| Skip to the end of the recording | Tap ▶, or press the Play/Pause button (between the volume buttons) twice. |
| Go to any point in a recording | Tap the screen, then drag the playhead along the track position control. Slide your finger down to slow the scrub rate for greater precision. The farther down you slide your finger, the smaller the increments. |
| Play back the last 30 seconds | On the second control screen, tap 🎨. |
| Set the playback speed | Tap the screen, then tap 🎨. Tap the control again to change the speed.2X = Play at double speed.1X = Play at normal speed.1X = Play at half speed. |
Managing recordings
Your saved recordings are listed by date and time. You can assign labels to recordings to help organize them. Use iTunes to copy recordings to your computer.
Label a recording:
1 On the Voice Memos screen, tap Memos. 2 Tap a recording, and when it begins to play, tap the screen again. 3 Tap ☐, then tap one of the choices.
You can choose Memo, Podcast, Interview, Lecture, Idea, Meeting, or Presentation.
The recording appears in the list with the label you chose, along with the date and time of the recording.
Delete a recording:
1 On the Voice Memos screen, tap Memos. 2 Tap Edit. 3 Tap - next to the recording, then tap Delete. 4 When you finish, tap Done.
Sync voice memos with your computer:
If iPod nano is set to sync songs automatically: Voice memos on iPod nano are synced to a playlist in iTunes named Voice Memos (and removed from iPod nano) when you connect iPod nano. See Syncing automatically on page 15. If iPod nano is set to sync songs manually: iTunes asks if you want to sync new voice memos the next time you sync. See Managing iPod nano manually on page 16.
Accessibility
Universal Access features
Accessibility features make it easier for users with visual, auditory, or other physical disabilities to use iPod nano. These features include:
- VoiceOver
- Mono Audio
- Invert Colors
You can turn these features on or off on iPod nano, or in iTunes. You can also set a preference that turns either VoiceOver or Invert Colors on or off with three clicks of the Home button (see Quickly activating accessibility features on page 51).
Turn on accessibility features in iTunes:
1 Connect iPod nano to your computer and open iTunes. 2 In iTunes, select iPod nano, then click the Summary tab. 3 In the Options section, select Configure Universal Access. 4 Select the options you want to use, then click OK. 5 Click Apply.
See the sections below for information about turning accessibility features on or off on iPod nano.
For more information about accessibility features on your Mac and iPod nano, go to www.apple.com/accessibility.
Using VoiceOver
VoiceOver describes aloud what appears onscreen, so that you can use iPod nano without seeing the screen. VoiceOver speaks the language you specify in Accessibility settings on iPod nano.
VoiceOver is available for many languages, but not all.
VoiceOver tells you about each element on the screen as it's selected. When an element is selected, it's enclosed by a white rectangle and VoiceOver speaks the name or describes the item. The rectangle is referred to as the VoiceOver cursor.
If text is selected, VoiceOver reads the text. If a control (such as a button or switch) is selected, VoiceOver may describe what the item does, or may provide instructions—for example, "double-tap to open."
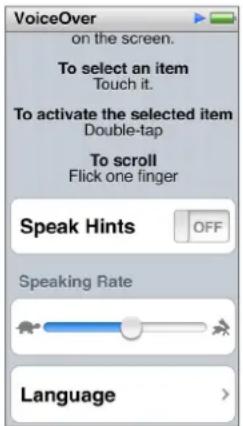
Set up VoiceOver on iPod nano:
1 Connect EarPods or headphones to iPod nano. 2 On the Home screen, tap Settings, then tap General. 3 Tap Accessibility. 4 Tap VoiceOver, then set any of these options:
- Speak Hints: Explains how to interact with the item in the VoiceOver cursor. You may want to turn this on to help you learn how to use iPod nano, and turn it off later.
- Speaking Rate: Increases or decreases the rate of speech for VoiceOver. This does not affect the speech rate for audiobooks or podcasts.
- Language: Sets the language for VoiceOver. It should match the language set for iPod nano.
5 Tap OFF to turn VoiceOver On.
If this is the first time you turned on VoiceOver on iPod nano, a dialog appears.
6 Tap OK in the dialog, then double-tap OK to confirm.
If you can't see the screen, move your finger until you hear "OK button," then double-tap with one finger.
If you do nothing for 15 seconds, the dialog disappears and VoiceOver turns off.
When VoiceOver is on, you use a different set of gestures to control iPod nano. If you change your mind and want to turn VoiceOver off, double-tap with two fingers to move the switch to Off. If you navigate away from the Settings screen, you need to use VoiceOver gestures to return to the setting and turn it off.
Turn off VoiceOver on iPod nano using VoiceOver gestures:
1. Click the Home button, then slide one finger around the screen until you hear "Settings." If you don't hear "Settings," swipe with two fingers to move to another screen and try again. 2. Double-tap to open Settings. 3. Slide your finger up or down the screen until you see or hear General, then double-tap. 4. Slide your finger up or down the screen until you see or hear "Accessibility," then double-tap. 5. Slide your finger up or down the screen until you see or hear "VoiceOver," then double-tap. 6. Double-tap when you hear "VoiceOver switch button on."
You hear "VoiceOver off" as confirmation. You can once again use standard gestures to control iPod nano.
VoiceOver gestures
When VoiceOver is turned on, use the following gestures to control iPod nano:
| Read the screen starting at the top Flick up with two fingers. | |
| Read the screen from the current selection Flick down with two fingers. | |
| Pause or continue speech when reading dialogs and other text | Tap the screen with one finger. |
| Select the item in the VoiceOver cursor Tap the screen with one finger. | |
| Activate the item in the VoiceOver cursor Double-tap with one finger. | |
| Scroll left one screen Swipe right with two fingers. | |
| Scroll right one screen Swipe left with two fingers. | |
| Scroll up one screen in a list or menu Flick down with one finger. | |
| Scroll down one screen in a list or menu Flick up with one finger. | |
| Start or stop the current action Tap with two fingers. | |
| Increase or decrease the value of a selected control | Flick up with one finger to increase down with one finger to decrease |
| Return to the Home screen | Press the Home button. |
Setting Mono Audio
Mono Audio combines the sound of the left and right channels into a monaural signal that plays through both sides of your EarPods. This enables users with a hearing impairment in one ear to hear both channels with the other ear.
Turn Mono Audio on or off:
1. On the Home screen, tap Settings > General. 2. Tap Accessibility. 3. Tap the On/Off switch next to Mono Audio.
Inverting the screen colors
You can invert the colors on the iPod nano screen, which may make it easier to read. When Invert Colors is on, the screen looks like a photographic negative.
Turn Invert Colors on or off:
1. On the Home screen, tap Settings > General. 2. Tap Accessibility. 3. Tap the On/Off switch next to Invert Colors.
Quickly activating accessibility features
You can set iPod nano to switch Invert Colors or VoiceOver off and on when you press the Home button three times. This makes it easier to share iPod nano with another person who doesn't need the same features.
Turn on the accessibility shortcut:
1 On the Home screen, tap Settings > General. 2 Tap Accessibility. 3 Tap Triple-click Home, then tap one of the options.
EarPods and Bluetooth accessories
12
You can use the EarPods that came with iPod nano, or use a variety of compatible third-party earphones, headsets, and speakers to listen to music and other audio content, watch videos, and view photos. You can also use iPod nano with compatible Bluetooth headsets and hands-free systems in some automobiles.
WARNING: For important information about avoiding hearing loss, see Chapter 14, Safety and Handling, on page 61.
Using the Apple EarPods
The Apple EarPods that came with your iPod nano connect to the earphone port on the bottom of iPod nano. Place the EarPods in your ears as shown.
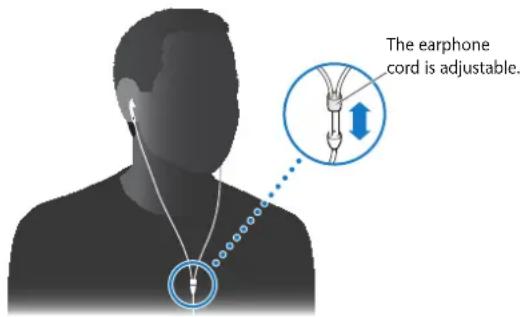
If you have the Apple EarPods with Remote and Mic or the In-Ear Headphones with Remote and Mic, you can also navigate playlists. For information, see the documentation for those accessories.
Using the Apple EarPods with Remote and Mic
The Apple EarPods with Remote and Mic (shown here) are available separately. They feature a microphone, volume buttons, and an integrated button that lets you control audio playback and hear track announcements.

Connect the EarPods to listen to music, FM radio, or to record a voice memo using the built-in microphone. Press the center button on the mic to control music playback and hear track announcements.
Pause a song or workout: Press the center button. Press again to resume playback.
Skip to the next song: Press the center button twice quickly.
Skip to the previous song: Press the center button three times quickly.
Fast-forward: Press the center button twice quickly and hold.
Rewind: Press the center button three times quickly and hold.
Adjust the volume: Press the + or - button.
| Hear the current track announcement | Press and hold the center button until you hear the current song title and artist name. |
| If you're listening to an audiobook, podcast, or iTunes U collection, you hear the book title and author's name or episode information. |
| Choose a different playlist Press and hold the center button through the announcement of the current song title and artist name, until you hear the first playlist.Click the + or – button to move forward or backward through the list of playlists. When you hear the one you want, click the center button. |
Note: The Play/Pause button on iPod nano works the same way as the center button on the Apple EarPods with Remote and Mic.
Connecting to Bluetooth accessories
You can use iPod nano with compatible Bluetooth headsets and other accessories, including some hands-free systems in newer cars. iPod nano supports A2DP for audio streaming and AVRCP for controlling playback on Bluetooth devices. Before you can use a Bluetooth device, you must pair it with iPod nano.
You can also use iPod nano with a Nike+ sensor or a Bluetooth heart rate monitor. Set up Bluetooth fitness devices in Fitness (see Setting Fitness preferences on page 34).
Important: Read the documentation that came with your Bluetooth device for instructions on its use, on pairing it with other devices, and on optimizing performance.
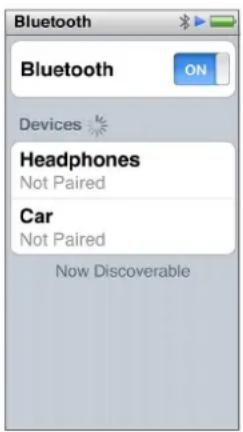
Pair iPod nano with a Bluetooth device:
1. Follow the instructions that came with the device to make it discoverable or set it to search for other Bluetooth devices. 2. On the iPod nano Home screen, tap Settings > Bluetooth. 3. Tap OFF to turn it On.
iPod nano begins searching for available Bluetooth devices.
4. When your device appears in the list, tap it.
When the pairing is completed, you see "Connected" below the device name.
Some Bluetooth devices require a code to complete the pairing. If you see a screen asking you to enter a code, check the documentation that came with the device, then enter the code provided in the device's documentation.
If your device uses the Simple Secure Pairing system, a six-digit code appears on iPod nano and on the Bluetooth device screen. If the codes match, tap Pair on iPod nano to complete the pairing.
Connect to a paired Bluetooth device:
A Bluetooth device can be paired with iPod nano even when it's not currently connected. You must connect to the device to use it.
- On the Home screen, tap Settings > Bluetooth, then tap the paired device.
When successfully connected, you see "Connected" below the device name.
Remove a Bluetooth device pairing:
1 On the Home screen, tap Settings > Bluetooth. 2 Tap ➤ next to the device in the Devices list. 3 Tap "Forget this Device."
Switching between audio output devices
If you have more than one audio output device connected or paired with iPod nano, you can use playback controls on iPod nano to choose one for audio output.
When multiple devices are available, a speaker icon appears next to the volume control for music, and in the additional playback controls for other types of audio, video, and movies.
| Appears when EarPods or other headphones are connected to the headphone jack and a supported USB audio accessory is connected to the Lightning connector. | |
| Appears when EarPods or other non-Bluetooth audio devices are selected and other output options are available. | |
| Appears when a Bluetooth device is selected and other output options are available. |
iPod nano must already be paired with a Bluetooth device to use the controls.
Select a device for audio output:
■Tap the icon, then tap the device in the list.
EarPods and other headphones connected to the earphone port appear as "iPod" in the list.
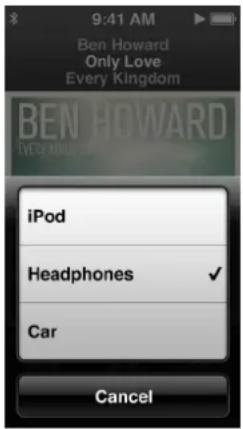
Tips and Troubleshooting
13
Most problems with iPod nano can be solved quickly by following the advice in this chapter.
The 5 Rs: Reset, Retry, Restart, Reinstall, Restore
Remember these five basic suggestions if you have a problem with iPod nano. Try these steps one at a time until your issue is resolved. If one of the following doesn't help, read on for solutions to specific problems.
- Reset iPod nano. See General suggestions, below.
- Retry with a different USB port if you cannot see iPod nano in iTunes.
- Restart your computer, and make sure you have the latest software updates installed.
- Reinstall iTunes software from the latest version on the web.
- Restore iPod nano. See Updating and restoring iPod software on page 60.
General suggestions
Most problems with iPod nano can be solved by resetting it.
If you need to reset iPod nano
- First, make sure iPod nano is charged. Then press the Sleep/Wake button and the Home button for 6 seconds, until the Apple logo appears.
If iPod nano won't turn on or respond
- The iPod nano battery might need to be recharged. Connect iPod nano to a high power USB 2.0 port or USB 3.0 port on your computer or to an Apple USB Power Adapter and let the battery recharge. Look for the lightning bolt icon on the iPod nano screen to verify that iPod nano is receiving a charge.
Note: The USB 2.0 port on most keyboards doesn't provide enough power to charge iPod nano. Connect iPod nano to a high power USB 2.0 port or USB 3.0 port on your computer.
Try the 5 Rs, one by one, until iPod nano responds.
If you want to disconnect iPod nano, but you see the message "Connected" or "Sync in Progress"
If iPod nano is syncing music, wait for it to finish.
Select iPod nano in iTunes, then click the Eject button (▲).
If iPod nano disappears from iTunes, but you still see the "Connected" or "Sync in Progress" message on the iPod nano screen, disconnect iPod nano.
If iPod nano doesn't disappear from iTunes, drag the iPod nano icon from the desktop to the Trash if you're using a Mac. If you're using a Windows PC, eject the device in My Computer or click the Safely Remove Hardware icon in the system tray and select iPod nano. If you still see the "Connected" or "Sync in Progress" message, restart your computer and eject iPod nano again.
If iPod nano isn't playing music
Make sure the volume is adjusted properly. A maximum volume limit might be set. You can change or remove it in Settings. See Setting the maximum volume limit on page 25. Make sure you're using iTunes 10.7 or later (available at www.itunes.com/downloads). Songs purchased from the iTunes Store using earlier versions of iTunes won't play on iPod nano until you upgrade iTunes.
If you connect iPod nano to your computer and nothing happens
Make sure you installed the latest iTunes software from www.itunes.com/downloads.
Try connecting to a different USB port on your computer.
Note: Your computer needs a USB 2.0 port or a USB 3.0 port to connect iPod nano. If you have a Windows PC that doesn't have a USB 2.0 port, in some cases you can purchase and install a USB 2.0 card.
If iPod nano is connected to a USB hub, try connecting iPod nano directly to a high power USB 2.0 port or USB 3.0 port on your computer. iPod nano might need to be reset (see page 56). If you're connecting iPod nano to a portable computer using the Lightning to USB Cable, connect the computer to a power outlet before connecting iPod nano. Make sure you have the required computer and software. See If you want to check the system requirements on page 59. Check the cable connections. Disconnect the cable at both ends and make sure no foreign objects are in the USB ports. Then reconnect the cable. Try restarting your computer. If none of the previous suggestions solves your problems, you might need to restore iPod nano software. See Updating and restoring iPod software on page 60.
If music stops when the iPod nano screen turns off
Make sure the earphone port is free of debris.
If iPod nano displays a "Connect to Power" message
This message may appear if iPod nano is exceptionally low on power and the battery needs to be charged before iPod nano can communicate with your computer. To charge the battery, connect iPod nano to a high-power USB 2.0 port or USB 3.0 port on your computer.
Leave iPod nano connected to your computer until the message disappears and iPod nano appears in iTunes or the Finder. Depending on how depleted the battery is, you may need to charge iPod nano for up to 30 minutes before it will start up.
To charge iPod nano more quickly, use the optional Apple USB Power Adapter.
If iPod nano displays a "Use iTunes to restore" message
Make sure you have the latest version of iTunes on your computer (download it from www.itunes.com/downloads). Connect iPod nano to your computer. When iTunes opens, follow the onscreen prompts to restore iPod nano.
If restoring iPod nano doesn't solve the problem, iPod nano may need to be repaired. You can arrange for service at the iPod Service & Support website at www.apple.com/support/ipod.
If you can't add a song or other item to iPod nano
The song may be in a format that iPod nano doesn't support. The following audio file formats are supported by iPod nano. These include formats for audiobooks and podcasting:
AAC (M4A, M4B, M4P, up to 320 Kbps), Apple Lossless (a high-quality compressed format), MP3 (up to 320 Kbps), MP3 Variable Bit Rate (VBR)
WAV
AA (audible.com spoken word, formats 2, 3, and 4)
AIFF
A song encoded using Apple Lossless format has CD-quality sound, but takes up only about half as much space as a song encoded using AIFF or WAV format. The same song encoded in AAC or MP3 format takes up even less space. When you import music from a CD using iTunes, it's converted to AAC format by default.
If you have a song in iTunes that isn't supported by iPod nano, you can convert it to a format iPod nano supports. For more information, see iTunes Help.
Using iTunes for Windows, you can convert nonprotected WMA files to AAC or MP3 format. This can be useful if you have a library of music encoded in WMA format.
iPod nano doesn't support audible.com format 1, MPEG Layer 1, MPEG Layer 2, or WMA audio files.
You can't sync HD video to iPod nano; only standard definition video is supported. You may be able to convert a video to play on iPod nano. See iTunes Help for more information.
If iPod nano displays a "Connect to iTunes to activate Genius" message
- You haven't turned on Genius in iTunes, or you haven't synced iPod nano since you turned on Genius in iTunes. See Creating Genius playlists on page 24.
If iPod nano displays a "Genius is not available for the selected song" message
- Genius is on but is unable to make a Genius playlist using the selected song. New songs are regularly added to the iTunes Store Genius database, so try again soon.
If iPod nano can't receive a radio signal
■Make sure the EarPods or headphones are fully connected.
- Try relocating the earphone or headphone cord, and make sure the cord isn't coiled or twisted.
■ Move to an area with better reception, such as near a window or outside.
If you accidentally set iPod nano to use a language you don't understand
■You can reset the language:
1 On the Home screen, tap Settings (the icon looks like a gear). 2 Tap the second menu item from the top (General). 3 Flick to the bottom of the list, then tap the second menu item from the bottom (Language). 4 Tap your language, then tap the button on the right at the top of the menu (Done).
The button on the left is Cancel.
- You can also reset all settings (your synced content isn't deleted or modified). Tap Settings, tap the last item in the menu (Reset Settings), then tap the red button (Reset).
The last button is Cancel.
If you can't recognize the Reset Settings menu item, you can restore iPod nano to its original state and choose a language. See Updating and restoring iPod software on page 60.
If iPod nano is unresponsive and you see a box around items on the screen
1 VoiceOver may be turned on. Click the Home button three times.
If the toggle feature is turned on for VoiceOver, clicking Home three times turns VoiceOver off or on.
2 If the box is still visible, use VoiceOver gestures to turn it off (see VoiceOver gestures on page 50).
If iPod nano speaks the text on the screen
■ VoiceOver may be turned on, and you must use VoiceOver gestures to turn it off (see VoiceOver gestures on page 50).
If you want to check the system requirements
To use iPod nano, you must have:
■One of the following computer configurations:
• A Mac with a high power USB 2.0 port or USB 3.0 port - A Windows PC with a high power USB 2.0 port or a USB 2.0 card installed
■One of the following operating systems:
• Mac OS X v10.6.8 or later - Windows 7, 32-bit edition • Windows Vista, 32-bit edition - Windows XP Home or Professional with Service Pack 2 or later
iTunes 10.7 or later (download it from www.itunes.com/downloads)
If your Windows PC doesn't have a high power USB 2.0 port, you can purchase and install a USB 2.0 card. For more information about cables and compatible USB cards, go to www.apple.com/ipod.
On the Mac, iPhoto 8.1 or later is required in order to use all iPod nano photo features. This software is optional. iPhoto might already be installed on your Mac, so check in the Applications folder.
On both Mac and Windows PC, iPod nano can sync digital photos from folders on your computer's hard disk.
If you want to use iPod nano with both a Mac and a Windows PC
If you're using iPod nano with a Mac and you want to use it with a Windows PC, you must restore the iPod software for use with the PC (see Updating and restoring iPod software on page 60).
Important: Restoring the iPod software erases all data from iPod nano, including songs.
You cannot switch from using iPod nano with a Mac to using it with a Windows PC, without erasing all data on iPod nano.
Updating and restoring iPod software
You can use iTunes to update or restore iPod software. You should update iPod nano to use the latest software. You can also restore the software, which puts iPod nano back to its original state.
- If you choose to update, the software is updated, but your settings and songs aren't affected.
- If you choose to restore, all data is erased from iPod nano, including songs, videos, files, photos, and any other data. All iPod nano settings are restored to their original state.
Update or restore iPod software:
1 Make sure you have an Internet connection and have installed the latest version of iTunes from www.itunes.com/downloads. 2 Connect iPod nano to your computer. 3 In iTunes, select iPod nano, then click Summary.
The Version section tells you whether iPod nano is up to date or needs a newer version of the software.
4 Click Update to install the latest version of the software. 5 If necessary, click Restore to restore iPod nano to its original settings (this erases all data from iPod nano). Follow the onscreen instructions to complete the restore process.
Important: Restoring the iPod software erases all data from iPod nano, including songs.

WARNING: Failure to follow these safety instructions could result in fire, electric shock, or other injuries, or damage to iPod nano or other property. Read all safety information below before using iPod nano.
Keep the iPod nano User Guide handy for future reference.
Important safety information
Handling Handle iPod nano with care. It is made of metal, glass, and plastic and has sensitive electronic components inside. iPod nano can be damaged if dropped, burned, punctured, or crushed, or if it comes in contact with liquid. Don't use a damaged iPod nano, such as when the screen is cracked, as it may cause injury. If you're concerned about scratching, consider using a case.
Repairing Don't open iPod nano and don't attempt to repair iPod nano by yourself. Disassembling iPod nano may cause injury to you or damage to iPod nano. If iPod nano is damaged, malfunctions or comes in contact with liquid, contact Apple or an Apple Authorized Service Provider. You can find more information about obtaining service at: www.apple.com/support/ipod.
Battery Don't attempt to replace the battery in iPod nano yourself as you may damage the battery which may cause overheating and injury. The lithium-ion battery in iPod nano should be replaced only by Apple or an Apple Authorized Service Provider, and must be recycled or disposed of separately from household waste. For information about battery recycling and replacement, go to www.apple.com/batteries. Don't incinerate the battery.
Distraction Using iPod nano in some circumstances can distract you and may cause a dangerous situation. Observe rules that prohibit or restrict the use of headphones (for example, using headphones while riding a bicycle).
Charging Charge iPod nano with the included cable and optional power adapter or other third-party Made for iPod cable and power adapters that are compatible with USB 2.0. Using damaged cables or chargers, or charging when moisture is present, can cause electric shock. When you use the Apple Lightning to USB Cable to charge iPod nano, make sure that the AC plug or AC power cord is fully inserted into the adapter before you plug it into a power outlet. Power adapters may become warm during normal use and prolonged contact may cause injury. Always allow adequate ventilation around power adapters when using.
Hearing loss Listening to sound at high volumes may damage your hearing. To prevent possible hearing damage, do not listen at high volume levels for long periods. Background noise, as well as continued exposure to high volume levels, can make sounds seem quieter than they actually are. Use only compatible receivers, earbuds, headphones, speakerphones, or earpieces with your device. Turn on the audio and check the volume before inserting anything in your ear. For more information about hearing loss, see www.apple.com/sound/. For information about how to set a maximum volume limit on iPod nano, see Setting the maximum volume limit on page 25.
RF exposure iPod nano uses radio signals to connect to Bluetooth capable devices. Specific Absorption Rate (SAR) refers to the rate at which the body absorbs RF energy. SAR limits are 1.6 Watts per Kilogram (over a volume containing a mass of 1 gram of tissue) in countries that follow the United States FCC limit and 2.0 W/Kg (averaged over 10 grams of tissue) in countries that follow the Council of the European Union limit. During testing, iPod nano Bluetooth radios are set to their highest transmission levels and placed in positions that simulate use against the body. Avoid cases with metal parts.
Radio frequency interference Observe signs and notices that prohibit or restrict the use of electronic devices (for example, in health care facilities or blasting areas). Although iPod nano is designed, tested, and manufactured to comply with regulations governing radio frequency emissions, such emissions from iPod nano can negatively affect the operation of other electronic equipment, causing them to malfunction. Turn off iPod nano or turn off Bluetooth when use is prohibited, such as while traveling in aircraft, or when asked to do so by authorities.
Medical devices iPod nano contains a radio that emits electromagnetic fields. These electromagnetic fields may interfere with pacemakers or other medical devices. If you wear a pacemaker, maintain at least 6 inches (approximately 15 cm) of separation between your pacemaker and the iPod nano. If you suspect iPod nano is interfering with your pacemaker or any other medical device, stop using iPod nano and consult your physician for information specific to your medical device. The included headphones have magnets in the earbuds, which may interfere with pacemakers, defibrillators or other medical devices. Maintain at least 6 inches (approximately 15 cm) of separation between your pacemaker or defibrillator and the earbuds.
Medical conditions If you have any medical condition that you believe could be affected by iPod nano (for example, seizures, blackouts, eyestrain, or headaches), consult with your physician prior to using iPod nano.
Explosive atmospheres Do not charge or use iPod nano in any area with a potentially explosive atmosphere, such as at a fueling area, or in areas where the air contains chemicals or particles (such as grain, dust or metal powders). Obey all signs and instructions.
Repetitive motion When you perform repetitive activities on iPod nano, you may experience occasional discomfort in your hands, arms, wrists, shoulders, neck, or other parts of your body. If you experience discomfort, stop using iPod nano and consult a physician.
Important handling information
Using connectors and ports Never force a connector into a port or apply excessive pressure to a button because this may cause damage that is not covered under warranty. If the connector and port don't join with reasonable ease, they probably don't match. Check for obstructions and make sure that the connector matches the port and that you have positioned the connector correctly in relation to the port.
Operating iPod nano in acceptable temperatures iPod nano is designed to be operated in temperatures between 0° and 35° C (32° to 95° F) and stored in temperatures between -20° and 45° C (-4° to 113° F). Low- or high-temperature conditions might temporarily shorten battery life or cause iPod nano to temporarily stop working properly. Leaving iPod nano in a parked vehicle or in direct sunlight can cause iPod nano to exceed these storage or operating temperature ranges. Avoid dramatic changes in temperature or humidity when using iPod nano as condensation may form on or within iPod nano.
When you're using iPod nano or charging the battery, it is normal for iPod nano to get warm. The exterior of iPod nano functions as a cooling surface that transfers heat from inside the unit to the cooler air outside.
Keeping the outside of iPod nano clean Clean iPod nano immediately if it comes into contact with any contaminants that may cause stains, for example, ink, dyes, makeup, dirt, food, oils, and lotions. To clean iPod nano, unplug all cables and turn off iPod nano (press and hold the Sleep/Wake button). Then use a soft, slightly damp, lint-free cloth. Avoid getting moisture in openings. Don't use window cleaners, household cleaners, aerosol sprays, solvents, alcohol, ammonia, or abrasives to clean iPod nano.
Lightning Cable Discoloration of the Lightning to USB Cable connector after regular use is normal. Dirt, debris, and exposure to liquids may cause discoloration. To remove the discoloration, or if the cable becomes warm during use or won't charge or sync iPod nano, disconnect the Lightning to USB Cable from your computer or power adapter and clean it with a soft, dry, lint-free cloth. Do not use liquids or cleaning products when cleaning the Lightning to USB Cable connector.
Disposing of iPod nano properly For information about the proper disposal of iPod nano, including other important regulatory compliance information, see Disposal and recycling information on page 66.
Learning More, Service, and Support
You can find the iPod nano serial number here:
- Etched on the back of iPod nano.
- Turn on iPod nano, then tap Settings > General > About.
- In iTunes (with iPod nano connected to your computer), select iPod nano, then click Summary.
Look here for iPod-related software and service information.
To learn about Do this
| Service and support, discussions, tutorials, and Apple software downloads | Go to: www.apple.com/support/ipodnano |
| Using iTunes | Open iTunes and choose Help > iTunes Help.For online iTunes tutorials (available in some areas only), go to:www.apple.com/support/itunes |
| Using iPhoto (on OS X) | Open iPhoto and choose Help > iPhoto Help. |
| The latest information about iPod nano | Register iPod nano. To register, install iTunes on your computer and connect iPod nano. |
| Obtaining warranty service | First follow the advice in this guide, the onscreen help, and online resources. Then go to: www.apple.com/support/ipodnano |
Regulatory Compliance Information
Regulatory
Regulatory information, certification, and compliance marks specific to iPod nano are available on iPod nano. Go to Settings > General > About > Regulatory.
FCC Compliance Statement
This device complies with part 15 of the FCC rules. Operation is subject to the following two conditions: (1) This device may not cause harmful interference, and (2) this device must accept any interference received, including interference that may cause undesired operation. See instructions if interference to radio or TV reception is suspected.
Radio and TV Interference
This computer equipment generates, uses, and can radiate radio-frequency energy. If it is not installed and used properly—that is, in strict accordance with Apple's instructions—it may cause interference with radio and TV reception.
This equipment has been tested and found to comply with the limits for a Class B digital device in accordance with the specifications in Part 15 of FCC rules. These specifications are designed to provide reasonable protection against such interference in a residential installation. However, there is no guarantee that interference will not occur in a particular installation.
You can determine whether your computer system is causing interference by turning it off. If the interference stops, it was probably caused by the computer or one of the peripheral devices.
If your computer system does cause interference to radio or TV reception, try to correct the interference by using one or more of the following measures:
- Turn the TV or radio antenna until the interference stops.
- Move the computer to one side or the other of the TV or radio.
- Move the computer farther away from the TV or radio.
- Plug the computer in to an outlet that is on a different circuit from the TV or radio. (That is, make certain the computer and the TV or radio are on circuits controlled by different circuit breakers or fuses.)
If necessary, consult an Apple Authorized Service Provider or Apple. See the service and support information that came with your Apple product. Or, consult an experienced radio/TV technician for additional suggestions.
Important: Changes or modifications to this product not authorized by Apple Inc. could void the EMC compliance and negate your authority to operate the product.
This product was tested for EMC compliance under conditions that included the use of Apple peripheral devices and Apple shielded cables and connectors between system components.
It is important that you use Apple peripheral devices and shielded cables and connectors between system components to reduce the possibility of causing interference to radios, TV sets, and other electronic devices. You can obtain Apple peripheral devices and the proper shielded cables and connectors through an Apple Authorized Reseller. For non-Apple peripheral devices, contact the manufacturer or dealer for assistance.
Responsible party (contact for FCC matters only):
Apple Inc. Corporate Compliance
1 Infinite Loop, MS 91-1EMC
Cupertino, CA 95014
Industry Canada Statement
This device complies with Industry Canada license-exempt RSS standard(s). Operation is subject to the following two conditions: (1) this device may not cause interference, and (2) this device must accept any interference, including interference that may cause undesired operation of the device.
Korea Warning Statements
Korea Regulations and Compliance
Notice according to the Korea Communications Commission (KCC) notice
Singapore Wireless Certification
Complies with IDA Standards DB00063
Taiwan Wireless Statements
Warning statements for wireless equipment
Japan VCCI Class B Statement
Voluntary control measures for radio interference from information technology equipment
This device complies with the R&TTE Directive.
A copy of the EU Declaration of Conformity is available online at www.apple.com/euro/compliance.
China
The lithium-ion battery in iPod nano should be replaced only by Apple or an Apple Authorized Service Provider, and must be recycled or disposed of separately from household waste. For information about battery recycling and replacement, go to www.apple.com/batteries.
Disposal and recycling information
Your iPod must be disposed of properly according to local laws and regulations. Because this product contains a battery, the product must be disposed of separately from household waste. When your iPod reaches its end of life, contact Apple or your local authorities to learn about recycling options.
For information about Apple's recycling program, go to: www.apple.com/recycling
China
Warning: Do not puncture or incinerate. This battery contains no mercury.
Taiwan

Recycle used batteries
Warning
Battery Charger Efficiency

European Union—Electronics and Battery Disposal Information

The symbol above means that according to local laws and regulations your product and/or its battery shall be disposed of separately from household waste. When this product reaches its end of life, take it to a collection point designated by local authorities. The separate collection and recycling of your product and/or its battery at the time of disposal will help conserve natural resources and ensure that it is recycled in a manner that protects human health and the environment.
Apple and the Environment
At Apple, we recognize our responsibility to minimize the environmental impacts of our operations and products.
For more information, go to www.apple.com/environment.
Apple Inc.
© 2012 Apple Inc. All rights reserved.
Apple, the Apple logo, Finder, iLife, iMovie, iPod, iPhone, iPhoto, iPod nano, iTunes, Mac, Macintosh, Mac OS, OS X, and the Made for iPod logo are trademarks of Apple Inc., registered in the U.S. and other countries.
Multi-Touch and EarPods are trademarks of Apple Inc.
iTunes Store is a service mark of Apple Inc., registered in the U.S. and other countries.
NIKE and the Swoosh design are trademarks of NIKE, Inc. and its affiliates and are used under license.
The Bluetooth® word mark and logos are registered trademarks owned by Bluetooth SIG, Inc. and any use of such marks by Apple Inc. is under license.
Other company and product names mentioned herein may be trademarks of their respective companies.
Mention of third-party products is for informational purposes only and constitutes neither an endorsement nor a recommendation. Apple assumes no responsibility with regard to the performance or use of these products. All understandings, agreements, or warranties, if any, take place directly between the vendors and the prospective users.
Every effort has been made to ensure that the information in this manual is accurate. Apple is not responsible for printing or clerical errors.
019-2342/2012-09



- CHAPTER 1: IPOD NANO AT A GLANCE
- CHAPTER 2: GETTING STARTED
- CHAPTER 3: BASICS
- CHAPTER 4: MUSIC AND OTHER AUDIO
- CHAPTER 5: VIDEOS
- CHAPTER 6: FM RADIO
- CHAPTER 7: FITNESS
- IPOD NANO AT A GLANCE
- ACCESSORIES
- THE HOME SCREEN
- STATUS ICONS
- GETTING STARTED
- SETTING UP IPOD NANO
- SET UP IPOD NANO
- BASICS
- USING MULTI-TOUCH
- TAP AND DOUBLE-TAP
- SWIPE
- FLICK
- DRAG
- ZOOM IN OR OUT
- SETTING PREFERENCES
- OPEN SETTINGS FOR IPOD NANO
- GETTING INFORMATION ABOUT IPOD NANO
- GENERAL SETTINGS
- MUSIC SETTINGS
- SETTINGS FOR VIDEOS, PHOTOS, AND RADIO
- RESETTING PREFERENCES
- RESET ALL SETTINGS
- CONNECTING AND DISCONNECTING IPOD NANO
- CONNECTING IPOD NANO TO YOUR COMPUTER
- CONNECT IPOD NANO TO YOUR COMPUTER
- DISCONNECTING IPOD NANO FROM YOUR COMPUTER
- DISCONNECT IPOD NANO
- EJECT IPOD NANO
- ABOUT THE BATTERY
- CHARGING THE BATTERY
- CHARGE THE BATTERY USING YOUR COMPUTER
- CHARGE THE BATTERY USING THE APPLE USB POWER ADAPTER
- UNDERSTANDING BATTERY STATES
- CONSERVING POWER
- SETTING UP ITUNES SYNCING
- SYNCING AUTOMATICALLY
- TURN OFF AUTOMATIC SYNCING FOR IPOD NANO
- MANAGING IPOD NANO MANUALLY
- SET ITUNES TO MANAGE CONTENT MANUALLY
- TRANSFERRING PURCHASED CONTENT TO ANOTHER COMPUTER
- TRANSFER PURCHASED CONTENT TO ANOTHER COMPUTER
- MUSIC AND OTHER AUDIO
- PLAYING MUSIC
- PLAY A SONG
- CONTROLLING PLAYBACK FOR SONGS
- SHUFFLING SONGS
- PLAYING PODCASTS, AUDIOBOOKS, AND ITUNES U COLLECTIONS
- CONTROLLING PLAYBACK FOR PODCASTS, AUDIOBOOKS, AND ITUNES U COLLECTIONS
- CREATING PLAYLISTS ON IPOD NANO
- CREATING AND EDITING PLAYLISTS
- CREATE A PLAYLIST
- REMOVE ITEMS FROM A PLAYLIST
- DELETE A PLAYLIST
- CREATING A SMART PLAYLIST BASED ON SONG RATINGS
- RATE A SONG
- CREATING GENIUS PLAYLISTS
- CREATE A GENIUS PLAYLIST ON IPOD NANO
- PLAYING GENIUS MIXES
- PLAY A GENIUS MIX
- CONTROLLING THE VOLUME
- SETTING THE MAXIMUM VOLUME LIMIT
- REMOVE THE VOLUME LIMIT
- PLAYING SONGS AT THE SAME VOLUME LEVEL
- SET SONGS TO PLAY AT THE SAME VOLUME LEVEL
- VIDEOS
- ADDING VIDEOS TO IPOD NANO
- WATCHING VIDEOS ON IPOD NANO
- WATCH A VIDEO ON IPOD NANO
- WATCHING RENTED MOVIES
- WATCH A RENTED MOVIE
- FM RADIO
- LISTENING TO FM RADIO
- LISTEN TO THE RADIO
- PAUSING LIVE RADIO
- SHOW THE LIVE PAUSE CONTROLS
- TURN OFF LIVE PAUSE
- FINDING LOCAL STATIONS AND SETTING FAVORITES
- FIND LOCAL STATIONS
- REMOVE STATIONS FROM FAVORITES
- TAGGING SONGS FOR REVIEW AND PURCHASE
- TAG A SONG
- SEE RECENT SONGS
- SETTING YOUR RADIO REGION
- SELECT A RADIO REGION
- FITNESS
- SETTING FITNESS PREFERENCES
- COUNTING STEPS
- CREATING WORKOUTS WITH MUSIC
- SET UP A RUN WORKOUT
- USE A SAVED WORKOUT
- CONTROLLING IPOD NANO DURING A WORKOUT
- CALIBRATING IPOD NANO
- CALIBRATE IPOD NANO
- RESET CALIBRATION
- VIEWING AND MANAGING FITNESS DATA
- VIEW YOUR EXERCISE HISTORY
- CLEAR WORKOUT DATA FROM IPOD NANO
- UPLOAD YOUR STEPS OR WORKOUT INFORMATION TO NIKE
- PHOTOS
- VIEWING PHOTOS ON IPOD NANO
- VIEWING INDIVIDUAL PHOTOS
- VIEW PHOTOS ON IPOD NANO
- VIEWING SLIDESHOWS ON IPOD NANO
- SYNCING PHOTOS
- ADDING PHOTOS FROM YOUR COMPUTER
- SYNC PHOTOS FROM YOUR IPHOTO LIBRARY
- ADD PHOTOS FROM A FOLDER ON YOUR HARD DISK TO IPOD NANO
- ADD FULL-RESOLUTION IMAGE FILES TO IPOD NANO
- COPYING PHOTOS FROM IPOD NANO TO A COMPUTER
- ADD PHOTOS FROM IPOD NANO TO A COMPUTER
- REMOVING PHOTOS FROM IPOD NANO
- DELETE ALL PHOTOS FROM IPOD NANO
- DELETE SELECTED PHOTOS
- CLOCK
- CUSTOMIZING THE CLOCK
- CHANGE THE CLOCK FACE
- SET A WORLD CLOCK TIME ZONE
- USING THE STOPWATCH
- USE THE STOPWATCH
- USING THE TIMER
- SET THE TIMER
- CANCEL THE TIMER
- SET THE SLEEP TIMER
- VOICE MEMOS
- RECORDING VOICE MEMOS
- RECORD A VOICE MEMO
- LISTENING TO RECORDINGS
- LISTEN TO A RECORDING
- TAP TO PAUSE PLAYBACK
- MANAGING RECORDINGS
- LABEL A RECORDING
- DELETE A RECORDING
- SYNC VOICE MEMOS WITH YOUR COMPUTER
- ACCESSIBILITY
- UNIVERSAL ACCESS FEATURES
- TURN ON ACCESSIBILITY FEATURES IN ITUNES
- USING VOICEOVER
- SET UP VOICEOVER ON IPOD NANO
- TURN OFF VOICEOVER ON IPOD NANO USING VOICEOVER GESTURES
- VOICEOVER GESTURES
- SETTING MONO AUDIO
- TURN MONO AUDIO ON OR OFF
- INVERTING THE SCREEN COLORS
- TURN INVERT COLORS ON OR OFF
- QUICKLY ACTIVATING ACCESSIBILITY FEATURES
- TURN ON THE ACCESSIBILITY SHORTCUT
- EARPODS AND BLUETOOTH ACCESSORIES
- USING THE APPLE EARPODS
- USING THE APPLE EARPODS WITH REMOTE AND MIC
- CONNECTING TO BLUETOOTH ACCESSORIES
- PAIR IPOD NANO WITH A BLUETOOTH DEVICE
- CONNECT TO A PAIRED BLUETOOTH DEVICE
- REMOVE A BLUETOOTH DEVICE PAIRING
- SWITCHING BETWEEN AUDIO OUTPUT DEVICES
- SELECT A DEVICE FOR AUDIO OUTPUT
- TIPS AND TROUBLESHOOTING
- THE 5 RS: RESET, RETRY, RESTART, REINSTALL, RESTORE
- GENERAL SUGGESTIONS
- IF YOU NEED TO RESET IPOD NANO
- IF IPOD NANO WON'T TURN ON OR RESPOND
- IF IPOD NANO ISN'T PLAYING MUSIC
- IF YOU CONNECT IPOD NANO TO YOUR COMPUTER AND NOTHING HAPPENS
- IF MUSIC STOPS WHEN THE IPOD NANO SCREEN TURNS OFF
- IF IPOD NANO DISPLAYS A "CONNECT TO POWER" MESSAGE
- IF IPOD NANO DISPLAYS A "USE ITUNES TO RESTORE" MESSAGE
- UPDATING AND RESTORING IPOD SOFTWARE
- UPDATE OR RESTORE IPOD SOFTWARE
- IMPORTANT SAFETY INFORMATION
- IMPORTANT HANDLING INFORMATION
- LEARNING MORE, SERVICE, AND SUPPORT
- REGULATORY COMPLIANCE INFORMATION
- REGULATORY
- FCC COMPLIANCE STATEMENT
- RADIO AND TV INTERFERENCE
- INDUSTRY CANADA STATEMENT
- KOREA WARNING STATEMENTS
- SINGAPORE WIRELESS CERTIFICATION
- TAIWAN WIRELESS STATEMENTS
- WARNING STATEMENTS FOR WIRELESS EQUIPMENT
- JAPAN VCCI CLASS B STATEMENT
- DISPOSAL AND RECYCLING INFORMATION
- CHINA
- TAIWAN
- WARNING
- BATTERY CHARGER EFFICIENCY
- APPLE AND THE ENVIRONMENT
Brand : APPLE
Model : iPod Nano 7th generation
Category : Mp3 player