
QB251A - Subwoofer MB QUART - Free user manual and instructions
Find the device manual for free QB251A MB QUART in PDF.


| Product Type | Subwoofer |
| Brand | MB Quart |
| Model | QB251A |
| Category | Subwoofer |
| Diameter | 12 inches (30.48 cm) |
| RMS Power | 250 Watts |
| Peak Power | 500 Watts |
| Impedance | 4 Ohms |
| Frequency Response | 30 Hz - 250 Hz |
| Sensitivity | 89 dB |
| Mounting Depth | 5.5 inches (14 cm) |
| Cutout Diameter | 11 inches (27.94 cm) |
| Weight | 10 lbs (4.5 kg) |
| Cone Material | Polypropylene |
| Surround Material | Rubber |
| Voice Coil | 2-layer |
| Magnet | Ferrite |
| Maintenance | Clean with a dry cloth |
| Safety | Avoid exposure to moisture |
| Repairability | Refer to a professional for repairs |
| Recommended Enclosure | Sealed or ported, 1.0-1.5 cu ft |
Frequently Asked Questions - QB251A MB QUART
User questions about QB251A MB QUART
0 question about this device. Answer the ones you know or ask your own.
Ask a new question about this device
Download the instructions for your Subwoofer in PDF format for free! Find your manual QB251A - MB QUART and take your electronic device back in hand. On this page are published all the documents necessary for the use of your device. QB251A by MB QUART.
USER MANUAL QB251A MB QUART
natural_image
Exterior view of a black MBOUART Active Semiconductor device with speaker grille and control panel (no visible text or symbols on body)ACTIVE SUBWOOFER SYSTEM
QB201A
QB251A
ENG USER'S MANUAL....2
IMPORTANT INFORMATIONS
QB201A
Subwoofer 20 cm (8")
Output Power RMS 125 Watts
Output Power Max. 250 Watts
Lowpass Filter 50 - 150 Hz
Phase Shift 0°/180°
Bass Boost 0 - 12 dB
Input Sensitivity 10 V - 0.2 V
Operating Voltage ....+12 V (9 - 15 V), negative ground
Fuse Rating 25 A
Dimensions (W x H x L) 240 x 73 x 325 mm
QB251A
Subwoofer 25 cm (10")
Output Power RMS 150 Watts
Output Power Max. 300 Watts
Lowpass Filter 50 - 150 Hz
Phase Shift 0°/180°
Bass Boost 0 - 12 dB
Input Sensitivity 10 V - 0.2 V
Operating Voltage ....+12 V (9 - 15 V), negative ground
Fuse Rating 25 A
Dimensions (W x H x L)....270 x 78 x 355 mm
All Specifications are subject to change.


10 \~ 90%



DISPOSAL

If you need to dispose the device and its components, please note that no electronic devices may be disposed with the household waste. Dispose the device and its components at an appropriate recycling facility in accordance with local waste regulations. If necessary, consult your local authority or dealer.
IMPORTANT NOTES PRIOR TO INSTALLATION
ATTENTION: Before you start with the installation, disconnect the ground connection from the vehicle's battery in order to prevent short circuits. This guide is an installation aid for a proper installation of the sound system. Please read the following instructions:
- This device is only suited for a 12 volt system in a vehicle with negative ground.
- The radiated heat while operation requires sufficient air circulation at the place of installation.
- Ensure the accessibility of the fuse and the operating elements after installation.
- The reliability and performance of the device depends on the quality of installation.
- Please treat all parts of the sound system and the components of your vehicle with caution.
- Follow under all circumstance the regulations of the vehicle manufacturer and do not make any modifications on the vehicle, which could interfere the driving safety.
INSTALLATION
Choose a suitable location for your device. The permanent temperature of the location should not be lower than 5^ C and not higher than 50^ C. Protect the device from moisture and humidity. Ensure that your device will not get loose during the drive and hurt someone in the passenger cabin. Use therefor the included mounting brackets (4 x) and screws (8 x). Then use self-tapping screws (not included) from the specialist trade, to fix the device in your vehicle.
Please observe not to damage any serial components of your vehicle (air bags, wires, gas tank etc.) during the installation of your device by drilling or any other operations.
INTERCONNECTION
POWER SUPPLY AND TURN-ON-CONNECTION
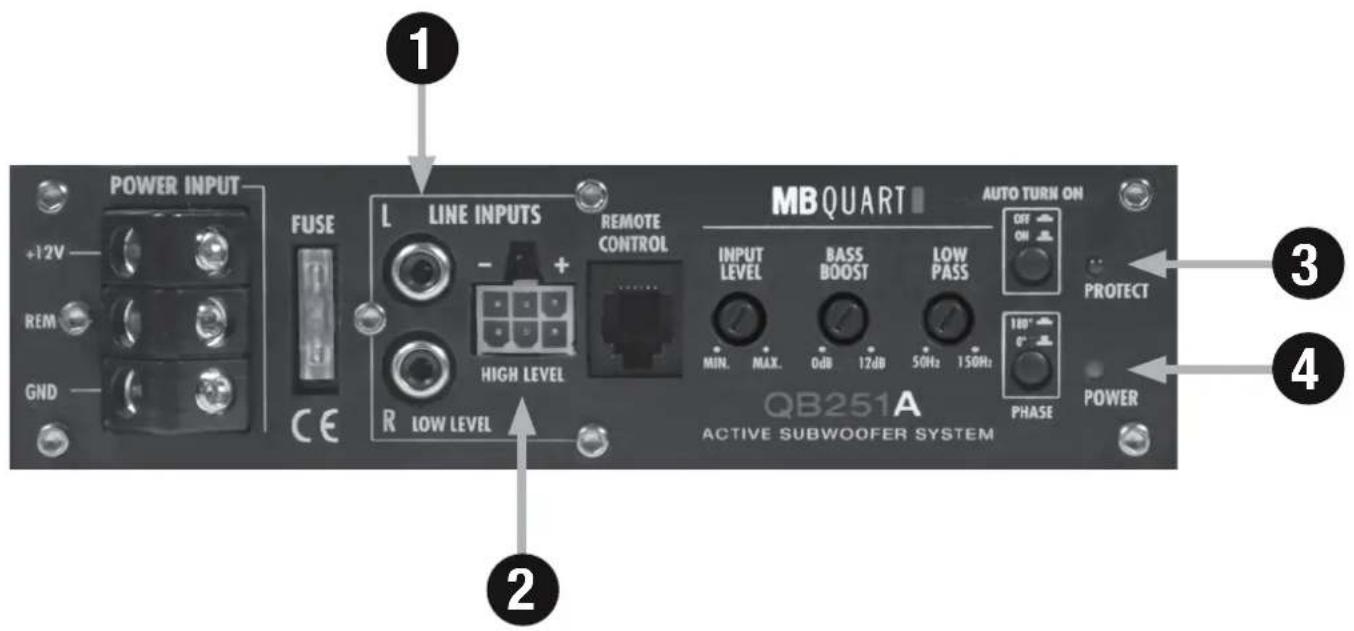
First connect the GND terminal (3) of the device to an appropriate ground connection at the chassis. To ensure a good connection, remove dirt and dust from the connection point. A loose connection may cause malfunctions or interferences noise and distortion.
Use at least a 10 mm ^2 cross-section for the power and ground connection cable. Suitable cable sets are available at the specialist shop.
Then connect the +12 V terminal (2) of the device with the battery by using an appropriate cable including an in-line fuse. This fuse should be located very close to the battery; for safety reasons not more than 30 cm away. Only insert the fuse when the installation has been accomplished.
Then connect the remote turn-on-wire from the head unit with the device's REM terminal (1). A cable with a cross-section of 0.5 mm² is adequate.
AUTO-TURN-ON FUNCTION
The amplifier detects a voltage rise (6 Volts) with a so called "DC Offset" over the connected input signal on the HIGH LEVEL input (5) when the head unit will be switched on. Hence, the amplifier will also be turned on. As soon as the head unit will be turned off, the amplifier turns also automatically off. In this case the turn-on connection at REM (1) is not needed, if the switch (5) is in position ON.
Note: The Auto Turn On-function usually works with 90% of all head units, because they are equipped with "High Power"-outputs. Only with a few older and still existing head units the Auto Turn On-function is not working.
FUSE
Fuse with a rating of 25 A (4). If the fuse is defective, please replace with an equivalent fuse.

INTERCONNECTION
PROTECTION CIRCUIT
If the POWER LED (4) lits up, the device is in normal operation. If the PROTECT LED (3) lits up, the device is overheated. If this occurs, the internal built-in protection circuit shuts down the device automatically. The device should work again properly after cooling down.
AUDIO SIGNAL CABLES
Connect the audio signal cables from the RCA outputs of the head unit to the RCA inputs on the device (1).
HIGH LEVEL INPUT
The HIGH LEVEL input (2) is suitable to connect the device input with speaker wires, if your head unit is not equipped with pre-amplifier RCA outputs. Extend therefore every regarding speaker cable from your head unit with appropriate speaker cables from your car audio retailer to the mounting location of the amplifier. Then connect the each matching loudspeaker cable with the cables of the included HIGH LEVEL input jack.
NOTE: Never use the HIGH LEVEL input (2) and the RCA inputs (1) at the same time. This may damage the device seriously.
OPERATING ELEMENTS
INPUT SENSITIVITY
Turn the volume controller of your head unit to the center medium position and then turn up the INPUT LEVEL controller (2) until you have an average medium level without distortion. This setting usually provides sufficient power reserves at optimum weighted signal-to-noise ratio.
LOWPASS FILTER
Set the desired crossover frequency of the low pass filter by using the LOW PASS controller (4). Hence, only the frequencies below the chosen crossover frequency will be amplified and the subwoofer plays more precisely and efficient.
BASS BOOST
By using the BASS BOOST controller (3) you are able to increase the bass boost level from 0 dB to 12 dB. Caution: Please use the bass boost with care.
Connect the included Bass Level Remote Controller at the REMOTE CONTROL input (1). This allows you to control the bass level f.e. out of the driver's seat.
PHASE
The PHASE switch (5) allows you to set the phase between 0^ or 180^ to match the output signal with the vehicle's interior acoustic and the loudspeakers of the sound system.

TROUBLE SHOOTING
If you are having problems after installation follow the trouble shooting procedures below.
Procedure 1:
Check the device for proper connections.
Verify that POWER LED is on. If POWER LED is on skip to Step 3, if not continue.
- Check the fuse of the device or the external fuse on battery positive cable. Replace if necessary.
- Verify that Ground connection is connected to clean metal on the vehicle's chassis. Repair/replace if necessary.
Please ensure that you have reconnected the GND connection at the battery after the installation. - Verify that there are 9 to 16 Volts present at the positive battery and remote turn-on cable. Verify quality connections for both cables at device, head unit and battery/fuse holder. Repair/replace if necessary. Check that the vehicle charging system is maintaining proper voltage.
Procedure 2:
PROTECTION LED is on.
- If the PROTECTION LED is on, this is a sign of driving the device at very high power levels without adequate airflow around the device.
Shut off the system and allow device to cool down. If the previous items do not solve the problem, a fault may be in the device.
Check that the vehicle charging system is maintaining proper voltage.
Procedure 3:
Check the device for a proper audio signal.
- Verify good RCA input connections at head unit and device. Check entire length of cables for kinks, splices, etc.
Test RCA inputs for AC volts with stereo on. Repair/replace if necessary.
- Use another audio source for testing to provide an audio signal to the Line Input.
Procedure 4:
Check the device for a popping noise while turning on.
- Disconnect input signal to device and turn device on and off.
- If the noise is eliminated, connect the REMOTE lead of device to source unit with a delay turn-on module.
OR
- Use a different 12 Volt source for REMOTE lead of the device (e.g. battery direct just for testing).
- If the noise is eliminated, use a relay to isolate the device from noisy turn-on output.
- Don't connect REMOTE directly to the battery after testing to avoid a discharge of the battery.
Procedure 5:
Check the device if you experience excess Engine Noise.
- Route all signal carrying wires (RCA, Speaker cables) away from power and ground wires.
OR
- Bypass any and all electrical components between the head unit and the device. Connect the head unit directly to input of the device. If noise goes away the unit being bypassed is the cause of the noise.
OR
- Use another audio source for testing to provide an audio signal to the Line Input.
OR
- Remove existing ground wires for all electrical components. Reground wires to different locations. Verify that grounding location is clean, shiny metal free of paint, rust etc.
OR
- Add secondary ground cable from negative battery terminal to the chassis metal or engine block of vehicle.
OR
- Have alternator and battery load tested by your mechanic. Verify good working order of vehicle electrical system including distributor, spark plugs, spark plug wires, voltage regulator etc.
WICHTIGE INFORMATIONEN
QB201A


- QB201A
- QB251A
- IMPORTANT INFORMATIONS
- DISPOSAL
- IMPORTANT NOTES PRIOR TO INSTALLATION
- INSTALLATION
- INTERCONNECTION
- POWER SUPPLY AND TURN-ON-CONNECTION
- AUTO-TURN-ON FUNCTION
- FUSE
- PROTECTION CIRCUIT
- AUDIO SIGNAL CABLES
- HIGH LEVEL INPUT
- OPERATING ELEMENTS
- INPUT SENSITIVITY
- LOWPASS FILTER
- BASS BOOST
- PHASE
- TROUBLE SHOOTING
- Procedure 1:
- Procedure 2:
- Procedure 3:
- Procedure 4:
- Procedure 5:
- WICHTIGE INFORMATIONEN
Brand : MB QUART
Model : QB251A
Category : Subwoofer