
MBQJL-302 - Subwoofer MB QUART - Free user manual and instructions
Find the device manual for free MBQJL-302 MB QUART in PDF.


| Product Type | Subwoofer Enclosure with Speaker |
| Brand | MB Quart |
| Model | MBQJL-302 |
| Compatible Vehicles | Jeep Wrangler JL (2018+) and JK (2007-2018) |
| Subwoofer Size | 12 inches |
| Enclosure Type | Loaded (includes subwoofer) |
| Impedance | 4 ohms (typical) |
| Power Handling (RMS) | 400 Watts (estimated) |
| Peak Power | 800 Watts (estimated) |
| Frequency Response | 30 Hz - 200 Hz (estimated) |
| Sensitivity | 88 dB (estimated) |
| Grill Included | Yes |
| Wiring Harness Included | Yes |
| Installation Hardware Included | Screws, bolts, spacers, L brackets, zip ties, rubber plugs, gasket |
| Assembly Time | 90 minutes (1.5 hours) |
| Mounting Location | Tailgate panel |
| Warranty | 1 year limited |
Frequently Asked Questions - MBQJL-302 MB QUART
User questions about MBQJL-302 MB QUART
0 question about this device. Answer the ones you know or ask your own.
Ask a new question about this device
Download the instructions for your Subwoofer in PDF format for free! Find your manual MBQJL-302 - MB QUART and take your electronic device back in hand. On this page are published all the documents necessary for the use of your device. MBQJL-302 by MB QUART.
USER MANUAL MBQJL-302 MB QUART
Installation Instructions
| Model: | Jeep Wrangler JL (Pg.1-5 & 12) & Jeep Wrangler JK (Pg.6-12) |
| Description: | MB Quart Jeep JL Wrangler 12" Subwoofer Enclosure |
| Part Number: | MBQJL-302MBQJL-302E - Unloaded Enclosure |
| Assembly Time: | 90 Minutes (1.5-Hours) |
Before you begin, read through these instructions and check that all parts are present. Please note that MB Quart cannot assume any responsibility for damage resulting from incorrect installation.
| Parts List | ||
| No. | Component Name Qty | |
| 1 | Subwoofer Enclosure 1 | |
| 2 | ST4.2 x 19mm Screw 14 | |
| 3 | M6 x 60mm Flathead Screw 2 | |
| 4 | M6 x 60mm Bolt 2 | |
| 5 | 7mm Rubber Plug 4 | |
| 6 | 9mm Rubber Plug 2 | |
| 7 | L Bracket 2 | |
| 8 | M6 x 16mm Torx Screw 2 | |
| 9 | M6 x 40mm Hex Bolt with Flange (Wrangler JK/JKU Only) 4 | |
| 10 | 13 x 30mm Spacer 2 | |
| 11 | 13 x 45mm Spacer 2 | |
| 12 | M6 Washer | 2 |
| 13 | 8" Zip Tie 6 | |
| 14 | Grill | 1 |
| 15 | White Gasket | 1 |
| 16 | Wire Harness | 1 |
| Tools Required | |
| 1 Bojo or Panel Tool | |
| 2 T20 Torx Driver | |
| 3 | T40 Torx Driver (Trailrail Equiped Only) |
| 4 9/16" Drill Bit | 23/64" Drill bit (Wrangler JK/JKU Only) | |
| 5 Drill | |
| 6 4mm Allen Wrench | |
| 7 10mm Socket | |
| 8 Threaded Insert Rivet Nut Tool | |
Disassembly Instructions
- Remove four T20 Torx screws holding the subwoofer in the enclosure. Then disconnect the wiring from the subwoofer.

natural_image
Close-up of a speaker with exposed microphone and wires, no visible text or symbols• Install four 7mm rubber plugs into the inside of the enclosure.

natural_image
Close-up of a speaker bowl with MBI QUART branding being inserted, no visible text or symbols on the device itself.
natural_image
Black plastic mechanical component with four red-circled holes, placed on a workbench (no text or symbols visible)
natural_image
Four black rubber caps arranged on a white surface with visible cracks (no text or symbols)• Install the white gasket material into the channel of the grill.

natural_image
Close-up of a black plastic tray with white wire and a small hole, resting on a textured surface (no text or symbols visible)
natural_image
Coiled white cable on a concrete surface (no text or symbols visible)Wrangler JL Disassembly Instructions
- Disconnect negative battery terminal of the vehicle.
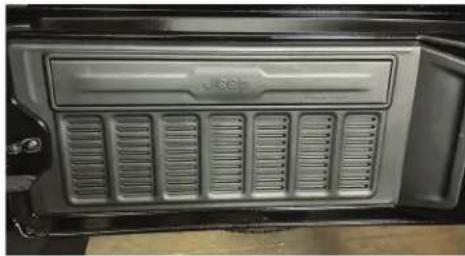
- If Trailrail equipped - remove three T40 screws and remove rail.
- If Trailrail ready - use panel tool to unclip cover and remove.
natural_image
Close-up of a black industrial vent with ventilation grilles and a label 'viceh' on the door (no other text or symbols visible)- Using a panel tool - carefully unclip the tailgate panel and remove.

natural_image
Red vehicle backrest with black vent grilles and a circular annotation highlighting three red markers (no text or symbols present)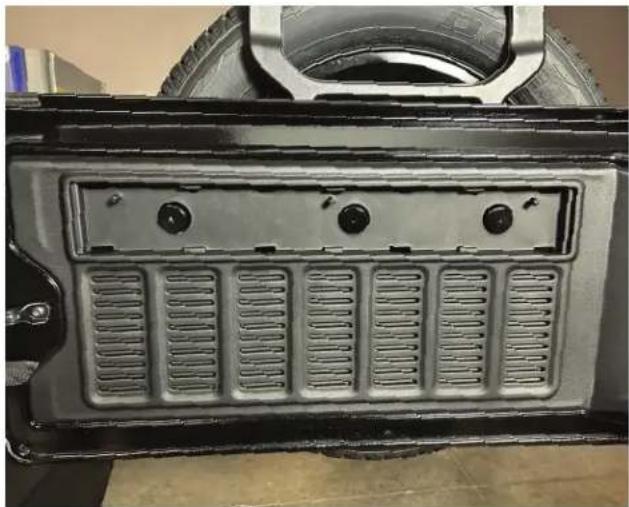
natural_image
Close-up of a car tire mounted on a vehicle chassis, showing vented grilles and mounting holes (no text or symbols visible)- With the tailgate panel laying face down, drill two 9/16" holes at the dimples at the bottom of the panel.

natural_image
Interior view of a car chassis frame with visible structural components and red circular annotations (no text or symbols)Wrangler JL Installation Instructions
• Install the tailgate panel back into the vehicle by snapping into location.

natural_image
Close-up of a military vehicle's front panel showing vented seating and tire wheel (no text or symbols visible)- Install two L brackets, 45mm spacers, and M6 x 60mm flathead screws in the bottom two holes of the tailgate panel with a 4mm Allen wrench.

natural_image
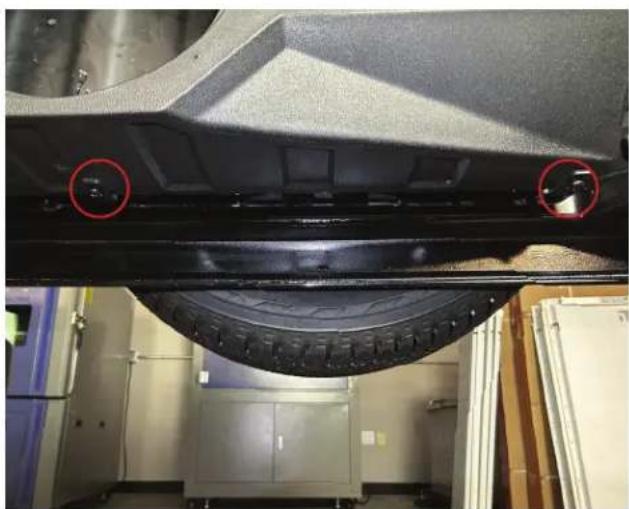
Close-up of a car rear vent with two red circular markers highlighting the bottom-left corner (no text or symbols visible)- Loosely install two M6 x 16mm Torx screws with a T40 Torx driver. NOTE - You will tighten in another step.
natural_image
Close-up of a car tire mounted on a lift in an industrial setting, with two red circles highlighting the components (no visible text or symbols)Wrangler JL Installation Instructions
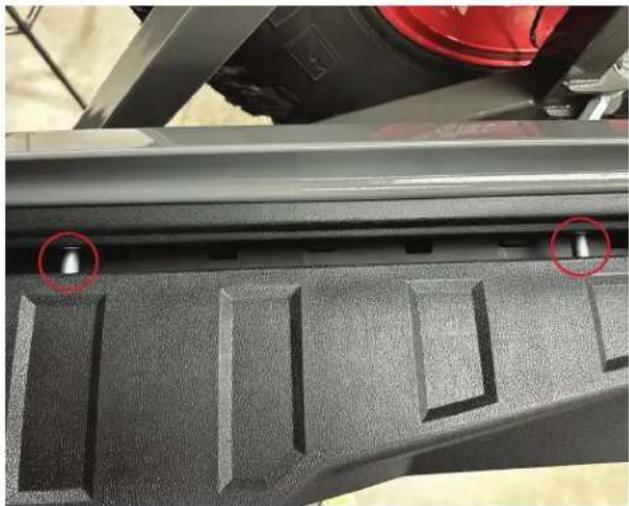
- Loosely install (2) M6 x 60mm Hex bolts with 10mm socket.
NOTE - You will tighten in another step.
natural_image
Close-up of a mechanical component with two red-circled features on its side (no visible text or symbols)
natural_image
Close-up of a metallic mechanical component with a red circle highlighting a small circular feature (no text or symbols visible)
natural_image
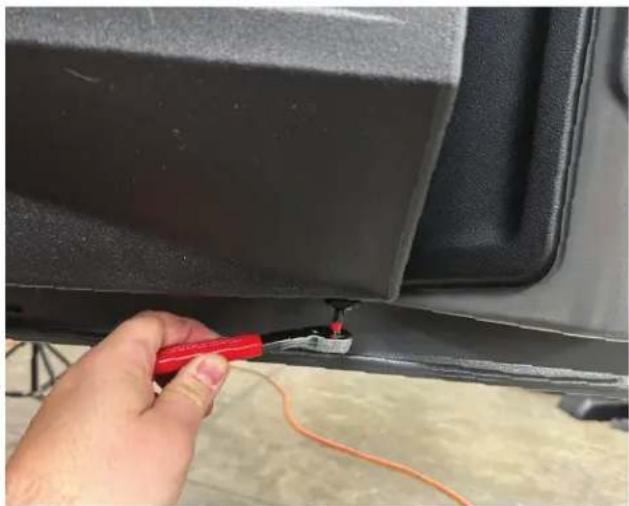
Close-up of a dark fabric surface with a red circle highlighting a small droplet, possibly indicating a droplet or particle (no text or symbols visible)- Tighten down the two M6 Torx screws on the bottom of the enclosure with a T40 Torx driver.
natural_image
Close-up of a hand using a red power strip to test electrical wiring on a car's side panel (no visible text or symbols)Wrangler JK Installation Instructions
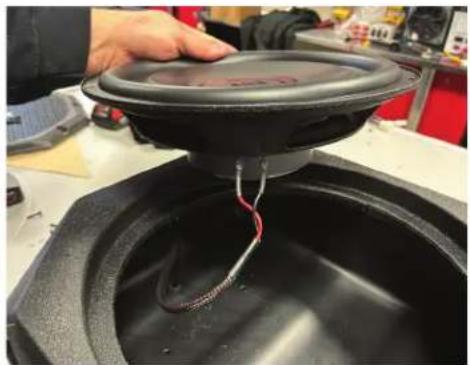
- Remove (4) T20 Torx screws holding the subwoofer in the enclosure. Then disconnect the wiring from the subwoofer.
natural_image
Close-up of a speaker with exposed wiring and a black speaker cover, partially submerged in a black speaker chamber (no visible text or symbols)• Install (2) 7mm rubber plugs into the inside of the enclosure.

natural_image
Close-up of a speaker bowl with MBI QUART branding being inserted, no visible text or symbols on the device itself.
natural_image
Black plastic container with multiple side slots and red circular markers, placed on a workbench (no text or symbols visible)
natural_image
Four black plastic pushpins on a white surface (no text or symbols visible)• Install the white gasket material into the channel of the grill.

natural_image
Close-up of a black plastic component with white coiled wires and a circular hole, resting on a textured surface (no text or symbols visible)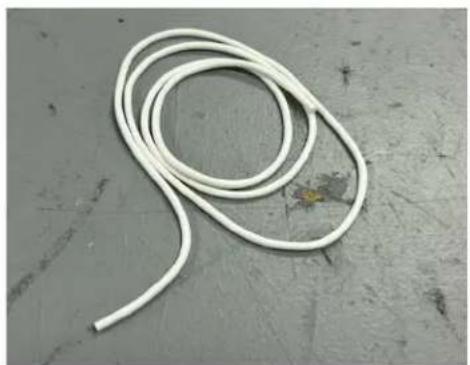
natural_image
Coiled white cable on a concrete surface (no text or symbols visible)Wrangler JK Installation Instructions
- Using panel tool - carefully remove upper tailgate trim panel

natural_image
Close-up of a vehicle's side panel showing front and rear panels with ventilation grilles (no text or symbols visible)
natural_image
Close-up of a hand holding a metal frame with visible bolts and components, next to a vehicle tire (no text or symbols)Wrangler JK Installation Instructions
- Cut out the alignment locations on the template, and then care carefully align and attach the drill template to the tailgate, using the three clip locations as your alignment guide

NOTE: (On the early versions of this template it is best to line up the top of the 3-template alignment holes with the bottom of the panels clip locations. This is done to land your drill points along the center of the brace inside of the tailgate. These braces are indicated by the small spot welds on the tailgate indicated in blue below.)
This template will be adjusted and made available as soon as possible. Contact Support@maxxsonics.com to receive the updated template or help on verifying where the holes should be.

natural_image
Close-up of a car front panel with visible ventilation grilles and three yellow circular markers on top (no text or symbols)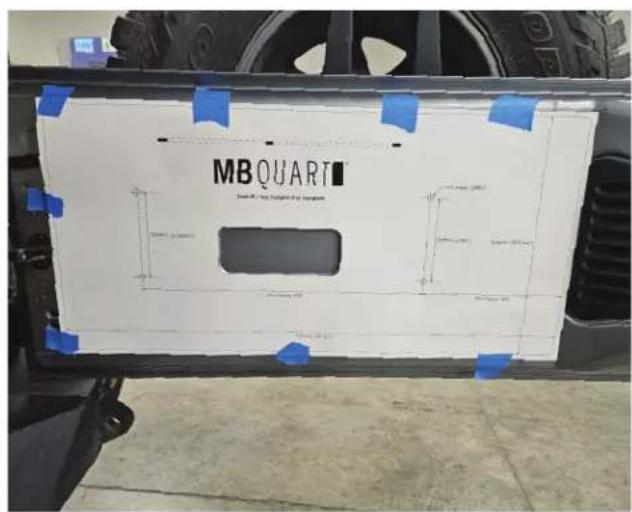
Wrangler JK Installation Instructions
- Use a center punch to mark your hole locations.
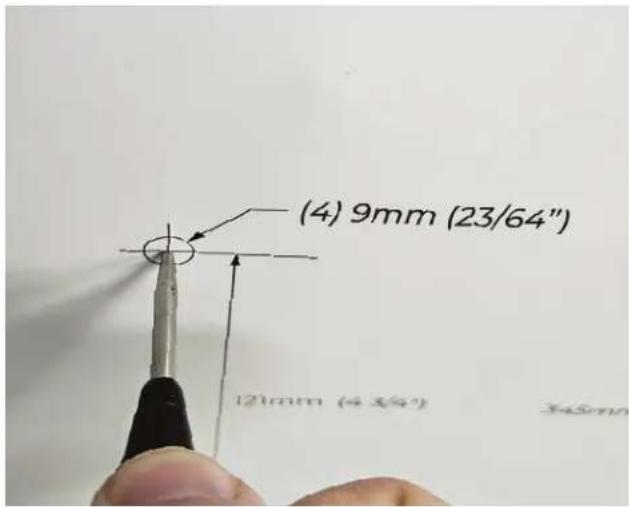
- Drill (4) 9mm or 23/64" holes at the punched locations.
Tech Tip - Be mindful not to let the drill bit continue to the outer tailgate shell. A drill bit stop collar can be very helpful.

Wrangler JK Installation Instructions
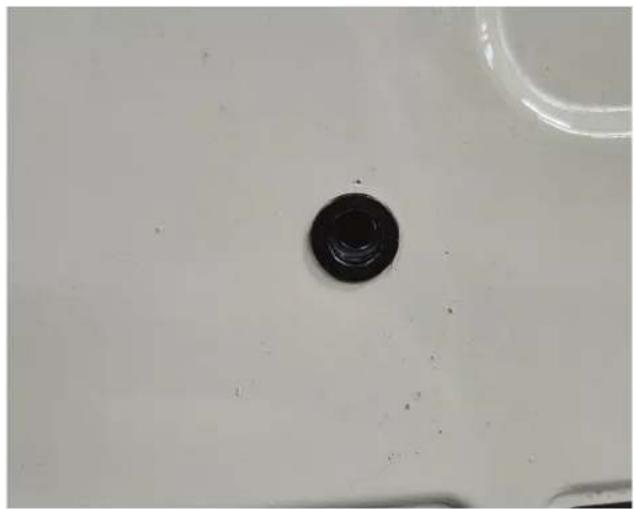
- Installing the provided threaded inserts, We recommend using a threaded insert tool for this.

natural_image
Close-up of a hand holding a black-handled measuring tool with red base, against a metallic background (no text or symbols visible)- Place the threaded insert into the previously drilled 9mm or 23/64" hole and squeeze the handle until the threaded insert is completely compressed.

natural_image
Close-up of a mechanical component with a screwdriver inserted, showing a hole and surrounding surfaces (no text or symbols visible)Wrangler JK Installation Instructions
- To remove the tool from the threaded insert simply turn the knob at the rear of the tool, to release the threads from within the threaded insert. The threaded insert should remain securely into the hole and not have any play.
Repeat for all four threaded insert locations.
natural_image
Close-up of a black circular object on a white surface, possibly a button or knob (no text or symbols visible)- Attach the provided foam patch over the OEM wires near the top of the tailgate.

natural_image
White car door panel with black cover and ventilation slots, no visible text or symbols- Hold the empty enclosure up to the tailgate to align the four holes in the enclosure to the threaded insert locations.

natural_image
Exterior view of a car front bumper with a large cylindrical vent and adjacent dashboard (no visible text or symbols)- Loosely install the (4) M6x40mm Hex Bolts through the enclosure into the threaded inserts.

natural_image
Close-up of a dark, textured mechanical component with a circular opening (no visible text or symbols)Installation Instructions
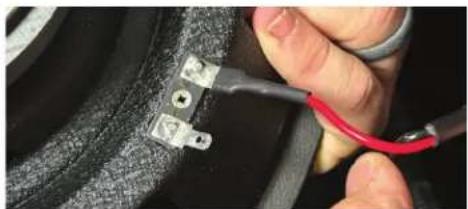
- Connect the red wire to the + terminal and the black wire to the terminal of the subwoofer.
• Install the subwoofer with eight ST4.2 x 19mm screws using a T20 Torx.
NOTE: DO NOT OVER TIGHTEN!
natural_image
Close-up of hands using a tool to connect two metal components on a black textured surface (no visible text or symbols)• Install the subwoofer grill to the enclosure with six ST4.2 x 19mm screws using a T20 Torx.
NOTE: DO NOT OVER TIGHTEN!

natural_image
Close-up of a speaker component with a red wire being inserted, showing the MBI QUART logo on its side (no text or symbols on the component itself)
natural_image
Close-up of a person using a power tool to clean the MBQUART speaker grille (no text or symbols visible on the grille itself)- Secure subwoofer enclosure wiring along vehicle tailgate wiring using zip ties. After, connect the extension harness and continue to amplifier location and make proper connections.
- Reconnect the negative battery terminal of the vehicle.

natural_image
Close-up of a car interior showing a black plastic car door, black plastic panel, and red tool (no visible text or symbols)FCC Notification
This equipment has been tested and found to comply with the limits for a Class B digital device, pursuant to part 15 of the FCC Rules. These limits are designed to provide reasonable protection against harmful interference in a mobile installation. This equipment generates uses and can radiate radio frequency energy. If not installed and used in accordance with the instructions, this equipment may cause harmful interference to radio communications. There is no guarantee that interference will not occur in a particular installation.
WARNING: Changes or modifications not expressly approved by the party responsible for compliance could void the user's authority to operate the equipment.
This equipment complied with FCC radiation exposure limits set forth for an uncontrolled environment. This equipment should be installed and operated with a minimum distance of 20cm between the radiator and your body.


MBQuart.com
MUSIC DEFINED
WARRANTY
Maxxsonics, LLC. warrants this product, to the original consumer purchaser, to be free from defects in material and workmanship for a period of one (1) year from the date of purchase. Maxxsonics, LLC. will, at its discretion, repair or replace defective products during the warranty period. Components that prove to be defective in materials and workmanship under proper installation and use must be returned to the original authorized Maxxsonics, LLC. retailer from where it was purchased. A photocopy of the original receipt must accompany the product being returned. The costs associated with removal, re-installation, and freight are not the responsibility of Maxxsonics, LLC. This warranty is limited to defective parts and specifically excludes any incidental or consequential damages connected therewith. To view the full warranty, please visit the website.
MB Quart products are designed and engineered in the USA by
MAXXSONICS®
www.maxxsonics.com

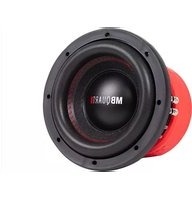


Brand : MB QUART
Model : MBQJL-302
Category : Subwoofer