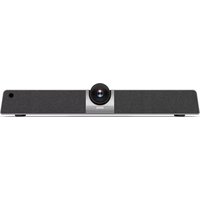
VC01A - Video Conferencing System BENQ - Free user manual and instructions
Find the device manual for free VC01A BENQ in PDF.


| Product Type | Video Conferencing System |
| Brand | BenQ |
| Model | VC01A |
| Camera Resolution | 4K Ultra HD (3840 x 2160) |
| Field of View | 120° diagonal |
| Microphone Type | Built-in array with beamforming |
| Microphone Pickup Range | Up to 6 meters |
| Speaker Output | Built-in speaker, 10W RMS |
| Connectivity | USB-C, HDMI Out, Ethernet, Bluetooth, Wi-Fi |
| Supported Platforms | Zoom, Microsoft Teams, Google Meet, Cisco Webex |
| Power Supply | AC 100-240V, 50/60Hz |
| Power Consumption | 30W (max) |
| Dimensions (W x D x H) | 800 mm x 120 mm x 70 mm |
| Weight | 3.5 kg |
| Mounting Options | Tabletop, wall mount, or tripod (VESA compatible) |
| Operating Temperature | 0°C to 40°C |
| Storage Temperature | -20°C to 60°C |
| Humidity | 20% to 80% non-condensing |
| What's in the Box | VC01A unit, USB-C cable, power adapter, remote control, user manual |
| Certifications | FCC, CE, RoHS, HDMI, USB-IF |
| Warranty | 2 years limited |
| Spare Parts Available | Remote control, power adapter, USB cable (sold separately) |
| Cleaning Instructions | Wipe with a soft, dry cloth. Do not use solvents or abrasive cleaners. |
| Safety Precautions | Avoid exposure to extreme temperatures, moisture, and direct sunlight. |
Frequently Asked Questions - VC01A BENQ
User questions about VC01A BENQ
0 question about this device. Answer the ones you know or ask your own.
Ask a new question about this device
Download the instructions for your Video Conferencing System in PDF format for free! Find your manual VC01A - BENQ and take your electronic device back in hand. On this page are published all the documents necessary for the use of your device. VC01A by BENQ.
USER MANUAL VC01A BENQ
Integrated video conference terminal
User Manual

Disclaimer
BenQ Corporation makes no representations or warranties, either expressed or implied, with respect to the contents of this document. BenQ Corporation reserves the right to revise this publication and to make changes from time to time in the contents thereof without obligation to notify any person of such revision or changes.
HDMI trademark disclaimer (for models with HDMI inputs)
The terms HDMI and HDMI High-Definition Multimedia Interface, and the HDMI Logo are trademarks or registered trademarks of HDMI Licensing Administrator, Inc. in the United States and other countries.

HIGH-DEFINITION MULTIMEDIA INTERFACE
Copyright
Copyright 2022 BenQ Corporation. All rights reserved. No part of this publication may be reproduced, transmitted, transcribed, stored in a retrieval system or translated into any language or computer language, in any form or by any means, electronic, mechanical, magnetic, optical, chemical, manual or otherwise, without the prior written permission of BenQ Corporation.
Product support
This document aims to provide the most updated and accurate information to customers, and thus all contents may be modified from time to time without prior notice. Please visit the website for the latest version of this document and other product information. Available files vary by model.
I. Make sure your computer is connected to the Internet.
2. Visit the local website from www.BenQ.com. The website layout and content may vary by region/country.
- User manual and related document: www.BenQ.com > Business > SUPPORT > Downloads > model name > User Manual
- (EU only) Dismantled information: Available on the user manual download page. This document is provided based on Regulation (EU) 2019/2021 to repair or recycle your product. Always contact the local customer service for servicing within the warranty period. If you wish to repair an out-of-warranty product, you are recommended to go to a qualified service personnel and obtain repair parts from BenQ to ensure compatibility. Do not disassemble the product unless you are aware of the consequences. If you cannot find the dismantled information on your product, contact the local customer service for assistance.
Table of Contents
Safety warnings and precautions.... I
Important safety instructions 2
Safety notice for remote control 2
Battery safety notice 2
Package contents.... 4
Installation instructions.... 5
Product interface 5
Input/output terminals 5
Remote control....7
Mounting 10
Installing the wall mount 10
Installing the display mount .... I
Connections.... 12
Connecting power.... 13
Working with the built-in OS of the product (All-in-one mode) ..... 14
Connect your personal device to the product (BYOD mode) 15
Basic operations 16
Turning the product on or off 16
Initial setup 16
Updating software.... 17
Android system interface 18
Main interface 18
Account Information.... 20
Menu operations 23
Setting up the Internet connection.... 23
Adjusting audio volume level.... 26
Device settings.... 27
System settings 29
Apps 30
Project wirelessly via InstaShare 2 32
AMS file manager overview 34
Camera settings.... 39
BenQ App Store.... 41
InstaQPrint 42
WPS Office 43
Saffi 45
Product information 47
Specifications.... 47
Dimensions 49
Troubleshooting.... 50
Safety warnings and precautions
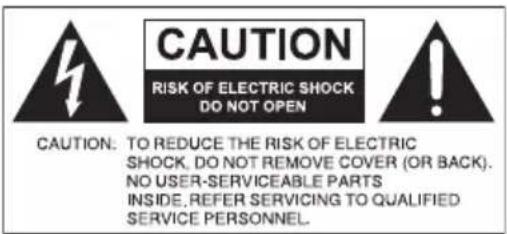

The lightning flash with arrowhead symbol, within an equilateral triangle, is intended to alert the user to the presence of uninsulated “dangerous voltage” within the product's enclosure that may be of sufficient magnitude to constitute a risk of electric shock to persons.

The exclamation point within an equilateral triangle is intended to alert the user to the presence of important operating and maintenance (servicing) instructions in the literature accompanying the appliance.
- The mains plug of the power supply cord shall remain readily operable. The AC receptacle (mains socket outlet) shall be installed near the equipment and shall be easily accessible. To completely disconnect this equipment from the AC mains, disconnect the power cord plug from the AC receptacle.
- Do not place this product on an uneven, sloping or unstable surface (such as a trolley) where it may fall and cause damage to itself or others.
- Do not place this product near water, like a spa or pool, or in a position which will allow the splashing or spraying of water onto the product, like in front of an open window where rain water may enter.
- Do not install this product in a confined space without proper ventilation and air circulation, such as in a closed cabinet. Allow proper space around the product for dissipating heat inside. Do not block any openings and vents on the product. Overheating may result in hazards and electric shock.
• Installation of this product should only be performed by a qualified technician. Failure to install this product properly may cause injuries and damages to the personnels and the product itself. Check the installation regularly and maintain the product periodically to ensure the best working condition. - Use only the accessories approved or recommended by the manufacturer to mount this product. Using wrong or unsuitable accessories may cause the product to fall and result in serious personal injuries. Make sure that the surface and fixing points are strong enough to sustain the weight of the product.
- To reduce the risk of electric shock, do not remove covers. No user serviceable parts inside. Refer servicing to qualified service personnel.
• To prevent personal injuries, mounting the product is required before use.
Important safety instructions
I. Read these instructions.
2. Keep these instructions.
3. Heed all warnings.
4. Follow all instructions.
5. Do not use this apparatus near water.
6. Clean only with dry cloth.
7. Do not block any ventilation openings. Install in accordance with the manufacturer's instructions.
8. Do not install near any heat sources such as radiators, heat registers, stoves, or other apparatus (including amplifiers) that produce heat.
9. Do not defeat the safety purpose of the polarized or grounding-type plug. A polarized plug has two blades with one wider than the other. A grounding-type plug has two blades and a third grounding prong. The wide blade or the third prong are provided for your safety. If the provided plug does not fit into your outlet, consult an electrician for replacement of the obsolete outlet.
- Protect the power cord from being walked on or pinched particularly at plugs, convenience receptacles, and the point where they exit from the apparatus.
II. Only use attachments/accessories specified by the manufacturer.
-
Use only with the cart, stand, tripod, bracket, or table specified by the manufacturer, or sold with the apparatus. When a cart is used, use caution when moving the cart/apparatus combination to avoid injury from tip-over.
-
Unplug this apparatus during lightning storms or when unused for long periods of time.
-
Refer all servicing to qualified service personnel. Servicing is required when the apparatus has been damaged in any way, such as power-supply cord or plug is damaged, liquid has been spilled or objects have fallen into the apparatus, the apparatus has been exposed to rain or moisture, does not operate normally, or has been dropped.

Safety notice for remote control
- Do not put the remote control in the direct heat, humidity, and avoid fire.
- Do not drop the remote control.
- Do not expose the remote control to water or moisture. Failure to do so could result in malfunction.
- Confirm there is no object between the remote control and the remote sensor of the product.
- When the remote control will not be used for an extended period, remove the batteries.
Battery safety notice
The use of the wrong type of batteries may cause chemical leaks or explosion. Please note the following:
- Always ensure that the batteries are inserted with the positive and negative terminals in the correct direction as shown in the battery compartment.
- Different types of batteries have different characteristics. Do not mix different types.
- Do not mix old and new batteries. Mixing old and new batteries will shorten battery life or cause chemical leaks from the old batteries.
- When batteries fail to function, replace them immediately.
- Chemicals which leak from batteries may cause skin irritation. If any chemical matter seeps out of the batteries, wipe it up immediately using a dry cloth, and replace the batteries as soon as possible.
- Due to varying storage conditions, the battery life for the batteries included with your product may be shortened. Replace them within 3 months or as soon as you can after initial use.
- There may be local restrictions on the disposal or recycling of batteries. Consult your local regulations or waste disposal provider.
Package contents
Open the sales package and check the contents. If any item is missing or damaged, please contact your dealer immediately.


Integrated video conference terminal
Adapter and plug (by region) x I
USB Type-C cable x l
2.4GHz remote control and AAA battery x 2


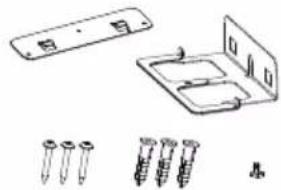
HDMI cable x | Quick start guide Camera cover x | Mounting kit

- “Integrated video conference terminal” will hereinafter be referred to as “the product” in this document.
- Before discarding the package, check that you haven't left any accessories inside the box.
- Dispose of packaging materials wisely. You can recycle the cardboard carton. Consider storing the package (if possible) for future transport of the display.
- Do not leave plastic bags within reach of young children or babies.
Installation instructions
Product interface

No
Name Description
1 IR Signal Receiver Receive IR signals. Do not obstruct the receiver.
2 Screw hole Screw hole for mounting.
Input/output terminals
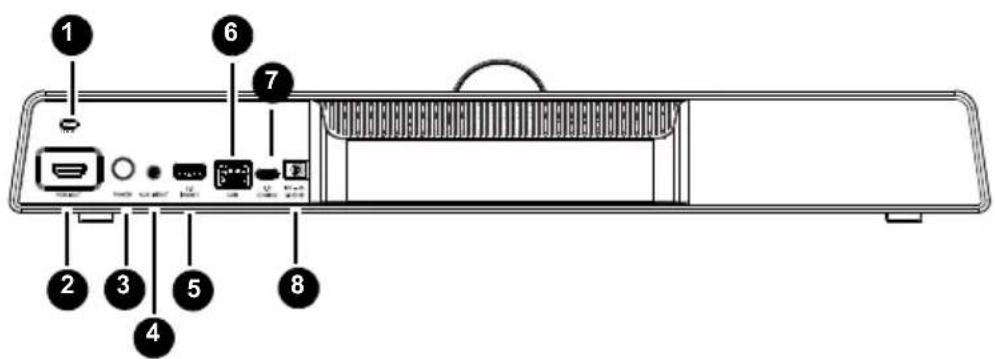
No
Name Description
1 LOCK For Kensington lock.
2 HDMI OUT (Video only) Connect to display devices with an HDMI input.
3 Power Press button to turn it on or off.
| No | Name Description | |
 | AUX IN/OUT(Mic in/Audio out) | Connect to external audio equipment. |
| [3BW6] | USB 3.0 (Host)(Type-A) | Connect USB devices such as USB keyboards, USB mouse, and USB flash drives. Used for upgrading. |
 | LAN Connect RJ45 terminals. | |
| [ZCS7] | USB 2.0 (Device)(Type-C) | Connect to the PC for external camera,microphone and speaker from the product. |
| [XBT8] | DC Used for 12V power supply. | |
 | • USB 3.0= 5V = 900mA• Direct Current / DC• Alternating Current /AC• The maximum length for the cables to be used with the USB slots are 5m (USB 2.0) and 3m (USB 3.0). | |
No
Remote control

1
Turn the display on or off.
2
Press to mute/unmute microphone.
3
Press to open Side toolbar.
4
Press to open or close the OSD menu.
5
Direction key. Press for upward selection.
6 <
Direction key. Press for left selection.
7 OK
Press to proceed.
8 >
Direction key. Press for right selection.
9
Direction key. Press for downward selection.
10
Android system main screen button.
11
Return key.
12
Voice command key. Press to activate Saffi (BenQ Voice As sistant).
⑬ V+ V-
Volume up/down.
14 + -
Press to zoom in/out.
Using the remote control Installing remote control batteries

I. Open the remote control battery compartment cover.

- Insert two AAA batteries into the battery compartment ensuring that the (+) and (-) signs on the batteries match the (+) and (-) indications on the battery compartment.

- Re-install the battery compartment cover.

This remote control applies only to a specific model and/or operating systems. Contact your reseller if you have any question.
Remote control usage tips
- To power on/off the product, aim the top front of the remote control directly at the product's remote control sensor window when you press the buttons.
- Avoid getting the remote control wet or store it in humid environments (like bathrooms).
- If the product's remote control sensor window is exposed to direct sunlight or strong light, the remote control may not operate properly. In this situation, change the light source, readjust the angle of the product, or operate the remote control from a location closer to the product's remote control sensor window.

Mounting
Select either way to install the product:
• Install the product on the wall mount with the provided mounting components. Refer to Installing the wall mount on page 10 for more information.
- Mount the product directly to any tripod or bracket with the lock screw. Refer to Installing the display mount on page 11 for more information.
Installing the wall mount
Check the mounting component list before installing:
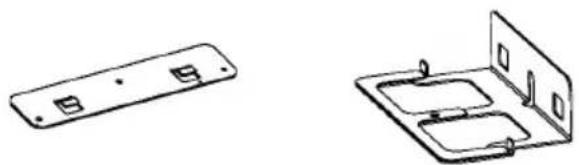
Mounting plate Mounting bracket

Screws (∅4x30mm) x 3

Expansion screws ( 9.5×29.5mm ) × 3

Lock screw (1/4"-20 UNC)
To install the wall mount:
I. Install three expansion screws into the wall.
- Install the mounting plate with three screws and secure it on the wall.

- Hook the mounting bracket onto the mounting plate.

- Place the product onto the mounting bracket and secure the product by screwing the lock screw into the product's screw hole.

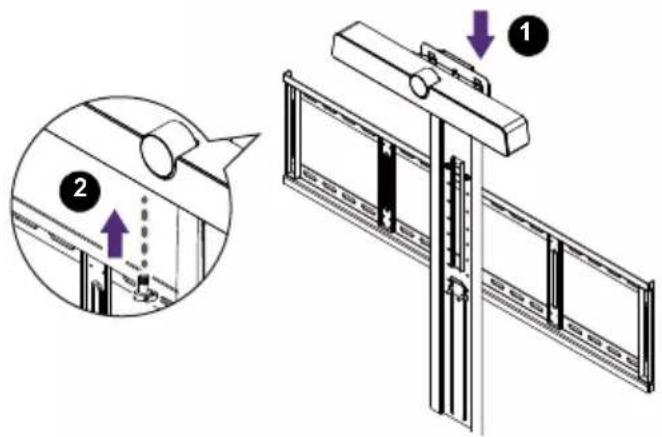
Installing the display mount
You may attach the product to the display by installing the product directly to any tripod or bracket with the lock screw.
To attach the product on the display mount:
I. Place the product onto a mounting bracket.
- Secure the product by screwing the lock screw into the product's screw hole.
Connections
Two modes are provided for you to connect the product:
- All-in-one mode: In this mode, you can work with the built-in operating system and software of the product to make the most of your monitor. To enjoy all features of the product, connecting via All-in-one mode is highly recommended. Refer to Working with the built-in OS of the product (All-in-one mode) on page 14 for more information.

You can project your computer wirelessly via built-in software of the product. Refer to Project wirelessly via InstaShare 2 on page 32 for more information.
- Bring-your-own-device mode (BYOD mode): In this mode, you can keep the operating system of your device while using the product as the external camera, microphone and speaker for a more enhanced meeting experience. Refer to Connect your personal device to the product (BYOD mode) on page 15 for more information.

You can adjust the camera's angle of view by using the built-in Camera Settings app in the product. Connect via All-in-one mode to launch the Camera Settings app before connecting through BYOD mode. Refer to Camera settings on page 39 for more information.
Comparison between two modes:
| Mode | Functions provided by the product |
| Operating System Camera, Microphone, Speaker | |
| All-in-one mode | O (Built-in OS of VC01A) O (Set by default) |
| BYOD mode | N/A (OS of user's own device) O (Select VC01A as source) |
Connecting power
Plug one end of the power cord into the power jack of the product and the other end into an appropriate power outlet (if the outlet is switched, turn on the switch).
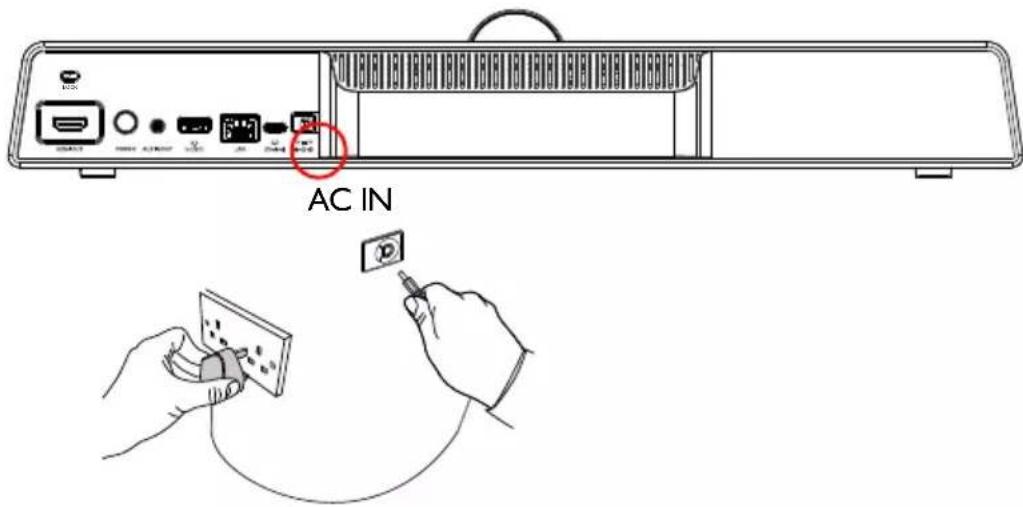

- The supplied power cord is suitable for use with 100-240V AC power only.
• The power cord and outlet illustrated may differ from the ones used in your region. - Only use an appropriate power cord for your region. Never use a power cord which appears damaged or frayed, or change the plug type on the power cord.
- Be aware of the power loading when you use extension cords or multiple outlet power boards.
• The illustration is for your reference only.
Working with the built-in OS of the product (All-in-one mode)
By connecting the product with a HDMI cable, the product functions as your monitor's operating system, which serves as your conference camera and offers apps for wireless projection, collaborative meetings, files management, etc.

To enable All-in-one mode:
I. Connect power to the product.
2. Connect the product to the monitor through a HDMI cable.
-
Power on the product.
-
To share the screen of your own device (such as laptop, tablet or smartphone) to the display wirelessly, refer to Project wirelessly via InstaShare 2 on page 32 for more information.
Connect your personal device to the product (BYOD mode)
In Bring-your-own-device mode (BYOD mode), the product is connected to your personal device through a USB Type-C cable. The built-in operating system of the product will not function. In other words, you can keep working with your own OS during meetings while choosing VC01A as the audio and video source for your device.

Refer to the OS requirements for BYOD mode as below: Win 10/Win 8/Win 7/Win XP/Linux OS/Mac OS/Chrome OS.
![graph TD A["Computer"] --> B["3 HDMI cable"] B --> C["Laptop"] C --> D["4 USB Type-C cable"] D --> E["1 Remote Device"] E --> F["2 USB Type-C cable"] F --> G["3 Remote Device"]](/content/2026/06/1370008/images/2cd093cf45d010f74d8402c06485f66d99acf1a2c8a7923349ae2c7ed12ee0a6.jpg)
To enable BYOD mode:
I. Connect power to the product.
2. Connect the product to your personal device with a USB Type-C cable. Plug-in to USB 2.0 (Device) port on the rear of the product and and the USB Type-C port of your own device.
3. (Optional) Connect TV/monitor to your device through a HDMI cable to share your screen to everyone in the room.
4. Power on the product.
Basic operations
Turning the product on or off
- Be sure to follow the instruction of Connecting power on page 13.
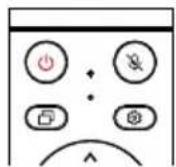
• To turn on the product, press the Power button on the back of the product or on the remote control. - To turn off the product, press the Power button on the back of the product or ⏻ on the remote control.


Initial setup
After you have connected the product to the power, you are ready to power on the product. The first time you power it on, you will be guided through a series of setup screens. Follow the on-screen instructions or the steps below to start up and complete the initial setup.
I. Turn on the product. Wait for it to boot up with the BenQ screen. This may take a moment.
2. Tap Next on the screen to begin. Follow the on-screen instructions to set up the language, date and time, and network. Or your can skip some of these steps and complete the setup later.

To adjust other settings, you can press 📋 on the remote control to enter the OSD menu again. Refer to Menu operations on page 23 for more information on the OSD menus and their settings.

Updating software
Whenever a new version of software is available, the system will automatically detect the update and will prompt you to download it every time you turn on the product. If you want to update the software, choose NETWORK UPDATE or USB UPDATE to continue the update. Or your can skip this step and update the software later.
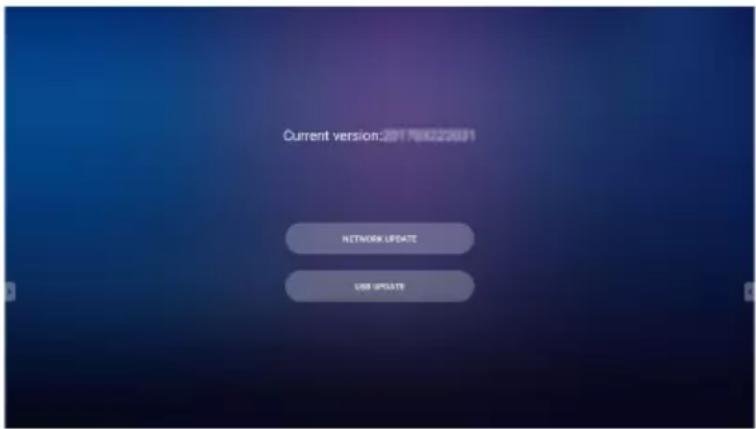
To manually update the software:
I. Go to System > About > System updates.
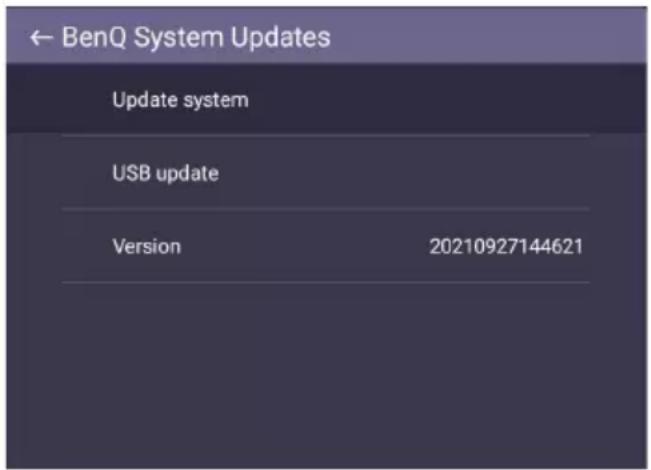
- If there is an update available, the system will begin updating.

- Software update process may take some time to complete.
- During the update process, do not turn off the product or disconnect the Internet connection. Any interruptions during the software update process may permanently damage the product.
Android system interface

Note that this is a closed Android OS. Download and use of unauthorized apps on this system are not available.
Main interface
The product launches the Android main interface by default. Press 📊 on the remote control or right click on a mouse to return to the main interface.

| Icon Function Description | ||
 | Wireless Projection | Shortcut links to InstaShare 2. Refer to Project wirelessly via InstaShare 2 on page 32 for more information. |
 | Video Conference | Shortcut links to TeamViewer Meeting. |
 | File Manager | Shortcut links to AMS files. Refer to AMS file manager overview on page 34 for more information. |
 | OSD Settings Click to open or close the OSD settings menu. | |
 | All Apps | Click to access all apps and widgets. Refer to Apps on page 30 for more information. |
 | Help Click to access online tutorial videos and manuals. | |
Side tool bar
Tap the side bars at the left or right of the Android main interface to access the side tool bar.

| Icon Function Description | |
 | Home Tap to return to the main interface. |
 | Back Tap to return to the previous screen. |
 | All Apps Tap to show all apps. Refer to Apps on page 30 for more information. |
 | Recent Tap to show recently opened apps in list. |
Account Information
Three types of accounts are provided: Guest, Admin, and Multiple users.
Guest
It's for public use under Guest account. You are able to change the headshot, wallpaper, volume and brightness.
Admin
Log in as Admin. Under Personal settings, you can change the headshot, wallpaper, and password. You can also enable AMS service, set Available offline accounts, and check Device
information.
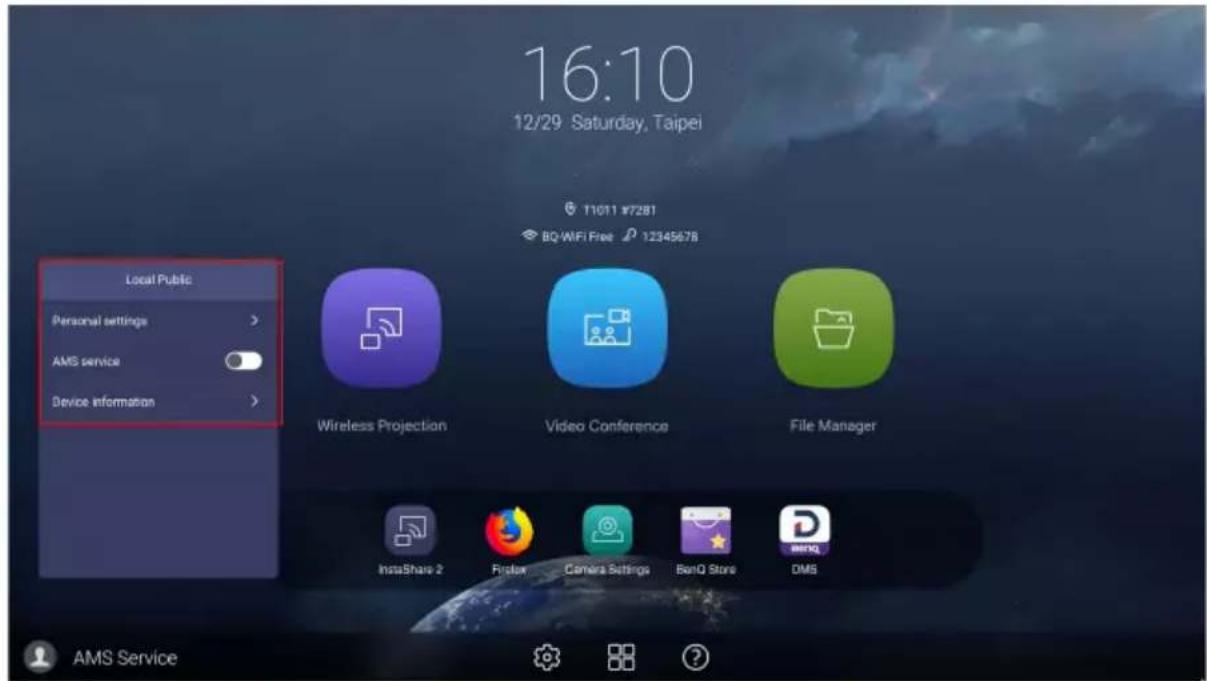
Multiple users
Before logging in as User, be sure to enter the correct email address and activate AMS service.
To access your personal account, you have to ask the administrator to activate AMS service first and create your account through IAM service. Refer to User Management on page 21 for more information.
For more information and tutorial videos about the AMS service please visit https://www.benq.com/en-us/business/ifp/account-management-system.html.
User Management
To add a new user, please contact your IT manager to create your account through BENQ IAM web service.
Creating a new account
I. As an administrator to create a new account for regular users, go to BenQ Service website: https://iam.benq.com. Suggested browsers are Chrome and Firefox.
- Log in and choose IAM.

- Click Create New Account to continue.
![BenQ Identity and Access Management Head Quarter [ ] Logout Account Managem... Role Management Agent Setting Service BENQ](/content/2026/06/1370008/images/7505503ce67cf4bf1d87530747cacc4d1d898d98f81969fbcb535be08e9b6329.jpg)
Account Management
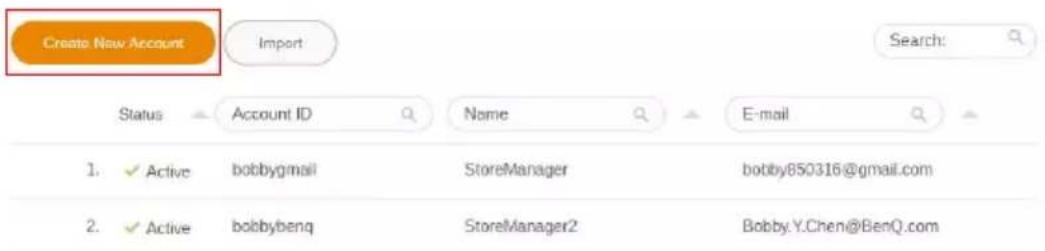
- Fill in the following fields. Be sure to enter the correct email address. Click Submit to create a new account.

If some members in your organization need more privilege to control the AMS service, you can activate the users as other roles. You can also activate X-Sign, DMS, and/or Broadcast when creating user accounts.


You can easily switch to different services, X-Sign, DMS, and Broadcast by clicking the icon on the upper right corner.
- The account has been created and a verifying email is sent to the new account owner.
Message
The account has been created. We'll send the email from "BenQ". If it isn't in your inbox, check your folders. If a spam filter or email rule moved the email, it might be in the Spam, Junk, Trash, Deleted items, or Archive folder.
Menu operations
- Press ▲/▼/◄/► on the remote control and press OK to confirm or directly click an item.
- Press on the remote control or click a blank area outside the menu to exit the menu.
Setting up the Internet connection
Your display must be connected to a network to conduct OTA updates or surf the Internet.

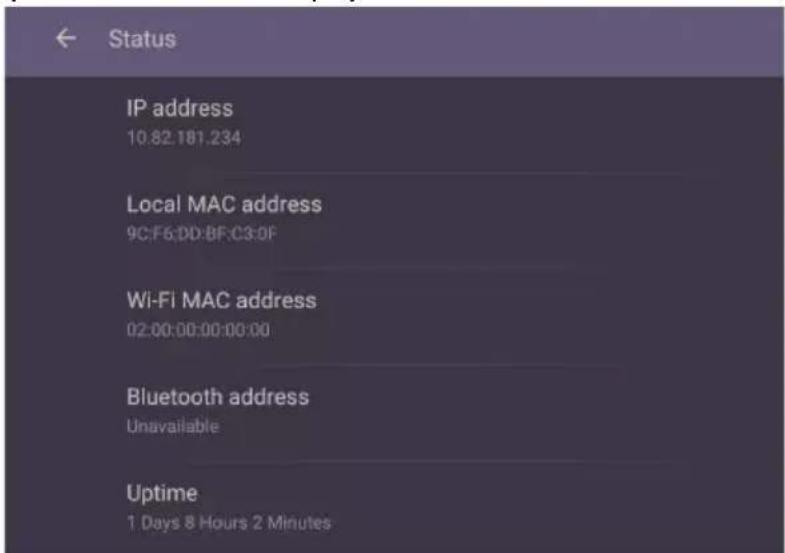
To find the MAC address in Android OS, please go to Setting > System > About > Status.
Network setting
On the home screen, go to Setting > System > About > Status. If there is no IP address shown, please connect the display to the ethernet cable.
Wireless connection
To make sure the product is connected to Wi-Fi, follow the steps below:
I. Press Ⓧ on the remote control, or go to Network > Wi-Fi.

- Turn the switcher to ON. A list of available networks will show on the screen.

- Touch the network's name to connect to the network. The password is needed if it is your first time to use the network. Key in the password and press Connect. The product is now connected to the WLAN.

- If you are connecting to a secured wireless network, enter the password for the wireless network access when prompted and tap Connect.
- For wireless connection, BenQ shipment does not include wireless dongles; therefore, you may purchase it separately via the local dealer.
Proxy setting
- Go to Network > Ethernet.

- Select Proxy to go to the proxy setting.
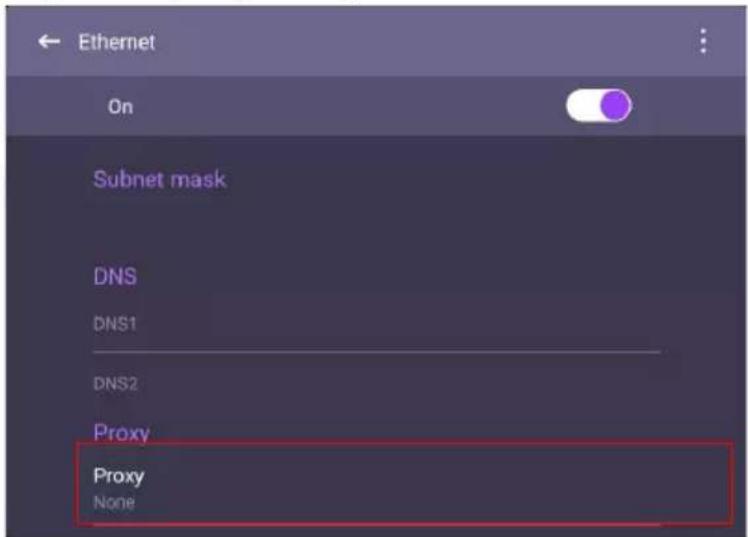
- Enter the proxy host name.
- Enter the using channel.

Adjusting audio volume level
To adjust the audio volume level, do either one of the following:
- Press V+ / Von the remote control to adjust the volume.
- Go to 📞> Audio to adjust the volume

- Use the volume bar to adjust the volume for the display.
- Directly swipe to enable or disable Mute.
Device settings
Go to Device to access the Device settings.
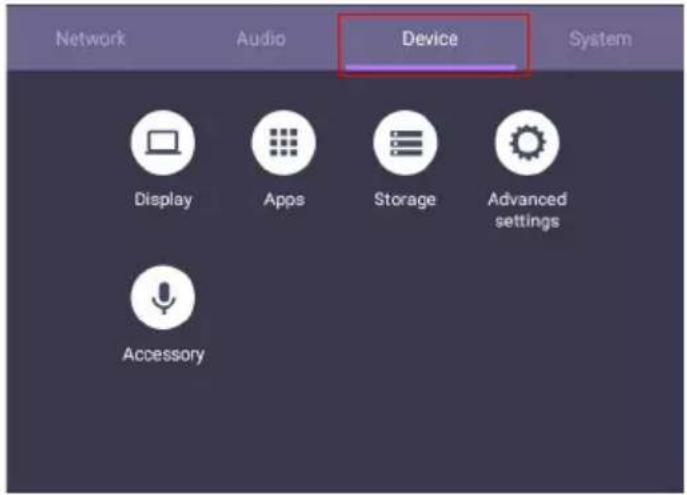
| Menu Description | |
| Display | Allows you to adjust the display's parameters. Refer to Display settings on page 27 for more information. |
| Apps Accesses | all the applications installed in the product. |
| Storage Allows you to manage the product's storage. | |
| Advanced Settings | Accesses more device settings. Refer to Advanced settings on page 28 for more information. |
| Accessory Allows you to set up the microphone, webcam and speaker. | |
Display settings

- Press ▲/▼/◄/► on the remote control and press OK to confirm or directly click an item.
- Press on the remote control or click a blank area outside the menu to exit the menu.
| Menu Description | |
| Sleep mode | Set up time interval to putHDMI OUTsource in sleep mode when you're not using it. |
| HDMI output resolution | Set up HDMI OUT out resolution. |
Advanced settings
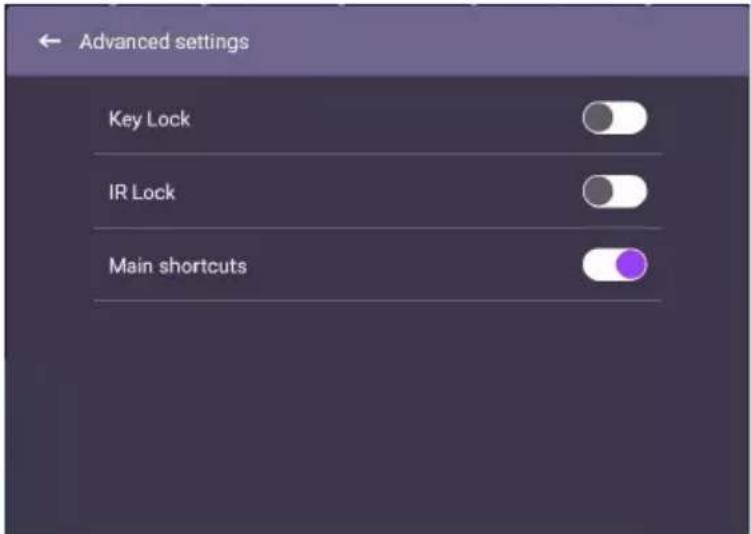
- Press ▲/▼/◄/► on the remote control and press OK to confirm or directly click an item.
- Press on the remote control or click a blank area outside the menu to exit the menu.
| Menu Description | |
| Key lock | Press OK on the remote control or click the switch to lock or unlock the buttons on the front panel of the display. |
| IR lock | Press OK on the remote control or click the switch to lock or unlock the remote control IR sensor on the front panel of the display. |
| Main shortcuts | Press OK on the remote control or click the switch to enable or disable Main shortcuts. |

If keypad and IR are locked all at once, please follow the steps to unlock: Press ☑ the remote control for five seconds.

System settings
On the home screen, select Setting > System to enter system settings.

- Press on the remote control or click a blank area outside the menu to exit the menu.
| Options Description | |
| Date & Time Click to set date, time, and their formats in Android. | |
| Language & Keyboard | Click to set Language, Keyboard in Android. |
| Scheduling | Click to set the Power off reminder. |
| Clone settings Click to export/import the settings. | |
| Factory Reset Click to erase all data back to default. | |
| About Click to view system information in Android. | |

The amount of available storage space for the user varies according to the amount of pre-installed apps and images occupying the total storage space.
Apps
Two ways are provided for you to access all apps on the product:
I. Select on the main screen to access the all apps window.
- Press ☐ on the remote control to open Side Tool Bar and select ☐ to open the all apps window.

| Application Name Description | |
InstaShare 2  | Allows screen mirroring and touch control for collaborative meetings. Refer to Project wirelessly via InstaShare 2 on page 32 for more information. |
| TeamViewer Meeting ( ) | Gives you access to instant or scheduled group meetings with any other TeamViewer Meeting users. |
AMS files  | Provides you with personalized working environment and file management service. Refer to AMS file manager overview on page 34 for more information. |
Camera Settings  | Adjusts camera settings and picture parameters. Refer to Camera settings on page 39 for more information. |
BenQ App Store  | Allows you to download recommended apps. Refer to BenQ App Store on page 41 for more information. |
X-Sign Broadcast  | Serves as a wireless broadcast system that allows immediate message delivery as well as group notification. |
DMS Client  | Allows remote management, configuration, and monitoring of the display. |
InstaQPrint (  ) ) | Allows you to print a file or website image using Wi-Fi or remote printer. Refer to InstaQPrint on page 42 for more information. |
Firefox (  ) ) | Allows you to view websites. |
WPS Office (  ) ) | Allows you to read PDF files or edit files created in Microsoft Office, PowerPoint, or Excel. Refer to WPS Office on page 43 for more information. |
Saffi (  ) ) | Refer to Saffi on page 45 for more information. |
Quick Support (  ) ) | Allows technicians to provide remote technical assistance. |
Project wirelessly via InstaShare 2
InstaShare 2 () is a software-based solution for multi-user collaboration, which lets users to share contents with all devices in a meeting wirelessly.
Two ways are provided for you to access InstaShare 2:
-
On the Android main interface, select Wireless Projection ( ).
-
Select All Apps(☐) > InstaShare 2 (☐).
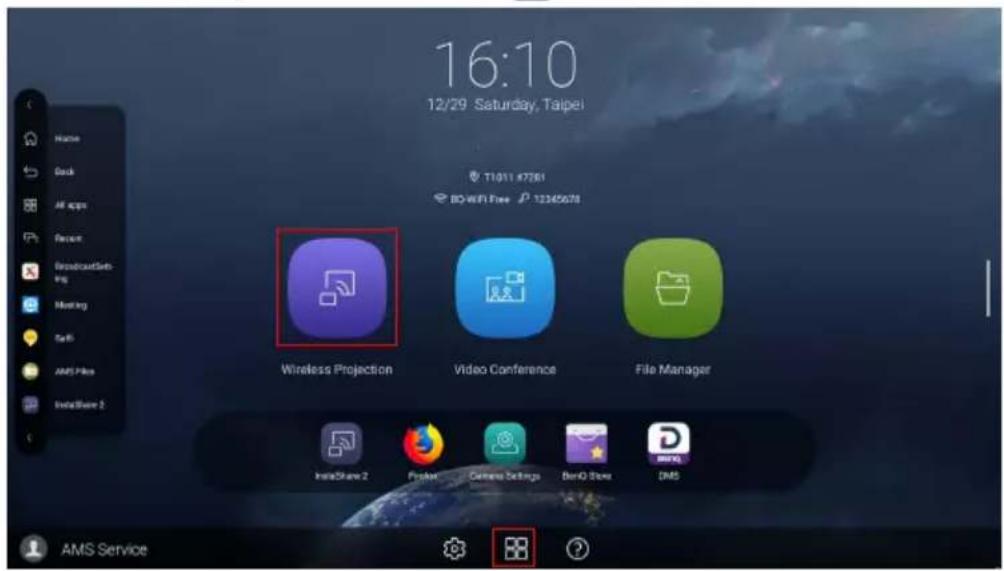

- Use mouse cursor to have a better user experience.
- Before launching the application, make sure your display is properly connected to the Internet.
When you enter InstaShare 2, the main interface is shown as below:

No. Item Description
| 1 | Connection Tutorial window | Follow the guide to connect and pair your device with the display. Select the device OS type below to see the projection tutorial respectively. |
| 2 | Connecting Information window | Shows the display name, pairing code and connection password while presenting. |

Host Controls window
Allows you to control the whole session and participant actions. You can also install InstaShare 2 app to manage the meeting session remotely

Visit BenQ website or click the link below to view the complete user manual of InstaShare 2 : https://www.benq.com/en-us/business/ifp/instashare-2.html
AMS file manager overview
With this application, you can access your personalized workspace environment and settings, and manage your files and accounts on any IFP that you have logged into.
To access the AMS files use either of the following methods:
- On the Android main interface, select the file manager shortcut

- Select the AMS application


While logging in, you will see four main parts, as described in the table below:

No. Item Description
1 Source Selection • You can open files from the cloud storage services like Google Drive, Dropbox, or Samba. • You can also open files from the local devices like Internal, My Folder, or connected USBs.

The icon next to Google Drive, Dropbox shows that the account is bound to AMS service.
2 Folder Path You can browse the file folder in this area.
Listing Files You can see a list of files from the storage device you select.
4 Operating Tab You can edit the files using the operating tabs here.

Regular users can only view their own files, while the local admin can view all users' files in the domain.
Multimedia files
Multimedia files such as images, audio files, and videos can be played by directly tapping on the file icon.
Image
Select an image file you want to show on the display and perform any of the functions shown on the screen.
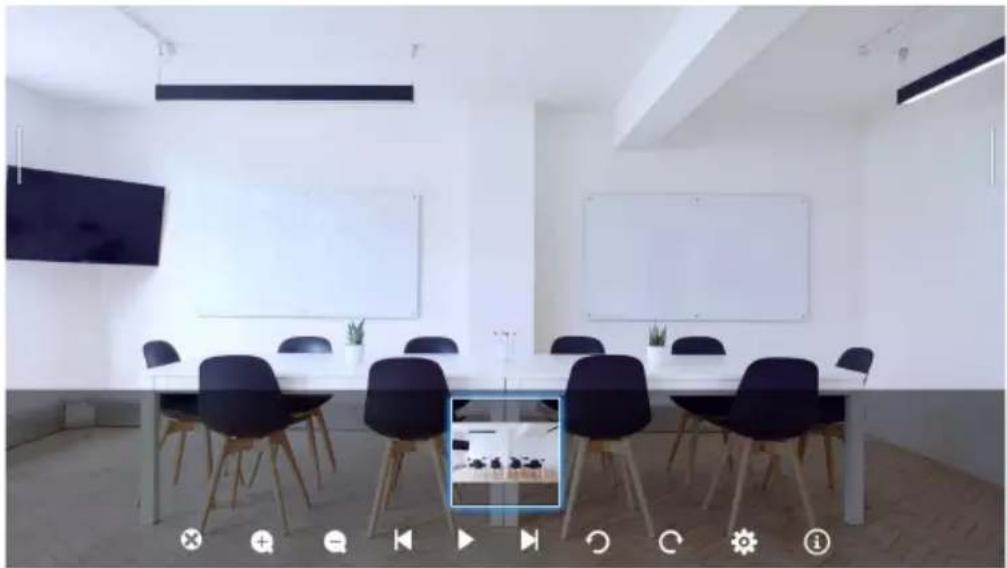
| Icon Function | |
 | Close the current image file. |
 | Magnify the current image. |
 | Shrink the current image. |
 | Play the previous image. |
 | Play/pause the current playback. You can set display intervals and animation in settings. |
 | Play the next image. |
 | Rotate the current image counter-clockwise. |
 | Rotate the current image clockwise. |
 | Adjust settings of the image such as setting display intervals and animation. |
 | Display the file information, including file name, creation time, file size, and file format. |
Supported image format
| File type Resolution |
| JPEG, PNG, BMP 3840x2160 |
Audio/Video
Select an audio/video file you want to play on the display and perform any of the functions shown on the screen.

| Icon Function | |
| Tap to view the audio/video files in the playlist. | |
| Rewind the audio/video. | |
| Play the previous audio/video file. | |
| Play/pause the current audio/video file. | |
| Play the next audio/video file. | |
| Fast forward the audio/video. | |
| Adjust repeats, including repeat all/repeat one/no repeat. | |
| Adjust the audio/video volume. | |
| Adjust the size of you screen to Full/Half/Default/Mini. |
Supported audio format
| Audio Codec Sample Rate Bit Rate | |
| MPEG1/2 Layer 1 16KHz - 48KHz 32Kbps - 448Kbps | |
| MPEG1/2 Layer 2 16KHz - 48KHz 8Kbps - 384Kbps | |
| MPEG1/2/2.5 Layer 3 8KHz - 48KHz 8Kbps - 320Kbps | |
| AAC-LC, HEAAC 8KHz - 48KHz AAC-LCz:12Kbps - | 576Kbps |
Supported video format
| Video Codec Resolution Bit Rate | |
| MPEG1/2 1080P @ 30 fps 30Mbps | |
| MPEG4 1080P @ 30 fps 30Mbps | |
| H.263 1080P @ 30 fps 30Mbps | |
| H.264 4k2k @ 30 fps 100Mbps | |
| H.265 4k2k @ 60 fps 100Mbps | |
| VP8 1920x1080 @ 30fps 30Mbps | |
| VP9 4k2k @ 60 fps 100Mbps |
Camera settings
Tap 📷 to launch Camera Settings. With this application, you can adjust different camera angles and picture parameters of the product.
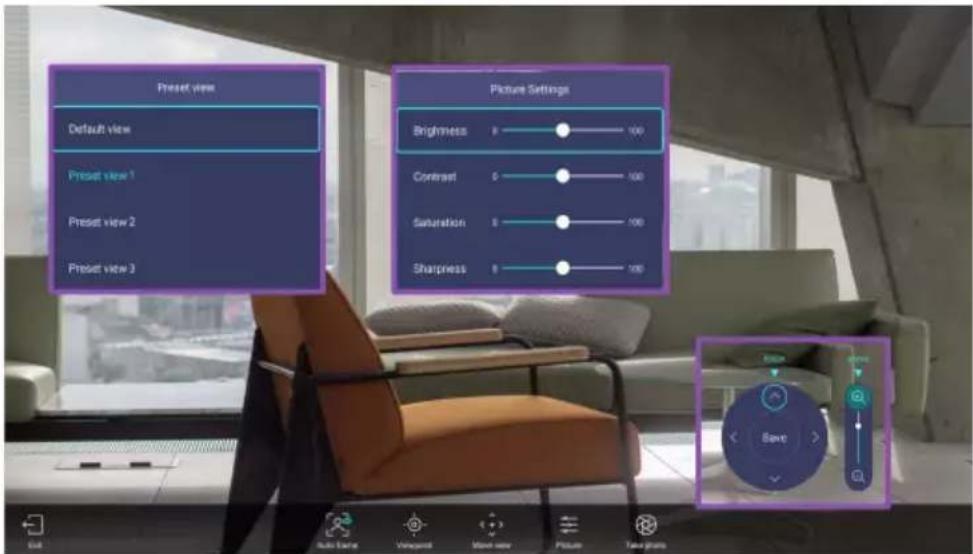
Function Description
Exit (  | Tap to close the application. |
Auto frame (  | Tap to enable/disable auto framing. Under Auto frame mode, Viewpoint and Move view settings are locked. |
Viewpoint(  | Allows you to choose a default or preset view for the camera. Besides the default view, you can preset three more views in Move view to accommodate different meeting environments. See Set and save a customized camera view on page 40 for more information. |
Move view (  ) ) | Allows you to adjust the camera view and save it in Viewpoint. You can tap / to pan, / to tilt or /to zoom in and out. |
Picture (  ) ) | Select to adjust picture settings including Brightness, Contrast, Saturation and Sharpness. |
Take photo (  ) ) | Tap to screenshot the current camera settings. |
Set and save a customized camera view
To set a customized camera view and save it for future use, follow the steps below:
- Tap Move view (☐) in Camera Settings to adjust the camera angle.

- Press ▲/▼/◄/► on the remote control to pan or tilt the camera view. Press

on the remote control to zoom in and out.
-
After all adjustments are set, you can save the camera view to Viewpoint by tapping Save in the middle of the pan and tilt wheel.
-
In the Save to preset window, choose to save your settings in Preset view 1/2/3. Or select Cancel to discard current settings.
After the customized camera view is saved, go to Viewpoint (☐) to choose the desired Preset view.
BenQ App Store
Tap 📋 to lanuch BenQ App Store. BenQ App Store allows you to view and download recommended apps.

After BenQ App Store is launched, you can select the category on the left panel to browse the suggested apps. Select an app from the selected category to view the basic description of the app.
| Function Description | |
| Search ( [IMAGE] ) | Searches for an app. |
| Update Center ( [IMAGE] ) | Allows you to update the BenQ App Store app. |
| Tools ( [IMAGE] ) | Lists the available apps. |
InstaQPrint
Tap to launch InstaQPrint. With this application, you can print a file or website image using a Wi-Fi or remote printer.

- Before launching the application, make sure your display is properly connected to Internet.
- For the list of supported printers, see https://printhand.com/list_of_supported_printers.php.

I. Tap the option on the left panel and browse and select the desired file, photo, page, or image you want to print.
2. Tap Manage Printers to choose which printer that you want to use.
3. To select a printer:
- Tap an option from the list of available printers on the left panel.
- Tap Scan for Wi-Fi Printers to search for printers automatically.
- Tap Manual Setup to add a new printer manually.

WPS Office
Tap 📋 to launch WPS Office. With this application, you can open document files including PDFs as well as Microsoft Word, PowerPoint and Excel documents.
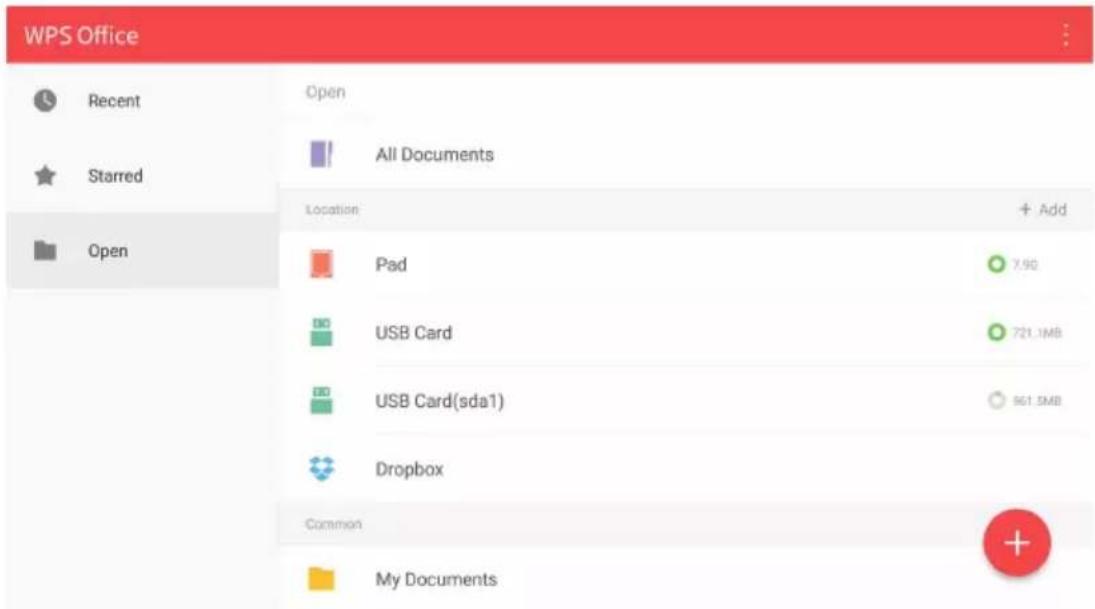
To edit a file with WPS Office:
- Tap Open (☐) on the left panel to browse and open a file located in either the display's internal memory, an external storage device, or cloud storage.
- Tap the function menu on the top panel to access the file format's various functions.

The description below is for a PowerPoint file, the function menus for other file formats will vary.

Function Description
File Tap to open, save, share, print, and manage your presentations.
View Tap to change or edit the presentation views.
Play Tap to start or set up a slide show.
| Edit Tap to edit the content or format of the slides. | |
| Insert Tap to insert tables, pictures, charts, comments, video, or audio. | |
| Transitions Tap to apply or adjust the timing of a transition. | |
| Pen Tap to write, draw, paint or sketch to the slides. | |
| Play ( ▷ ) | Tap to start a slide show. |
| Save As ( □ ) | Tap to save the presentation file on either the display's internal memory, an external storage device, or cloud storage. |
| Undo ( ↗ ) | Tap to undo an action. |
| Redo ( ↕ ) | Tap to redo the last action. |
| Close ( ✕ ) | Tap to close the presentation file. |
| Back ( ← ) | Tap to return to the previous page. |
| Next ( → ) | Tap to go to the next page. |
| Exit ( ← ) | Tap to exit WPS Office. |
Supported Office versions and file formats
Supported Office versions: 97 / 2000 / XP / 2003 / 2007 / 2010 / 2013 / 2016
Supported Office software formats:
| Office Software Supported File Formats |
| Word wps / wpt / doc / docx / dot / dotx / txt / log / irc / c / cpp / h / asm / s / java / asp / bat / bas / prg / cmd |
| Excel et / ett / xls / xlsx / xlt / xltx / csv / xlsm / xltm |
| PowerPoint ppt / pptx |
Saffi
How to start using Saffi – BenQ Voice Assistant
The product offers an extra level of flexibility for device control through Voice Assistant. Voice Assistant lets users control the flow of meetings by allowing them to start timers or search the Internet from anywhere in the room.
Already enable AMS service but did not bind your Amazon account to it
If you already enable Multi Account Mode and AMS service and you have not yet bind your Amazon account to it, please follow the below steps:
- Access AMS website to link the account with Amazon. For more detail on how to link the account under AMS, please refer to AMS user manual.

- Press the Voice command key to activate Saffi.
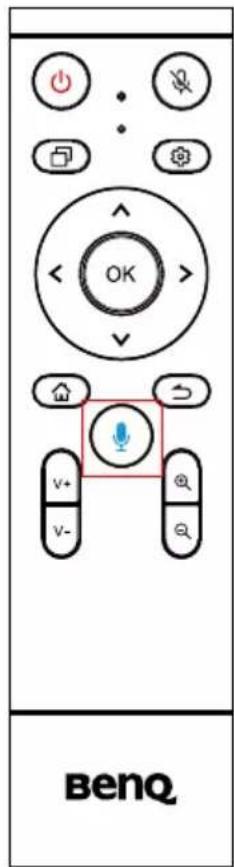
- The screen will show the privacy agreement. Select AGREE AND NEXT to proceed.

- It will then show the instruction for the setup. Follow the instruction on the screen to complete the setup.
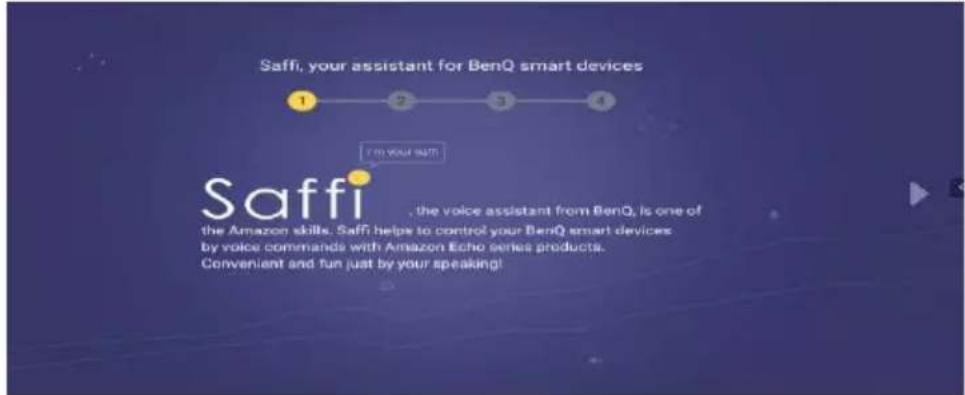
- Download and install Alexa app on your phone. Search Saffi and enable it.
![graph TD A["1: Download Alexa app"] --> B["2: Open Alexa app"] B --> C["3: Check up Alexa app"] C --> D["4: Enable Saffi skill to your account"]](/content/2026/06/1370008/images/618f54513aefce6539dd89f869d61017aa2c7d5407cef7a420f78a8f74442677.jpg)
- The setup is completed. Press the Voice command key and speak the commands to start using Saffi.

Product information
Specifications
| Item | Specifications | |
| VC01A | ||
| Camera | Pixel 12 million pixels | |
| Resolution & Frame Rate | H.264/MJPG: | |
| 3840×2160 / 2560×1440 / 1920×1080 / 1280×720 / 1024×576 / 960×540 / 800×600 / 640×480 / 640×360 / 480×270 / 352×288 / 320×240 / 320×180 / 176×144 / 160×120 / 160×90 | ||
| YUV2: | ||
| 640×480 / 640×360 / 480×270 / 352×288 / 320×240 / 320×180 / 176×144 / 160×120 / 160×90 | ||
| Output Format H.264/MJPG/YUY2 | ||
| Field of View (FOV) DFOV: 120° (Diagonal) | ||
| Adjustable Angle ±15° (Manual) | ||
| Focus Mode Fixed Focus | ||
| Focus Distance 0.5m | ||
| Digital Zoom x5 | ||
| Camera Presets 3 | ||
| Auto Framing Yes | ||
| Microphone | Array Microphone x6 | |
| Voice Pickup Range 0~8 m | ||
| Beamforming | Yes | |
| Noise Reduction | Yes | |
| Echo Cancellation Yes | ||
| Voice Localization Yes | ||
| Auto Gain Control (AGC) | Yes | |
| Speaker | Number of Speaker | x1 |
| Output Power | 8W | |
| Sound Channel | 1 | |
| Automatic Level Control (ALC) | Yes | |
| System | OS | Android 9.0 |
| OS Requirements (BYOD Mode) | Win10/Win8/Win7/Win XP/Linux OS/Mac OS/Chrome OS | |
| Memory | 4GB | |
| Storage | 16GB | |
| I/O Connection | USB 2.0 Type-C x1 (serve as device) | |
| USB 3.0 Type-A x1 | ||
| Audio in/out (AUX) x1 | ||
| HDMI out x1 | ||
| RJ45 x1 (10M/100M) | ||
| DC-in 2.0 x1 | ||
| Wi-Fi & Bluetooth | Wi-Fi | Wi-Fi (802.11 a/b/g/n/ac/ax)2.4G/5G |
| Bluetooth Bluetooth 5.0 | ||
| Power | Power Requirements 12V/3A (Adapter) | |
| Power Consumption (max.) | 36W | |
| Stand by ≤0.5W | ||
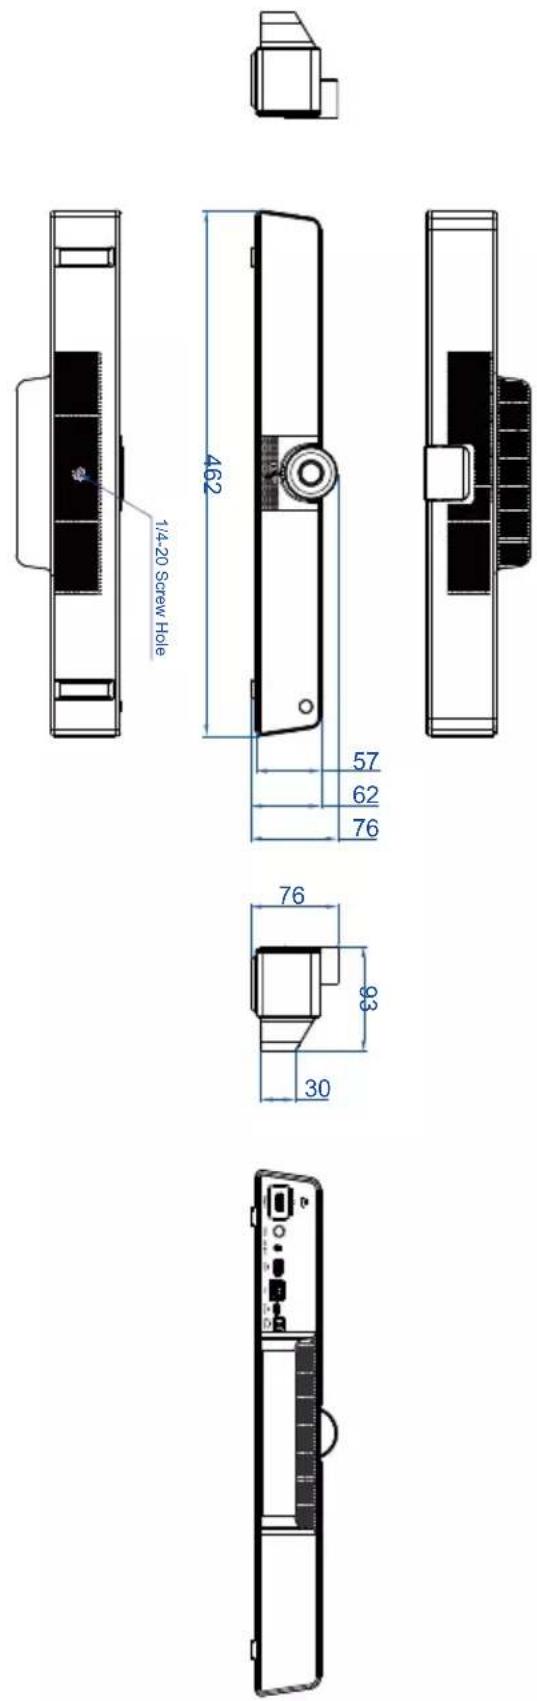
| Mechanical | Dimension (WxHxD) 462 x 76 x 93 mm | |
| Dimension w/ pack (WxHxD) | 540 x 160 x170 mm | |
| Net Weight 1.0 kg | ||
| Gross Weight 2.3 kg | ||
| Environmental Conditions | Operation Temp (°C) 0°C ~ 40°C | |
| Storage Temp (°C) -20°C ~ 60°C | ||
| Storage Humidity | 10% ~ 90% RH Non-Condensing | |
| Operating Humidity | 10% ~ 90% RH Non-Condensing | |
| Altitude | Below 5000 meters | |
| Accessory | Remote Control | x1 |
| Adaptor / Plug | x5 (US/EU/AU/KR/UK) | |
| HDMI cable x1 (1.5m) | ||
| USB Type-C cable | x1 (3m) | |
| Camera cover | x1 | |
| QSG | x1 | |

- OS: This Android 9.0 operating system is not standard Android, so access to Google Play™ is not available. APK cannot be installed in the default location. Without management permission, installing function won't work. There is no guarantee that the self-installed APK can function normally.
- Storage: Content storage may vary by the product supplied for your region. Pre-installed system and apps may take up some space.
Dimensions
Troubleshooting
| Problem Solution | |
| No picture Check the following:Is the display turned on? Check the power indicator of the display.Is your product turned on? Turn on the product and try again.Are there any loose cable connections? Make sure that all cables are connected firmly. | |
| No sound Check the following:Have you turned on the mute function? Turn off the mute function or increase the audio volume level and try again.Are there any loose cable connections? Make sure that all cables are connected firmly. | |
| The remote control does not work | Check for incorrect battery orientation.Check for dead batteries.Check your distance and angle from the product.Check whether remote control is properly being pointed at the receiver.Check for any obstacle between the remote control and the receiver.Check that the receiver is not under strong fluorescent lighting, or in direct sunlight.Check for any devices (computer or personal digital assistant, PDA) nearby that transmit infrared signals which may cause interference to signal transmission between the remote control and the display. Turn off the infrared function of these devices. |

- INTEGRATED VIDEO CONFERENCE TERMINAL
- USER MANUAL
- DISCLAIMER
- HDMI TRADEMARK DISCLAIMER (FOR MODELS WITH HDMI INPUTS)
- COPYRIGHT
- PRODUCT SUPPORT
- TABLE OF CONTENTS
- SAFETY WARNINGS AND PRECAUTIONS
- IMPORTANT SAFETY INSTRUCTIONS
- SAFETY NOTICE FOR REMOTE CONTROL
- BATTERY SAFETY NOTICE
- PACKAGE CONTENTS
- INSTALLATION INSTRUCTIONS
- PRODUCT INTERFACE
- NO
- NAME DESCRIPTION
- INPUT/OUTPUT TERMINALS
- REMOTE CONTROL
- 1
- 2
- 3
- 4
- 5
- 6
- 7 OK
- 8
- 9
- 10
- 11
- 12
- ⑬ V+ V
- 14
- USING THE REMOTE CONTROL INSTALLING REMOTE CONTROL BATTERIES
- REMOTE CONTROL USAGE TIPS
- MOUNTING
- INSTALLING THE WALL MOUNT
- INSTALLING THE DISPLAY MOUNT
- CONNECTIONS
- CONNECTING POWER
- WORKING WITH THE BUILT-IN OS OF THE PRODUCT (ALL-IN-ONE MODE)
- TO ENABLE ALL-IN-ONE MODE
- CONNECT YOUR PERSONAL DEVICE TO THE PRODUCT (BYOD MODE)
- BASIC OPERATIONS
- TURNING THE PRODUCT ON OR OFF
- INITIAL SETUP
- UPDATING SOFTWARE
- ANDROID SYSTEM INTERFACE
- MAIN INTERFACE
- SIDE TOOL BAR
- ACCOUNT INFORMATION
- GUEST
- ADMIN
- MULTIPLE USERS
- USER MANAGEMENT
- CREATING A NEW ACCOUNT
- ACCOUNT MANAGEMENT
- MESSAGE
- MENU OPERATIONS
- SETTING UP THE INTERNET CONNECTION
- NETWORK SETTING
- WIRELESS CONNECTION
- PROXY SETTING
- ADJUSTING AUDIO VOLUME LEVEL
- DEVICE SETTINGS
- DISPLAY SETTINGS
- ADVANCED SETTINGS
- SYSTEM SETTINGS
- APPS
- PROJECT WIRELESSLY VIA INSTASHARE 2
- AMS FILE MANAGER OVERVIEW
- NO. ITEM DESCRIPTION
- MULTIMEDIA FILES
- IMAGE
- AUDIO/VIDEO
- CAMERA SETTINGS
- SET AND SAVE A CUSTOMIZED CAMERA VIEW
- BENQ APP STORE
- INSTAQPRINT
- WPS OFFICE
- FUNCTION DESCRIPTION
- SUPPORTED OFFICE VERSIONS AND FILE FORMATS
- SAFFI
- HOW TO START USING SAFFI – BENQ VOICE ASSISTANT
- ALREADY ENABLE AMS SERVICE BUT DID NOT BIND YOUR AMAZON ACCOUNT TO IT
- PRODUCT INFORMATION
- DIMENSIONS
Brand : BENQ
Model : VC01A
Category : Video Conferencing System