
Connect M3 - Smart Home ACER - Free user manual and instructions
Find the device manual for free Connect M3 ACER in PDF.


| Product Type | Smart Home Hub |
| Dimensions | 4.5 x 4.5 x 1.2 in (114 x 114 x 30 mm) |
| Weight | 4.2 oz (120 g) |
| Power Supply | 5V DC, 1A via micro USB |
| Connectivity | Wi-Fi 802.11 b/g/n, Bluetooth 4.2, Zigbee |
| Voice Assistant Support | Amazon Alexa, Google Assistant |
| Main Functions | Control compatible devices, automation, scheduling |
| Zigbee Range | Up to 100 ft (30 m) indoors |
| Maximum Devices | Up to 128 Zigbee devices |
| Certifications | FCC, CE |
| Operating Temperature | 32°F to 104°F (0°C to 40°C) |
| Humidity | 10% to 90% non-condensing |
| Warranty | 1 year |
| Box Contents | Connect M3 Hub, power adapter, micro USB cable, quick start guide |
| Care and Cleaning | Wipe with a soft dry cloth |
| Safety | Do not expose to water or open the device |
| Repairability | Not user-serviceable; contact Acer support |
Frequently Asked Questions - Connect M3 ACER
User questions about Connect M3 ACER
0 question about this device. Answer the ones you know or ask your own.
Ask a new question about this device
Download the instructions for your Smart Home in PDF format for free! Find your manual Connect M3 - ACER and take your electronic device back in hand. On this page are published all the documents necessary for the use of your device. Connect M3 by ACER.
USER MANUAL Connect M3 ACER
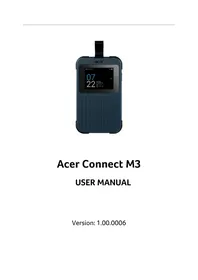
Acer Connect M3
USER MANUAL
Version: 1.00.0006
© 2023. All Rights Reserved.
This revision: February 2023
Important: This manual contains proprietary information that is protected by copyright laws. The information contained in this manual is subject to change without notice. Some features described in this manual may not be supported depending on the Operating System version. Images provided herein are for reference only and may contain information or features that do not apply to your device. Acer Group shall not be liable for technical or editorial errors or omissions contained in this manual.
Table of Contents
Overview.... 3
1.1 Package Contents .... 3 1.2 System Requirements .... 3 1.3 Device description....4 1.4 Environmental....5 1.5 Power Management 5
Installation....6
2.1 First-time setup for SIM, vSIM, and Charging 6
Getting online 10
3.1 Quick Start 10
Connection Manager App.... 12
4.1 Home Screen.... 12 4.2 Basic Control....14 4.3 Initial Setting....17 4.4 SIM Card 18 4.5 SIMO Service (Virtual SIM) 22 4.6 Wi-Fi Setting 27 4.7 Manage Connected Device 28 4.8 Settings 29 4.9 Firmware Update....30
Web User Interface (UI) 33
5.1 Web Browser Compatibility....33 5.2 Admin Login 33 5.3 Wi-Fi Setting 35 5.4 APN Profile 37 5.5 VPN (Open VPN) 39 5.6 SIMO Service 46 5.7 Languages....47 5.8 User Manual 48 5.9 Log Out....48
6. Regulatory Information.... 49
6.1 Important Safety Precaution....49
7. Safety Information 52
7.1 Important Safety Precaution....52 7.2 Condition of Use....52 7.3 Cleaning and Maintenance 53 7.4 Disposal Instructions....53 7.5 Ethernet Cable Line Safety....53 7.6 Medical Devices....53 7.7 Vehicles 54 7.8 Warning 54 7.9 Explosive Device Proximity Warning 54 7.10 Wireless adapter regulatory information....55 7.11 EU/UK Regulatory Conformance 56 7.12 Duty Cycle Attestation 56 7.13 Restrictions 56 7.14 EU/UK Regulatory Compliance – Radio 57
8. Limited Warranty 58
9. Factory Default Settings.... 59
10. Basic Specification 60
Overview
The Acer Connect M3 Mobile Wi-Fi is designed to feature the latest Wi-Fi 6 technology. This guide provides an overview of Acer Connect M3's features and a description of the user interface and ports of the device.
The Acer Connect M3 delivers multi-gigabit transfer speed along with Wi-Fi 6 features and user experience for the demands of travelers and media streamers. The Acer Connect M3 Mobile Wi-Fi can be used to provide increased network capacity while reducing bandwidth congestion and uncompromised internet access for every Wi-Fi 6 device. With a 2.4" display, Acer Connect M3 provides a simple operation and secure user experience for connecting and streaming on the internet.
1.1 Package Contents
The box should include the following items:
- Acer Connect M3
- USB Type C cable
- SIM card ejector tool
- Manual Kit including:
a. Quick Start Guide b. EMEA/PAP/ANZ Warranties c. CE Safety d. CE Declaration of Conformity
1.2 System Requirements
This Acer Connect M3 is compatible with Wi-Fi devices which support Wi-Fi 2.4GHz and 5GHz bands (802.11 b/g/n/ac/ax) and 4G LTE/5G NR internet connectivity.
1.3 Device description
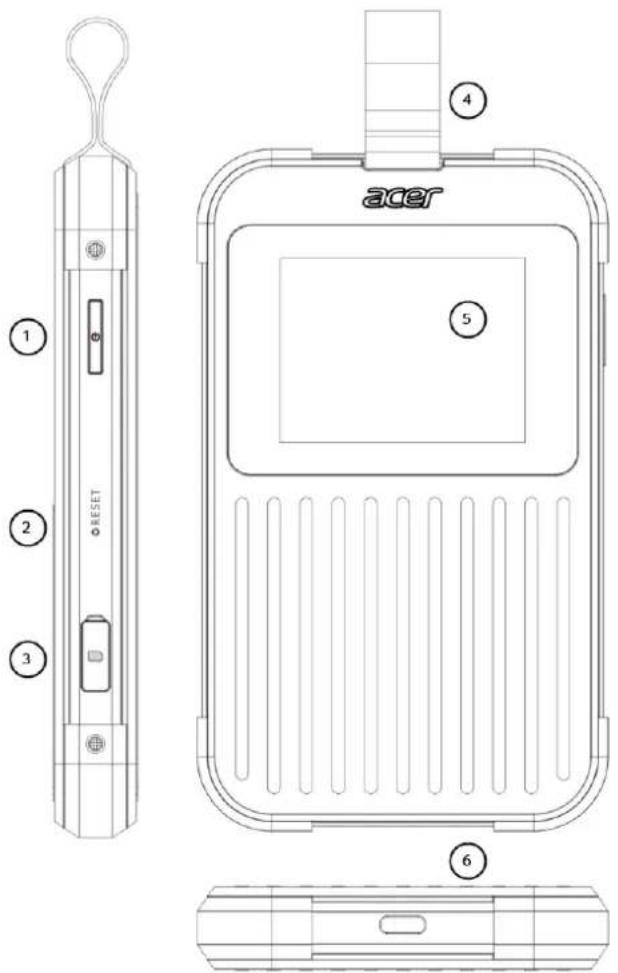
- Power Button
- Reset Button
- SIM Door Cover
- Removable Loop
- Touch Screen
- USB Type C port
1.4 Environmental
Temperature:
• Operating: 0 °C to 45 °C (32 °F to 115 °F) • Storage: -10 °C to 60 °C (14 °F to 140 °F)
Humidity (Non-condensing):
- Operating: 20% to 80% • Storage: 20% to 60%
1.5 Power Management
Acer Connect M3 can be powered from USB 3.0 Type C port with included USB Type C Cable.
Note: Since Acer Connect M3 does not include the adapter, it is recommended to use a 15Watt 5VDC, 2A or 3A charger type.
Installation
2.1 First-time setup for SIM, vSIM, and Charging
Physical SIM Card
Acer Connect M3 uses nano SIM type. Make sure you use the correct SIM card type.
Before installing your SIM card, please follow these steps:
a. Ensure the device is powered off. b. Turn your M3 to the back side (display facing down). c. Insert your fingernail into slit on the corner tray cover and open it by pulling out the tray on that side. d. Once the tray is pulled out, rotate the SIM slot cover by 90 degrees to reveal the SIM card tray and the SIM pinhole.

Follow the steps below to install the SIM card to Acer Connect M3:
Step 1: Prepare SIM tray ejector tool.
Step 2: Eject the SIM tray by pushing it into the pinhole.


Step 3: Locate your valid 5G SIM card and install it into the SIM tray. The SIM card with the operator logo should face upward (the gold contacts facing downwards). Ensure the card fits into place.
Align the notch corner properly. The SIM card must be placed completely flat on the SIM tray.
Step 4: Install the SIM tray with a valid SIM card back into the Acer Connect M3. Then close the SIM slot cover.


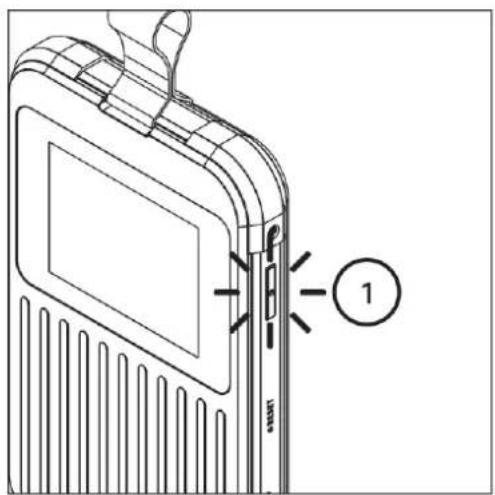
Step 5: Press and hold the Power Button located on the right side for 3 seconds. Once turned on, the Acer logo will appear on the screen.
Step 6: Follow the on-screen instructions to begin the SIM card activation process.
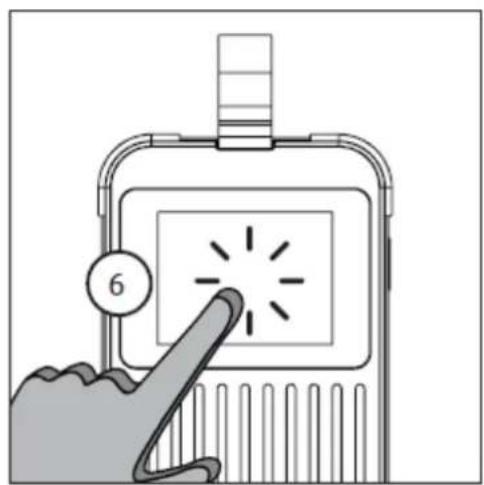
When using the SIM card, start by clicking the "SIM Card" icon.

Virtual SIM (SIMO Service)
In addition to using a physical SIM card, the Acer Connect M3 also supports virtual SIM technology provided by the SIMO application. With the pre-installed SIMO application, you can access internet or mobile data services around the world without using a physical SIM card. Before you can use SIMO data service, you need to sign up for a SIMO account at https://buy.simo.co and bundle the device with the M3 SIMO SN (SIMO Serial Number).
Follow the steps below to activate SIMO service from your Acer Connect M3:
Step 1: Press and hold the Power Button located on the right side. Once turned on, the Acer logo will appear on the screen.
Step 2: From the Menu, select SIMO Service and proceed to the next activation steps.

2.1.3 Charging your device
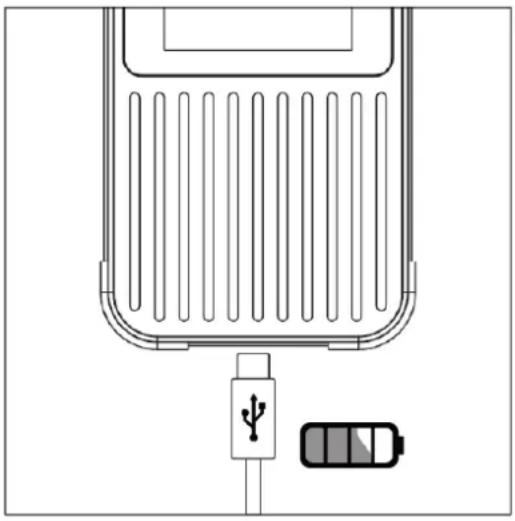
To charge the Acer Connect M3, connect the M3 with the included USB Type-C cable. It is recommended to use a power adapter with a 2A or 3A power rating. The Acer Connect M3 Mobile Wi-Fi does not include a power adapter.
Getting online
3.1 Quick Start
- If this is the first time you are using or setting up the Acer Connect M3 Mobile Wi-Fi, please proceed by tapping the “≡ Menu” icon to bring up the control menu.

From this menu selection page, you can access Wi-Fi Settings, Connected Device, Brightness, SIM Card, SIMO Service, and Settings.
- To connect devices to your Acer Connect M3 Mobile Wi-Fi, tap the “Wi-Fi Info” icon on the screen.

- By default, Wi-Fi hotspots are on. If hotspots are off, you will be prompted with a choice to turn on the Wi-Fi hotspot. Tap "Turn On" to proceed to the next step.

- On this page, you may choose which band to utilize to get online. Once determined which band to use, please scan the corresponding QR code with QR code Scanner on Android mobile devices, or with Camera APP on iOS mobile devices. You may return to the main page by tapping "BACK".

The below image is an example of the prompted message that may appear on your mobile devices.

Note: You can also find your default Wi-Fi password on the label located at the back side of the Acer Connect M3.
Connection Manager App
You can view or change Acer Connect M3 settings from the device touchscreen or by connecting to the Admin Web UI. This chapter will give you detailed explanation to manage Acer Connect M3 Mobile Wi-Fi using device touchscreen user interface.
4.1 Home Screen
SIM Card
In the SIM card usage scenario, once SIM card has been properly inserted and the network service is available, if all in normal state, you will see Data Usage as main topic in display screen.

SIMO Service (Virtual SIM)
In the virtual SIM usage scenario, once you have registered to a network supported by SIMO and the network service is available, the home screen will display status of SIMO data plan and menu to manage it.

Status Bar (Top of the screen)
The Acer Connect M3 uses the following status indicators and icons.
| Icon | Description |
 | Received network signal strength indicator |
 | Received network signal strength indicator and roaming state |
 | Carrier/Network Operator/Communication Service Provider's name |
 | Available network service indicator (5G NR/4G LTE) |
 | Cellular data traffic activity (downlink/uplink) |
 | Battery indicator status (capacity, charging state) |
 | Connection to USB port (USB tethering is active) |
This status applies to both physical SIM card and SIMO service (virtual SIM).
Information Panel
The Acer Connect M3 uses the following panel information and configuration menu access.
| Panel | Description | SIM Card | SIMO (v SIM) |
 | This is where mainly the information topic and the detailed status is located.Initially for physical SIM card usage, it will display “Data Usage” information with the value in the box below it. |  | |
 | This info will appear when you use SIMO service (virtual SIM), indicating the service state and function to manage your data plan. |  | |
 | You can tap this icon to get you into Wi-Fi information page (frequency band, access point name and password). |  |  |
 | Tap this icon to reset data usage counter. |  | |
 | SignalScanTM function for SIMO service. |  | |
 | This panel shows number of connected WiFi users on each frequency band. |  |  |
 | Tap this Menu icon for more detailed configuration and settings of Acer Connect M3 Mobile Wi-Fi. |  |  |
4.2 Basic Control
Power On
To turn your Acer Connect M3 on, press and hold the Power button for 3 seconds. The Home screen will show up after the system boot process has been completed.
![graph LR A["Long press power button"] --> B["acer"] B --> C["Data Usage"] C --> D["Carrier 5G IT 10:10 - 100%"] D --> E["Start Date 2022/05/20 220.25 GB"] D --> F["12 2.4 GHz | 8 5 GHz"] D --> G["Menu"]](/content/2026/06/1369276/images/41828df0a4880c2e24f11171a17561a6e00f09733732d107edf09f79a09f68b8.jpg)
Power Off
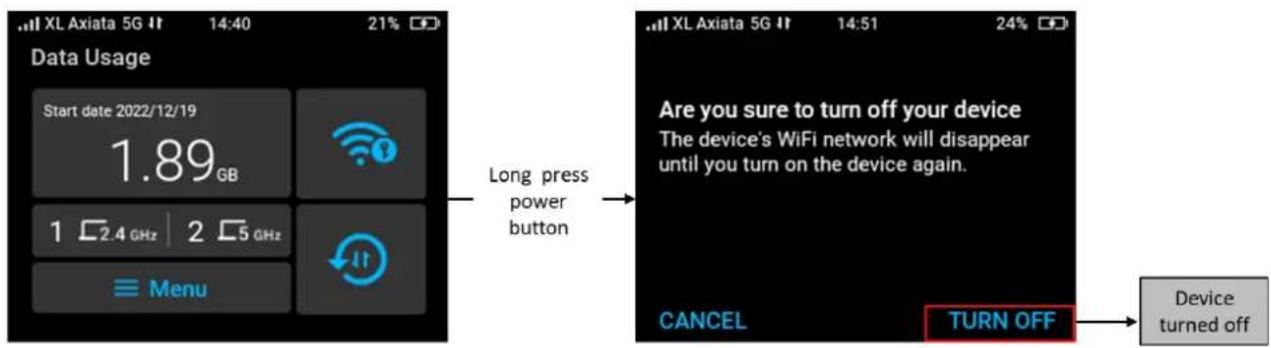
To turn your Acer Connect M3 off, press and hold the power button for 3 seconds until a confirmation page appears and then confirm by tapping Turn Off.
Auto Screen-Lock Timeout
When the touchscreen is idle for 15 seconds due to user inactivity, by default the screen will be turned off.
You can manage the screen timeout duration from Menu on Home screen > Settings > Screen Timeout. Adjust the timeout as per your requirement.
Screen timeout options are 15 sec, 30 sec, 1 min, 2 min, 5 min, 10 min, and Never.
![graph LR A["Screen Timeout\n30 seconds"] -->|Tap| B["15 seconds"] C["Time Zone\nAuto"] --> D["30 seconds"] E["Firmware Update\nBACK"] --> F["1 minute\nBACK"] B --> G["15 seconds"] F --> H["1 minute\nBACK"]](/content/2026/06/1369276/images/60bfd38d9244db4548453768eaa02e1d07539bf90701c19de4854b109dae63a1.jpg)
Screen Lock PIN Setting
You can manage the screen PIN lock configuration to ON or OFF. To turn it ON from OFF position, select Menu on Home screen > Settings > Screen PIN Lock > select ON.
Then continue to input the screen lock PIN from Screen PIN > tap Pencil icon > input at least 4-digit PIN and then click Save.
![graph TD A["Screen PIN Lock Off"] -->|Tap| B["Screen PIN Lock"] B -->|Tap| C["Screen PIN Lock"] C --> D["Screen PIN Lock"] D --> E["Enter at least 4 characters PIN"] E --> F["Screen PIN 1234"] F --> G["OK"] G --> H["Back"] H --> I["Back"]](/content/2026/06/1369276/images/fbb382902207748845a367c7a7e7fb8da991d9b5d2404ce0f26008a76453a3a8.jpg)
Unlocking Screen
When the screen is turned off due to screen access inactivity, you might have two options below:
• Screen activation when PIN Lock is Off
If the PIN lock is Off, press power button once > slide left using your finger to unlock the screen.

• Screen activation when PIN Lock is On
When screen is locked and the PIN lock is on (activated), press power button once > slide using your finger > input the PIN number to unlock the screen.
Critical Low Battery
The screen will be turned off when battery out of charge. Long press the power button will show
you low battery indicator on the screen.
Enable USB Tethering (Connect to PC/Laptop as a dongle)
When you plug M3 to PC/laptop with USB cable (USB A to C), the M3's screen will pop "Do you want to turn on USB tethering?". Press "Turn ON" will enable USB tethering.

If the USB Tethering is still off, to activate it you can select Menu > Setting > slide on USB Tethering.

Note: Once USB cable connection is detected and successfully connected, the USB icon will be displayed on the right top of the screen.
Menu Navigation
Tap the Menu icon. From the Home screen, navigate the available menu by swiping left or right and tap your selection. From this menu selection page, you can access Wi-Fi Settings, Connected Device, Brightness, SIM Card, SIMO Service, and Settings. Tap Back at any time to go back to the previous menu.
![graph LR A["Start date 2022/12/19<br>1.89 GB"] -->|Tap| B["Menu"] B --> C["Back"] C --> D["Switch"] D --> E["Output"]](/content/2026/06/1369276/images/72ff6525b3f9bd431942f0785b21b0dd61b5a2cba604373dbb822cc10dbf24eb.jpg)
Screen Brightness
You can adjust screen brightness from Menu > Brightness. Swipe right or left with your finger to adjust the screen brightness according to your eye's comfort level.
![graph LR A["Menu"] -->|Tap| B["Brightness"] B -->|Swipe| C["Brightness"]](/content/2026/06/1369276/images/39a1282dd083926cb26386b76701867ff0a6d92bea73908c91b37f8ce22cadfb.jpg)
4.3 Initial Setting
- Power on the device by long pressing the power button for 3 seconds. The Acer startup logo screen will be displayed.
- Tap Menu > Setting from the home screen to configure some basic parameters such as:
a. Select the preferred language you want to use for navigating the touchscreen menu. Languages supported are English, Traditional Chinese, German, French, Italian, Spanish, Polish, Czech, Portuguese, Brazilian Portuguese, Latino Spanish, Swedish, Norwegian, Danish, Finnish, Netherlands, Hungarian, Thai, and Hebrew. b. Select your time zone. Default time zone setting is "Auto". You can change it by selecting the time zone as your preference. c. Select your SIM type. You can choose using a physical SIM card or SIMO service (virtual SIM). Detailed steps for these SIM settings will be explained in another part of the document.
- From Menu, you can also select SIM Card or SIMO Service for more settings and configuration.
![graph TD A["acer"] --> B["No SIM Card"] B --> C["Switch SIM Type"] C --> D["0 2.4 GHz"] C --> E["0 5 GHz"] D --> F["Menu"] E --> F F --> G["No Service 23:01 76%"] G --> H["Menu"] H --> I["1 Card"] H --> J["SIMO Service"] H --> K["Settings"] G --> L["No Service 22:58 76%"] L --> M["Menu"] M --> N["SI…](/content/2026/06/1369276/images/3739f2c00168d16cf35570eeb17212f037c90365be6c0f2c8d9c8667eba764e6.jpg)
Note: When no action is performed by the user during this initial setting process, the screen will be automatically suspended after 60 seconds but it will not be locked. Press the power button once and it will resume to the last page where the user was located before.
4.4 SIM Card
To use a physical SIM card, please refer to point 2.1 Installation step 1 until step 6 to insert the SIM card into the designated slot. Once you have inserted the SIM card, go through the initial setting steps until prompted to Select SIM Type. If the user has already inserted a SIM card, the system will select the SIM card option as the default.
Valid SIM Card
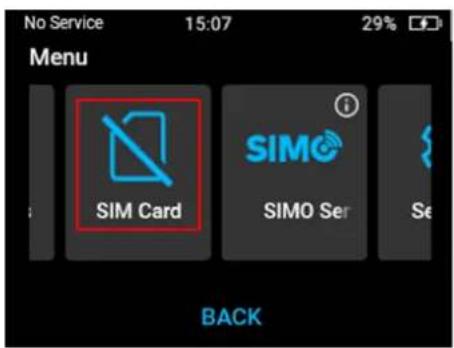
Once the SIM card you have inserted is detected, valid, and unlocked, the cross sign on the SIM card menu will be changed.
No SIM Card detected
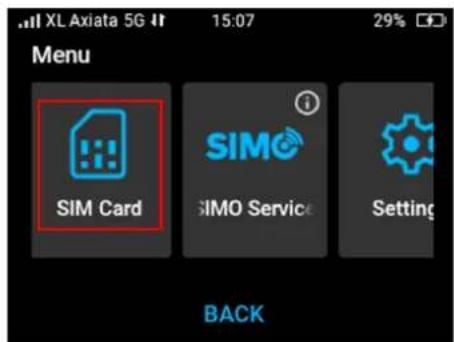
SIM Card detected
SIM Card Problem
There are possibilities of some SIM card errors during setting up the SIM card. Below are some of the possible error messages that may occur, and the recommended action you need to do to resolve it.
| Error Message | Recommended Action |
| No SIM Card | When SIM Card is not detected, please make sure you have inserted the SIM card into the SIM card slot correctly. |
| Invalid SIM Card | You need to insert another SIM card from the service provider or contact the service provider for further support. |
| Locked SIM Card | You need to reset the PIN by entering your SIM card's unique PUK (PIN Unlock Key) with another device which can edit SIM PIN. |
| SIM PIN Required | Input the PIN to enable the SIM card. If you put incorrect PIN for 3 times, the SIM card will be locked. |
Note: At this point, if you got one of above errors, you have an option to switch SIM type into SIMO virtual SIM, or you can keep your option and retry to use the SIM card.
![graph LR A["No SIM Card"] --> B["Switch SIM Type"] B --> C["0 2.4 GHz | 0 5 GHz"] C --> D["Menu"] E["Tap"] --> F["No Service 20:23 63%"] G["SIM Type"] --> H["SIM Card ✓"] I["SIMO virtual SIM"] --> J["BACK"]](/content/2026/06/1369276/images/2baa67d91883fd0521791885ed279f43c7a1172e947a086239b6b1f43b56cd54.jpg)
SIM PIN Lock
You can activate SIM PIN lock from Menu > SIM Card > SIM PIN Lock > enable the SIM PIN lock slider into "ON". You can disable it by switching the slider into "OFF". Both enabling and disabling this SIM PIN Lock requires the correct SIM PIN.
![graph LR A["SIM Card"] -->|Tap| B["Enable SIM PIN"] B -->|OK| C["Data Roaming"] style A fill:#f9f,stroke:#333 style B fill:#ccf,stroke:#333 style C fill:#cfc,stroke:#333](/content/2026/06/1369276/images/60072ff0e0e4bf92c12eb9366eccd519c295b9f64808a2972399c61581f06982.jpg)
Change Network Mode (Physical SIM Card only)
You can change the network mode selection depend on your network provider's service availability.
There are two network types that you can choose:
- Auto (5G NR/4G LTE)
- 4G LTE Only
![graph LR A["Menu SIM Card"] -->|Tap| B["Network Mode Auto (5G NR/4G LTE)"] B -->|Tap| C["Network Mode Auto (5G NR/4G LTE)"] C --> D["4G LTE only"]](/content/2026/06/1369276/images/c6abb38972252b29a37775a32880c393343480e3df54bee5ee3efa9eef41e596.jpg)
Note: By default, Acer M3 will select auto (5G NR/4G LTE).
Enable Data Roaming (Physical SIM Card Only)
You can enable data roaming option by sliding Data roaming to "ON". The default mode is OFF. Note: Before enabling the international roaming, make sure that you are aware of any extra data charges that might applied.
![graph LR A["SIM PIN Lock"] -->|Tap| B["Are you sure you want to enable data roaming?"] B -->|Tap| C["Data Roaming"] C -->|OK| D["Back"]](/content/2026/06/1369276/images/a0bc2a2167fa744eeb1a41766ad8fb130f942e3eb78df51909b853332de30bfe.jpg)
Change SIM Type (SIM Card to vSIM)
You can change your SIM card type from physical SIM card to virtual SIM (SIMO service).
Tap Menu from home screen > Setting > Select SIM card > tap SIMO virtual SIM > confirm by tapping Switch. You will be redirected to Home SIMO screen.
![graph TD A["Menu"] --> B["1 Card"] B --> C["SIMO Service"] C --> D["Settings"] D --> E["Tap"] E --> F["Sim Type"] F --> G["SIM Card"] G --> H["USB Tethering via USB. Sharing this"] H --> I["Tap"] I --> J["SIMO virtual SIM"] J --> K["No Service 17:03"] K --> L["No SIMO Data Plan Manage Data Plan 1 2.…](/content/2026/06/1369276/images/1b99eb2f0763594e01f16c107e669d4b7ae4c1fb8f9fb330120e653eb5d53c51.jpg)
Reset Data Usage (Physical SIM Card Only)
You can reset the data usage by tapping reset data “ ” icon from SIM home screen > message “Do you want to reset data usage?” will pop up > confirm by tapping “OK”, then the data usage will restart from zero.
![graph LR A["Start date 2022/12/19<br>2.62GB"] -->|Tap| B["Do you want to reset data usage?<br>Please note that calculation is for equipment accumulation only and does not represent the actual carrier data count."] B -->|OK| C["End"]](/content/2026/06/1369276/images/cfb9b364be9983840c1ecc8847e45492a09b6b37a035d24a0e17018bc5fbaec2.jpg)
Note: the data usage calculation on the screen is for equipment accumulation only and does not represent the actual data counting of the carrier.
4.5 SIMO Service (Virtual SIM)
Acer Connect M3 come with pre-installed SIMO application (virtual SIM). With SIMO application, you will be able to connect to the internet or using data services without using a physical SIM card. SIMO offers connection to its mobile operator partners around the globe to give you access to the internet and data services anywhere, anytime by automatically switching to the best available local network.
Prior using the virtual SIM (SIMO service), you need to purchase a SIMO data plan first. There are 3 (three) methods you can use to do it:
- Visit SIMO home page https://buy.simo.co directly from your internet browser to see the available data plans and purchase it by filling all the requirements.

- From Acer M3 device menu. You can find the link to register SIMO service from Menu > SIMO Service > Show Web QR code.
![graph LR A["No SIM Card"] -->|Tap| B["Menu"] B --> C["Back"] C --> D["Simo Service"] D -->|Tap| E["Visit SIMO to manage your data plan"] E --> F["https://buy.simo.co"] F --> G["Show Web QRcode"] G --> H["Back"] H --> I["Simo Service"] I --> J["SIMO SN"] I --> K["srs2232a0k14dbb7"] I --> L["IMEI"] I…](/content/2026/06/1369276/images/b7e64736d00ab6be2b24fdbb1008fbe8e4d4ace868a27876c3c047799769a9cd.jpg)
You can scan the QR code with your mobile phone camera or QR scanner apps and it will give you an URL for SIMO registration. Below is an example of given URL:

- From SIMO web user interface, which will be explained on Web User Interface (UI) chapter.
SIMO offered a free trial data plan (limited time duration and quota). Below images are example of view from successful SIMO data plan registration:

Once you have successfully subscribed to a data plan from SIMO, and you haven't inserted a SIM card yet, you can select SIMO service by Switch SIM Type > Select SIMO virtual SIM > confirm by tapping SWITCH.
![graph TD A["acer"] --> B["No Service 20:21 63%"] B --> C["No SIM Card"] C --> D["Switch SIM Type"] D --> E["0 2.4 GHz 0 5 GHz"] E --> F["Menu"] F --> G["Tap"] G --> H["No Service 20:23 63%"] H --> I["SIM Type"] I --> J["SIM Card ✓"] J --> K["SIMO virtual SIM"] K --> L["BACK"] L --> M["Tap"] M --> N[…](/content/2026/06/1369276/images/a877c8d32bb8bb3feb86146aa5b065b1075711811a5b43fa7b7164dd12b94e06.jpg)
After tapping "SWITCH", one of three things will happen:
- If you have an active data plan and successfully connect to the Internet via SIMO partner's network, you will be brought to the SIMO home screen with the "Active SIMO Data Plan" state. You can now use the SIMO service.
- If you fail to connect to the Internet, you will receive a "SIMO Connection Error" alert. Please refer to the SIMO Connection Error section below for next steps.
- If you successfully connect to the Internet but don't have an active SIMO data plan, you will get a notification "No SIMO Data Plan". Please refer to the SIMO Data Plan section below for further explanation.
SIMO Connection Error
When you receive the SIMO Connection Error notification during your initial setup or when switching to another service provider, tap Learn More > tap Try connecting again > wait for the system to reconnect to the service provider's network.
SIMO Data Plan
There are 3 situations where you need to manage your data plan:
- When you receive the "No SIMO Data Plan" notification during initial setup because no data plan is defined yet or the device is unbinded with the service. To enable it, select Manage Data Plan from the SIMO home screen > visit the SIMO URL to manage your data plan (link provided by QR code).
- You can also access Manage Data Plan from your Active SIMO Data Plan on the Home screen whenever you need to adjust or modify your existing data plan.
- You can also access your data plan from the Menu on the SIMO home screen > SIMO Service.
![graph TD A["1 SIMO virtual SIM (No data plan/Unbinded Device)"] --> B["2 SIMO virtual SIM (with activate data plan)"] B --> C["3 Check SIMO Service"] subgraph A D["No Service 11:26 99%"] E["No SIMO Data Plan Manage Data Plan 0 2.4 GHz 1 5 GHz Menu"] end subgraph B F["Back"] G["Check SIMO Service"] H…](/content/2026/06/1369276/images/546ca524bfecaa256a7198f73e330322ce7ba79622e0006ef9b8fce94f5c4526.jpg)
SIMO Error Messages
There are some possible errors that can occur during SIMO setup, along with their possible causes:
1. VSIM or RSIM failed to connect
There is a mobile network connection issue. Please try again. If the issue persists, please contact the SIMO Support Team at simo.co/livechat or call us at +1-855-759-7626. [XXXXXXXX]
Try connecting again
2. Not enough VSIM cards
SIMO service is temporarily unavailable as our network is experiencing high traffic. Please try again later. If the issue persists, please contact the SIMO Support Team at simo.co/livechat or call us at +1-855-759-7626. [XXXXXXXXX] Device SN: XXXXXXXXX
Try connecting again
3. SIMO does not have coverage in the current country
SIMO service is not available in your current country. [XXXXXXXX]
4. The device is not configured properly. E.g. missing SkyroamID, SIMO SN. Etc.
This device isn't configured properly. Please contact the SIMO Support Team at simo.co/livechat or call us at +1-855-759-7626. [XXXXXXXXX] Device SN: XXXXXXXXX
5. Failed to update SIMO FLOW
This device isn't configured properly. Please contact the SIMO Support Team at simo.co/livechat or call us at +1-855-759-7626. [XXXXXXXXX] Device SN: XXXXXXXXXX
SignalScan™ Feature
If you are attached to a network under SIMO service, SignalScan™ can be used to identify a better mobile network in case you have a bad network experience from current service provider. To use SignalScan™, tap icon SignalScan™ from SIMO home screen > tap Start to SignalScan™ to start scanning. The device will scan the best available signal around 20 seconds.
![graph TD A["Active SIMO Data Plan"] -->|Tape| B["SignalScan™"] B -->|Tape| C["Scanning network"] C --> D["No Service 20:36 FINISH"] D --> E["Connecting to internet FINISH"] E --> F["Successfully connected to a new network. Press Finish to back to the home page. FINISH"] F --> G["Active SIMO Data Pla…](/content/2026/06/1369276/images/9314a4a8b332774cf40c5dea43a40879741ec44165c7bb4d15f13dc67abb252a.jpg)
During the SignalScan™ process, if not successful, you might encounter some error messages such as:
• SIMO Connection Error
This could happen when it failed to connect to the internet. You can try to reconnect or contact SIMO customer support displayed on the screen.
• No better networks available
This notification will pop up after the system could not find another better network on the current location. Tap Finish to go back to SIMO home screen.
Change SIM Type (vSIM to SIM card)
You can change your SIM card type from virtual SIM (SIMO service) to physical SIM card. Tap Menu from home screen > Setting > SIM Type > Select SIM card > confirm by tapping OK. When successful, you will be redirected to Home screen SIM card.
![graph TD A["SIM Type"] --> B["SIM Card"] B --> C["SIMO virtual SIM"] C --> D["BACK"] D --> E["Tap"] E --> F["SIM Card"] F --> G["Are you sure you want to switch to a SIM card?"] G --> H["Your device will be disconnected for a while until the SIM setting process has been completed."] H --> I["BACK"]…](/content/2026/06/1369276/images/d9e7f94472d1733e530c31c28d56dbab0c0374ef79c71e087e698bbdffda906d.jpg)
You can also view SIMO Service information from Menu on Home screen > SIMO service > tap the information icon
![graph TD A["Menu"] --> B["Back"] B --> C["Meet SIMO"] C --> D["Next"] D --> E["Choose Flexible Data Plan"] E --> F["Next"] F --> G["Switch carriers with SignalScan™"] G --> H["Finish"]](/content/2026/06/1369276/images/3166ca17ba902b4fd843d8105f4f4f3063a553fb35d8e60e29137cbc9377fb01.jpg)
4.6 Wi-Fi Setting
Turn On Wi-Fi hotspot from Home screen
If Wi-Fi hotspot are off, you can turn it on from Home screen > tap Wi-Fi info icon. Confirm by tapping "Turn On". Once hotspot is activated, you can view information on each hotspot.

Turn On and Off Wi-Fi hotspot from Menu
If Wi-Fi hotspots are off and you want to turn on the Wi-Fi hotspot function, tap Menu from home screen > tap Wi-Fi Settings and then slide on the Wi-Fi Hotspot slider. You can also turn off Wi-Fi from this slider.
![graph LR A["Menu"] --> B["WiFi Setting"] B --> C["Connected I"] B --> D["Brightn"] D --> E["Tap"] E --> F["WiFi Settings"] F --> G["WiFi Hotspot"] G --> H["Turn Off Wifi Hotspot Automatically"] H --> I["If no device is connected to this"] I --> J["Tap"] J --> K["WiFi Settings"] K --> L["WiFi Hotspot…](/content/2026/06/1369276/images/b7601d4f803394863af6e525fdbe8d03b02bee6679cb20faea0a891cd27235cb.jpg)
Enable automatic Wi-Fi hotspot turn off
To save battery life, you have an option to turn off Wi-Fi hotspot automatically when there are no users connected. The default state of this function is OFF.
To activate the automatic Wi-Fi turn off, Menu > select Wi-Fi Settings > slide on Turn off Wi-Fi Hotspot automatically.

Change Wi-Fi Name and Password
You can change Wi-Fi Name and Password on Wi-Fi setting by accessing the website using the URL or QR code given.
To change the Wi-Fi password, from the Menu on the home screen, select Wi-Fi Setting, then tap Change Wi-Fi Name/Password. Connect to the M3 Wi-Fi and visit the given URL (http://acerconnect.com) or scan the QR code shown after tapping "Show Web QRcode".
![graph LR A["XL Axiata 5G 17:07"] --> B["Device's WiFi"] C["Multi Device Connected to this device's WiFi"] --> D["WiFi Band"] D --> E["Dual Band (2.4 GHz + 5 GHz)"] E --> F["Change WiFi Name / Password"] F --> G["Back"] H["XL Axiata 5G 17:08"] --> I["WiFi Info"] I --> J["Connect to the M3 WiFi, and v…](/content/2026/06/1369276/images/d58bd6ee5f17916f2ae286205093b13685e1dc535ee61a84e5e38ab678c37d3b.jpg)
Change Wi-Fi Band
The Acer Connect M3 Wi-Fi hotspot supports 2.4GHz and 5GHz bands. You can enable dual bands or select only one of them to be used in your hotspot.
Tap Menu > Wi-Fi Setting > Wi-Fi Band, then select your preferred band.
![graph LR A["Device's WiFi"] -->|Tap| B["2.4 GHz only"] B -->|Tap| C["2.4 GHz + 5 GHz"] C --> D["Dual Band (2.4 GHz + 5 GHz)"] D --> E["5 GHz only"] E --> F["Back"]](/content/2026/06/1369276/images/e069f35596d740312e1fffed5700b1f48f0d7748a5f1479249b9c31875b26f80.jpg)
4.7 Manage Connected Devices
View Connected Device(s)
To view detailed client devices connected to the M3 hotspot, choose Connected Devices from the Menu. It will show devices connected at that time on dual bands (2.4 GHz and 5 GHz).
![graph LR A["Menu"] --> B["WiFi Se"] B --> C["ed Device"] C --> D["Brightn"] D --> E["Tap"] E --> F["Connected Device"] F --> G["2.4 GHz Galaxy-J7-Pro"] F --> H["5 GHz"] F --> I["5 GHz 52s"]](/content/2026/06/1369276/images/e9b825e44d57b5083c0506c831793756faa2805b31970d3a234fe665e0d31738.jpg)
Block a Device
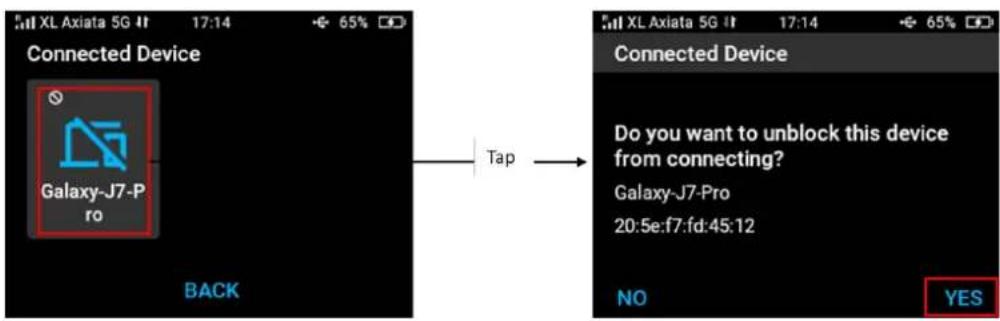
You can prevent a device from accessing the internet via the M3 hotspot by blocking it from the list of connected devices. To block a device, tap Menu from the home screen, then Connected Device, select the device you want to block, and confirm by tapping "Yes".

Unblock a Device
You can unblock a blocked device by tapping the selected blocked device and then confirming by tapping "Yes" to unblock it.
4.8 Settings
Change Language
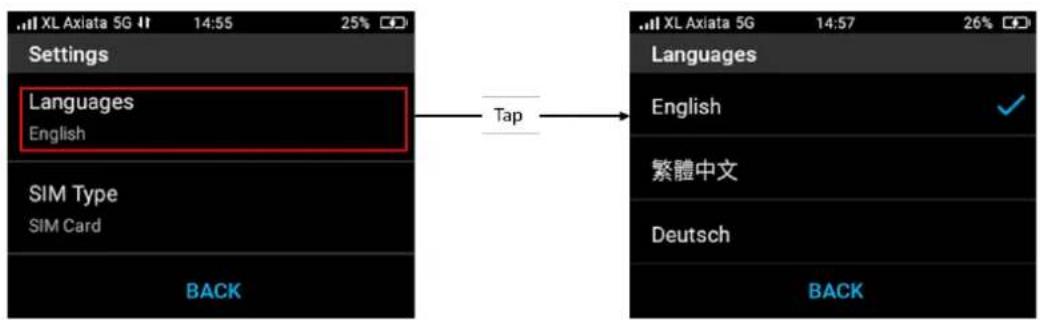
You can change the language from Menu > Settings > Language, then select your preferred language.
Languages supported by the Acer Connect M3 are English, Traditional Chinese, German, French, Italian, Spanish, Polish, Czech, Portuguese, Brazilian Portuguese, Latino Spanish, Swedish, Norwegian, Danish, Finnish, Netherlands, Hungarian, Thai, and Hebrew.
Check Device Information
To check the device info, from Menu > Setting > tap Device Info. It will show you details of the device such as Device Name, IMEIs, MAC Addresses, Serial Number, SIMO Serial Number, Software Version and App Version.

4.9 Firmware Update
Change Firmware Update Settings (Manual/Automatic)
You can turn on automatic firmware check update and select the frequency interval (days, weeks).
From Menu > Setting > Firmware Update > Manual Check > turn on Auto check update > Select your preferred Check Frequency.
If the Auto Check is On (enabled), tap Auto Check to view the configuration.
![graph TD A["Time Zone"] --> B["Firmware Update Manual Check"] B --> C["Firmware Update Auto Check Update"] C --> D["Firmware Update Auto Check Update"] D --> E["Firmware Update Check Frequency 2 days"] E --> F["Firmware Update Back"] F --> G["Firmware Update 2 days"] G --> H["Firmware Update 1 week"…](/content/2026/06/1369276/images/3c314369743b645143e8acc345483153216c41d593f8dde87337e3b3e7e634d4.jpg)
Auto Firmware Update
When you select the auto firmware update option, Acer Connect M3 will check the new available firmware periodically. If an update become available, it will give you a notification. When you received a “new update has been found” message, tap download, and then tap Update. Wait until firmware is successfully updated by tapping “OK”. When the firmware update is finished, you will be redirected to Home screen.
Note:
- You might encounter "Download Failed" due to your internet connection during the process. If this happens, you can check your internet status and try to download later or tap Retry.
- If you received "Firmware update Failed" notification after update firmware process, you can try to update again later. If this happens, you will redirect to Home screen.
![graph TD A["New Update has been found.<br>New firmware version: M3_GBL_1.01.000004<br>File size: 52 MB<br>Please note downloading this file will use you data transfer traffic.<br>SKIP"] --> B["DOWNLOAD"] B --> C["Firmware Update<br>Downloading Image 37%"] C --> D["Firmware update file is ready.<br>D…](/content/2026/06/1369276/images/255f2798cb7b28b839972d5d600ed3519f19607b7c75e42380811e79ce7104d2.jpg)
Manual Firmware Update
You can also set and check manually the availability of the update. You will not receive any alert on this mode. By tapping Check Now from Firmware Update menu, the system will check the availability of new firmware.
- When a new firmware update found, you will receive notification and you can continue the process by tapping Download. Follow the rest of the update process as auto firmware above.
- When your firmware is still the latest, the system will give you a notification. No action is needed for this status.
- There is also the possibility of an internet connection error during this process. You can check the internet connection and tap "Retry" to retry all the process from the beginning.
![graph LR A["Auto Check Update"] --> B["Check Frequency 1 week"] B --> C["Check Now"] C --> D["Tap"] D --> E["Checking for update"] E --> F["New Update has been found. New firmware version: M3_GBL_1.01.000004 File size: 52 MB Please note downloading this file will use you data transfer traffic. SKIP…](/content/2026/06/1369276/images/a055f7cf33e279cc7532788b034c141035023bd3ee0e8e716fb78bcc41a6d033.jpg)
Web User Interface (UI)
This chapter will give you an explanation on configuring and managing your Acer Connect M3 using the web interface.
5.1 Web Browser Compatibility
The Acer Connect M3 Web User Interface Admin is compatible with the following browsers:
- Google Chrome
- Mozilla Firefox
- Internet Explorer
- Safari
- Microsoft Edge
5.2 Admin Login
- Connect your computer or your smartphone device to Acer Connect M3 hotspot.
- Open a web browser.
- Type http://acerconnect.com into the address bar and press enter. The Home page will then load, as shown in the screenshot below.

- On the Home page, enter the default password as found on the device label on the back of the Acer Connect M3 and click Login.
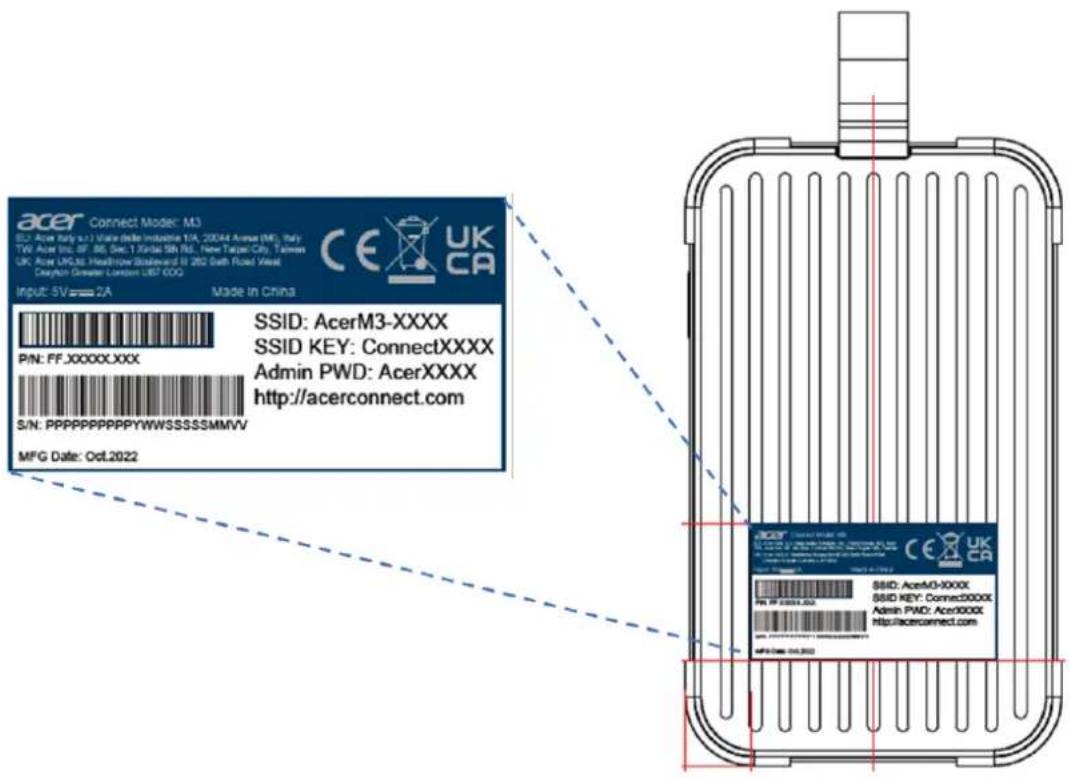
Note: You will need to change your password at first time you login.

Change Admin Password
Enter your current password, then input and confirm a new password. Your new password must be between 8-32 characters long.
Note: For security reasons, it is recommended to strengthen your password using a mixture of upper-case letters, lower-case letters, and numbers. The password should not be easily guessed, or a word from the dictionary. The system will give notification of your password strength during setting (weak, normal or strong).

5.3 Wi-Fi Setting
Change Wi-Fi Name and Wi-Fi Password
On this page, you can configure basic Wi-Fi parameters, such as the Wi-Fi name and password for 2.4GHz and 5GHz band (separate network name/SSID).
Wi-Fi Name
Wi-Fi Name represents the Wi-Fi network name (SSID) of the corresponding Wi-Fi network. You can change the Wi-Fi Name by using 8~32 characters (Using a mixture of upper-case letters, lower-case letters, numbers, '-', ' ', '' and space).
Wi-Fi Password
It specifies the password for connecting to the Wi-Fi network. You are strongly recommended to set a Wi-Fi password for security.
It is recommended to use the combination of numbers, uppercase letters, lowercase letters, and special symbols in the password to enhance the security of the Wi-Fi network.
You can change the Wi-Fi password using 8~63 characters (ASCII code).

Configuring procedure:
- Change the parameters of the 2.4 GHz network.
- Change the Wi-Fi Name of the 2.4 GHz network, which is MyWi-Fi_2.4G in this example.
- Change the Wi-Fi Password of the 2.4 GHz network.
- Change the parameters of the 5 GHz network.
- Change the Wi-Fi Name of the 5 GHz network, which is MyWi-Fi_5G in this example.
- Change the Wi-Fi Password of the 2.4 GHz network.
3. Click Apply

Once the Wi-Fi name (SSID) and password has been changed, you will need to reconnect to your Wi-Fi clients.

5.4 APN Profile
APN Setting
Acer Connect M3 will detect your SIM and set APN (Access Point Name) for 4G/5G data connection as the default configuration. But some carriers may not be automatically configured by Acer Connect M3. In that case, you need to manually create a new profile and setup the SIM's APN.
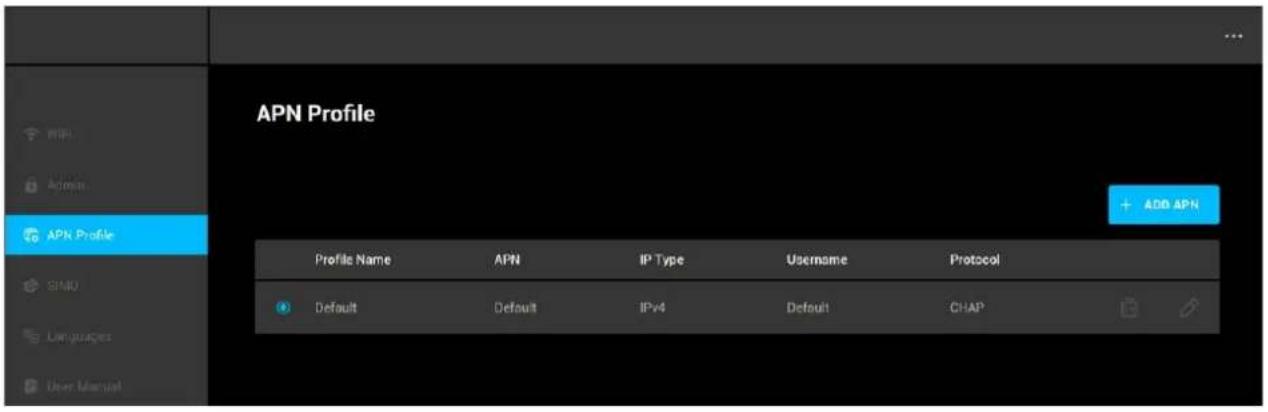
Add New APN Profile
- From APN profile menu, click Add APN.
- Input the required parameters inquired from your network provider, such as Profile Name, APN, IP Type, Username, Password and Protocol.
- Click Save.
Note:
- Profile Name is mandatory, cannot be left empty. • IP Type options: IPv4, IPv6 and IPv4v6.
- Protocol options: None, PAP and CHAP.

Once the new APN successfully added, it will be shown on the list of APN profile. You can now choose the new APN to be used by the Acer Connect M3.

Edit and Delete APN Profile
You can edit the APN profile by clicking the pen on the right side of each profile. Once you have finished editing, click Save.

You can edit the APN profile by clicking the pen on the right side of each profile. Once you have finished editing, click Save.
To delete an APN profile, click the delete button and confirm with "OK".
5.5 VPN (OpenVPN)
■ Only supports IPv4
■ Using Web Portal to set up OpenVPN Client connections. The Acer Connect M3 Web User Interface Admin is compatible with the following browsers: - Google Chrome - Mozilla Firefox - Internet Explorer - Safari
- Microsoft Edge
■ Only supports OpenVPN files (*.ovpn file). ■ Username and password are mandatory.
1. Web Portal VPN page (OpenVPN)

Press the ADD button to add an *.ovpn profile.
2. Select an available *.ovpn profile.

- Enter the correct username and password for the *.ovpn profile, then press the SAVE button to save the *.ovpn profile. (Example is from vpnbook)


- Press the on/off button to enable the OpenVPN connection.


- Check My IP Address (What is My IP address from the connected device)
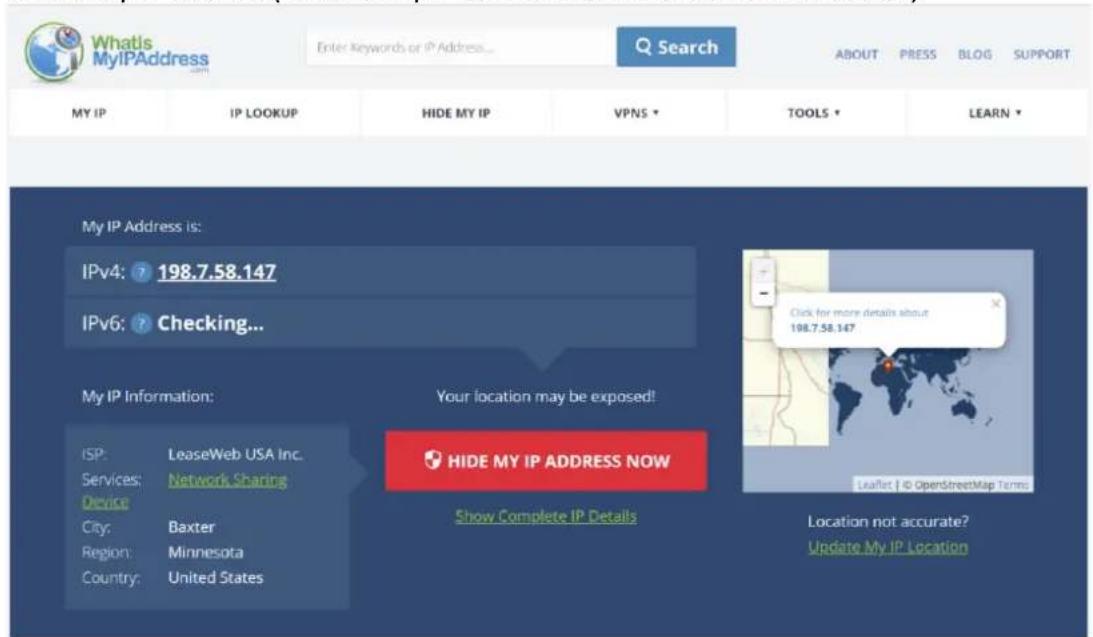
- Press the on/off button to disable the OpenVPN connection.

- Press the Edit button to edit the profile (to modify the profile name, username, and password).

- Press the delete button to delete the *.ovpn profile.


5.6 SIMO Service
With Acer Connect M3 you can enjoy data connectivity service around the world without using a physical SIM card. Select SIMO from the web menu and click the “Visit SIMO” button to continue for registration.

It will redirect you to the SIMO registration homepage. You can purchase and select a data plan from the website. You will be offered several commercial data plan options as in the example below.
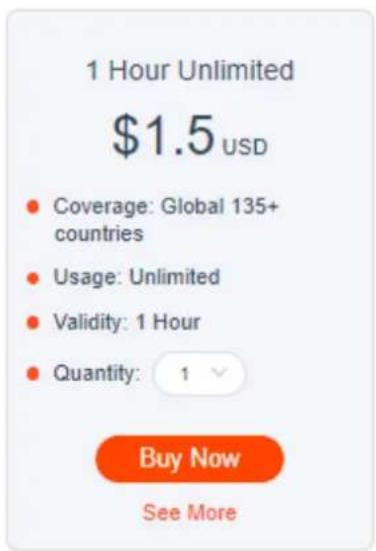


5.7 Languages
You can select your language preference for the Web UI from the Language menu. Languages supported by Acer Connect M3 are English, Traditional Chinese, German, French, Italian, Spanish, Polish, Czech, Portuguese, Brazilian Portuguese, Latino Spanish, Swedish, Norwegian, Danish, Finnish, Netherlands, Hungarian, Thai, and Hebrew. Once you have selected it, click Apply.

5.8 User Manual
You can access the M3 User Manual from the admin website. Click User Manual and you will be redirected to the Acer drivers and manuals home page.

To get the user manual from the support page, enter the device Serial Number, SNID, or model number.
5.9 Log Out
To log out from the Web Admin UI, click the dots located on the top right of the page and click "Log Out". You will be logged out and will be redirected to the Admin Login page again.

6. Regulatory Information
6.1 Important Safety Precaution
Safety instructions
Do not attempt to service this product yourself, as opening or removing covers may expose you to dangerous voltage points or other risks. Refer all servicing to qualified service personnel.
Unplug this product from the wall outlet and refer servicing to qualified service personnel when:
• The power cord or plug is damaged, cut, or frayed. • Liquid was spilled into the product. • The product was exposed to rain or water.
- The product has been dropped or the case has been damaged.
- The product exhibits a distinct change in performance, indicating a need for service.
- The product does not operate normally after following the operating instructions.
- The product exhibits a distinct change in performance, indicating a need for service.
- The product does not operate normally after following the operating instructions.
- When unplugging the power cord, do not pull on the cord itself but pull on the plug. • This product should be operated from the type of power indicated on the marking label.
Battery information
Batteries may explode if not handled properly. Do not disassemble or dispose of them in the fire. Do not tamper with batteries. Keep them away from children.
Follow local regulations when disposing of used batteries.
This device uses a Lithium battery. Do not use it in a humid, wet, or corrosive environment.
Do not put, store, or leave your product in or near a heat source, in a high-temperature location, in strong direct sunlight, in a microwave oven, or a pressurized container, and do not expose it to temperatures over 60°C (140°F).
Failure to follow these guidelines may cause the battery to leak acid, become hot, explode or ignite and cause injury and/or damage. Do not pierce, open or disassemble the battery.
If the battery leaks and you come into contact with the leaked fluids, rinse thoroughly with water and seek medical attention immediately. For safety reasons, and to prolong the lifetime of the battery, charging will not occur at temperatures below 0°C (32°F) or above 45°C (113°F).
The full performance of a new battery is achieved only after two or three complete charge and discharge cycles. The battery can be charged and discharged hundreds of times, but it will eventually wear out. When the operation time becomes noticeably shorter than normal, buy a new battery. Use only the approved batteries and recharge your battery only with the approved chargers designated for this device.
Never use any charger or battery that is damaged. Do not short-circuit the battery. Accidental short-circuiting can occur when a metallic object such as a coin, clip, or pen causes a direct connection between the positive (+) and negative (-) terminals of the battery. (These look like metal strips on the battery.)
Replacing the battery
Improper replacement or mishandling could damage the battery, cause overheating, result in injury, or cause a risk of fire or explosion. Please check the user manual for the product information.
The device with built-in battery
The built-in battery must be replaced by an authorized service center. Do not attempt to replace or remove the battery by yourself.
Note: Please refer to www.acer.com for battery shipping documents.
Disposal instructions
Do not throw this electronic device into the trash when discarding. To minimize pollution and ensure the utmost protection of the global environment, please recycle. For more information on the Waste from Electrical and Electronics Equipment (WEEE) regulations, visit www.acer-group.com/public/Sustainability.
FCC statements:
This device complies with part 15 of the FCC rules. Operation is subject to the following two conditions: (1) this device may not cause harmful interference, and (2) this device must accept any interference received, including interference that may cause undesired operation.
NOTE: The manufacturer is not responsible for any radio or TV interference caused by unauthorized modifications or changes to this equipment. Such modifications or changes could void the user's authority to operate the equipment.
NOTE: This equipment has been tested and found to comply with the limits for a Class B digital device, pursuant to part 15 of the FCC Rules. These limits are designed to provide reasonable protection against harmful interference in a residential installation. This equipment generates, uses, and can radiate radio frequency energy and, if not installed and used in accordance with the instructions, may cause harmful interference to radio communications. However, there is no guarantee that interference will not occur in a particular installation. If this equipment does cause harmful interference to radio or television reception, which can be determined by turning the equipment off and on, the user is encouraged to try to correct the interference by one or more of the following measures:
- Reorient or relocate the receiving antenna.
- Increase the separation between the equipment and receiver. Connect the equipment into an outlet on a circuit different from that to which the receiver is connected. Consult the dealer or an experienced radio/TV technician for help.
The SAR limit of USA (FCC) is 1.6 W/kg averaged over one gram of tissue. Device types M3 (FCC ID: HLZM3) has also been tested against this SAR limit.
For body worn operation, this product has been tested and meets the FCC RF exposure guidelines for use with an accessory that contains no metal and positions the
product a minimum of 10 mm from the body. Use of other enhancements may not ensure compliance with FCC RF exposure guidelines.
The device for operation in the band 5150-5250MHz is only for indoor use to reduce the potential for harmful interference to co-channel mobile satellite systems.
IC statements:
This device complies with Industry Canada license-exempt RSS standard(s).
Operation is subject to the following two conditions:
(1) this device may not cause interference, and (2) this device must accept any interference, including interference that may cause undesired operation of the device.
• To reduce the risk of accidents, do not use your device while driving. - RF signals may affect the electronic systems of motor vehicles. For more information, consult the vehicle manufacturer.
7.3 Cleaning and Maintenance
- Do not attempt to dry your device with an external heat source, such as a microwave oven or hair dryer. • Use a clean, soft, and dry cloth to clean the device and accessories.
7.4 Disposal Instructions
Do not throw this electronic device into the trash when discarding. To minimize pollution and ensure the utmost protection of the global environment, please recycle. For more information on the Waste from Electrical and Electronics Equipment (WEEE) regulations, visit www.acer-group.com/public/Sustainability

7.5 Ethernet Cable Line Safety
- Disconnect all Ethernet cable lines from the equipment when not in use and/or before servicing.
- To avoid the remote risk of electric shock from lightning, do not connect the Ethernet cable line to this equipment during lightning or thunderstorms.
7.6 Medical Devices
The operation of any radio transmitting equipment, including wireless phones, may interfere with the functionality of inadequately protected medical devices. Consult a physician or the manufacturer of the medical device to determine if they are adequately shielded from external RF energy or if you have any questions. Switch off your device in health care facilities when any regulations posted in these areas instruct you to do so. Hospitals or health care facilities may be using equipment that could be sensitive to external RF transmissions.
Pacemakers. Pacemaker manufacturers recommend that a minimum separation of 15.3 centimeters (6 inches) be maintained between wireless devices and a pacemaker to avoid potential interference with the pacemaker. These recommendations are consistent with the independent research and recommendations of Wireless Technology Research. Persons with pacemakers should do the following:
• Always keep the device more than 15.3 centimeters (6 inches) from the pacemaker
- Do not carry the device near your pacemaker when the device is switched on. If you suspect interference, switch off your device, and move it.
Hearing aids. Some digital wireless devices may interfere with some hearing aids. If interference occurs, consult your service provider.
7.7 Vehicles
RF signals may affect improperly installed or inadequately shielded electronic systems in motor vehicles such as electronic fuel injection systems, electronic antiskid (anti-lock) braking systems, electronic speed control systems, and airbag systems. For more information, check with the manufacturer, or its representative, of your vehicle or any equipment that has been added. Only qualified personnel should service the device, or install the device in a vehicle. Faulty installation or service may be dangerous and may invalidate any warranty that may apply to the device. Check regularly that all wireless equipment in your vehicle is mounted and operating properly. Do not store or carry flammable liquids, gases, or explosive materials in the same compartment as the device, its parts, or enhancements. For vehicles equipped with an airbag, remember that airbags inflate with great force. Do not place objects, including installed or portable wireless equipment in the area over the airbag or in the airbag deployment area. If in-vehicle wireless equipment is improperly installed, and the airbag inflates, serious injury could result. Using your device while flying in aircraft is prohibited. Switch off your device before boarding an aircraft. The use of wireless devices in an aircraft may be dangerous to the operation of the aircraft, disrupt the wireless telephone network, and may be illegal.
7.8 Warning
- Do not attempt to open the device by yourself. Disassembling may result in damage to the device. Small parts may also present a choking hazard.
- When this device is switched on, it should be kept at least 15 cm from any medical device such as a pacemaker, a hearing aid or insulin pump, etc.
- Switch this device off when you are near gas or flammable liquids. Strictly obey all signs and instructions posted in any potentially explosive atmosphere.
7.9 Explosive Device Proximity Warning
Switch off your device when in any area with a potentially explosive atmosphere and obey all signs and instructions. Potentially explosive atmospheres include areas where you would normally be advised to turn off your vehicle's engine. Sparks in such areas could cause an explosion or fire resulting in bodily injury or even death. Switch off the device at refueling points such as near gas pumps at service stations. Observe restrictions on the use of radio equipment in fuel depots, storage, and distribution areas; chemical plants; or where blasting operations are in progress. Areas with a potentially explosive atmosphere are often, but not always, clearly marked. They include below deck on boats, chemical transfer or storage facilities, vehicles using liquefied petroleum gas (such as propane or butane), and areas where the air contains chemicals or particles such as grain, dust, or metal powders. Do not switch the notebook on when wireless phone use is prohibited or when it may cause interference or danger.
- Warning: Do not operate a portable transmitter (including this wireless adapter device) near unshielded blasting caps or in an explosive environment unless the transmitter has been modified to qualify for such use.
- Warning: The wireless adapter is not designed for use with high-gain directional antennas
7.10 Wireless adapter regulatory information
- Warning: For safety reasons, turn off all wireless or radio transmitting devices when using your device under the following conditions.
Remember to follow any special regulations in force in any area, and always switch off your device when its use is prohibited or when it may cause interference or danger. Use the device only in its normal operating positions. This device meets RF exposure guidelines when used normally. To successfully transmit data files or messages, this device requires a good quality connection to the network. In some cases, the transmission of data files or messages may be delayed until such a connection is available. Parts of the device are magnetic. Metallic materials may be attracted to the device, and persons with hearing aids should not hold the device to their ears with the hearing aid. Do not place credit cards or other magnetic storage media near the device, because information stored on them may be erased.
Aircraft
Warning FCC and FAA regulations may prohibit airborne operation of radio-frequency wireless devices (wireless adapters) because their signals could interfere with critical aircraft instruments. Ask the airport staff and cabin crew before turning on your device's wireless adapter whilst board.
The wireless adapter and your health
The wireless adapter, like other radio devices, emits radio frequency electromagnetic energy. The level of energy emitted by the wireless adapter, however, is less than the electromagnetic energy emitted by other wireless devices such as mobile phones. The wireless adapter operates within the guidelines found in radio frequency safety standards and recommendations. These standards and recommendations reflect the consensus of the scientific community and result from deliberations of panels and committees of scientists who continually review and interpret the extensive research literature. In some situations or environments, the use of the wireless adapter may be restricted by the proprietor of the building or responsible representatives of the applicable organization. Examples of such situations may include:
- Using the wireless adapter on board airplanes, or - Using the wireless adapter in any other environment where the risk of interference with other devices or services is perceived or identified as being harmful.
If you are uncertain of the policy that applies to the use of wireless adapters in a specific organization or environment (an airport, for example), you are encouraged to ask for authorization to use the adapter before you turn it on.
7.11 EU/UK Regulatory Conformance
List of applicable countries
This product must be used in strict accordance with the regulations and constraints in the country of use. For further information, contact the local office in the country of use. Please see https://europa.eu/european-union/about-eu/countries_en for the latest country list.
Specific absorption rate information
This device meets the EU/UK requirements on the limitation of exposure of the general public to electromagnetic fields by way of health protection. The limits are part of extensive recommendations for the protection of the general public. These recommendations have been developed and checked by independent scientific organizations through regular and thorough evaluations of scientific studies. The unit of measurement for the European Council's /UK recommended limit for mobile devices is the "Specific Absorption Rate" (SAR), the device complies with RF specifications when the device used at a distance of 5 mm from your body. The SAR limit for mobile devices is 2.0 W/Kg (Body-worn), 4.0 W/Kg (Limbs) and the highest SAR value for this device when tested for use at the body-worn was 1.458W/kg and when tested for use at the limbs was 3.663W/kg. This device was tested for typical body-worn operations with the back of the device kept 0.5cm from the body. It meets the requirements of the International Commission on Non-Ionizing Radiation Protection (ICNIRP). For body-worn operation, this device has been tested and meets the ICNIRP exposure guidelines and the European/UK Standard, for use with dedicated accessories. The use of other accessories which contain metals may not ensure compliance with ICNIRP exposure guidelines.
Hereby, Acer Incorporated declares that the radio equipment type M3 complies with Directive 2014/53/EU and RER 2017 (SI 2017/1206). The full text of the EU and UK declaration of conformity is available: Please search for Acer Connect at www.acer.com
7.12 Duty Cycle Attestation
5G MiFi UE (User Equipment) will operate on its 5G network with a configuration of 1:1 DL: UL ratio, i.e. The highest uplink duty cycle is 50% for the NR n78 band for the lifetime of this device.
7.13 Restrictions
Operations in the 5.15–5.25GHz band is restricted to indoor usage only.
 | AT | BE | BG | CH | CY | CZ | DE |
| DK | EE | EL | ES | FI | FR | HR | |
| HU | IE | IS | IT | LI | LT | LU | |
| LV | MT | NL | PL | PT | RO | SE | |
| SI | SK | TR | NO | UK(NI) |
5150~5250MHz for indoor use only.
| UK |
7.14 EU/UK Regulatory Compliance – Radio
| 4G | Operation Frequency (MHz) | conductive power (dBm) | |
| Up link | Downlink | ||
| B1 | 1920 – 1980 | 2110 – 2170 | 23.5 |
| B3 | 1710 – 1785 | 1805 – 1880 | 23.5 |
| B7 | 2500 – 2570 | 2620 – 2690 | 23.5 |
| B8 | 880 – 915 | 925 – 960 | 24 |
| B20 | 832 – 862 | 791 – 821 | 23.5 |
| B28 | 703 – 748 | 758 – 803 | 23.5 |
| B38 | 2570 – 2620 | 23 | |
| B40 | 2300 – 2400 | 23 | |
| B42 | 3400 – 3600 | 23 | |
| 5G | Operation Frequency (MHz) | conductive power (dBm) | |
| Up link | Downlink | ||
| n1 | 1920 – 1980 | 2110 – 2170 | 24 |
| n3 | 1710 – 1785 | 1805 – 1880 | 25 |
| n7 | 2500 – 2570 | 2620 – 2690 | 25 |
| n8 | 880 – 915 | 925 – 960 | 24.5 |
| n20 | 832 – 862 | 791 – 821 | 24 |
| n28 | 703 – 748 | 758 – 803 | 24.5 |
| n38 | 2570 – 2620 | 24 |
| n40 | 2300 – 2400 | 24 |
| n41 | 2496 – 2690 | 24 |
| n77 | 3300 – 4200 | 24 |
| n78 | 3300 – 3800 | 24 |
| Bands | Operation Frequency | Max. Power | |
| Wi-Fi | 2.4GHz | 2412-2472MHz | EIRP 19.07 dBm |
| 5GHz | 5180-5240MHz | EIRP 21.53 dBm | |
| 5745-5825MHz | EIRP 13.88 dBm |
8. Limited Warranty
The product is covered by a limited warranty. Please check the warranty booklet inside the product package for details.
9. Factory Default Settings
| Web Portal admin | |
| URL | http://acerconnect.com or http://acer-connect.com or http://192.168.76.1 |
| Login Password (case-sensitive) | XXXXXXXXX |
| (XXXXXXXX is randomized variables. Please check the device label) | |
| Gateway | |
| Gateway address | 192.168.76.1 |
| CM App | |
| Auto Turn off hotspot when no device connected | OFF |
| Roaming | OFF |
| SIM PIN Lock | OFF |
| Language | English |
| Network mode | Auto (5G NR/4G LTE) |
| Screen PIN Lock | OFF |
| Screen Time Out | 30 seconds |
| Time zone | Auto |
| Firmware Update Auto Check | ON |
| USB tethering | Support Mac/Windows/Linux/Chrome OS |
| Wireless LAN (WLAN) | |
| Wi-Fi Band | Dual Bands |
| WiFi SSID (case-sensitive) | 2.4GHz: M3-YYYY-2.4GHz |
| 5GHz: M3-YYYY-5GHz | |
| (YYYY is randomized variables. Please check the device label) | |
| Security | 2.4GHz: WPA2/WPA3 |
| 5GHz: WPA2/WPA3 | |
| SSID Broadcast | Enabled. |
| RF channel | 2.4GHz : Auto |
| 5GHz : Auto | |
10. Basic Specification
| Processor | System | MTK D900 |
| CPU | Octa Core Cortex A78/A55 up to 2.4GHz | |
| Memory | LPDDR4X | 3GB |
| Flash | 8GB | |
| Display | with Touch Screen | 2.4” 240x 320 |
| 5G NR Band | Global | n1/3/5/7/8/20/28/38/40/41/66/71/77/78/79 |
| US | n1/2/3/5/7/8/38/41/66/71/77/78 | |
| 4G LTE Band | Global | B1/2/3/4/5/7/8/12/17/18/19/20/26/28/38/40/41/42/66 |
| US | B1/2/3/4/5/7/8/12/13/14/17/25/26/29/30/38/41/42/48/66/71 | |
| Wireless LAN | IEEE standardBand | 802.11 a/b/g/n/ac/axDual-band, 2.4GHz + 5GHz simultaneously |
| Max Connected Devices | 16 | |
| USB | Port | USB 3.0 Type-C |
| USB tethering | Support Mac/Windows/Linux/Chrome OS | |
| Power bank | DC 5V1A (TWN SKU isn't including) | |
| Button | Power | Power-ON/OFF or Suspend/Resume system |
| Rest | Restart or factory reset | |
| Form factor | Dimension | 138x83x17.1mm (with internal antenna x8) |
| MIL-810H Certificated | Yes | |
| Weight | <=250g | |
| Temperature | Operating | 0 °C to 45 °C (32 °F to 115 °F) |
| Storage | -10 °C to 60 °C (14 °F to 140 °F) | |
| Humidity (Non-condensing) | Operating | 20% to 80 % |
| Storage | 20% to 60 % | |
| Battery | Capacity | 6500mAh |
| Battery Life | 4G/5G Standby(Hot spot Always on) | Up to 30hrs |
| Play video 1080P with one connected devices | Up to 20hrs | |
| Video con-call with one connected devices | Up to 20hrs | |
| DoU (Daily of Usage) | Up to 28hrs | |
| Power | Input | DC 5V2A or 5V3A |
| Output | DC 5V1A (TWN SKU isn't including) |



- ACER CONNECT M
- USER MANUAL
- TABLE OF CONTENTS
- OVERVIEW
- INSTALLATION
- GETTING ONLINE
- CONNECTION MANAGER APP
- WEB USER INTERFACE (UI)
- REGULATORY INFORMATION
- SAFETY INFORMATION
- LIMITED WARRANTY
- FACTORY DEFAULT SETTINGS
- BASIC SPECIFICATION
- PACKAGE CONTENTS
- SYSTEM REQUIREMENTS
- DEVICE DESCRIPTION
- ENVIRONMENTAL
- TEMPERATURE
- POWER MANAGEMENT
- FIRST-TIME SETUP FOR SIM, VSIM, AND CHARGING
- PHYSICAL SIM CARD
- VIRTUAL SIM (SIMO SERVICE)
- CHARGING YOUR DEVICE
- QUICK START
- HOME SCREEN
- SIM CARD
- SIMO SERVICE (VIRTUAL SIM)
- STATUS BAR (TOP OF THE SCREEN)
- INFORMATION PANEL
- BASIC CONTROL
- POWER ON
- POWER OFF
- AUTO SCREEN-LOCK TIMEOUT
- UNLOCKING SCREEN
- CRITICAL LOW BATTERY
- ENABLE USB TETHERING (CONNECT TO PC/LAPTOP AS A DONGLE)
- MENU NAVIGATION
- SCREEN BRIGHTNESS
- INITIAL SETTING
- VALID SIM CARD
- SIM CARD PROBLEM
- SIM PIN LOCK
- ENABLE DATA ROAMING (PHYSICAL SIM CARD ONLY)
- CHANGE SIM TYPE (SIM CARD TO VSIM)
- RESET DATA USAGE (PHYSICAL SIM CARD ONLY)
- SIMO CONNECTION ERROR
- SIMO DATA PLAN
- SIMO ERROR MESSAGES
- VSIM OR RSIM FAILED TO CONNECT
- NOT ENOUGH VSIM CARDS
- SIMO DOES NOT HAVE COVERAGE IN THE CURRENT COUNTRY
- THE DEVICE IS NOT CONFIGURED PROPERLY. E.G. MISSING SKYROAMID, SIMO SN. ETC
- FAILED TO UPDATE SIMO FLOW
- SIGNALSCAN™ FEATURE
- CHANGE SIM TYPE (VSIM TO SIM CARD)
- WI-FI SETTING
- TURN ON WI-FI HOTSPOT FROM HOME SCREEN
- TURN ON AND OFF WI-FI HOTSPOT FROM MENU
- ENABLE AUTOMATIC WI-FI HOTSPOT TURN OFF
- CHANGE WI-FI NAME AND PASSWORD
- CHANGE WI-FI BAND
- MANAGE CONNECTED DEVICES
- VIEW CONNECTED DEVICE(S)
- BLOCK A DEVICE
- UNBLOCK A DEVICE
- SETTINGS
- CHANGE LANGUAGE
- CHECK DEVICE INFORMATION
- FIRMWARE UPDATE
- CHANGE FIRMWARE UPDATE SETTINGS (MANUAL/AUTOMATIC)
- AUTO FIRMWARE UPDATE
- NOTE
- MANUAL FIRMWARE UPDATE
- WEB BROWSER COMPATIBILITY
- ADMIN LOGIN
- CHANGE ADMIN PASSWORD
- CHANGE WI-FI NAME AND WI-FI PASSWORD
- WI-FI NAME
- WI-FI PASSWORD
- CONFIGURING PROCEDURE
- CLICK APPLY
- APN PROFILE
- APN SETTING
- ADD NEW APN PROFILE
- EDIT AND DELETE APN PROFILE
- VPN (OPENVPN)
- WEB PORTAL VPN PAGE (OPENVPN)
- SELECT AN AVAILABLE *.OVPN PROFILE
- SIMO SERVICE
- LANGUAGES
- LOG OUT
- IMPORTANT SAFETY PRECAUTION
- SAFETY INSTRUCTIONS
- BATTERY INFORMATION
- REPLACING THE BATTERY
- THE DEVICE WITH BUILT-IN BATTERY
- DISPOSAL INSTRUCTIONS
- FCC STATEMENTS
- IC STATEMENTS
- CLEANING AND MAINTENANCE
- ETHERNET CABLE LINE SAFETY
- MEDICAL DEVICES
- VEHICLES
- WARNING
- EXPLOSIVE DEVICE PROXIMITY WARNING
- WIRELESS ADAPTER REGULATORY INFORMATION
- AIRCRAFT
- THE WIRELESS ADAPTER AND YOUR HEALTH
- EU/UK REGULATORY CONFORMANCE
- LIST OF APPLICABLE COUNTRIES
- SPECIFIC ABSORPTION RATE INFORMATION
- DUTY CYCLE ATTESTATION
- RESTRICTIONS
Brand : ACER
Model : Connect M3
Category : Smart Home