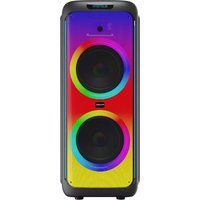
XXL1 - Docking Station SALORA - Free user manual and instructions
Find the device manual for free XXL1 SALORA in PDF.


| Product Type | Docking Station |
| Brand | Salora |
| Model | XXL1 |
| Dimensions (approx.) | 25 x 15 x 5 cm |
| Weight | 0.5 kg |
| Power Supply | DC 12V, 2A |
| Input Connector | USB-C |
| Output Ports | HDMI, USB-A x2, USB-C, 3.5mm audio |
| Max Resolution | 4K@30Hz |
| Charging Capability | Pass-through charging up to 60W |
| Compatibility | Laptops, tablets, smartphones with USB-C Alt Mode |
| Operating Systems | Windows, macOS, Android, Chrome OS |
| LED Indicator | Power status LED |
| Material | Aluminum alloy |
| Color | Space Gray |
| Package Contents | Docking station, power adapter, user manual |
| Warranty | 2 years |
| Repairability | Screwless assembly, replaceable USB-C port |
Frequently Asked Questions - XXL1 SALORA
User questions about XXL1 SALORA
0 question about this device. Answer the ones you know or ask your own.
Ask a new question about this device
Download the instructions for your Docking Station in PDF format for free! Find your manual XXL1 - SALORA and take your electronic device back in hand. On this page are published all the documents necessary for the use of your device. XXL1 by SALORA.
USER MANUAL XXL1 SALORA
- Ultra-large magnetic circuit high-sensitivity speaker with high penetrating power, low-frequency vibration and perfect medium/high frequency representation.
- The latest decoding chips supporting stable playback of MP3 from USB/TF card of up to 32GB.
- 3.5mm audio input for connection to a wide range of sound sources.
- Built-in high capacity battery for up to 2 hours of consecutive playback.
- Connect the microphone and use adjustable reverberation, voice and Karaoke function for outstanding performances.
- Battery with built-in recharging protection to ensure a long and stable service life.
- Built-in low battery and full recharging indication. Human-oriented use.
- With belt/handle design for best choice of mobile speaker.
- Microphone recording input can be used as your personal business assistant.
- Supports Bluetooth and TWS function.
II. Recording
Recording via External Microphone:
Connect a storage device (USB/TF card) and briefly press RECORD to start recording for a duration that depends on the storage capacity. During recording, tune the “-ECHO+” button to minimum. Note that the microphone should be located a proper distance away from the speaker to prevent any feedback or noise.
Note: This product starts recording from the time as displayed on the LED screen.
III. Bluetooth pairing operation and related parameters:
- Power: switch ON the power, press "MODE" to enter Bluetooth mode. The display screen will show "BLUE".
- Switch on the Bluetooth function of your mobile phone and start searching. When the mobile phone shows "PartySpeaker XXL1", immediately click on connect. The mobile phone connection does not require a password. If a password is asked, please enter "0000" to continue pairing. After successful pairing, the speaker sends out a prompt message. This means that the pairing between mobile phone and Bluetooth speaker has been successful.
- Play the music on your mobile phone and you will hear a good sound from the speaker.
IV. Functional Operations and Features

- LED screen.
- VOLUME PRESS BASS/TREBLE/MIC VOL/ECHO/GT.VOL: By default, this button regulates the master volume. Press once briefly for bass adjustment. Press twice briefly for high pitch adjustment. Press three times briefly for microphone volume adjustment. Press four times briefly for microphone reverb adjustment. Press five times briefly for guitar volume adjustment. Adjust each time within four seconds, without operation the function of the button automatically jumps back to the master volume mode after four seconds. In each mode, adjust the button to control the volume.
- TF Port: Read audio files in MP3 format from TF card with a capacity of up to 32GB (FAT32).
- USB Port: Read audio files in MP3 format from USB storage device with a capacity of up to 32GB (FAT32).
-
: In the play mode of USB/TF Card/Bluetooth, briefly press this key to select the previous channel.
-
▶II: In USB/TF card/Bluetooth reading mode, briefly press this key to play/pause. In USB/TF card reading mode, hold down this key to select one of four playback sequencing modes (All - play all tracks in sequence; RAND - play at random; ONE - repeat one track; FOD - repeat all tracks in a folder). In AUX input mode, briefly press this key to toggle between mute and normal volume.
-
USB/TF card/Bluetooth reading mode, briefly press this key to go to the next song.
-
MODE/SHIFT: Briefly press this key to toggle between USB/TF/AUX/Bluetooth modes. Hold down this key to toggle between recording folder and MP3 folder.
-
EQ: In USB/TF/AUX/Bluetooth reading mode briefly press this key to select an environment mode (from NOR, POP, ROC, JAZ, CLA, CUT).
-
Power: Power switch.
-
Recording/DEL: Briefly press this key to enable recording. During recording, reverb should be tuned to the minimum. Hold down to delete a recording file. Recording in Microphone mode is available.
-
TWS MODE:
1) Open the 2 speakers and change them to Bluetooth mode.
2) Briefly press one TWS button to pair the other speaker.
3) After successful pairing, open the mobile phone's Bluetooth mode to pair one of them to play synchronously.
4) If the TWS key is pressed briefly once more, the TWS mode will be disconnected.
Note: Cannot pair the mobile phone with speakers through Bluetooth first, as it cannot connect the TWS and must disconnect the pairing between the mobile and speaker.
-
🙏 : Briefly press this key to select light mode.
-
VARIABLE SOUND: Control Mic sound (normal sound, man sound, girl sound, kid sound, old man sound).
- VOCAL CUT: Cancel the original sound of music.
- MIC PRIORITY: Connect the microphone, briefly press the key to enter the microphone priority mode.
- AUX IN: External sound source input port (plug-and-play).
- GUITAR IN: Electric guitar input port (plug-and-play).
- Microphone input: Microphone input jack.
- Microphone input: Microphone input jack.
- Recharging indicator light: When recharger is connected, the red light turns on. When the device is fully recharged, the light turns off.
- DC 13.5V INPUT: DC 13.5V recharging port.
- Remote Control Receiver.
V. Operating Instructions on Remote Control

- Power Button: Briefly press this button to enter standby mode; briefly press it again to resume. If no device is connected, the system goes to "BT".
- ☒: In USB/TF/AUX/Bluetooth mode, briefly press this key to mute the device.
- EQ: Same functions as "EQ" on the master device.
- MODE: Same functions as "Mode" on the master device.
- BASS-: Bass volume down control key.
- BASS+: Bass volume up control key.
- TWS: Same function as the TWS key on the master device.
- :Briefly press this key for light mode.
-
VOL+: Master volume up control key.
-
VOL-: Master volume down control button.
-
: Functions as “ ◀◀ ” on the master device.
-
▶|| : Functions as “ ▶|| ” on the master device.
-
▶: Functions as “ ▶” on the master device.
-
Numeric Keys 0\~9: In USB/TF card reading mode, to play Track 12 simply enter numbers "1" and "2" and in 2 seconds the system will go to Track 12 and start playback. If a number is entered that is larger than the total number of available tracks, this entry will be invalid.
CAUTION:
Please recharge when the music sounds distorted.
Brand : SALORA
Model : XXL1
Category : Docking Station