
DMX Interface - DMX Interface MARTIN - Free user manual and instructions
Find the device manual for free DMX Interface MARTIN in PDF.


| Product Type | DMX Interface |
| Brand | Martin |
| Model | DMX Interface |
| Category | Lighting Control Interface |
| Communication Protocol | DMX512-A |
| Number of DMX Channels | 512 (universe) |
| Connectors | 5-pin XLR input and output |
| Power Supply | USB powered (5V, 500mA) or external 12V DC |
| Dimensions (W x D x H) | 120 x 70 x 40 mm |
| Weight | 0.2 kg |
| Housing Material | Aluminum |
| Operating Temperature | 0°C to 40°C |
| Compatibility | Windows, macOS, Linux |
| Control Software | Compatible with most DMX software (e.g., Martin M-Touch, Freestyler, Daslight) |
| Functions | Standalone mode, master/slave, universe merge |
| LED Indicators | Power, Data activity |
| DMX Termination | Built-in termination switch |
| Mounting | Desktop or rackmount (optional bracket) |
| Included Accessories | USB cable, quick start guide |
| Maintenance | Keep dry; clean with a soft cloth; avoid moisture |
| Safety | Complies with CE, RoHS; use only supplied power source |
| Spare Parts | Power supply, XLR connectors available from Martin |
Frequently Asked Questions - DMX Interface MARTIN
User questions about DMX Interface MARTIN
0 question about this device. Answer the ones you know or ask your own.
Ask a new question about this device
Download the instructions for your DMX Interface in PDF format for free! Find your manual DMX Interface - MARTIN and take your electronic device back in hand. On this page are published all the documents necessary for the use of your device. DMX Interface by MARTIN.
USER MANUAL DMX Interface MARTIN
AC Power Connection ....4
To install a plug on the mains lead. 4
Data Connection ....5
Recommended cable 5
Connections 5
To connect the DMX Interface to the DMX link 6
To connect Martin fixtures to the DMX Interface 6
DIP-switch Settings 7
DMX Interface settings 7
To set the 10-position DIP-switch ....7
To set the 6-position DIP-switch ....9
Fixture settings....10
To set the fixture address....10
Operation....11
Status LEDs 11
DMX Protocols ......12
INTRODUCTION
1
The Martin DMX Interface converts DMX data into Martin data to allow you to control an older, Martin-protocol-only fixture with a DMX controller. The DMX Interface supports the following Martin products:
| Fixture Type Fixtures per Interface | |
| RoboColor MSD 8 | |
| RoboColor 8 | |
| RoboColor II 8 | |
| RoboScan 804/805 8 | |
| RoboScan 1004/1005 8 | |
| RoboScan 1016 | 8 |
| RoboScan 1020 | 4 |
| RoboScan Pro 218 | 8 |
| RoboScan Pro 1220 | 4 |
| RoboScan Pro 1220 II | 4 |
| RoboScan Pro 1220 IIR | 4 |
| RoboZap | 8 |
| RoboZap MSR 1200 | 8 |
| Centrepiece | 8 |
Table 1: Supported fixtures
Note! A separate DMX Interface is required for each type of fixture.
The DMX Interface operates only one type of fixture at a time. It can operate multiple fixtures of the same type. The table above shows the maximum number of each fixture type that can be operated with a single DMX Interface.
PACKAGE CONTENTS
Please make sure that you received the following with your DMX Interface:
• 1 X Martin Professional DMX Interface
• 1 X Terminator Plug
AC POWER CONNECTION
Warning! For safe operation, the DMX Interface must be grounded (earthed).
Important! Check voltage setting before applying power.
Before use verify that the fixture's voltage switch is set correctly for the local AC voltage. The switch can be set for 115 or 230V : use the setting that is closest to the local supply voltage.
Do not connect the DMX Interface to an electrical dimmer system: doing so can damage the electronics.
To install a plug on the mains lead
The fixture's mains lead must be fitted with a grounding-type cord cap that fits your power distribution cable or outlet. Consult a qualified electrician if you have any doubts about proper installation.
- Following the cord cap manufacturer's instructions, connect the yellow and green wire to ground (earth), the brown wire to live, and the blue wire to neutral. The table below shows some pin identification schemes.
Wire Pin Marking Screw color
| brown | live | “L” | yellow |
| blue | neutral | “N” | silver |
| yellow/green | ground |  | green |
Table 2: Plug markings
This section describes how to place the DMX Interface in the data link between the DMX controller and the Martin fixtures.
RECOMMENDED CABLE
Reliable data communication begins with the right cable. Standard microphone cable cannot transmit DMX data reliably over long runs. For best results, use cable specifically designed for RS-485 applications. Your Martin dealer can supply high quality cable in various lengths.
CONNECTIONS
The DMX IN and DMX OUT sockets are wired for DMX data with pin 1 to ground, pin 2 to signal - (cold), and pin 3 to signal + (hot). This is the standard pin assignment for DMX devices.
One or more adaptor cables may be required to connect the DMX Interface because many devices have 5-pin connectors and others may have reversed signal polarity, that is, pin 2 hot and pin 3 cold.
| 5-pin to 3-pin Adaptor |
| Male Female1——12——23——345 |
| P/N 11820005 |
| 3-pin to 5-pin Adaptor |
| Male Female1——12——23——345 |
| P/N 11820004 |
| 3-pin to 3-pinPhase-ReversingAdaptor |
| Male Female1——12——23——3 |
| P/N 11820006 |
To connect the DMX Interface to the DMX link
Up to 32 devices may be connected to the DMX link. The DMX Interface and all fixtures connected to the Martin link count as just 1 device.
1 Connect the data cable coming from the controller output to the DMX IN socket on the DMX Interface. If you are using 5-pin XLR connectors, you will need to insert a 5-pin male to 3-pin female adaptor cable such as P/N 11820005.
2 If connecting additional DMX fixtures to the DMX link after the DMX Interface, connect DMX OUT on the DMX Interface to the input of the next device. If the device has a 5-pin XLR input, insert a 3-pin to 5-pin adaptor cable such as P/N 11820004. If the device has reversed polarity (pin-3 cold), use a phase-reversing adaptor such as P/N 11820006.
3 Terminate the DMX link. If the DMX Interface is the last device on the link, simply set pin-9 of the DMX-Link DIP-switch to the ON position (down). Otherwise, insert a male termination plug (P/N 91613017) into the DMX output of the last fixture on the DMX link. A termination plug is simply an XLR connector with a 120 ohm, 0.25 W resistor soldered across pins 2 and 3.
To connect Martin fixtures to the DMX Interface
| Male Termination Plug |
| Male XLR1203 |
| P/N 91613017 |
All fixtures connected to the DMX Interface must be of the same type.
1 Connect a data cable to the Martin Link output socket on the front panel of the DMX Interface and the data input of the first Martin fixture. Use a 3-pin XLR cable wired with pin 1 to pin 1, pin 2 to pin 2, and pin 3 to pin 3.
2 Connect the output of the Martin fixture closest to the DMX Interface to the input of the next Martin fixture. You can connect up to 4 or 8 identical fixtures depending on type. See Table 1 on page 3 for the number that can be connected.
3 Terminate the Martin link by inserting a male termination plug (P/N 91613017) into the data output of the last fixture on the Martin link.
DMX INTERFACE SETTINGS
The DMX Interface has 2 DIP-switches. The 10-pin “DMX-LINK” DIP-switch is for selecting the DMX address (pins 1-8), link termination (pin 9), and DMX mode (pin 10). The 6-pin “PRODUCT SELECT” DIP-switch is for selecting the type of product connected to the interface.
See the fixture DMX protocols, starting on page 12, for specific mode and channel information.
Note: All fixtures may be operated in “reduced DMX” mode, which is selected with pin 10 OFF. RoboColors and RoboScan 1220s also provide a “full DMX” mode that provides speed control and is selected with pin 10 ON.
To set the 10-position DIP-switch
Important! The interface must be set to an odd-numbered DMX channel.
1 The DMX Interface cannot be set to even-numbered DMX addresses. Assign an odd DMX address to the first fixture operated through the interface.
2 Find the DMX address for the first fixture in the Table 3. Read the settings for pins 1 - 4 to the left and read the settings for pins 5 - 8 above the address. "0" means OFF and "1" means ON. Flip pins 1 - 8 ON (down) or OFF (up) to set the address.
3 Pin 9 toggles link termination on / off. Set it to ON only if the DMX Interface is the last device connected to the controller. Set pin 9 to OFF if there are any devices connected to the DMX-OUT socket.
4 Pin 10 sets the DMX mode. To select reduced DMX mode, which works with all products, set pin 10 to OFF. For full DMX mode, which is available with RoboColors and RoboScan 1220s, set it to ON,
| DIP-Switch Setting0 = OFF1 = ON | # | 8 | 0 | 0 | 0 | 0 | 0 | 0 | 0 | 0 | 1 | 1 | 1 | 1 | 1 | 1 | 1 | |||
| # | 7 | 0 | 0 | 0 | 0 | 1 | 1 | 1 | 1 | 0 | 0 | 0 | 0 | 1 | 1 | 1 | ||||
| # | 6 | 0 | 0 | 1 | 1 | 0 | 0 | 1 | 1 | 0 | 0 | 1 | 1 | 0 | 0 | 1 | ||||
| # | 5 | 0 | 1 | 0 | 1 | 0 | 1 | 0 | 1 | 0 | 1 | 0 | 1 | 0 | 1 | 0 | ||||
| #1 | #2 | #3 | #4 | |||||||||||||||||
| 0 | 0 | 0 | 0 | 1 | 3 | 3 | 6 | 5 | 9 | 7 | 1 | 2 | 9 | 1 | 6 | 1 | 1 | 9 | 3 | |
| 1 | 0 | 0 | 0 | 3 | 3 | 5 | 6 | 7 | 9 | 9 | 1 | 3 | 1 | 1 | 6 | 3 | 1 | 9 | 5 | |
| 0 | 1 | 0 | 0 | 5 | 37 | 69 | 101 | 133 | 165 | 197 | 229 | 261 | 293 | 325 | 357 | 389 | 421 | 453 | 485 | |
| 1 | 1 | 0 | 0 | 7 | 3 | 9 | 7 | 1 | 1 | 0 | 3 | 1 | 3 | 5 | 1 | 6 | 7 | 1 | 9 | |
| 0 | 0 | 1 | 0 | 9 | 4 | 1 | 7 | 3 | 1 | 0 | 5 | 1 | 3 | 7 | 1 | 6 | 9 | 2 | 0 | |
| 1 | 0 | 1 | 0 | 11 | 43 | 75 | 107 | 139 | 171 | 203 | 235 | 267 | 299 | 331 | 363 | 395 | 427 | 459 | 491 | |
| 0 | 1 | 1 | 0 | 1 | 3 | 4 | 5 | 7 | 7 | 1 | 0 | 9 | 1 | 4 | 1 | 1 | 7 | 3 | 2 | |
| 1 | 1 | 1 | 0 | 15 | 47 | 79 | 111 | 143 | 175 | 207 | 239 | 271 | 303 | 335 | 367 | 399 | 431 | 463 | 495 | |
| 0 | 0 | 0 | 1 | 17 | 49 | 81 | 113 | 145 | 177 | 209 | 241 | 273 | 305 | 337 | 369 | 401 | 433 | 465 | 497 | |
| 1 | 0 | 0 | 1 | 19 | 51 | 83 | 115 | 147 | 179 | 211 | 243 | 275 | 307 | 339 | 371 | 403 | 435 | 467 | 499 | |
| 0 | 1 | 0 | 1 | 21 | 53 | 85 | 117 | 149 | 181 | 213 | 245 | 277 | 309 | 341 | 373 | 405 | 437 | 469 | 501 | |
| 1 | 1 | 0 | 1 | 23 | 55 | 87 | 119 | 151 | 183 | 215 | 247 | 279 | 311 | 343 | 375 | 407 | 439 | 471 | 503 | |
| 0 | 0 | 1 | 1 | 2 | 5 | 5 | 7 | 8 | 9 | 1 | 2 | 1 | 1 | 5 | 3 | 1 | 8 | 5 | 2 | |
| 1 | 0 | 1 | 1 | 27 | 59 | 91 | 123 | 155 | 187 | 219 | 251 | 283 | 315 | 347 | 379 | 411 | 443 | 475 | 507 | |
| 0 | 1 | 1 | 1 | 29 | 61 | 93 | 125 | 157 | 189 | 221 | 253 | 285 | 317 | 349 | 381 | 413 | 445 | 477 | 509 | |
| 1 | 1 | 1 | 1 | 3 | 1 | 6 | 3 | 9 | 5 | 1 | 2 | 7 | 1 | 5 | 9 | 1 | 9 | 1 | 2 | |
Table 3: DMX address settings
To set the 6-position DIP-switch
The 6-position DIP-switch selects the fixture as shown in Table 4.
Product Product Select DIP-switch setting
| RoboColor MSD 200 1 |  | |
| RoboColor (1st version) 2 |  | |
| RoboColor II 3 |  | |
| RoboScan 804/805 5 |  | |
| RoboScan 1004/1005 6 |  | |
| RoboScan 1016 7 |  | |
| RoboScan 1020 10 |  | |
| RoboScan Pro 218 11 |  | |
| RoboScan Pro 1220 12 | 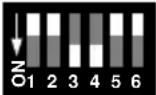 | |
| RoboScan Pro 1220 II 13 | 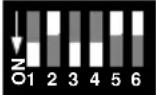 | |
| RoboScan Pro 1220 IIR 14 | 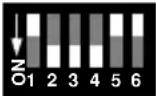 | |
| RoboZap | 15 |  |
| RoboZap MSR 1200 16 |  | |
| Centrepiece | 17 |  |
Table 4: Product select settings
Each fixture operated through the DMX Interface must be set to a Martin address from 1 to 8. RoboScan 1020s and Pro 1220s, which use 2 Martin channels, can be set to Martin address 1, 3, 5, or 7.
Important! The first fixture connected to the DMX Interface is always set to channel 1.
To set the fixture address
1 Set the DIP-switch on the first fixture to channel 1.
The first fixture is controlled starting from the DMX channel set on the interface. For example, if operating a RoboColor II in full mode (6 DMX channels), and the DMX Interface is set to DMX channel 1, then the fixture is controlled by DMX channels 1-6.
2 For independent control, set the DIP-switch on the next fixture to the next channel (ch. 2, ch. 3 if the fixture uses 2 Martin channels).
Additional fixtures are controlled by consecutive DMX channels. Continuing the previous example, a second RoboColor II would use DMX channels 7 - 12.
3 If identical control is desired, set the DIP-switch on additional fixtures to channel 1.
These fixtures are controlled by the same DMX channels as the first fixture.
| Channel 1 | 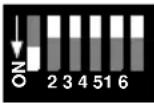 |
| Channel 2 |  |
| Channel 3 |  |
| Channel 4 |  |
| Channel 5 |  |
| Channel 6 |  |
| Channel 7 |  |
| Channel 8 |  |
Once you have connected the devices and set all the DIP-switches you are ready to operate the Martin fixtures with your DMX controller. The protocols at the back of this manual describe how each fixture responds to DMX commands.
STATUS LEDS
The LEDs on the front panel indicate the system's status. When you first apply power to the DMX Interface, the green LED blinks approximately once per second to show that it is sending a default signal and waiting for DMX data from the controller. Both LEDs blink rapidly when data is received.
If the DMX signal fails the red LED lights for approximately two seconds and then goes out. The green LED flashes as on power up, indicating that a default reset signal is being sent to all units.
DMX PROTOCOLS
The following section includes the DMX protocol for every Martin product supported by the DMX Interface. The protocols list the ways the fixtures respond to DMX commands sent from the controller.
RoboColor MSD 200.... p. 13
RoboColor.... p. 14
RoboColor II.... p. 15
RoboScan 804/805.... p. 16
RoboScan 1004/1005.... p. 17
RoboScan 1016.... p. 18
RoboScan 1020.... p. 19
RoboScan Pro 218.... p. 21
RoboScan 1220.... p. 23
RoboScan 1220 II.... p. 23
RoboScan 1220 IIR.... p. 25
RoboZap.... p. 28
RoboZap MSR 1200 p. 29
Centrepiece.... p. 30
ROBOCOLOR MSD 200
| DMX channels, reduced mode | DMX channels, full mode Martin channels Product select | ||
| 4 | 7 | 1 | 1 |
| Channel Value Effect | ||
| 1 | 0 - 56 - 120121 - 252253 - 255 | Shutter / Reset UnitShutter Closed (Light off)Shutter Open (Light on)Strobe on (Fast -> Slow)Reset Unit |
| 2 | 0 - 1011 - 168169 - 255 | DimmerDimmer full ON (no light)Dimmer (ON -> Off)Dimmer full OFF (Light) |
| 3 | 0 - 455 - 59110 - 114165 - 169220 - 255 | Color 1WhiteRedBlueGreenYellow |
| 4 | 0 - 455 - 59110 - 114165 - 169220 - 255 | Color 2WhiteOrangePinkMauveCyan |
| 5 (F) | 0 - 255 | Color 1 SpeedSpeed (fast -> slow) |
| 6 (F) | 0 - 255 | Color 2 SpeedSpeed (fast -> slow) |
| 7 (F) | 0 - 255 | Dimmer SpeedSpeed (fast -> slow) |
(F) Full DMX mode only
ROBOCOLOR
| DMX channels, reduced mode | DMX channels, full mode Martin channels Product select | ||
| 5 | 6 | 1 | 2 |
| Channel Values Effect | ||
| 1 | 0 - 5 | Shutter / Reset Unit |
| 6 - 120 | Shutter Closed (Light off) | |
| 121 - 252 | Shutter Open (Light on) | |
| 253 - 255 | Strobe on (Fast -> Slow)Reset Unit | |
| 2-5 | 0 - 2 | Color (Head 1-4) |
| 45 - 47 | White | |
| 90 - 92 | Red | |
| 135 - 137 | Blue | |
| 180 - 182 | Green | |
| 225 - 255 | YellowBlackout | |
| 6 (F) | 0 - 255 | Color Speed (All heads)(Speed fast -> slow) |
(F) Full DMX mode only
Note: When using the strobe the color function will be suspended. The colors will reappear when strobe is deselected.
ROBOCOLOR II
| DMX channels, reduced mode | DMX channels, full mode Martin channels Product select | ||
| 5 | 6 | 1 | 3 |
| Channel Values Effect | |||
| 1 | 0 - 5 | Shutter / Reset Unit | |
| 6 - 40 | Lamp off | ||
| 41 - 80 | Lamp on | ||
| 81 - 120 | Stand-alone, music trigger | ||
| 121 - 252 | Stand-alone, auto trigger | ||
| 253 - 255 | Strobe on (Fast -> Slow) Reset Unit | ||
| 2-5 | 0 - 9 | Color (Head 1-4) | |
| 10 - 19 | Black | ||
| 20 - 29 | Black / White | ||
| 30 - 39 | White | ||
| 40 - 49 | White / Magenta | ||
| 50 - 59 | Magenta | ||
| 60 - 69 | Magenta / Pink | ||
| 70 - 79 | Pink | ||
| 80 - 89 | Pink / Red | ||
| 90 - 99 | Red | ||
| 100 - 109 | Red / Orange | ||
| 110 - 119 | Orange | ||
| 120 - 129 | Orange / Dark Yellow | ||
| 130 - 139 | Dark Yellow | ||
| 140 - 149 | Dark Yellow / Yellow | ||
| 150 - 159 | Yellow | ||
| 160 - 169 | Yellow / Light Green | ||
| 170 - 179 | Light Green | ||
| 180 - 189 | Light Green / Green | ||
| 190 - 199 | Green | ||
| 200 - 209 | Green / Cyan | ||
| 210 - 219 | Cyan | ||
| 220 - 229 | Cyan / Light Blue | ||
| 230 - 239 | Light Blue | ||
| 240 - 255 | Light Blue / Dark Blue | ||
| Dark Blue | |||
| 6 (F) | 0 - 255 | Color Speed (All heads) (Speed fast -> slow) | |
(F) Full DMX mode only
Note: The fixture strobes between the current color and the one before it. To strobe with white, set all heads to white. Color positioning while strobing is disabled in full DMX mode.
ROBOSCAN 804/805
| DMX channels, reduced mode | DMX channels, full mode Martin channels Product select | ||
| 5 | N | / | A |
| Channel Values Effect | |||
| 1 | 0 - 56 - 252253 - 255 | Power / Reset UnitPower OffPower OnReset Unit | |
| 2 | 0 - 5051 - 100101 - 150151 - 200201 - 255 | ColorWhiteRedBlueGreenYellow | |
| 3 | 0 - 6364 - 127128 - 191192 - 255 | Gobo (805 only)OpenHolesStarCircle | |
| 4 | 0 - 3031 - 223224 - 255 | PanMax LeftLeft --> Right (127 Neutral)Max Right | |
| 5 | 0 - 1213 - 241242 - 255 | TiltMax UpUp --> Down (127 Neutral)Max Down | |
1
ROBOSCAN 1004/1005
| DMX channels, reduced mode | DMX channels, full mode Martin channels Product select | ||
| 5 | N | / | A |
| Channel Values Effect | |||
| 1 | 0 - 56 - 120121 - 252253 - 255 | Shutter / Reset UnitShutter Closed (Light off)Shutter open (Light on)Strobe on (Fast -> Slow)Reset Unit | |
| 2 | 0 - 1819 - 727374 - 127128129 - 182183184 - 237238 - 255 | ColorWhiteWhite --> RedRedRed --> BlueBlueBlue --> GreenGreenGreen --> YellowYellow | |
| 3 | 0 - 1213 - 888990 - 165166167 - 242243 - 255 | GoboOpenOpen --> HolesHolesHoles --> StarStarStar --> ConeCone | |
| 4 | 0 - 3031 - 223224 - 255 | PanMax LeftLeft -> Right (127 = Neutral)Max Right | |
| 5 | 0 - 1213 - 241242 - 255 | TiltMax UpUp--> Down (127 = Neutral)Max Down | |
ROBOSCAN 1016
| DMX channels, reduced mode | DMX channels, full mode Martin channels Product select | ||
| 5 | N | / | A |
| Channel Values Effect | |||
| 1 | 0 - 56 - 120121 - 252253 - 255 | Shutter / Reset UnitShutter closed (Light off)Shutter open (Light on)Strobe on (Fast -> Slow)Reset unit | |
| 2 | 0 - 385062748698110122134146158170182194206218 - 255 | ColorWhiteFlame RedLight BlueFern GreenYellowPrimary GreenMauveMedium BlueCyanPrimary RedOrangeLight GreenAmberPinkDark LavenderDeep Orange | |
| 3 | 0 - 385062748698110122134146158170182194206218 - 255 | GoboGobo 1Gobo 2Gobo 3Gobo 4Gobo 5Gobo 6Gobo 7Gobo 8Gobo 9Gobo 10Gobo 11Gobo 12Gobo 13Gobo 14Gobo 15Gobo 16 | |
| 4 | 0 - 3031- 223224 - 255 | PanMax LeftLeft --> Right (127 = Neutral)Max Right | |
| 5 | 0 - 1213 - 241242- 255 | TiltMax UpUp --> Down (127 = Neutral)Max Down | |
ROBOSCAN 1020
| DMX channels, reduced mode | DMX channels, full mode Martin channels Product select | |
| 12 N/A 2 10 | ||
| Channel Values Effect | ||
| 1 | 0 - 56 - 120121 - 252253 - 255 | Shutter / Reset UnitShutter closed (Light off)Shutter open (Light on)Strobe on (Fast -> Slow)Reset unit |
| 2 | 0 - 1011 - 220221 - 255 | DimmerDimmer full on (No Light)Dimmer (On -> Off)Dimmer full off (Light) |
| 3 | 0 - 37577797117137157177197217 - 255 | Color 1WhiteR61B51G51/56Y52G50/55M47/63B42C54R65 |
| 4 | 0 - 37577797117137157177197217 - 255 | Color 2WhiteO56G49/59Y54Y52P47/58M47/63M49/65C54T48/53 |
| 5 | 0 - 37577797117137157177197217 - 255 | Gobo 1OpenStarsStarDotsConePlingDot-CircleBellsFlowerTurbine |
| 6 | Gobo 2 | |
| 0 - 37 | Open | |
| 57 | Logo | |
| 77 | Triangle | |
| 97 | Sun | |
| 117 | Holes | |
| 137 | Raster | |
| 157 | Bars | |
| 177 | Turbine | |
| 197 | Flash | |
| 217 - 255 | Star | |
| 7 | Focus | |
| 0 -10 | Default | |
| 11 - 239 | Min. --> Max (140 = Default) | |
| 240 - 255 | Default | |
| 8 | Iris | |
| 0 -48 | Default | |
| 49 -205 | Full open -> Full Close | |
| 206 -255 | Full Close | |
| 9 | Prism | |
| 0 - 10 | Open | |
| 43 | 3 Facet | |
| 76 | Open | |
| 109 | 5 Facet | |
| 142 | Open | |
| 175 - 255 | 9 Facet | |
| 10 | Pan | |
| 0 - 255 | Left --> Right (127 = Neutral) | |
| 11 | Tilt | |
| 0 - 255 | Up --> Down (127 = Neutral) | |
| 12 | Movement Speed(Speed fast -> slow) | |
ROBOSCAN PRO 218
| DMX channels, reduced mode | DMX channels, full mode Martin channels Product select | ||
| 7 | N | / | A |
| Channel Values Effect | ||
| 1 | 0 - 5 | Shutter / Reset Unit |
| 6 - 120 | Shutter Closed (Light off) | |
| 121 - 252 | Shutter Open (Light on) | |
| 253 - 255 | Strobe on (Fast -> Slow)Reset Unit | |
| 2 | 0 - 10 | Dimmer |
| 11 - 168 | Dimmer full ON (no light) | |
| 169 - 255 | Dimmer (ON -> Off)Dimmer full OFF (Light) | |
| 3 | 0 - 34 | Color |
| 45 | White | |
| 56 | R61 | |
| 67 | B51 | |
| 78 | G51/56 | |
| 89 | Y52 | |
| 100 | G50/55 | |
| 111 | M47/63 | |
| 122 | B46 | |
| 133 | C54 | |
| 144 | R65 | |
| 155 | O56 | |
| 166 | G49/59 | |
| 177 | Y54 | |
| 188 | P47/58 | |
| 199 | M49/65 | |
| 210 | O59 | |
| 221 - 255 | MultiColor 1MultiColor 2 | |
| 4 | 0 - 34 | Gobo |
| 45 | Open | |
| 56 | Half | |
| 67 | Dot | |
| 78 | Vertical Bar | |
| 89 | Horizontal Bar | |
| 100 | Arrow | |
| 111 | Fat Cone | |
| 122 | Triangle | |
| 133 | Star | |
| 144 | Dots | |
| 155 | Bells | |
| 166 | Cone | |
| 177 | Flash | |
| 188 | Raster | |
| 199 | Dot Circle | |
| 210 | Bars | |
| 221 - 255 | WindowTurbine | |
| 5 | 0 - 255 | PanLeft --> Right (127 = Neutral) |
| 6 | 0 - 255 | TiltUp -- > Down (127 = Neutral) |
| 7 | 0 - 255 | Movement SpeedSpeed (fast -> slow) |
ROBOSCAN 1220
| DMX channels, reduced mode | DMX channels, full mode Martin channels Product select |
| 12 15 2 12 |
Note: The original 1220 has a separate shutter and dimmer. The 1220 II has a combined shutter and dimmer. Neither the 1220 nor the 1220 II has rotating gobos.
ROBOSCAN 1220 II
| DMX channels, reduced mode | DMX channels, full mode Martin channels Product select | ||
| 12 15 2 13 | |||
| Channel Values Effect | ||
| 1 | 0 - 56 - 115116 - 247248 - 251252 - 255 | Shutter / Reset Unit / PowerShutter Closed (Light off)Shutter open (Light on)Strobe on (Fast --> Slow)Reset UnitLamp On (Power on) |
| 2 | 0 - 1011 - 220221 - 255 | DimmerDimmer full on (No Light)Dimmer (On -> Off)Dimmer Full Off (Light) |
| 3 | 0 - 37577797117137157177197217 - 255 | Color 1WhiteR61B51G51/56Y52G50/55M47/63B42C54R65 |
| 4 | 0 - 37577797117137157177197217 - 255 | Color 2WhiteO56G49/59Y54Y52P47/58M47/63M49/65C54T48/53 |
| 5 | Gobo 1 | |
| 0 - 37 | Open | |
| 57 | Stars | |
| 77 | Star | |
| 97 | Dots | |
| 117 | Cone | |
| 137 | Pling | |
| 157 | Dot-Circle | |
| 177 | Bells | |
| 197 | Flower | |
| 217 - 255 | Turbine | |
| 6 | Gobo 2 | |
| 0 - 37 | Open | |
| 57 | Logo | |
| 77 | Triangle | |
| 97 | Sun | |
| 117 | Holes | |
| 137 | Raster | |
| 157 | Bars | |
| 177 | Turbine | |
| 197 | Flash | |
| 217 - 255 | Star | |
| 7 | Focus | |
| 0 -10 | Default | |
| 11 - 239 | Min. --> Max (140 = Default) | |
| 240 - 255 | Default | |
| 8 | Iris | |
| 0 -48 | Default | |
| 49 -205 | Full open --> Full Close | |
| 206 -255 | Full Close | |
| 9 | Prism | |
| 0 - 10 | Open | |
| 43 | 3 Facet | |
| 76 | Open | |
| 109 | 5 Facet | |
| 142 | Open | |
| 175 - 255 | 9 Facet | |
| 10 | Pan | |
| 0 - 255 | Left --> Right (127 = Neutral) | |
| 11 | Tilt | |
| 0 - 255 | Up --> Down (127 = Neutral) | |
| 12 | Pan/Tilt Speed(Speed fast -> slow) | |
| 13 (F) | 0 - 255 | Color Speed(Speed fast -> slow) |
| 14 (F) | 0 - 255 | Gobo Speed(Speed fast -> slow) |
| 15 (F) | 0 - 255 | Focus/Iris/Dimmer Speed(Speed fast -> slow) |
(F) Full DMX mode only
ROBOSCAN 1220 IIR
| DMX channels, reduced mode | DMX channels, full mode Martin channels Product select | |
| 12 16 2 14 | ||
Note: The 1220 IIR has a combined shutter and dimmer and rotating gobos.
| Channel Values Effect | ||
| 1 | 0 - 56 - 115116 - 247248 - 251252 - 255 | Shutter / Reset Unit / PowerShutter Closed (Light off)Shutter open (Light on)Strobe on (Fast --> Slow)Reset UnitLamp On (Power on) |
| 2 | 0 - 1011 - 220221 - 255 | DimmerDimmer full on (No Light)Dimmer (On -> Off)Dimmer Full Off (Light) |
| 3 | 0 - 37577797117137157177197217 - 255 | Color 1WhiteR61B51G51/56Y52G50/55M47/63B42C54R65 |
| 4 | 0 - 37577797117137157177197217 - 255 | Color 2WhiteO56G49/59Y54Y52P47/58M47/63M49/65C54T48/53 |
| 5 | 0 - 37577797117137157177197217 - 255 | Gobo 1OpenStarsStarDotsConePlingDot-CircleBellsFlowerTurbine |
| 6(Reduced mode only) | Rotating Gobo Selection and Rotation: Reduced mode only | |
| 0 - 15 | Open Gobo - No Rotation | |
| 16 - 44 | Gobo 1 - CW Rotation Fast --> Slow | |
| 45 - 46 | Gobo 1 Stop | |
| 47 - 75 | Gobo 1 - CCW Rotation Slow --> Fast | |
| 76 - 104 | Gobo 2 - CW Rotation Fast --> Slow | |
| 105 - 106 | Gobo 2 Stop | |
| 107 - 135 | Gobo 2 - CCW Rotation Slow --> Fast | |
| 136 - 164 | Gobo 3 - CW Rotation Fast --> Slow | |
| 165 - 166 | Gobo 3 Stop | |
| 167 - 195 | Gobo 3 - CCW Rotation Slow --> Fast | |
| 196 - 224 | Gobo 4 - CW Rotation Fast --> Slow | |
| 225 - 226 | Gobo 4 Stop | |
| 227 - 255 | Gobo 4 - CCW Rotation Slow --> Fast | |
| 6 (F) | Rotating Gobo Selection, Index and Rotation: Full mode only | |
| 0 - 3 | Open Gobo - No Rotation | |
| 4 - 7 | Gobo 1 - indexed (set index on ch. 16) | |
| 8 - 11 | Gobo 2 - indexed (set index on ch. 16) | |
| 12 - 15 | Gobo 3 - indexed (set index on ch. 16) | |
| 16 - 19 | Gobo 4 - indexed (set index on ch. 16) | |
| 20 - 48 | Gobo 1 - CW Rotation Fast --> Slow | |
| 49 | Gobo 1 Stop | |
| 50 - 78 | Gobo 1 - CCW Rotation Slow --> Fast | |
| 79 - 107 | Gobo 2 - CW Rotation Fast --> Slow | |
| 108 | Gobo 2 Stop | |
| 109 - 137 | Gobo 2 - CCW Rotation Slow --> Fast | |
| 138 - 166 | Gobo 3 - CW Rotation Fast --> Slow | |
| 167 | Gobo 3 Stop | |
| 168 - 196 | Gobo 3 - CCW Rotation Slow --> Fast | |
| 197 - 225 | Gobo 4 - CW Rotation Fast --> Slow | |
| 226 | Gobo 4 Stop | |
| 227 - 255 | Gobo 4 - CCW Rotation Slow --> Fast | |
| 7 | 0 -10 | Focus |
| 11 - 239 | Default | |
| 240 - 255 | Min. --> Max (140 = Default) | |
| Default | ||
| 8 | 0 -48 | Iris |
| 49 -205 | Default | |
| 206 -255 | Full open --> Full Close | |
| Full Close | ||
| 9 | 0 - 10 | Prism |
| 43 | Open | |
| 76 | 3 Facet | |
| 109 | Open | |
| 142 | 5 Facet | |
| 175 - 255 | Open | |
| 9 Facet | ||
| 10 | 0 - 255 | Pan |
| Left --> Right (127 = Neutral) | ||
| 11 | 0 - 255 | TiltUp --> Down (127 = Neutral) |
| 12 | 0 - 255 | Pan/Tilt Speed(Speed fast -> slow) |
| 13 (F) | 0 - 255 | Color Speed(Speed fast -> slow) |
| 14 (F) | 0 - 255 | Gobo Speed(Speed fast -> slow) |
| 15 (F) | 0 - 255 | Focus/Iris/Dimmer Speed(Speed fast -> slow) |
| 16 (F) | 0 - 119120121 - 239 | Rotating Gobo Orientation- 216° --> Default IndexDefault IndexDefault Index --> 214.2 degreesGobos are reindexed whenever a new gobo is selected or the current gobo has been rotating continuously. |
(F) Full DMX mode only
ROBOZAP
| DMX channels, reduced mode | DMX channels, full mode Martin channels Product select | ||
| 4 | N | / | A |
1
| Channel Values Effect | ||
| 1 | 0 - 56 - 120121 - 252253 - 255 | Shutter / Reset UnitShutter Closed (Light off)Shutter Open (Light on)Strobe on (Fast -> Slow)Reset Unit |
| 2 | 0 - 248 - 5096 - 98144 - 146192 - 194240 - 255 | Color RightWhiteRedBlueGreenYellowBlackout |
| 3 | 0 - 248 - 5096 - 98144 - 146192 - 194240 - 255 | Color LeftWhiteRedBlueGreenYellowBlackout |
| 4 | 0 - 123124 - 131132 - 255 | RotationRotate Right (Slow -> Fast)StopRotate Left (Slow -> Fast) |
Note: When using the strobe the color function will be suspended. The colors will reappear when strobe is deselected.
ROBOZAP MSR 1200
| DMX channels, reduced mode | DMX channels, full mode Martin channels Product select | ||
| 6 | N | / | A |
| Channel Values Effect | ||
| 1 121 - 252 | 253 - 255 | Shutter / Reset UnitStrobe on (Fast -> Slow)Reset Unit |
| 2&3 | 0 - 37577797117137157197217237 - 255 | Color Right & LeftPrimary RedWhiteFlame RedLight BlueFern GreenYellowPrimary GreenMauveDark BlueCyan |
| 4&5 | 0 - 37577797117137157197217237 - 255 | Gobo Right & LeftBlack OutOpenStarsStarDotsConePlingDot-CirclesBellsFlower |
| 6 | 0 - 123124 - 131132 - 255 | RotationRotate Right (Fast -> Slow)StopRotate Left (Slow -> Fast) |
As the Zap MSR uses it's gobo wheels to perform blackout there is no light on function on this channel. You must use channels 4 and 5 to move the gobos from their blackout positions. Also please note when using the strobe function the gobo function will be suspended. The gobos will reappear when strobe is deselected.
CENTREPIECE
| DMX channels, reduced mode | DMX channels, full mode Martin channels Product select | ||
| 7 | N | / | A |
1
| Channel Values Effect | ||
| 1 | 0 - 49 | Reset Fixture, Stand-Alone, Lamp On Manual Control |
| 50 - 99 | Stand-Alone Random Music | |
| 100 - 149 | Stand-Alone Random Auto | |
| 150 - 199 | Stand-Alone Music | |
| 200 - 247 | Stand-Alone Auto | |
| 248 - 252 | Reset Fixture | |
| 253 - 255 | Lamp On | |
| When running stand-alone, the Centrepiece will not respond to any other commands. | ||
| 2 - 5 0 - 198 | 199 - 255 | Tilt 1-4Full Closed --> Full OpenFull Open |
| 6 | 0 - 123 | Color CarouselRotate Right (Fast --> Slow) |
| 124 - 131 | StopRotate Left (Slow --> Fast) | |
| 132 - 255 | ||
| 7 | 0 - 123 | Mirror RotationRotate Right (Fast --> Slow) |
| 124 - 131 | StopRotate Left (Slow --> Fast) | |
| 132 - 255 | ||
- AC Power Connection ....4
- Data Connection ....5
- DIP-switch Settings 7
- Operation....11
- DMX Protocols ......12
- INTRODUCTION
- 1
- PACKAGE CONTENTS
- AC POWER CONNECTION
- To install a plug on the mains lead
- RECOMMENDED CABLE
- CONNECTIONS
- To connect the DMX Interface to the DMX link
- To connect Martin fixtures to the DMX Interface
- DMX INTERFACE SETTINGS
- To set the 10-position DIP-switch
- To set the 6-position DIP-switch
- Important! The first fixture connected to the DMX Interface is always set to channel 1.
- To set the fixture address
- Set the DIP-switch on the first fixture to channel 1.
- For independent control, set the DIP-switch on the next fixture to the next channel (ch. 2, ch. 3 if the fixture uses 2 Martin channels).
- If identical control is desired, set the DIP-switch on additional fixtures to channel 1.
- STATUS LEDS
- DMX PROTOCOLS
- ROBOCOLOR MSD 200
- ROBOCOLOR
- ROBOSCAN PRO 218
- ROBOSCAN 1220
- ROBOSCAN 1220 II
- ROBOSCAN 1220 IIR
- ROBOZAP
- ROBOZAP MSR 1200
- CENTREPIECE
Brand : MARTIN
Model : DMX Interface
Category : DMX Interface