
WD10514 - Washing machine GORENJE - Free user manual and instructions
Find the device manual for free WD10514 GORENJE in PDF.


| Product Type | Freestanding Washing Machine |
| Brand | Gorenje |
| Model | WD10514 |
| Dimensions (H x W x D) | 85 x 60 x 58 cm |
| Weight | 72 kg |
| Rated Capacity (Cotton) | 7.0 kg |
| Maximum Spin Speed | 1400 rpm |
| Energy Efficiency Class | A++ |
| Power Consumption (Wash) | 0.80 kWh/cycle |
| Water Consumption | 45 L/cycle |
| Noise Level (Wash/Spin) | 58 dB / 76 dB |
| Number of Programs | 16 |
| Special Programs | Quick Wash, Delicates, Wool, Rinse & Spin |
| Display Type | LED |
| Control Type | Rotary Dial + Button |
| Drum Material | Stainless Steel |
| Water Connection | Cold Water |
| Installation Type | Freestanding |
| Maintenance | Clean detergent drawer and door seal regularly; run drum cleaning cycle |
| Safety Features | Child Lock, Overflow Protection, Unbalanced Load Detection |
| Spare Parts Availability | Genuine parts available through authorized service centers |
| User Manual | Free download in PDF format from notice-facile.com |
Frequently Asked Questions - WD10514 GORENJE
User questions about WD10514 GORENJE
0 question about this device. Answer the ones you know or ask your own.
Ask a new question about this device
Download the instructions for your Washing machine in PDF format for free! Find your manual WD10514 - GORENJE and take your electronic device back in hand. On this page are published all the documents necessary for the use of your device. WD10514 by GORENJE.
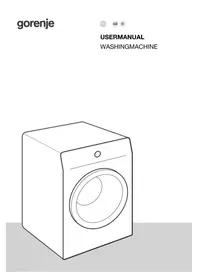
USER MANUAL WD10514 GORENJE
DETAILED INSTRUCTIONS FOR USE OF THE APPLIANCE
gorenje

This appliance is intended solely for household use. Please do not use it for any laundry labelled as not suitable for machine washing.
The following symbols are used throughout the manual and they have the following meanings:

Information, advice, tip, or recommendation

Warning – general danger

Warning – danger of hot surface

Warning – danger of fire

Warning – danger of fire

It is important that you carefully read the instructions.
CONTENTS
| 4 SAFETY PRECAUTIONS | INTRODUCTION |
| 12 APPLIANCE DESCRIPTION | |
| 13 Technical specifications | |
| 14 Control unit | |
| 16 INSTALLATION AND CONNECTION | PREPARING THE APPLIANCE FOR THE FIRST USE |
| 17 Removing the blocking screws/rods | |
| 18 Moving and transport after installation | |
| 19 Selecting the room | |
| 19 Adjusting the appliance feet | |
| 20 Adjusting the bottom cover | |
| 22 Connecting the appliance to water supply | |
| 23 Aqua - stop | |
| 24 Connecting and securing the drain hose | |
| 26 Connecting the appliance to the power mains | |
| 27 BEFORE USING THE APPLIANCE FOR THE FIRST TIME | |
| 28 USE OF THE APPLIANCE, STEP BY STEP (1-7) | STEPS OF THE WASHING PROCESS |
| 28 Step 1: Heed the labels (care tags) on the laundry | |
| 29 Step 2: Preparing the laundry | |
| 32 Step 3: Choosing a programme | |
| 36 Step 4: Selecting additional settings and functions | |
| 45 Step 5: Program start | |
| 46 Step 6: Changing the washing programme or manual (physical) program termination | |
| 47 Step 7: End of program | |
| 48 PAUSING AND CHANGING THE PROGRAMME | |
| 51 MAINTENANCE & CLEANING | CLEANING & MAINTENANCE OF THE APPLIANCE |
| 51 Cleaning the dispenser tray | |
| 52 Cleaning the water supply hose net filter, detergent dispenser housing, and rubber door gasket | |
| 53 Cleaning the pump filter | |
| 54 Cleaning the appliance exterior | |
| 55 TROUBLESHOOTING | TROUBLE-SHOOTING |
| 55 What to do ...? | |
| 56 Troubleshooting table | |
| 58 Servicing | |
| 59 RECOMMENDATIONS FOR WASHING AND ECONOMIC USE YOUR A P P L I A N C E | MISCELLANE-OUS |
| 63 Stain removal tips | |
| 65 DISPOSAL | |
| 66 SPECIFICATION |
SAFETY PRECAUTIONS

Make sure you read the instructions for use before using the appliance.
Please, do not use the appliance without reading and understanding these instructions for use first.
These instructions for use are supplied with different appliance types or models. Therefore, they may include descriptions of settings or equipment that are not available in your appliance.
Failure to observe the instructions for use or
inappropriate use of the appliance may result in damage to the laundry or the appliance, or injury to the user. Keep the instruction manual handy, near the appliance.
Instructions for use are available on our website at www.gorenje.com.
The appliance is intended solely for household use. If the appliance is used for professional, for-profit purpose or purpose exceeding normal use in a household, or if the appliance is used by a person who is not a consumer, the warranty period shall be equal to the shortest warranty period required by relevant legislation.
Follow the instructions for correct installation of the Gorenje appliance and connection to the water and power mains (see chapter »INSTALLATION AND CONNECTION«).
Connection to water and power supply has to be executed by an adequately trained technician or expert.
Any repair and maintenance pertaining to safety or performance should be done by trained experts.
To avoid danger, a damaged power cord may only be replaced by the manufacturer, a service technician, or an authorized person.
Before connecting the appliance to the power mains, wait for at least 2 hours until it reaches room temperature.
In case of a defect, only use approved spare parts by authorized manufacturers.
In case of incorrect appliance connection, incorrect use, or servicing by an unauthorized person, the user shall bear the cost of any damage and such damage shall not be covered by the warranty.
The appliance may not be connected to the power mains using an extension cord.
Do not connect the appliance to the power mains using an external switching device such as a program timer, or connect it to power mains that is regularly switched on and off by the power supply provider.
Do not connect the appliance to an electrical outlet intended for an electric shaver or a hair dryer.
The power socket has to be safely earthed, and the water supply should be unimpeded.
Do not install the appliance in a room where the temperature can drop below 5°C, as appliance parts may be damaged in case of water freezing.
Place the appliance on a level and stable solid (concrete) base.
If the appliance is placed on an elevated stable base, it has to be additionally secured against tipping.
Before using the appliance for the first time, remove the blocking screws/rods, as switching on a blocked appliance can result in major damage (see chapter »INSTALLATION AND CONNECTION / Removing the blocking screws/rods«). Warranty shall be void in cases of such damage!
To connect the appliance to water supply make sure to use the supplied water supply hose and gaskets. Water pressure has to be between 0.1 and 1 MPa (approximately 1–10 bar or 1–10 kp/cm²; 10–100 N/cm²).
Always use a new water supply hose to connect the appliance to water supply; do not reuse an old water supply hose.
The end of the drain hose may not be immersed in flowing draining water.
Before the start of the washing programme, press the door on the indicated spot until it locks into place. The door cannot be opened during washing machine operation.
We recommend removing any impurities from the washing machine drum before the first wash, using the Steril Tub programme (see PROGRAMME TABLE).
After the programme, close the water tap and pull out the appliance plug from the power socket.
Only use the appliance for washing and drying of laundry, as described in the instruction manual. The machine is not intended for dry cleaning.
Only use agents for machine washing and care of laundry. We shall not be responsible for any damages or discolouration of gaskets and plastic parts resulting from incorrect use of bleaching or colouring agents.
When descaling, only use descaling agents with added anti-corrosion protection. (Only use non-corrosive descaling agents.) Follow the manufacturer's instructions. Finish the descaling process with several rinse cycles or by running the Steril Tub self-cleaning programme in order to remove any residual acid (e.g. vinegar etc.).
Do not use detergents that contain solvents as this could lead to release of poisonous gases, damage to the appliance, and risk of fire and explosion.
No silver ions are released during the washing programme.
The appliance is not intended for use by persons (including children) with physical or mental impairments, or persons with lacking experience and knowledge. These persons should be instructed about the use.
The warranty does not cover consumables, minor deviations in colour, increased noise which is a consequence of the appliance age and does not affect the functionality of the appliance, and aesthetic defects on components that do not affect the functionality and safety of the appliance.
CHILD SAFETY
Before closing the appliance door and running a programme, make sure there is nothing except laundry in the drum (e.g. if a child climbed into the dryer drum and closed the door from the inside).
Keep the detergent and conditioner out of reach of children.
Activate the child lock. See chapter »CHOOSING THE SETTINGS/Child lock«.
Do not let children younger than three years come near the appliance, unless they are under constant supervision.
The appliance is made in compliance with all relevant safety standards.
This appliance may be used by children aged 8 years and above and by persons with reduced physical, sensory or mental capabilities or lack of experience and knowledge, but only if they are supervised during the use of the appliance, if they have been provided relevant instructions regarding safe use of the appliance, and if they understand the hazards of inappropriate use. Make sure children do not play with the appliance. Children may not clean the appliance or perform any maintenance tasks without supervision.
DANGER OF HOT SURFACE
At higher washing temperatures, the door glass will heat up. Be careful to avoid burns. Make sure children do not play near the door glass.
PROTECTION AGAINST EXCESSIVE WATER LEVEL (WHEN THE APPLIANCE IS SWITCHED ON ⚠️)
If the water level in the appliance increases above the normal level, then protection against excessive water level will be activated; water will be pumped out of the appliance and water supply will be shut off. The program is interrupted and an error is reported (see TROUBLESHOOTING TABLE).
TRANSPORT/TRANSPORT AFTER INSTALLATION
If you intend to move the appliance after it has been installed, then it has to be blocked by inserting at least one blocking rod (see chapter »INSTALLATION AND CONNECTION/Moving and transport«). Before inserting the blocking rods, disconnect the appliance from the power mains!
Do not place the appliance behind a lockable or sliding door, or a door with a hinge on the opposite side of the appliance door hinge. Install the appliance in such a way that the door can always be freely opened.
Never block the air exhaust (evacuation opening).
Do not place the appliance on a carpet with long fibres as this may impede air circulation.
Do not connect the appliance to a chimney or a duct that is also used to extract products of combustion of natural gas or other fuels from other appliances.
The air in the room where the appliance is installed may not contain dust particles. The air where the appliance is installed should be thoroughly ventilated to prevent reverse flow of gases released from gas appliances with open fire (e.g., fireplaces).
Make sure fibres do not accumulate around the appliance.
Do not use the appliance to dry any laundry that has not been washed.
Laundry stained with oil, acetone, alcohol, oil derivatives, stain removers, turpentine, wax, and wax removers should first be washed (before drying) in the appliance with hot water and detergent.
Clothing that includes latex, rubber parts, shower and bathing caps, and laundry or covers with rubber foam may not be dried in the appliance.
Use laundry conditioners or similar products in compliance with the manufacturer's instructions.
⚠️ Remove all objects such as lighters, matches, etc. from the pockets.
APPLIANCE DESCRIPTION
FRONT
1 On/off and start/pause button 2 Control unit 3 Programme selector knob 4 Dispenser tray 5 Door 6 Rating plate 7 Pump filter cover

BACK
1 Water supply hose 2 Power cord 3 Drain hose 4 Adjustable feet 5 Blocking rods/screws

TECHNICAL SPECIFICATIONS
(DEPENDING ON THE MODEL)
Rating plate with basic information about the appliance is fitted on the front wall of the appliance door opening (see chapter »DESCRIPTION OF THE APPLIANCE«).
| Maximum washing machine load 8 kg 10 kg | |
| Maximum dryer load 5 kg 7 kg | |
| Width 595 mm 595 mm | |
| Height 845 mm 845 mm | |
| Appliance depth (a) 610 mm 660 mm | |
| Depth with door open (b) 1050 mm 1100 mm | |
| Appliance weight X kg (depending on the model) | |
| Rated Voltage See rating plate | |
| Nominal power See rating plate | |
| Connection See rating plate | |
| Water pressure See rating plate | |
| Current See rating plate | |
| Frequency | See rating plate |
Rating plate
gorenje
Model: XXXXX
Type: XXXXXXXX
Washing Capacity: Xkg (2000W)
Drying Capacity: Xkg (1700W) IPX4
10A/220-240V\~ 50Hz
Art. No.: XXXXXX
Washer-dryer
1400rpm/min


XXX3XXXX
CONTROL UNIT

1 PROGRAMME SELECTOR KNOB


2 □ TEMP. (WASHING TEMPERATURE)
Temperature adjustment
2 + 3 CHILD LOCK
3 RINSE
3+4 MUTE
4 SPIN (SPIN CYCLE RPM / DRAINING)
Spinning rate adjustment
5 PREWASH INTENSIVE
6 DRY LEVEL
7 START DELAY
8 START/PAUSE BUTTON
Use this button to start or pause a programme
Upon start-up or during pause, the button backlight will flash; when the programme is started and in progress, it will be lit continuously.
9 ON/OFF BUTTON ⏻
INSTALLATION AND CONNECTION
Remove all packaging (see chapter »DISPOSAL«). When removing the packaging, make sure not to damage the appliance with a sharp object. Keep the packaging material (plastic bags, other plastic parts etc.) out of reach of children.
Check for any damage on the appliance. If you suspect the appliance is damaged, do not use it and immediately contact the service unit.
The appliance is supplied with a support set that includes:
- Instructions for use,
- Warranty card,
- 4 plastic plugs,
- spanner,
- supply hose,
- drain hose holder, • bottom appliance cover.
Make sure all of the above is supplied.
REMOVING THE BLOCKING SCREWS/RODS
Before the first use of the appliance, transport screws/rods must be removed. A blocked appliance may be damaged when it is switched on for the first time. Warranty shall be void in cases of such damage.

1 Move aside the hoses and use a fitting spanner to undo the 4 screws on the back of the appliance by turning them counter-clockwise, as indicated by the arrow. Undo them by approximately 30 mm (not completely).
2 Pull all 4 transport screws/rods horizontally.
3 Pull out the transport screws/rods complete with the rubber and the plastic part.
4 Cover the two holes through which the blocking screws/rods were inserted with plastic plugs. The plastic plugs are supplied in the bag with the washing machine instruction manual (the support set).
Save the transport screws/rods in case you have to transport the appliance again later (to reinstall the blocking screws/rods, follow the above procedure in reverse order).
MOVING AND TRANSPORT AFTER INSTALLATION
If you wish to move the appliance after it has been installed, the blocking screws/rods have to be re-installed to prevent vibration damage to the appliance during transport (see chapter > INSTALLATION AND CONNECTION / Removing the blocking screws/rods). If you lost the blocking screws/rods, they can be ordered from the manufacturer.
After transport, the appliance should be left to stand still for at least two hours before it is connected to the power mains, so that it can reach room temperature. The appliance should be installed and connected by a trained technician.
⚠️ Carefully read the instructions for use before connecting the appliance. Repair or any warranty claim resulting from incorrect connection or use of the appliance shall not be covered by the warranty.
SELECTING THE ROOM
The appliance has to be placed on floor with a concrete base. The floor must be clean and dry; otherwise, the machine may slide. Also, clean the bottom surface of adjustable feet. The appliance must stand level and stable on a solid base. We recommend installing the appliance in a corner.
If the floor is not level, do not place any cardboard, wood, or any other material or objects under the appliance feet; rather, adjust the appliance position by adjusting the feet.
Make sure the appliance's vents are not blocked. Do not place the appliance in a room with a high humidity level. Do not store flammable substances near the appliance.
ADJUSTING THE APPLIANCE FEET
Use a spirit level and the supplied spanner.

1 Rotate the adjustable feet to level the appliance lengthwise and crosswise. The feet allow levelling by +/- 2 cm.
2 After adjusting the height of the feet, firmly tighten the jam nuts (counter nuts) using the supplied spanner by turning them towards the bottom of the appliance ↑(see figure).
Incorrect levelling of the appliance with the adjustable feet may cause vibration, appliance sliding across the room, and loud operation. Incorrect levelling of the dryer shall not be subject to warranty. Sometimes, unusual or loud noise may appear during appliance operation; this are mostly the result of improper installation.
ADJUSTING THE BOTTOM COVER
Sound insulation

1 Remove the double-sided adhesive tape (b) from the bottom cover.
2 Lift the appliance by approximately 30° to 40°. Push the back of the bottom cover towards the rear feet. Lift the bottom cover and attach it to the appliance bottom on all four sides.
Appliance clearance


The appliance may not be in contact with a wall or adjacent furniture. For optimum appliance operation, we recommend observing the clearances from the walls as indicated in the figure. In case of failure to observe the minimum required clearances, safe and correct appliance operation cannot be ensured. Moreover, overheating can also occur (Figures 1 and 2).
Installing the appliance under a countertop is not recommended.
Opening the appliance door (bird's-eye view)

See chapter »DESCRIPTION OF THE APPLIANCE/Technical information«.
a = Appliance depth b = Depth with door open
Before connecting the appliance to the power mains, wait for at least 2 hours until it reaches room temperature.
CONNECTING THE APPLIANCE TO WATER SUPPLY
Attach the hose to the water tap by screwing it onto the thread.


AQUA-STOP

REGULAR ATTACHMENT
For flawless appliance operation, water pressure in the water supply system has to be between 0.1 and 1 MPa (1–10 bar; 1–10 kp/cm2; 10–100 N/cm²). Minimum dynamic water pressure can be determined by measuring the water flow. In 15 seconds, 3 litres of water should flow from a fully open tap.
Tighten the water supply hose by hand, firmly enough for the hose to have a good seal (max. 2 Nm). After connecting the hose, the seal must be checked for any leaks. Do not use pliers or similar tools when connecting the hose as this could damage the nut thread.

Only use the water supply hose supplied with the appliance. Do not use any used or other hoses.

Make sure the hose is not damaged. If the hose is degraded, brittle, or cracked, it has to be replaced.
AQUA-STOP (ONLY IN SOME MODELS)
If the internal tube is damaged, a shut-off system is activated that cuts the water supply to the appliance. In such case, the control glass (a) will turn red. Replace the water supply hose.

Do not immerse the water supply hose with the Aqua stop system in water as it contains an electric valve. The water supply hose can be connected without a non-return valve. When connecting the water supply hose, make sure to connect it in a way that allows adequate and unobstructed water supply.
CONNECTING AND SECURING THE DRAIN HOSE
Feed the drain (discharge) hose into a washbasin or a bathtub, or connect it directly to a drain (drain hose minimum diameter 4 cm). The vertical distance from the floor to the end of the drain hose may be no more than 100 cm and no less than 60 cm. It can be attached in three ways (A, B, C).

A The drain hose can be led into a sink or a bathtub. B Use a string fed through the opening in the elbow support to attach the hose and prevent it from slipping to the floor.
B The drain (discharge) hose may also be attached directly to the sink drainage. A sink that is too small is not acceptable. Be careful as the drained water may be hot.

C Discharge hose can also be attached to a wall drain with a trap; such trap should be properly installed to allow cleaning.

D The drain hose has to be attached and affixed to the pin on the back of the appliance, as shown in the figure. Max. drain hose length is 2.5 m.
Make sure the drain hose is not damaged.
If the drain hose is not correctly attached, correct washing machine operation cannot be ensured.
CONNECTING THE APPLIANCE TO THE POWER MAINS

Before connecting the appliance to the power mains, wait for at least 2 hours until it reaches room temperature.
Connect the appliance to an earthed power outlet. After installation, the wall outlet should be freely accessible. The outlet should be fitted with an earth contact (in compliance with the relevant regulations).
Information on your appliance is indicated on the rating plate (see chapter »DESCRIPTION OF THE APPLIANCE/Technical information«).
⚠️ We recommend using over-voltage protection to protect the appliance in case of a lightning strike.
The appliance may not be connected to the power mains using an extension cord.
Do not connect the appliance to an electrical outlet intended for an electric shaver or a hair dryer.
Do not plug or unplug the appliance when your hands are wet.
Any repair and maintenance pertaining to safety or performance should be carried out by trained experts.
A damaged power cord may only be replaced by a person authorized by the manufacturer.
BEFORE USING THE APPLIANCE FOR THE FIRST TIME
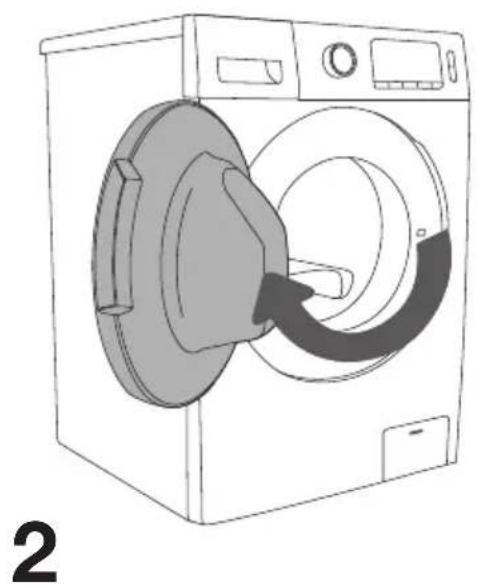
Make sure the appliance is disconnected from the power mains; then, open the door towards you (figures 1 and 2).
Before using the appliance for the first time, clean the drum using a soft and moist cotton cloth, or use the Steril Tub program. In such case, connect the appliance to the power mains and open the water tap. There should not be any laundry in the drum; the drum should be empty (Figures 3 and 4).



Do not use any solvents or cleaning agents that could damage the appliance (please observe the recommendations and warnings provided by the cleaning agent).
USE OF THE APPLIANCE, STEP BY STEP (1 – 7)
STEP 1: HEED THE LABELS (CARE TAGS) ON THE LAUNDRY
| Normal wash;Sensitive laundry | Max.washing temp.95°C  | Max.washing temp.60°C[60] | Max.washing temp.40°C  | Max.washing temp.30°C[30] | Hand wash only | Do not wash |
Bleaching Bleaching in cool water | Bleaching not allowed | |||||
Dry cleaning Dry cleaning with all agents | Petroleum solvent R11,R113P | Dry cleaning in kerosene, pure  [11113F [11113F | Dry cleaning not allowed | |||
Ironing Hot ironing,max.200°C | Hot ironing,max.150°C | Hot ironing, max.110°C[·] |   | |||
Drying Dry flat (place on a flat surface) | Drip dry[III] Line dry[·] Line dry[·] | High temperature[·] Low temperature Low temperature | Do not tumble dry[×] | |||
STEP 2: PREPARING THE LAUNDRY
- Sort the laundry by type of fabric, colour, soiling, appliance load, and allowed washing temperature (see PROGRAMME TABLE).
- Close the buttons and zippers, tie any ribbons, and turn the pockets inside out; remove any metal clips that could damage the laundry and appliance interior, or clog the drain.
- Place very sensitive clothes and small items in a special-purpose laundry washing bag. (The special-purpose laundry bag is available as an optional accessory).

To remove stains, use a stain remover that you can add to the main compartment of the detergent dispenser. When dyeing clothes, only use dyes suitable for use in a washing machine or similar appliance. Observe the dye manufacturer's instructions. Plastic and rubber parts of the appliance may discolour, or take on the colour of the dye you are using.
SWITCHING THE APPLIANCE ON
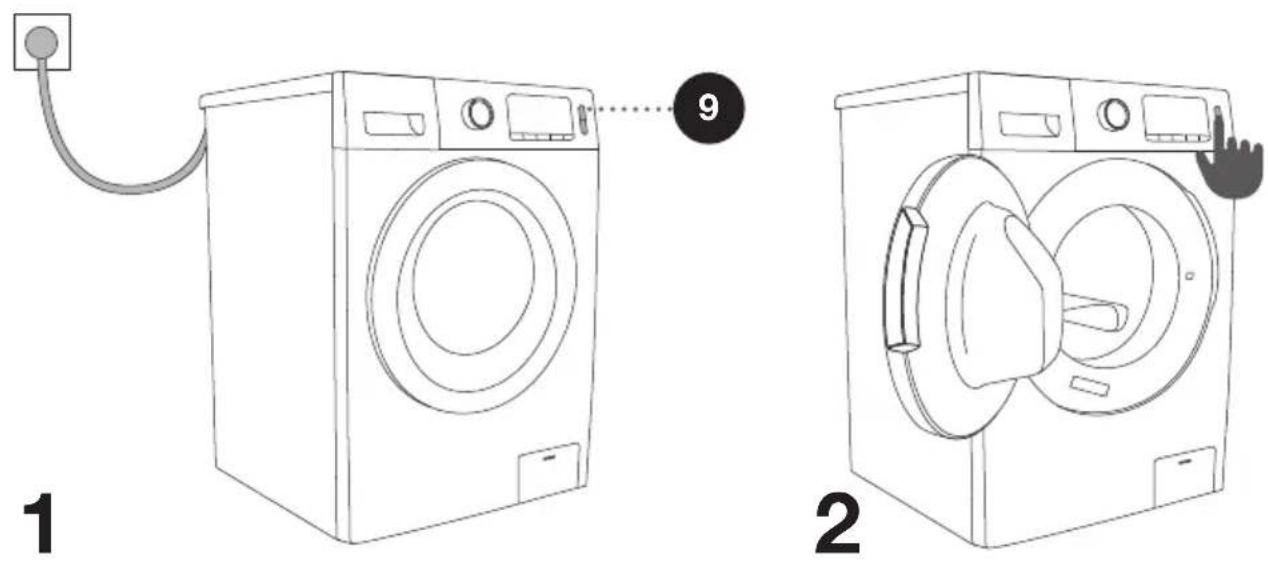
Connect the appliance to the power mains using the power cord, and connect the appliance to the water supply system. Press the (9) ON/OFF button to switch on the appliance (Figure 1).
LOADING THE APPLIANCE
Open the appliance door by pulling it towards you (figure 1).
Insert the laundry into the drum (after making sure the drum is empty) (Figure 2).
Close the appliance door (Figure 3). The door is closed when you hear a click.


Never try to forcefully open the door. Moreover, do not open the door during appliance operation.
If you have to open the door during appliance operation, observe the instructions in the chapter »PAUSING AND CHANGING THE PROGRAM«.
Do not overload the drum! See PROGRAMME TABLE and observe your nominal load as indicated on the rating plate.
If the appliance drum is too full, the laundry will not be washed as thoroughly.
STEP 3: CHOOSING A PROGRAMME
Choose the programme by rotating the programme selector knob (1) to the left or to the right (depending on the type of laundry and how heavily soiled it is). See PROGRAMME TABLE. When you select the programme, the light next to the selected programme lights up.

The programme selector knob (1) will not rotate automatically during operation.
PROGRAMME TABLE
| Program | Functions | Max. load for washing/ drying | Max spinning rate | Programme description | ||
| WD85XX | WD105XX | |||||
| Cotton(-, 20°C, 30°C,40°C, 60°C, 95°C) | W 8 10 1400 The program is suitable for heavily and moderately soiled cotton or linen laundry.For heavily soiled laundry, select the Prewash function. | |||||
| WD 5 7 1400 | ||||||
| Synthetic(-, 20°C, 30°C,40°C, 60°C) | W 4 5 1200 The program is suitable for moderately soiled synthetic and cotton fabrics. | |||||
| WD 4 5 1400 | ||||||
| Wool(-, 20°C, 30°C,40°C) | W 2 2 600 The program is suitable for machine-washable wool (see label on the garment). | |||||
| 15' | Quick 15'(-, 20°C, 30°C,40°C) | W 1 1 1000 The program is suitable for cotton and mixed fabrics. It is suitable for new or little work clothes. | ||||
| Mix(-, 20°C, 30°C,40°C) | W 4 5 1400 The program is suitable for varied loads of moderately soiled cotton and synthetic fabrics. | |||||
| WD 4 5 1400 | ||||||
| Jeans(-, 20°C, 30°C,40°C, 60°C) | W 4 4 1400 The program is suitable for washing jeans (denim) garments. | |||||
| Rinse&Spin W 8 10 | 1400 The program includes to preset rinse cycles and a spinning cycle). | |||||
| WD 5 7 1400 | ||||||
| Spin S 8 10 1400 In this program, you can select the duration and spinning rate manually. | ||||||
| SD 5 7 1400 | ||||||
W = Wash D = Dry WD = Wash and Dry S = Spin SD = Spin and Dry
| Program | Functions | Max. load for washing/ drying | Max spinning rate | Programme description | ||
| WD85XX | WD105XX | |||||
| Dry Cotton D 5 7 / With this program, you can dry the wet cotton or linen laundry that is still wet, but has been spun. | ||||||
| Dry Synthetics | D 3 5 / With this program, you can dry the wet synthetic laundry that is still wet, but has been spun. | |||||
| Refresh / 2 2 / The program is suitable for refreshing laundry and removing any odours (odours of smoke, sweat, barbecue etc.). | ||||||
| Wash&Dry WD 1 1 1200 This is a 60-minute program, suitable for washing and drying of very lightly soiled clothes that you change daily (T-shirts, shirts, skirts etc.). We recommend washing and drying up to 3 items at once. | ||||||
| Allergy (- -, 20°C, 30°C, 40°C, 60°C) | W 4 4 1400 This program is suitable for washing clothes that require special care, such as clothes for people with highly sensitive skin or skin allergies, as it includes an additional rinse cycle. Make sure there are no detergent residues on the garments, as these could cause skin irritation. | |||||
| Baby (- -, 20°C, 30°C, 40°C, 60°C, 95°C) | W 4 4 1400 This program is suitable for washing baby clothes and clothes requiring special care. The program efficiently eliminates bacteria and other impurities from the clothes. | |||||
| WD 4 4 1400 | ||||||
| Gently (- -, 20°C, 30°C, 40°C) | W 2 2 600 This program is suitable for delicate laundry and silk that you can wash in the appliance (see care tag). | |||||
| Steril tub (95°C) | WD 0 0 600 The program is used for cleaning the drum and removing any residues of detergent and bacteria that can accumulate and develop especially when you use programmes with low washing temperatures. The drum has to be empty. You can add some distilled (spirit) vinegar (approx. 2 dl) or sodium bicarbonate (1 tablespoon, or 15 g). Run this programme at least once a month. | |||||
W = Wash
D = Dry
WD = Wash and Dry
S = Spin
SD = Spin and Dry
CHOOSING THE DETERGENTS AND ADDITIVES
Always choose highly efficient detergents that do not foam and which are intended for front-loading appliances.
The choice of detergent depends on the type, soil level, laundry colour, and washing temperature.
White residues (streaks etc.) on black laundry may appear if you are using modern phosphate-free detergents. In such case, brush the streaks and use a liquid detergent.
Only use detergent intended for appliances for household use.
Descaling agents may damage the appliance. Do not use solvents.
Do not wash the clothes that were cleaned with solvents or flammable substances.
Observe the manufacturer's instructions on detergent dosing.
Excessive amount of detergent may result in foaming that in turn impairs washing efficiency. If the appliance senses excessive foaming, it may prevent the spin cycle from taking place.
If the amount of detergent is too small, the laundry may no longer be white after a while. It could also result in accumulation of limescale in the drum and the pipes.
Maximum amount of laundry for washing and drying, in kg (for the cotton programme), is indicated on the rating plate fitted under the appliance door (see chapter »APPLIANCE DESCRIPTION/Technical information«).
Maximum or nominal load applies to laundry prepared pursuant to the IEC 60456 standard.
For better washing effect, we recommend loading the drum to 2/3 when using the cotton programmes.
STEP 4: SELECTING ADDITIONAL SETTINGS AND FUNCTIONS
Most programmes feature basic settings, but these settings can be changed.
Adjust the settings by pressing the relevant function button (before pressing the (8) START/PAUSE button). Functions that cannot be changed with the selected programme are partly lit (dimmed). Certain settings cannot be selected with some programmes. Such settings will not be lit, and the button will flash when pressed (see FUNCTION TABLE).
Description of lighting of functions for the selected programme:
- Lit (Basic/preset setting)
- Unlit (Functions that are not selected)
Activate/deactivate the functions by pressing the desired function (before pressing the (8) START/PAUSE button).
Certain settings cannot be selected with some programmes. Such settings will not be lit, and when the corresponding button is pressed, an acoustic signal will be emitted and the button will flash (see FUNCTION TABLE).


TEMP. (WASHING TEMPERATURE)
Changing the temperature for the selected program. Each program has a preset temperature that can be changed by pressing the position (2) TEMP. (WASHING TEMPERATURE). (-- indicates cold wash) The temperature is displayed on the display unit above the button.

RINSE
Change the number of rinse cycles.
The preset includes one rinse cycle before the conditioning cycle.
To increase the number of rinse cycles (1 to 5), use the (3) key; however, this has to be done before you press the (8) START/PAUSE button. When a program is in progress, this function cannot be changed.


SPIN
Use this to adjust the spinning rate. With preset or selected spinning rate, the selected spinning rate will be lit on the display unit.
If you select draining without spinning, the ⓤ will appear on the display unit.

CHILD LOCK
This is a safety feature. To activate it, simultaneously press the positions (2) TEMP. (TEMPERATURE) and (3) RINSE, and hold them for at least 2 seconds. The following will be indicated on the display unit: »SAFE on«. Follow the same procedure to deactivate the child lock. The following will be indicated on the display unit: »SAFE oFF«. As long as the child lock is activated, programme, settings, or additional functions cannot be changed.


MUTE (SWITCHING OFF THE ACOUSTIC SIGNALS)
Sound can also be turned off by simultaneously pressing the buttons (3) Rinse and (4) Spin and holding them for 2 seconds. "bEEp oFF" will be indicated on the display unit.
All sounds, except for alarms, will be turned off.
Follow the same procedure to switch on the sounds. In this case, "bEEp on" will be indicated on the display unit.
All sounds will be turned back on.
This setting remains active even after the appliance is unplugged from the power mains.
5
PREWASH/INTENSIVE
For washing heavily soiled laundry, particularly with stubborn superficial stains.
- If you select PREWASH, add the detergent into the prewash compartment Ⓠ.
Press the (5) key to alternately select the Prewash function or the Intensive function; as you press the key, the relevant symbol will appear on the display unit ☐ for prewash, for intensive wash.
Select prewash to improve the washing effect or stain removal, or for very heavily soiled laundry.
Choose intensive wash to improve the washing effect and stain removal.

6
DRY LEVEL
Press the DRY LEVEL button (6) to select between the following dryness levels:
- Iron dry: after the drying process, the laundry will still be slightly moist.
- Cupboard dry: garments can be worn immediately after drying.
- Extra dry: garments can be folded and stored in the cupboard or closet immediately after drying.
- Timed drying: drying time can be selected from the following options: 30', 1 h, 1.5 h, 2 h, 3 h, 4 h. Select the drying time depending on the type of laundry.
The icon for the selected drying program will be lit, and drying time will be indicated on the display unit. The appliance will automatically adjust the drying time to the amount of laundry in the appliance.
Before selecting the drying program, check the following:
- Is the type of laundry suitable for machine-drying (see program table)? Is the water supply tap open?
- If you wish to dry your laundry separately, take the spun laundry from the appliance and dry it with the desired drying programme.
- When drying smaller items, programme time can be shorter than initially specified.
- To dry hand-washed laundry, we recommend using the »Spin+Dry Level« program.
- After the drying program, the appliance will execute the anti-releasing program for a while.
- Laundry that is stuck to the drum wall after the end of the washing programme/spinning cycle may be inefficiently dried as a result. Therefore, we recommend loosening the laundry manually before the drying programme is started.
- Excessive load can impair drying efficiency.
- When drying garments made of different materials, drying can be less effective.
- If an error is indicated on the display unit, see the troubleshooting table (error table).
If the laundry is not adequately spun or wrung and it is still dripping, then it is not suitable for a drying programme!
The table specifies the estimated drying time for a variety of loads. Actual drying time, however, depends on the type of garment:
| OEstimated drying time (min) | |||
| Laundry weight(kg) | Cupboard dryIron dryVery dry | ||
| <1,5 60-90 | 40-70 80-110 | ||
| 1,5-3 100-1 | 40 80-120 120-160 | ||
| 3-4,5 150-190 | 150-170 190-210 | ||
| 4,5-7 210-250 | 190-230 230-270 | ||
7
DELAY
Use this function to start the programme after a certain amount of time has elapsed. The function may only be selected before a programme is started. Press the (7) DELAY position. »-:-« will appear on the display unit. If, for example, you choose a programme with a duration of 2:39, the time will be indicated on the display unit. Press the (7) DELAY position to select the delay of up to 24 hours in 1-hour or 2-hour increments (depending on the selected programme).
If nothing is pressed for 5 seconds, actual washing time will be displayed. To adjust the start delay setting, press the DELAY (7) position.
The function is activated when the START/PAUSE (8) button is pressed. The appliance starts counting down the specified delay time. When the countdown reaches zero, the selected washing programme will start automatically.
- To cancel, press the ON/OFF (9) button and hold it for 3 seconds. Choose the programme and functions once again, and then press the DELAY (7) position to select a new delay time; then, confirm the setting with the START/PAUSE (8) button.
- In case of a power supply failure before the delay time elapsed, the countdown will resume at the point where it was interrupted once the power supply is restored.

When using the Delay function, do not use liquid detergents.
When the appliance is switched off, all extra functions return to their basic or custom settings, except for the acoustic signal setting.
FUNCTION TABLE
| PROGRAM | FUNCTIONS | FUNCTIONS - WASHING | |||||||
| PREWASH | MAIN WASH | SOFTENING | MUTE (SWITCHING OFF THE) | CHILD LOCK | TEMP. (TEMPERATURE SELECTION) | ||||
| Cotton | W | √ | √ | ● ● | ● ● | ||||
| WD | √ | √ | ● ● | ● ● | |||||
| Synthetic | W | √ | √ | ● ● | ● ● | ||||
| WD | √ | √ | ● ● | ● ● | |||||
| Wool | W | √ | √ | ● ● | ● ● | ||||
| 15' | Quick 15' | W | √ | √ | ● ● | ● ● | |||
| Mix | W ● | ● √ ● | √ | ||||||
| WD | √ | √ | ● ● | ● ● | |||||
| Jeans | W ● | ● √ ● | √ | ||||||
| Rinse&Spin | W -- ● | ● ● - | |||||||
| WD -- ● | ● ● - | ||||||||
| Spin | S | - | - | - | ● | ||||
| SD -- ● ● - | |||||||||
| Dry Cotton | D -- ● | ● - | |||||||
| Dry Synthetics | D -- ● | ● - | |||||||
| Refresh | / | -- - ● | ● | - | |||||
| Wash&Dry | WD | - | √ | ● ● | ● - | ||||
| Allergy | W ● | √ | ● ● | ● ● | |||||
| Baby | W ● | √ | ● ● | ● ● | |||||
| WD | ● | √ | ● ● | ● ● | |||||
| Gently | W | - | √ | ● ● | ● ● | ||||
| Steril tub | WD -- ● | ● - | |||||||
W = Wash D = Dry WD = Wash and Dry S = Spin SD = Spin and Dry
| FUNCTIONS - WASHING FUNCTIONS - DRYING | |||||||||||||||||||||||||
| RINSE | |||||||||||||||||||||||||
| SPIN | |||||||||||||||||||||||||
| INTENSIVE | |||||||||||||||||||||||||
| PREWASH | |||||||||||||||||||||||||
| DRY | |||||||||||||||||||||||||
| DELAY | |||||||||||||||||||||||||
| CUPBOARD | |||||||||||||||||||||||||
| IRON | |||||||||||||||||||||||||
| EXTRA DRY | |||||||||||||||||||||||||
| TIME DRY | |||||||||||||||||||||||||
- Optional functions
- Cannot be selected
√ Detergent required
x Default
TIME OPTIMIZATION DURING THE PROGRAMME PROGRESS
In the early stage of the washing programme, the appliance uses advanced technology to detect the amount of laundry. After load detection, the appliance adjusts the programme duration.
STEP 5: PROGRAM START
Once you have selected the programme and extra functions, and added the detergent into the dispenser tray, press the START/PAUSE (8) button.

On the display unit, programs will be displayed with icons, according to their actual sequence, from left to right. Time remaining until the end of the programme will be indicated as well.
Symbols will be lit on the selected functions.
After pressing the (8) PAUSE/STOP button, the spinning rate can be adjusted (except in the case of the SterilTub self-cleaning program and SPIN (SPINNING RATE/DRAIN program), and child lock can be activated or deactivated; other settings, however, cannot be changed.
When the program starts, »--- ---« will appear on the display unit, which indicates that the laundry is being weighed. Program duration (hours : minutes) will be adjusted automatically according to the laundry weight.
After the start of the programme, Door Lock will be lit on the display unit. When the program is complete, the icon will disappear.
If you press the PAUSE (8) button during program operation, and all conditions are met for you to open the door, then the Ⓞ will disappear as well.
If the Ⓞ flashes, this means that the door cannot be opened; in such case, do not attempt to open the door by force.
If anything is flashing on the display unit, the washing machine door is open or not closed correctly. Close the washing machine door and press the START/PAUSE (8) button again to resume the washing programme.
STEP 6: CHANGING THE WASHING PROGRAMME OR MANUAL (PHYSICAL) PROGRAM TERMINATION
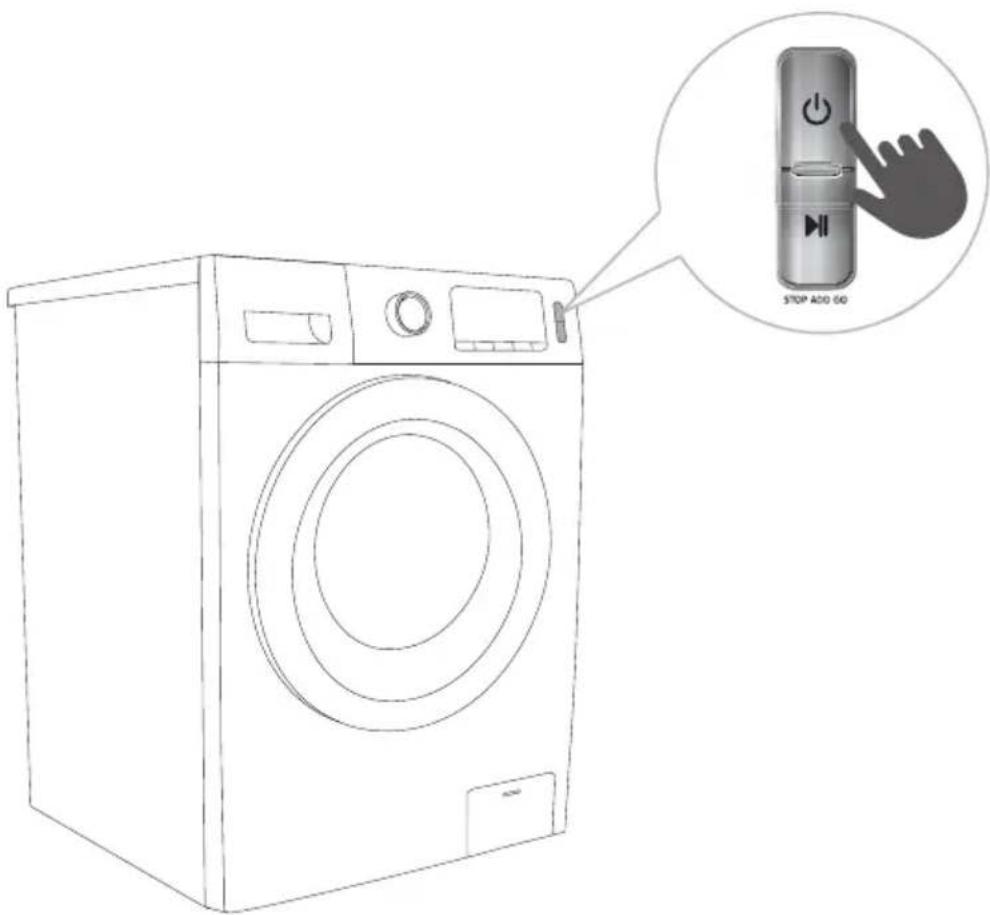
1 To stop and cancel a washing programme, press the ON/OFF (9) button and hold it for more than 2 seconds.
2 The program is paused when the time remaining until the end of the wash is flashing (appearing and disappearing) on the display unit. At the same time, the appliance pumps the water from the appliance drum. When the water is pumped out, appliance door will be unlocked. If the water in the appliance is hot, the appliance will automatically cool it and pump/drain it out.
3 To select a new programme, press the ON/OFF (9) button again, and then select the programme and extra functions. Press the START/PAUSE (8) button without adding the detergent again.
STEP 7: END OF PROGRAM
An acoustic signal will indicate the end of the washing process; the display will read »End«. The appliance will switch off automatically if you do not perform any action within 2 minutes.

- Open the appliance door.
- Take the laundry from the drum.
- Close the door!
- Shut off the water supply tap.
- Switch off the appliance (press the ON/OFF (9) button).
- Unplug the power cord from the outlet.

PAUSING AND CHANGING THE PROGRAMME
MANUAL PAUSE AND RESET
To stop and cancel (reset) a washing programme, press the (9) ON/OFF button and hold it for more than 3 seconds. All lights are turned off. They will again be lit when the appliance is switched on again (by pressing the ON/OFF (9) button). At the same time, the appliance pumps the water from the appliance drum. When the water is pumped out, appliance door will be unlocked. If the water in the appliance is hot, the appliance will automatically cool it and pump/drain it out.
START/PAUSE BUTTON ▶II
You can always stop the programme by pressing the (8) START/PAUSE button. The programme is paused when the time remaining until programme completion is flashing on the display unit. If there is no water in the drum and water temperature is not too high, then the door will unlock after a certain period of time, and it can be opened. To resume the programme, first close the door and then press the (8) START/PAUSE button.
ADDING/REMOVING LAUNDRY DURING APPLIANCE OPERATION
After a certain period of time, the appliance door can be opened if the water level and temperature are below a predefined threshold.
If the conditions below are met, then the electronic door lock is released and the appliance door can be opened:
• water temperature in the drum has to be suitable, • water level in the drum has to be below a certain value, • The icon has to be lit.
In order to add or remove laundry from the appliance during programme operation, proceed as follows:
- Press the (8) START/PAUSE button.
- If all conditions for the release of the electronic door lock are met, then you can open the appliance door and add or remove laundry from the drum:
- If the water temperature in the drum is above the allowed temperature, then the icon will not be lit, and the icon Door Lock will not flash. This means that laundry can no longer be added to the drum. In this case, wait for the water in the drum to cool down. When the water cools down to a suitable temperature, you can open the appliance door and take the laundry from the drum.
- Close the appliance door!
- Press the START/PAUSE button (8).
The program will resume.
If you add a considerable amount of laundry during the wash, the laundry could be washed less effectively, since the appliance initially sensed a lower weight of the load of laundry and added a smaller amount of water. Insufficient amount of water relative to the amount of laundry could also cause damage to the laundry (rubbing of dry laundry), and washing time can be longer.
Washing programme will resume in the washing stage in which it was interrupted.
FAULTS
In case of a fault, the program will be interrupted.
Flashing signal lights and an acoustic signal will warn about such occurrence (see FAULTS TABLE), and the fault will be indicated on the display unit (F:XX).
POWER OUTAGE
In case of a power supply failure (power outage), the washing programme is interrupted. When power supply is restored, the program is resumed in the stage in which it was interrupted.
OPENING THE DOOR MANUALLY IN CASE OF A POWER OUTAGE – IN CASE OF A PROGRAM PAUSE

1 When the program is paused or interrupted, open the filter cap using a suitable tool (flat screwdriver or a similar tool).
2 Appliance door can only be opened by pulling on the special lever (located at the filter).
3 Manually open the appliance door by pulling it towards you.
OPENING THE DOOR (PAUSE/CANCEL - CHANGE PROGRAMME)
Appliance door can be opened, if the water level in the appliance is low enough and if the water temperature is not excessively high. Otherwise, use manual (physical) termination (see chapter »PAUSING AND CHANGING THE PROGRAMME/Manual (physical) program termination«).
4 If there is still water in the washing machine after a power outage, make sure not to open the door before you manually drain the water from the appliance via the pump filter (see chapter »CLEANING AND MAINTENANCE/Cleaning the pump filter«).
MAINTENANCE & CLEANING
Before cleaning, unplug the appliance from the power mains.
Children should not clean the appliance or perform maintenance tasks without proper supervision.
CLEANING THE DISPENSER TRAY
The dispenser tray should be cleaned at least twice per month.
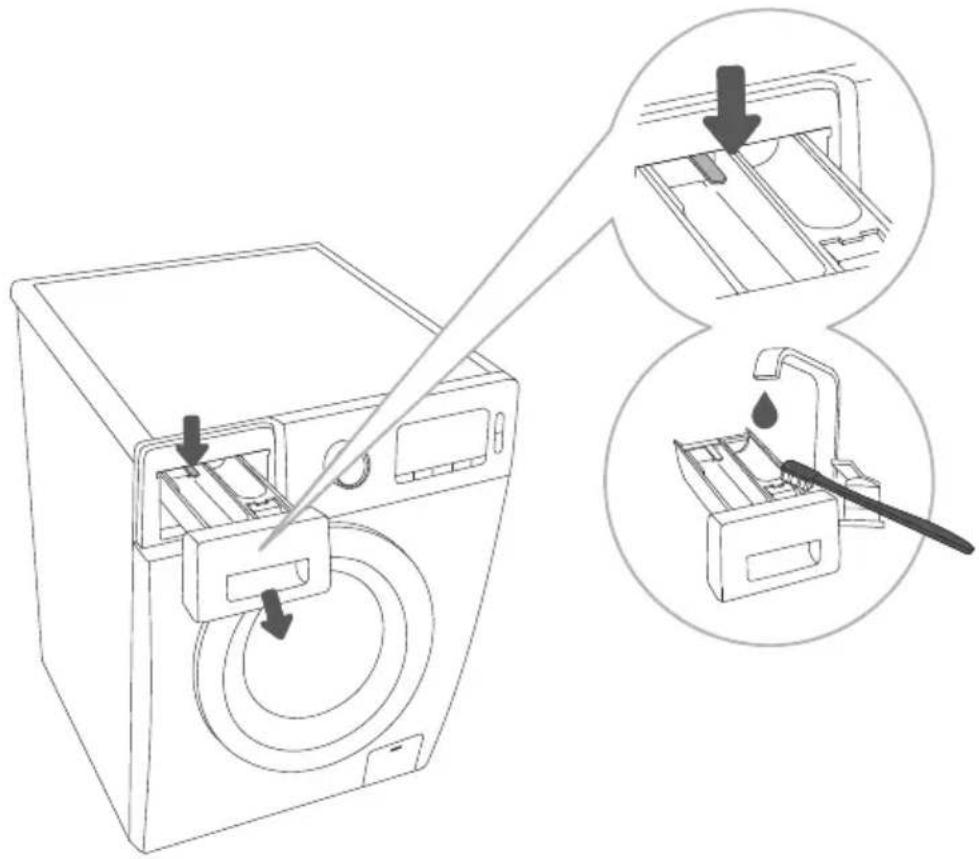
1. To remove the dispenser tray from the housing, press the small tab.
2. Clean the dispenser tray under running water using a brush, and dry it. Also, remove any detergent residue from the bottom of the housing.
3. Remove the conditioner insert (softener insert) from the dispenser tray. Wash all parts under running water, and reinsert the conditioner insert (softener insert) into the dispenser tray and re-insert them into the dispenser tray housing.
Do not wash the dispenser tray in a dishwasher.
CLEANING THE WATER SUPPLY HOSE NET FILTER, DETERGENT DISPENSER HOUSING, AND RUBBER DOOR GASKET

1. Clean the water supply hose net filter often under running water.
2. Use a brush to clean the entire appliance rinsing section, especially the nozzles on the upper side of the rinsing chamber.
3. After every wash, wipe the rubber door gasket to extend its useful life.
CLEANING THE PUMP FILTER
During cleaning, some water may be spilled. It is therefore recommended to place an absorbent cloth on the floor.
Make sure the water has cooled down before you release it from the appliance.

1 Open the pump filter cap using a suitable tool (flat screwdriver or a similar tool).
2 Pull out the water outlet spout before cleaning the pump filter.
Rotate the pump filter slowly in the counterclockwise direction.
Remove the pump filter to allow the water to slowly drain.
3 Clean the filter under running water.
4 Replace the pump filter as shown in the figure, and fasten it by rotating in the clockwise direction. For a good seal, the filter gasket surface should be clean.
The pump filter must be occasionally cleaned, especially after washing very fleecy, woolly, or very old laundry.
Also clean the pump filter if the appliance cannot start the spinning cycle or when there is debris in the pump (buttons, coins, hair pins or clips etc.).
CLEANING THE APPLIANCE EXTERIOR
⚠️ Always disconnect the appliance from the power mains before cleaning.
Clean the appliance exterior and the display unit using a soft damp cotton cloth and water. Then, use a soft dry cloth to dry the appliance.
Do not use any solvents, abrasive cleaners, or cleaning agents that could damage the appliance (please observe the recommendations and warnings provided by the cleaning agent
If necessary, wipe the appliance door with a damp cloth, and then dry with a dry soft cloth as well.
Do not clean the appliance with a jet of water!

TROUBLESHOOTING
WHAT TO DO ...?
The appliance will automatically control the operation of particular functions during the washing cycle. If any irregularity is identified, this will be indicated by reporting (F:XX) on the display. The appliance will report the error until it is switched off. Disturbances from the environment (e.g. the power grid) may result in various fault reports (see TROUBLESHOOTING TABLE). In such case:
- Switch off the appliance and wait for a few seconds.
- Switch on the appliance and restart the washing programme.
- Most errors during operation can be resolved by the user (see TROUBLESHOOTING TABLE).
- If the error persists, call an authorized service unit. • Repairs may only be carried out by an adequately trained person.
- Repair or any warranty claim resulting from incorrect connection or use of the appliance shall not be covered by the warranty. In such cases, the costs of repair shall be charged to the user.
The warranty does not cover the errors or failures resulting from disturbances from the environment (lightning strike, power grid failures, natural disasters etc.).
TROUBLESHOOTING TABLE
For the washing programmes
| Error indication on the display unit | Problem/error What to do? | |
| F01 | Water inflow fault | Check the following:Is the water supply tap open and is the pressure too low?Is the water supply hose pinched?Is the filter on the water supply hose clogged?Is the hose frozen? |
| F03 | Drainage fault | PCheck the following:Is the hose pinched, does the water flow through it?Is the filter on the drain hose clogged?Is the hose frozen? |
| F04/F05/F06/F07/F23 | Electronic module fault | Switch off the appliance by pressing the ON/OFF (9) button and holding it for at least 3 seconds. Press the START/PAUSE (8) button again. If the error reoccurs, call a service technician. |
| F24 | Water level reaches overflow level | Stop the programme by pressing the START/ PAUSE (8) button. Restart the programme. If the appliance continues to pump water into the tub, close the water tap and call a service technician. |
| F13 | Error while locking the door. | Door is closed, but it cannot be locked. Switch off the washing machine. Switch it back on and restart the washing programme.If the error reoccurs, call a service technician. |
| F14 | Error while unlocking the door. | Door is closed, but it cannot be unlocked. Turn off the appliance, then turn it back on. If the error reoccurs, call a service technician. To open the door, see chapter »PAUSING AND CHANGING THE PROGRAMME/Opening the door manually«. |
| Unb Unbalance alarm • Switch off the appliance by pressing the ON/OFF (9) button and holding it for at least 3 seconds.Open the door and redistribute the laundry in the drum.Press the SPIN (4) button and restart the spinning cycle.If the error reoccurs, call a service technician. | ||
For the drying programmes
| Error What to do (recommended)? | |
| The appliance does not carry out the drying programme. | Check the following:Have you set/selected the drying programme?Is the water tap open?Is the door properly closed?Is there excessive amount of laundry in the drum, based on the information in the table? Dry the laundry separately. |
| Drying is not effective. • Check the following:Is there too much laundry in the appliance? This can result in incomplete drying of the clothes. Split the load in half and dry in two batches.Did you dry different types of laundry (laundry that is easier to dry and laundry that takes longer to dry) together? | |
| Drying time is too long. Check the following:Is there too much laundry in the appliance? Double-check the suitability of the laundry programmes using the programme table and dry a part of the load separately.Is the laundry properly spun?Are you drying several thick garments together? | |
SERVICING
Before calling a service technician
When you contact a service centre, please state your appliance's type (1), code/ID (2), model number (3), and serial number (4).
Type, code/ID, model, and serial number are indicated on the rating (type) plate located on the front side of the appliance door opening.
In case of a failure/fault, only use approved spare parts from authorized manufacturers. Repair or any warranty claim resulting from incorrect connection or use of the appliance shall not be covered by the warranty. In such cases, the costs of repair shall be charged to the user.


Additional equipment and maintenance accessories are available on our website at www.gorenje.com.
RECOMMENDATIONS FOR WASHING AND ECONOMIC USE OF YOUR APPLIANCE
Wash new coloured garments separately the first time.
Wash heavily soiled laundry in smaller amounts, with more powder detergent or with a prewash cycle.
Apply a special stain remover on stubborn stains before the wash. We recommend consulting the STAIN REMOVAL TIPS.
With slightly soiled laundry, we recommend a program without a pre-wash, use of shorter programs, and a lower washing temperature.
If you often wash laundry at low temperatures and with liquid detergents, bacteria may spawn which can cause odour in the appliance. To prevent such odour, we recommend occasionally running the Steril Tub self-cleaning programme (see PROGRAMME TABLE).
We recommend avoiding washing very small amounts of laundry as this will lead to excessive use of energy and poorer appliance performance.
Loosen any folded laundry before putting it into the drum. Only use detergents for machine washing.
Add powder or liquid detergents as instructed by the manufacturer, according to the washing temperature and selected washing programme.
When using highly concentrated detergents, use special-purpose dosing cups (supplied with the detergent) and place them directly in the appliance drum.
If water hardness exceeds 14° dH, water softener should be used. Heater damage resulting from incorrect use of water softeners shall not be covered by the warranty. Check the information on water hardness with your local water supply company or authority.
Use of chlorine-based bleaches is not recommended as they can damage the heater.
If you use a descaling agent, bleach, or dye, only use the kind that is suitable for use in the appliance.
Do not use solvents or similar chemicals (e.g., paint thinner, turpentine, gasoline, etc.)!
Do not add hardened lumps of powder detergent into the detergent dispenser, as this may clog the piping in the appliance.
When using thick liquid laundry care products, we recommend diluting them with water to prevent clogging the dispenser tray drain.
Liquid detergents are intended for washing programmes without a prewash cycle.
At higher spinning rates, there will be less residual moisture in the laundry. As a result, drying in a tumble dryer will be more economical and faster.
| Water hardness | Hardness levels | |||
| °dH (°N) m mol/l °fH(°F) p.p.m. | ||||
| 1 - soft < 8,4 < 1,5 < 15 < 150 | ||||
| 2 - normal 8,4 - 14 1,5 - 2,5 15 - 25 150 - 250 | ||||
| 3 - hard > 14 > 2,5 > 25 > 250 | ||||
Check the information on water hardness with your local water supply company or authority.

Symbols of detergent dispenser compartments
We recommend adding powder detergent immediately before the washing cycle. If you add it sooner, make sure the detergent compartment in the dispenser tray is completely dry before adding the powder detergent; otherwise, the powder detergent may cake before the start of the washing process.
Pour the conditioner into the dispenser tray, into the compartment with the symbol ✿. Observe the recommendation on the conditioner packaging.
Do not fill the conditioner compartment over the max. indication (maximum indicated level). Otherwise, the conditioner will be added to the laundry too soon, leading to poorer washing effect.
Keep detergents and additives out of reach of children.
Liquid detergents can be used for prewash; however, a powder detergent has to be used for the main wash in this case.
STAIN REMOVAL TIPS
Before using special-purpose stain removers, try using the natural methods that do not harm the environment on less stubborn stains.
However, prompt action is required! Soak the stain with an absorbent sponge or a paper towel; then, rinse with cold (lukewarm) water – but never with hot water!
| Stains Stain removal | |
| Mud When the stain is dry, first scrape it off the garment before washing it in the appliance. If the stain is stubborn, soak it with an enzyme-based stain remover before the wash. If the stain is not stubborn, wash the laundry with liquid detergent or powder detergent and water before the wash. | |
| Antiperspirant Before washing in the appliance, apply liquid detergent onto the laundry.Apply stain removers on any stubborn stains. | |
| Tea Soak or rinse the laundry in cold water and add stain remover if necessary. | |
| Chocolate Soak or rinse the laundry with lukewarm soapy water. Then, apply lemon juice and rinse. | |
| Ink Before washing in the appliance, apply stain removers on the stain. You may also use denatured alcohol. Turn the garment inside out and place a paper towel under the stain. Use the alcohol on the back side of the stain. At the end of the process, thoroughly rinse the garment. | |
| Felt tip pens Dilute some starch in water and apply it to the stain. When it dries, scrape it off with a brush; then, wash the garment in the appliance. | |
| Baby food (urine, mud, food stains) | Before washing in the appliance, soak the stains in lukewarm water for at least half an hour. For easier stain removal, add an enzyme-based stain remover. |
| Grass Before washing in the appliance, soak the laundry in an enzyme-based stain remover. | |
| Eggs Soak the garment in an enzyme-based stain remover. Soak in cold water for at least 30 minutes or a few hours if the stains are stubborn. Then, wash it in the appliance. | |
| Coffee Soak the garment in salt water. If the stain is not fresh, soak it with a mixture of glycerine, ammonia and alcohol. | |
| Shoe polish Apply cooking oil to the stain and rinse. | |
| Blood Fresh stain – rinse the garment with cool water and wash it in the appliance. Dried stain – soak the garment in an enzyme-based stain remover. Then, wash it in the appliance. | |
| Glue, chewing gum | Place the garment in a bag and put it in the freezer until the stain hardens. Then, remove it with a blunt knife. Then, dilute the stain with a pre-wash stain remover and rinse thoroughly. Then, wash the laundry as usual. |
| Makeup Use a stain remover for the prewash; then, wash in the appliance. | |
| Butter Before washing in the appliance, apply stain remover to the stain. Then, rinse with hot water (as hot as the fabric will allow). | |
| Milk Soak the garment in an enzyme-based stain remover. Soak for at least 30 minutes or a few hours if the stains are stubborn. Then, wash it in the appliance. | |
| Fruit juice Apply a mixture of salt and water on the stain. Leave to take effect for a while, then rinse. You can apply sodium bicarbonate, distilled vinegar or lemon juice on the stain before washing in the appliance. For old stains, use glycerine. After 20 minutes, rinse with cold water, then wash the laundry in the appliance. | |
| Wine Soak the laundry in cold water for at least 30 minutes. Also, use a stain remover. Then, wash it in the appliance. | |
| Wax Put the garment into the freezer until the wax hardens. Then, scrape it off.Remove the remaining wax by placing a paper towel onto the stain, and then heat it with an iron until the paper absorbs the wax. | |
| Sweat Before washing in the appliance, rub liquid detergent thoroughly into the stain. | |
| Chewing gum Put the garment into the freezer until the chewing gum hardens. Then, scrape it off. Then, wash it in the appliance. | |
DISPOSAL

Packaging is made of environmentally friendly materials that can be recycled, disposed of, or destroyed without any hazard to the environment. To this end, packaging materials are labelled appropriately.
The symbol on the product or its packaging indicates that the product should not be treated as normal household waste. Take the product to an authorized collection centre for waste electric and electronic equipment processing.
When disposing of an appliance at the end of its useful life, remove all detergent residue and power cord, and destroy the door latch and switch to prevent the door from locking or latching (child safety).
This appliance is labelled in accordance with the European Waste Electric and Electronic (WEEE) Directive.
Correct disposal of the product will help prevent any negative effects on the environment and health of people, which could occur in case of incorrect product removal. For detailed information on removal and processing of the product, please contact the relevant municipal body in charge of waste management, your waste disposal service, or the store where you bought the product.
SPECIFICATION
Pursuant to the Regulation (EU) No. 90/60/EC
| Model name WD85XX WD105XX | ||
| Energy Efficiency | ||
| A (maximum efficiency) to G (lowest efficiency) A | ||
| Washing, spinning, drying 5,44 kWh 6,80 kWh | ||
| Washing, spinning 0,82 kWh 0,92 kWh | ||
| Washing performance class | ||
| A (maximum performance) to G (lowest performance) A | ||
| Water extraction performance class | ||
| A (maximum performance) to G (lowest performance) A | ||
| Residual moisture 44 % | ||
| Maximum spin speed 1400 rpm | ||
| Load / capacity | ||
| Washing 8 kg 10 kg | ||
| Drying 5 kg 7 kg | ||
| Water consumption | ||
| Washing, spinning, drying 121 l 160 l | ||
| Washing, spinning 60 l 70 l | ||
| Program duration | ||
| Washing, spinning, drying | 648 min | 675 min |
| Washing, spinning | 315 min | 315 min |
| Programs specified on the rating plate and label | Wash(Cotton60°C+1400rpm)Dry(Cotton Dry+Time dry till »-- --- shows) | |
| Estimated annual consumption for a 4-person household, always using the drier (200 cycles) | ||
| Energy consumption 1212 kWh/year 1360 kWh/year | ||
| Water consumption | 24200 l | 32000 l |
| Estimated annual consumption for a 4-person household, always using the drier (200 cycles) | ||
| Energy consumption | 164 kWh/year | 184 kWh/year |
| Water consumption | 12000 l | 14000 l |
Energy consumption of drying programs was measured under conditions specified according to the EN50229 standard.
- The first drying cycle has to be completed with a 7-kg load (the load consists of 2 bed sheets, 12 pillow covers, and 26 towels) by selecting the Cotton Dry + Time Dry, until »-- ---« appears.
- The second drying cycle has to be completed with a 3-kg load (the load consists of 2 bed sheets, 4 pillow covers, and 4 towels) by selecting the Cotton Dry + Time Dry, until »--- ---« appears.
(To adjust the weight, 1 or 2 towels may be added or removed.)
Due to deviations in terms of type and amount of laundry, spinning, power supply oscillation, and environment temperature and humidity, the programme duration and power consumption values measured at the end user may differ from the ones stated in the table.
We reserve the right to any changes and errors in the instructions for use..
- DETAILED INSTRUCTIONS FOR USE OF THE APPLIANCE
- CONTENTS
- SAFETY PRECAUTIONS
- BEFORE CONNECTING THE APPLIANCE TO THE POWER MAINS, WAIT FOR AT LEAST 2 HOURS UNTIL IT REACHES ROOM TEMPERATURE
- CHILD SAFETY
- DANGER OF HOT SURFACE
- PROTECTION AGAINST EXCESSIVE WATER LEVEL (WHEN THE APPLIANCE IS SWITCHED ON ⚠️)
- TRANSPORT/TRANSPORT AFTER INSTALLATION
- APPLIANCE DESCRIPTION
- FRONT
- BACK
- TECHNICAL SPECIFICATIONS
- (DEPENDING ON THE MODEL)
- CONTROL UNIT
- INSTALLATION AND CONNECTION
- REMOVING THE BLOCKING SCREWS/RODS
- MOVING AND TRANSPORT AFTER INSTALLATION
- SELECTING THE ROOM
- ADJUSTING THE APPLIANCE FEET
- ADJUSTING THE BOTTOM COVER
- SOUND INSULATION
- APPLIANCE CLEARANCE
- OPENING THE APPLIANCE DOOR (BIRD'S-EYE VIEW)
- CONNECTING THE APPLIANCE TO WATER SUPPLY
- AQUA-STOP (ONLY IN SOME MODELS)
- CONNECTING AND SECURING THE DRAIN HOSE
- CONNECTING THE APPLIANCE TO THE POWER MAINS
- BEFORE USING THE APPLIANCE FOR THE FIRST TIME
- USE OF THE APPLIANCE, STEP BY STEP (1 – 7)
- STEP 2: PREPARING THE LAUNDRY
- SWITCHING THE APPLIANCE ON
- LOADING THE APPLIANCE
- STEP 3: CHOOSING A PROGRAMME
- CHOOSING THE DETERGENTS AND ADDITIVES
- STEP 4: SELECTING ADDITIONAL SETTINGS AND FUNCTIONS
- TEMP. (WASHING TEMPERATURE)
- RINSE
- SPIN
- CHILD LOCK
- MUTE (SWITCHING OFF THE ACOUSTIC SIGNALS)
- PREWASH/INTENSIVE
- DRY LEVEL
- DELAY
- TIME OPTIMIZATION DURING THE PROGRAMME PROGRESS
- STEP 5: PROGRAM START
- STEP 6: CHANGING THE WASHING PROGRAMME OR MANUAL (PHYSICAL) PROGRAM TERMINATION
- STEP 7: END OF PROGRAM
- PAUSING AND CHANGING THE PROGRAMME
- MANUAL PAUSE AND RESET
- START/PAUSE BUTTON ▶II
- ADDING/REMOVING LAUNDRY DURING APPLIANCE OPERATION
- FAULTS
- POWER OUTAGE
- OPENING THE DOOR MANUALLY IN CASE OF A POWER OUTAGE – IN CASE OF A PROGRAM PAUSE
- OPENING THE DOOR (PAUSE/CANCEL - CHANGE PROGRAMME)
- MAINTENANCE & CLEANING
- CLEANING THE DISPENSER TRAY
- CLEANING THE WATER SUPPLY HOSE NET FILTER, DETERGENT DISPENSER HOUSING, AND RUBBER DOOR GASKET
- CLEANING THE PUMP FILTER
- CLEANING THE APPLIANCE EXTERIOR
- ⚠️ ALWAYS DISCONNECT THE APPLIANCE FROM THE POWER MAINS BEFORE CLEANING
- TROUBLESHOOTING
- WHAT TO DO
- TROUBLESHOOTING TABLE
- SERVICING
- BEFORE CALLING A SERVICE TECHNICIAN
- RECOMMENDATIONS FOR WASHING AND ECONOMIC USE OF YOUR APPLIANCE
- STAIN REMOVAL TIPS
- DISPOSAL
- SPECIFICATION
Brand : GORENJE
Model : WD10514
Category : Washing machine